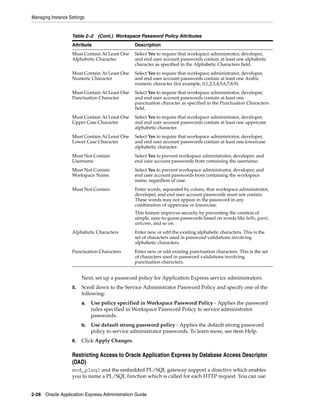
Oracle® Application Express
Administration Guide
Release 4.2 for Oracle Database 12c
E17965-08
May 2013
Oracle Application Express Administration Guide, Release 4.2 for Oracle Database 12c
E17965-08
Copyright © 2003, 2013, Oracle and/or its affiliates. All rights reserved.
Primary Author: Terri Jennings
Contributors: Marco Adelfio, Drue Swadener, Carl Backstrom, Christina Cho, Michael Hichwa, Joel
Kallman, Sharon Kennedy, Scott Spadafore, and Jason Straub
This software and related documentation are provided under a license agreement containing restrictions on
use and disclosure and are protected by intellectual property laws. Except as expressly permitted in your
license agreement or allowed by law, you may not use, copy, reproduce, translate, broadcast, modify, license,
transmit, distribute, exhibit, perform, publish, or display any part, in any form, or by any means. Reverse
engineering, disassembly, or decompilation of this software, unless required by law for interoperability, is
prohibited.
The information contained herein is subject to change without notice and is not warranted to be error-free. If
you find any errors, please report them to us in writing.
If this is software or related documentation that is delivered to the U.S. Government or anyone licensing it
on behalf of the U.S. Government, the following notice is applicable:
U.S. GOVERNMENT END USERS: Oracle programs, including any operating system, integrated software,
any programs installed on the hardware, and/or documentation, delivered to U.S. Government end users
are "commercial computer software" pursuant to the applicable Federal Acquisition Regulation and
agency-specific supplemental regulations. As such, use, duplication, disclosure, modification, and
adaptation of the programs, including any operating system, integrated software, any programs installed on
the hardware, and/or documentation, shall be subject to license terms and license restrictions applicable to
the programs. No other rights are granted to the U.S. Government.
This software or hardware is developed for general use in a variety of information management
applications. It is not developed or intended for use in any inherently dangerous applications, including
applications that may create a risk of personal injury. If you use this software or hardware in dangerous
applications, then you shall be responsible to take all appropriate fail-safe, backup, redundancy, and other
measures to ensure its safe use. Oracle Corporation and its affiliates disclaim any liability for any damages
caused by use of this software or hardware in dangerous applications.
Oracle and Java are registered trademarks of Oracle and/or its affiliates. Other names may be trademarks of
their respective owners.
Intel and Intel Xeon are trademarks or registered trademarks of Intel Corporation. All SPARC trademarks
are used under license and are trademarks or registered trademarks of SPARC International, Inc. AMD,
Opteron, the AMD logo, and the AMD Opteron logo are trademarks or registered trademarks of Advanced
Micro Devices. UNIX is a registered trademark of The Open Group.
This software or hardware and documentation may provide access to or information on content, products,
and services from third parties. Oracle Corporation and its affiliates are not responsible for and expressly
disclaim all warranties of any kind with respect to third-party content, products, and services. Oracle
Corporation and its affiliates will not be responsible for any loss, costs, or damages incurred due to your
access to or use of third-party content, products, or services.
iii
Contents
Preface................................................................................................................................................................. ix
Topic Overview ........................................................................................................................................... ix
Audience....................................................................................................................................................... ix
Documentation Accessibility..................................................................................................................... x
Related Documents ..................................................................................................................................... x
Conventions ................................................................................................................................................. xi
Changes in This Release ....................................................................................................................... xiii
Changes in Oracle Application Express Release 4.2 ............................................................................ xiii
1 Workspace and Application Administration
About the Workspace Administration Page........................................................................................ 1-1
Accessing the Workspace Administration Page............................................................................ 1-3
Resetting Your Password from the Administration Page............................................................ 1-4
Viewing the Application Express Product Information Page ..................................................... 1-4
Managing Files in the Export Repository....................................................................................... 1-6
Managing Websheet Database Objects ........................................................................................... 1-6
About the Manage Service Page............................................................................................................ 1-7
Accessing the Manage Service Page................................................................................................ 1-8
Managing Interactive Report Settings............................................................................................. 1-8
Managing Saved Interactive Reports....................................................................................... 1-8
Managing Interactive Report Subscriptions ........................................................................... 1-9
Making a Service Request ...................................................................................................................... 1-9
Requesting a New Schema, More Storage, or Terminating Service ........................................ 1-10
Determining the Amount of Space Available in Your Workspace.......................................... 1-10
Requesting Another Workspace ................................................................................................... 1-11
Configuring Workspace Preferences ................................................................................................. 1-11
Enabling Account Login Controls for a Workspace .................................................................. 1-11
Enabling Application Builder Development............................................................................... 1-12
Enabling SQL Workshop................................................................................................................ 1-13
Disabling PL/SQL Program Unit Editing for a Workspace ..................................................... 1-13
Managing Team Development...................................................................................................... 1-14
Enabling Team Development................................................................................................. 1-14
Enabling Support for File Attachments in Team Development........................................ 1-14
Defining a Workspace Announcement............................................................................................. 1-15
iv
About the Workspace Utilization Report ......................................................................................... 1-15
Viewing and Emailing the Workspace Summary Report......................................................... 1-16
Understanding User Roles................................................................................................................... 1-16
Managing Application Express Users ............................................................................................... 1-16
Creating New User Accounts........................................................................................................ 1-17
Creating Multiple Users Simultaneously .................................................................................... 1-19
Editing Existing User Accounts .................................................................................................... 1-20
Deleting or Locking User Accounts.............................................................................................. 1-22
Deleting Multiple Users at Once................................................................................................... 1-22
Changing an End User Password................................................................................................. 1-23
Viewing the Users Dashboard....................................................................................................... 1-23
Using Groups to Manage Application Express Users ............................................................... 1-24
Creating a Group ..................................................................................................................... 1-24
Editing an Existing User Group............................................................................................. 1-24
Adding and Removing Users from a Group ....................................................................... 1-25
Purging the Developer Activity and Click Count Log Files ......................................................... 1-25
Purging the Developer Activity Log ............................................................................................ 1-26
Purging the External Click Count Log......................................................................................... 1-26
Managing Session State and User Preferences................................................................................ 1-26
Managing Session State.................................................................................................................. 1-27
Removing Session State After Reviewing Session Details................................................. 1-27
Viewing Session State for the Current Session.................................................................... 1-28
Purging Sessions by Age......................................................................................................... 1-28
Purging Session State for the Current Session..................................................................... 1-28
Managing User Preferences........................................................................................................... 1-29
Viewing Preferences by User ................................................................................................. 1-29
Viewing Current User Preferences........................................................................................ 1-29
Purging Preferences for a Specific User................................................................................ 1-30
Purging Current User Preferences ........................................................................................ 1-30
Setting User Preferences ......................................................................................................... 1-31
Removing User Preferences Programmatically................................................................... 1-32
Resetting User Preferences Using a Page Process............................................................... 1-32
Managing Page and Region Caching ................................................................................................ 1-32
Purging Cached Regions................................................................................................................ 1-33
Purging Cached Pages.................................................................................................................... 1-33
Changing Build Status for Multiple Applications ......................................................................... 1-34
Managing Application Models........................................................................................................... 1-35
Deleting an Application Model..................................................................................................... 1-35
Monitoring Activity Within a Workspace ........................................................................................ 1-36
Viewing Developer Activity and Application Change Information ....................................... 1-36
Viewing Application Changes by Developer ............................................................................. 1-37
Viewing Application Changes by Day......................................................................................... 1-37
Viewing Active Sessions ................................................................................................................ 1-37
Viewing Schema Reports ............................................................................................................... 1-38
Viewing Workspace Dashboards ....................................................................................................... 1-38
About the Workspace Dashboard................................................................................................. 1-39
About the Users Dashboard .......................................................................................................... 1-39
v
About the Activity Dashboard...................................................................................................... 1-39
About the Developer Activity Dashboard................................................................................... 1-40
About the Performance Dashboard.............................................................................................. 1-40
About the Websheets Dashboard ................................................................................................. 1-41
About the Applications Dashboard.............................................................................................. 1-41
About the Database Dashboard .................................................................................................... 1-41
Leveraging Application Builder Defaults........................................................................................ 1-42
About Application Builder Defaults ............................................................................................ 1-42
Configuring Application Builder Defaults ................................................................................. 1-42
2 Oracle Application Express Hosted Instance Administration
What Is an Instance Administrator? ..................................................................................................... 2-1
About the Instance Administration Home Page ........................................................................... 2-2
About Instance Tasks ................................................................................................................. 2-2
About Workspace Tasks ............................................................................................................ 2-3
About Language Selector........................................................................................................... 2-3
Accessibility Mode...................................................................................................................... 2-3
About the Manage Instance Page .................................................................................................... 2-3
About the Manage Workspaces Page.............................................................................................. 2-5
Logging In To Oracle Application Express Administration Services ............................................ 2-6
Managing Workspace and Change Requests...................................................................................... 2-7
Viewing Requests on the Instance Administration Home Page ................................................. 2-7
Viewing Pending Requests............................................................................................................... 2-8
Managing Workspace Requests....................................................................................................... 2-9
Approving or Declining a Pending Workspace Request ................................................... 2-10
Changing the Status of an Existing Workspace Request.................................................... 2-11
Deleting a Workspace Request .............................................................................................. 2-11
Managing Change Requests .......................................................................................................... 2-12
Viewing Requests from the All Change Requests Page..................................................... 2-12
Approving or Declining a Pending Change Request ......................................................... 2-12
Managing Instance Settings................................................................................................................ 2-13
Managing Feature Configuration ................................................................................................. 2-13
Disabling PL/SQL Program Unit Editing............................................................................ 2-14
Disabling the Creation of Demonstration Objects in a New Workspace......................... 2-14
Disabling the Creation of Websheet Objects........................................................................ 2-14
Enabling and Disabling SQL Access in Websheets............................................................. 2-15
Configuring Packaged Application Installation Options .................................................. 2-15
Configuring SQL Workshop .................................................................................................. 2-16
Enabling Database Monitoring .............................................................................................. 2-16
Enabling Application Activity Logging ............................................................................... 2-17
Enabling Application Tracing................................................................................................ 2-17
Enabling Service Requests...................................................................................................... 2-18
Configuring Security Settings ....................................................................................................... 2-18
Turning Off Cookies Used to Populate the Login Form ................................................... 2-19
Disabling Access to Oracle Application Express Administration Services..................... 2-19
Disabling Workspace Login Access ...................................................................................... 2-20
Controlling Public File Upload.............................................................................................. 2-21
vi
Restricting User Access by IP Address................................................................................. 2-21
Configuring a Proxy Server for an Instance......................................................................... 2-21
Requiring HTTPS..................................................................................................................... 2-22
Controlling RESTful Access ................................................................................................... 2-24
Configuring Session Timeout................................................................................................. 2-24
Excluding Domains from Regions of Type URL and Web Services................................. 2-25
Configuring Login Controls................................................................................................... 2-25
Enabling Login Controls for All Workspaces...................................................................... 2-26
About Strong Password Policies............................................................................................ 2-27
Configuring Password Policies.............................................................................................. 2-27
Restricting Access to Oracle Application Express by Database Access Descriptor (DAD) .....
2-28
Defining Authorized URLs..................................................................................................... 2-30
Configuring Instance Settings ....................................................................................................... 2-31
Enabling Self Service Workspace Provisioning................................................................... 2-31
Disabling Email Provisioning ................................................................................................ 2-32
Configuring Storage ................................................................................................................ 2-33
Configuring Email ................................................................................................................... 2-35
Configuring Wallet Information............................................................................................ 2-38
Configuring Report Printing .................................................................................................. 2-40
Configuring Online Help........................................................................................................ 2-43
Configuring Workspace Size Options for Requests............................................................ 2-43
Managing Application ID Range........................................................................................... 2-44
Including an Agreement or Survey When Running the Signup Wizard................................ 2-44
Defining an Agreement........................................................................................................... 2-44
Defining a Signup Survey....................................................................................................... 2-44
Purging Inactive Workspaces........................................................................................................ 2-45
Configuring Workspace Purge Settings ............................................................................... 2-45
Viewing Information About Installed Packaged Database Applications............................... 2-46
Viewing Packaged Database Applications........................................................................... 2-46
Viewing Packaged Websheet Applications ......................................................................... 2-47
Monitoring the Progress Packaged Application Installations.................................................. 2-47
Managing Public Themes............................................................................................................... 2-48
Adding a Public Theme to the Theme Repository.............................................................. 2-48
Deleting a Public Theme......................................................................................................... 2-48
Modifying a Public Theme ..................................................................................................... 2-49
About Exporting a Public Theme .......................................................................................... 2-49
Managing Template Applications ................................................................................................ 2-49
Adding an Application to the Template Applications Repository................................... 2-50
Deleting a Template Application .......................................................................................... 2-50
Editing a Template Application............................................................................................. 2-51
Managing Session State.................................................................................................................. 2-51
Viewing Session Details Before Purging .............................................................................. 2-52
Purging Sessions by Age......................................................................................................... 2-52
Viewing Session Statistics Before Purging ........................................................................... 2-52
Managing the Mail Queue ............................................................................................................. 2-53
Viewing Installed Translations ..................................................................................................... 2-53
Managing Interactive Report Subscriptions................................................................................ 2-54
vii
Managing Logs and Files ............................................................................................................... 2-54
Deleting SQL Workshop Logs................................................................................................ 2-54
Deleting Page View Activity Log Entries............................................................................. 2-55
Deleting Developer Activity Log Entries ............................................................................. 2-55
Deleting Click Counting Log Entries .................................................................................... 2-56
Deleting the Login Access Log............................................................................................... 2-56
Managing Log Intervals.......................................................................................................... 2-56
Managing a Runtime Environment.............................................................................................. 2-57
Managing Messages........................................................................................................................ 2-57
Defining a Login Message ...................................................................................................... 2-58
Defining a System Message.................................................................................................... 2-58
Creating a Site-Specific Tasks List......................................................................................... 2-59
About the Self Service Sign Up Wizard ....................................................................................... 2-60
Managing a New Service Signup Wizard ............................................................................ 2-60
Running a New Service Signup Wizard............................................................................... 2-61
Managing Schemas ............................................................................................................................... 2-61
Determining the Oracle Application Express Engine Schema ................................................. 2-61
Understanding Oracle Default Schema Restrictions.................................................................. 2-62
Granting the Privilege to Assign Oracle Default Schemas ................................................ 2-62
Revoking the Privilege to Assign Oracle Default Schemas ............................................... 2-62
Working with Restricted Schemas......................................................................................... 2-63
Determining the Privilege Status........................................................................................... 2-63
Creating Workspaces ............................................................................................................................ 2-64
About Workspace Provisioning.................................................................................................... 2-64
Specifying a Provisioning Mode................................................................................................... 2-65
Creating a Workspace Manually .................................................................................................. 2-66
Creating Workspace Manually in a Full Development Environment ............................. 2-66
Creating a Workspace Manually in a Runtime Environment........................................... 2-67
Creating Multiple Workspaces...................................................................................................... 2-67
Managing Existing Workspaces.......................................................................................................... 2-69
Deleting a Workspace..................................................................................................................... 2-69
Deleting Workspaces in a Full Development Environment.............................................. 2-70
Deleting Workspaces in a Runtime Development Environment...................................... 2-70
About Deleting Inactive Workspaces.................................................................................... 2-70
Locking a Workspace...................................................................................................................... 2-73
Managing Workspace to Schema Assignments.......................................................................... 2-73
Viewing Schema and Workspace Assignments in a Development Environment ......... 2-74
Viewing Schema and Workspace Assignments in a Runtime Environment.................. 2-74
Editing Existing Schema and Workspace Assignments..................................................... 2-74
Associating Additional Schemas with a Workspace .......................................................... 2-75
Removing a Schema Mapping from a Workspace in a Runtime Environment.............. 2-76
Creating a New Schema.......................................................................................................... 2-76
Managing Component Availability.............................................................................................. 2-77
Defining a Workspace Message............................................................................................. 2-78
Performing a Workspace Search................................................................................................... 2-78
Viewing Existing Workspaces....................................................................................................... 2-78
Editing Workspace Details ............................................................................................................ 2-79
viii
Viewing Workspace Details........................................................................................................... 2-79
About the Workspace Summary Report .............................................................................. 2-80
Viewing Workspace Database Privileges .................................................................................... 2-81
Viewing File Size and File Count by Workspace ....................................................................... 2-81
Exporting and Importing a Workspace ....................................................................................... 2-81
Exporting a Workspace........................................................................................................... 2-82
Importing a Workspace........................................................................................................... 2-82
Viewing Application Attributes.................................................................................................... 2-82
Changing Application Build Status Set During Deployment................................................... 2-83
Viewing the Parsing Schemas Report .......................................................................................... 2-84
Managing Users in an Oracle Application Express Instance........................................................ 2-84
Creating New User Accounts........................................................................................................ 2-84
Editing an Existing User Account................................................................................................. 2-86
Deleting User Accounts.................................................................................................................. 2-86
Monitoring Activity Across a Development Instance.................................................................... 2-87
Monitoring Activity ........................................................................................................................ 2-87
Viewing the Signup Survey Report.............................................................................................. 2-89
DBMS_SCHEDULER Jobs In Oracle Application Express ............................................................ A-1
Index
ix
Preface
Oracle Application Express is a hosted declarative development environment for
developing and deploying database-centric web applications. Oracle Application
Express turns a single Oracle database into a shared service by enabling multiple
workgroups to build and access applications as if they were running in separate
databases.
Oracle Application Express Application Administration Guide describes how to perform
administration tasks for an Oracle Application Express workspace, application, or an
entire development instance.
Topics:
■ Topic Overview
■ Audience
■ Documentation Accessibility
■ Related Documents
■ Conventions
Topic Overview
This document contains the following chapters:
Audience
Oracle Application Express Administration Guide is intended for application developers
who are building database-centric web applications using Oracle Application Express.
The guide describes how to use the Oracle Application Express development
environment to build, debug, manage, and deploy applications.
Title Description
Changes in This Release Describes changes in this document for Oracle
Application Express, release 4.2.
Workspace and Application
Administration
Describes how to perform Workspace administration
tasks and access many of these reports.
Oracle Application Express
Hosted Instance Administration
Describes tasks an Oracle Application Express
administrator performs when administering an Oracle
Application Express hosted instance.
x
To use this guide, you must have a general understanding of relational database
concepts and an understanding of the operating system environment under which you
are running Oracle Application Express.
Documentation Accessibility
For information about Oracle's commitment to accessibility, visit the Oracle
Accessibility Program website at
http://www.oracle.com/pls/topic/lookup?ctx=acc&id=docacc.
Access to Oracle Support
Oracle customers have access to electronic support through My Oracle Support. For
information, visit
http://www.oracle.com/pls/topic/lookup?ctx=acc&id=info or visit
http://www.oracle.com/pls/topic/lookup?ctx=acc&id=trs if you are
hearing impaired.
Related Documents
For more information, see these Oracle resources:
■ Oracle Application Express Release Notes
■ Oracle Application Express Installation Guide
■ Oracle Database 2 Day + Oracle Application Express Developer's Guide
■ Oracle Application Express End User's Guide
■ Oracle Application Express Application Builder User's Guide
■ Oracle Application Express SQL Workshop Guide
■ Oracle Application Express API Reference
■ Oracle Application Express Migration Guide
■ Oracle Database Concepts
■ Oracle Database Advanced Application Developer's Guide
■ Oracle Database Administrator's Guide
■ Oracle Database SQL Language Reference
■ SQL*Plus User's Guide and Reference
For additional documentation available on Oracle Technology Network (OTN), visit
the Oracle Application Express website located at:
http://www.oracle.com/technetwork/developer-tools/apex/overview/index.h
tml
For additional application examples, go to the Learning Library. Search for free online
training content, including Oracle by Example (OBE), demos, and tutorials. To access
the Oracle Learning Library, go to:
http://www.oracle.com/technetwork/tutorials/index.html
Printed documentation is available for sale in the Oracle Store at:
See Also: Oracle Database 2 Day + Oracle Application Express
Developer's Guide
xi
http://shop.oracle.com/
If you have a user name and password for OTN, then you can go directly to the
documentation section of the OTN website at:
http://www.oracle.com/technetwork/indexes/documentation/index.ht
ml
Conventions
The following text conventions are used in this document:
Convention Meaning
boldface Boldface type indicates graphical user interface elements associated
with an action, or terms defined in text or the glossary.
italic Italic type indicates book titles, emphasis, or placeholder variables for
which you supply particular values.
monospace Monospace type indicates commands within a paragraph, URLs, code
in examples, text that appears on the screen, or text that you enter.
xii
xiii
Changes in This Release
This preface contains:
■ Changes in Oracle Application Express Release 4.2
Changes in Oracle Application Express Release 4.2
The following are changes in Oracle Application Express Administration Guide for Oracle
Application Express release 4.2.
New Features
The following features are new in this release:
■ Team Development Attachments
Developers can now add external documents as attachments to features, bugs, and
ToDos.
See "Enabling Support for File Attachments in Team Development" on page 1-14.
■ Manage Packaged Applications
– Configure Packaged Application Authentication Options
Instance administrators can define authentication options for packaged
application.
See "Configuring Packaged Application Installation Options" on page 2-15.
– View Information About Installed Packaged Application
Instance administrators can view the popularity of any given packaged
database and Websheet application on a given instance.
See "Viewing Information About Installed Packaged Database Applications"
on page 2-46.
– Monitoring the Progress of Packaged Application Installations
Instance administrators can monitor users and installation performance of
packaged applications.
See "Monitoring the Progress Packaged Application Installations" on
page 2-47.
■ Instance Proxy
Proxies can now be defined at the instance level superseding those at the
application and Web Service reference level.
xiv
See "Configuring a Proxy Server for an Instance" on page 2-21.
■ All Outbound traffic HTTPS
When enabled, this new instance setting requires that all outbound traffic use the
HTTPS protocol.
See "Requiring HTTPS" on page 2-22.
■ Bigfile Tablespace
When a workspace is provisioned and Oracle Application Express is creating the
associated database user, tablespace, and datafile, the underlying tablespace can
be created as a bigfile tablespace that can grow to a very large size (terabytes),
overcoming the limitation of smallfile tablespaces.
See "Enabling Bigfile Tablespaces" on page 2-33.
■ Encrypted Tablespace
Tablespaces created by Oracle Application Express when provisioning a
workspace can be created as an encrypted tablespace, assuming the database
administrator has created and opened an encryption wallet with a master
encryption key set.
See "Enabling Encrypted Tablespaces" on page 2-34.
■ Manage Application ID Range
Instance administrators can control the range for IDs of new database or Websheet
applications.
See "Managing Application ID Range" on page 2-44.
■ Create Multiple Workspaces
Instance administrators can now utilize a wizard to provision multiple workspaces
at once.
See "Creating Multiple Workspaces" on page 2-67.
■ Enable Application Tracing
Instance administrators can enable or disable application tracing to control when
database trace files can be created by an application which has Debug enabled.
See "Enabling Application Tracing" on page 2-17.
■ Reporting on Interactive Report Subscriptions
Enables instance administrators to monitor and review interactive report
subscriptions.
See "Managing Interactive Report Subscriptions" on page 2-54.
■ Failed Login Handling
Administrators can define a period of time users must wait following each failed
login attempt. Administrators can also define a lockout period following a
specified number of failed attempts.
See "Configuring Login Controls" on page 2-25.
■ Define Resource Consumer Group
Instance administrators can associate a workspace with a Resource Consumer
Group to better manage the resource utilization of different workspaces within a
shared environment.
xv
See "Editing Workspace Details" on page 2-79.
Other Changes
The following are additional changes in the release:
■ All content has been updated to reflect new functionality.
■ Screen captures and graphics have been added and updated to reflect Oracle
Application Express release 4.2 user interface enhancements.
xvi
Workspace and Application Administration 1-1
1
Workspace and Application Administration
In an Oracle Application Express development environment, users log in to a shared
work area called a workspace. A workspace is a virtual private database that enables
multiple users to work within the same Oracle Application Express installation while
keeping their objects, data and applications private. This flexible architecture enables a
single database instance to manage thousands of applications.
Developers can create and edit applications and view developer activity, session state,
workspace activity, application, and schema reports. Workspace administrators
additionally can create and edit user accounts, manage groups, and manage
development services. This section describes how to perform Workspace
administration tasks and access many of these reports.
Topics:
■ About the Workspace Administration Page
■ About the Manage Service Page
■ Making a Service Request
■ Configuring Workspace Preferences
■ Defining a Workspace Announcement
■ About the Workspace Utilization Report
■ Understanding User Roles
■ Managing Application Express Users
■ Purging the Developer Activity and Click Count Log Files
■ Managing Session State and User Preferences
■ Managing Page and Region Caching
■ Changing Build Status for Multiple Applications
■ Managing Application Models
■ Monitoring Activity Within a Workspace
■ Viewing Workspace Dashboards
■ Leveraging Application Builder Defaults
About the Workspace Administration Page
Use the Workspace Administration page to manage your application development
environment.
About the Workspace Administration Page
1-2 Oracle Application Express Administration Guide
The top of Workspace Administration page contains the following icons:
■ Manage Services links to the Manage Service page. Use this page to manage
service requests (including, schema requests, storage requests, and service
termination) and configure workspace preferences, edit announcements, view
utilization reports and log files, and manage session state and application models.
See "About the Manage Service Page" on page 1-7.
■ Manage Users and Groups links to the Manage Users page. Use this page to
manage Application Express user accounts and user groups. See "Managing
Application Express Users" on page 1-16.
■ Monitor Activity links to the Monitor Activity page. Use this page to monitor
changes to page views, developer activity, page view analysis, and active sessions.
It also shows reports on such information as login attempts and external click
counts. See "Monitoring Activity Within a Workspace" on page 1-36.
■ Dashboards links to the Dashboard page. Use this page to view details about the
current workspace and monitor users, activity, developer activity, performance,
Websheet application development, application development, and view database
details. See "Viewing Workspace Dashboards" on page 1-38.
About Tasks
A Tasks list displays on the right side of the page and displays the following links:
About the Workspace Administration Page
Workspace and Application Administration 1-3
■ Change My Password links to the Change Password page. See "Resetting Your
Password from the Administration Page" on page 1-4.
■ About Application Express links to an About page that lists basic product
information. See "Viewing the Application Express Product Information Page" on
page 1-4.
■ Change Password links to a form you can use to change your password. See
"Resetting Your Password from the Administration Page" on page 1-4.
■ Manage User Groups links to the User groups page. See "Using Groups to
Manage Application Express Users" on page 1-24.
■ Create User links to a form where you can create new user. See "Creating New
User Accounts" on page 1-17.
■ Create Multiple Users enables you to create multiple users once. See "Creating
Multiple Users Simultaneously" on page 1-19.
■ Delete Multiple Users enables you to delete multiple users at once. See "Deleting
Multiple Users at Once" on page 1-22.
■ Manage Interactive Report Settings enables you to manage saved reports and
subscriptions. See "Managing Interactive Report Settings" on page 1-8.
■ Manage Export Repository links to the Manage Export Repository. See "Managing
Files in the Export Repository" on page 1-6.
■ Websheet Database Objects displays the Websheet Database Objects page. See
"Managing Websheet Database Objects" on page 1-6.
Workspace Announcements
The Workspace Announcements region displays directly below the icons at the top of
the Workspace Administration page. Use this display to communicate information to
other users. See "Defining a Workspace Announcement" on page 1-15.
About Dashboards
The Dashboards region displays links to specific dashboards. See "Viewing Workspace
Dashboards" on page 1-38.
Topics:
■ Accessing the Workspace Administration Page
■ Resetting Your Password from the Administration Page
■ Viewing the Application Express Product Information Page
■ Managing Files in the Export Repository
Accessing the Workspace Administration Page
Use the Administration page to manage your application development environment.
To access the Administration page:
1. Log in to Oracle Application Express. See "Logging In To Oracle Application
Express" in Oracle Application Express Application Builder User's Guide.
The Workspace home page appears.
2. Click the Administration icon.
The Administration page appears.
About the Workspace Administration Page
1-4 Oracle Application Express Administration Guide
Resetting Your Password from the Administration Page
To reset your password from the Administration page:
1. Log in to Oracle Application Express. See "Logging In To Oracle Application
Express" in Oracle Application Express Application Builder User's Guide.
The Workspace home page appears.
2. Click the Administration icon.
The Administration page appears.
3. On the Tasks list, click Change Password.
4. In Change Password, enter the following:
■ Enter Current Password - Enter your current password.
■ Enter New Password - Enter your new password.
■ Confirm New Password - Enter your new password again.
5. Click Apply Changes.
Viewing the Application Express Product Information Page
The About Application Express page lists basic product information. You can access
the About Application Express page from the Workspace Administration page.
To view the About Application Express page:
1. Navigate to the Workspace home page.
2. Click the Administration icon.
The Workspace Administration page appears.
3. On the Tasks list, click About Application Express.
The About Application Express page appears. The page is divided into these
sections: About; Visit Oracle Online For More Information; CGI Environment; and
Database Version.
See Also: "Changing an End User Password" on page 1-23
About the Workspace Administration Page
Workspace and Application Administration 1-5
About
The About section displays the following information:
■ Product build
■ Schema compatibility
■ Last DDL time
■ Host schema
■ Application Owner
■ Workspace ID
■ Workspace Name
■ Current user
■ Language Preference
■ Current Time (on server)
Oracle Online For More Information
Oracle Online For More Information contains links to Oracle Technology Network and
Oracle Technology Network Discussion Forum.
About the Workspace Administration Page
1-6 Oracle Application Express Administration Guide
CGI Environment
Common Gateway Interface (CGI) Environment provides information about the
currently installed web server software such as currently defined parameters and
variables.
Database Version
Database Version lists details about the currently installed database version.
Character Set
Character Set lists currently selected character sets. The selected character set
determines the encoding scheme used to display characters on screen.
Managing Files in the Export Repository
Use the Manage Export Repository page to manage files in the current workspace.
To access the Manage Export Repository page:
1. Navigate to the Workspace home page.
2. Click the Administration icon.
The Workspace Administration page appears.
3. On the Tasks list, click Manage Workspace Files.
The Manage Export Repository page appears.
You can customize the appearance of the page using the Search bar at the top of
the page. See "Customizing Interactive Reports" in Oracle Application Express
Application Builder User's Guide.
4. To remove a file, select the file and click Delete Checked.
Managing Websheet Database Objects
All Websheet application data is stored within tables owned by a schema associated
with this workspace. The tables are all prefixed by APEX$_. Use this page to manage
these tables.
To access the Manage Export Repository page:
1. Navigate to the Workspace home page.
2. Click the Administration icon.
The Workspace Administration page appears.
3. On the Tasks list, click Websheet Database Objects.
The Websheet Database Objects page appears.
4. Select one of the following:
■ Remove Websheet Database Objects
■ Validate Websheet Database Objects
About the Manage Service Page
Workspace and Application Administration 1-7
About the Manage Service Page
You can use the Manage Service page to manage service requests, configure workspace
preferences, edit workspace announcements, and view workspace utilization reports.
Additionally, use the links on the Manage Meta Data list to manage log files, session
state, page and region caching, application build status, application models, and view
the Workspace Utilization report.
The Manage Service page contains the following icons:
■ Make a Service Request. Use this link to request a new schema, request additional
storage space, or terminate a workspace. See "Making a Service Request" on
page 1-9.
■ Set Workspace Preferences. Use this link to configure login controls, Application
Builder, SQL Workshop, and Team Development and enable support for PL/SQL
editing. See "Configuring Workspace Preferences" on page 1-11.
■ Edit Announcement. Use this link to create a message that displays on the
Workspace home page and on the Workspace Administration page. See "Defining
a Workspace Announcement" on page 1-15.
■ Workspace Utilization. Use this link to view a summary report about the current
workspace. See "About the Workspace Utilization Report" on page 1-15.
About Manage Meta Data
The Manage Meta Data list displays on the right side of the page and displays the
following links:
■ Developer Activity and Click Count Logs. See "Purging the Developer Activity
and Click Count Log Files" on page 1-25.
■ Session State. See "Managing Session State and User Preferences" on page 1-26.
■ Application Cache. See "Managing Page and Region Caching" on page 1-32.
■ Websheet Database Objects displays the Websheet Database Objects page. See
"Managing Websheet Database Objects" on page 1-6.
■ Application Build Status. See "Managing Build Status in Workspace
Administration" on page 1-34.
■ Application Models. See "Managing Application Models" on page 1-35.
■ Utilization Page. See "About the Workspace Utilization Report" on page 1-15.
■ Interactive Report Settings. See "Managing Interactive Report Settings" on
page 1-8.
About the Manage Service Page
1-8 Oracle Application Express Administration Guide
About Dashboards
The Dashboards link displays links to specific dashboards. See "Viewing Workspace
Dashboards" on page 1-38.
Topics:
■ Accessing the Manage Service Page
■ Managing Interactive Report Settings
Accessing the Manage Service Page
To access the Manage Service page:
1. Log in to Oracle Application Express. See "Logging In To Oracle Application
Express" in Oracle Application Express Application Builder User's Guide.
The Workspace home page appears.
2. Click the Administration icon.
The Administration page appears.
3. Click Manage Service.
The Manage Service page appears.
Managing Interactive Report Settings
Interactive reports include components that enable users to alter the layout of report
data. Users can then save the report or receive updated versions of a report by
subscribing to it. To learn more, see "Customizing Interactive Reports" in Oracle
Application Express Application Builder User's Guide.
Topics:
■ Managing Saved Interactive Reports
■ Managing Interactive Report Subscriptions
Managing Saved Interactive Reports
Both developers and end users can save interactive reports. However, only a
developer can save the report that initially displays (called the Primary Default) or
create an Alternative report.
There are four types of saved interactive reports:
■ Primary Default (Developer Only). This is the report that initially displays.
Primary Default reports cannot be renamed or deleted.
■ Alternative Report (Developer Only). Enables developers to create multiple report
layouts. Only developers can save, rename, or delete an Alternative Report.
■ Public Report (End user). Can be saved, renamed, or deleted by the end user who
created it. Other users can view and save the layout as another report.
■ Private Report (End user). Only the end user that created the report can view,
save, rename, or delete the report.
Workspace administrators can view and manage these reports on the Saved Reports
page.
See Also: "About the Manage Service Page" on page 1-7
Making a Service Request
Workspace and Application Administration 1-9
To manage saved interactive reports:
1. Navigate to the Workspace home page.
2. Click the Administration icon.
The Administration page appears.
3. From the Tasks list, click Manage Interactive Report Settings.
The Manage Interactive Report Settings page appears.
4. Click Saved Reports.
The Saved Reports page appears.
You can customize the appearance of the page using the Search bar at the top of
the page. See "Customizing Interactive Reports" in Oracle Application Express
Application Builder User's Guide.
5. To link to an application, page or region, click the appropriate hyperlink.
6. To delete a report:
a. Select the report to be removed.
b. Click Delete Checked.
Managing Interactive Report Subscriptions
End users can receive updated versions of a report by subscribing to it. Workspace
administrators can view and manage these subscriptions on the Subscriptions page.
To manage interactive report subscriptions:
1. Navigate to the Workspace home page.
2. Click the Administration icon.
The Administration page appears.
3. From the Tasks list, click Manage Interactive Report Settings.
The Manage Interactive Report Settings page appears.
4. Click Subscriptions.
The Subscriptions page appears.
You can customize the appearance of the page using the Search bar at the top of
the page. See "Customizing Interactive Reports" in Oracle Application Express
Application Builder User's Guide.
5. To link to an application, page or region, click the appropriate hyperlink.
6. To delete a subscription:
a. Select the subscription to be removed.
b. Click Delete Checked.
Making a Service Request
Use the Request Service page to request a new schema, additional storage space, or to
terminate a workspace.
See Also: "Managing Workspace and Change Requests" on page 2-7
Making a Service Request
1-10 Oracle Application Express Administration Guide
Topics:
■ Requesting a New Schema, More Storage, or Terminating Service
■ Determining the Amount of Space Available in Your Workspace
■ Requesting Another Workspace
Requesting a New Schema, More Storage, or Terminating Service
To make a service request:
1. Log in to Oracle Application Express. See "Logging In To Oracle Application
Express" in Oracle Application Express Application Builder User's Guide.
The Workspace home page appears.
2. Click the Administration icon.
The Administration page appears.
3. Click Manage Service.
4. Click Make a Service Request.
5. Select one of the following:
a. Request Schema
b. Request Storage
c. Request Termination
6. If Request Schema, specify the following:
a. Schema - Select either Request a new schema or Use an existing schema.
b. Schema Name - Enter a new name or select one from the list.
c. Click Next.
7. If Request Storage, specify the following:
a. Amount of Storage to Add - Select the amount of storage to add.
b. Click Next.
c. Confirm your request by clicking Request Storage.
8. If Request Termination, specify the following:
a. Verify the workspace service to be terminated.
b. Click Next.
c. Confirm your request by clicking Terminate Service.
Determining the Amount of Space Available in Your Workspace
The Detailed Tablespace Utilization report displays the amount of space used and
amount of free space available in the current workspace. When requesting additional
storage, use this report to determine how much additional storage space you need.
To view the Detailed Tablespace Utilization report:
1. Log in to Oracle Application Express. See "Logging In To Oracle Application
Express" in Oracle Application Express Application Builder User's Guide.
The Workspace home page appears.
Configuring Workspace Preferences
Workspace and Application Administration 1-11
2. Click the Administration icon.
The Administration page appears.
3. Click Manage Service.
4. Click Make a Service Request.
5. Expand the Tasks list and click Detailed Tablespace Utilization Report (may take
several seconds).
A report appears displaying the tablespace name, available bytes, amount used,
amount free and percentage used.
Requesting Another Workspace
To request another workspace:
1. Log in to Oracle Application Express. See "Logging In To Oracle Application
Express" in Oracle Application Express Application Builder User's Guide.
The Workspace home page appears.
2. Click the Administration icon.
The Administration page appears.
3. Click Manage Service.
4. Click Make a Service Request.
5. From the Tasks list, click Sign up for another workspace.
6. Follow the online registration instructions.
Configuring Workspace Preferences
Workspace administrators can configure the following preferences for the current
workspace, including login controls, support for Application Builder, SQL Workshop,
PL/SQL editing, and Team Development.
Topics:
■ Enabling Account Login Controls for a Workspace
■ Enabling Application Builder Development
■ Enabling SQL Workshop
■ Disabling PL/SQL Program Unit Editing for a Workspace
■ Managing Team Development
Enabling Account Login Controls for a Workspace
There are two different ways to configure login controls:
■ An Instance administrator enables account login controls for all Application
Express accounts in all workspaces across a development instance.
If your Instance administrator configures these preferences for an instance, those
settings display as the defaults for all workspaces. See "Enabling Login Controls
for All Workspaces" on page 2-26.
Configuring Workspace Preferences
1-12 Oracle Application Express Administration Guide
■ If the Instance administrator does not enable login controls across an entire
instance, then each Workspace administrator can enable the following controls on
a workspace-by-workspace basis:
– Require end-user account expiration and locking
– Set up a maximum number of failed login attempts for end-user accounts
– Set the password lifetime for end-user accounts, that is, the number of days an
end-user account password can be used before it expires
To enable login controls for a workspace:
1. Log in to Oracle Application Express. See "Logging In To Oracle Application
Express" in Oracle Application Express Application Builder User's Guide.
The Workspace home page appears.
2. Click the Administration icon.
The Administration page appears.
3. Click Manage Service.
4. Click Set Workspace Preferences.
5. Under Account Login Control:
a. Account Expiration and Locking - Click Enable.
If you select Enable, end-user account passwords expire after a configurable
time period and accounts are locked after a configurable number of
authentication failures. Account passwords can be set to expire after the first
use.
If your Instance administrator set the Require User Account Expiration and
Locking preference to Yes, this preference defaults to Enable and you cannot
update it.
b. Maximum Login Failures Allowed - Enter a positive integer for the maximum
number of consecutive unsuccessful authentication attempts allowed before
an end-user account is locked. If you do not specify a value in this field, the
instance-level setting for Maximum Login Failures Allowed is used.
c. End User Account Lifetime (days) - Enter a positive integer for the maximum
number of days an end-user account password may be used before the
account expires. If you do not specify a value in this field, the instance-level
setting for Account Password Lifetime is used.
6. Click Apply Changes.
Enabling Application Builder Development
To enable Application Builder:
1. Log in to Oracle Application Express. See "Logging In To Oracle Application
Express" in Oracle Application Express Application Builder User's Guide.
The Workspace home page appears.
Tip: This feature applies only to accounts created using the
Application Express user creation and management facilities. It
provides additional authentication security for applications. See
"Managing Application Express Users" on page 1-16.
Configuring Workspace Preferences
Workspace and Application Administration 1-13
2. Click the Administration icon.
The Administration page appears.
3. Click Manage Service.
4. Click Set Workspace Preferences.
5. Scroll down to Application Builder.
6. For Enable Application Builder, select Yes. To disable Application Builder, select
No.
7. Click Apply Changes.
Enabling SQL Workshop
To enable SQL Workshop:
1. Log in to Oracle Application Express. See "Logging In To Oracle Application
Express" in Oracle Application Express Application Builder User's Guide.
The Workspace home page appears.
2. Click the Administration icon.
The Administration page appears.
3. Click Manage Service.
4. Click Set Workspace Preferences.
5. Scroll down to SQL Workshop.
6. For Enable SQL Workshop, select Yes. To disable SQL Workshop, select No.
7. Click Apply Changes.
Disabling PL/SQL Program Unit Editing for a Workspace
By default, developers can change and compile PL/SQL source code when browsing
database procedures, packages, and functions in SQL Workshop Object Browser.
Workspace administrators can disable PL/SQL program unit editing by selecting Do
not allow PL/SQL program unit editing on the Preferences page.
To disable PL/SQL program unit editing:
1. Log in to Oracle Application Express. See "Logging In To Oracle Application
Express" in Oracle Application Express Application Builder User's Guide.
The Workspace home page appears.
2. Click the Administration icon.
The Administration page appears.
3. Click Manage Service.
4. Click Set Workspace Preferences.
5. Scroll down to SQL Workshop.
Tip: These settings can be overridden by an Instance administrator.
See "Managing Component Availability" on page 2-77.
Tip: These settings can be overridden by an Instance administrator.
See "Managing Component Availability" on page 2-77.
Configuring Workspace Preferences
1-14 Oracle Application Express Administration Guide
6. Under PL/SQL Editing, select one of the following:
■ Allow PL/SQL program unit editing
■ Do not allow PL/SQL program unit editing
If you select Do not allow PL/SQL program unit editing, developers can still
create and replace PL/SQL program units using scripts or SQL Commands.
7. Click Apply Changes.
Managing Team Development
Use the options under Team Development to specify whether Team Development is
available in the current workspace and to enable support for file attachments.
Topics:
■ Enabling Team Development
■ Enabling Support for File Attachments in Team Development
Enabling Team Development
To enable Team Development:
1. Log in to Oracle Application Express. See "Logging In To Oracle Application
Express" in Oracle Application Express Application Builder User's Guide.
The Workspace home page appears.
2. Click the Administration icon.
The Administration page appears.
3. Click Manage Service.
4. Click Set Workspace Preferences.
5. Scroll down to Team Development.
6. For Enable Team Development, select either:
■ Yes - Select Yes to enable Team Development in the current workspace.
■ No - Select No to disable Team Development in the current workspace.
7. Click Apply Changes.
Enabling Support for File Attachments in Team Development
To enable support for file attachments in Team Development:
1. Log in to Oracle Application Express. See "Logging In To Oracle Application
Express" in Oracle Application Express Application Builder User's Guide.
The Workspace home page appears.
2. Click the Administration icon.
The Administration page appears.
3. Click Manage Service.
See Also: "Disabling PL/SQL Program Unit Editing" on page 2-14
and "Using SQL Commands" in Oracle Application Express SQL
Workshop Guide
About the Workspace Utilization Report
Workspace and Application Administration 1-15
4. Click Set Workspace Preferences.
5. Scroll down to Team Development.
6. For Enable File Repository, select either:
■ Yes - Select Yes to enable support for file attachments in Team Development.
Selecting Yes creates a local APEX$ table to store the files.
■ No - Select No to disable support for file attachments in Team Development.
7. Click Apply Changes.
Defining a Workspace Announcement
You can quickly communicate with other users by creating workspace
announcements. These announcements display both on the Workspace home page and
on the Workspace Administration page.
To create or edit a workspace announcement:
1. Log in to Oracle Application Express. See "Logging In To Oracle Application
Express" in Oracle Application Express Application Builder User's Guide.
The Workspace home page appears.
2. Click the Administration icon.
The Workspace Administration page appears. The Workspace Announcements
region displays in the center of the page.
3. To create or edit an announcement, click the Edit icon that resembles a pencil.
4. In Message, enter text. Use standard HTML tags to include formatting.
5. Click Apply Changes.
About the Workspace Utilization Report
Workspace administrators can view a summary report of the current workspace by
selecting Workspace Utilization on the Manage Service page.
Administrators can use this report to view a comprehensive summary of the current
workspace information including, schemas, applications, websheets, SQL Workshop,
and Team Development details, activity summaries, and counts of database objects.
Tip: You can also create or edit announcements by clicking the
Administration icon, the Manage Service icon, and then Edit
Announcement.
Understanding User Roles
1-16 Oracle Application Express Administration Guide
Viewing and Emailing the Workspace Summary Report
To view a summary report about the current workspace:
1. View the Workspace Summary Report:
a. Log in to Oracle Application Express. See "Logging In To Oracle Application
Express" in Oracle Application Express Application Builder User's Guide.
The Workspace home page appears.
b. Click the Administration icon.
The Administration page appears.
c. On the Administration page, click Manage Service.
d. Click Workspace Utilization.
e. From Show, select a time interval.
f. Scroll down to view the report.
2. To email the report:
a. Click Email.
b. In the Email form, enter email addresses, edit the subject line, enter optional
body text, and click Email.
– To - Enter valid email addresses.
– Subject - Enter text that describes the message.
– Body - Enter optional body text.
– Click Email.
The report is automatically emailed to the specified recipients.
Understanding User Roles
In the Oracle Application Express, users log in to a shared work area called a
workspace. Users are divided into three primary roles:
■ Developers create and edit applications.
■ Workspace administrators are developers who also perform administrator tasks
specific to their workspace such as managing user accounts, monitoring
workspace activity, and viewing log files. See "Workspace and Application
Administration" on page 1-1.
■ Instance administrators are superusers that manage the entire hosted instance
using the Oracle Application Express Administration Services application.
Managing Application Express Users
Workspace administrators can create new user accounts, manage existing user
accounts, and change user passwords. User accounts are particularly useful if you are
using Application Express Authentication. Application Express Authentication checks
the user name and password against the Oracle Application Express account
See Also: "Oracle Application Express Hosted Instance
Administration" on page 2-1 for more information on the
responsibilities of an Instance administrator.
Managing Application Express Users
Workspace and Application Administration 1-17
repository. The Oracle Application Express account repository contains account
information for developers and administrators when they log in to Oracle Application
Express applications.
If the workspace administrator enables the Account Locking/Expiration feature for
end user accounts, new account management attributes are exposed. Accounts may be
locked, unlocked, or expired. Passwords for those accounts can also have restrictions,
such as a fixed lifetime, a maximum number of consecutive incorrect passwords when
attempting to log in, and a requirement to be changed on first use.
Topics:
■ Creating New User Accounts
■ Creating Multiple Users Simultaneously
■ Editing Existing User Accounts
■ Deleting or Locking User Accounts
■ Deleting Multiple Users at Once
■ Changing an End User Password
■ Viewing the Users Dashboard
■ Using Groups to Manage Application Express Users
Creating New User Accounts
Workspace administrators can create three different types of user accounts:
■ Developers can create and edit applications and view developer activity, session
state, workspace activity, application, and schema reports. In Icons view,
developers are yellow.
■ Workspace administrators perform administrator tasks specific to a workspace,
such as managing user accounts, managing groups, altering passwords of users
within the same workspace, and managing development services. In Icons view,
Workspace administrators are red.
■ End users are application users without any access to development or
administrative capabilities. In Icons view, end users are green.
To create a new user account:
1. Log in to Oracle Application Express. See "Logging In To Oracle Application
Express" in Oracle Application Express Application Builder User's Guide.
The Workspace home page appears.
2. Click the Administration icon.
The Administration page appears.
3. Click Manage Users and Groups.
4. Click Create User.
See Also: "Managing Users in an Oracle Application Express
Instance" on page 2-84 and "Exporting Workspace Users" in Oracle
Application Express Application Builder User's Guide
See Also: "Oracle Application Express Hosted Instance
Administration" on page 2-1
Managing Application Express Users
1-18 Oracle Application Express Administration Guide
The Create User page appears.
5. Under User Identification, enter:
a. Username - Enter the username used to log in to the system. Restrictions
include:
– Maximum length of 100 characters
– No spaces
– Only these special characters are permitted: ampersand (@) and period (.)
b. Email Address - Enter the valid email address for this user.
c. First Name - Enter the first or given name to further identify the user
(optional).
d. Last Name - Enter the last or family name to further identify the user
(optional).
e. Description - Enter comments about this user (optional).
f. Default Date Format - Specify the default Oracle date format for the user. This
option controls the default date format within SQL Workshop.
6. Under Account Privileges:
a. Default Schemas - Specify the default schema used for data browsing,
application creation, and SQL script execution.
When using workspaces that have more than one schema available, this
schema is the default. This setting does not control security, only the user's
preference.
b. Accessible Schemas (null for all) - Leave this blank to enable the end user to
access all schemas associated with the workspace.
c. User is a workspace administrator - Select Yes or No to specify if this user
should have workspace administrator privileges. Administrators are given
access to all components. Additionally, they can manage user accounts,
groups, and development services. Components may not be available if they
are switched off by Instance Administrators.
d. User is a developer - Select Yes or No to specify if this user should have
developer privileges. Developers create and modify applications and database
objects and view developer activity, session state, workspace activity,
application, and schema reports.
Developers must have access to either Application Builder, SQL Workshop, or
both. Components may not be available if they are switched off by Instance
Administrators.
e. Application Builder Access - Determines whether a developer has access to
the Application Builder.
f. SQL Workshop Access - Determines whether a developer has access to the
SQL Workshop.
g. Team Development Access - Determines whether a developer has access to
the Team Development.
h. Set Account Availability - Select Locked to prevent the account from being
used. Select Unlocked to allow the account to be used.
Managing Application Express Users
Workspace and Application Administration 1-19
If the user has exceeded the maximum login failures allowed as defined in
Workspace Preferences, then the account is locked automatically.
7. Under Password:
■ Password - Enter a case-sensitive password.
■ Confirm Password - Enter the password again.
■ Require Change of Password On First Use - Select No to allow the user to use
the same password until it expires. Select Yes to require the user to change the
password immediately when logging in the first time.
8. Under User Groups, optionally select one or more user groups by holding down
the CTRL key and selecting the groups.
9. Click Create User or Create and Create Another.
Creating Multiple Users Simultaneously
Workspace administrators can create multiple user accounts in a single operation.
To create multiple user accounts simultaneously:
1. Log in to Oracle Application Express. See "Logging In To Oracle Application
Express" in Oracle Application Express Application Builder User's Guide.
The Workspace home page appears.
2. Click the Administration icon.
The Administration page appears.
3. Click Manage Users and Groups.
4. On the Tasks list, click Create Multiple Users.
The Create Multiple Users page appears.
5. In List of Email Addresses, enter or copy and paste email addresses separated by
commas, semicolons, or new lines.
6. Under Users:
■ List of Email Addresses - Enter or copy and paste email addresses separated
by commas, semicolons, or new lines.
Tip: An Instance administrator can configure these settings for an
entire Oracle Application Express instance and define password
complexity policies. See "Enabling Login Controls for All Workspaces"
on page 2-26. "About Strong Password Policies" on page 2-27, and
"Configuring Password Policies" on page 2-27
See Also: "Using Groups to Manage Application Express Users" on
page 1-24 and "Adding and Removing Users from a Group" on
page 1-25
Managing Application Express Users
1-20 Oracle Application Express Administration Guide
■ Usernames - Specify whether to include or exclude the domain name. Select
one of the following:
– Set username to full email address
– Exclude @ domain as part of the username
Removes all text after the @ symbol (for example, user1@xyz.com
becomes user1).
7. Under Account Privileges:
■ Default Schemas - Specify the default schema used for data browsing,
application creation, and SQL script execution. When using workspaces that
have more than one schema available, this schema is the default for creating
applications, performing SQL queries, and so on.
■ Accessible Schemas (null for all) - Enter a colon-delimited list of schemas for
which this developer has permissions when using the SQL Workshop. The list
of schemas you enter here restricts the user to a subset of the full set of
schemas provisioned for the workspace and determines what schema names
the user sees in SQL Workshop.
■ User is a workspace administrator - Select Yes or No to specify if this user
should have workspace administrator privileges. Administrators are given
access to all components. Additionally, they can manage user accounts,
groups, and development services. Components may not be available if they
are switched off by Instance Administrators.
■ User is a developer - Select Yes or No to specify if this user should have
developer privileges. Developers create and modify applications and database
objects and view developer activity, session state, workspace activity,
application, and schema reports.
Developers must have access to either Application Builder, SQL Workshop, or
both. Components may not be available if they are switched off by Instance
Administrators.
■ Application Builder Access - Determines whether a developer has access to
the Application Builder.
■ SQL Workshop Access - Determines whether a developer has access to the
SQL Workshop.
■ Team Development Access - Determines whether a developer has access to
the Team Development.
8. Under Password:
■ Password - Specify a password. Passwords are case-sensitive. Developers can
change their own passwords. Developers with Administrator privilege can
change the passwords of users within the same workspace.
■ Confirm Password - Enter the password again.
9. Click Apply Changes.
Editing Existing User Accounts
Workspace administrators can edit existing user accounts.
See Also: "Using Groups to Manage Application Express Users" on
page 1-24 and "Adding and Removing Users from a Group" on
page 1-25
Managing Application Express Users
Workspace and Application Administration 1-21
To edit an existing user account:
1. Log in to Oracle Application Express. See "Logging In To Oracle Application
Express" in Oracle Application Express Application Builder User's Guide.
The Workspace home page appears.
2. Click the Administration icon.
The Administration page appears.
3. Click Manage Users and Groups.
The Users page appears.
4. You can customize the appearance of the page using the Search bar at the top of
the page. See "Customizing Interactive Reports" in Oracle Application Express
Application Builder User's Guide.
5. Select a user.
The Edit User page appears.
6. Under Edit User, update the email address, first name, last name, description, and
default date format.
7. Under Account Privileges:
■ Default Schema - Identifies the default schema used for data browsing,
application creation, and SQL script execution.
■ Accessible Schemas (null for all) - Enter a colon-delimited list of schemas for
which this developer has permissions when using the SQL Workshop. This list
of schemas restricts the user to a subset of the full set of schemas provisioned
for the workspace and determines what schema names the user sees in SQL
Workshop.
■ User is a workspace administrator - Select Yes or No to specify if this user
should have workspace administrator privileges. Administrators are given
access to all components. Additionally, they can manage user accounts,
groups, and development services. Components may not be available if they
are switched off by Instance Administrators.
■ User is a developer - Select Yes or No to specify if this user should have
developer privileges. Developers create and modify applications and database
objects and view developer activity, session state, workspace activity,
application, and schema reports.
Note that Developers must have access to either Application Builder, SQL
Workshop, or both. Components may not be available if they are switched off
by Instance Administrators.
■ Application Builder Access - Determines whether a developer has access to
the Application Builder.
■ SQL Workshop Access - Determines whether a developer has access to the
SQL Workshop.
■ Team Development Access - Determines whether a developer has access to
the Team Development.
■ Account Availability - Select Locked to prevent the account from being used.
Select Unlocked to enable the account to be used.
If the user has exceeded the maximum login failures allowed, specified in
Workspace Preferences, then the account is locked automatically.
Managing Application Express Users
1-22 Oracle Application Express Administration Guide
8. Under Password:
■ Password - Enter a case-sensitive password.
■ Confirm Password - Enter the password again.
■ Require Change of Password On First Use - Select No to allow the user to use
the same password until it expires. Select Yes to require the user to change the
password immediately when logging in the first time.
9. Under User Groups, optionally select one or more user groups by holding down
the CTRL key and selecting the groups.
10. Click Apply Changes.
Deleting or Locking User Accounts
Workspace administrators can delete or lock user accounts.
To delete or lock a user account:
1. Navigate to the Workspace home page.
2. Click the Administration icon.
The Administration page appears.
3. Click Manage Users and Groups.
The Users page appears.
4. Select a user.
The Edit User page appears.
5. To delete a user:
a. Click the Delete User button.
b. Confirm your selection and click OK.
6. To lock the account:
a. Scroll down to the Account Privileges section.
b. For Account Availability, select Locked.
c. Click Apply Changes.
Deleting Multiple Users at Once
Workspace administrators can delete multiple user accounts at the same time
To delete multiple user accounts:
1. Log in to Oracle Application Express. See "Logging In To Oracle Application
Express" in Oracle Application Express Application Builder User's Guide.
The Workspace home page appears.
Tip: An Instance administrator can configure these settings for an
entire Oracle Application Express instance. See "Configuring Security
Settings" on page 2-18.
See Also: "Using Groups to Manage Application Express Users" on
page 1-24 and "Adding and Removing Users from a Group" on
page 1-25
Managing Application Express Users
Workspace and Application Administration 1-23
2. Click the Administration icon.
The Administration page appears.
3. Click Manage Users and Groups.
4. On the Tasks list, click Delete Multiple Users.
The Delete Multiple Users page appears.
5. Select the users to be deleted.
6. Click Delete Users.
Changing an End User Password
To change an end user password:
1. Log in to Oracle Application Express. See "Logging In To Oracle Application
Express" in Oracle Application Express Application Builder User's Guide.
The Workspace home page appears.
2. Click the Administration icon.
The Administration page appears.
3. Click Manage Users and Groups.
The Users page appears.
4. Select a user.
5. Under Password, type a new password in the Password and Confirm Password
fields.
6. Click Apply Changes.
Viewing the Users Dashboard
The Users Dashboard displays a summary of your account information, users in the
current workspace, defined user groups, recently created users, and user status.
To view the Users Dashboard:
1. Log in to Oracle Application Express. See "Logging In To Oracle Application
Express" in Oracle Application Express Application Builder User's Guide.
The Workspace home page appears.
2. Click the Administration icon.
The Administration page appears.
3. Click Dashboards.
The Dashboard page appears.
4. Click Users.
The Users Dashboard appears listing the following information:
Tip: To search for an existing user, enter a query in the Find field and
click Go.
See Also: "Viewing Workspace Dashboards" on page 1-38
Managing Application Express Users
1-24 Oracle Application Express Administration Guide
■ Your Account lists information about your account including your username,
workspace, account credentials, and email address.
■ Workspace Users lists statistics about all users in the current workspace.
■ User Groups lists all currently defined user groups.
■ Recently Created lists recently created users.
■ User Status lists valid passwords, expired passwords, locked accounts,
unlocked accounts, and any accounts for which no email address is defined.
Using Groups to Manage Application Express Users
You can create groups to restrict access to specific features and functions. Note that
groups are not portable over different authentication schemes. Groups are primarily
useful when used with Application Express Authentication (Internal Cookie User
authentication).
Topics:
■ Creating a Group
■ Editing an Existing User Group
■ Adding and Removing Users from a Group
Creating a Group
To create a new group:
1. Log in to Oracle Application Express. See "Logging In To Oracle Application
Express" in Oracle Application Express Application Builder User's Guide.
The Workspace home page appears.
2. Click the Administration icon.
The Administration page appears.
3. From the Tasks list, click Manage User Groups.
The User Groups page appears.
4. On the User Groups page, click Create User Group.
The Create/Edit User Group page appears.
5. Specify a group name and description, and click Create Group.
Editing an Existing User Group
To edit an existing group assignment:
1. Log in to Oracle Application Express. See "Logging In To Oracle Application
Express" in Oracle Application Express Application Builder User's Guide.
The Workspace home page appears.
2. Click the Administration icon.
The Administration page appears.
3. From the Tasks list, click Manage User Groups.
The User Groups page appears.
See Also: "Managing Application Express Users" on page 1-16“
Purging the Developer Activity and Click Count Log Files
Workspace and Application Administration 1-25
4. You can customize the appearance of the page using the Search bar at the top of
the page. See "Customizing Interactive Reports" in Oracle Application Express
Application Builder User's Guide.
5. Select the group you want to edit.
The Create/Edit User Group page appears.
6. Make the appropriate edits and click Apply Changes.
Adding and Removing Users from a Group
To add a user to a group:
1. Log in to Oracle Application Express. See "Logging In To Oracle Application
Express" in Oracle Application Express Application Builder User's Guide.
The Workspace home page appears.
2. Click the Administration icon.
The Administration page appears.
3. Click Manage Users and Groups.
The Users page appears.
4. Select a user.
The Edit User page appears.
5. Scroll down to User Groups.
Each user belongs to the groups on the right.
6. To add a user to a group, select the group and click Move.
7. To remove a user from a group, select the group and click Remove.
8. Click Apply Changes.
Purging the Developer Activity and Click Count Log Files
Log entries older then one month are automatically deleted. Workspace administrators
can manually purge developer logs and the External Count Clicks log on the Log files
page.
Topics:
■ Purging the Developer Activity Log
■ Purging the External Click Count Log
See Also: "Managing Logs and Files" on page 2-54
Managing Session State and User Preferences
1-26 Oracle Application Express Administration Guide
Purging the Developer Activity Log
The Developer Activity Log tracks changes to applications within the current
workspace.
To purge the Developer Activity Log:
1. Log in to Oracle Application Express. See "Logging In To Oracle Application
Express" in Oracle Application Express Application Builder User's Guide.
The Workspace home page appears.
2. Click the Administration icon.
3. On the Administration page, click Manage Service.
4. Under Manage Meta Data, click Developer Activity and Click Count Logs.
5. Click the Manage Developer Activity Log tab.
6. Click Purge Developer Log.
Purging the External Click Count Log
The external Click Count Log counts clicks from an application to an external site. You
can implement this functionality using APEX_UTIL.COUNT_CLICK procedure.
To purge the external Click Count Log:
1. Log in to Oracle Application Express. See "Logging In To Oracle Application
Express" in Oracle Application Express Application Builder User's Guide.
The Workspace home page appears.
2. Click the Administration icon.
3. On the Administration page, click Manage Service.
4. Under Manage Meta Data, click Developer Activity and Click Count Logs.
5. Click the Manage Click Count Log tab.
6. Click Purge Click Log.
Managing Session State and User Preferences
A session is a logical construct that establishes persistence (or stateful behavior) across
page views. Each session is assigned a unique ID, which the Application Express
engine uses to store and retrieve an application's working set of data (or session state)
before and after each page view. Sessions persist in the database until purged.
Topics:
■ Managing Session State
■ Managing User Preferences
See Also: "COUNT_CLICK Procedure" in Oracle Application Express
API Reference
See Also: "Viewing Workspace Dashboards" on page 1-38
Managing Session State and User Preferences
Workspace and Application Administration 1-27
Managing Session State
A session establishes persistence (or stateful behavior) across page views. You can
review session details for the current session or for recent sessions. You can also purge
the current session state or purge sessions based on their age.
Topics:
■ Removing Session State After Reviewing Session Details
■ Viewing Session State for the Current Session
■ Purging Sessions by Age
■ Purging Session State for the Current Session
Removing Session State After Reviewing Session Details
You can determine whether to remove existing sessions by first reviewing session
details. From the Session Details page, you can remove the session record or session
state.
To view session details and remove session state:
1. Log in to Oracle Application Express. See "Logging In To Oracle Application
Express" in Oracle Application Express Application Builder User's Guide.
The Workspace home page appears.
2. Click the Administration icon.
3. On the Administration page, click Manage Service.
4. Under Manage Meta Data, click Session State.
5. Click Recent Sessions with Drill-Down to Session Details.
6. You can customize the appearance of the page using the Search bar at the top of
the page. See "Customizing Interactive Reports" in Oracle Application Express
Application Builder User's Guide.
7. To view session details, select the session ID.
The Session Details page appears.
8. Click one of the following buttons:
■ Remove State clears the session data from the session state tables (including
collections data) but does not remove the session record. Removing a session
is a good approach for developers during debugging.
This is the equivalent of clearing session state for the current session using the
Clear Cache argument value SESSION in the f?p URL. This option might also
be used by developers during debugging.
■ Remove Session removes the record of the session from the SESSIONS table
along with the session state (including collections data) associated with the
session.
See Also: "Managing Session State" in Oracle Application Express
Application Builder User's Guide and "Managing Session State" on
page 2-51
See Also: "What Is a Session?" in Oracle Application Express
Application Builder User's Guide
Managing Session State and User Preferences
1-28 Oracle Application Express Administration Guide
Any user using a session that has removed is no longer able to use the session
and is prompted to re-authenticate upon their next page request (in most
situations). This option can be used by administrators who must ensure a
specific user can no longer access an Oracle Application Express application.
Viewing Session State for the Current Session
To view session state for the current or recent sessions:
1. Log in to Oracle Application Express. See "Logging In To Oracle Application
Express" in Oracle Application Express Application Builder User's Guide.
The Workspace home page appears.
2. Click the Administration icon.
3. On the Administration page, click Manage Service.
4. Under Manage Meta Data, click Session State.
5. Click Report Session State for Current Session.
6. You can customize the appearance of the page using the Search bar at the top of
the page. See "Customizing Interactive Reports" in Oracle Application Express
Application Builder User's Guide.
Purging Sessions by Age
To purge existing sessions by age:
1. Log in to Oracle Application Express. See "Logging In To Oracle Application
Express" in Oracle Application Express Application Builder User's Guide.
The Workspace home page appears.
2. Click the Administration icon.
3. On the Administration page, click Manage Service.
4. Under Manage Meta Data, click Session State.
5. Click Purge sessions by Age.
6. Make a selection from the Sessions older than list.
7. Click one of the following buttons:
■ Purge Sessions purges existing sessions by the age you selected.
■ Report Sessions generates a report detailing the total number of sessions for
the workspace, the number of users, and the number of old sessions.
Purging Session State for the Current Session
To purge session state for the current session:
See Also: "Debugging an Application" in Oracle Application Express
Application Builder User's Guide
See Also: "Removing Session State After Reviewing Session Details"
on page 1-27
See Also: "Viewing Session State" in Oracle Application Express
Application Builder User's Guide
Managing Session State and User Preferences
Workspace and Application Administration 1-29
1. Log in to Oracle Application Express. See "Logging In To Oracle Application
Express" in Oracle Application Express Application Builder User's Guide.
The Workspace home page appears.
2. Click the Administration icon.
3. On the Administration page, click Manage Service.
4. Under Manage Meta Data, click Session State.
5. Click Purge Session State for Current Session.
6. Click one of the following buttons:
■ View Session State - Displays information about the current session.
■ Purge Session State - Resets the session state for the current session.
Managing User Preferences
You can use preferences to store values for a specific Application Express user across
distinct sessions. Once set, these preferences can be removed programmatically or
manually. You can set user preferences by creating a page process, by the calculation of
a preference Item Source Value, or programmatically by using a PL/SQL API.
Topics:
■ Viewing Preferences by User
■ Viewing Current User Preferences
■ Purging Preferences for a Specific User
■ Purging Current User Preferences
■ Setting User Preferences
■ Removing User Preferences Programmatically
■ Resetting User Preferences Using a Page Process
Viewing Preferences by User
To view the preferences by user:
1. Log in to Oracle Application Express. See "Logging In To Oracle Application
Express" in Oracle Application Express Application Builder User's Guide.
The Workspace home page appears.
2. Click the Administration icon.
3. On the Administration page, click Manage Service.
4. Under Manage Meta Data, click Session State.
5. Click Preferences by User.
The Preferences by User page appears.
6. You can customize the appearance of the page using the Search bar at the top of
the page. See "Customizing Interactive Reports" in Oracle Application Express
Application Builder User's Guide.
Viewing Current User Preferences
To view current user preferences:
Managing Session State and User Preferences
1-30 Oracle Application Express Administration Guide
1. Log in to Oracle Application Express. See "Logging In To Oracle Application
Express" in Oracle Application Express Application Builder User's Guide.
The Workspace home page appears.
2. Click the Administration icon.
3. On the Administration page, click Manage Service.
4. Under Manage Meta Data, click Session State.
5. Click Report Current User Preferences.
The Current user Preferences page appears.
6. You can customize the appearance of the page using the Search bar at the top of
the page. See "Customizing Interactive Reports" in Oracle Application Express
Application Builder User's Guide.
Purging Preferences for a Specific User
You can purge preferences for a specific user on the Purge Preferences page.
To purge preferences for a specific user:
1. Navigate to the appropriate Page Definition. See "Accessing a Page Definition" in
Oracle Application Express Application Builder User's Guide.
2. Click the Administration icon.
3. On the Administration page, click Manage Service.
4. Under Manage Meta Data, click Session State.
5. Click Purge preferences by User.
The Purge Preferences page appears.
6. Select a specific user and click Report.
A report appears at the bottom of the page.
7. To purge the displayed user preferences, click Purge User Preferences.
Purging Current User Preferences
To purge preferences for the current user:
1. Log in to Oracle Application Express. See "Logging In To Oracle Application
Express" in Oracle Application Express Application Builder User's Guide.
The Workspace home page appears.
2. Click the Administration icon.
3. On the Administration page, click Manage Service.
4. Under Manage Meta Data, click Session State.
5. Click Purge Preferences for Current User.
The Purge Preferences page appears.
6. Select a user and click Report.
7. To purge preferences, click Purge User Preferences.
Managing Session State and User Preferences
Workspace and Application Administration 1-31
Setting User Preferences
You can set user preferences within your application through the creation of a page
process, by creating a preference item, or programmatically.
Topics:
■ Setting User Preferences Using a Page Process
■ Setting the Source of an Item Based on a User Preference
■ Setting User Preferences Programmatically
Setting User Preferences Using a Page Process To set user preference values by creating a
page process:
1. Navigate to the appropriate Page Definition. See "Accessing a Page Definition" in
Oracle Application Express Application Builder User's Guide.
2. Access the Create Page Process Wizard:
■ Tree view- Under the appropriate event, locate Processes. Right-click and
select Create.
■ Component view - Under Processes, click the Create icon.
3. For process category, select Session State and click Next.
4. For the process type, select Reset Preferences (remove all preferences for current
user) and click Next.
5. Specify a name, sequence, and processing point and click Next.
6. Follow the on-screen instructions and click Create Process.
Setting the Source of an Item Based on a User Preference You can set the source of an item
based on a user preference by defining the item source type as Preference.
To define the source of item based on a user preference:
1. Navigate to the appropriate Page Definition. See "Accessing a Page Definition" in
Oracle Application Express Application Builder User's Guide.
2. Access the Create Page Item Wizard:
■ Tree view- Under Page Rending, expand Regions, right-click Items, and select
Create Page Item.
■ Component view - Component view - Under Items, click the Create icon.
3. For the item type, select Hidden and click Next.
4. For Hidden Item Type, select one of the following and click Next:
■ Hidden - A hidden item is exposed in the HTML form but not displayed.
■ Hidden and Protected - A hidden and protected item is also exposed in the
HTML form but not displayed. However, its value cannot be changed when
the page is posted.
5. Specify the item name, sequence, and region and click Next.
6. For Source, select Source Type of Preference, enter the appropriate Source Value,
and click Next. If the item source is null the default value is used.
To learn more about a specific field, see item Help.
7. Click Create Item.
Managing Page and Region Caching
1-32 Oracle Application Express Administration Guide
Setting User Preferences Programmatically To set or reference user preferences
programmatically, you must use a PL/SQL API. User-level caching is available
programmatically. You can use the SET_PREFERENCE procedure to set a user level
preference called NAMED_PREFERENCE. For example:
APEX_UTIL.SET_PREFERENCE(
p_preference=>'NAMED_PREFERENCE',
p_value =>:ITEM_NAME);
You can reference the value of a user preference using the function GET_PREFERENCE.
For example:
NVL(APEX_UTIL.GET_PREFERENCE('NAMED_PREFERENCE'),15)
In the previous example, the preference would default to the value 15 if the preference
contained no value.
Removing User Preferences Programmatically
To remove user preferences programmatically, you must use a PL/SQL API. You can
use the REMOVE_PREFERENCE procedure to remove a user level preference called
NAMED_PREFERENCE. For example:
APEX_UTIL.REMOVE_PREFERENCE(
p_preference=>'NAMED_PREFERENCE');
Resetting User Preferences Using a Page Process
You can reset user preferences by creating a page process and selecting the Reset
Preferences process type.
To reset user preferences using a page process:
1. Navigate to the appropriate Page Definition. See "Accessing a Page Definition" in
Oracle Application Express Application Builder User's Guide.
2. Access the Create Page Process Wizard:
a. Tree view- Under the appropriate event, locate Processes. Right-click and
select Create Process.
b. Component view - Under Processes, click the Create icon.
3. For the process category, select Session State and click Next.
4. For the process type, select Reset Preferences (remove all preferences for current
user) and click Next.
5. Specify a name, sequence, and processing point and click Next.
6. Follow the on-screen instructions.
7. Click Create Process.
Managing Page and Region Caching
One way to improve an application’s performance is to take advantage of page and
region caching. Developers can configure page and region caching by setting the
See Also: GET_PREFERENCE Function and SET_PREFERENCE
Procedure in Oracle Application Express API Reference
Managing Page and Region Caching
Workspace and Application Administration 1-33
Cache attribute on the Edit Page or Edit Region pages. This section describes how
Workspace administrators can view and purge cached regions and pages.
Topics:
■ Purging Cached Regions
■ Purging Cached Pages
Purging Cached Regions
To view and purge cached regions:
1. Navigate to the appropriate Page Definition. See "Accessing a Page Definition" in
Oracle Application Express Application Builder User's Guide.
2. Click the Administration icon.
3. On the Administration page, click Manage Service.
4. Under Manage Meta Data, click Application Cache and select one of the
following:
■ Purge Cached Regions by Region
■ Purge Cached Region by Application
■ Purge Cached Regions by Workspace
5. If you select Purge Cached Regions:
a. You can customize the appearance of the page using the Search bar at the top
of the page. See "Customizing Interactive Reports" in Oracle Application Express
Application Builder User's Guide.
b. Select the regions you want to purge and click Purge Checked.
6. If you select Purge Cached Regions by Application:
a. Select an application.
b. Click Purge Cached Regions.
7. If you select Purge Cached Regions by Workspace, click Purge All Cached
Regions.
Purging Cached Pages
To view and purge cached pages:
1. Navigate to the appropriate Page Definition. See "Accessing a Page Definition" in
Oracle Application Express Application Builder User's Guide.
2. Click the Administration icon.
3. On the Administration page, click Manage Service.
4. Under Manage Meta Data, click Application Cache and select one of the
following:
■ Purge Cached Pages by Page
■ Purge Cached Pages by Application
■ Purge Expired Cached Pages by Application
5. If you select Purge Cached Pages by Page:
Changing Build Status for Multiple Applications
1-34 Oracle Application Express Administration Guide
a. You can customize the appearance of the page using the Search bar at the top
of the page. See "Customizing Interactive Reports" in Oracle Application Express
Application Builder User's Guide.
b. Select the regions you want to purge and click Purge Checked.
6. If you select Purge Cached Pages by Application:
a. Select an application.
b. Click Purge Cached Pages.
7. If you select Purge Expired Cached Pages by Application:
a. Select an application.
b. Click Purge Expired.
Changing Build Status for Multiple Applications
Every Oracle Application Express application has an application-level attribute called
Build Status. You can use this attribute to prevent an application from being modified
by other developers. Build Status has two settings:
■ Run and Build Application - Developers can both run and edit an application.
■ Run Application Only - Developers can only run an application.
Setting the Build Status to Run Application Only is an effective way to prevent other
developers from modifying it.
You can change the Build Status of an application as follows:
■ Developers and administrators can change the Build Status attribute on the Edit
Application page. See "Availability" in Oracle Application Express Application Builder
User's Guide.
■ Workspace administrators can change the Build Status of applications within the
current workspace as described in this section. See "Managing Build Status in
Workspace Administration" on page 1-34.
■ Instance administrators can change the Build Status of an application on the Build
Status page. See "Changing Application Build Status Set During Deployment" on
page 2-83.
Managing Build Status in Workspace Administration
To manage Build Status in Workspace Administration:
1. Navigate to the Workspace home page.
2. Click the Administration icon.
3. On the Administration page, click Manage Service.
4. Under Manage Meta Data, click Application Build Status.
Next, select a status. Status specifies whether the application is available or
unavailable for use.
5. For Status, select one of the following:
■ Available - Application is available with no restrictions.
■ Available with Edit Links - Application is available for use. For developers,
the Developer toolbar displays at the bottom of each page. Requires the
Managing Application Models
Workspace and Application Administration 1-35
developer to be logged in to the Application Builder in the same browser
session.
■ Available to Developers Only - Application is available to users having
developer privileges.
■ Restricted Access - Application is available to developers named in the
Restrict to comma separated user list.
■ Unavailable - Application cannot be run or edited. The message in Message
for unavailable application displays when users attempt to access the
application.
■ Unavailable (Status Shown with PL/SQL) - Application cannot be run or
edited.
■ Unavailable (Redirect to URL) - Application cannot be run or edited.
6. From Build Status, select one of the following:
■ Run and Build Application - Developers can both run and edit an
application.
■ Run Application Only - Developers can only run an application.
7. Click Apply Changes.
Managing Application Models
Running the Create Application Wizard creates an application model. This model
contains basic application property values, such as the application pages and page
definitions, DML processes, and multi-row operation processes. When you create a
new application, you can base it on an existing application model, making the creation
process more productive.
Deleting an Application Model
You can remove unwanted application models on the Application Models page.
To delete an application model:
1. Navigate to the Workspace home page.
2. Click the Administration icon.
3. On the Administration page, click Manage Service.
4. Under Manage Meta Data, click Application Models.
The Application Models page appears.
5. You can customize the appearance of the page using the Search bar at the top of
the page. See "Customizing Interactive Reports" in Oracle Application Express
Application Builder User's Guide.
6. Select the models you want to delete and click Delete Checked.
See Also: "About Application Models and User Interface Defaults"
in Oracle Application Express Application Builder User's Guide
Monitoring Activity Within a Workspace
1-36 Oracle Application Express Administration Guide
Monitoring Activity Within a Workspace
You can monitor developer activity and changes within your workspace by accessing
the Monitor Activity page. The Monitor Activity page features links to over thirty
reports that track page views, developer activity, active sessions, login attempts,
environment, application errors, and workspace schemas. Note that this section only
describes a few reports in detail.
Topics:
■ Viewing Developer Activity and Application Change Information
■ Viewing Application Changes by Developer
■ Viewing Application Changes by Day
■ Viewing Active Sessions
■ Viewing Schema Reports
Viewing Developer Activity and Application Change Information
To view developer activity and application change information from the Monitor
Activity page:
1. Navigate to the Workspace home page.
2. Click the Administration icon.
3. Click Monitor Activity.
The Monitor Activity page features activity reports divided into the following
sections:
■ Page Views - Contains reports of page views organized by view, user,
application, or application and page.
■ Developer Activity - Offers reports of developer activity organized by
developer, day, application, application changes, and day or month.
■ Page View Analysis - Contains reports analyzing page views, such as top
page views by application.
■ Sessions - Lists active sessions with the current workspace.
■ Login Attempts - Offers reports listing login attempts.
■ Environment - Contains reports of environments organized by user agent,
browser, external clicks, or operating system.
■ Application Errors - Contains a report of application errors.
■ Workspace Schema Reports - Offers summaries of schema tablespace
utilization and database privileges by schema and a list of all database
schemas available in the current workspace
4. Select a report to review.
The sections that follow details a few specific reports.
See Also: "Viewing Workspace Dashboards" on page 1-38,
"Monitoring Activity Across a Development Instance" on page 2-87,
and "Creating Custom Activity Reports Using APEX_ACTIVITY_LOG
in Oracle Application Express Application Builder User's Guide
Monitoring Activity Within a Workspace
Workspace and Application Administration 1-37
Viewing Application Changes by Developer
The Application Changes by Developer report displays the number of pages changed
by each developer and offers a graphical representation of the information in either a
bar chart or pie chart format.
To view application changes by developer:
1. Navigate to the Workspace home page.
2. Click the Administration icon.
3. Click Monitor Activity.
4. Under Developer Activity, select By Developer.
5. Make a time selection from the Since list, an application (if applicable), and click
Set.
You can customize the appearance of the page using the Search bar at the top of
the page. See "Customizing Interactive Reports" in Oracle Application Express
Application Builder User's Guide.
Viewing Application Changes by Day
The Application Changes by Day report displays a summary of the number of
application changes by day. You have the option to view this information by month, as
a line chart, or by developer.
To view application changes by day:
1. Navigate to the Workspace home page.
2. Click the Administration icon.
3. Click Monitor Activity.
4. Under Developer Activity, click By Day or By Day, Monthly View.
The Application Changes by Day page appears.
5. Make a time selection from the Since list, an application (if applicable), and click
Set.
You can customize the appearance of the page using the Search bar at the top of
the page. See "Customizing Interactive Reports" in Oracle Application Express
Application Builder User's Guide.
Viewing Active Sessions
A session is a logical construct that establishes persistence (or stateful behavior) across
page views. The Active Sessions report lists active sessions with the current
workspace.
Whenever an application is run, the Application Express engine maintains a record in
a database table in the Oracle Application Express schema. This table records a
numeric identifier (or session ID), the authenticated (or public) user identifier, the
creation date, and other information. The session is the key record that enables session
state, or persistence, across page requests. By viewing the Active Sessions report, a
developer or administrator can see who has been using applications in a workspace.
An active session is a session that has not yet been purged from the sessions table. A
DBMS job runs every eight hours and purges session records older than 24 hours.
Viewing Workspace Dashboards
1-38 Oracle Application Express Administration Guide
To view active session details:
1. Navigate to the Workspace home page.
2. Click the Administration icon.
3. Click Monitor Activity.
4. Under Sessions, select Active Sessions.
You can customize the appearance of the page using the Search bar at the top of
the page. See "Customizing Interactive Reports" in Oracle Application Express
Application Builder User's Guide.
5. Click a session ID to view the Session Details page.
Viewing Schema Reports
Schema Reports offer summaries of schema tablespace utilization and database
privileges by schema and a list of all database schemas available in the current
workspace.
To view Schema Reports:
1. Navigate to the Workspace home page.
2. Click the Administration icon.
3. Click Monitor Activity.
4. Under Workspace Schema Reports, click one of the following reports:
■ Schema Tablespace Utilization
■ Database Privileges by Schema
■ Workspace Schemas
■ Report Tablespace Utilization (popup)
You can customize the appearance of the Database Privileges and Workspace
Schemas reports using the Search bar at the top of the page. See "Customizing
Interactive Reports" in Oracle Application Express Application Builder User's Guide.
Viewing Workspace Dashboards
Use the Dashboard page to view details about the current workspace and monitor
overall activity within your workspace.
Topics:
■ About the Workspace Dashboard
■ About the Users Dashboard
■ About the Activity Dashboard
■ About the Developer Activity Dashboard
■ About the Performance Dashboard
■ About the Websheets Dashboard
See Also: "What Is a Session?" in Oracle Application Express
Application Builder User's Guide
Viewing Workspace Dashboards
Workspace and Application Administration 1-39
■ About the Applications Dashboard
■ About the Database Dashboard
About the Workspace Dashboard
The Workspace Dashboard lists statistics about the current workspace. Sections
include:
■ Service - Lists the workspace name and the number of applications, application
pages, SQL scripts, Websheets, schemas, and open service requests.
■ Available Schemas - Lists schemas within the current workspace.
■ Files - Details the space used by specific file types.
■ Recent Service Requests lists pending service requests.
To view the Workspace Dashboard:
1. Navigate to the Workspace home page.
2. Click the Administration icon.
3. On the Administration page, click Dashboards.
About the Users Dashboard
The Users Dashboard displays a summary of your account information, users in the
current workspace, defined user groups, recently created users, and user status.
Sections include:
■ Your Account - List information about your account including your username,
workspace, account credentials, and email address.
■ Workspace Users - Lists statistics about all users in the current workspace.
■ User Groups - Lists are currently defined user groups.
■ Recently Created - Lists recently created users.
■ User Status - Lists valid passwords, expired passwords, locked accounts, unlocked
accounts, and any accounts for which no email address is defined.
To view the Users Dashboard:
1. Navigate to the Workspace home page.
2. Click the Administration icon.
3. On the Administration page, click Dashboards.
4. Click the Users tab.
About the Activity Dashboard
The Activity Dashboard displays a summary of top users, application, and pages and a
list of recent logins and errors. Sections include:
See Also: "Monitoring Activity Across a Development Instance" on
page 2-87 and "Creating Custom Activity Reports Using APEX_
ACTIVITY_LOG in Oracle Application Express Application Builder User's
Guide
See Also: "Managing Application Express Users" on page 1-16
Viewing Workspace Dashboards
1-40 Oracle Application Express Administration Guide
■ Top Users - Lists the most active users in the workspace.
■ Top Applications - Lists applications having the most activity.
■ Top Pages - Lists the application pages having the most activity.
■ Recent Logins- Shows the time and date a user authenticated to an application.
■ Recent Errors - Lists errors that have occurred in the current workspace from the
Application Express activity log.
To view the Activity Dashboard:
1. Navigate to the Workspace home page.
2. Click the Administration icon.
3. On the Administration page, click Dashboards.
4. Click the Activity tab.
About the Developer Activity Dashboard
The Developer Activity Dashboard displays a summary of top developers, application,
and pages and a list of recent application changes and edits. Sections include:
■ Top Developers - Lists the most active developers in the workspace.
■ Top Applications - Lists the applications having the most developer activity.
■ Top Pages - Lists the application pages having the most developer activity.
■ Recent Changes - Lists changes by application, page, and user.
■ Recent Application Edits - Lists edits by application.
To view the Developer Activity Dashboard:
1. Navigate to the Workspace home page.
2. Click the Administration icon.
3. On the Administration page, click Dashboards.
4. Click the Developer Activity tab.
About the Performance Dashboard
The Performance Dashboard displays a report of pages having the worst page
performance. Page performance is calculated by multiplying page events by median
elapsed server page generation time. Page events include page gets, page posts, and
partial page gets.
To view the Performance Dashboard:
1. Navigate to the Workspace home page.
2. Click the Administration icon.
3. On the Administration page, click Dashboards.
4. Click the Performance tab.
5. You can customize the appearance of the page using the Search bar at the top of
the page. See "Customizing Interactive Reports" in Oracle Application Express
Application Builder User's Guide.
6. From the Show list, select a time frame.
Viewing Workspace Dashboards
Workspace and Application Administration 1-41
About the Websheets Dashboard
The Websheets Dashboard displays a websheet activity for the selected time frame.
Sections include:
■ Workspace Summary
■ Recent Views
■ Recently Created
■ Recently Updated
To view the Websheets Dashboard:
1. Navigate to the Workspace home page.
2. Click the Administration icon.
3. On the Administration page, click Dashboards.
4. Click the Websheets tab.
5. From the Show list, select a time frame.
About the Applications Dashboard
The Applications Dashboard displays a summary of applications in the current
workspace. Sections include:
■ Summary - Lists the number of applications, pages, and workspace themes.
■ Application Groups - Lists defined application groups.
■ Recently Created - Lists recently created applications.
■ Defaults - Lists defined defaults.
To view the Applications Dashboard:
1. Navigate to the Workspace home page.
2. Click the Administration icon.
3. On the Administration page, click Dashboards.
4. Click the Applications tab.
5. To refresh the report, click Refresh.
About the Database Dashboard
The Database Dashboard displays a summary of database objects by schema. Row
counts are based on database table statistics. Sections include:
■ Recently Modified Program Units
■ Object Counts
■ Recently Created Tables
■ Top Tables by Row Count
To view the Database Dashboard:
1. Navigate to the Workspace home page.
2. Click the Administration icon.
3. On the Administration page, click Dashboards.
Leveraging Application Builder Defaults
1-42 Oracle Application Express Administration Guide
4. Click the Database tab.
5. From Schema, select the appropriate schema.
6. To refresh the report, click Refresh.
Leveraging Application Builder Defaults
Application Builder Defaults enable developers to reduce the number of steps needed
to create a new application. By configuring these attributes, developers can exit the
Create Application Wizard early and can create a new application in two simple steps.
Topics:
■ About Application Builder Defaults
■ Configuring Application Builder Defaults
About Application Builder Defaults
Application Builder Defaults are specific to each workspace. These attributes define
preferences for tabs, authentication schemes, themes, and globalization when running
the Create Application Wizard. When a Workspace administrator configures these
attributes, developers within that workspace can use these defaults and exit the Create
Application Wizard after two easy steps.
Configuring Application Builder Defaults
To configure Application Builder Defaults:
1. On the Workspace home page, click the Application Builder icon.
2. From the Tasks list, select Application Builder Defaults.
The Manage Application Builder Defaults page appears and is divided into the
following sections:
■ Tabs
■ Authentication
■ Theme
■ Globalization
3. For each section of the page, select the appropriate default.
4. To learn more about a specific attribute, click the item label.
When Help is available, the item label changes to red when you pass your cursor
over it and the cursor changes to an arrow and question mark.
5. Click Apply Changes.
2
Oracle Application Express Hosted Instance Administration 2-1
2Oracle Application Express Hosted Instance
Administration
This section describes tasks an Instance administrator performs when administering
an Oracle Application Express hosted instance.
Topics:
■ What Is an Instance Administrator?
■ Logging In To Oracle Application Express Administration Services
■ Managing Workspace and Change Requests
■ Managing Instance Settings
■ Managing Schemas
■ Creating Workspaces
■ Managing Existing Workspaces
■ Managing Users in an Oracle Application Express Instance
■ Monitoring Activity Across a Development Instance
What Is an Instance Administrator?
Instance administrators are responsible for managing an entire Oracle Application
Express instance.
In Oracle Application Express, users log in to a shared work area called a workspace.
These users are divided into three primary roles:
■ Developers create and edit applications.
■ Workspace administrators are developers who also perform administrator tasks
specific to their workspace such as managing user accounts, monitoring
workspace activity, and viewing log files. See "Workspace and Application
Administration" on page 1-1.
■ Instance administrators are superusers that manage the entire hosted instance
using the Oracle Application Express Administration Services application.
Note: The topics in this section are not applicable to all customers,
specifically to those using a hosted instance. This section only applies
to administrators who have access to Oracle Application Express
Instance Administration.
What Is an Instance Administrator?
2-2 Oracle Application Express Administration Guide
Topics:
■ About the Instance Administration Home Page
■ About the Manage Instance Page
■ About the Manage Workspaces Page
About the Instance Administration Home Page
The Instance Administration home page is the starting point for managing an entire
Oracle Application Express instance.
Four icons display at the top of the page:
■ Manage Requests. See "Managing Workspace and Change Requests" on page 2-7.
■ Manage Instance. See "About the Manage Instance Page" on page 2-3.
■ Manage Workspace. See "About the Manage Workspaces Page" on page 2-5.
■ Monitor Activity. See "Monitoring Activity Across a Development Instance" on
page 2-87.
About the System Message Region
The System Message region display in the center of the page. Use this region to
communicate with other users in the workspace. To add a system message, click the
Edit System Message icon. See "Defining a System Message" on page 2-58.
About Instance Tasks
Use the Instance Tasks list to access the following tasks:
■ Feature Configuration. See "Managing Feature Configuration" on page 2-13.
■ Security. See "Configuring Security Settings" on page 2-18.
■ Instance Settings. See "Managing Instance Settings" on page 2-13.
■ Workspace Purge Settings. See "Purging Inactive Workspaces" on page 2-45.
See Also: Oracle Application Express Installation Guide
What Is an Instance Administrator?
Oracle Application Express Hosted Instance Administration 2-3
About Workspace Tasks
Use the Workspace Tasks list to access the following tasks:
■ Create Workspace. See "Creating Workspaces" on page 2-64.
■ Create Multiple Workspaces. See "Creating Multiple Workspaces" on page 2-67.
■ Find a Workspace. See "Performing a Workspace Search" on page 2-78.
■ Manage Workspaces. See "Managing Existing Workspaces" on page 2-69.
■ Create User. See "Creating New User Accounts" on page 2-84.
■ Find a User. See "Managing Users in an Oracle Application Express Instance" on
page 2-84.
■ Reset User Password. See "Editing an Existing User Account" on page 2-86.
About Language Selector
Displays the default language for this Oracle Application Express instance.
Accessibility Mode
Select the accessibility mode for this instance. See "Appendix E: Accessibility in Oracle
Application Express" in Oracle Application Express Application Builder User's Guide,
"Using Screen Reader Mode in Your Database Applications" in Oracle Application
Express Application Builder User's Guide, "Using High Contrast Mode in Your Database
Applications" in Oracle Application Express Application Builder User's Guide.
About the Manage Instance Page
Instance administrators use the Manage Instance page to configure an Oracle
Application Express instance. This topic provides information about the links on this
page.
About Instance Setting
Instance Settings contains the following links:
■ Feature Configuration. See "Managing Feature Configuration" on page 2-13.
■ Security. See "Configuring Security Settings" on page 2-18.
■ Instance Settings. See "Configuring Instance Settings" on page 2-31.
See Also: "Viewing Requests on the Instance Administration Home
Page" on page 2-7
What Is an Instance Administrator?
2-4 Oracle Application Express Administration Guide
■ Workspace Purge Settings. See "Purging Inactive Workspaces" on page 2-45.
About Manage Shared Components
Manage Shared Components contains the following link:
■ Packaged Database Applications. See "Viewing Information About Installed
Packaged Database Applications" on page 2-46.
■ Packaged Websheet Applications. See "Viewing Packaged Websheet
Applications" on page 2-47.
■ Monitor Packaged Application Installations. See "Monitoring the Progress
Packaged Application Installations" on page 2-47.
■ Public Themes. See "Managing Public Themes" on page 2-48.
■ Template Applications. See "Managing Template Applications" on page 2-49.
About Manage Meta Data
Manage Meta Data contains the following links:
■ Session State. See "Managing Session State" on page 2-51.
■ Mail Queue. See "Managing the Mail Queue" on page 2-53.
■ Installed Translations. See "Viewing Installed Translations" on page 2-53.
■ Interactive Report Subscriptions. See "Managing Interactive Report
Subscriptions" on page 2-54.
About Messages
Messages contains the following links:
■ Define Login Message. See "Defining a Login Message" on page 2-58
■ Set System Message. See "Defining a System Message" on page 2-58
■ Manage Site-Specific Tasks. See "Creating a Site-Specific Tasks List" on page 2-59.
About Manage Logs and Files
Manage Logs and Files contains the following links:
■ Set SQL Workshop logs. See "Deleting SQL Workshop Logs" on page 2-54.
■ Page View Activity Log, with option to truncate. See "Deleting Page View
Activity Log Entries" on page 2-55.
■ Developer Activity Log, with option to truncate. See "Deleting Developer
Activity Log Entries" on page 2-55.
■ External Click Counting Log, with option to truncate. See "Deleting Click
Counting Log Entries" on page 2-56
■ Login Access Log. See "Deleting the Login Access Log" on page 2-56.
■ Manage Log Interval. See "Managing Log Intervals" on page 2-56.
About Self Service Sign Up
Self Service Sign Up contains the following links:
See Also: "Managing Existing Workspaces" on page 2-69 and "About
the Manage Workspaces Page" on page 2-5
What Is an Instance Administrator?
Oracle Application Express Hosted Instance Administration 2-5
■ Manage New Service Signup Wizard. See "Managing a New Service Signup
Wizard" on page 2-60.
■ Run New Service Signup Wizard. See "Running a New Service Signup Wizard"
on page 2-61
About the Manage Workspaces Page
Instance administrators use the Manage Workspaces page to manage workspaces for
an Oracle Application Express instance. This topic provides information about the
links on this page.
About Workspace Actions
Manage Workspaces contains the following links:
■ Create Workspace. See "Creating Workspaces" on page 2-64.
■ Remove Workspace. See "Deleting a Workspace" on page 2-69.
■ Lock Workspace. See "Locking a Workspace" on page 2-73.
■ Manage Workspace to Schema Assignments. See "Managing Workspace to
Schema Assignments" on page 2-73.
■ Manage Developers and Users. See "Managing Users in an Oracle Application
Express Instance" on page 2-84.
■ Manage Component Availability. See "Managing Component Availability" on
page 2-77.
About Workspace Reports
Use Workspace Reports to access the following links:
■ Existing Workspaces. See "Managing Existing Workspaces" on page 2-69.
■ Workspace Details. See "Viewing Workspace Details" on page 2-79.
■ Workspace Database Privileges. See "Viewing Workspace Database Privileges" on
page 2-81.
■ Workspaces with Only Sample Application. See "Viewing Workspaces with Only
a Sample Application" on page 2-72.
■ Manage File Utilization. See "Viewing File Size and File Count by Workspace" on
page 2-81.
About Export Import
Use Export Import to access the following links:
■ Import Workspaces. See "Importing a Workspace" on page 2-82.
■ Export Workspaces. See "Exporting a Workspace" on page 2-82.
About Manage Application
Use Manage Workspaces to access the following links:
■ Application Attributes. See "Viewing Application Attributes" on page 2-82.
■ Build Status. See "Changing Application Build Status Set During Deployment" on
page 2-83.
■ Parsing Schemas. See "Viewing the Parsing Schemas Report" on page 2-84.
Logging In To Oracle Application Express Administration Services
2-6 Oracle Application Express Administration Guide
Logging In To Oracle Application Express Administration Services
Instance administrators are responsible for managing an entire Oracle Application
Express instance. To perform these tasks, an Instance administrator logs in to the
Oracle Application Express Administration Services application.
To log in to Oracle Application Express Administration Services:
1. In a web browser, navigate to the Oracle Application Express Administration
Services application. By default, Oracle Application Express Administration
Services installs to the following location:
■ If your setup uses the Oracle Application Express Listener, go to:
http://hostname:port/apex/apex_admin
Where:
– hostname is the name of the system where Oracle Application Express
Listener is installed.
– port is the port number assigned when configuring the Oracle
Application Express Listener. In a default installation, this number is 8080.
To learn more, see Oracle Application Express Listener Installation and
Configuration Guide.
– apex is the service name defined when configuring the Oracle
Application Express Listener.
■ If your setup uses the embedded PL/SQL gateway, go to:
http://hostname:port/apex/apex_admin
Where:
– hostname is the name of the system where Oracle XML DB Protocol
Server is installed.
– port is the port number assigned to HTTP on the Oracle XML DB
Protocol Server. In a default installation, this number is 8080. If you are
using the Oracle Database 12c multitenant architecture, then each PDB
will have a distinct port number. See "Verifying the Port Assigned to
HTTP on the Oracle XML DB Protocol Server" in Oracle Application Express
Application Builder User's Guide.
– apex is the database access descriptor (DAD) defined in the configuration
file.
■ If your setup uses Apache and mod_plsql, go to:
http://hostname:port/pls/apex/apex_admin
Where:
– hostname is the name of the system where Oracle HTTP Server is
installed.
– port is the port number assigned to Oracle HTTP Server. In a default
installation, this number is 7777.
– pls is the indicator to use the mod_plsql cartridge.
– apex is the database access descriptor (DAD) defined in the mod_plsql
configuration file.
Managing Workspace and Change Requests
Oracle Application Express Hosted Instance Administration 2-7
For users who have upgraded from earlier releases, or who have a custom
configuration, this value may be htmldb or something else. Verify your
DAD with your Instance administrator.
The Login page appears.
2. In Username, enter admin.
3. In Password, enter the Instance administrator account password you specified
when you installed Oracle Application Express.
4. Click Login to Administration.
Oracle Application Express Administration Services appears.
Managing Workspace and Change Requests
An Instance administrator is responsible for reviewing and managing workspace
requests and change request.
A Workspace Request enables users to request workspaces directly in a self-service
fashion. For example, users could click a link on the login page to access a request
form. Once the Instance administrator approves the workspace request, each user is
automatically emailed the appropriate login information. To learn more about
configuring an instance to use workspace requests, see "Specifying a Provisioning
Mode" on page 2-65.
A Change Request enables users to modify an existing workspace (for example, add a
new schema or increase the disk space limit).
Topics:
■ Viewing Requests on the Instance Administration Home Page
■ Viewing Pending Requests
■ Managing Workspace Requests
■ Managing Change Requests
Viewing Requests on the Instance Administration Home Page
Instance administrators can view pending and new service requests on the Oracle
Application Express Instance Administration (Instance Administration) home page.
The Pending Requests region lists the total number of new service requests and service
change requests. To view a more detailed report, click the number listed.
Tip: admin is the default Instance administrator account. To create
additional Instance administrator accounts, see "Creating New User
Accounts" on page 2-84
See Also: Oracle Application Express Installation Guide for information
about installing Oracle Application Express
See Also: "Specifying a Provisioning Mode" on page 2-65, "Enabling
Service Requests" on page 2-18, and "Making a Service Request" on
page 1-9
Managing Workspace and Change Requests
2-8 Oracle Application Express Administration Guide
The Workspace Requests report displays at the bottom on the page. This report lists
service requests by date. To view a specific request, click the description.
Viewing Pending Requests
To view workspace requests from the Manage Service Requests page:
1. Log in to Oracle Application Express Administration Services. See "Logging In To
Oracle Application Express Administration Services" on page 2-6.
2. Click Manage Requests.
From Manage Service Requests page, you can choose three tabs:
■ Open Requests
■ All Workspace Requests
■ All Change Requests
3. Open Requests displays new service requests and change requests. To approve or
decline a new request, click the Edit icon.
Tip: To view the new Service Requests report page, see "Monitoring
Activity Across a Development Instance" on page 2-87
Tip: All Change Requests pages display as interactive reports. You
can customize the appearance of each page using the Search bar at the
top of each page. See "Customizing Interactive Reports" in Oracle
Application Express Application Builder User's Guide.
Managing Workspace and Change Requests
Oracle Application Express Hosted Instance Administration 2-9
4. Click the All Workspace Requests tab.
To edit the request, click the Edit icon. To approve or decline the request, click
Provision in the Action column. To learn more, see "Managing Workspace
Requests" on page 2-9.
5. Click All Change Requests.
To view a request, click View Request. To learn more, see "Managing Change
Requests" on page 2-12.
Managing Workspace Requests
A Workspace Request enables a user to request a workspace by clicking a link on the
login page to access a request form. Once submitted, the Instance administrator can
review the request and either approve or decline it. To learn more about configuring
an instance to use workspace requests, see "Specifying a Provisioning Mode" on
page 2-65.
Managing Workspace and Change Requests
2-10 Oracle Application Express Administration Guide
Topics:
■ Approving or Declining a Pending Workspace Request
■ Changing the Status of an Existing Workspace Request
■ Deleting a Workspace Request
Approving or Declining a Pending Workspace Request
To approve or decline a pending workspace request:
1. Log in to Oracle Application Express Administration Services. See "Logging In To
Oracle Application Express Administration Services" on page 2-6.
2. Click Manage Requests.
3. Click the All Workspace Requests tab.
The Workspace Requests page displays as an interactive report. To customize the
report, use the Search bar at the top of the page. See "Customizing Interactive
Reports" in Oracle Application Express Application Builder User's Guide.
4. Locate a request to review.
5. To edit or review the request, click the Edit icon. On the Provision Request page
you can:
■ Edit the request and click Apply Changes.
■ Delete the request by clicking Delete.
6. Return to the All Workspace Requests page.
7. To approve a request:
a. Click Provision in the Actions column.
b. On the Provisioning Administration page, click Approve.
c. Review the email message.
d. If needed, update the message and click Approve and Send Email.
If you selected the Provisioning Status, Email Verification, an email
containing a verification link is sent to the user. To create the workspace, the
user must click the verification link to create the workspace. See "Specifying a
Provisioning Mode" on page 2-65.
8. To decline a request:
a. Click Provision in the Actions column.
b. On the Provisioning Administration page, click Decline.
c. Review the email message.
d. To add information, such as the reason for declining a request, update the
message and then click Decline and Send Email.
The email is sent to the user notifying them the request was declined.
More About the Approval Process If you are using Email Verification, when an Instance
administrator approves a workspace request, the following events occur:
1. An email containing a verification link is sent to the user.
2. When user clicks the verification link, the workspace is created.
Managing Workspace and Change Requests
Oracle Application Express Hosted Instance Administration 2-11
3. Another email is sent to the user containing login credentials (that is, the
workspace name, Username, and password).
4. The status of the workspace request changes from Accepted to Approved.
If the user fails to click the verification link, you can quickly delete the request by
clicking the DELETE link in the Action column.
When an Error Occurs If an error occurs during the workspace creation process, the
status of the request reverts to Requested and an email is sent to the user containing
the following message:
Please contact administrator.
Once the issue is resolved, the administrator can again repeat the previous procedure
and approve the request.
Changing the Status of an Existing Workspace Request
To change the status of an existing workspace request:
1. Log in to Oracle Application Express Administration Services. See "Logging In To
Oracle Application Express Administration Services" on page 2-6.
2. Click Manage Requests.
3. Click the All Workspace Requests tab.
The Workspace Requests page displays as an interactive report. To customize the
report, use the Search bar at the top of the page. See "Customizing Interactive
Reports" in Oracle Application Express Application Builder User's Guide.
4. To review all workspace requests, deselect Filter Status_Code = '1' .
5. Locate a request to review.
6. Click the Adjust link in the Actions column.
The Adjust Request page appears.
7. From the Project Status list, select a new status.
8. Click Apply Changes.
Deleting a Workspace Request
To delete a workspace request:
1. Log in to Oracle Application Express Administration Services. See "Logging In To
Oracle Application Express Administration Services" on page 2-6.
2. Click Manage Requests.
3. Click All Workspace Requests.
Note: Be careful when setting the Project Status to Requested.
Although Requested enables you to provision a workspace, it could
result in data corruption due to the manner in which accounts are
provisioned. The provisioning system assumes Requested workspace
requests do not have the corresponding schemas and dictionary
entries for a Workspace administrator or developers. If you must
change the Project Status for an Approved workspace to Requested,
terminate the service first and then change the status to Requested.
Managing Workspace and Change Requests
2-12 Oracle Application Express Administration Guide
The Workspace Requests page appears.
4. Uncheck the Filter Status_Code = '1' to review all workspace requests.
5. Click the Edit icon for the request you want to delete.
6. On the Provision Request page, click the appropriate button:
■ If the Project Status is Approved, click Terminate or Delete.
■ If the Project Status is Declined, Requested, Terminated, or Accepted,
click Delete.
7. Click Delete Request.
Managing Change Requests
A Change Request enables users to modify an existing workspace (for example, by
adding a new schema or increasing the disk space limit). Once submitted, the Instance
administrator reviews and either approves or declines the change request.
Topics:
■ Viewing Requests from the All Change Requests Page
■ Approving or Declining a Pending Change Request
Viewing Requests from the All Change Requests Page
To view change requests from the Workspace Requests page:
1. Log in to Oracle Application Express Administration Services. See "Logging In To
Oracle Application Express Administration Services" on page 2-6.
2. Click Manage Requests.
3. Under Manage Requests, click the All Change Requests tab.
This page displays as an interactive report. To customize the report, use the Search
bar at the top of the page. See "Customizing Interactive Reports" in Oracle
Application Express Application Builder User's Guide.
4. See the next topic, "Approving or Declining a Pending Workspace Request" on
page 2-10.
Approving or Declining a Pending Change Request
To approve or decline a pending change request:
1. Log in to Oracle Application Express Administration Services. See "Logging In To
Oracle Application Express Administration Services" on page 2-6.
2. Click Manage Requests.
3. Under Manage Requests, click the All Change Requests tab.
This page displays as an interactive report. To customize the report, use the Search
bar at the top of the page. See "Customizing Interactive Reports" in Oracle
Application Express Application Builder User's Guide.
4. Locate the request and click View Request under the Action column.
The View Change Request page appears. Note that the buttons that display
depend upon the nature of the change request.
5. Select one of the following:
Managing Instance Settings
Oracle Application Express Hosted Instance Administration 2-13
■ To approve a request for a schema, click Create Schema.
■ To approve a request for additional disk space, click Add Space.
■ To approve a request to terminate the service, click Terminate Service.
■ To deny a request, click Deny Request.
■ To delete a request and deny it, select Delete this request if denying? and
then click Deny Request.
Managing Instance Settings
Instance administrators use the settings under Manage Instance to manage and
configure an Oracle Application Express instance.
Topics:
■ Managing Feature Configuration
■ Configuring Security Settings
■ Configuring Instance Settings
■ Including an Agreement or Survey When Running the Signup Wizard
■ Purging Inactive Workspaces
■ Viewing Information About Installed Packaged Database Applications
■ Monitoring the Progress Packaged Application Installations
■ Managing Public Themes
■ Managing Template Applications
■ Managing Session State
■ Managing the Mail Queue
■ Viewing Installed Translations
■ Managing Interactive Report Subscriptions
■ Managing Logs and Files
■ Managing a Runtime Environment
■ Managing Messages
■ About the Self Service Sign Up Wizard
Managing Feature Configuration
Use the Feature Configuration page to configure application development and SQL
Workshop and control database monitoring.
Topics:
■ Disabling PL/SQL Program Unit Editing
■ Disabling the Creation of Demonstration Objects in a New Workspace
■ Disabling the Creation of Websheet Objects
■ Enabling and Disabling SQL Access in Websheets
See Also: "Specifying a Provisioning Mode" on page 2-65
Managing Instance Settings
2-14 Oracle Application Express Administration Guide
■ Configuring Packaged Application Installation Options
■ Configuring SQL Workshop
■ Enabling Database Monitoring
■ Enabling Application Activity Logging
■ Enabling Service Requests
Disabling PL/SQL Program Unit Editing
By default, developers can change and compile PL/SQL source code when browsing
database procedures, packages, and functions in Object Browser. As an Instance
administrator, you can control PL/SQL program unit editing for an entire instance by
making a selection from Allow PL/SQL Program Unit Editing.
To disable PL/SQL program unit editing:
1. Log in to Oracle Application Express Administration Services. See "Logging In To
Oracle Application Express Administration Services" on page 2-6.
2. Click Manage Instance.
3. Under Instance Settings, click Feature Configuration.
4. Locate the Application Development section.
5. For Allow PL/SQL Program Unit Editing, select No.
6. Click Apply Changes.
Disabling the Creation of Demonstration Objects in a New Workspace
When an Instance administrator creates a new workspace, Oracle Application Express
automatically creates sample applications within the workspace.
To disable the creation of sample applications:
1. Log in to Oracle Application Express Administration Services. See "Logging In To
Oracle Application Express Administration Services" on page 2-6.
2. Click Manage Instance.
3. Under Instance Settings, click Feature Configuration.
4. Locate the Application Development section.
5. For Create demonstration objects in new workspaces, select No.
6. Click Apply Changes.
Disabling the Creation of Websheet Objects
When an Instance administrator creates a new workspace, Oracle Application Express
automatically creates sample Websheet objects within the workspace.
To disable the creation of sample Websheet objects:
1. Log in to Oracle Application Express Administration Services. See "Logging In To
Oracle Application Express Administration Services" on page 2-6.
See Also: "Managing Component Availability" on page 2-77
See Also: "Disabling PL/SQL Program Unit Editing for a
Workspace" on page 1-13 for information about disabling PL/SQL
program unit editing for a specific workspace
Managing Instance Settings
Oracle Application Express Hosted Instance Administration 2-15
2. Click Manage Instance.
3. Under Instance Settings, click Feature Configuration.
4. Locate the Application Development section.
5. For Create Websheet objects in new workspaces, select No.
6. Click Apply Changes.
Enabling and Disabling SQL Access in Websheets
An Instance administrator can control the ability to use the SQL tag and the ability to
create SQL reports in Application Express Websheets. When disabled, all Websheet
applications in all workspaces in the instance are prevented from using the SQL tag or
creating SQL reports.
To control SQL access in Websheets:
1. Log in to Oracle Application Express Administration Services. See "Logging In To
Oracle Application Express Administration Services" on page 2-6.
2. Click Manage Instance.
3. Under Instance Settings, click Feature Configuration.
4. Locate the Application Development section.
5. For Enable SQL and PL/SQL Access in Websheets, select Yes or No.
6. Click Apply Changes.
Configuring Packaged Application Installation Options
When installing a packaged application, Instance administrators can specify a number
of installation options.
To configure packaged application installation options:
1. Log in to Oracle Application Express Administration Services. See "Logging In To
Oracle Application Express Administration Services" on page 2-6.
2. Click Manage Instance.
3. Under Instance Settings, click Feature Configuration.
4. Under Packaged Application Install Options, select Yes or No for these options:
■ Allow HTTP Header Variable authentication - Select Yes to enable HTTP
Header Variable authentication when installing a packaged application.
Otherwise, select No.
■ Allow LDAP Directory authentication - Select Yes to enable LDAP Directory
authentication. Otherwise, select No.
■ Allow Oracle Application Server Single Sign-On authentication - Select Yes
to enable Oracle Application Server Single Sign-On authentication. Otherwise,
select No.
5. Click Apply Changes.
See Also: "Utilizing Packaged Applications" in Oracle Application
Express Application Builder User's Guide
Managing Instance Settings
2-16 Oracle Application Express Administration Guide
Configuring SQL Workshop
As an Instance administrator, you can use the attributes under SQL Workshop to
configure basic SQL Workshop behavior.
To configure SQL Workshop:
1. Log in to Oracle Application Express Administration Services. See "Logging In
To Oracle Application Express Administration Services" on
page 2-6.
2. Click Manage Instance.
3. Under Instance Settings, click Feature Configuration.
4. Under SQL Workshop, enter the attributes described in Table 2–1.
5. Click Apply Changes.
Enabling Database Monitoring
Setting Enable Database Monitoring to Yes enables monitoring within SQL Workshop.
Before you can access the Database Monitoring page, an Instance administrator must
enable database monitoring.
To enable database monitoring:
1. Log in to Oracle Application Express Administration Services. See "Logging In To
Oracle Application Express Administration Services" on page 2-6.
2. Click Manage Instance.
3. Under Instance Settings, click Feature Configuration.
4. Scroll down to Monitoring.
Table 2–1 SQL Workshop Attributes
Attribute Description
SQL Commands Maximum
Inactivity in minutes
Identify the maximum amount of time a transactional
command in the SQL Command Processor waits before timing
out.
SQL Scripts Maximum Script
Output Size in bytes
Identify the maximum amount of output a single SQL script
can generate. SQL scripts are run from the SQL Workshop.
SQL Scripts Maximum
Workspace Output Size in
bytes
Identify the maximum amount of space all scripts within a
workspace may consume. SQL script results are the output
generated when running SQL scripts from the Script Editor or
from the SQL Scripts home page.
SQL Scripts Maximum Script
Size in bytes
Identify the maximum size of a SQL script used within the
SQL Workshop.
Enable Transactional SQL
Commands
Select Yes to enable transactional SQL commands for the entire
Oracle Application Express instance. Enabling this feature
permits SQL Command Processor users to issue multiple SQL
commands within the same physical database transaction.
When you select Yes, an Autocommit check box appears on the
SQL Command Processor page. By default, this option is set to
No.
See Also: "Monitoring the Database" in Oracle Application Express
SQL Workshop Guide
Managing Instance Settings
Oracle Application Express Hosted Instance Administration 2-17
5. For Enable Database Monitoring, select Yes.
6. Click Apply Changes.
Enabling Application Activity Logging
Application Activity Logging controls how application activity is logged for all
applications on this instance.
To configuring application activity logging:
1. Log in to Oracle Application Express Administration Services. See "Logging In To
Oracle Application Express Administration Services" on page 2-6.
2. Click Manage Instance.
3. Under Instance Settings, click Feature Configuration.
4. Scroll down to Monitoring.
5. For Application Activity Logging, select one of the following:
■ Use Application Settings (default) - Use the Logging attribute of each
application to determine if activity is logged.
■ Never - Disable activity logging for all applications in the instance.
■ Always - Enable activity logging for all applications in the instance.
6. Click Apply Changes.
Enabling Application Tracing
Instance administrators can control whether developers or users can generate database
trace files simply by specifying &p_trace=YES on the URL when displaying a page.
The ability to generate a trace file is already controlled if the application has Debug
enabled.
To control application tracing at the instance-level:
1. Log in to Oracle Application Express Administration Services. See "Logging In To
Oracle Application Express Administration Services" on page 2-6.
2. Click Manage Instance.
3. Under Instance Settings, click Feature Configuration.
4. Scroll down to Monitoring.
5. From Enable Application Tracing, select:
■ Yes - Any application which has Debug enabled can also generate a
server-side database trace file for a page using &p_trace=YES on the URL. To
Note: Only users having a database user account that has been
granted a DBA role can access the Database Monitor page.
See Also: "Monitoring Activity Across a Development Instance" on
page 2-87
See Also: "Monitoring Activity Across a Development Instance" on
page 2-87
Managing Instance Settings
2-18 Oracle Application Express Administration Guide
learn more, see "Enabling SQL Tracing and Using TKPROF" in Oracle
Application Express Application Builder User's Guide.
■ No - Tracing cannot be enabled for any application on the instance. If someone
attempts to run an application with &p_trace=YES in the URL, the page
renders but the request to generate the SQL trace file is silently ignored.
6. Click Apply Changes.
Enabling Service Requests
Controls the ability for workspace administrators to make service requests from
Workspace Administration. Service Requests include the ability to request a new
schema, request storage, or request termination of their workspace.
To enable service requests:
1. Log in to Oracle Application Express Administration Services. See "Logging In To
Oracle Application Express Administration Services" on page 2-6.
2. Click Manage Instance.
3. Under Instance Settings, click Feature Configuration.
4. Scroll down to Workspace Administration.
5. For Enable Service Requests, select Yes.
6. Click Apply Changes.
Configuring Security Settings
Instance administrators can configure security settings, such as turning off cookies
used to populate the login form in Application Express, controlling access to accounts,
and setting up password policies.
Topics:
■ Turning Off Cookies Used to Populate the Login Form
■ Disabling Access to Oracle Application Express Administration Services
■ Disabling Workspace Login Access
■ Controlling Public File Upload
■ Restricting User Access by IP Address
■ Configuring a Proxy Server for an Instance
■ Requiring HTTPS
■ Controlling RESTful Access
■ Configuring Session Timeout
■ Excluding Domains from Regions of Type URL and Web Services
■ Configuring Login Controls
■ Enabling Login Controls for All Workspaces
See Also: "Available Parameter Values" in Oracle Application Express
API Reference to learn about the TRACING_ENABLED parameter
See Also: "Managing Workspace and Change Requests" on page 2-7
Managing Instance Settings
Oracle Application Express Hosted Instance Administration 2-19
■ About Strong Password Policies
■ Configuring Password Policies
■ Restricting Access to Oracle Application Express by Database Access Descriptor
(DAD)
■ Defining Authorized URLs
Turning Off Cookies Used to Populate the Login Form
Instance administrators can control if a convenience cookie is sent to a user's computer
whenever a developer or administrator logs in to a workspace from the Application
Express Login page.
If Set Workspace Cookie option is set to Yes, Oracle Application Express sends a
persistent cookie that:
■ combines the last used workspace name and user name
■ has a lifetime of six months
■ is read to populate the Application Express Workspace Login form (but not the
Oracle Application Express Administration Services Login form)
To turn off cookies used to populate the login form:
1. Log in to Oracle Application Express Administration Services. See "Logging In To
Oracle Application Express Administration Services" on page 2-6.
2. Click Manage Instance.
3. Under Instance Settings, click Security.
4. Locate the Security section.
5. For Set Workspace Cookie, select No.
6. Click Apply Changes.
Disabling Access to Oracle Application Express Administration Services
Instance administrators can restrict user access to Oracle Application Express
Administration Services and prevent a user from logging in to Oracle Application
Express Administration Services. Disabling administrator login in production
environments prevents unauthorized users from logging in to Application Express
Administration Services and possibly compromising user login credentials.
To disable user access to Oracle Application Express Administration Services:
1. Log in to Oracle Application Express Administration Services. See "Logging In To
Oracle Application Express Administration Services" on page 2-6.
2. Click Manage Instance.
3. Under Instance Settings, click Security.
4. Locate the Security section.
Note: If your computer has received this cookie, you can physically
remove it from its persistent location on disk using browser tools or
system utilities. The cookie is named ORA_WWV_REMEMBER_UN. In
older releases of Oracle Application Express, this cookie was named
ORACLE_PLATFORM_REMEMBER_UN. It may exist for each Oracle
Application Express service accessed having distinct hostname and
path components.
Managing Instance Settings
2-20 Oracle Application Express Administration Guide
5. For Disable Administrator Login, select Yes.
6. Click Apply Changes.
Setting this value and logging out prevents anyone from logging in to Oracle
Application Express Administration Services.
Enabling Administrator Login To reverse this setting and enable administrator login:
1. Connect in SQL*Plus and connect to the database where Oracle Application
Express is installed as SYS, for example:
■ On Windows:
SYSTEM_DRIVE: sqlplus /nolog
SQL> CONNECT SYS as SYSDBA
Enter password: SYS_password
■ On UNIX and Linux:
$ sqlplus /nolog
SQL> CONNECT SYS as SYSDBA
Enter password: SYS_password
2. Run the following statement:
ALTER SESSION SET CURRENT_SCHEMA = APEX_040200;
3. Run the following statements:
BEGIN
APEX_INSTANCE_ADMIN.SET_PARAMETER('DISABLE_ADMIN_LOGIN', 'N');
commit;
END;
/
Disabling Workspace Login Access
Developers and Workspace administrators log in to the Oracle Application Express
development environment to access the Application Builder, SQL Workshop, Team
Development and Administration.
To restrict access to these applications, select Yes from Disable Workspace Login. This
option effectively sets a Runtime-Only environment while still allowing Instance
administrators to log in to Instance Administration. Selecting Yes in production
environments prevents developers from changing applications or data.
To disable user access to the Internal workspace:
1. Log in to Oracle Application Express Administration Services. See "Logging In To
Oracle Application Express Administration Services" on page 2-6.
2. Click Manage Instance.
3. Under Instance Settings, click Security.
4. Locate the Security section.
5. From Disable Workspace Login, select Yes.
Selecting Yes prevents users from logging in to the Internal workspace.
See Also: "Managing a Runtime Environment" on page 2-57
Managing Instance Settings
Oracle Application Express Hosted Instance Administration 2-21
6. Click Apply Changes.
Controlling Public File Upload
Use the Allow Public File Upload attribute to control whether unauthenticated users
can upload files in applications that provide file upload controls.
To control file upload:
1. Log in to Oracle Application Express Administration Services. See "Logging In To
Oracle Application Express Administration Services" on page 2-6.
2. Click Manage Instance.
3. Under Instance Settings, click Security.
4. Locate the Security section.
5. From Allow Public File Upload, select one of the following:
■ Yes - Enables unauthenticated users to upload files in applications in the
Internal workspace.
■ No - Prevents unauthenticated users from uploading files in applications in
the Internal workspace.
6. Click Apply Changes.
Restricting User Access by IP Address
Instance administrators can restrict user access to an Oracle Application Express
instance by creating a runtime setting named RESTRICT_IP_RANGE.
To restrict user access by IP address:
1. Log in to Oracle Application Express Administration Services. See "Logging In To
Oracle Application Express Administration Services" on page 2-6.
2. Click Manage Instance.
3. Under Instance Settings, click Security.
4. Locate the Security section.
5. For Disable Administrator Login, select No.
6. In Restrict Access by IP Address, enter a comma-delimited list of IP addresses. Use
an asterisk (*) to specify a wildcard.
You can enter IP addresses from one to four levels. For example:
141, 141.* ...
192.128.23.1 ...
7. Click Apply Changes.
Configuring a Proxy Server for an Instance
You can configure an entire Oracle Application Express instance to use a proxy for all
outbound HTTP traffic. Setting a proxy at the instance-level supersedes any proxies
Note: When using wildcards, do not include additional numeric
values after wildcard characters. For example, 138.*.41.2.
Managing Instance Settings
2-22 Oracle Application Express Administration Guide
defined at the application-level or in web service references. If a proxy is specified,
regions of type URL, Web services, and report printing will use the proxy.
To configure a proxy for an Oracle Application Express instance:
1. Log in to Oracle Application Express Administration Services. See "Logging In To
Oracle Application Express Administration Services" on page 2-6.
2. Click Manage Instance.
3. Under Instance Settings, click Security.
4. Locate the Security section.
5. In Instance Proxy, enter the address of the proxy to be used for the entire instance.
6. Click Apply Changes.
Requiring HTTPS
Secure Socktets Layer (SSL) is a protocol for managing the security of data transmitted
on the Internet. For web applications, SSL is implemented by using the HTTPS
protocol. Oracle recommends running Oracle Application Express applications using
SSL (HTTPS protocol) to prevent any sensitive data from being sent over an
unencrypted (cleartext) communication channel.
You can configure both your Oracle Application Express instance and all related
applications to require HTTPS by configuring the Require HTTPS and Require
Outbound HTTPS attributes.
Topics:
■ Requiring HTTPS for an Instance
■ Requiring HTTPS for Outbound Traffic
■ Reversing Require HTTPS
■ Reversing Require Outbound HTTPS
Requiring HTTPS for an Instance To require HTTPS for an Oracle Application Express
instance:
1. Log in to Oracle Application Express Administration Services. See "Logging In To
Oracle Application Express Administration Services" on page 2-6.
2. Click Manage Instance.
3. Under Instance Settings, click Security.
4. Locate the Security section.
5. For Require HTTPS, select Yes.
6. Click Apply Changes.
Requiring HTTPS for Outbound Traffic To require HTTPS for outbound traffic only:
1. Log in to Oracle Application Express Administration Services. See "Logging In To
Oracle Application Express Administration Services" on page 2-6.
Note: If you set Require HTTPS to Yes, you are only able to log in to
an Oracle Application Express workspace or Oracle Application
Express Administration Services over HTTPS.
Managing Instance Settings
Oracle Application Express Hosted Instance Administration 2-23
2. Click Manage Instance.
3. Under Instance Settings, click Security.
4. Locate the Security section.
5. For Require Outbound HTTPS, select Yes.
6. Click Apply Changes.
Reversing Require HTTPS To reverse Require HTTPS:
1. Connect in SQL*Plus or SQL Developer with the Application Express engine
schema as the current schema, for example:
■ On Windows:
SYSTEM_DRIVE: sqlplus /nolog
SQL> CONNECT SYS as SYSDBA
Enter password: SYS_password
■ On UNIX and Linux:
$ sqlplus /nolog
SQL> CONNECT SYS as SYSDBA
Enter password: SYS_password
2. Run the following statement:
ALTER SESSION SET CURRENT_SCHEMA = APEX_040200;
3. Run the following statements:
BEGIN
APEX_INSTANCE_ADMIN.SET_PARAMETER('REQUIRE_HTTPS', 'N');
commit;
end;
/
Reversing Require Outbound HTTPS To reverse Require Outbound HTTPS:
1. Connect in SQL*Plus or SQL Developer with the Application Express engine
schema as the current schema, for example:
■ On Windows:
SYSTEM_DRIVE: sqlplus /nolog
SQL> CONNECT SYS as SYSDBA
Enter password: SYS_password
■ On UNIX and Linux:
$ sqlplus /nolog
SQL> CONNECT SYS as SYSDBA
Enter password: SYS_password
2. Run the following statement:
ALTER SESSION SET CURRENT_SCHEMA = APEX_040200;
3. Run the following statements:
BEGIN
APEX_INSTANCE_ADMIN.SET_PARAMETER('REQUIRE_OUT_HTTPS', 'N');
commit;
Managing Instance Settings
2-24 Oracle Application Express Administration Guide
end;
/
Controlling RESTful Access
Use the Allow RESTful Access attribute to control whether developers can expose
report regions as RESTful services.
To enable RESTful Access:
1. Log in to Oracle Application Express Administration Services. See "Logging In To
Oracle Application Express Administration Services" on page 2-6.
2. Click Manage Instance.
3. Under Instance Settings, click Security.
4. Locate the RESTful Access section.
5. From Allow RESTful Access, select one of the following:
■ Yes - Enables developers to expose report regions as RESTful services.
■ No - Prevents developers from exposing report regions as RESTful services.
6. Click Apply Changes.
Configuring Session Timeout
Use the attributes under Session Timeout to reduce exposure to abandoned computers
with an open web browser at the application level.
To manage session settings for an Oracle Application Express instance:
1. Log in to Oracle Application Express Administration Services. See "Logging In To
Oracle Application Express Administration Services" on page 2-6.
2. Click Manage Instance.
3. Under Instance Settings, click Security.
4. Under Session Timeout For Application Express, specify the following attributes:
■ Maximum Session Length in Seconds - Enter a positive integer to control
how many seconds an application session is allowed to exist. This setting is
superseded by the application-level setting. Leave the value null in order to
revert to the default value of 8 hours (28800 seconds). Enter 0 to have the
session exist indefinitely. This session duration may be superseded by the
operation of the job that runs every hour which deletes sessions older than 12
hours.
■ Maximum Session Idle Time in Seconds - Enter a positive integer to control
how many seconds a session may remain idle for Oracle Application Express
applications. This setting is superseded by the application-level setting. Leave
the value null in order to revert to the default value of 1 hour (3600 seconds).
Set to 0 to prevent session idle time checks from being performed.
5. Click Apply Changes.
See Also: "Using RESTful Services" in Oracle Application Express SQL
Workshop Guide
Managing Instance Settings
Oracle Application Express Hosted Instance Administration 2-25
Excluding Domains from Regions of Type URL and Web Services
It is possible to restrict regions of type URL and Web services for the entire Oracle
Application Express instance. The Instance administrator defines excluded domains
and regions of type URL. If a web reference or region of type URL contains an
excluded domain, an error displays informing the user that it is restricted.
To exclude a domain from regions of type URL and Web services:
1. Log in to Oracle Application Express Administration Services. See "Logging In To
Oracle Application Express Administration Services" on page 2-6.
2. Click Manage Instance.
3. Under Instance Settings, click Security.
4. In Domain Must Not Contain, enter a colon-delimited list of excluded domains,
for example:
mycompany.com:yourcompany.com:abccompany.com
5. Click Apply Changes.
Configuring Login Controls
Instance administrators can configure how Oracle Application Express handles failed
login attempts.
To configure general login controls:
1. Log in to Oracle Application Express Administration Services. See "Logging In To
Oracle Application Express Administration Services" on page 2-6.
2. Click Manage Instance.
3. Under Instance Settings, click Security.
4. Scroll down to General Login Control.
5. Under General Login Control:
a. Delay after failed login attempts in Seconds - Enter a positive integer value
for the delay in seconds between login attempts. Enter 0 to disable the
countdown and enable immediate access. If the delay is greater than 0, Oracle
Application Express always displays the countdown, even on the first login
failure.
b. Method for computing the delay - Select a method for computing the delay
for failed logins. The computation methods are based on recent data in the
Login Access Log. See item help for further details.
c. Inbound Proxy Servers - Enter a comma-separated list of IP addresses for well
known proxy servers, through which requests come in. Oracle Application
Express uses this list to compute the actual client address from the HTTP
Headers X-Forwarded-For and REMOTE_ADDR.
6. Click Apply Changes.
See Also: "Session Timeout" in Oracle Application Express Application
Builder User's Guide
Managing Instance Settings
2-26 Oracle Application Express Administration Guide
Enabling Login Controls for All Workspaces
By default, no login controls are enabled across an Oracle Application Express
instance. Instance administrators can enable login controls for all accounts in all
workspaces across an entire development instance. Account login controls include:
■ Require user account expiration and locking
■ Set up a maximum number of failed login attempts
■ Set the lifetime of a password before prompted for a new one
If the Instance administrator does not enable login controls for an entire instance then
each Workspace administrator can enable controls on a workspace-by-workspace
basis. See "Enabling Account Login Controls for a Workspace" on page 1-11.
Note that Account Login control applies to end-user accounts created using the
Application Express end-user account management interface.
To enable login controls for all workspaces:
1. Log in to Oracle Application Express Administration Services. See "Logging In To
Oracle Application Express Administration Services" on page 2-6.
2. Click Manage Instance.
3. Under Instance Settings, click Security.
4. Scroll down to Workspace Login control.
5. Under Workspace Login Control:
a. Require User Account Expiration and Locking - Select Yes to enable
Application Express user account expiration and locking features across all
workspaces in an instance. This selection prevents the same feature from being
disabled at the workspace-level.
Select No to relinquish control to each Workspace administrator.
b. Maximum Login Failures Allowed - Enter a integer for the maximum number
of consecutive unsuccessful authentication attempts allowed before a
developer or administrator account is locked. If you do not specify a value in
this field, the default value is 4.
This setting applies to administrator and developer accounts. It does not apply
to end user accounts.
The value you enter is used as the default for the workspace-level Maximum
Login Failures Allowed preference if the Workspace administrator does not
specify a value. That preference is used for end-user accounts within the
respective workspace.
c. Account Password Lifetime (days) - Enter a number for the maximum
number of days a developer or administrator account password may be used
before the account expires. If you do not specify a value in this field, a default
value is 45 days.
This setting applies to accounts used to access the Application Express
administration and development environment only. It does not apply to end
user accounts.
The value you enter is used as the default workspace-level End User Account
Lifetime preference, if the Workspace administrator specifies no value. That
preference is used for end-user accounts within the respective workspace.
6. Click Apply Changes.
Managing Instance Settings
Oracle Application Express Hosted Instance Administration 2-27
About Strong Password Policies
Instance administrators can enable password policies for:
■ All users across all workspaces (that is, Workspace administrators, developers,
and end users).
Instance administrators can set up restrictions for all users, including password
characters, lengths, words, and differences in consecutive passwords.
■ Users logging in to Oracle Application Express Administration Services.
Turning on the strong password requirement for Oracle Application Express adds
another layer of security to prevent hackers from determining an administrator’s
password. When this option is selected, passwords must meet these requirements:
– consist of at least six characters
– contain at least one lowercase alphabetic character, one uppercase alphabetic
character, one numeric digit, and one punctuation character
– cannot include the username
– cannot include the word Internal
– cannot contain any words shown in the Must Not Contain Workspace Name
field in this section
Configuring Password Policies
To configure password policies:
1. Log in to Oracle Application Express Administration Services. See "Logging In To
Oracle Application Express Administration Services" on page 2-6.
2. Click Manage Instance.
3. Under Instance Settings, click Security.
4. To set up a password policy for Workspace administrators, developers, and end
users, scroll down to Workspace Password Policy and specify the attributes
described in Table 2–2.
Tip: This feature applies only to accounts created using the
Application Express user creation and management facilities. It
provides additional authentication security for applications. See
"Managing Application Express Users" on page 1-16.
Table 2–2 Workspace Password Policy Attributes
Attribute Description
Minimum Password Length Enter a number to set a minimum character length for
passwords for workspace administrator, developer, and end user
accounts.
Minimum Password
Differences
Enter a positive integer or 0.
When users change their password, the new password must
differ from the old password by this number of characters. The
old and new passwords are compared, character-by-character,
for differences such that each difference in any position common
to the old and new passwords counts toward the required
minimum difference.
This setting applies to accounts for workspace administrators,
developers, and end users.
Managing Instance Settings
2-28 Oracle Application Express Administration Guide
Next, set up a password policy for Application Express service administrators.
5. Scroll down to the Service Administrator Password Policy and specify one of the
following:
a. Use policy specified in Workspace Password Policy - Applies the password
rules specified in Workspace Password Policy to service administrator
passwords.
b. Use default strong password policy - Applies the default strong password
policy to service administrator passwords. To learn more, see item Help.
6. Click Apply Changes.
Restricting Access to Oracle Application Express by Database Access Descriptor
(DAD)
mod_plsql and the embedded PL/SQL gateway support a directive which enables
you to name a PL/SQL function which is called for each HTTP request. You can use
Must Contain At Least One
Alphabetic Character
Select Yes to require that workspace administrator, developer,
and end user account passwords contain at least one alphabetic
character as specified in the Alphabetic Characters field.
Must Contain At Least One
Numeric Character
Select Yes to require that workspace administrator, developer,
and end user account passwords contain at least one Arabic
numeric character (for example, 0,1,2,3,4,5,6,7,8,9).
Must Contain At Least One
Punctuation Character
Select Yes to require that workspace administrator, developer,
and end user account passwords contain at least one
punctuation character as specified in the Punctuation Characters
field.
Must Contain At Least One
Upper Case Character
Select Yes to require that workspace administrator, developer,
and end user account passwords contain at least one uppercase
alphabetic character.
Must Contain At Least One
Lower Case Character
Select Yes to require that workspace administrator, developer,
and end user account passwords contain at least one lowercase
alphabetic character.
Must Not Contain
Username
Select Yes to prevent workspace administrator, developer, and
end user account passwords from containing the username.
Must Not Contain
Workspace Name.
Select Yes to prevent workspace administrator, developer, and
end user account passwords from containing the workspace
name, regardless of case.
Must Not Contain Enter words, separated by colons, that workspace administrator,
developer, and end user account passwords must not contain.
These words may not appear in the password in any
combination of uppercase or lowercase.
This feature improves security by preventing the creation of
simple, easy-to-guess passwords based on words like hello, guest,
welcome, and so on.
Alphabetic Characters Enter new or edit the existing alphabetic characters. This is the
set of characters used in password validations involving
alphabetic characters.
Punctuation Characters Enter new or edit existing punctuation characters. This is the set
of characters used in password validations involving
punctuation characters.
Table 2–2 (Cont.) Workspace Password Policy Attributes
Attribute Description
Managing Instance Settings
Oracle Application Express Hosted Instance Administration 2-29
this functionality to restrict the procedures that can be called through the embedded
PL/SQL gateway or mod_plsql. The function returns TRUE if the named procedure
in the current request is allowed and FALSE if it is not allowed. You can use this
function to enforce access restrictions for Oracle Application Express on a per-database
access descriptor (DAD) basis.
Oracle Application Express ships with a request validation function named wwv_
flow_epg_include_modules.authorize. This function specifies access
restrictions appropriate for the standard DAD configured for Oracle Application
Express.
During installation, the installer also creates a PL/SQL function in the Oracle
Application Express product schema (APEX_040200). You can change and recompile
this function to restrict access. The source code for this function is not wrapped and
can be found in the Oracle Application Express product core directory in the file
named wwv_flow_epg_include_local.sql. The source code is as follows
CREATE OR REPLACE FUNCTION
wwv_flow_epg_include_mod_local(
PROCEDURE_NAME IN VARCHAR2)
RETURN BOOLEAN
IS
BEGIN
RETURN FALSE; -- remove this statement when
you add procedure names to the "IN" list
IF UPPER(procedure_name) IN (
'') THEN
RETURN TRUE;
ELSE
RETURN FALSE;
END IF;
END wwv_flow_epg_include_mod_local;
/
To add names of procedures that should be allowed:
1. Remove or comment out the RETURN FALSE statement that immediately follows
the BEGIN statement:
...
BEGIN
RETURN FALSE; -- remove this statement when
you add procedure names to the "IN" list
...
2. Add names to the clause representing procedure names that should be allowed to
be invoked in HTTP requests. For example to allow procedures PROC1 and PROC2
the IN list you would write IN ('PROC1', 'PROC2').
After changing the source code of this function, alter the Oracle Application Express
product schema (APEX_040200) and compile the function in that schema.
To alter the product schema, APEX_040200
1. Log in to SQL Command Line (SQL*Plus) as SYS.
2. Alter the product schema (APEX_040200) by entering the following command:
ALTER SESSION SET CURRENT_SCHEMA APEX_040200;
See Also: Oracle Application Express Installation Guide
Managing Instance Settings
2-30 Oracle Application Express Administration Guide
3. Compile the function wwv_flow_epg_include_local.sql.
The wwv_flow_epg_include_mod_local function is called by Oracle Application
Express's request validation function which itself is called by the embedded PL/SQL
gateway or mod_plsql. The Oracle Application Express function first evaluates the
request and based on the procedure name, approves it, rejects it, or passes it to the
local function, wwv_flow_epg_include_mod_local, which can evaluate the
request using its own rules.
When you create new Database Access Descriptors for use with Oracle Application
Express, the request validation function directive should be specified. Specifically, the
function wwv_flow_epg_include_modules.authorize should be named in the
directive PlsqlRequestValidationFunction in the Database Access Descriptor
entry in dads.conf.
If you have no additional restrictions beyond those implemented in the wwv_flow_
epg_include_modules.authorize function, there is no need to take any action
with respect to the source code for the wwv_flow_epg_include_mod_local
function.
The PL/SQL Request Validation Function directive is only available in Oracle
Application Server 10g and Oracle HTTP Server 11g or later, as well as the embedded
PL/SQL gateway in Oracle Database 11g or later. This directive is not available in
Oracle HTTP Server Release 9.0.3.
Defining Authorized URLs
In previous releases of Oracle Application Express, developers can use a URL as an
argument in Oracle Application Express procedures that redirect to the defined URL.
Examples include APEX_UTIL.COUNT_CLICK (p_url parameter) and WWV_FLOW_
CUSTOM_AUTH_STD.LOGOUT (p_next_url parameter).
Instance administrators can define a list of authorized URLs. When a URL is provided
as an argument to these procedures, it is verified internally against this list.
To manage the Authorized URLs list:
1. Log in to Oracle Application Express Administration Services. See "Logging In To
Oracle Application Express Administration Services" on page 2-6.
2. Click Manage Instance.
3. Under Instance Settings, click Security.
4. Click the Authorized URLs tab.
5. To add a new URL:
a. Click Create.
b. Authorized URL - Enter an authorized URL that can be used as the parameter
value to certain Application Express procedures.
The entire authorized URL value is compared with the URL parameter value
in Oracle Application Express procedures. If there is an exact match up to and
including the entire length of the Authorized URL value, then the URL
parameter value is permitted.
c. Description - Enter a description of the URL.
d. Click Apply Changes.
6. To edit an existing URL:
a. Click the Edit icon adjacent to the URL.
Managing Instance Settings
Oracle Application Express Hosted Instance Administration 2-31
b. Edit the Authorized URL and Description fields.
c. Click Apply Changes.
7. To delete an existing URL:
a. Click the Edit icon adjacent to the URL.
b. Click Delete.
Configuring Instance Settings
Instance Settings control Oracle Application Express configuration and apply to all
workspaces within the current Oracle Application Express instance.
Topics:
■ Enabling Self Service Workspace Provisioning
■ Disabling Email Provisioning
■ Configuring Storage
■ Configuring Email
■ Configuring Wallet Information
■ Configuring Report Printing
■ Configuring Online Help
■ Configuring Workspace Size Options for Requests
■ Managing Application ID Range
Enabling Self Service Workspace Provisioning
Use the Self Service section of the Instance Setting page to determine how the process
of provisioning (or creating) a workspace works for your Oracle Application Express
development instance.
In Manual provision mode, an Instance administrator creates new workspaces and
notifies the Workspace administrator of the login information. In Request or Email
Verification provision modes, users request workspaces directly in a self-service
fashion. In this scenario, users use a link on the login page to access a request form.
After the workspace request has been granted, users are automatically emailed the
appropriate login information.
To specify a provisioning mode:
1. Log in to Oracle Application Express Administration Services. See "Logging In To
Oracle Application Express Administration Services" on page 2-6.
2. Click Manage Instance.
3. Under Instance Settings, click Instance Settings.
4. Locate the Self Service region.
5. Make a selection from Provisioning Status:
■ Manual - An Instance administrator manually creates new workspaces and
notifies the Workspace administrator of the login information.
See Also: Oracle Application Express API Reference
See Also: "Creating Workspaces" on page 2-64
Managing Instance Settings
2-32 Oracle Application Express Administration Guide
■ Request - Users request workspaces directly in a self-service fashion. Selecting
this option displays a link on the Login page enabling users to request a
workspace. When a user requests a workspace, each request is submitted to a
queue for approval. When the request is approved, the user is sent an email
containing login credentials (the workspace name, Username, and password).
■ Request with Email Verification - Works similar to Request except each user
receives an initial email containing a verification link. Clicking this link
validates the user’s email address and then the request is processed. Then
another email is sent to the user containing login credentials (that is, the
workspace name, Username, and password).
6. For Require Verification Code, select Yes or No to specify whether a verification
code is displayed and required for someone to request a new workspace.
7. If you select Request with Email Verification:
■ Require Verification Code - Determines if a verification code displays and is
required during the request process. Select Yes or No.
8. For Notification Email Address, enter the email address to receive notification
email messages for new workspace requests and change workspace requests. If
not specified, no workspace request notification email messages is sent.
9. Click Apply Changes.
Disabling Email Provisioning
Use Email Provisioning to disable workspace provisioning when provisioning with
Email Verification. Use the Message field to display a message to the user that explains
why email provisioning is disabled.
To disable email provisioning:
1. Log in to Oracle Application Express Administration Services. See "Logging In To
Oracle Application Express Administration Services" on page 2-6.
2. Click Manage Instance.
3. Under Instance Settings, click Instance Settings.
4. From Email Provisioning, select Disabled.
Selecting Disabled completely disables workspace provisioning when
provisioning with Email Verification.
5. In Message, enter a message that explains why email provisioning is disabled.
6. Click Apply Changes.
Note: To enable users to request a workspace using a link on the
Login page, an Instance administrator must choose the
provisioning status of Request or Email Verification as described
in the previous procedure. If the provisioning status is set to
Manual, no link appears on the login page.
See Also: "Disabling Email Provisioning" on page 2-32, "Configuring
Email" on page 2-35, and "Managing Workspace and Change
Requests" on page 2-7
Managing Instance Settings
Oracle Application Express Hosted Instance Administration 2-33
Configuring Storage
Instance administrators can configure the following storage options: require a new
schema when requesting a workspace, auto extend tablespaces, or delete uploaded
files are a specified number of days.
Topics:
■ Requiring a New Schema
■ Enabling Auto Extend Tablespaces
■ Enabling Bigfile Tablespaces
■ Enabling Encrypted Tablespaces
■ Deleting Uploaded Files
Requiring a New Schema To require a new schema when creating a workspace:
1. Log in to Oracle Application Express Administration Services. See "Logging In To
Oracle Application Express Administration Services" on page 2-6.
2. Click Manage Instance.
3. Under Instance Settings, click Instance Settings.
4. Scroll down to Storage.
5. From Require New Schema, select one of the following:
■ Yes - Requires users to request a new schema when they request a new
workspace.
■ No - Enables users to select an existing schema when they request a new
workspace.
6. Auto Extend Tablespaces, select Yes or No.
7. Click Apply Changes.
Enabling Auto Extend Tablespaces If Auto Extend Tablespaces is enabled, tablespaces
provisioned with Oracle Application Express are created with a data file that is one
tenth the requested size. The data file automatically extends up to the requested size.
For example, if a user requests a 100 MB workspace, the initial size of the data file is 10
MB and automatically extends up to a maximum size of 100 MB.
To enable Auto Extend Tablespaces:
1. Log in to Oracle Application Express Administration Services. See "Logging In To
Oracle Application Express Administration Services" on page 2-6.
2. Click Manage Instance.
3. Under Instance Settings, click Instance Settings.
4. Scroll down to Storage.
5. To enable Auto Extend Tablespaces, select Yes.
6. Click Apply Changes.
Enabling Bigfile Tablespaces When a workspace is provisioned, Oracle Application
Express creates the associated database user, tablespace, and data file. If Bigfile
Tablespaces is enabled, tablespaces provisioned with Oracle Application Express are
created as bigfile tablespaces. A bigfile tablespace is a tablespace with a single, but
Managing Instance Settings
2-34 Oracle Application Express Administration Guide
very large data file. Traditional smallfile tablespaces, in contrast, can contain multiple
datafiles, but the files cannot be as large.
Oracle does not recommend using bigfile tablespaces on platforms that do not support
large file sizes and can limit tablespace capacity. Refer to your operating system
specific documentation for information about maximum supported file sizes.
1. Log in to Oracle Application Express Administration Services. See "Logging In To
Oracle Application Express Administration Services" on page 2-6.
2. Click Manage Instance.
3. Under Instance Settings, click Instance Settings.
4. Scroll down to Storage.
5. For Bigfile Tablespaces, select Yes.
6. Click Apply Changes.
Enabling Encrypted Tablespaces If Encrypted Tablespaces is enabled, tablespaces
provisioned with Oracle Application Express are created as encrypted tablespaces
using the Oracle database feature Transparent Data Encryption (TDE). TDE encrypts
sensitive data stored in data files. To prevent unauthorized decryption, TDE stores the
encryption keys in a security module external to the database.
To be able to exploit this feature in Application Express, an encryption wallet must be
created and with a master encryption key set. Additionally, the encryption wallet must
be open before provisioning a new Application Express workspace.
To enable Encrypted Tablespaces:
1. Log in to Oracle Application Express Administration Services. See "Logging In To
Oracle Application Express Administration Services" on page 2-6.
2. Click Manage Instance.
3. Under Instance Settings, click Instance Settings.
4. Scroll down to Storage.
5. For Encrypted Tablespaces, select Yes.
6. Click Apply Changes.
Deleting Uploaded Files Use Delete Uploaded Files After (days) to specify the number
of days after which Oracle Application Express automatically deletes uploaded files.
Note this automatic deletion process applies to all workspaces in an Oracle
Application Express instance. The types of files that are deleted include:
■ Application Export
■ CSS Export
■ Images Export
■ Page Export
See Also: "Available Parameter Values" in Oracle Application Express
API Reference to learn about the BIGFILE_TABLESPACES_ENABLED
parameter
See Also: "Available Parameter Values" in Oracle Application Express
API Reference to learn about the ENCRYPTED_TABLESPACES_
ENABLED parameter
Managing Instance Settings
Oracle Application Express Hosted Instance Administration 2-35
■ Plug-in
■ Script Export
■ Spreadsheet / Text Data Import
■ Static Files Export
■ Themes
■ User Interface Defaults
■ Workspace Export
■ XML Data Import
To configure when export and import files are deleted:
1. Log in to Oracle Application Express Administration Services. See "Logging In To
Oracle Application Express Administration Services" on page 2-6.
2. Click Manage Instance.
3. Under Instance Settings, click Instance Settings.
4. Scroll down to Storage.
5. In Delete Uploaded Files After (days), enter the number of days after which Oracle
Application Express deletes uploaded files. Enter a positive, whole number. If this
setting is null, then no files are automatically deleted.
6. Click Apply Changes.
Configuring Email
To enable Oracle Application Express to send mail, an Instance administrator must
configure email settings.
Additionally, if you are running Oracle Application Express with Oracle Database 11g
or later, you must enable outbound mail. Starting with Oracle Database 11g Release 1
(11.1), the ability to interact with network services is disabled by default. For more
information, see "Enabling Network Services in Oracle Database 12c" for your
configuration scenario in Oracle Application Express Installation Guide.
Topics:
■ Configuring Email in a Full Development Environment
■ Configuring Email in a Runtime Environment
■ Determining Email Settings in a Runtime Environment
Tip: To view a summary of deleted files, see the Automatic File
Delete Log. See "Monitoring Activity Across a Development Instance"
on page 2-87
Tip: You can configure Oracle Application Express to automatically
email users their login credentials when a new workspace request has
been approved. To learn more, see "Specifying a Provisioning Mode"
on page 2-65.
See Also: "Managing the Mail Queue" on page 2-53 and "APEX_
MAIL" in Oracle Application Express API Reference
Managing Instance Settings
2-36 Oracle Application Express Administration Guide
Configuring Email in a Full Development Environment To configure Oracle Application
Express to send mail in a full development environment:
1. Log in to Oracle Application Express Administration Services. See "Logging In To
Oracle Application Express Administration Services".
2. Click Manage Instance.
3. Under Instance Settings, click Instance Settings.
4. Under Email, enter the following:
a. Application Express Instance URL - Enter the URL to the Oracle Application
Express instance, inclusive of the DAD and trailing slash.
b. Application Express Images URL - Enter the URL to the Oracle Application
Express images directory, inclusive of the trailing slash.
c. SMTP Host Address - Defines the server address of the SMTP server. By
default on installation, this is set to localhost. If you are using another
server as an SMTP relay, change this parameter to that server's address.
d. SMTP Host Port - Defines the port the SMTP server listens to for mail
requests. The default setting is 25.
e. SMTP Authentication Username - If you enter a username, Oracle
Application Express authenticates against it when sending emails. Prior to
Oracle Database 11g Release 2 (11.2.0.2), only the SMTP authentication scheme
"LOGIN" is supported. On newer database versions, all authentication
schemes of UTL_SMTP are supported.
f. SMTP Authentication Password - If you enter a password, Oracle
Application Express authenticates against it when sending emails. Prior to
Oracle Database 11g Release 2, Release 11.2.0.2, only the SMTP authentication
scheme "LOGIN" is supported. On newer database versions, all authentication
schemes of UTL_SMTP are supported.
g. Use SSL/TLS - Beginning with Oracle Database 11g Release 2 (11.2.0.2), Oracle
Application Express supports secure SMTP connections. Options include:
– Yes - A secure connection with SSL/TLS is made before SMTP
communication.
– After connection is established - Oracle Application Express sends the
SMTP command STARTTLS immediately after the connection is opened.
– No - A non-secure connection is opened.
h. Default Email From Address - Defines the from address for tasks that
generate email, such as approving a provision request or resetting a password.
i. Maximum Emails per Workspace - Defines the number of email messages
that can be sent with the APEX_MAIL API per workspace per 24 hour period.
5. Click Apply Changes.
Configuring Email in a Runtime Environment To configure Oracle Application Express to
send mail in a runtime environment:
1. Start SQL*Plus and connect to the database where Oracle Application Express is
installed as SYS. For example:
■ On Windows:
SYSTEM_DRIVE: sqlplus /nolog
Managing Instance Settings
Oracle Application Express Hosted Instance Administration 2-37
SQL> CONNECT SYS as SYSDBA
Enter password: SYS_password
■ On UNIX and Linux:
$ sqlplus /nolog
SQL> CONNECT SYS as SYSDBA
Enter password: SYS_password
2. Run the following statement:
ALTER SESSION SET CURRENT_SCHEMA = APEX_040200
3. Run the following statement:
BEGIN
APEX_INSTANCE_ADMIN.SET_PARAMETER(PARAMETER_NAME, PARAMETER_VALUE);
END;
For a description of email parameters, see "Configuring Email in a Full
Development Environment" on page 2-36.
Determining Email Settings in a Runtime Environment To determine email settings in
runtime environment:
1. Start SQL*Plus and connect to the database where Oracle Application Express is
installed as SYS. For example:
■ On Windows:
SYSTEM_DRIVE: sqlplus /nolog
SQL> CONNECT SYS as SYSDBA
Enter password: SYS_password
■ On UNIX and Linux:
$ sqlplus /nolog
SQL> CONNECT SYS as SYSDBA
Enter password: SYS_password
2. Run the following statement:
ALTER SESSION SET CURRENT_SCHEMA = APEX_040200
3. Run the following statement:
SELECT
APEX_INSTANCE_ADMIN.GET_PARAMETER(PARAMETER_NAME)
FROM DUAL;
For a description of email parameters, see "Configuring Email in a Full
Development Environment" on page 2-36.
See Also: "SET_PARAMETER Procedure" in Oracle Application
Express API Reference
See Also: "GET_PARAMETER Function" in Oracle Application
Express API Reference
Managing Instance Settings
2-38 Oracle Application Express Administration Guide
Configuring Wallet Information
Secure Sockets Layer (SSL) is an industry standard protocol that uses RSA public key
cryptography with symmetric key cryptography to provide authentication,
encryption, and data integrity. When SSL is enabled, https displays in the URL.
If you call a SSL-enabled URL (for example, by invoking a Web service), or create a
region of type URL that is SSL-enabled, you must create a wallet. A wallet is a
password-protected container that stores authentication and signing credentials
(including private keys, certificates, and trusted certificates) needed by SSL.
Topics:
■ Creating a Wallet
■ Configuring a Wallet in a Full Development Environment
■ Configuring a Wallet in a Runtime Environment
■ Determining Wallet Settings in a Runtime Environment
Creating a Wallet To create a wallet:
1. The database administrator must create a wallet on the Oracle Application Express
database instance. See "Using Oracle Wallet Manager" in Oracle Database Enterprise
User Security Administrator's Guide.
2. The Instance administrator configures the Wallet section of the Instance Settings
page to specify the file system path to the wallet and the wallet password (if
required).
Configuring a Wallet in a Full Development Environment To specify wallet settings in a full
development environment:
1. Log in to Oracle Application Express Administration Services. See "Logging In To
Oracle Application Express Administration Services" on page 2-6.
2. Click Manage Instance.
3. Under Instance Settings, click Instance Settings.
4. Scroll down to Wallet.
5. In Wallet, enter the path on the file system where the wallet is located using the
following format:
file:directory-path
6. If a password is required to open the wallet:
a. Enter a password in the Wallet Password field.
b. Select Check to confirm that you wish to change the wallet password.
7. Click Apply Changes.
Configuring a Wallet in a Runtime Environment To specify wallet settings in a runtime
environment:
See Also: "Working with SSL Enabled Web Services" in Oracle
Application Express Application Builder User's Guide and "Using Oracle
Wallet Manager" in Oracle Database Enterprise User Security
Administrator's Guide
Managing Instance Settings
Oracle Application Express Hosted Instance Administration 2-39
1. Start SQL*Plus and connect to the database where Oracle Application Express is
installed as SYS. For example:
■ On Windows:
SYSTEM_DRIVE: sqlplus /nolog
SQL> CONNECT SYS as SYSDBA
Enter password: SYS_password
■ On UNIX and Linux:
$ sqlplus /nolog
SQL> CONNECT SYS as SYSDBA
Enter password: SYS_password
2. Run the following statement:
ALTER SESSION SET CURRENT_SCHEMA = APEX_040200
3. Run the following statement:
BEGIN
APEX_INSTANCE_ADMIN.SET_PARAMETER(PARAMETER_NAME, PARAMETER_VALUE);
END;
For a description of wallet parameters, see Table 2–3 on page 2-39.
Determining Wallet Settings in a Runtime Environment To determine wallet settings in a
runtime environment:
1. Start SQL*Plus and connect to the database where Oracle Application Express is
installed as SYS. For example:
■ On Windows:
SYSTEM_DRIVE: sqlplus /nolog
SQL> CONNECT SYS as SYSDBA
Enter password: SYS_password
■ On UNIX and Linux:
$ sqlplus /nolog
SQL> CONNECT SYS as SYSDBA
Enter password: SYS_password
2. Run the following statement:
ALTER SESSION SET CURRENT_SCHEMA = APEX_040200
3. Run the following statement:
Table 2–3 Wallet Parameters
Parameter Name Description
WALLET_PATH The path to the wallet on the file system, for example:
file:/home/username/wallets
WALLET_PWD The password associated with the wallet.
See Also: "SET_PARAMETER Procedure" in Oracle Application
Express API Reference
Managing Instance Settings
2-40 Oracle Application Express Administration Guide
SELECT
APEX_INSTANCE_ADMIN.GET_PARAMETER(PARAMETER_NAME)
FROM DUAL;
For a description of wallet parameters, see Table 2–3 on page 2-39.
Configuring Report Printing
Oracle Application Express provides several features so that end users can download
and print reports in various formats, including PDF. To set up this functionality,
different users must configure the following printing settings:
1. Site Level: Instance administrators must specify the level of functionality
(Standard or Advanced) for an entire Oracle Application Express instance, as
described in this section.
2. Application Level: Workspace administrators and developers can define Report
Queries and Report Layouts. Report Queries and Report Layouts are stored under
Shared Components and are not tied to a specific page.
3. Page/Region Level: Developers can edit the Report regions on specific pages to
enable printing. This, in turn, enables end users to print regions as reports in
various formats. See "Configuring Classic Report Region Print Attributes" in
Oracle Application Express Application Builder User's Guide.
Topics:
■ Configuring Report Printing in a Full Development Environment
■ Configuring Report Printing Settings in a Runtime Environment
■ Determining Report Printing Settings in a Runtime Environment
Configuring Report Printing in a Full Development Environment To configure the printing of
reports in a full development environment:
1. Log in to Oracle Application Express Administration Services. See "Logging In To
Oracle Application Express Administration Services" on page 2-6.
2. Click Manage Instance.
3. Under Instance Settings, click Instance Settings.
4. Scroll down to Report Printing.
5. For Printer Server:
– APEX Listener - Select this option if you are using the APEX Listener 2.0 or
newer. This option enables you to use the basic printing functionality, which
includes creating report queries and printing report regions using the default
templates provided in Application Express and using your own customized
XSL-FO templates.
See Also: "GET_PARAMETER Function" in Oracle Application
Express Application Builder User's Guide
Tip: If you are running Oracle Application Express with Oracle
Database 11g Release 1 (11.1) or later, you must enable network
services to use report printing. See "Enable Network Services in Oracle
Database 12c" for your configuration scenario in Oracle Application
Express Installation Guide.
Managing Instance Settings
Oracle Application Express Hosted Instance Administration 2-41
– External (Apache FOP) - Select this option if you are using Apache FOP on an
external J2EE server. This option enables you to use the basic printing
functionality, which includes creating report queries and printing report
regions using the default templates provided in Application Express and
using your own customized XSL-FO templates.
– Oracle BI Publisher - This option requires a valid license of Oracle BI
Publisher (also known as Oracle XML Publisher). This option enables you to
take report query results and convert them from XML to RTF format using
Oracle BI Publisher. Select this option to upload your own customized RTF or
XSL-FO templates for printing reports within Application Express.
6. The following options apply to External (Apache FOP) and Oracle BI Publisher:
■ For Print Server Protocol, select the protocol that the print server uses.
■ For Print Server Host Address, specify the host address of the print server
engine.
■ For Print Server Port, define the port of the print server engine. By default, this
is set to 8888 when the report server is installed.
7. Click Apply Changes.
Configuring Report Printing Settings in a Runtime Environment To configure report printing
settings in a runtime environment:
1. Start SQL*Plus and connect to the database where Oracle Application Express is
installed as SYS. For example:
■ On Windows:
SYSTEM_DRIVE: sqlplus /nolog
SQL> CONNECT SYS as SYSDBA
Enter password: SYS_password
■ On UNIX and Linux:
$ sqlplus /nolog
SQL> CONNECT SYS as SYSDBA
Enter password: SYS_password
2. Run the following statement:
ALTER SESSION SET CURRENT_SCHEMA = APEX_040200
3. Run the following statement:
Note: The APEX Listener option does not require an external print
server, instead the report data and stylesheet are downloaded to the
listener, rendered into PDF format by the listener and then sent to the
client. The PDF documents in this setup are not returned back into the
database, thus the print APIs are not supported when using the APEX
Listener-based configuration.
See Also: PDF Printing in Application Express to learn more about
installing and configuring Oracle BI Publisher. Go to:
http://www.oracle.com/technetwork/developer-tools/apex/ap
plication-express/configure-printing-093060.html
Managing Instance Settings
2-42 Oracle Application Express Administration Guide
BEGIN
APEX_INSTANCE_ADMIN.SET_PARAMETER(PARAMETER_NAME, PARAMETER_VALUE);
END;
For a description of available parameters, see Table 2–4.
Determining Report Printing Settings in a Runtime Environment To determine report printing
settings in a runtime environment:
1. Start SQL*Plus and connect to the database where Oracle Application Express is
installed as SYS. For example:
■ On Windows:
SYSTEM_DRIVE: sqlplus /nolog
SQL> CONNECT SYS as SYSDBA
Enter password: SYS_password
■ On UNIX and Linux:
$ sqlplus /nolog
SQL> CONNECT SYS as SYSDBA
Enter password: SYS_password
2. Run the following statement:
ALTER SESSION SET CURRENT_SCHEMA = APEX_040200
3. Run the following statement:
SELECT
APEX_INSTANCE_ADMIN.GET_PARAMETER(PARAMETER_NAME)
FROM DUAL;
Table 2–4 Report Printing Parameters in Runtime Environment
Parameter Name Description
PRINT_BIB_LICENSED Specify either standard support or advanced support. Advanced
support requires an Oracle BI Publisher license. Valid values
include:
■ STANDARD
■ ADVANCED
■ APEX_LISTENER
PRINT_SVR_HOST Specifies the host address of the print server converting engine,
for example, localhost. Enter the appropriate host address if
the print server is installed at another location.
PRINT_SVR_PORT Defines the port of the print server engine, for example 8888.
Value must be a positive integer.
PRINT_SVR_PROTOCOL Valid values include:
■ http
■ https
PRINT_SVR_SCRIPT Defines the script that is the print server engine, for example:
/xmlpserver/convert
See Also: "SET_PARAMETER Procedure" in Oracle Application
Express API Reference
Managing Instance Settings
Oracle Application Express Hosted Instance Administration 2-43
For a description of available parameters, see Table 2–4 on page 2-42.
Configuring Online Help
Developers can access the Oracle Application Express online documentation library by
clicking the Help link in the upper right corner of the Oracle Application Express
development environment. Instance administrators can redirect this Help link by
configuring the Help URL attribute.
To configure the location of Oracle Application Express Help link:
1. Log in to Oracle Application Express Administration Services. See "Logging In To
Oracle Application Express Administration Services" on page 2-6.
2. Click Manage Instance.
3. Under Instance Settings, click Instance Settings.
4. Scroll down to Help.
5. In Help URL, edit the URL. This URL displays when users click the Help link from
within Oracle Application Express.
6. Click Apply Changes.
Configuring Workspace Size Options for Requests
Instance administrators can configure the workspace sizes available when users
request:
■ a new workspace and schema
■ additional space for an existing workspace
To configure workspace size options:
1. Log in to Oracle Application Express Administration Services. See "Logging In To
Oracle Application Express Administration Services" on page 2-6.
2. Click Manage Instance.
3. Under Instance Settings, click Instance Settings.
4. Scroll down to New Workspace Request Size and Workspace Change Request Size.
Specify the following:
■ Size in Megabytes - Edit the default numbers to change the size options.
■ Display - Select Yes for all the size options you want to appear in the select list
for workspace size.
■ Default - Select the default value to appear in the storage field for workspace
and change requests.
5. Click Apply Changes.
See Also: "GET_PARAMETER Function" in Oracle Application
Express API Reference
See Also: "About the Oracle Application Express Documentation" in
Oracle Application Express Application Builder User's Guide
See Also: "Enabling Auto Extend Tablespaces" on page 2-33
Managing Instance Settings
2-44 Oracle Application Express Administration Guide
Managing Application ID Range
Instance administrators can control the range for IDs of new database or Websheet
applications. If you separate ID ranges in large multi-instance installations, you can
easily move workspaces between the instances and keep their application IDs. To
enable ID ranges, you must specify at least an ID Minimum.
To configure the application ID ranges:
1. Log in to Oracle Application Express Administration Services. See "Logging In To
Oracle Application Express Administration Services" on page 2-6.
2. Click Manage Instance.
3. Under Instance Settings, click Instance Settings.
4. Scroll down to Application ID Range and specify the following:
■ ID Minimum - Enter the lower range for database and Websheet application
IDs.
■ ID Maximum - Enter the maximum range for database and Websheet
application IDs.
5. Click Apply Changes.
Including an Agreement or Survey When Running the Signup Wizard
Instance administrators have the option to create and include an agreement or survey
when users run the New Signup Wizard.
Topics:
■ Defining an Agreement
■ Defining a Signup Survey
Defining an Agreement
When users run the New Service Signup Wizard, Instance administrators can require
they accept an agreement before the wizards submits the service request.
To include and define an agreement:
1. Log in to Oracle Application Express Administration Services. See "Logging In To
Oracle Application Express Administration Services" on page 2-6.
2. Click Manage Instance.
3. Under Instance Settings, click Manage New Service Signup Wizard.
4. For Enable Agreement:
■ Yes - Includes the agreement you define when users run the New Signup
Service Wizard.
■ No - Excludes the agreement you define when users run the New Signup
Service Wizard.
5. In Agreement Text, enter the text of the agreement
6. Click Apply Changes.
Defining a Signup Survey
Instance administrators can also include survey questions users must complete when
running the New Service Signup Wizard.
Managing Instance Settings
Oracle Application Express Hosted Instance Administration 2-45
To include and define a survey:
1. Log in to Oracle Application Express Administration Services. See "Logging In To
Oracle Application Express Administration Services" on page 2-6.
2. Click Manage Instance.
3. Under Instance Settings, click Manage New Service Signup Wizard.
4. Scroll down to Survey Questions.
5. For Enable Survey:
■ Yes - Includes the survey questions you define when users run the New
Signup Service Wizard.
■ No - Excludes the survey questions you define when users run the New
Signup Service Wizard.
6. Under Question, enter questions and answers.
Enter all answers for each question in one field, delimited by a new line. Use the
Pre Text and Post Text fields to include introductory and closing text.
7. Click Apply Changes.
Purging Inactive Workspaces
Inactive workspaces consume valuable storage space and degrade system
performance. By enabling Workspace Purge Settings, you can configure Oracle
Application Express to purge inactive workspaces.
If a workspace is designated as inactive, a notification email is sent to each workspace
administrator indicating that the workspace is purged in a specific number of days.
The workspace administrator can prevent the workspace from being purged by
following an embedded link and following the online instructions.
Configuring Workspace Purge Settings
To configure workspace purge settings:
1. Log in to Oracle Application Express Administration Services. See "Logging In To
Oracle Application Express Administration Services" on page 2-6.
2. Click Manage Instance.
3. Under Instance Settings, click Workspace Purge Settings.
4. On the Workspace Purge Settings, configure the following:
a. Enabled - Select Yes to enable the workspace purge process. Select No to
disable the workspace purge process.
See Also: "Viewing the Signup Survey Report" on page 2-89
See Also: To view reports concerning purging inactive workspaces,
see "Monitoring Activity Across a Development Instance" on
page 2-87
See Also: "Configuring Email" on page 2-35 and "Sending Email
from an Application" in Oracle Application Express Application Builder
User's Guide
Managing Instance Settings
2-46 Oracle Application Express Administration Guide
b. Language - Select the language of the text of emails sent to workspace
administrators of inactive workspaces. Note that only one language can be
selected for each instance.
c. Purge Administration Email Address - Enter the email address (or From
address) from which emails are sent to workspace administrators.
d. Send Summary Email To - Enter a list of email addresses separated by
commas. Recipients will receive a daily email summary of the purge process.
e. Days Until Purge - Enter the number of days before a workspace is physically
purged. For example, entering 10 means a workspace will be purged 10 days
after it is added to the inactive list.
f. Reminder Days in Advance - Enter the number of days before the purge date
to send a reminder email to workspace administrators. Reminder email
criteria includes:
– The workspace is on the inactive list
– There has been no activity in the workspace
– The workspace administrator has not chosen to follow the link in the
email to prevent the workspace from being purged
g. Days Inactive - Enter the number of days of inactivity before a workspace is
classified as inactive. Inactivity includes not logging into the workspace and
the no runtime activity of any application in the workspace.
h. Grace Period (Days) - Enter the number of days for the grace period. The grace
period starts after workspace administrators click the link in the email to not
have their workspace purged. If there is no activity during the grace period,
the workspace is added back to the list of inactive workspaces.
i. Maximum Execution Time (Hours) - Enter the number limiting the number of
hours that the purge process may execute per run of the workspace purge job.
j. Maximum Number of Workspaces - Enter the maximum number of
workspaces to be purged per run of the workspace purge job.
k. Maximum Number of Emails - Enter the maximum number of reminder
emails and workspace inactive emails to be send per run of the workspace
purge job.
5. Click Apply Changes.
Viewing Information About Installed Packaged Database Applications
Instance administrators can view the popularity of any given packaged database and
Websheet application on a given instance. For example, they can see how many
workspaces have installed Sample Calendar.
Topics:
■ Viewing Packaged Database Applications
■ Viewing Packaged Websheet Applications
Viewing Packaged Database Applications
To view a summary of packaged database applications:
1. Log in to Oracle Application Express Administration Services. See "Logging In To
Oracle Application Express Administration Services" on page 2-6.
Managing Instance Settings
Oracle Application Express Hosted Instance Administration 2-47
2. Click Manage Instance.
3. Under Manage Shared Components, click Packaged Database Applications.
The Packaged Database Applications page appears.
Viewing Packaged Websheet Applications
To view a summary of packaged Websheet applications:
1. Log in to Oracle Application Express Administration Services. See "Logging In To
Oracle Application Express Administration Services" on page 2-6.
2. Click Manage Instance.
3. Under Manage Shared Components, click Packaged Websheet Applications.
The Packaged Websheet Applications page appears.
The report displays total elapsed time to install each packaged applications. Note
that the packaged application log is kept only up to 60 days. Any log older than 60
days is deleted.
Monitoring the Progress Packaged Application Installations
Instance administrators have the ability to view the progress of a packaged application
installation.
To monitor packaged application installation progress:
1. Log in to Oracle Application Express Administration Services. See "Logging In To
Oracle Application Express Administration Services" on page 2-6.
2. Click Manage Instance.
3. Under Manage Shared Components, click Monitor Packaged Application
Installations.
The Packaged Applications Installations page appears. You can customize the
page using the Search bar at the top. See "Customizing Interactive Reports" in
Oracle Application Express Application Builder User's Guide.
The report displays total elapsed time to install each packaged application. Click
the number in the Events column to view the log in detail.
Tip: The Packaged Database Applications page displays as an
interactive report. You can customize the appearance of the page
using the Search bar at the top of the page. See "Customizing
Interactive Reports" in Oracle Application Express Application Builder
User's Guide.
Tip: The Packaged Websheet Applications page displays as an
interactive report. You can customize the appearance of the page
using the Search bar at the top of the page. See "Customizing
Interactive Reports" in Oracle Application Express Application Builder
User's Guide.
Note: The Packaged Application log is kept for up to 60 days. Any
log older than 60 days is deleted.
Managing Instance Settings
2-48 Oracle Application Express Administration Guide
Managing Public Themes
Instance administrators manage the theme repository for an entire Oracle Application
Express instance. Only an Instance administrators can add or delete a theme from the
repository.
When you create a public theme, you add it to the theme repository. Public themes are
available when you create an application or when you create a theme for an existing
application.
Topics:
■ Adding a Public Theme to the Theme Repository
■ Deleting a Public Theme
■ Modifying a Public Theme
■ About Exporting a Public Theme
Adding a Public Theme to the Theme Repository
To add a theme to the Theme repository:
1. Log in to Oracle Application Express Administration Services. See "Logging In To
Oracle Application Express Administration Services" on page 2-6.
2. Click Manage Instance.
3. Under Manage Shared Components, click Public Themes.
The Public Themes page appears.
4. Select Create.
5. For Workspace, select a workspace and click Next.
6. For Application, select an application and click Next.
7. For Theme, select a theme and click Next.
8. For Name, specify the following:
a. Theme Number - Enter a number that uniquely identifies a theme within a
workspace.
b. Theme Name - Enter a name for the workspace theme.
c. Description - Enter a description.
d. Click Next.
9. Click Create Public Theme.
Deleting a Public Theme
To delete a public theme:
1. Log in to Oracle Application Express Administration Services. See "Logging In To
Oracle Application Express Administration Services" on page 2-6.
2. Click Manage Instance.
3. Under Manage Shared Components, click Public Themes.
See Also: "Managing Workspace Themes" in Oracle Application
Express Application Builder User's Guide
Managing Instance Settings
Oracle Application Express Hosted Instance Administration 2-49
The Public Themes page appears.
4. Select the theme to be deleted.
5. Click Delete.
Modifying a Public Theme
You cannot edit a public theme directly. To modify a public theme, you must create a
new application using the theme, modify it, and then manually add it to the theme
repository.
To modify a public theme:
1. Create an application using the theme you want to modify. See "Creating a
Database Application" in Oracle Application Express Application Builder User's Guide.
2. Modify the theme. See "Editing a Theme" in Oracle Application Express Application
Builder User's Guide.
3. Delete the existing public theme. See "Deleting a Template Application" on
page 50.
4. Add the modified theme to the theme repository. See "Adding an Application to
the Template Applications Repository" on page 2-50.
About Exporting a Public Theme
You export a theme in the same way you export any related application files.
Exporting a public theme involves the following steps:
1. Create an application using the theme you want to modify. See "Creating a
Database Application" in Oracle Application Express Application Builder User's Guide.
2. Export the application. See "Exporting an Application" in Oracle Application Express
Application Builder User's Guide.
3. Import the exported file into the target Oracle Application Express instance. See
"Importing an Application, Page or Component Export" in Oracle Application
Express Application Builder User's Guide.
4. Install the exported file from the Export Repository. See "Installing Export Files" in
Oracle Application Express Application Builder User's Guide.
Managing Template Applications
Instance administrators manage the template application repository for an entire
Oracle Application Express. Developers can use templates applications when they run
the Create Application Wizard to quickly create robust applications.
Only an instance administrator can add or remove a template application from the
repository. To create a template application, you must first export the application and
then add it to the template application repository.
Topics:
■ Adding an Application to the Template Applications Repository
■ Deleting a Template Application
■ Editing a Template Application
See Also: "Creating a Database Application from a Template" in
Oracle Application Express Application Builder User's Guide
Managing Instance Settings
2-50 Oracle Application Express Administration Guide
Adding an Application to the Template Applications Repository
To add an application to the template application repository:
1. Export the application. See "Exporting an Application" in Oracle Application Express
Application Builder User's Guide.
2. Log in to Oracle Application Express Administration Services. See "Logging In To
Oracle Application Express Administration Services" on page 2-6.
3. Click Manage Instance.
4. Under Manage Shared Components, click Template Applications.
The Template Applications page appears.
5. Select Load Template Application.
6. For Specify File:
a. Import File - Click Choose File and select an application export file.
b. File Type - Select the type of application export file to import, Database
Application Export or Websheet Application Export.
c. File Character Set - Select the character set encoding of the application export
file to be imported.
d. Click Next.
7. For Application Details:
a. Template Application - Specify an integer value that identifies the application.
The application ID must be unique within your Oracle Application Express
instance. Application IDs in the range of 3000 to 9000 are reserved for internal
use by Application Express.
b. Name - Enter a name to identify the application to developers.
c. Alias - Enter an alternate alphanumeric application identifier. You can use this
identifier in place of the application ID.
d. Click Next.
A confirmation page appears.
8. Click Create.
Deleting a Template Application
To delete a public application template:
1. Log in to Oracle Application Express Administration Services. See "Logging In To
Oracle Application Express Administration Services" on page 2-6.
2. Click Manage Instance.
3. Under Manage Shared Components, click Template Applications.
The Template Applications page appears.
4. Select the template application to be deleted.
The Edit Properties page appears.
5. Click Delete.
The Confirm Delete page appears.
Managing Instance Settings
Oracle Application Express Hosted Instance Administration 2-51
6. Click Ok.
Editing a Template Application
You cannot directly edit the pages of a template application. To modify the pages of a
template application, you must create a new application using the template
application, modify it, export it, and then manually add it to the template application
repository. You can edit the properties of a template application.
Topics:
■ Modifying the Pages of a Template Application
■ Editing Template Application Properties
Modifying the Pages of a Template Application To modify the pages of a template
application:
1. Create an application using the application template. See "Creating a Database
Application from a Template" in Oracle Application Express Application Builder
User's Guide.
2. Export the application. See "Exporting an Application and Related Files" in Oracle
Application Express Application Builder User's Guide.
3. Upload the exported file to the Template Application repository. See "Adding an
Application to the Template Applications Repository" on page 2-50.
Editing Template Application Properties To modify the properties of a template
application:
1. Log in to Oracle Application Express Administration Services. See "Logging In To
Oracle Application Express Administration Services" on page 2-6.
2. Click Manage Instance.
3. Under Manage Shared Components, click Template Applications.
The Template Applications page appears.
4. Select the application template to be modified.
The Edit Properties page appears.
5. Modify the template application properties, such as the Template Application
Name. To learn more, see item Help.
6. Click Apply Changes.
Managing Session State
A session is a logical construct used to establish persistence (or stateful behavior)
across page views. Each session is assigned a unique ID, which the Application
Express engine uses to store and retrieve an application's working set of data (or
session state) before and after each page view. An automatic process clears sessions
older than 24 hours every eight hours. Instance administrators can also purge them
manually.
An Instance administrator can view session state statistics and purge the session state
on the Session State page.
Topics:
■ Viewing Session Details Before Purging
Managing Instance Settings
2-52 Oracle Application Express Administration Guide
■ Purging Sessions by Age
■ Viewing Session Statistics Before Purging
Viewing Session Details Before Purging
Before purging sessions, Instance administrators can use the Recent Sessions page to
first view a listing of recent sessions and then drill down on session details.
To view a listing of recent sessions:
1. Log in to Oracle Application Express Administration Services. See "Logging In To
Oracle Application Express Administration Services" on page 2-6.
2. Click Manage Instance.
3. Under Manage Meta Data, click Session State.
The Session State page appears.
4. Click Recent Sessions, with drill down to session details.
5. On the Recent Sessions page, you can:
■ Click a session number to view additional details.
■ Click Purge Sessions to delete the displayed sessions.
Purging Sessions by Age
Using the Purge Session page, Instance administrators can purge sessions by age.
To purge sessions by age:
1. Log in to Oracle Application Express Administration Services. See "Logging In To
Oracle Application Express Administration Services" on page 2-6.
2. Click Manage Instance.
3. Under Manage Meta Data, click Session State.
The Session State page appears.
4. Click Purge Sessions, by age.
5. On the Purge Sessions page, specify:
■ The maximum number of sessions to be purged
■ The age of sessions to be purged
6. To view a report of session statistics, click Count Sessions.
7. To purge the selected sessions, click Purge Sessions.
Viewing Session Statistics Before Purging
On the Session State Statistics page, Instance administrators can view statistics about
current sessions before purging.
To view session state statistics:
1. Log in to Oracle Application Express Administration Services. See "Logging In To
Oracle Application Express Administration Services" on page 2-6.
2. Click Manage Instance.
See Also: "Managing Session State" in Oracle Application Express
Application Builder User's Guide
Managing Instance Settings
Oracle Application Express Hosted Instance Administration 2-53
3. Under Manage Meta Data, click Session State.
The Session State page appears.
4. Select Session State Statistics.
5. Click Purge Sessions to delete the current sessions.
Managing the Mail Queue
Instance administrators can manage email sent from applications by monitoring email
messages in the mail queue and mail log.
To manage messages in the mail queue:
1. Log in to Oracle Application Express Administration Services. See "Logging In To
Oracle Application Express Administration Services" on page 2-6.
2. Click Manage Instance.
3. Under Manage Meta Data, click Mail Queue.
The Mail Queue page appears.
If there is an issue sending an email (for example, because of a bad email address
or unavailable mail server) then the mail message remains in the queue along with
the last encountered error. For every subsequent attempt to send the email, the gap
in time increases between send attempts (for example, 1 minute, 2 minutes, 4
minutes, 8 minutes, 16 minutes, and so on).
4. Use the following buttons to manage messages in the mail queue:
■ Send All Mail - Pushes the messages in the queue. The calculated delay for
messages which encounter an error is observed.
■ Force Send All Mail - The calculated delay for messages which encounter an
error is ignored and an attempt is made to push all messages in the queue.
■ Delete - Deletes selected messages.
■ Reset - Resets the page pagination.
Viewing Installed Translations
Instance administrators can view a page showing which translated languages have
been installed within the current development instance.
To view the list of installed translations:
1. Log in to Oracle Application Express Administration Services. See "Logging In To
Oracle Application Express Administration Services" on page 2-6.
2. Click Manage Instance.
3. Under Manage Meta Data, click Installed Translations.
The Installed Translations page appears. This page displays a list of languages and
indicates if the translations have been loaded.
Tip: To view the Mail Log, see "Monitoring Activity Across a
Development Instance" on page 2-87
See Also: "Configuring Email" on page 2-35 and "Sending Email
from an Application" in Oracle Application Express Application Builder
User's Guide
Managing Instance Settings
2-54 Oracle Application Express Administration Guide
Managing Interactive Report Subscriptions
Instance administrators can manage the interactive report subscriptions within the
current development instance.
To remove an interactive report subscription:
1. Log in to Oracle Application Express Administration Services. See "Logging In To
Oracle Application Express Administration Services" on page 2-6.
2. Click Manage Instance.
3. Under Manage Meta Data, click Interactive Report Subscriptions.
The Interactive Report Subscriptions page appears.
4. Find the subscription you want to remove and select the check box to the left.
5. Click Delete Checked.
Managing Logs and Files
Instance administrators can delete log entries.
Topics:
■ Deleting SQL Workshop Logs
■ Deleting Page View Activity Log Entries
■ Deleting Developer Activity Log Entries
■ Deleting Click Counting Log Entries
■ Deleting the Login Access Log
■ Managing Log Intervals
Deleting SQL Workshop Logs
The SQL Workshop logs maintain a history of recent commands and scripts run in the
SQL Commands.
To delete log files entries:
1. Log in to Oracle Application Express Administration Services. See "Logging In To
Oracle Application Express Administration Services" on page 2-6.
2. Click Manage Instance.
3. Under Manage Logs and Files, click SQL Workshop Logs.
4. Click one of the following:
See Also: "Managing Application Globalization" in Oracle
Application Express Application Builder User's Guide
Tip: The Interactive Report Subscriptions page displays as an
interactive report. You can customize the appearance of the page
using the Search bar at the top of the page. See "Customizing
Interactive Reports" in Oracle Application Express Application Builder
User's Guide.
See Also: "REMOVE_SUBSCRIPTION Procedure" in Oracle
Application Express API Reference
Managing Instance Settings
Oracle Application Express Hosted Instance Administration 2-55
■ Script File executions log entries
■ SQL Command Processor history entries
5. On the Clean up Logs page:
■ To delete entries by age, specify the age of the entries to be deleted and click
Delete Entries.
■ To delete all entries, click Truncate Log.
Deleting Page View Activity Log Entries
Page view activity logs track user activity for an application. Developers enable
logging within their application using the Logging attribute on the Edit Application
Definition page.
The Application Express engine uses two logs to track user activity. At any given time,
one log is designated as current. For each rendered page view, the Application Express
engine inserts one row into the log file. A log switch occurs at the interval listed on the
Page View Activity Logs page. At that point, the Application Express engine removes
all entries in the noncurrent log and designates it as current.
To truncate the activity logs manually:
1. Log in to Oracle Application Express Administration Services. See "Logging In To
Oracle Application Express Administration Services" on page 2-6.
2. Click Manage Instance.
3. Under Manage Logs and Files, click Page View Activity Logs, with option to
truncate.
The Page View Activity Logs page appears.
4. Click Truncate Logs.
5. Click either Truncate Log 1 or Truncate Log 2.
Deleting Developer Activity Log Entries
The Developer Activity Log tracks changes to applications within an individual
workspace. Log entries older than one month are automatically deleted.
To delete Developer Activity Log entries:
1. Log in to Oracle Application Express Administration Services. See "Logging In To
Oracle Application Express Administration Services" on page 2-6.
2. Click Manage Instance.
3. Under Manage Logs and Files, click Developer Activity Logs, with option to
delete entries.
The Developer Activity Log page appears.
4. On the Developer Activity Log page, click Manage.
See Also: "Accessing a Command from Command History"in
Oracle Application Express SQL Workshop Guide
See Also: "Editing the Application Definition" in Oracle
Application Express Application Builder User's Guide
See Also: "Viewing Workspace Dashboards" on page 1-38
Managing Instance Settings
2-56 Oracle Application Express Administration Guide
5. Specify the age of the entries to be deleted and click Delete Entries.
Deleting Click Counting Log Entries
The External Clicks Log counts clicks from an Oracle Application Express application
to an external site. You can implement this functionality using the APEX_
UTIL.COUNT_CLICK procedure.
To delete click counting log entries:
1. Log in to Oracle Application Express Administration Services. See "Logging In To
Oracle Application Express Administration Services" on page 2-6.
2. Click Manage Instance.
3. Under Manage Logs and Files, click External Click Counting Log, with option to
truncate.
The External Click Counting Log page appears.
4. On the External Click Counting Log page, click Manage.
5. Specify the age of the entries to be deleted and click Delete Entries.
Deleting the Login Access Log
This table records authentication events by developers and administrators accessing
the Oracle Application Express environment and by end users of Oracle Application
Express applications that use the built-in login APIs available to developers. Log
entries are aged out of the log tables and purged periodically.
To truncate the Login Access log:
1. Log in to Oracle Application Express Administration Services. See "Logging In To
Oracle Application Express Administration Services" on page 2-6.
2. Click Manage Instance.
3. Under Manage Logs and Files, click Login Access Log.
The Login Access Log page appears.
4. Click Manage.
5. On the Manage Login Access Log page, click Delete Entries.
Managing Log Intervals
Use the Manage Log Interval page to set the minimum number of days to retrain log
information for log files.
To manage the log interval:
1. Log in to Oracle Application Express Administration Services. See "Logging In To
Oracle Application Express Administration Services" on page 2-6.
2. Click Manage Instance.
3. Under Manage Logs and Files, click Manage Log Interval.
The Manage Log Interval page appears.
See Also: "About the Developer Activity Dashboard" on page 1-40
for information about the Developer Activity Log
See Also: "COUNT_CLICK Procedure" in Oracle Application Express
API Reference
Managing Instance Settings
Oracle Application Express Hosted Instance Administration 2-57
4. For each log type, enter the duration of the interval in days.
The maximum value that can be specified is 180 days, with a default value of 14
days. Keeping log information for longer periods can degrade runtime
performance.
5. Click Apply Changes.
Managing a Runtime Environment
An Oracle Application Express runtime environment enables you to run production
applications, but it does not provide a web interface for administration. A runtime
environment only includes the packages necessary to run your application, making it a
more hardened environment.
You administer the Oracle Application Express runtime environment using SQL*Plus
and the APEX_INSTANCE_ADMIN API. To learn more, see "APEX_INSTANCE_
ADMIN" in Oracle Application Express API Reference.
To install an exported application into a runtime installation, you must:
1. Export the workspace from the Application Express instance where the application
was developed as described in "Exporting and Importing a Workspace" on
page 2-81.
2. Use SQL*Plus to import your workspace in to the runtime environment:
■ Connect as APEX_040200, SYS, SYSTEM, or any schema to which the role
APEX_ADMINISTRATOR_ROLE has been granted.
■ Run the workspace import file.
If the workspace export file was created with a version of Oracle Application
Express lower than 3.2, you must connect as APEX_040200.
3. Export and then import your application using SQL*Plus in to the runtime
environment. See "Exporting an Application and Related Files" in Oracle
Application Express Application Builder User's Guide.
Managing Messages
Instance administrators can communicate with all users in an Oracle Application
Express instance by creating login and system messages. Typically, administrators use
a login message with a system message to communicate with all system users, such as
regarding privacy notices or access restrictions.
See Also: SET_LOG_SWITCH_INTERVAL Procedure in Oracle
Application Express API Reference
Tip: Websheets are not supported in an Oracle Application Express
runtime environment.
Tip: The APEX_ADMINISTRATOR_ROLE must be granted directly to
a user and not through another database role.
See Also: "Creating a Workspace Manually in a Runtime
Environment" on page 2-67, "Managing Workspace to Schema
Assignments" on page 2-73, "Removing a Schema Mapping from a
Workspace in a Runtime Environment" on page 2-76, and "Deleting
Workspaces in a Runtime Development Environment" on page 2-70
Managing Instance Settings
2-58 Oracle Application Express Administration Guide
Topics:
■ Defining a Login Message
■ Defining a System Message
■ Creating a Site-Specific Tasks List
Defining a Login Message
A login message displays on the Oracle Application Express login page. Instance
administrators can create a login message using the Login Message section of the
Messages page.
To create a login message:
1. Log in to Oracle Application Express Administration Services. See "Logging In To
Oracle Application Express Administration Services" on page 2-6.
2. Click Manage Instance.
3. Under Messages, click Define Login Message.
4. In Message, enter a message. The message can contain any text and can optionally
include HTML formatting.
5. Click Apply Changes.
To disable a login message:
1. Log in to Oracle Application Express Administration Services. See "Logging In To
Oracle Application Express Administration Services" on page 2-6.
2. Click Manage Instance.
3. Under Messages, click Define Login Message.
4. For Login Message, select No Message.
5. Click Apply Changes.
Defining a System Message
System messages display on the Workspace home page, Application Builder home
page, Application home page, SQL Workshop home page, and the Oracle Application
Express Utilities page.
Instance administrators can create a system message using the System Message section
of the Messages page.
Creating a System Message To create a system message:
1. Log in to Oracle Application Express Administration Services. See "Logging In To
Oracle Application Express Administration Services" on page 2-6.
2. Click Manage Instance.
3. Under Messages, click Define System Message.
4. For System Message, select Custom Message.
5. In Message, enter a message. The message can contain any text and can optionally
include HTML formatting.
Tip: You can also access the Set System Message page by clicking
Edit System Message icon on the Instance Administration home page.
Managing Instance Settings
Oracle Application Express Hosted Instance Administration 2-59
6. Click Apply Changes.
Disabling a System Message To disable a system message:
1. Log in to Oracle Application Express Administration Services. See "Logging In To
Oracle Application Express Administration Services" on page 2-6.
2. Click Manage Instance.
3. Under Messages, click Define System Message.
4. For System Message, select No Message.
5. Click Apply Changes.
Creating a Site-Specific Tasks List
The Site-Specific Tasks list is a list of links that appears on the Workspace home page
or login page. If links are defined, a Site-Specific Tasks region appears. If no
Site-Specific Tasks are defined, the region does not display. This feature enables
Instance administrators to customize the Workspace home page for an entire
development instance. Typical uses for the Site-Specific Tasks list include links to
training, discussion forums, and user feedback applications.
Topics:
■ Adding a New Task
■ Editing an Existing Task
■ Deleting a Task
Adding a New Task To add a new task to a Site-Specific Tasks list:
1. Log in to Oracle Application Express Administration Services. See "Logging In To
Oracle Application Express Administration Services" on page 2-6.
2. Click Manage Instance.
3. Under Messages, click Site-Specific Tasks.
The Site-Specific Tasks page appears.
4. To create a new link, click Create.
5. On the Create/Edit Site-Specific Tasks page, you can specify the following:
a. Display Sequence - Indicate the relative order of this task within the list.
b. Display Location - Indicate the page on which the task should display (that is,
the Workspace Login page or Workspace home page).
c. Task Name - Enter a name for this task.
d. Tasks Link - Enter the link target for this task using either a relative URL (for
example, using f?p syntax) or an absolute URL (such as
http://otn.oracle.com).
e. Displayed - Select Yes to display the task link.
6. Click Create.
Editing an Existing Task To edit an existing task:
See Also: "Using f?p Syntax to Link Pages" in Oracle Application
Express Application Builder User's Guide
Managing Instance Settings
2-60 Oracle Application Express Administration Guide
1. Log in to Oracle Application Express Administration Services. See "Logging In To
Oracle Application Express Administration Services" on page 2-6.
2. Click Manage Instance.
3. Under Messages, click Site-Specific Tasks.
The Site-Specific Tasks page appears.
4. Select the task name.
5. On the Create/Edit Site-Specific Tasks page, edit the appropriate attributes.
6. Click Apply Changes.
Deleting a Task To delete an existing task:
1. Log in to Oracle Application Express Administration Services. See "Logging In To
Oracle Application Express Administration Services" on page 2-6.
2. Click Manage Instance.
3. Under Messages, click Site-Specific Tasks.
The Site-Specific Tasks page appears.
4. Select the task name.
5. Click Delete.
About the Self Service Sign Up Wizard
Instance administrators can specify if the Sign Up wizard displays a sign up
agreement and survey questions and answers.
Topics:
■ Managing a New Service Signup Wizard
■ Running a New Service Signup Wizard
Managing a New Service Signup Wizard
As an instance administrator, you can require users accept an agreement before the
New Service Signup Wizard submits a request. You can also include a survey when
users run the New Service Signup Wizard.
To manage a New Service Signup Wizard:
1. Log in to Oracle Application Express Administration Services. See "Logging In To
Oracle Application Express Administration Services" on page 2-6.
2. Click Manage Instance.
3. Under Self Service Sign Up, click Manage New Service Signup Wizard.
The Sign Up Survey page appears.
4. Under Agreement, make these selections:
■ Enable Agreement - Select Yes to display agreement displayed during the
New Service Signup Wizard. Otherwise, select No.
■ Agreement Text - Enter the agreement text.
5. Under Survey Questions, make these selections.
Managing Schemas
Oracle Application Express Hosted Instance Administration 2-61
■ Enable Survey - Select Yes to display survey questions during the New Service
Signup Wizard. Otherwise, select No.
■ Questions - Enter the question text.
■ Answers - Enter all answers for each question in the same field, delimited by a
new line. Each question can have any number of answers.
■ Pre Text - Enter text that displays before the survey questions.
■ Post Text - Enter text that displays after the survey questions.
6. Click Apply Changes.
Running a New Service Signup Wizard
To run a newNew Service Signup Wizard:
1. Log in to Oracle Application Express Administration Services. See "Logging In To
Oracle Application Express Administration Services" on page 2-6.
2. Click Manage Instance.
3. Under Self Service Sign Up, click Run New Service Signup Wizard.
The first page of the Self Service Sign Up Wizard appears.
Managing Schemas
This section describes how to manage the schemas within an Oracle Application
Express instance.
Topics:
■ Determining the Oracle Application Express Engine Schema
■ Understanding Oracle Default Schema Restrictions
Determining the Oracle Application Express Engine Schema
A schema is a logical container for the database objects. Instance administrators may
need to perform certain actions within the Application Express engine schema. For
example, in order for an Instance administrator to have the ability to assign Oracle
default schemas, the database administrator (DBA) must explicitly grant the privilege
by running the APEX_SITE_ADMIN.UNRESTRICT_SCHEMA procedure within the
Application Express engine.
To determine the current Application Express engine schema for your Oracle
Application Express instance:
1. Use SQL*Plus to connect to the database.
2. Run the following query in a schema with DBA privileges (for example, SYSTEM).
SELECT DISTINCT TABLE_OWNER FROM all_synonyms
WHERE SYNONYM_NAME = 'WWV_FLOW' and OWNER = 'PUBLIC'
See Also: "Viewing the Parsing Schemas Report" on page 2-84 and
"Managing Workspace to Schema Assignments" on page 2-73
See Also: "Understanding Oracle Default Schema Restrictions" on
page 2-62 for information about the APEX_SITE_
ADMIN.UNRESTRICT_SCHEMA procedure
Managing Schemas
2-62 Oracle Application Express Administration Guide
Understanding Oracle Default Schema Restrictions
When Oracle Application Express installs, the Instance administrator does not have
the ability to assign Oracle default schemas to workspaces. Default schemas such as
SYS, SYSTEM, and RMAN are reserved by Oracle for various product features and for
internal use. Access to a default schema can be a very powerful privilege. For example,
a workspace with access to the default schema SYSTEM can run applications that parse
as the SYSTEM user.
In order for an Instance administrator to have the ability to assign most Oracle default
schemas to workspaces, the database administrator (DBA) must explicitly grant the
privilege using SQL*Plus to run a procedure within the APEX_ SITE_ADMIN_PRIVS
package. Note, however, that beginning with Oracle Application Express release 3.1,
the SYS and SYSTEM schemas may no longer be used by workspaces as parsing
schemas.
Topics:
■ Granting the Privilege to Assign Oracle Default Schemas
■ Revoking the Privilege to Assign Oracle Default Schemas
■ Working with Restricted Schemas
■ Determining the Privilege Status
Granting the Privilege to Assign Oracle Default Schemas
The DBA can grant an Instance administrator the ability to assign Oracle schemas to
workspaces by using SQL*Plus to run the APEX_SITE_ADMIN_PRIVS.UNRESTRICT_
SCHEMA procedure from within the Application Express engine schema. For example:
EXEC APEX_040200.APEX_SITE_ADMIN_PRIVS.UNRESTRICT_SCHEMA(p_schema => 'RMAN');
COMMIT;
This example would enable the Instance administrator to assign the RMAN schema to
any workspace.
Revoking the Privilege to Assign Oracle Default Schemas
The DBA can revoke this privilege using SQL*Plus to run the APEX_SITE_ADMIN_
PRIVS.RESTRICT_SCHEMA procedure from within the Application Express engine
schema. For example:
EXEC APEX_040200.APEX_SITE_ADMIN_PRIVS.RESTRICT_SCHEMA(p_schema => 'RMAN');
Note: All schema and workspace names used as arguments to
procedures in the APEX_SITE_ADMIN_PRIVS package are used
exactly as they are provided by the caller.
For example, if you pass an argument value such as p_schema
=>'system', the lower-case schema name 'system' is recorded
and referenced. This example could return unexpected results if you
really meant to reference the common schema name SYSTEM, which
would be referenced using upper case.
See Also: "Determining the Oracle Application Express Engine
Schema" on page 2-61
Managing Schemas
Oracle Application Express Hosted Instance Administration 2-63
COMMIT;
This example would prevent the Instance administrator from assigning the RMAN
schema to any workspace. It does not, however, prevent workspaces that have already
had the RMAN schema assigned to them from using the RMAN schema.
Working with Restricted Schemas
If a schema has been designated as restricted using the RESTRICT_SCHEMA procedure,
the DBA can designate specific workspaces as exceptions by running the APEX_SITE_
ADMIN_PRIVS.CREATE_EXCEPTION procedure. For example:
EXEC APEX_040200.APEX_SITE_ADMIN_PRIVS.CREATE_EXCEPTION(p_schema => 'RMAN', p_
workspace=> 'DBA_WORKSPACE');
EXEC APEX_040200.APEX_SITE_ADMIN_PRIVS.CREATE_EXCEPTION(p_schema => 'RMAN', p_
workspace => 'AUDITOR_WORKSPACE');
COMMIT;
This example would prevent the Instance administrator from assigning the RMAN
schema to the workspace named AUDITOR_WORKSPACE. However this restriction
only applies to workspace provisioning requests processed after the REMOVE_
EXCEPTION procedure has been run. If the AUDITOR_WORKSPACE has the RMAN
schema assigned to it, this method would not prevent that workspace from continuing
to use the schema.
Removing Workspace Exceptions for a Schema The DBA can remove all workspace
exceptions for a schema by using SQL*Plus to run the APEX_SITE_ADMIN_
PRIVS.REMOVE_SCHEMA_EXCEPTIONS procedure from within the Application
Express engine schema. For example:
EXEC APEX_040200.APEX_SITE_ADMIN_PRIVS.REMOVE_SCHEMA_EXCEPTIONS(p_schema =>
'RMAN');
COMMIT;
This example would prevent the Instance administrator from assigning the RMAN
schema to any workspaces if the RMAN schema were already restricted, but had one or
more exceptions previously created for it.
Removing Schema Exceptions for a Workspace The DBA can remove all schema exceptions
for a workspace by using SQL*Plus to run the APEX_SITE_ADMIN_PRIVS.REMOVE_
WORKSPACE_EXCEPTIONS procedure from within the Application Express engine
schema. For example:
EXEC APEX_040200.APEX_SITE_ADMIN_PRIVS.REMOVE_WORKSPACE_EXCEPTIONS(p_workspace =>
'AUDITOR_WORKSPACE');
COMMIT;
This example would prevent the Instance administrator from assigning any restricted
schemas to the workspace named AUDITOR_WORKSPACE if that workspace had
exceptions previously created for it with respect to any restricted schemas.
Determining the Privilege Status
The DBA can determine the current status of the privilege by using SQL*Plus to run
the APEX_SITE_ADMIN_PRIVS.REPORT procedure. For example:
SET SERVEROUTPUT ON
See Also: "Determining the Oracle Application Express Engine
Schema" on page 2-61
Creating Workspaces
2-64 Oracle Application Express Administration Guide
EXEC APEX_040200.APEX_SITE_ADMIN_PRIVS.REPORT;
This example would display the text of a query that dumps the tables that defines the
schema and workspace restrictions.
SELECT a.schema "SCHEMA",b.workspace_name "WORKSPACE" FROM WWV_FLOW_RESTRICTED_
SCHEMAS a, WWV_FLOW_RSCHEMA_EXCEPTIONS b WHERE b.schema_id (+)= a.id;
When reviewing the output of this query, remember the following:
■ A schema name in the SCHEMA column indicates that the schema is restricted.
■ Schemas that are not listed are not restricted and may be assigned to any
workspace.
■ A workspace name next to a schema name means that an exception exists for the
schema for the named workspace.
You can run this query in SQL*Plus as shown above, or you can change it and format
the output.
Creating Workspaces
When users log in to Oracle Application Express, they log in to a shared work area
called a workspace. A workspace is a virtual private database allowing multiple users
to work within the same Oracle Application Express installation while keeping their
objects, data and applications private. Each workspace has a unique numeric ID and
name.
To make changes to their workspace, Workspace administrators submit change
requests to an Instance administrator. Only an Instance administrator can approve
change requests or provision new workspaces.
Topics:
■ About Workspace Provisioning
■ Specifying a Provisioning Mode
■ Creating a Workspace Manually
■ Creating Multiple Workspaces
About Workspace Provisioning
When an Instance administrator creates a new workspace with a new schema, a new
tablespace and data file are created for that schema. If Oracle-managed files is
enabled, it manages the data file for the new tablespace.
Using Oracle-managed files simplifies the administration of the Oracle database and
eliminates the need for the database administrator (DBA) to directly manage the
operating system files that comprise the database. Using Oracle-managed files, the
DBA specifies operations in terms of database objects rather than file names. The data
file for the new tablespaces are named according to the Oracle-managed files
conventions. The placement of these files is determined by the database initialization
parameter DB_CREATE_FILE_DEST.
If the Oracle-Managed Files is not enabled, the data file is created in the same directory
as the first data file of the tablespace in which Oracle Application Express is installed.
See Also: "Managing Workspace and Change Requests" on
page 2-7 and "Managing Existing Workspaces" on page 2-69
Creating Workspaces
Oracle Application Express Hosted Instance Administration 2-65
Specifying a Provisioning Mode
The Instance administrator determines how the process of provisioning (or creating) a
workspace works for a specific Oracle Application Express instance.
In Manual provision mode, an Instance administrator creates new workspaces and
notifies the Workspace administrator of the login information. In Request or Email
Verification provision modes, users request workspaces directly in a self-service
fashion. In this scenario, users use a link on the login page to access a request form.
After the workspace request has been granted, users are automatically emailed the
appropriate login information.
To specify a provisioning mode:
1. Log in to Oracle Application Express Administration Services. See "Logging In To
Oracle Application Express Administration Services" on page 2-6.
2. Click Manage Instance.
3. Under Instance Settings, click Instance Settings.
4. Under Self Service, select a provisioning status:
■ Manual - An Instance administrator manually creates new workspaces and
notifies the Workspace administrator of the login information.
■ Request - Users request workspaces directly in a self-service fashion. Selecting
this option displays a link on the Login page enabling users to request a
workspace. When a user requests a workspace, each request is submitted to a
queue for approval. When the request is approved, the user is sent an email
containing login credentials (the workspace name, Username, and password).
■ Email Verification - Works similar to Request except each user receives an
initial email containing a verification link. Clicking this link validates the
user’s email address and then the request is processed. Then another email is
sent to the user containing login credentials (that is, the workspace name,
Username, and password).
If you select Email Verification, you can disable workspace provisioning and
send users a message:
a. Locate the Email Provisioning section.
b. From Email Provisioning, select Disabled.
c. In the Message field, enter message that explains why email provisioning
is disabled.
5. If you select Request or Email Verification:
■ Development Service URL - Enter a URL for the service (optional). This value
is used in the email when the request is approved. If this setting is not present,
the URL is derived from your environment.
■ Require Verification Code - Determines if a verification code displays and is
required during the request process. Select Yes or No.
6. Click Apply Changes.
See Also: "Using Oracle Managed Files" in Oracle Database
Administrator's Guide
Creating Workspaces
2-66 Oracle Application Express Administration Guide
Creating a Workspace Manually
Instance administrators can provision a workspace manually in either a full
development environment or a runtime environment.
Topics:
■ Creating Workspace Manually in a Full Development Environment
■ Creating a Workspace Manually in a Runtime Environment
Creating Workspace Manually in a Full Development Environment
Instance administrators can provision a workspace manually by running the Create
Workspace Wizard.
To create a workspace manually:
1. Log in to Oracle Application Express Administration Services. See "Logging In To
Oracle Application Express Administration Services" on page 2-6.
2. Click Manage Workspaces.
3. Under Workspace Actions, click Create Workspace.
The Create Workspace Wizard appears.
4. For Identify Workspace, enter the following:
a. Workspace Name - Enter a unique workspace name.
b. Workspace ID - Leave Workspace ID blank to have the new Workspace ID
automatically generated. A Workspace ID must be a positive integer greater
than 100000.
c. Workspace Description - Enter a workspace description.
d. Click Next.
5. For Identify Workspace, enter a workspace name and description and click Next.
6. For Identify Schema, specify whether you are re-using an existing schema or
creating a new one.
If you are using an existing schema:
a. For Re-use existing schema, select Yes.
b. Select a schema from the list.
c. Click Next.
If you are creating a new schema:
a. For Re-use existing schema, select No.
Note: To enable users to request a workspace using a link on the
Login page, you must choose the provisioning status of Request or
Email Verification as described in the previous procedure. If the
provisioning status is set to Manual, no link appears on the login
page.
See Also: "Configuring Email" on page 2-35 and "Managing
Workspace and Change Requests" on page 2-7
Creating Workspaces
Oracle Application Express Hosted Instance Administration 2-67
b. Enter a schema name and password.
c. Specify a space quota.
d. Click Next.
7. For Identify Administrator, enter the Workspace administrator information and
click Next.
8. Confirm your selections and click Create Workspace.
Creating a Workspace Manually in a Runtime Environment
To add a workspace in a runtime environment:
1. Start SQL*Plus and connect to the database where Oracle Application Express is
installed as SYS. For example:
■ On Windows:
SYSTEM_DRIVE: sqlplus /nolog
SQL> CONNECT SYS as SYSDBA
Enter password: SYS_password
■ On UNIX and Linux:
$ sqlplus /nolog
SQL> CONNECT SYS as SYSDBA
Enter password: SYS_password
2. Run the following statement:
ALTER SESSION SET CURRENT_SCHEMA = APEX_040200
3. Run the following statement:
BEGIN
APEX_INSTANCE_ADMIN.ADD_WORKSPACE(WORKSPACE_ID,WORKSPACE_NAME, SCHEMA_NAME,
SCHEMA_LIST)
END;
Where:
■ WORKSPACE_ID is the ID for the workspace. Auto-assigned if NULL.
■ WORKSPACE_NAME is the name of the workspace.
■ SCHEMA_NAME is the name of the primary schema to associate with the
workspace.
■ SCHEMA_LIST is a colon delimited list of additional schemas to associate with
the workspace.
Creating Multiple Workspaces
Instance administrators can provision multiple workspaces by running the Create
Multiple Workspaces Wizard.
To create multiple workspaces:
1. Log in to Oracle Application Express Administration Services. See "Logging In To
Oracle Application Express Administration Services" on page 2-6.
2. Click Manage Workspaces.
3. Under Workspace Actions, click Create Multiple Workspaces.
Creating Workspaces
2-68 Oracle Application Express Administration Guide
The Create Multiple Workspaces Wizard appears.
4. Under Provision Workspace Using, select one of the following:
■ System Generated Workspace Names
■ Statically Prefixed Workspace Name with Sequential Integer Suffix
■ Email Domain Name as Workspace Name, with Sequential Integer Suffix
for duplicates
5. Depending upon the option you select in the previous step, make the following
selections:
■ System Generated Workspace Names
– Workspace Count
– Install Sample Application
– Install Sample Websheet
– Install Sample DEPT and EMP Tables
– Space Quota (MB)
– Resource Manager Consumer Group
– Allow workspaces to be automatically purged
– Workspace Description.
■ Statically Prefixed Workspace Name with Sequential Integer Suffix
– Workspace Prefix
– Workspace Count
– Install Sample Application
– Install Sample Websheet
– Install Sample DEPT and EMP Tables
– Space Quota (MB)
– Resource Manager Consumer Group
– Allow workspaces to be automatically purged
– Workspace Description
■ Email Domain Name as Workspace Name, with Sequential Integer Suffix
for duplicates
– Install Sample Application
– Install Sample Websheet
– Install Sample DEPT and EMP Tables
– Space Quota (MB)
– Resource Manager Consumer Group
– Allow workspaces to be automatically purged
– Email Addresses
Tip: To learn more about a specific field, see item Help.
Managing Existing Workspaces
Oracle Application Express Hosted Instance Administration 2-69
– Workspace Description
6. Click Next.
7. Confirm your choices and click Provision Workspaces.
Managing Existing Workspaces
This section describes how Instance administrators can manage existing workspaces
within an Oracle Application Express instance.
Topics:
■ Deleting a Workspace
■ Locking a Workspace
■ Managing Workspace to Schema Assignments
■ Managing Component Availability
■ Performing a Workspace Search
■ Viewing Existing Workspaces
■ Editing Workspace Details
■ Viewing Workspace Details
■ Viewing Workspace Database Privileges
■ Viewing File Size and File Count by Workspace
■ Exporting and Importing a Workspace
■ Viewing Application Attributes
■ Changing Application Build Status Set During Deployment
■ Viewing the Parsing Schemas Report
Deleting a Workspace
Deleting a workspace does not remove any of the associated database objects. To
remove the associated schemas, a database administrator (DBA) must use a standard
database administration tool, such as Oracle Enterprise Manager or SQL*Plus.
Topics:
■ Deleting Workspaces in a Full Development Environment
■ Deleting Workspaces in a Runtime Development Environment
■ About Deleting Inactive Workspaces
See Also: "Creating Workspaces" on page 2-64, "Managing Schemas"
on page 2-61, "Managing Users in an Oracle Application Express
Instance" on page 2-84, and "Monitoring Activity Across a
Development Instance" on page 2-87
See Also: SQL*Plus User's Guide and Reference, "Viewing
Workspace Details" on page 2-79, and "Creating Workspaces" on
page 2-64
Managing Existing Workspaces
2-70 Oracle Application Express Administration Guide
Deleting Workspaces in a Full Development Environment
To delete a workspace in a full development environment:
1. Log in to Oracle Application Express Administration Services. See "Logging In To
Oracle Application Express Administration Services" on page 2-6.
2. Click Manage Workspaces.
3. Under Workspace Reports, click Existing Workspaces.
4. Under the Action column, click Delete.
5. Follow the on-screen instructions.
Deleting Workspaces in a Runtime Development Environment
To delete a workspace in a runtime development environment:
1. Start SQL*Plus and connect to the database where Oracle Application Express is
installed as SYS. For example:
■ On Windows:
SYSTEM_DRIVE: sqlplus /nolog
SQL> CONNECT SYS as SYSDBA
Enter password: SYS_password
■ On UNIX and Linux:
$ sqlplus /nolog
SQL> CONNECT SYS as SYSDBA
Enter password: SYS_password
2. Run the following statement:
ALTER SESSION SET CURRENT_SCHEMA = APEX_040200
3. Run the following statement:
BEGIN
APEX_INSTANCE_ADMIN.REMOVE_WORKSPACE(WORKSPACE_NAME, DROP_USER, DROP_
TABLESPACE)
END;
Where:
■ WORKSPACE_NAME is the name of the workspace.
■ DROP_USER is either Y or N. The default is N.
■ DROP_TABLESPACE is either Y or N. The default is N.
About Deleting Inactive Workspaces
If you are managing a large hosted Oracle Application Express instance, manually
deleting inactive workspaces can free up resources for other users. The process of
manually deleting inactive workspaces consists of the following steps:
1. Identify inactive workspaces.
2. Remove the resources associated with each inactive workspace.
3. Delete the inactive workspaces.
Managing Existing Workspaces
Oracle Application Express Hosted Instance Administration 2-71
Topics:
■ Identifying Inactive Workspaces
■ Viewing Workspaces with Only a Sample Application
■ Removing the Resources Associated with Inactive Workspaces
■ Deleting Inactive Workspaces
Identifying Inactive Workspaces The first step in determining if a workspace is inactive is
to establish some basic rules. A common approach is to base the rules on the Oracle
Application Express activity records found in the current Application Express engine
schema.
The following DDL (data definition language) creates a table of all workspaces
requested before June 28, 2004 but that have been inactive since June 10, 2004. In this
example, inactivity is determined by checking a key within the Application Express
engine schema for the most recent updates by each workspace.
ALTER SESSION SET CURRENT_SCHEMA = APEX_040200;
CREATE TABLE ws_to_purge AS
SELECT c.security_group_id, c.company_name, c.admin_email, c.request_date,
SYSDATE last_updated_on, 'Y' ok_to_delete
FROM wwv_flow_provision_company c
WHERE
c.request_date <= to_date('20040628','YYYYMMDD') AND
( not exists
(SELECT NULL /* Activity Log */
FROM wwv_flow_activity_log l
WHERE l.security_group_id = c.security_group_id
AND l.time_stamp > to_date('20040610','YYYYMMDD'))
)
AND NOT EXISTS
(SELECT NULL /* workspace applications */
FROM wwv_flows f
WHERE f.security_group_id = c.security_group_id
AND f.last_updated_on > to_date('20040610','YYYYMMDD'))
AND NOT EXISTS
(SELECT NULL /* Pages */
FROM wwv_flow_steps s
WHERE s.security_group_id = c.security_group_id
AND s.last_updated_on > to_date('20040610','YYYYMMDD'))
AND NOT EXISTS
(SELECT NULL /* Regions */
FROM wwv_flow_page_plugs p
WHERE p.security_group_id = c.security_group_id
AND p.last_updated_on > to_date('20040610','YYYYMMDD'))
AND NOT EXISTS
(SELECT NULL /* Items */
FROM wwv_flow_step_items i
WHERE i.security_group_id = c.security_group_id
AND i.last_updated_on > to_date('20040610','YYYYMMDD'))
AND NOT EXISTS
Tip: To systematically purge inactive workspaces you must
configure Workspace Purge settings. See "Purging Inactive
Workspaces" on page 2-45.
See Also: "Determining the Oracle Application Express Engine
Schema"
Managing Existing Workspaces
2-72 Oracle Application Express Administration Guide
(SELECT NULL /* Templates */
FROM wwv_flow_templates t
WHERE t.security_group_id = c.security_group_id
AND t.last_updated_on > to_date('20040610','YYYYMMDD'))
AND NOT EXISTS
(SELECT NULL /* Files uploaded */
FROM wwv_flow_file_objects$ o
WHERE o.security_group_id = c.security_group_id
AND o.created_on > to_date('20040610','YYYYMMDD'))
AND NOT EXISTS
(SELECT NULL /* SQL Workshop history */
FROM wwv_flow_sw_sql_cmds s
WHERE s.security_group_id = c.security_group_id
AND s.created_on > to_date('20040610','YYYYMMDD'));
After you identify inactive workspaces, you can purge them. Purging inactive
workspaces is a two-step process:
■ First, remove the resources (that is, the database schemas, tablespaces, and data
files) associated with each inactive workspace.
■ Second, drop the inactive workspaces from Oracle Application Express.
Viewing Workspaces with Only a Sample Application Another way to identify potentially
inactive workspaces is to view the Workspaces with Only Sample Application report.
To view a report or workspaces only containing only a sample application.
1. Log in to Oracle Application Express Administration Services. See "Logging In To
Oracle Application Express Administration Services" on page 2-6.
2. Click Manage Workspaces.
3. Under Workspace Reports, click Workspaces with Only Sample Application.
The Workspaces with Only Sample Applications page appears.
This page displays as an interactive report. To customize the report, use the Search
bar at the top of the page. See "Customizing Interactive Reports" in Oracle
Application Express Application Builder User's Guide.
Removing the Resources Associated with Inactive Workspaces After you have identified
inactive workspaces in a single table, the next step is to remove them.
To remove the resources associated with inactive workspaces:
1. Identify the schemas used by the workspaces to be deleted by joining the table
containing the identified inactive workspaces to wwv_flow_company_schemas.
2. Drop the schemas, tablespaces, and data files used exclusively by the inactive
workspaces from the database. You can identify the schemas to drop by running a
query similar to the following:
SELECT s.schema
FROM ws_to_purge ws,
wwv_flow_company_schemas s
WHERE s.security_group_id = ws.security_group_id
Note: Before removing the schemas, tablespaces, or data files
associated with inactive workspaces, make sure these resources are
not being used in any other workspace or application.
Managing Existing Workspaces
Oracle Application Express Hosted Instance Administration 2-73
AND ws.ok_to_delete = 'Y';
Deleting Inactive Workspaces Once you remove the resources associated with an inactive
workspace, you can delete the workspace. You can delete inactive workspaces
manually using the Oracle Application Express Administration Services application.
Or, you can delete them programmatically as shown in the following PL/SQL
example.
BEGIN
FOR c1 IN (SELECT security_group_id
FROM ws_to_purge
WHERE ok_to_delete = 'Y')
LOOP
WWV_FLOW_PROVISIONING.TERMINATE_SERVICE_BY_SGID(c1.security_group_id);
END LOOP;
END;
Locking a Workspace
Instance administrators can lock a workspace to address security or performance
issues. Locking a workspace immediately locks all workspace administrator, developer
and user accounts in the workspace. It also changes the status of all applications in the
workspace to Unavailable.
To lock a workspace:
1. Log in to Oracle Application Express Administration Services. See "Logging In To
Oracle Application Express Administration Services" on page 2-6.
2. Click Manage Workspaces.
3. Under Workspace Actions, click Lock Workspace.
4. For Workspace, select the workspace you want to lock and click Next.
5. Review the information about applications and users and click Lock Workspace.
Managing Workspace to Schema Assignments
When users log in to Oracle Application Express, they log in to a shared work area
called a workspace. Each workspace can have multiple associated (or mapped)
schemas. By associating a workspace with a schema, developers in that workspace
can:
■ Build applications that interact with the database objects in that schema.
■ Create new database objects in that schema.
Topics:
■ Viewing Schema and Workspace Assignments in a Development Environment
■ Viewing Schema and Workspace Assignments in a Runtime Environment
■ Editing Existing Schema and Workspace Assignments
■ Associating Additional Schemas with a Workspace
■ Removing a Schema Mapping from a Workspace in a Runtime Environment
Warning: Locking a workspace makes it permanently inaccessible.
Managing Existing Workspaces
2-74 Oracle Application Express Administration Guide
■ Creating a New Schema
Viewing Schema and Workspace Assignments in a Development Environment
Instance administrators can view the existing schema to workspace assignment on the
Manage Workspace to Schema Assignments page.
To view the existing schema to workspace assignment:
1. Log in to Oracle Application Express Administration Services. See "Logging In To
Oracle Application Express Administration Services" on page 2-6.
2. Click Manage Workspaces.
3. Under Workspace Actions, click Manage Workspace to Schema Assignments.
The Manage Workspace to Schema Assignments page appears and lists all
workspaces in your environment along with their associated schemas.
This page displays as an interactive report. To customize the report, use the Search
bar at the top of the page. See "Customizing Interactive Reports" in Oracle
Application Express Application Builder User's Guide.
Viewing Schema and Workspace Assignments in a Runtime Environment
To view the existing schema to workspace assignment in a runtime environment:
1. Start SQL*Plus and connect to the database where Oracle Application Express is
installed as SYS. For example:
■ On Windows:
SYSTEM_DRIVE: sqlplus /nolog
SQL> CONNECT SYS as SYSDBA
Enter password: SYS_password
■ On UNIX and Linux:
$ sqlplus /nolog
SQL> CONNECT SYS as SYSDBA
Enter password: SYS_password
2. Run the following statement:
ALTER SESSION SET CURRENT_SCHEMA = APEX_040200
3. Run the following statement:
SELECT APEX_INSTANCE_ADMIN.GET_SCHEMAS(WORKSPACE_NAME)
FROM DUAL;
Where WORKSPACE_NAME is the name of the workspace.
Editing Existing Schema and Workspace Assignments
To edit an existing schema and workspace assignment:
1. Log in to Oracle Application Express Administration Services. See "Logging In To
Oracle Application Express Administration Services" on page 2-6.
2. Click Manage Workspaces.
See Also: "Managing Schemas" on page 2-61 and "Viewing the
Parsing Schemas Report" on page 2-84
Managing Existing Workspaces
Oracle Application Express Hosted Instance Administration 2-75
3. Under Manage Workspaces, click Manage Workspace to Schema Assignments.
The Manage Workspace to Schema Assignments page appears.
4. To edit an existing workspace to schema assignment:
a. Select the workspace name.
The Edit Schema to Workspace Assignment page appears.
b. Select a new workspace or schema.
c. Click Apply Changes.
Associating Additional Schemas with a Workspace
Instance administrators can associate (or map) additional existing schemas to a
workspace.
Associating Additional Schemas in a Full Development Environment To associate additional
schemas with a workspace:
1. Log in to Oracle Application Express Administration Services. See "Logging In To
Oracle Application Express Administration Services" on page 2-6.
2. Click Manage Workspaces.
3. Under Workspace Actions, click Manage Workspace to Schema Assignments.
The Manage Workspace to Schema Assignments page appears.
4. Click Add Schema.
The Add Schema wizard appears.
5. For New or Existing Schema, select Existing and click Next.
6. Follow the on-screen instructions to associate the existing schema to a workspace.
7. To verify that the new schema is added to the workspace:
a. Log in to the workspace on Oracle Application Express.
b. Review the Workspace Schemas list on the Workspace home page. The list
shows all schemas currently associated with this workspace.
Associating Additional Schemas in a Runtime Environment To associate additional schemas
with a workspace in a runtime environment:
1. Start SQL*Plus and connect to the database where Oracle Application Express is
installed as SYS. For example:
■ On Windows:
SYSTEM_DRIVE: sqlplus /nolog
SQL> CONNECT SYS as SYSDBA
Enter password: SYS_password
■ On UNIX and Linux:
$ sqlplus /nolog
SQL> CONNECT SYS as SYSDBA
Enter password: SYS_password
2. Run the following statement:
ALTER SESSION SET CURRENT_SCHEMA = APEX_040200
Managing Existing Workspaces
2-76 Oracle Application Express Administration Guide
3. Run the following statement:
BEGIN
APEX_INSTANCE_ADMIN.ADD_SCHEMA(WORKSPACE_NAME, SCHEMA_NAME)
END;
Where:
■ WORKSPACE_NAME is the name of the workspace.
■ SCHEMA_NAME is the name of the schema.
Removing a Schema Mapping from a Workspace in a Runtime Environment
To remove a schema mapping from a workspace in a runtime environment:
1. Start SQL*Plus and connect to the database where Oracle Application Express is
installed as SYS. For example:
■ On Windows:
SYSTEM_DRIVE: sqlplus /nolog
SQL> CONNECT SYS as SYSDBA
Enter password: SYS_password
■ On UNIX and Linux:
$ sqlplus /nolog
SQL> CONNECT SYS as SYSDBA
Enter password: SYS_password
2. Run the following statement:
ALTER SESSION SET CURRENT_SCHEMA = APEX_040200
3. Run the following statement:
BEGIN
APEX_INSTANCE_ADMIN.REMOVE_SCHEMA(WORKSPACE_NAME, SCHEMA_NAME)
END;
Where:
■ WORKSPACE_NAME is the name of the workspace.
■ SCHEMA_NAME is the name of the schema.
Creating a New Schema
Instance administrators can create a new schema and associate it with a workspace.
To create a new schema for a workspace:
1. Log in to Oracle Application Express Administration Services. See "Logging In To
Oracle Application Express Administration Services" on page 2-6.
2. Click Manage Workspaces.
3. Under Workspace Actions, click Manage Workspace to Schema Assignments.
The Manage Workspace to Schema Assignments page appears.
4. Click Add Schema.
The Add Schema wizard appears.
Managing Existing Workspaces
Oracle Application Express Hosted Instance Administration 2-77
5. For New or Existing Schema, select New and click Next.
6. For Choose Workspace, select the workspace to associate the new schema with
and click Next.
7. For Identify Schema:
a. Schema - Enter a unique name containing only letters.
b. Password - Enter a case-sensitive password.
c. Default Tablespace - Identify the default tablespace that you want this schema
to use.
d. Temporary Tablespace - Identify the temporary tablespace you want this
schema to use.
e. Click Next.
8. Confirm the information and click Add Schema.
9. To verify that the new schema is added to the workspace:
a. Log in to the workspace on Oracle Application Express.
b. Review the Workspace Schemas list on the Workspace home page. The list
shows all schemas associated with this workspace.
Managing Component Availability
Instance administrators can control which components are available within an Oracle
Application Express instance. Configurable components include: Websheets, SQL
Workshop, Application Builder, and Team Development.
To configure component availability:
1. Log in to Oracle Application Express Administration Services. See "Logging In To
Oracle Application Express Administration Services" on page 2-6.
2. Click Manage Workspaces.
3. Under Workspace Actions, click Manage Component Availability.
The Component Availability page appears.
This page displays as an interactive report. To customize the report, use the Search
bar at the top of the page. See "Customizing Interactive Reports" in Oracle
Application Express Application Builder User's Guide.
4. Locate the workspace for which you want to enable or disable components.
5. Click the Edit icon adjacent to the workspace name.
The Workspace Settings page appears.
6. Under Workspace Settings, select Yes to enable a component or No to disable it.
Options include:
■ Enable Application Builder
■ Enable SQL Workshop
■ Enable PL/SQL Editing in SQL Workshop
Tip: To verify that the new schema name is unique, open the select
list and search for the name.
Managing Existing Workspaces
2-78 Oracle Application Express Administration Guide
■ Enable Team Development
7. Click Apply Changes.
Defining a Workspace Message
You can display a message on the workspace home page by defining a Workspace
Message.
To define a workspace message:
1. Log in to Oracle Application Express Administration Services. See "Logging In To
Oracle Application Express Administration Services" on page 2-6.
2. Click Manage Workspaces.
3. Under Workspace Actions, click Manage Component Availability.
The Component Availability page appears.
This page displays as an interactive report. To customize the report, use the Search
bar at the top of the page. See "Customizing Interactive Reports" in Oracle
Application Express Application Builder User's Guide.
4. Locate the workspace for which you want to define a workspace message.
5. Under Workspace Message, enter a message in the Message field. To format the
display, include standard HTML tags.
6. Click Apply Changes.
Performing a Workspace Search
To perform a workspace search:
1. Log in to Oracle Application Express Administration Services. See "Logging In To
Oracle Application Express Administration Services" on page 2-6.
2. Under Workspace Tasks, click Find a Workspace.
The Workspace Search page appears
This page displays as an interactive report. To customize the report, use the Search
bar at the top of the page. See "Customizing Interactive Reports" in Oracle
Application Express Application Builder User's Guide.
3. To view workspace details, click the workspace name. See "About the Workspace
Summary Report" on page 2-80.
Viewing Existing Workspaces
Use the Existing Workspaces report to view an interactive report of existing
workspaces. From the Existing Workspaces report, you can view or edit workspace
details.
To access the Existing Workspaces report:
1. Log in to Oracle Application Express Administration Services. See "Logging In To
Oracle Application Express Administration Services" on page 2-6.
2. Click Manage Workspaces.
3. Under Workspace Reports, click Existing Workspaces.
The Existing Workspaces page appears
Managing Existing Workspaces
Oracle Application Express Hosted Instance Administration 2-79
This page displays as an interactive report. To customize the report, use the Search
bar at the top of the page. See "Customizing Interactive Reports" in Oracle
Application Express Application Builder User's Guide.
4. To edit workspace information, click the Edit icon adjacent to the workspace
name. See "Editing Workspace Details" on page 2-79
5. To view workspace details, click the workspace name. The Workspace Summary
Report. See "About the Workspace Summary Report" on page 2-80.
Editing Workspace Details
To edit workspace details:
1. Log in to Oracle Application Express Administration Services. See "Logging In To
Oracle Application Express Administration Services" on page 2-6.
2. Click Manage Workspaces.
3. Under Workspace Reports, click Existing Workspaces.
The Existing Workspaces report appears.
4. To edit workspace details, click the Edit icon adjacent to the workspace name.
The Edit Workspace Information page appears.
5. Edit the appropriate attributes.
To learn more about a specific attribute, click the item label. When Help is
available, the item label changes to red when you pass your cursor over it and the
cursor changes to an arrow and question mark.
6. Click Apply Changes.
Viewing Workspace Details
Instance administrators can view workspace information by viewing the Workspace
Summary Report.
To view workspace details:
1. Log in to Oracle Application Express Administration Services. See "Logging In To
Oracle Application Express Administration Services" on page 2-6.
2. Click Manage Workspaces.
3. Under Workspace Reports, click Workspace Details.
The Workspace Details page appears.
4. Make a selection from the Workspace list at the top of the page and click Set.
The Workspace Summary Report page appears.
Managing Existing Workspaces
2-80 Oracle Application Express Administration Guide
The following buttons appear above the report:
■ Remove - Click Remove to remove the current workspace.
■ Edit - Click Edit to edit workspace details.
■ Schema Assignments - Click Schema Assignments to manage workspace
schema assignments.
■ Manage Users - Click Manage Users to edit or create new users.
■ Email - Click Email send this report by email.
About the Workspace Summary Report
The Workspace Summary Report is divided into the following major sections:
■ Workspace. Displays high-level information about selected workspace.
■ Workspace Schemas. Displays the schema name, and default tablespace,
privileges granted, and database role privileges.
When users log in to Oracle Application Express, they log in to a shared work area
called a workspace. Each workspace can have multiple associated schemas. By
associating a workspace with a schema, developers can build applications that
interact with the objects in that schema and create new database objects in that
schema. To edit workspace to schema assignments, click Workspace to Schema
Assignments. See "Managing Schemas" on page 2-61.
■ Database Applications. Lists details about the database applications within the
workspace.
■ Workspace Websheets. Lists details about the websheets within the workspace.
■ Packaged Applications. Lists packaged application within the workspace.
■ SQL Workshop. Lists the number of SQL scripts, SQL script results, and SQL
Command history.
■ Team Development. Lists the number of features, milestones, bugs, To Dos,
feedback entries, news entries, and links.
Managing Existing Workspaces
Oracle Application Express Hosted Instance Administration 2-81
■ Workspace Application Activity Summary. Details statistics about workspace
applications.
Other sections include:
■ 5 Most Active Applications
■ Developer Activity Summary
■ Database Object Counts by Object Type
■ 5 Top Tables by Row Count, Reported by Schema
Viewing Workspace Database Privileges
Instance administrators can view a summary of workspace database privileges on the
Workspace Database Privileges page.
To view workspace database privileges:
1. Log in to Oracle Application Express Administration Services. See "Logging In To
Oracle Application Express Administration Services" on page 2-6.
2. Click Manage Workspaces.
3. Under Workspace Reports, click Workspace Database Privileges.
The Workspace Database Privileges page appears.
This page displays as an interactive report. To customize the report, use the Search
bar at the top of the page. See "Customizing Interactive Reports" in Oracle
Application Express Application Builder User's Guide.
4. To view workspace details, click the workspace name.
The Workspace Summary report appears. See "About the Workspace Summary
Report" on page 2-80.
Viewing File Size and File Count by Workspace
To view total file size and file count by workspace:
1. Log in to Oracle Application Express Administration Services. See "Logging In To
Oracle Application Express Administration Services" on page 2-6.
2. Click Manage Workspaces.
3. Under Workspace Reports, click Manage File Utilization.
The File Utilization by Workspace page appears.
This page displays as an interactive report. To customize the report, use the Search
bar at the top of the page. See "Customizing Interactive Reports" in Oracle
Application Express Application Builder User's Guide.
Exporting and Importing a Workspace
To move a workspace and all associated users to a new Oracle Application Express
instance, an Instance administrator must export the workspace. When you export a
workspace, Oracle Application Express generates a text file. This file contains
information about your workspace, all the users in your workspace, and any groups in
your workspace (if applicable). You can use this file to import your workspace into
another Oracle Application Express instance.
Managing Existing Workspaces
2-82 Oracle Application Express Administration Guide
Exporting a workspace and importing it into a new database instance enables
developers to import application components. Therefore, to provide maximum
capabilities Oracle recommends that when building new environments (for example,
for production or testing) create these workspaces by importing the development
workspaces.
Keep in mind, this method only imports workspace, users, and groups. This file does
not contain:
■ The schemas associated with this workspace or the objects in those schemas.
■ Any applications, images, cascading style sheets, and static text files.
These items must be exported separately.
Topics:
■ Exporting a Workspace
■ Importing a Workspace
Exporting a Workspace
To export a workspace:
1. Log in to Oracle Application Express Administration Services. See "Logging In To
Oracle Application Express Administration Services" on page 2-6.
2. Click Manage Workspaces.
3. Under Export Import, click Export Workspace.
4. Select a workspace and then click Export Workspace.
5. To export the selected workspace, click Save File.
6. Follow the on-screen instructions.
Importing a Workspace
To import a workspace:
1. Log in to Oracle Application Express Administration Services. See "Logging In To
Oracle Application Express Administration Services" on page 2-6.
2. Click Manage Workspaces.
3. Under Export Import, click Import Workspace.
4. Click Browse, select a workspace export file, and click Next.
5. To install the workspace, click Install.
6. Follow the on-screen instructions.
Viewing Application Attributes
Instance administrators can view applications by workspace on the Application
Attributes page.
To view the Application Attributes page:
See Also: "Deploying an Application" in Oracle Application Express
Application Builder User's Guide
Managing Existing Workspaces
Oracle Application Express Hosted Instance Administration 2-83
1. Log in to Oracle Application Express Administration Services. See "Logging In To
Oracle Application Express Administration Services" on page 2-6.
2. Click Manage Workspaces.
3. Under Manage Applications, click Application Attributes.
The Application Attributes page appears.
This page displays as an interactive report. To customize the report, use the Search
bar at the top of the page. See "Customizing Interactive Reports" in Oracle
Application Express Application Builder User's Guide.
Changing Application Build Status Set During Deployment
Every Oracle Application Express application has an application-level attribute called
Build Status. You can use this attribute to prevent an application from being modified
by other developers. Build Status has two settings:
■ Run and Build Application - Developers can both run and edit an application.
■ Run Application Only - Developers can only run an application.
Setting the Build Status to Run Application Only is an effective way to prevent other
developers from modifying it.
You can change the Build Status of an application as follows:
■ Developers and administrators can change the Build Status attribute on the Edit
Application page. See "Availability" in Oracle Application Express Application Builder
User's Guide.
■ Workspace administrators can change the Build Status of applications within the
current workspace on the Manage Application Build Status page. See "Changing
Build Status for Multiple Applications" on page 1-34.
■ Instance administrators can change the Build Status of an application on the Build
Status page as described in the next section.
To change a Build Status as an Instance administrator:
1. Log in to Oracle Application Express Administration Services. See "Logging In To
Oracle Application Express Administration Services" on page 2-6.
2. Click Manage Workspaces.
3. Under Manage Applications, click Build Status.
The Build Status page appears.
This page displays as an interactive report. To customize the report, use the Search
bar at the top of the page. See "Customizing Interactive Reports" in Oracle
Application Express Application Builder User's Guide.
4. Click the Edit icon adjacent to the appropriate application.
The Edit Build Status page appears.
5. Select an alternate build status and click Apply Changes.
Tip: Note that if you select Build Application Only during
deployment, the only way to change this setting is change it on the
Build Status page in Oracle Application Express Administration
Services.
Managing Users in an Oracle Application Express Instance
2-84 Oracle Application Express Administration Guide
Viewing the Parsing Schemas Report
Instance administrators can use the Parsing Schemas report to identify the current
parsing schema of each application in any workspace. This attribute identifies the
Oracle database schema whose privileges are used when Application Express
dynamically executes the application's SQL and PL/SQL code at runtime.
To view the Parsing Schemas report:
1. Log in to Oracle Application Express Administration Services. See "Logging In To
Oracle Application Express Administration Services" on page 2-6.
2. Click Manage Workspaces.
3. Under Manage Applications, click Parsing Schemas.
The Parsing Schemas page appears.
This page displays as an interactive report. To customize the report, use the Search
bar at the top of the page. See "Customizing Interactive Reports" in Oracle
Application Express Application Builder User's Guide.
Managing Users in an Oracle Application Express Instance
Instance administrators can manage all user accounts within an Oracle Application
Express instance on the Manage Developers and Users page. User accounts are
particularly useful if a workspace utilizes Application Express Authentication.
When setting up user accounts, Instance administrators can take advantage of some
manageability attributes, such as allowing the accounts to be locked, their password to
have a fixed lifetime, and their password to require change on first use.
Topics:
■ Creating New User Accounts
■ Editing an Existing User Account
■ Deleting User Accounts
Creating New User Accounts
To create a new user account:
1. Log in to Oracle Application Express Administration Services. See "Logging In To
Oracle Application Express Administration Services" on page 2-6.
See Also: "Managing Schemas" on page 2-61 and "Managing
Workspace to Schema Assignments" on page 2-73
See Also:
■ "Workspace and Application Administration" on page 1-1
■ "Managing Application Express Users" on page 1-16
■ "Application Express Account Credentials" in Oracle Application
Express Application Builder User's Guide
Tip: You can also access the Create/Edit User page by clicking
Create User on the Workspace Tasks list on the Instance
Administration home page.
Managing Users in an Oracle Application Express Instance
Oracle Application Express Hosted Instance Administration 2-85
2. Click Manage Workspaces.
3. Under Manage Workspaces, click Manage Developers and Users.
The Manage Developers and Users page appears.
4. Click Create User.
The Create/Edit User page appears.
5. Under User Attributes, enter:
a. Username - Enter the username used to log in to the system. Restrictions
include:
– Maximum length of 100 characters
– No spaces
– Only these special characters are permitted: amerpsand (@) and period (.)
b. Email Address - Enter the valid email address for this user.
c. First Name - Enter the first or given name to further identify the user
(optional).
d. Last Name - Enter the last or family name to further identify the user
(optional).
e. Description - Enter comments about this user (optional).
f. Default Date Format - Specify the default Oracle date format for the user. This
option controls the default date format within SQL Workshop.
6. Under Account Privileges:
a. Workspace - Select a workspace in which to create the user.
b. Default Schema - Specify the default schema used for data browsing,
application creation, and SQL script execution.
c. User is an administrator - Select Yes or No to specify if this user should have
workspace administrator privileges. Administrators are given access to all
components. Additionally, they can manage user accounts, groups, and
development services. Components may not be available if they are switched
off by Instance Administrators.
d. User is a developer - Select Yes or No to specify if this user should have
developer privileges. Developers create and modify applications and database
objects and view developer activity, session state, workspace activity,
application, and schema reports.
Developers must have access to either Application Builder, SQL Workshop, or
both. Components may not be available if they are switched off by Instance
Administrators.
e. Application Builder Access - Determines whether a developer has access to
the Application Builder.
f. SQL Workshop Access - Determines whether a developer has access to the
SQL Workshop.
g. Team Development Access - Determines whether a developer has access to
the Team Development.
h. Account Availability - Select Locked to prevent the account from being used.
Select Unlocked to allow the account to be used.
Managing Users in an Oracle Application Express Instance
2-86 Oracle Application Express Administration Guide
7. Under Password:
■ Password - Enter a case-sensitive password.
■ Confirm Password - Enter the password again.
■ Require Change of Password On First Use - Select No to require this user to
change his or her password at first log in. Select Yes to require the user to
change the password immediately after logging in the first time.
8. Click Create or Create and Create Another.
Editing an Existing User Account
To edit an existing user account:
1. Log in to Oracle Application Express Administration Services. See "Logging In To
Oracle Application Express Administration Services" on page 2-6.
2. Click Manage Workspaces.
3. Under Manage Workspaces, click Manage Developers and Users.
The Manage Developers and Users page appears.
This page displays as an interactive report. To customize the report, use the Search
bar at the top of the page. See "Customizing Interactive Reports" in Oracle
Application Express Application Builder User's Guide.
4. To edit account details, click the Edit icon adjacent to the user name.
To learn more about a specific attribute, click the item label. When Help is
available, the item label changes to red when you pass your cursor over it and the
cursor changes to an arrow and question mark.
5. Make the appropriate changes.
6. Click Apply Changes.
Deleting User Accounts
To delete a user account:
1. Log in to Oracle Application Express Administration Services. See "Logging In To
Oracle Application Express Administration Services" on page 2-6.
2. Click Manage Workspaces.
3. Under Manage Workspaces, click Manage Developers and Users.
The Manage Developers and Users page appears.
This page displays as an interactive report. To customize the report, use the Search
bar at the top of the page. See "Customizing Interactive Reports" in Oracle
Application Express Application Builder User's Guide.
4. Select a user.
Tip: An Instance administrator can configure these settings for an
entire Oracle Application Express instance and define password
complexity policies. See "Enabling Login Controls for All Workspaces"
on page 2-26. "About Strong Password Policies" on page 2-27, and
"Configuring Password Policies" on page 2-27
See Also: "Creating New User Accounts" on page 2-84
Monitoring Activity Across a Development Instance
Oracle Application Express Hosted Instance Administration 2-87
The Create/Edit User page appears.
5. Click Delete User.
6. Confirm your selection and click OK.
Monitoring Activity Across a Development Instance
Instance administrators can monitor end user and developer activity for an Oracle
Application Express instance on the Monitor Activity page.
Topics:
■ Monitoring Activity
■ Viewing the Signup Survey Report
Monitoring Activity
To monitor activity:
1. Log in to Oracle Application Express Administration Services. See "Logging In To
Oracle Application Express Administration Services" on page 2-6.
2. Click Monitor Activity.
The Monitor Activity page appears.
See Also: "Viewing Workspace Dashboards" on page 1-38
Monitoring Activity Across a Development Instance
2-88 Oracle Application Express Administration Guide
The Monitor Activity page is divided into the following sections:
■ Page Views - View activity by application, user, workspace, day, or REST
access.
■ Workspace Purge - View a dashboard summary, inactive workspaces,
workspaces purged, workspaces that became active, or a workspace purge log.
■ Environment Reports - View a summary of used operating systems, browser
types, user agent, or external sites.
■ Calendar Reports - View workspaces by date last used, page views by day
and then by application and user, or by hour.
■ Service Requests - View new service requests or signup survey activity.
■ Logs - View the mail log, jobs log, automatic delete log, or monitor packaged
application installations.
■ Login Attempts - View login attempts or developer last login.
■ Developer Activity - View application changes by developer or workspace.
Click the appropriate link to view reports across all workspaces.
3. To viewing archived activity, click the Archived Activity tab and follow the
on-screen instructions.
4. To view the Dasboard, click the Dashboard tab.
Monitoring Activity Across a Development Instance
Oracle Application Express Hosted Instance Administration 2-89
Viewing the Signup Survey Report
Instance administrators can also include survey questions users must complete when
running the New Service Signup Wizard.
To view the Signup Survey report:
1. Log in to Oracle Application Express Administration Services. See "Logging In To
Oracle Application Express Administration Services" on page 2-6.
2. Click Monitor Activity.
The Monitor Activity page appears.
3. Under Service Requests, click the Signup Survey.
The Signup Survey appears displaying the survey questions, answers, and the
number of responses.
4. To clear the Signup Survey report, click Reset Report.
See Also: "Viewing Workspace Dashboards" on page 1-38
See Also: "Defining a Signup Survey" on page 2-44
Monitoring Activity Across a Development Instance
2-90 Oracle Application Express Administration Guide
A
About DBMS_SCHEDULER Jobs A-1
AAbout DBMS_SCHEDULER Jobs
The DBMS_SCHEDULER package provides a collection of scheduling functions and
procedures that can be called from any PL/SQL program.
DBMS_SCHEDULER Jobs In Oracle Application Express
Table A–1 describes DBMS_SCHEDULER jobs that are created in the database when you
install Oracle Application Express.
Table A–1 DBMS_SCHEDULER Jobs
Job Name Description
ORACLE_APEX_PURGE_SESSIONS Purges sessions older than 12 hours (the default). This job runs every
hour.
See Also: "Managing Session State" on page 2-51
ORACLE_APEX_MAIL_QUEUE Sends mail that is in the mail queue every 5 minutes.
See Also: "APEX_MAIL" in Oracle Application Express API Reference
and "Configuring Email" on page 2-35.
ORACLE_APEX_WS_NOTIFICATIONS Determines Websheet notifications that must be sent every 30 minutes.
See Also: "About Websheet Applications" in Oracle Application Express
Application Builder User's Guide
ORACLE_APEX_DAILY_MAINTENANCE Performs nightly maintenance, every day at 0100. This job archives the
activity summary and runs the workspace purge process.
See Also: "Purging Inactive Workspaces" on page 2-45
DBMS_SCHEDULER Jobs In Oracle Application Express
A-2 Oracle Application Express Administration Guide
Index-1
Index
A
Activity, 1-39
Administration Services
enabling access, 2-20
logging in to, 2-6
restricting access, 2-19
administrator roles, 1-16
agreement, including with Signup Wizard, 2-44
APEX_SITE_ADMIN_PRIVS
CREATE_EXCEPTION, 2-63
REMOVE_WORKSPACE_EXCEPTIONS, 2-63
REPORT, 2-63
RESTRICT_SCHEMA, 2-62
UNRESTRICT_SCHEMA, 2-62
APEX_SITE_ADMIN_PRIVS.REMOVE_SCHEMA_
EXCEPTIONS, 2-63
APEX_SITE_ADMIN_PRIVS.REMOVE_
WORKSPACE_EXCEPTIONS, 2-63
Application Builder Defaults, 1-42
configuring, 1-42
Application Builder, enabling, 1-12
Application Express engine, determining schema
for, 2-61
Application Express user groups
adding users, 1-25
creating, 1-24
editing, 1-24
Application Express users
changing user password, 1-23
creating, 1-17, 2-84
creating multiple, 1-19
deleting accounts, 1-22, 2-86
deleting multiple users, 1-22
editing accounts, 1-20, 2-86
grouping, 1-24
managing, 1-16
Application Express, about, 1-4
application ID ranges, configuring, 2-44
application models
deleting, 1-35
application reports, 1-36
applications
enabling activity logging, 2-17
enabling tracing, 2-17
Applications reports
Applications Dashboard, 1-41
B
build status
changing, 1-34
changing as instance administrator, 2-83
C
change requests, 2-12
approving, 2-12
managing, 2-12
Change Requests page, 2-12
character set, 1-6
Create Workspace Wizard, 2-66
D
DAD, restricting access, 2-28
dashboards, 1-39, 1-40, 1-41
viewing, 1-38
database dashboards, 1-41
database version, 1-6
database, about version, 1-4
Detailed Tablespace Utilization report, 1-10
Developer Activity, 1-40
Developer activity log, deleting, 2-55
developer logs, purging, 1-26
E
email
configuring, 2-35
configuring for a runtime instance, 2-36
configuring for development instance, 2-36
determining email settings in runtime
instance, 2-37
mail queue, 2-53
viewing mail log, 2-53
export, workspace, 2-81
External click counting log, deleting, 2-56
External Clicks Log, purging, 1-26
Index-2
F
feature configuration
configure SQL Workshop, 2-16
creating Websheet objects, 2-14
creation of demonstration objects in new
workspace, 2-14
disabling PL/SQL program unit editing, 2-14
disabling SQL Access in Websheets, 2-15
enabling application activity logging, 2-17
enabling database monitoring, 2-16
enabling service requests, 2-18
enabling tracing, 2-17
Packaged Application Installation Options, 2-15
G
groups
adding users, 1-25
creating, 1-24
editing, 1-24
managing Application Express users, 1-24
removing users, 1-25
H
help, configuring URL, 2-43
HTTPS
requiring for an instance, 2-22
reversing requirement for an instance, 2-23
I
import, workspace, 2-81
Installed Translations page, 2-53
instance proxy setting, 2-21
instance settings
auto extend tablespaces, 2-33
configuring a wallet, 2-38
configuring email, 2-35, 2-36
configuring online Help, 2-43
configuring workspace size options, 2-43
deleting uploaded files, 2-34
disabling email provisioning, 2-32
managing application ID ranges, 2-44
requiring a new schema, 2-33
self service provisioning, 2-31
interactive report
manage saved reports, 1-8
manage subscriptions, 1-8
IP address, restricting by IP address, 2-21
L
log entries, deleting, 2-54
Login Access log, deleting entries, 2-56
login controls
configuring for an instance, 2-25
configuring for workspace, 2-26
enabling for workspace, 1-11
login message
creating, 2-58
disabling, 2-58
logs, purging, 1-25
M
mail queue, viewing, 2-53
Manage Export Repository, 1-6
Manage Instance page, 2-3
Manage Service page, 1-7
Manage Workspaces page, 2-5
messages
login, 2-57
system, 2-57
monitor activity
Archived Activity, 2-87
Calendar Reports, 2-88
Dashboard, 2-87
Developer Activity, 2-88
Environment Reports, 2-88
Login Attempts, 2-88
Logs, 2-88
Page Views, 2-88
Realtime Monitor Reports, 2-87
Service Requests, 2-88
Workspace Purge, 2-88
O
Online Help, configuring, 2-43
Oracle Application Express
application owner, 1-5
CGI environment, 1-6
character set, 1-6
current time (on server), 1-5
current user, 1-5
database version, 1-6
host schema, 1-5
language preference, 1-5
last DDL time, 1-5
managing component availability, 2-77
online resources, 1-5
schema compatibility, 1-5
version, 1-5
web server software, 1-6
workspace ID, 1-5
workspace name, 1-5
Oracle Application Express administrator, 2-1
approving a change request, 2-12
approving a workspace request, 2-10
changing a workspace request, 2-11
changing build status, 2-83
creating a workspace manually, 2-66
creating user accounts, 2-84
deleting a workspace, 2-69
deleting a workspace request, 2-11
deleting log entries, 2-54
deleting user accounts, 2-86
editing user accounts, 2-86
editing workspace details, 2-79
Index-3
emailing workspace summary, 2-79
exporting and importing a workspace, 2-81
locking a workspace, 2-73
managing email, 2-53
managing instance settings, 2-31
managing schemas, 2-73
managing session state, 2-51
managing users, 2-84
Oracle default schemas, 2-62
provisioning a workspace, 2-64
purging inactive workspaces, 2-70
viewing database privileges, 2-81
viewing Parse as Schemas report, 2-84
viewing pending new service requests, 2-7
viewing pending requests, 2-7
viewing report attributes, 2-82
viewing workpace summary, 2-79
viewing workspaces, 2-78
Oracle default schemas
determining administrator privilege status, 2-62
removing default restrictions, 2-62
revoking administrator privileges, 2-62
Oracle Technology Network, 1-5
Discussion Forum, 1-5
Oracle-managed files, 2-64
OTN, Discussion Forum, 1-5
outbound HTTP traffic, setting proxy, 2-21
P
packaged application
monitoring installation progress, 2-47
viewing packaged database application, 2-46
viewing packaged Websheet application, 2-47
packaged application install options
Allow HTTP Header Variable
authentication, 2-15
Allow LDAP Directory authentication, 2-15
Allow Oracle Application Server Single Sign-On
authentication, 2-15
packaged applications
installation options, 2-15
packaged database application, viewing
summary, 2-46
packaged Websheet application, viewing
summary, 2-47
Page View Activity logs, deleting, 2-55
pages, purging cached, 1-33
password policies
about strong, 2-27
configuring, 2-27
password, resetting from Administration page, 1-4
Performance, 1-40
PL/SQL editing, disabling, 1-13
PL/SQL program unit editing, 2-14
preferences
creating a workspace announcement, 1-15
for a workspace, 1-11
purging for a specific user, 1-30
provisioning mode
Email Verification, 2-65
Manual, 2-65
Request, 2-65
specifying, 2-65
proxy, setting for instance, 2-21
public file upload, disabling, 2-21
public themes
adding, 2-48
deleting, 2-48
exporting, 2-49
managing, 2-48
modifying, 2-49
R
regions, purging cached, 1-33
report
Detailed Tablespace Utilization, 1-10
used and free space, 1-10
report printing
configuring, 2-40
configuring in full development instance, 2-40
configuring in runtime instance, 2-41
determining settings in runtime instance, 2-42
reports
Active Sessions, 1-37
Activity Dashboard, 1-39
Application Attributes, 2-82
Application Changes by Application, 1-37
Application Changes by Developer, 1-37
Database Dashboard, 1-41
Developer Activity Dashboard, 1-40
monitor activity, 1-36
monitoring activity, 1-38
Parse as Schemas, 2-84
Performance Dashboard, 1-40
schema, 1-38
Users Dashboard, 1-39
Websheet Dashboard, 1-41
Workspace Dashboard, 1-39
RESTRICT_IP_RANGE, 2-21
restricting user access, 2-21
runtime settings, RESTRICT_IP_RANGE, 2-21
S
schema
associating with workspace, 2-75
creating new, 2-76
determining for Application Express, 2-61
editing schema mapping, 2-74
reports, 1-38
requesting new, 1-10
schema mapping, 2-73
editing, 2-74
removing in runtime instance, 2-76
viewing in development instance, 2-74
viewing in runtime instance, 2-74
Secure Sockets Layer (SSL), 2-38
security settings
Index-4
access to Administration Services, 2-19
authorized URLs, 2-30
configuring login controls for an instance, 2-25
configuring password policies, 2-27
configuring session timeout, 2-24
disabling access to Internal applications, 2-20
disabling cookies to populate login form, 2-19
disabling public file upload, 2-21
disabling workspace login, 2-20
enabling access to Administration Services, 2-20
enabling login controls for a workspace, 2-26
enabling RESTful access, 2-24
excluding domains, 2-25
excluding URL regions, 2-25
requiring HTTPS, 2-22
restricting access by DAD, 2-28
restricting access by IP address, 2-21
reversing HTTPS requirement, 2-23
setting instance proxy, 2-21
service request
enabling for workspace, 2-18
managing, 2-7
more storage, 1-10
new schema, 1-10
new workspace, 1-11
requesting, 1-9
terminate service, 1-10
service, terminating, 1-10
session state
managing, 1-26, 2-51
purging current session, 1-28
removing, 1-27
viewing session details, 1-27
session, purging by age, 1-28
sign up agreement, including in Signup wizard, 2-60
Signup Wizard, 2-60
creating survey questions, 2-60
enabling an agreement, 2-60
including agreement, 2-44
including survey, 2-44
site-specific tasks lists, 2-59
adding a task, 2-59
deleting a task, 2-60
editing a task, 2-59
SQL Workshop
deleting logs, 2-54
enabling, 1-13
SSL-enabled URLs, 2-38
storage, requesting more, 1-10
survey
creating questions, 2-60
including with Signup Wizard, 2-44, 2-60
system message
creating, 2-58
disabling, 2-58
T
Team Development
enabling, 1-14
enabling support for file attachments, 1-14
template applications
adding to repository, 2-50
deleting, 2-50
editing, 2-51
editing properties, 2-51
managing, 2-49
modifying pages, 2-51
translation, viewing installed, 2-53
U
user access, restricting access by IP address, 2-21
user account
creating, 2-84
deleting, 2-86
editing, 2-86
user preferences
managing, 1-26
purging, 1-30
purging for current user, 1-30
removing programmatically, 1-32
resetting using a page process, 1-32
setting, 1-31
viewing by user, 1-29
viewing for current user, 1-29
user roles
developer, 1-16, 2-1
Instance administrator, 1-16, 2-1
Oracle Application Express administrator, 1-16
Workspace administrator, 1-16
Workspace administrators, 1-16, 2-1
Users Dashboard, 1-39
V
viewing, dashboards, 1-38
W
wallet
configuring, 2-38
configuring in full development instance, 2-38
configuring in runtime instance, 2-38
creating, 2-38
determining settings in runtime instance, 2-39
Websheet Dashboard, 1-41
Websheet Database Objects, 1-6
workspace
about provisioning, 2-64
administration, 2-1
configuring preferences, 1-11
creating in development environment, 2-66
creating in runtime environment, 2-67
creating manually, 2-66
creating new tablespaces, 2-64
dashboard, 1-39
deleting, 2-69
deleting inactive, 2-73
determining available space, 1-10
editing, 2-79
Index-5
exporting and importing, 2-81
identifying inactive, 2-71
locking, 2-73
login controls, 1-11
managing, 1-1
managing files, 1-6
managing Websheet objects, 1-6
provisioning, 2-64
purging, 2-70
purging inactive, 2-45
removing resources, 2-72
requesting new, 1-11
size options for requests, 2-43
specifying a provisioning mode, 2-65
terminating, 1-10
viewing, 2-78
Workspace Administration page, 1-1
Workspace administrator, 1-1
changing build status, 1-34
requesting a database schema, 1-10
requesting additional storage, 1-10
requesting service termination, 1-10
viewing schema reports, 1-38
viewing workspace utilization, 1-15
workspace announcement, creating, 1-15
Workspace Database Privileges, 2-81
workspace login, disabling, 2-20
workspace message, defining, 2-78
workspace preferences
Application Builder, 1-12
login controls, 1-11
PL/SQL editing, 1-13
SQL Workshop, 1-13
Team Development, 1-14
workspace report
having only sample applications, 2-72
viewing file size and count, 2-81
workspace requests
approving, 2-10
changing, 2-11
configuring size options, 2-43
Workspace Requests page, 2-8
Workspace Summary Report
emailing, 2-79
viewing, 2-79
Workspace Utilization Report viewing, 1-15
Index-6

Oracle database 12c application express administration guide

  • 1.
    Oracle® Application Express AdministrationGuide Release 4.2 for Oracle Database 12c E17965-08 May 2013
  • 2.
    Oracle Application ExpressAdministration Guide, Release 4.2 for Oracle Database 12c E17965-08 Copyright © 2003, 2013, Oracle and/or its affiliates. All rights reserved. Primary Author: Terri Jennings Contributors: Marco Adelfio, Drue Swadener, Carl Backstrom, Christina Cho, Michael Hichwa, Joel Kallman, Sharon Kennedy, Scott Spadafore, and Jason Straub This software and related documentation are provided under a license agreement containing restrictions on use and disclosure and are protected by intellectual property laws. Except as expressly permitted in your license agreement or allowed by law, you may not use, copy, reproduce, translate, broadcast, modify, license, transmit, distribute, exhibit, perform, publish, or display any part, in any form, or by any means. Reverse engineering, disassembly, or decompilation of this software, unless required by law for interoperability, is prohibited. The information contained herein is subject to change without notice and is not warranted to be error-free. If you find any errors, please report them to us in writing. If this is software or related documentation that is delivered to the U.S. Government or anyone licensing it on behalf of the U.S. Government, the following notice is applicable: U.S. GOVERNMENT END USERS: Oracle programs, including any operating system, integrated software, any programs installed on the hardware, and/or documentation, delivered to U.S. Government end users are "commercial computer software" pursuant to the applicable Federal Acquisition Regulation and agency-specific supplemental regulations. As such, use, duplication, disclosure, modification, and adaptation of the programs, including any operating system, integrated software, any programs installed on the hardware, and/or documentation, shall be subject to license terms and license restrictions applicable to the programs. No other rights are granted to the U.S. Government. This software or hardware is developed for general use in a variety of information management applications. It is not developed or intended for use in any inherently dangerous applications, including applications that may create a risk of personal injury. If you use this software or hardware in dangerous applications, then you shall be responsible to take all appropriate fail-safe, backup, redundancy, and other measures to ensure its safe use. Oracle Corporation and its affiliates disclaim any liability for any damages caused by use of this software or hardware in dangerous applications. Oracle and Java are registered trademarks of Oracle and/or its affiliates. Other names may be trademarks of their respective owners. Intel and Intel Xeon are trademarks or registered trademarks of Intel Corporation. All SPARC trademarks are used under license and are trademarks or registered trademarks of SPARC International, Inc. AMD, Opteron, the AMD logo, and the AMD Opteron logo are trademarks or registered trademarks of Advanced Micro Devices. UNIX is a registered trademark of The Open Group. This software or hardware and documentation may provide access to or information on content, products, and services from third parties. Oracle Corporation and its affiliates are not responsible for and expressly disclaim all warranties of any kind with respect to third-party content, products, and services. Oracle Corporation and its affiliates will not be responsible for any loss, costs, or damages incurred due to your access to or use of third-party content, products, or services.
  • 3.
    iii Contents Preface................................................................................................................................................................. ix Topic Overview........................................................................................................................................... ix Audience....................................................................................................................................................... ix Documentation Accessibility..................................................................................................................... x Related Documents ..................................................................................................................................... x Conventions ................................................................................................................................................. xi Changes in This Release ....................................................................................................................... xiii Changes in Oracle Application Express Release 4.2 ............................................................................ xiii 1 Workspace and Application Administration About the Workspace Administration Page........................................................................................ 1-1 Accessing the Workspace Administration Page............................................................................ 1-3 Resetting Your Password from the Administration Page............................................................ 1-4 Viewing the Application Express Product Information Page ..................................................... 1-4 Managing Files in the Export Repository....................................................................................... 1-6 Managing Websheet Database Objects ........................................................................................... 1-6 About the Manage Service Page............................................................................................................ 1-7 Accessing the Manage Service Page................................................................................................ 1-8 Managing Interactive Report Settings............................................................................................. 1-8 Managing Saved Interactive Reports....................................................................................... 1-8 Managing Interactive Report Subscriptions ........................................................................... 1-9 Making a Service Request ...................................................................................................................... 1-9 Requesting a New Schema, More Storage, or Terminating Service ........................................ 1-10 Determining the Amount of Space Available in Your Workspace.......................................... 1-10 Requesting Another Workspace ................................................................................................... 1-11 Configuring Workspace Preferences ................................................................................................. 1-11 Enabling Account Login Controls for a Workspace .................................................................. 1-11 Enabling Application Builder Development............................................................................... 1-12 Enabling SQL Workshop................................................................................................................ 1-13 Disabling PL/SQL Program Unit Editing for a Workspace ..................................................... 1-13 Managing Team Development...................................................................................................... 1-14 Enabling Team Development................................................................................................. 1-14 Enabling Support for File Attachments in Team Development........................................ 1-14 Defining a Workspace Announcement............................................................................................. 1-15
  • 4.
    iv About the WorkspaceUtilization Report ......................................................................................... 1-15 Viewing and Emailing the Workspace Summary Report......................................................... 1-16 Understanding User Roles................................................................................................................... 1-16 Managing Application Express Users ............................................................................................... 1-16 Creating New User Accounts........................................................................................................ 1-17 Creating Multiple Users Simultaneously .................................................................................... 1-19 Editing Existing User Accounts .................................................................................................... 1-20 Deleting or Locking User Accounts.............................................................................................. 1-22 Deleting Multiple Users at Once................................................................................................... 1-22 Changing an End User Password................................................................................................. 1-23 Viewing the Users Dashboard....................................................................................................... 1-23 Using Groups to Manage Application Express Users ............................................................... 1-24 Creating a Group ..................................................................................................................... 1-24 Editing an Existing User Group............................................................................................. 1-24 Adding and Removing Users from a Group ....................................................................... 1-25 Purging the Developer Activity and Click Count Log Files ......................................................... 1-25 Purging the Developer Activity Log ............................................................................................ 1-26 Purging the External Click Count Log......................................................................................... 1-26 Managing Session State and User Preferences................................................................................ 1-26 Managing Session State.................................................................................................................. 1-27 Removing Session State After Reviewing Session Details................................................. 1-27 Viewing Session State for the Current Session.................................................................... 1-28 Purging Sessions by Age......................................................................................................... 1-28 Purging Session State for the Current Session..................................................................... 1-28 Managing User Preferences........................................................................................................... 1-29 Viewing Preferences by User ................................................................................................. 1-29 Viewing Current User Preferences........................................................................................ 1-29 Purging Preferences for a Specific User................................................................................ 1-30 Purging Current User Preferences ........................................................................................ 1-30 Setting User Preferences ......................................................................................................... 1-31 Removing User Preferences Programmatically................................................................... 1-32 Resetting User Preferences Using a Page Process............................................................... 1-32 Managing Page and Region Caching ................................................................................................ 1-32 Purging Cached Regions................................................................................................................ 1-33 Purging Cached Pages.................................................................................................................... 1-33 Changing Build Status for Multiple Applications ......................................................................... 1-34 Managing Application Models........................................................................................................... 1-35 Deleting an Application Model..................................................................................................... 1-35 Monitoring Activity Within a Workspace ........................................................................................ 1-36 Viewing Developer Activity and Application Change Information ....................................... 1-36 Viewing Application Changes by Developer ............................................................................. 1-37 Viewing Application Changes by Day......................................................................................... 1-37 Viewing Active Sessions ................................................................................................................ 1-37 Viewing Schema Reports ............................................................................................................... 1-38 Viewing Workspace Dashboards ....................................................................................................... 1-38 About the Workspace Dashboard................................................................................................. 1-39 About the Users Dashboard .......................................................................................................... 1-39
  • 5.
    v About the ActivityDashboard...................................................................................................... 1-39 About the Developer Activity Dashboard................................................................................... 1-40 About the Performance Dashboard.............................................................................................. 1-40 About the Websheets Dashboard ................................................................................................. 1-41 About the Applications Dashboard.............................................................................................. 1-41 About the Database Dashboard .................................................................................................... 1-41 Leveraging Application Builder Defaults........................................................................................ 1-42 About Application Builder Defaults ............................................................................................ 1-42 Configuring Application Builder Defaults ................................................................................. 1-42 2 Oracle Application Express Hosted Instance Administration What Is an Instance Administrator? ..................................................................................................... 2-1 About the Instance Administration Home Page ........................................................................... 2-2 About Instance Tasks ................................................................................................................. 2-2 About Workspace Tasks ............................................................................................................ 2-3 About Language Selector........................................................................................................... 2-3 Accessibility Mode...................................................................................................................... 2-3 About the Manage Instance Page .................................................................................................... 2-3 About the Manage Workspaces Page.............................................................................................. 2-5 Logging In To Oracle Application Express Administration Services ............................................ 2-6 Managing Workspace and Change Requests...................................................................................... 2-7 Viewing Requests on the Instance Administration Home Page ................................................. 2-7 Viewing Pending Requests............................................................................................................... 2-8 Managing Workspace Requests....................................................................................................... 2-9 Approving or Declining a Pending Workspace Request ................................................... 2-10 Changing the Status of an Existing Workspace Request.................................................... 2-11 Deleting a Workspace Request .............................................................................................. 2-11 Managing Change Requests .......................................................................................................... 2-12 Viewing Requests from the All Change Requests Page..................................................... 2-12 Approving or Declining a Pending Change Request ......................................................... 2-12 Managing Instance Settings................................................................................................................ 2-13 Managing Feature Configuration ................................................................................................. 2-13 Disabling PL/SQL Program Unit Editing............................................................................ 2-14 Disabling the Creation of Demonstration Objects in a New Workspace......................... 2-14 Disabling the Creation of Websheet Objects........................................................................ 2-14 Enabling and Disabling SQL Access in Websheets............................................................. 2-15 Configuring Packaged Application Installation Options .................................................. 2-15 Configuring SQL Workshop .................................................................................................. 2-16 Enabling Database Monitoring .............................................................................................. 2-16 Enabling Application Activity Logging ............................................................................... 2-17 Enabling Application Tracing................................................................................................ 2-17 Enabling Service Requests...................................................................................................... 2-18 Configuring Security Settings ....................................................................................................... 2-18 Turning Off Cookies Used to Populate the Login Form ................................................... 2-19 Disabling Access to Oracle Application Express Administration Services..................... 2-19 Disabling Workspace Login Access ...................................................................................... 2-20 Controlling Public File Upload.............................................................................................. 2-21
  • 6.
    vi Restricting User Accessby IP Address................................................................................. 2-21 Configuring a Proxy Server for an Instance......................................................................... 2-21 Requiring HTTPS..................................................................................................................... 2-22 Controlling RESTful Access ................................................................................................... 2-24 Configuring Session Timeout................................................................................................. 2-24 Excluding Domains from Regions of Type URL and Web Services................................. 2-25 Configuring Login Controls................................................................................................... 2-25 Enabling Login Controls for All Workspaces...................................................................... 2-26 About Strong Password Policies............................................................................................ 2-27 Configuring Password Policies.............................................................................................. 2-27 Restricting Access to Oracle Application Express by Database Access Descriptor (DAD) ..... 2-28 Defining Authorized URLs..................................................................................................... 2-30 Configuring Instance Settings ....................................................................................................... 2-31 Enabling Self Service Workspace Provisioning................................................................... 2-31 Disabling Email Provisioning ................................................................................................ 2-32 Configuring Storage ................................................................................................................ 2-33 Configuring Email ................................................................................................................... 2-35 Configuring Wallet Information............................................................................................ 2-38 Configuring Report Printing .................................................................................................. 2-40 Configuring Online Help........................................................................................................ 2-43 Configuring Workspace Size Options for Requests............................................................ 2-43 Managing Application ID Range........................................................................................... 2-44 Including an Agreement or Survey When Running the Signup Wizard................................ 2-44 Defining an Agreement........................................................................................................... 2-44 Defining a Signup Survey....................................................................................................... 2-44 Purging Inactive Workspaces........................................................................................................ 2-45 Configuring Workspace Purge Settings ............................................................................... 2-45 Viewing Information About Installed Packaged Database Applications............................... 2-46 Viewing Packaged Database Applications........................................................................... 2-46 Viewing Packaged Websheet Applications ......................................................................... 2-47 Monitoring the Progress Packaged Application Installations.................................................. 2-47 Managing Public Themes............................................................................................................... 2-48 Adding a Public Theme to the Theme Repository.............................................................. 2-48 Deleting a Public Theme......................................................................................................... 2-48 Modifying a Public Theme ..................................................................................................... 2-49 About Exporting a Public Theme .......................................................................................... 2-49 Managing Template Applications ................................................................................................ 2-49 Adding an Application to the Template Applications Repository................................... 2-50 Deleting a Template Application .......................................................................................... 2-50 Editing a Template Application............................................................................................. 2-51 Managing Session State.................................................................................................................. 2-51 Viewing Session Details Before Purging .............................................................................. 2-52 Purging Sessions by Age......................................................................................................... 2-52 Viewing Session Statistics Before Purging ........................................................................... 2-52 Managing the Mail Queue ............................................................................................................. 2-53 Viewing Installed Translations ..................................................................................................... 2-53 Managing Interactive Report Subscriptions................................................................................ 2-54
  • 7.
    vii Managing Logs andFiles ............................................................................................................... 2-54 Deleting SQL Workshop Logs................................................................................................ 2-54 Deleting Page View Activity Log Entries............................................................................. 2-55 Deleting Developer Activity Log Entries ............................................................................. 2-55 Deleting Click Counting Log Entries .................................................................................... 2-56 Deleting the Login Access Log............................................................................................... 2-56 Managing Log Intervals.......................................................................................................... 2-56 Managing a Runtime Environment.............................................................................................. 2-57 Managing Messages........................................................................................................................ 2-57 Defining a Login Message ...................................................................................................... 2-58 Defining a System Message.................................................................................................... 2-58 Creating a Site-Specific Tasks List......................................................................................... 2-59 About the Self Service Sign Up Wizard ....................................................................................... 2-60 Managing a New Service Signup Wizard ............................................................................ 2-60 Running a New Service Signup Wizard............................................................................... 2-61 Managing Schemas ............................................................................................................................... 2-61 Determining the Oracle Application Express Engine Schema ................................................. 2-61 Understanding Oracle Default Schema Restrictions.................................................................. 2-62 Granting the Privilege to Assign Oracle Default Schemas ................................................ 2-62 Revoking the Privilege to Assign Oracle Default Schemas ............................................... 2-62 Working with Restricted Schemas......................................................................................... 2-63 Determining the Privilege Status........................................................................................... 2-63 Creating Workspaces ............................................................................................................................ 2-64 About Workspace Provisioning.................................................................................................... 2-64 Specifying a Provisioning Mode................................................................................................... 2-65 Creating a Workspace Manually .................................................................................................. 2-66 Creating Workspace Manually in a Full Development Environment ............................. 2-66 Creating a Workspace Manually in a Runtime Environment........................................... 2-67 Creating Multiple Workspaces...................................................................................................... 2-67 Managing Existing Workspaces.......................................................................................................... 2-69 Deleting a Workspace..................................................................................................................... 2-69 Deleting Workspaces in a Full Development Environment.............................................. 2-70 Deleting Workspaces in a Runtime Development Environment...................................... 2-70 About Deleting Inactive Workspaces.................................................................................... 2-70 Locking a Workspace...................................................................................................................... 2-73 Managing Workspace to Schema Assignments.......................................................................... 2-73 Viewing Schema and Workspace Assignments in a Development Environment ......... 2-74 Viewing Schema and Workspace Assignments in a Runtime Environment.................. 2-74 Editing Existing Schema and Workspace Assignments..................................................... 2-74 Associating Additional Schemas with a Workspace .......................................................... 2-75 Removing a Schema Mapping from a Workspace in a Runtime Environment.............. 2-76 Creating a New Schema.......................................................................................................... 2-76 Managing Component Availability.............................................................................................. 2-77 Defining a Workspace Message............................................................................................. 2-78 Performing a Workspace Search................................................................................................... 2-78 Viewing Existing Workspaces....................................................................................................... 2-78 Editing Workspace Details ............................................................................................................ 2-79
  • 8.
    viii Viewing Workspace Details...........................................................................................................2-79 About the Workspace Summary Report .............................................................................. 2-80 Viewing Workspace Database Privileges .................................................................................... 2-81 Viewing File Size and File Count by Workspace ....................................................................... 2-81 Exporting and Importing a Workspace ....................................................................................... 2-81 Exporting a Workspace........................................................................................................... 2-82 Importing a Workspace........................................................................................................... 2-82 Viewing Application Attributes.................................................................................................... 2-82 Changing Application Build Status Set During Deployment................................................... 2-83 Viewing the Parsing Schemas Report .......................................................................................... 2-84 Managing Users in an Oracle Application Express Instance........................................................ 2-84 Creating New User Accounts........................................................................................................ 2-84 Editing an Existing User Account................................................................................................. 2-86 Deleting User Accounts.................................................................................................................. 2-86 Monitoring Activity Across a Development Instance.................................................................... 2-87 Monitoring Activity ........................................................................................................................ 2-87 Viewing the Signup Survey Report.............................................................................................. 2-89 DBMS_SCHEDULER Jobs In Oracle Application Express ............................................................ A-1 Index
  • 9.
    ix Preface Oracle Application Expressis a hosted declarative development environment for developing and deploying database-centric web applications. Oracle Application Express turns a single Oracle database into a shared service by enabling multiple workgroups to build and access applications as if they were running in separate databases. Oracle Application Express Application Administration Guide describes how to perform administration tasks for an Oracle Application Express workspace, application, or an entire development instance. Topics: ■ Topic Overview ■ Audience ■ Documentation Accessibility ■ Related Documents ■ Conventions Topic Overview This document contains the following chapters: Audience Oracle Application Express Administration Guide is intended for application developers who are building database-centric web applications using Oracle Application Express. The guide describes how to use the Oracle Application Express development environment to build, debug, manage, and deploy applications. Title Description Changes in This Release Describes changes in this document for Oracle Application Express, release 4.2. Workspace and Application Administration Describes how to perform Workspace administration tasks and access many of these reports. Oracle Application Express Hosted Instance Administration Describes tasks an Oracle Application Express administrator performs when administering an Oracle Application Express hosted instance.
  • 10.
    x To use thisguide, you must have a general understanding of relational database concepts and an understanding of the operating system environment under which you are running Oracle Application Express. Documentation Accessibility For information about Oracle's commitment to accessibility, visit the Oracle Accessibility Program website at http://www.oracle.com/pls/topic/lookup?ctx=acc&id=docacc. Access to Oracle Support Oracle customers have access to electronic support through My Oracle Support. For information, visit http://www.oracle.com/pls/topic/lookup?ctx=acc&id=info or visit http://www.oracle.com/pls/topic/lookup?ctx=acc&id=trs if you are hearing impaired. Related Documents For more information, see these Oracle resources: ■ Oracle Application Express Release Notes ■ Oracle Application Express Installation Guide ■ Oracle Database 2 Day + Oracle Application Express Developer's Guide ■ Oracle Application Express End User's Guide ■ Oracle Application Express Application Builder User's Guide ■ Oracle Application Express SQL Workshop Guide ■ Oracle Application Express API Reference ■ Oracle Application Express Migration Guide ■ Oracle Database Concepts ■ Oracle Database Advanced Application Developer's Guide ■ Oracle Database Administrator's Guide ■ Oracle Database SQL Language Reference ■ SQL*Plus User's Guide and Reference For additional documentation available on Oracle Technology Network (OTN), visit the Oracle Application Express website located at: http://www.oracle.com/technetwork/developer-tools/apex/overview/index.h tml For additional application examples, go to the Learning Library. Search for free online training content, including Oracle by Example (OBE), demos, and tutorials. To access the Oracle Learning Library, go to: http://www.oracle.com/technetwork/tutorials/index.html Printed documentation is available for sale in the Oracle Store at: See Also: Oracle Database 2 Day + Oracle Application Express Developer's Guide
  • 11.
    xi http://shop.oracle.com/ If you havea user name and password for OTN, then you can go directly to the documentation section of the OTN website at: http://www.oracle.com/technetwork/indexes/documentation/index.ht ml Conventions The following text conventions are used in this document: Convention Meaning boldface Boldface type indicates graphical user interface elements associated with an action, or terms defined in text or the glossary. italic Italic type indicates book titles, emphasis, or placeholder variables for which you supply particular values. monospace Monospace type indicates commands within a paragraph, URLs, code in examples, text that appears on the screen, or text that you enter.
  • 12.
  • 13.
    xiii Changes in ThisRelease This preface contains: ■ Changes in Oracle Application Express Release 4.2 Changes in Oracle Application Express Release 4.2 The following are changes in Oracle Application Express Administration Guide for Oracle Application Express release 4.2. New Features The following features are new in this release: ■ Team Development Attachments Developers can now add external documents as attachments to features, bugs, and ToDos. See "Enabling Support for File Attachments in Team Development" on page 1-14. ■ Manage Packaged Applications – Configure Packaged Application Authentication Options Instance administrators can define authentication options for packaged application. See "Configuring Packaged Application Installation Options" on page 2-15. – View Information About Installed Packaged Application Instance administrators can view the popularity of any given packaged database and Websheet application on a given instance. See "Viewing Information About Installed Packaged Database Applications" on page 2-46. – Monitoring the Progress of Packaged Application Installations Instance administrators can monitor users and installation performance of packaged applications. See "Monitoring the Progress Packaged Application Installations" on page 2-47. ■ Instance Proxy Proxies can now be defined at the instance level superseding those at the application and Web Service reference level.
  • 14.
    xiv See "Configuring aProxy Server for an Instance" on page 2-21. ■ All Outbound traffic HTTPS When enabled, this new instance setting requires that all outbound traffic use the HTTPS protocol. See "Requiring HTTPS" on page 2-22. ■ Bigfile Tablespace When a workspace is provisioned and Oracle Application Express is creating the associated database user, tablespace, and datafile, the underlying tablespace can be created as a bigfile tablespace that can grow to a very large size (terabytes), overcoming the limitation of smallfile tablespaces. See "Enabling Bigfile Tablespaces" on page 2-33. ■ Encrypted Tablespace Tablespaces created by Oracle Application Express when provisioning a workspace can be created as an encrypted tablespace, assuming the database administrator has created and opened an encryption wallet with a master encryption key set. See "Enabling Encrypted Tablespaces" on page 2-34. ■ Manage Application ID Range Instance administrators can control the range for IDs of new database or Websheet applications. See "Managing Application ID Range" on page 2-44. ■ Create Multiple Workspaces Instance administrators can now utilize a wizard to provision multiple workspaces at once. See "Creating Multiple Workspaces" on page 2-67. ■ Enable Application Tracing Instance administrators can enable or disable application tracing to control when database trace files can be created by an application which has Debug enabled. See "Enabling Application Tracing" on page 2-17. ■ Reporting on Interactive Report Subscriptions Enables instance administrators to monitor and review interactive report subscriptions. See "Managing Interactive Report Subscriptions" on page 2-54. ■ Failed Login Handling Administrators can define a period of time users must wait following each failed login attempt. Administrators can also define a lockout period following a specified number of failed attempts. See "Configuring Login Controls" on page 2-25. ■ Define Resource Consumer Group Instance administrators can associate a workspace with a Resource Consumer Group to better manage the resource utilization of different workspaces within a shared environment.
  • 15.
    xv See "Editing WorkspaceDetails" on page 2-79. Other Changes The following are additional changes in the release: ■ All content has been updated to reflect new functionality. ■ Screen captures and graphics have been added and updated to reflect Oracle Application Express release 4.2 user interface enhancements.
  • 16.
  • 17.
    Workspace and ApplicationAdministration 1-1 1 Workspace and Application Administration In an Oracle Application Express development environment, users log in to a shared work area called a workspace. A workspace is a virtual private database that enables multiple users to work within the same Oracle Application Express installation while keeping their objects, data and applications private. This flexible architecture enables a single database instance to manage thousands of applications. Developers can create and edit applications and view developer activity, session state, workspace activity, application, and schema reports. Workspace administrators additionally can create and edit user accounts, manage groups, and manage development services. This section describes how to perform Workspace administration tasks and access many of these reports. Topics: ■ About the Workspace Administration Page ■ About the Manage Service Page ■ Making a Service Request ■ Configuring Workspace Preferences ■ Defining a Workspace Announcement ■ About the Workspace Utilization Report ■ Understanding User Roles ■ Managing Application Express Users ■ Purging the Developer Activity and Click Count Log Files ■ Managing Session State and User Preferences ■ Managing Page and Region Caching ■ Changing Build Status for Multiple Applications ■ Managing Application Models ■ Monitoring Activity Within a Workspace ■ Viewing Workspace Dashboards ■ Leveraging Application Builder Defaults About the Workspace Administration Page Use the Workspace Administration page to manage your application development environment.
  • 18.
    About the WorkspaceAdministration Page 1-2 Oracle Application Express Administration Guide The top of Workspace Administration page contains the following icons: ■ Manage Services links to the Manage Service page. Use this page to manage service requests (including, schema requests, storage requests, and service termination) and configure workspace preferences, edit announcements, view utilization reports and log files, and manage session state and application models. See "About the Manage Service Page" on page 1-7. ■ Manage Users and Groups links to the Manage Users page. Use this page to manage Application Express user accounts and user groups. See "Managing Application Express Users" on page 1-16. ■ Monitor Activity links to the Monitor Activity page. Use this page to monitor changes to page views, developer activity, page view analysis, and active sessions. It also shows reports on such information as login attempts and external click counts. See "Monitoring Activity Within a Workspace" on page 1-36. ■ Dashboards links to the Dashboard page. Use this page to view details about the current workspace and monitor users, activity, developer activity, performance, Websheet application development, application development, and view database details. See "Viewing Workspace Dashboards" on page 1-38. About Tasks A Tasks list displays on the right side of the page and displays the following links:
  • 19.
    About the WorkspaceAdministration Page Workspace and Application Administration 1-3 ■ Change My Password links to the Change Password page. See "Resetting Your Password from the Administration Page" on page 1-4. ■ About Application Express links to an About page that lists basic product information. See "Viewing the Application Express Product Information Page" on page 1-4. ■ Change Password links to a form you can use to change your password. See "Resetting Your Password from the Administration Page" on page 1-4. ■ Manage User Groups links to the User groups page. See "Using Groups to Manage Application Express Users" on page 1-24. ■ Create User links to a form where you can create new user. See "Creating New User Accounts" on page 1-17. ■ Create Multiple Users enables you to create multiple users once. See "Creating Multiple Users Simultaneously" on page 1-19. ■ Delete Multiple Users enables you to delete multiple users at once. See "Deleting Multiple Users at Once" on page 1-22. ■ Manage Interactive Report Settings enables you to manage saved reports and subscriptions. See "Managing Interactive Report Settings" on page 1-8. ■ Manage Export Repository links to the Manage Export Repository. See "Managing Files in the Export Repository" on page 1-6. ■ Websheet Database Objects displays the Websheet Database Objects page. See "Managing Websheet Database Objects" on page 1-6. Workspace Announcements The Workspace Announcements region displays directly below the icons at the top of the Workspace Administration page. Use this display to communicate information to other users. See "Defining a Workspace Announcement" on page 1-15. About Dashboards The Dashboards region displays links to specific dashboards. See "Viewing Workspace Dashboards" on page 1-38. Topics: ■ Accessing the Workspace Administration Page ■ Resetting Your Password from the Administration Page ■ Viewing the Application Express Product Information Page ■ Managing Files in the Export Repository Accessing the Workspace Administration Page Use the Administration page to manage your application development environment. To access the Administration page: 1. Log in to Oracle Application Express. See "Logging In To Oracle Application Express" in Oracle Application Express Application Builder User's Guide. The Workspace home page appears. 2. Click the Administration icon. The Administration page appears.
  • 20.
    About the WorkspaceAdministration Page 1-4 Oracle Application Express Administration Guide Resetting Your Password from the Administration Page To reset your password from the Administration page: 1. Log in to Oracle Application Express. See "Logging In To Oracle Application Express" in Oracle Application Express Application Builder User's Guide. The Workspace home page appears. 2. Click the Administration icon. The Administration page appears. 3. On the Tasks list, click Change Password. 4. In Change Password, enter the following: ■ Enter Current Password - Enter your current password. ■ Enter New Password - Enter your new password. ■ Confirm New Password - Enter your new password again. 5. Click Apply Changes. Viewing the Application Express Product Information Page The About Application Express page lists basic product information. You can access the About Application Express page from the Workspace Administration page. To view the About Application Express page: 1. Navigate to the Workspace home page. 2. Click the Administration icon. The Workspace Administration page appears. 3. On the Tasks list, click About Application Express. The About Application Express page appears. The page is divided into these sections: About; Visit Oracle Online For More Information; CGI Environment; and Database Version. See Also: "Changing an End User Password" on page 1-23
  • 21.
    About the WorkspaceAdministration Page Workspace and Application Administration 1-5 About The About section displays the following information: ■ Product build ■ Schema compatibility ■ Last DDL time ■ Host schema ■ Application Owner ■ Workspace ID ■ Workspace Name ■ Current user ■ Language Preference ■ Current Time (on server) Oracle Online For More Information Oracle Online For More Information contains links to Oracle Technology Network and Oracle Technology Network Discussion Forum.
  • 22.
    About the WorkspaceAdministration Page 1-6 Oracle Application Express Administration Guide CGI Environment Common Gateway Interface (CGI) Environment provides information about the currently installed web server software such as currently defined parameters and variables. Database Version Database Version lists details about the currently installed database version. Character Set Character Set lists currently selected character sets. The selected character set determines the encoding scheme used to display characters on screen. Managing Files in the Export Repository Use the Manage Export Repository page to manage files in the current workspace. To access the Manage Export Repository page: 1. Navigate to the Workspace home page. 2. Click the Administration icon. The Workspace Administration page appears. 3. On the Tasks list, click Manage Workspace Files. The Manage Export Repository page appears. You can customize the appearance of the page using the Search bar at the top of the page. See "Customizing Interactive Reports" in Oracle Application Express Application Builder User's Guide. 4. To remove a file, select the file and click Delete Checked. Managing Websheet Database Objects All Websheet application data is stored within tables owned by a schema associated with this workspace. The tables are all prefixed by APEX$_. Use this page to manage these tables. To access the Manage Export Repository page: 1. Navigate to the Workspace home page. 2. Click the Administration icon. The Workspace Administration page appears. 3. On the Tasks list, click Websheet Database Objects. The Websheet Database Objects page appears. 4. Select one of the following: ■ Remove Websheet Database Objects ■ Validate Websheet Database Objects
  • 23.
    About the ManageService Page Workspace and Application Administration 1-7 About the Manage Service Page You can use the Manage Service page to manage service requests, configure workspace preferences, edit workspace announcements, and view workspace utilization reports. Additionally, use the links on the Manage Meta Data list to manage log files, session state, page and region caching, application build status, application models, and view the Workspace Utilization report. The Manage Service page contains the following icons: ■ Make a Service Request. Use this link to request a new schema, request additional storage space, or terminate a workspace. See "Making a Service Request" on page 1-9. ■ Set Workspace Preferences. Use this link to configure login controls, Application Builder, SQL Workshop, and Team Development and enable support for PL/SQL editing. See "Configuring Workspace Preferences" on page 1-11. ■ Edit Announcement. Use this link to create a message that displays on the Workspace home page and on the Workspace Administration page. See "Defining a Workspace Announcement" on page 1-15. ■ Workspace Utilization. Use this link to view a summary report about the current workspace. See "About the Workspace Utilization Report" on page 1-15. About Manage Meta Data The Manage Meta Data list displays on the right side of the page and displays the following links: ■ Developer Activity and Click Count Logs. See "Purging the Developer Activity and Click Count Log Files" on page 1-25. ■ Session State. See "Managing Session State and User Preferences" on page 1-26. ■ Application Cache. See "Managing Page and Region Caching" on page 1-32. ■ Websheet Database Objects displays the Websheet Database Objects page. See "Managing Websheet Database Objects" on page 1-6. ■ Application Build Status. See "Managing Build Status in Workspace Administration" on page 1-34. ■ Application Models. See "Managing Application Models" on page 1-35. ■ Utilization Page. See "About the Workspace Utilization Report" on page 1-15. ■ Interactive Report Settings. See "Managing Interactive Report Settings" on page 1-8.
  • 24.
    About the ManageService Page 1-8 Oracle Application Express Administration Guide About Dashboards The Dashboards link displays links to specific dashboards. See "Viewing Workspace Dashboards" on page 1-38. Topics: ■ Accessing the Manage Service Page ■ Managing Interactive Report Settings Accessing the Manage Service Page To access the Manage Service page: 1. Log in to Oracle Application Express. See "Logging In To Oracle Application Express" in Oracle Application Express Application Builder User's Guide. The Workspace home page appears. 2. Click the Administration icon. The Administration page appears. 3. Click Manage Service. The Manage Service page appears. Managing Interactive Report Settings Interactive reports include components that enable users to alter the layout of report data. Users can then save the report or receive updated versions of a report by subscribing to it. To learn more, see "Customizing Interactive Reports" in Oracle Application Express Application Builder User's Guide. Topics: ■ Managing Saved Interactive Reports ■ Managing Interactive Report Subscriptions Managing Saved Interactive Reports Both developers and end users can save interactive reports. However, only a developer can save the report that initially displays (called the Primary Default) or create an Alternative report. There are four types of saved interactive reports: ■ Primary Default (Developer Only). This is the report that initially displays. Primary Default reports cannot be renamed or deleted. ■ Alternative Report (Developer Only). Enables developers to create multiple report layouts. Only developers can save, rename, or delete an Alternative Report. ■ Public Report (End user). Can be saved, renamed, or deleted by the end user who created it. Other users can view and save the layout as another report. ■ Private Report (End user). Only the end user that created the report can view, save, rename, or delete the report. Workspace administrators can view and manage these reports on the Saved Reports page. See Also: "About the Manage Service Page" on page 1-7
  • 25.
    Making a ServiceRequest Workspace and Application Administration 1-9 To manage saved interactive reports: 1. Navigate to the Workspace home page. 2. Click the Administration icon. The Administration page appears. 3. From the Tasks list, click Manage Interactive Report Settings. The Manage Interactive Report Settings page appears. 4. Click Saved Reports. The Saved Reports page appears. You can customize the appearance of the page using the Search bar at the top of the page. See "Customizing Interactive Reports" in Oracle Application Express Application Builder User's Guide. 5. To link to an application, page or region, click the appropriate hyperlink. 6. To delete a report: a. Select the report to be removed. b. Click Delete Checked. Managing Interactive Report Subscriptions End users can receive updated versions of a report by subscribing to it. Workspace administrators can view and manage these subscriptions on the Subscriptions page. To manage interactive report subscriptions: 1. Navigate to the Workspace home page. 2. Click the Administration icon. The Administration page appears. 3. From the Tasks list, click Manage Interactive Report Settings. The Manage Interactive Report Settings page appears. 4. Click Subscriptions. The Subscriptions page appears. You can customize the appearance of the page using the Search bar at the top of the page. See "Customizing Interactive Reports" in Oracle Application Express Application Builder User's Guide. 5. To link to an application, page or region, click the appropriate hyperlink. 6. To delete a subscription: a. Select the subscription to be removed. b. Click Delete Checked. Making a Service Request Use the Request Service page to request a new schema, additional storage space, or to terminate a workspace. See Also: "Managing Workspace and Change Requests" on page 2-7
  • 26.
    Making a ServiceRequest 1-10 Oracle Application Express Administration Guide Topics: ■ Requesting a New Schema, More Storage, or Terminating Service ■ Determining the Amount of Space Available in Your Workspace ■ Requesting Another Workspace Requesting a New Schema, More Storage, or Terminating Service To make a service request: 1. Log in to Oracle Application Express. See "Logging In To Oracle Application Express" in Oracle Application Express Application Builder User's Guide. The Workspace home page appears. 2. Click the Administration icon. The Administration page appears. 3. Click Manage Service. 4. Click Make a Service Request. 5. Select one of the following: a. Request Schema b. Request Storage c. Request Termination 6. If Request Schema, specify the following: a. Schema - Select either Request a new schema or Use an existing schema. b. Schema Name - Enter a new name or select one from the list. c. Click Next. 7. If Request Storage, specify the following: a. Amount of Storage to Add - Select the amount of storage to add. b. Click Next. c. Confirm your request by clicking Request Storage. 8. If Request Termination, specify the following: a. Verify the workspace service to be terminated. b. Click Next. c. Confirm your request by clicking Terminate Service. Determining the Amount of Space Available in Your Workspace The Detailed Tablespace Utilization report displays the amount of space used and amount of free space available in the current workspace. When requesting additional storage, use this report to determine how much additional storage space you need. To view the Detailed Tablespace Utilization report: 1. Log in to Oracle Application Express. See "Logging In To Oracle Application Express" in Oracle Application Express Application Builder User's Guide. The Workspace home page appears.
  • 27.
    Configuring Workspace Preferences Workspaceand Application Administration 1-11 2. Click the Administration icon. The Administration page appears. 3. Click Manage Service. 4. Click Make a Service Request. 5. Expand the Tasks list and click Detailed Tablespace Utilization Report (may take several seconds). A report appears displaying the tablespace name, available bytes, amount used, amount free and percentage used. Requesting Another Workspace To request another workspace: 1. Log in to Oracle Application Express. See "Logging In To Oracle Application Express" in Oracle Application Express Application Builder User's Guide. The Workspace home page appears. 2. Click the Administration icon. The Administration page appears. 3. Click Manage Service. 4. Click Make a Service Request. 5. From the Tasks list, click Sign up for another workspace. 6. Follow the online registration instructions. Configuring Workspace Preferences Workspace administrators can configure the following preferences for the current workspace, including login controls, support for Application Builder, SQL Workshop, PL/SQL editing, and Team Development. Topics: ■ Enabling Account Login Controls for a Workspace ■ Enabling Application Builder Development ■ Enabling SQL Workshop ■ Disabling PL/SQL Program Unit Editing for a Workspace ■ Managing Team Development Enabling Account Login Controls for a Workspace There are two different ways to configure login controls: ■ An Instance administrator enables account login controls for all Application Express accounts in all workspaces across a development instance. If your Instance administrator configures these preferences for an instance, those settings display as the defaults for all workspaces. See "Enabling Login Controls for All Workspaces" on page 2-26.
  • 28.
    Configuring Workspace Preferences 1-12Oracle Application Express Administration Guide ■ If the Instance administrator does not enable login controls across an entire instance, then each Workspace administrator can enable the following controls on a workspace-by-workspace basis: – Require end-user account expiration and locking – Set up a maximum number of failed login attempts for end-user accounts – Set the password lifetime for end-user accounts, that is, the number of days an end-user account password can be used before it expires To enable login controls for a workspace: 1. Log in to Oracle Application Express. See "Logging In To Oracle Application Express" in Oracle Application Express Application Builder User's Guide. The Workspace home page appears. 2. Click the Administration icon. The Administration page appears. 3. Click Manage Service. 4. Click Set Workspace Preferences. 5. Under Account Login Control: a. Account Expiration and Locking - Click Enable. If you select Enable, end-user account passwords expire after a configurable time period and accounts are locked after a configurable number of authentication failures. Account passwords can be set to expire after the first use. If your Instance administrator set the Require User Account Expiration and Locking preference to Yes, this preference defaults to Enable and you cannot update it. b. Maximum Login Failures Allowed - Enter a positive integer for the maximum number of consecutive unsuccessful authentication attempts allowed before an end-user account is locked. If you do not specify a value in this field, the instance-level setting for Maximum Login Failures Allowed is used. c. End User Account Lifetime (days) - Enter a positive integer for the maximum number of days an end-user account password may be used before the account expires. If you do not specify a value in this field, the instance-level setting for Account Password Lifetime is used. 6. Click Apply Changes. Enabling Application Builder Development To enable Application Builder: 1. Log in to Oracle Application Express. See "Logging In To Oracle Application Express" in Oracle Application Express Application Builder User's Guide. The Workspace home page appears. Tip: This feature applies only to accounts created using the Application Express user creation and management facilities. It provides additional authentication security for applications. See "Managing Application Express Users" on page 1-16.
  • 29.
    Configuring Workspace Preferences Workspaceand Application Administration 1-13 2. Click the Administration icon. The Administration page appears. 3. Click Manage Service. 4. Click Set Workspace Preferences. 5. Scroll down to Application Builder. 6. For Enable Application Builder, select Yes. To disable Application Builder, select No. 7. Click Apply Changes. Enabling SQL Workshop To enable SQL Workshop: 1. Log in to Oracle Application Express. See "Logging In To Oracle Application Express" in Oracle Application Express Application Builder User's Guide. The Workspace home page appears. 2. Click the Administration icon. The Administration page appears. 3. Click Manage Service. 4. Click Set Workspace Preferences. 5. Scroll down to SQL Workshop. 6. For Enable SQL Workshop, select Yes. To disable SQL Workshop, select No. 7. Click Apply Changes. Disabling PL/SQL Program Unit Editing for a Workspace By default, developers can change and compile PL/SQL source code when browsing database procedures, packages, and functions in SQL Workshop Object Browser. Workspace administrators can disable PL/SQL program unit editing by selecting Do not allow PL/SQL program unit editing on the Preferences page. To disable PL/SQL program unit editing: 1. Log in to Oracle Application Express. See "Logging In To Oracle Application Express" in Oracle Application Express Application Builder User's Guide. The Workspace home page appears. 2. Click the Administration icon. The Administration page appears. 3. Click Manage Service. 4. Click Set Workspace Preferences. 5. Scroll down to SQL Workshop. Tip: These settings can be overridden by an Instance administrator. See "Managing Component Availability" on page 2-77. Tip: These settings can be overridden by an Instance administrator. See "Managing Component Availability" on page 2-77.
  • 30.
    Configuring Workspace Preferences 1-14Oracle Application Express Administration Guide 6. Under PL/SQL Editing, select one of the following: ■ Allow PL/SQL program unit editing ■ Do not allow PL/SQL program unit editing If you select Do not allow PL/SQL program unit editing, developers can still create and replace PL/SQL program units using scripts or SQL Commands. 7. Click Apply Changes. Managing Team Development Use the options under Team Development to specify whether Team Development is available in the current workspace and to enable support for file attachments. Topics: ■ Enabling Team Development ■ Enabling Support for File Attachments in Team Development Enabling Team Development To enable Team Development: 1. Log in to Oracle Application Express. See "Logging In To Oracle Application Express" in Oracle Application Express Application Builder User's Guide. The Workspace home page appears. 2. Click the Administration icon. The Administration page appears. 3. Click Manage Service. 4. Click Set Workspace Preferences. 5. Scroll down to Team Development. 6. For Enable Team Development, select either: ■ Yes - Select Yes to enable Team Development in the current workspace. ■ No - Select No to disable Team Development in the current workspace. 7. Click Apply Changes. Enabling Support for File Attachments in Team Development To enable support for file attachments in Team Development: 1. Log in to Oracle Application Express. See "Logging In To Oracle Application Express" in Oracle Application Express Application Builder User's Guide. The Workspace home page appears. 2. Click the Administration icon. The Administration page appears. 3. Click Manage Service. See Also: "Disabling PL/SQL Program Unit Editing" on page 2-14 and "Using SQL Commands" in Oracle Application Express SQL Workshop Guide
  • 31.
    About the WorkspaceUtilization Report Workspace and Application Administration 1-15 4. Click Set Workspace Preferences. 5. Scroll down to Team Development. 6. For Enable File Repository, select either: ■ Yes - Select Yes to enable support for file attachments in Team Development. Selecting Yes creates a local APEX$ table to store the files. ■ No - Select No to disable support for file attachments in Team Development. 7. Click Apply Changes. Defining a Workspace Announcement You can quickly communicate with other users by creating workspace announcements. These announcements display both on the Workspace home page and on the Workspace Administration page. To create or edit a workspace announcement: 1. Log in to Oracle Application Express. See "Logging In To Oracle Application Express" in Oracle Application Express Application Builder User's Guide. The Workspace home page appears. 2. Click the Administration icon. The Workspace Administration page appears. The Workspace Announcements region displays in the center of the page. 3. To create or edit an announcement, click the Edit icon that resembles a pencil. 4. In Message, enter text. Use standard HTML tags to include formatting. 5. Click Apply Changes. About the Workspace Utilization Report Workspace administrators can view a summary report of the current workspace by selecting Workspace Utilization on the Manage Service page. Administrators can use this report to view a comprehensive summary of the current workspace information including, schemas, applications, websheets, SQL Workshop, and Team Development details, activity summaries, and counts of database objects. Tip: You can also create or edit announcements by clicking the Administration icon, the Manage Service icon, and then Edit Announcement.
  • 32.
    Understanding User Roles 1-16Oracle Application Express Administration Guide Viewing and Emailing the Workspace Summary Report To view a summary report about the current workspace: 1. View the Workspace Summary Report: a. Log in to Oracle Application Express. See "Logging In To Oracle Application Express" in Oracle Application Express Application Builder User's Guide. The Workspace home page appears. b. Click the Administration icon. The Administration page appears. c. On the Administration page, click Manage Service. d. Click Workspace Utilization. e. From Show, select a time interval. f. Scroll down to view the report. 2. To email the report: a. Click Email. b. In the Email form, enter email addresses, edit the subject line, enter optional body text, and click Email. – To - Enter valid email addresses. – Subject - Enter text that describes the message. – Body - Enter optional body text. – Click Email. The report is automatically emailed to the specified recipients. Understanding User Roles In the Oracle Application Express, users log in to a shared work area called a workspace. Users are divided into three primary roles: ■ Developers create and edit applications. ■ Workspace administrators are developers who also perform administrator tasks specific to their workspace such as managing user accounts, monitoring workspace activity, and viewing log files. See "Workspace and Application Administration" on page 1-1. ■ Instance administrators are superusers that manage the entire hosted instance using the Oracle Application Express Administration Services application. Managing Application Express Users Workspace administrators can create new user accounts, manage existing user accounts, and change user passwords. User accounts are particularly useful if you are using Application Express Authentication. Application Express Authentication checks the user name and password against the Oracle Application Express account See Also: "Oracle Application Express Hosted Instance Administration" on page 2-1 for more information on the responsibilities of an Instance administrator.
  • 33.
    Managing Application ExpressUsers Workspace and Application Administration 1-17 repository. The Oracle Application Express account repository contains account information for developers and administrators when they log in to Oracle Application Express applications. If the workspace administrator enables the Account Locking/Expiration feature for end user accounts, new account management attributes are exposed. Accounts may be locked, unlocked, or expired. Passwords for those accounts can also have restrictions, such as a fixed lifetime, a maximum number of consecutive incorrect passwords when attempting to log in, and a requirement to be changed on first use. Topics: ■ Creating New User Accounts ■ Creating Multiple Users Simultaneously ■ Editing Existing User Accounts ■ Deleting or Locking User Accounts ■ Deleting Multiple Users at Once ■ Changing an End User Password ■ Viewing the Users Dashboard ■ Using Groups to Manage Application Express Users Creating New User Accounts Workspace administrators can create three different types of user accounts: ■ Developers can create and edit applications and view developer activity, session state, workspace activity, application, and schema reports. In Icons view, developers are yellow. ■ Workspace administrators perform administrator tasks specific to a workspace, such as managing user accounts, managing groups, altering passwords of users within the same workspace, and managing development services. In Icons view, Workspace administrators are red. ■ End users are application users without any access to development or administrative capabilities. In Icons view, end users are green. To create a new user account: 1. Log in to Oracle Application Express. See "Logging In To Oracle Application Express" in Oracle Application Express Application Builder User's Guide. The Workspace home page appears. 2. Click the Administration icon. The Administration page appears. 3. Click Manage Users and Groups. 4. Click Create User. See Also: "Managing Users in an Oracle Application Express Instance" on page 2-84 and "Exporting Workspace Users" in Oracle Application Express Application Builder User's Guide See Also: "Oracle Application Express Hosted Instance Administration" on page 2-1
  • 34.
    Managing Application ExpressUsers 1-18 Oracle Application Express Administration Guide The Create User page appears. 5. Under User Identification, enter: a. Username - Enter the username used to log in to the system. Restrictions include: – Maximum length of 100 characters – No spaces – Only these special characters are permitted: ampersand (@) and period (.) b. Email Address - Enter the valid email address for this user. c. First Name - Enter the first or given name to further identify the user (optional). d. Last Name - Enter the last or family name to further identify the user (optional). e. Description - Enter comments about this user (optional). f. Default Date Format - Specify the default Oracle date format for the user. This option controls the default date format within SQL Workshop. 6. Under Account Privileges: a. Default Schemas - Specify the default schema used for data browsing, application creation, and SQL script execution. When using workspaces that have more than one schema available, this schema is the default. This setting does not control security, only the user's preference. b. Accessible Schemas (null for all) - Leave this blank to enable the end user to access all schemas associated with the workspace. c. User is a workspace administrator - Select Yes or No to specify if this user should have workspace administrator privileges. Administrators are given access to all components. Additionally, they can manage user accounts, groups, and development services. Components may not be available if they are switched off by Instance Administrators. d. User is a developer - Select Yes or No to specify if this user should have developer privileges. Developers create and modify applications and database objects and view developer activity, session state, workspace activity, application, and schema reports. Developers must have access to either Application Builder, SQL Workshop, or both. Components may not be available if they are switched off by Instance Administrators. e. Application Builder Access - Determines whether a developer has access to the Application Builder. f. SQL Workshop Access - Determines whether a developer has access to the SQL Workshop. g. Team Development Access - Determines whether a developer has access to the Team Development. h. Set Account Availability - Select Locked to prevent the account from being used. Select Unlocked to allow the account to be used.
  • 35.
    Managing Application ExpressUsers Workspace and Application Administration 1-19 If the user has exceeded the maximum login failures allowed as defined in Workspace Preferences, then the account is locked automatically. 7. Under Password: ■ Password - Enter a case-sensitive password. ■ Confirm Password - Enter the password again. ■ Require Change of Password On First Use - Select No to allow the user to use the same password until it expires. Select Yes to require the user to change the password immediately when logging in the first time. 8. Under User Groups, optionally select one or more user groups by holding down the CTRL key and selecting the groups. 9. Click Create User or Create and Create Another. Creating Multiple Users Simultaneously Workspace administrators can create multiple user accounts in a single operation. To create multiple user accounts simultaneously: 1. Log in to Oracle Application Express. See "Logging In To Oracle Application Express" in Oracle Application Express Application Builder User's Guide. The Workspace home page appears. 2. Click the Administration icon. The Administration page appears. 3. Click Manage Users and Groups. 4. On the Tasks list, click Create Multiple Users. The Create Multiple Users page appears. 5. In List of Email Addresses, enter or copy and paste email addresses separated by commas, semicolons, or new lines. 6. Under Users: ■ List of Email Addresses - Enter or copy and paste email addresses separated by commas, semicolons, or new lines. Tip: An Instance administrator can configure these settings for an entire Oracle Application Express instance and define password complexity policies. See "Enabling Login Controls for All Workspaces" on page 2-26. "About Strong Password Policies" on page 2-27, and "Configuring Password Policies" on page 2-27 Tip: An Instance administrator can configure these settings for an entire Oracle Application Express instance and define password complexity policies. See "Enabling Login Controls for All Workspaces" on page 2-26. "About Strong Password Policies" on page 2-27, and "Configuring Password Policies" on page 2-27 See Also: "Using Groups to Manage Application Express Users" on page 1-24 and "Adding and Removing Users from a Group" on page 1-25
  • 36.
    Managing Application ExpressUsers 1-20 Oracle Application Express Administration Guide ■ Usernames - Specify whether to include or exclude the domain name. Select one of the following: – Set username to full email address – Exclude @ domain as part of the username Removes all text after the @ symbol (for example, user1@xyz.com becomes user1). 7. Under Account Privileges: ■ Default Schemas - Specify the default schema used for data browsing, application creation, and SQL script execution. When using workspaces that have more than one schema available, this schema is the default for creating applications, performing SQL queries, and so on. ■ Accessible Schemas (null for all) - Enter a colon-delimited list of schemas for which this developer has permissions when using the SQL Workshop. The list of schemas you enter here restricts the user to a subset of the full set of schemas provisioned for the workspace and determines what schema names the user sees in SQL Workshop. ■ User is a workspace administrator - Select Yes or No to specify if this user should have workspace administrator privileges. Administrators are given access to all components. Additionally, they can manage user accounts, groups, and development services. Components may not be available if they are switched off by Instance Administrators. ■ User is a developer - Select Yes or No to specify if this user should have developer privileges. Developers create and modify applications and database objects and view developer activity, session state, workspace activity, application, and schema reports. Developers must have access to either Application Builder, SQL Workshop, or both. Components may not be available if they are switched off by Instance Administrators. ■ Application Builder Access - Determines whether a developer has access to the Application Builder. ■ SQL Workshop Access - Determines whether a developer has access to the SQL Workshop. ■ Team Development Access - Determines whether a developer has access to the Team Development. 8. Under Password: ■ Password - Specify a password. Passwords are case-sensitive. Developers can change their own passwords. Developers with Administrator privilege can change the passwords of users within the same workspace. ■ Confirm Password - Enter the password again. 9. Click Apply Changes. Editing Existing User Accounts Workspace administrators can edit existing user accounts. See Also: "Using Groups to Manage Application Express Users" on page 1-24 and "Adding and Removing Users from a Group" on page 1-25
  • 37.
    Managing Application ExpressUsers Workspace and Application Administration 1-21 To edit an existing user account: 1. Log in to Oracle Application Express. See "Logging In To Oracle Application Express" in Oracle Application Express Application Builder User's Guide. The Workspace home page appears. 2. Click the Administration icon. The Administration page appears. 3. Click Manage Users and Groups. The Users page appears. 4. You can customize the appearance of the page using the Search bar at the top of the page. See "Customizing Interactive Reports" in Oracle Application Express Application Builder User's Guide. 5. Select a user. The Edit User page appears. 6. Under Edit User, update the email address, first name, last name, description, and default date format. 7. Under Account Privileges: ■ Default Schema - Identifies the default schema used for data browsing, application creation, and SQL script execution. ■ Accessible Schemas (null for all) - Enter a colon-delimited list of schemas for which this developer has permissions when using the SQL Workshop. This list of schemas restricts the user to a subset of the full set of schemas provisioned for the workspace and determines what schema names the user sees in SQL Workshop. ■ User is a workspace administrator - Select Yes or No to specify if this user should have workspace administrator privileges. Administrators are given access to all components. Additionally, they can manage user accounts, groups, and development services. Components may not be available if they are switched off by Instance Administrators. ■ User is a developer - Select Yes or No to specify if this user should have developer privileges. Developers create and modify applications and database objects and view developer activity, session state, workspace activity, application, and schema reports. Note that Developers must have access to either Application Builder, SQL Workshop, or both. Components may not be available if they are switched off by Instance Administrators. ■ Application Builder Access - Determines whether a developer has access to the Application Builder. ■ SQL Workshop Access - Determines whether a developer has access to the SQL Workshop. ■ Team Development Access - Determines whether a developer has access to the Team Development. ■ Account Availability - Select Locked to prevent the account from being used. Select Unlocked to enable the account to be used. If the user has exceeded the maximum login failures allowed, specified in Workspace Preferences, then the account is locked automatically.
  • 38.
    Managing Application ExpressUsers 1-22 Oracle Application Express Administration Guide 8. Under Password: ■ Password - Enter a case-sensitive password. ■ Confirm Password - Enter the password again. ■ Require Change of Password On First Use - Select No to allow the user to use the same password until it expires. Select Yes to require the user to change the password immediately when logging in the first time. 9. Under User Groups, optionally select one or more user groups by holding down the CTRL key and selecting the groups. 10. Click Apply Changes. Deleting or Locking User Accounts Workspace administrators can delete or lock user accounts. To delete or lock a user account: 1. Navigate to the Workspace home page. 2. Click the Administration icon. The Administration page appears. 3. Click Manage Users and Groups. The Users page appears. 4. Select a user. The Edit User page appears. 5. To delete a user: a. Click the Delete User button. b. Confirm your selection and click OK. 6. To lock the account: a. Scroll down to the Account Privileges section. b. For Account Availability, select Locked. c. Click Apply Changes. Deleting Multiple Users at Once Workspace administrators can delete multiple user accounts at the same time To delete multiple user accounts: 1. Log in to Oracle Application Express. See "Logging In To Oracle Application Express" in Oracle Application Express Application Builder User's Guide. The Workspace home page appears. Tip: An Instance administrator can configure these settings for an entire Oracle Application Express instance. See "Configuring Security Settings" on page 2-18. See Also: "Using Groups to Manage Application Express Users" on page 1-24 and "Adding and Removing Users from a Group" on page 1-25
  • 39.
    Managing Application ExpressUsers Workspace and Application Administration 1-23 2. Click the Administration icon. The Administration page appears. 3. Click Manage Users and Groups. 4. On the Tasks list, click Delete Multiple Users. The Delete Multiple Users page appears. 5. Select the users to be deleted. 6. Click Delete Users. Changing an End User Password To change an end user password: 1. Log in to Oracle Application Express. See "Logging In To Oracle Application Express" in Oracle Application Express Application Builder User's Guide. The Workspace home page appears. 2. Click the Administration icon. The Administration page appears. 3. Click Manage Users and Groups. The Users page appears. 4. Select a user. 5. Under Password, type a new password in the Password and Confirm Password fields. 6. Click Apply Changes. Viewing the Users Dashboard The Users Dashboard displays a summary of your account information, users in the current workspace, defined user groups, recently created users, and user status. To view the Users Dashboard: 1. Log in to Oracle Application Express. See "Logging In To Oracle Application Express" in Oracle Application Express Application Builder User's Guide. The Workspace home page appears. 2. Click the Administration icon. The Administration page appears. 3. Click Dashboards. The Dashboard page appears. 4. Click Users. The Users Dashboard appears listing the following information: Tip: To search for an existing user, enter a query in the Find field and click Go. See Also: "Viewing Workspace Dashboards" on page 1-38
  • 40.
    Managing Application ExpressUsers 1-24 Oracle Application Express Administration Guide ■ Your Account lists information about your account including your username, workspace, account credentials, and email address. ■ Workspace Users lists statistics about all users in the current workspace. ■ User Groups lists all currently defined user groups. ■ Recently Created lists recently created users. ■ User Status lists valid passwords, expired passwords, locked accounts, unlocked accounts, and any accounts for which no email address is defined. Using Groups to Manage Application Express Users You can create groups to restrict access to specific features and functions. Note that groups are not portable over different authentication schemes. Groups are primarily useful when used with Application Express Authentication (Internal Cookie User authentication). Topics: ■ Creating a Group ■ Editing an Existing User Group ■ Adding and Removing Users from a Group Creating a Group To create a new group: 1. Log in to Oracle Application Express. See "Logging In To Oracle Application Express" in Oracle Application Express Application Builder User's Guide. The Workspace home page appears. 2. Click the Administration icon. The Administration page appears. 3. From the Tasks list, click Manage User Groups. The User Groups page appears. 4. On the User Groups page, click Create User Group. The Create/Edit User Group page appears. 5. Specify a group name and description, and click Create Group. Editing an Existing User Group To edit an existing group assignment: 1. Log in to Oracle Application Express. See "Logging In To Oracle Application Express" in Oracle Application Express Application Builder User's Guide. The Workspace home page appears. 2. Click the Administration icon. The Administration page appears. 3. From the Tasks list, click Manage User Groups. The User Groups page appears. See Also: "Managing Application Express Users" on page 1-16“
  • 41.
    Purging the DeveloperActivity and Click Count Log Files Workspace and Application Administration 1-25 4. You can customize the appearance of the page using the Search bar at the top of the page. See "Customizing Interactive Reports" in Oracle Application Express Application Builder User's Guide. 5. Select the group you want to edit. The Create/Edit User Group page appears. 6. Make the appropriate edits and click Apply Changes. Adding and Removing Users from a Group To add a user to a group: 1. Log in to Oracle Application Express. See "Logging In To Oracle Application Express" in Oracle Application Express Application Builder User's Guide. The Workspace home page appears. 2. Click the Administration icon. The Administration page appears. 3. Click Manage Users and Groups. The Users page appears. 4. Select a user. The Edit User page appears. 5. Scroll down to User Groups. Each user belongs to the groups on the right. 6. To add a user to a group, select the group and click Move. 7. To remove a user from a group, select the group and click Remove. 8. Click Apply Changes. Purging the Developer Activity and Click Count Log Files Log entries older then one month are automatically deleted. Workspace administrators can manually purge developer logs and the External Count Clicks log on the Log files page. Topics: ■ Purging the Developer Activity Log ■ Purging the External Click Count Log See Also: "Managing Logs and Files" on page 2-54
  • 42.
    Managing Session Stateand User Preferences 1-26 Oracle Application Express Administration Guide Purging the Developer Activity Log The Developer Activity Log tracks changes to applications within the current workspace. To purge the Developer Activity Log: 1. Log in to Oracle Application Express. See "Logging In To Oracle Application Express" in Oracle Application Express Application Builder User's Guide. The Workspace home page appears. 2. Click the Administration icon. 3. On the Administration page, click Manage Service. 4. Under Manage Meta Data, click Developer Activity and Click Count Logs. 5. Click the Manage Developer Activity Log tab. 6. Click Purge Developer Log. Purging the External Click Count Log The external Click Count Log counts clicks from an application to an external site. You can implement this functionality using APEX_UTIL.COUNT_CLICK procedure. To purge the external Click Count Log: 1. Log in to Oracle Application Express. See "Logging In To Oracle Application Express" in Oracle Application Express Application Builder User's Guide. The Workspace home page appears. 2. Click the Administration icon. 3. On the Administration page, click Manage Service. 4. Under Manage Meta Data, click Developer Activity and Click Count Logs. 5. Click the Manage Click Count Log tab. 6. Click Purge Click Log. Managing Session State and User Preferences A session is a logical construct that establishes persistence (or stateful behavior) across page views. Each session is assigned a unique ID, which the Application Express engine uses to store and retrieve an application's working set of data (or session state) before and after each page view. Sessions persist in the database until purged. Topics: ■ Managing Session State ■ Managing User Preferences See Also: "COUNT_CLICK Procedure" in Oracle Application Express API Reference See Also: "Viewing Workspace Dashboards" on page 1-38
  • 43.
    Managing Session Stateand User Preferences Workspace and Application Administration 1-27 Managing Session State A session establishes persistence (or stateful behavior) across page views. You can review session details for the current session or for recent sessions. You can also purge the current session state or purge sessions based on their age. Topics: ■ Removing Session State After Reviewing Session Details ■ Viewing Session State for the Current Session ■ Purging Sessions by Age ■ Purging Session State for the Current Session Removing Session State After Reviewing Session Details You can determine whether to remove existing sessions by first reviewing session details. From the Session Details page, you can remove the session record or session state. To view session details and remove session state: 1. Log in to Oracle Application Express. See "Logging In To Oracle Application Express" in Oracle Application Express Application Builder User's Guide. The Workspace home page appears. 2. Click the Administration icon. 3. On the Administration page, click Manage Service. 4. Under Manage Meta Data, click Session State. 5. Click Recent Sessions with Drill-Down to Session Details. 6. You can customize the appearance of the page using the Search bar at the top of the page. See "Customizing Interactive Reports" in Oracle Application Express Application Builder User's Guide. 7. To view session details, select the session ID. The Session Details page appears. 8. Click one of the following buttons: ■ Remove State clears the session data from the session state tables (including collections data) but does not remove the session record. Removing a session is a good approach for developers during debugging. This is the equivalent of clearing session state for the current session using the Clear Cache argument value SESSION in the f?p URL. This option might also be used by developers during debugging. ■ Remove Session removes the record of the session from the SESSIONS table along with the session state (including collections data) associated with the session. See Also: "Managing Session State" in Oracle Application Express Application Builder User's Guide and "Managing Session State" on page 2-51 See Also: "What Is a Session?" in Oracle Application Express Application Builder User's Guide
  • 44.
    Managing Session Stateand User Preferences 1-28 Oracle Application Express Administration Guide Any user using a session that has removed is no longer able to use the session and is prompted to re-authenticate upon their next page request (in most situations). This option can be used by administrators who must ensure a specific user can no longer access an Oracle Application Express application. Viewing Session State for the Current Session To view session state for the current or recent sessions: 1. Log in to Oracle Application Express. See "Logging In To Oracle Application Express" in Oracle Application Express Application Builder User's Guide. The Workspace home page appears. 2. Click the Administration icon. 3. On the Administration page, click Manage Service. 4. Under Manage Meta Data, click Session State. 5. Click Report Session State for Current Session. 6. You can customize the appearance of the page using the Search bar at the top of the page. See "Customizing Interactive Reports" in Oracle Application Express Application Builder User's Guide. Purging Sessions by Age To purge existing sessions by age: 1. Log in to Oracle Application Express. See "Logging In To Oracle Application Express" in Oracle Application Express Application Builder User's Guide. The Workspace home page appears. 2. Click the Administration icon. 3. On the Administration page, click Manage Service. 4. Under Manage Meta Data, click Session State. 5. Click Purge sessions by Age. 6. Make a selection from the Sessions older than list. 7. Click one of the following buttons: ■ Purge Sessions purges existing sessions by the age you selected. ■ Report Sessions generates a report detailing the total number of sessions for the workspace, the number of users, and the number of old sessions. Purging Session State for the Current Session To purge session state for the current session: See Also: "Debugging an Application" in Oracle Application Express Application Builder User's Guide See Also: "Removing Session State After Reviewing Session Details" on page 1-27 See Also: "Viewing Session State" in Oracle Application Express Application Builder User's Guide
  • 45.
    Managing Session Stateand User Preferences Workspace and Application Administration 1-29 1. Log in to Oracle Application Express. See "Logging In To Oracle Application Express" in Oracle Application Express Application Builder User's Guide. The Workspace home page appears. 2. Click the Administration icon. 3. On the Administration page, click Manage Service. 4. Under Manage Meta Data, click Session State. 5. Click Purge Session State for Current Session. 6. Click one of the following buttons: ■ View Session State - Displays information about the current session. ■ Purge Session State - Resets the session state for the current session. Managing User Preferences You can use preferences to store values for a specific Application Express user across distinct sessions. Once set, these preferences can be removed programmatically or manually. You can set user preferences by creating a page process, by the calculation of a preference Item Source Value, or programmatically by using a PL/SQL API. Topics: ■ Viewing Preferences by User ■ Viewing Current User Preferences ■ Purging Preferences for a Specific User ■ Purging Current User Preferences ■ Setting User Preferences ■ Removing User Preferences Programmatically ■ Resetting User Preferences Using a Page Process Viewing Preferences by User To view the preferences by user: 1. Log in to Oracle Application Express. See "Logging In To Oracle Application Express" in Oracle Application Express Application Builder User's Guide. The Workspace home page appears. 2. Click the Administration icon. 3. On the Administration page, click Manage Service. 4. Under Manage Meta Data, click Session State. 5. Click Preferences by User. The Preferences by User page appears. 6. You can customize the appearance of the page using the Search bar at the top of the page. See "Customizing Interactive Reports" in Oracle Application Express Application Builder User's Guide. Viewing Current User Preferences To view current user preferences:
  • 46.
    Managing Session Stateand User Preferences 1-30 Oracle Application Express Administration Guide 1. Log in to Oracle Application Express. See "Logging In To Oracle Application Express" in Oracle Application Express Application Builder User's Guide. The Workspace home page appears. 2. Click the Administration icon. 3. On the Administration page, click Manage Service. 4. Under Manage Meta Data, click Session State. 5. Click Report Current User Preferences. The Current user Preferences page appears. 6. You can customize the appearance of the page using the Search bar at the top of the page. See "Customizing Interactive Reports" in Oracle Application Express Application Builder User's Guide. Purging Preferences for a Specific User You can purge preferences for a specific user on the Purge Preferences page. To purge preferences for a specific user: 1. Navigate to the appropriate Page Definition. See "Accessing a Page Definition" in Oracle Application Express Application Builder User's Guide. 2. Click the Administration icon. 3. On the Administration page, click Manage Service. 4. Under Manage Meta Data, click Session State. 5. Click Purge preferences by User. The Purge Preferences page appears. 6. Select a specific user and click Report. A report appears at the bottom of the page. 7. To purge the displayed user preferences, click Purge User Preferences. Purging Current User Preferences To purge preferences for the current user: 1. Log in to Oracle Application Express. See "Logging In To Oracle Application Express" in Oracle Application Express Application Builder User's Guide. The Workspace home page appears. 2. Click the Administration icon. 3. On the Administration page, click Manage Service. 4. Under Manage Meta Data, click Session State. 5. Click Purge Preferences for Current User. The Purge Preferences page appears. 6. Select a user and click Report. 7. To purge preferences, click Purge User Preferences.
  • 47.
    Managing Session Stateand User Preferences Workspace and Application Administration 1-31 Setting User Preferences You can set user preferences within your application through the creation of a page process, by creating a preference item, or programmatically. Topics: ■ Setting User Preferences Using a Page Process ■ Setting the Source of an Item Based on a User Preference ■ Setting User Preferences Programmatically Setting User Preferences Using a Page Process To set user preference values by creating a page process: 1. Navigate to the appropriate Page Definition. See "Accessing a Page Definition" in Oracle Application Express Application Builder User's Guide. 2. Access the Create Page Process Wizard: ■ Tree view- Under the appropriate event, locate Processes. Right-click and select Create. ■ Component view - Under Processes, click the Create icon. 3. For process category, select Session State and click Next. 4. For the process type, select Reset Preferences (remove all preferences for current user) and click Next. 5. Specify a name, sequence, and processing point and click Next. 6. Follow the on-screen instructions and click Create Process. Setting the Source of an Item Based on a User Preference You can set the source of an item based on a user preference by defining the item source type as Preference. To define the source of item based on a user preference: 1. Navigate to the appropriate Page Definition. See "Accessing a Page Definition" in Oracle Application Express Application Builder User's Guide. 2. Access the Create Page Item Wizard: ■ Tree view- Under Page Rending, expand Regions, right-click Items, and select Create Page Item. ■ Component view - Component view - Under Items, click the Create icon. 3. For the item type, select Hidden and click Next. 4. For Hidden Item Type, select one of the following and click Next: ■ Hidden - A hidden item is exposed in the HTML form but not displayed. ■ Hidden and Protected - A hidden and protected item is also exposed in the HTML form but not displayed. However, its value cannot be changed when the page is posted. 5. Specify the item name, sequence, and region and click Next. 6. For Source, select Source Type of Preference, enter the appropriate Source Value, and click Next. If the item source is null the default value is used. To learn more about a specific field, see item Help. 7. Click Create Item.
  • 48.
    Managing Page andRegion Caching 1-32 Oracle Application Express Administration Guide Setting User Preferences Programmatically To set or reference user preferences programmatically, you must use a PL/SQL API. User-level caching is available programmatically. You can use the SET_PREFERENCE procedure to set a user level preference called NAMED_PREFERENCE. For example: APEX_UTIL.SET_PREFERENCE( p_preference=>'NAMED_PREFERENCE', p_value =>:ITEM_NAME); You can reference the value of a user preference using the function GET_PREFERENCE. For example: NVL(APEX_UTIL.GET_PREFERENCE('NAMED_PREFERENCE'),15) In the previous example, the preference would default to the value 15 if the preference contained no value. Removing User Preferences Programmatically To remove user preferences programmatically, you must use a PL/SQL API. You can use the REMOVE_PREFERENCE procedure to remove a user level preference called NAMED_PREFERENCE. For example: APEX_UTIL.REMOVE_PREFERENCE( p_preference=>'NAMED_PREFERENCE'); Resetting User Preferences Using a Page Process You can reset user preferences by creating a page process and selecting the Reset Preferences process type. To reset user preferences using a page process: 1. Navigate to the appropriate Page Definition. See "Accessing a Page Definition" in Oracle Application Express Application Builder User's Guide. 2. Access the Create Page Process Wizard: a. Tree view- Under the appropriate event, locate Processes. Right-click and select Create Process. b. Component view - Under Processes, click the Create icon. 3. For the process category, select Session State and click Next. 4. For the process type, select Reset Preferences (remove all preferences for current user) and click Next. 5. Specify a name, sequence, and processing point and click Next. 6. Follow the on-screen instructions. 7. Click Create Process. Managing Page and Region Caching One way to improve an application’s performance is to take advantage of page and region caching. Developers can configure page and region caching by setting the See Also: GET_PREFERENCE Function and SET_PREFERENCE Procedure in Oracle Application Express API Reference
  • 49.
    Managing Page andRegion Caching Workspace and Application Administration 1-33 Cache attribute on the Edit Page or Edit Region pages. This section describes how Workspace administrators can view and purge cached regions and pages. Topics: ■ Purging Cached Regions ■ Purging Cached Pages Purging Cached Regions To view and purge cached regions: 1. Navigate to the appropriate Page Definition. See "Accessing a Page Definition" in Oracle Application Express Application Builder User's Guide. 2. Click the Administration icon. 3. On the Administration page, click Manage Service. 4. Under Manage Meta Data, click Application Cache and select one of the following: ■ Purge Cached Regions by Region ■ Purge Cached Region by Application ■ Purge Cached Regions by Workspace 5. If you select Purge Cached Regions: a. You can customize the appearance of the page using the Search bar at the top of the page. See "Customizing Interactive Reports" in Oracle Application Express Application Builder User's Guide. b. Select the regions you want to purge and click Purge Checked. 6. If you select Purge Cached Regions by Application: a. Select an application. b. Click Purge Cached Regions. 7. If you select Purge Cached Regions by Workspace, click Purge All Cached Regions. Purging Cached Pages To view and purge cached pages: 1. Navigate to the appropriate Page Definition. See "Accessing a Page Definition" in Oracle Application Express Application Builder User's Guide. 2. Click the Administration icon. 3. On the Administration page, click Manage Service. 4. Under Manage Meta Data, click Application Cache and select one of the following: ■ Purge Cached Pages by Page ■ Purge Cached Pages by Application ■ Purge Expired Cached Pages by Application 5. If you select Purge Cached Pages by Page:
  • 50.
    Changing Build Statusfor Multiple Applications 1-34 Oracle Application Express Administration Guide a. You can customize the appearance of the page using the Search bar at the top of the page. See "Customizing Interactive Reports" in Oracle Application Express Application Builder User's Guide. b. Select the regions you want to purge and click Purge Checked. 6. If you select Purge Cached Pages by Application: a. Select an application. b. Click Purge Cached Pages. 7. If you select Purge Expired Cached Pages by Application: a. Select an application. b. Click Purge Expired. Changing Build Status for Multiple Applications Every Oracle Application Express application has an application-level attribute called Build Status. You can use this attribute to prevent an application from being modified by other developers. Build Status has two settings: ■ Run and Build Application - Developers can both run and edit an application. ■ Run Application Only - Developers can only run an application. Setting the Build Status to Run Application Only is an effective way to prevent other developers from modifying it. You can change the Build Status of an application as follows: ■ Developers and administrators can change the Build Status attribute on the Edit Application page. See "Availability" in Oracle Application Express Application Builder User's Guide. ■ Workspace administrators can change the Build Status of applications within the current workspace as described in this section. See "Managing Build Status in Workspace Administration" on page 1-34. ■ Instance administrators can change the Build Status of an application on the Build Status page. See "Changing Application Build Status Set During Deployment" on page 2-83. Managing Build Status in Workspace Administration To manage Build Status in Workspace Administration: 1. Navigate to the Workspace home page. 2. Click the Administration icon. 3. On the Administration page, click Manage Service. 4. Under Manage Meta Data, click Application Build Status. Next, select a status. Status specifies whether the application is available or unavailable for use. 5. For Status, select one of the following: ■ Available - Application is available with no restrictions. ■ Available with Edit Links - Application is available for use. For developers, the Developer toolbar displays at the bottom of each page. Requires the
  • 51.
    Managing Application Models Workspaceand Application Administration 1-35 developer to be logged in to the Application Builder in the same browser session. ■ Available to Developers Only - Application is available to users having developer privileges. ■ Restricted Access - Application is available to developers named in the Restrict to comma separated user list. ■ Unavailable - Application cannot be run or edited. The message in Message for unavailable application displays when users attempt to access the application. ■ Unavailable (Status Shown with PL/SQL) - Application cannot be run or edited. ■ Unavailable (Redirect to URL) - Application cannot be run or edited. 6. From Build Status, select one of the following: ■ Run and Build Application - Developers can both run and edit an application. ■ Run Application Only - Developers can only run an application. 7. Click Apply Changes. Managing Application Models Running the Create Application Wizard creates an application model. This model contains basic application property values, such as the application pages and page definitions, DML processes, and multi-row operation processes. When you create a new application, you can base it on an existing application model, making the creation process more productive. Deleting an Application Model You can remove unwanted application models on the Application Models page. To delete an application model: 1. Navigate to the Workspace home page. 2. Click the Administration icon. 3. On the Administration page, click Manage Service. 4. Under Manage Meta Data, click Application Models. The Application Models page appears. 5. You can customize the appearance of the page using the Search bar at the top of the page. See "Customizing Interactive Reports" in Oracle Application Express Application Builder User's Guide. 6. Select the models you want to delete and click Delete Checked. See Also: "About Application Models and User Interface Defaults" in Oracle Application Express Application Builder User's Guide
  • 52.
    Monitoring Activity Withina Workspace 1-36 Oracle Application Express Administration Guide Monitoring Activity Within a Workspace You can monitor developer activity and changes within your workspace by accessing the Monitor Activity page. The Monitor Activity page features links to over thirty reports that track page views, developer activity, active sessions, login attempts, environment, application errors, and workspace schemas. Note that this section only describes a few reports in detail. Topics: ■ Viewing Developer Activity and Application Change Information ■ Viewing Application Changes by Developer ■ Viewing Application Changes by Day ■ Viewing Active Sessions ■ Viewing Schema Reports Viewing Developer Activity and Application Change Information To view developer activity and application change information from the Monitor Activity page: 1. Navigate to the Workspace home page. 2. Click the Administration icon. 3. Click Monitor Activity. The Monitor Activity page features activity reports divided into the following sections: ■ Page Views - Contains reports of page views organized by view, user, application, or application and page. ■ Developer Activity - Offers reports of developer activity organized by developer, day, application, application changes, and day or month. ■ Page View Analysis - Contains reports analyzing page views, such as top page views by application. ■ Sessions - Lists active sessions with the current workspace. ■ Login Attempts - Offers reports listing login attempts. ■ Environment - Contains reports of environments organized by user agent, browser, external clicks, or operating system. ■ Application Errors - Contains a report of application errors. ■ Workspace Schema Reports - Offers summaries of schema tablespace utilization and database privileges by schema and a list of all database schemas available in the current workspace 4. Select a report to review. The sections that follow details a few specific reports. See Also: "Viewing Workspace Dashboards" on page 1-38, "Monitoring Activity Across a Development Instance" on page 2-87, and "Creating Custom Activity Reports Using APEX_ACTIVITY_LOG in Oracle Application Express Application Builder User's Guide
  • 53.
    Monitoring Activity Withina Workspace Workspace and Application Administration 1-37 Viewing Application Changes by Developer The Application Changes by Developer report displays the number of pages changed by each developer and offers a graphical representation of the information in either a bar chart or pie chart format. To view application changes by developer: 1. Navigate to the Workspace home page. 2. Click the Administration icon. 3. Click Monitor Activity. 4. Under Developer Activity, select By Developer. 5. Make a time selection from the Since list, an application (if applicable), and click Set. You can customize the appearance of the page using the Search bar at the top of the page. See "Customizing Interactive Reports" in Oracle Application Express Application Builder User's Guide. Viewing Application Changes by Day The Application Changes by Day report displays a summary of the number of application changes by day. You have the option to view this information by month, as a line chart, or by developer. To view application changes by day: 1. Navigate to the Workspace home page. 2. Click the Administration icon. 3. Click Monitor Activity. 4. Under Developer Activity, click By Day or By Day, Monthly View. The Application Changes by Day page appears. 5. Make a time selection from the Since list, an application (if applicable), and click Set. You can customize the appearance of the page using the Search bar at the top of the page. See "Customizing Interactive Reports" in Oracle Application Express Application Builder User's Guide. Viewing Active Sessions A session is a logical construct that establishes persistence (or stateful behavior) across page views. The Active Sessions report lists active sessions with the current workspace. Whenever an application is run, the Application Express engine maintains a record in a database table in the Oracle Application Express schema. This table records a numeric identifier (or session ID), the authenticated (or public) user identifier, the creation date, and other information. The session is the key record that enables session state, or persistence, across page requests. By viewing the Active Sessions report, a developer or administrator can see who has been using applications in a workspace. An active session is a session that has not yet been purged from the sessions table. A DBMS job runs every eight hours and purges session records older than 24 hours.
  • 54.
    Viewing Workspace Dashboards 1-38Oracle Application Express Administration Guide To view active session details: 1. Navigate to the Workspace home page. 2. Click the Administration icon. 3. Click Monitor Activity. 4. Under Sessions, select Active Sessions. You can customize the appearance of the page using the Search bar at the top of the page. See "Customizing Interactive Reports" in Oracle Application Express Application Builder User's Guide. 5. Click a session ID to view the Session Details page. Viewing Schema Reports Schema Reports offer summaries of schema tablespace utilization and database privileges by schema and a list of all database schemas available in the current workspace. To view Schema Reports: 1. Navigate to the Workspace home page. 2. Click the Administration icon. 3. Click Monitor Activity. 4. Under Workspace Schema Reports, click one of the following reports: ■ Schema Tablespace Utilization ■ Database Privileges by Schema ■ Workspace Schemas ■ Report Tablespace Utilization (popup) You can customize the appearance of the Database Privileges and Workspace Schemas reports using the Search bar at the top of the page. See "Customizing Interactive Reports" in Oracle Application Express Application Builder User's Guide. Viewing Workspace Dashboards Use the Dashboard page to view details about the current workspace and monitor overall activity within your workspace. Topics: ■ About the Workspace Dashboard ■ About the Users Dashboard ■ About the Activity Dashboard ■ About the Developer Activity Dashboard ■ About the Performance Dashboard ■ About the Websheets Dashboard See Also: "What Is a Session?" in Oracle Application Express Application Builder User's Guide
  • 55.
    Viewing Workspace Dashboards Workspaceand Application Administration 1-39 ■ About the Applications Dashboard ■ About the Database Dashboard About the Workspace Dashboard The Workspace Dashboard lists statistics about the current workspace. Sections include: ■ Service - Lists the workspace name and the number of applications, application pages, SQL scripts, Websheets, schemas, and open service requests. ■ Available Schemas - Lists schemas within the current workspace. ■ Files - Details the space used by specific file types. ■ Recent Service Requests lists pending service requests. To view the Workspace Dashboard: 1. Navigate to the Workspace home page. 2. Click the Administration icon. 3. On the Administration page, click Dashboards. About the Users Dashboard The Users Dashboard displays a summary of your account information, users in the current workspace, defined user groups, recently created users, and user status. Sections include: ■ Your Account - List information about your account including your username, workspace, account credentials, and email address. ■ Workspace Users - Lists statistics about all users in the current workspace. ■ User Groups - Lists are currently defined user groups. ■ Recently Created - Lists recently created users. ■ User Status - Lists valid passwords, expired passwords, locked accounts, unlocked accounts, and any accounts for which no email address is defined. To view the Users Dashboard: 1. Navigate to the Workspace home page. 2. Click the Administration icon. 3. On the Administration page, click Dashboards. 4. Click the Users tab. About the Activity Dashboard The Activity Dashboard displays a summary of top users, application, and pages and a list of recent logins and errors. Sections include: See Also: "Monitoring Activity Across a Development Instance" on page 2-87 and "Creating Custom Activity Reports Using APEX_ ACTIVITY_LOG in Oracle Application Express Application Builder User's Guide See Also: "Managing Application Express Users" on page 1-16
  • 56.
    Viewing Workspace Dashboards 1-40Oracle Application Express Administration Guide ■ Top Users - Lists the most active users in the workspace. ■ Top Applications - Lists applications having the most activity. ■ Top Pages - Lists the application pages having the most activity. ■ Recent Logins- Shows the time and date a user authenticated to an application. ■ Recent Errors - Lists errors that have occurred in the current workspace from the Application Express activity log. To view the Activity Dashboard: 1. Navigate to the Workspace home page. 2. Click the Administration icon. 3. On the Administration page, click Dashboards. 4. Click the Activity tab. About the Developer Activity Dashboard The Developer Activity Dashboard displays a summary of top developers, application, and pages and a list of recent application changes and edits. Sections include: ■ Top Developers - Lists the most active developers in the workspace. ■ Top Applications - Lists the applications having the most developer activity. ■ Top Pages - Lists the application pages having the most developer activity. ■ Recent Changes - Lists changes by application, page, and user. ■ Recent Application Edits - Lists edits by application. To view the Developer Activity Dashboard: 1. Navigate to the Workspace home page. 2. Click the Administration icon. 3. On the Administration page, click Dashboards. 4. Click the Developer Activity tab. About the Performance Dashboard The Performance Dashboard displays a report of pages having the worst page performance. Page performance is calculated by multiplying page events by median elapsed server page generation time. Page events include page gets, page posts, and partial page gets. To view the Performance Dashboard: 1. Navigate to the Workspace home page. 2. Click the Administration icon. 3. On the Administration page, click Dashboards. 4. Click the Performance tab. 5. You can customize the appearance of the page using the Search bar at the top of the page. See "Customizing Interactive Reports" in Oracle Application Express Application Builder User's Guide. 6. From the Show list, select a time frame.
  • 57.
    Viewing Workspace Dashboards Workspaceand Application Administration 1-41 About the Websheets Dashboard The Websheets Dashboard displays a websheet activity for the selected time frame. Sections include: ■ Workspace Summary ■ Recent Views ■ Recently Created ■ Recently Updated To view the Websheets Dashboard: 1. Navigate to the Workspace home page. 2. Click the Administration icon. 3. On the Administration page, click Dashboards. 4. Click the Websheets tab. 5. From the Show list, select a time frame. About the Applications Dashboard The Applications Dashboard displays a summary of applications in the current workspace. Sections include: ■ Summary - Lists the number of applications, pages, and workspace themes. ■ Application Groups - Lists defined application groups. ■ Recently Created - Lists recently created applications. ■ Defaults - Lists defined defaults. To view the Applications Dashboard: 1. Navigate to the Workspace home page. 2. Click the Administration icon. 3. On the Administration page, click Dashboards. 4. Click the Applications tab. 5. To refresh the report, click Refresh. About the Database Dashboard The Database Dashboard displays a summary of database objects by schema. Row counts are based on database table statistics. Sections include: ■ Recently Modified Program Units ■ Object Counts ■ Recently Created Tables ■ Top Tables by Row Count To view the Database Dashboard: 1. Navigate to the Workspace home page. 2. Click the Administration icon. 3. On the Administration page, click Dashboards.
  • 58.
    Leveraging Application BuilderDefaults 1-42 Oracle Application Express Administration Guide 4. Click the Database tab. 5. From Schema, select the appropriate schema. 6. To refresh the report, click Refresh. Leveraging Application Builder Defaults Application Builder Defaults enable developers to reduce the number of steps needed to create a new application. By configuring these attributes, developers can exit the Create Application Wizard early and can create a new application in two simple steps. Topics: ■ About Application Builder Defaults ■ Configuring Application Builder Defaults About Application Builder Defaults Application Builder Defaults are specific to each workspace. These attributes define preferences for tabs, authentication schemes, themes, and globalization when running the Create Application Wizard. When a Workspace administrator configures these attributes, developers within that workspace can use these defaults and exit the Create Application Wizard after two easy steps. Configuring Application Builder Defaults To configure Application Builder Defaults: 1. On the Workspace home page, click the Application Builder icon. 2. From the Tasks list, select Application Builder Defaults. The Manage Application Builder Defaults page appears and is divided into the following sections: ■ Tabs ■ Authentication ■ Theme ■ Globalization 3. For each section of the page, select the appropriate default. 4. To learn more about a specific attribute, click the item label. When Help is available, the item label changes to red when you pass your cursor over it and the cursor changes to an arrow and question mark. 5. Click Apply Changes.
  • 59.
    2 Oracle Application ExpressHosted Instance Administration 2-1 2Oracle Application Express Hosted Instance Administration This section describes tasks an Instance administrator performs when administering an Oracle Application Express hosted instance. Topics: ■ What Is an Instance Administrator? ■ Logging In To Oracle Application Express Administration Services ■ Managing Workspace and Change Requests ■ Managing Instance Settings ■ Managing Schemas ■ Creating Workspaces ■ Managing Existing Workspaces ■ Managing Users in an Oracle Application Express Instance ■ Monitoring Activity Across a Development Instance What Is an Instance Administrator? Instance administrators are responsible for managing an entire Oracle Application Express instance. In Oracle Application Express, users log in to a shared work area called a workspace. These users are divided into three primary roles: ■ Developers create and edit applications. ■ Workspace administrators are developers who also perform administrator tasks specific to their workspace such as managing user accounts, monitoring workspace activity, and viewing log files. See "Workspace and Application Administration" on page 1-1. ■ Instance administrators are superusers that manage the entire hosted instance using the Oracle Application Express Administration Services application. Note: The topics in this section are not applicable to all customers, specifically to those using a hosted instance. This section only applies to administrators who have access to Oracle Application Express Instance Administration.
  • 60.
    What Is anInstance Administrator? 2-2 Oracle Application Express Administration Guide Topics: ■ About the Instance Administration Home Page ■ About the Manage Instance Page ■ About the Manage Workspaces Page About the Instance Administration Home Page The Instance Administration home page is the starting point for managing an entire Oracle Application Express instance. Four icons display at the top of the page: ■ Manage Requests. See "Managing Workspace and Change Requests" on page 2-7. ■ Manage Instance. See "About the Manage Instance Page" on page 2-3. ■ Manage Workspace. See "About the Manage Workspaces Page" on page 2-5. ■ Monitor Activity. See "Monitoring Activity Across a Development Instance" on page 2-87. About the System Message Region The System Message region display in the center of the page. Use this region to communicate with other users in the workspace. To add a system message, click the Edit System Message icon. See "Defining a System Message" on page 2-58. About Instance Tasks Use the Instance Tasks list to access the following tasks: ■ Feature Configuration. See "Managing Feature Configuration" on page 2-13. ■ Security. See "Configuring Security Settings" on page 2-18. ■ Instance Settings. See "Managing Instance Settings" on page 2-13. ■ Workspace Purge Settings. See "Purging Inactive Workspaces" on page 2-45. See Also: Oracle Application Express Installation Guide
  • 61.
    What Is anInstance Administrator? Oracle Application Express Hosted Instance Administration 2-3 About Workspace Tasks Use the Workspace Tasks list to access the following tasks: ■ Create Workspace. See "Creating Workspaces" on page 2-64. ■ Create Multiple Workspaces. See "Creating Multiple Workspaces" on page 2-67. ■ Find a Workspace. See "Performing a Workspace Search" on page 2-78. ■ Manage Workspaces. See "Managing Existing Workspaces" on page 2-69. ■ Create User. See "Creating New User Accounts" on page 2-84. ■ Find a User. See "Managing Users in an Oracle Application Express Instance" on page 2-84. ■ Reset User Password. See "Editing an Existing User Account" on page 2-86. About Language Selector Displays the default language for this Oracle Application Express instance. Accessibility Mode Select the accessibility mode for this instance. See "Appendix E: Accessibility in Oracle Application Express" in Oracle Application Express Application Builder User's Guide, "Using Screen Reader Mode in Your Database Applications" in Oracle Application Express Application Builder User's Guide, "Using High Contrast Mode in Your Database Applications" in Oracle Application Express Application Builder User's Guide. About the Manage Instance Page Instance administrators use the Manage Instance page to configure an Oracle Application Express instance. This topic provides information about the links on this page. About Instance Setting Instance Settings contains the following links: ■ Feature Configuration. See "Managing Feature Configuration" on page 2-13. ■ Security. See "Configuring Security Settings" on page 2-18. ■ Instance Settings. See "Configuring Instance Settings" on page 2-31. See Also: "Viewing Requests on the Instance Administration Home Page" on page 2-7
  • 62.
    What Is anInstance Administrator? 2-4 Oracle Application Express Administration Guide ■ Workspace Purge Settings. See "Purging Inactive Workspaces" on page 2-45. About Manage Shared Components Manage Shared Components contains the following link: ■ Packaged Database Applications. See "Viewing Information About Installed Packaged Database Applications" on page 2-46. ■ Packaged Websheet Applications. See "Viewing Packaged Websheet Applications" on page 2-47. ■ Monitor Packaged Application Installations. See "Monitoring the Progress Packaged Application Installations" on page 2-47. ■ Public Themes. See "Managing Public Themes" on page 2-48. ■ Template Applications. See "Managing Template Applications" on page 2-49. About Manage Meta Data Manage Meta Data contains the following links: ■ Session State. See "Managing Session State" on page 2-51. ■ Mail Queue. See "Managing the Mail Queue" on page 2-53. ■ Installed Translations. See "Viewing Installed Translations" on page 2-53. ■ Interactive Report Subscriptions. See "Managing Interactive Report Subscriptions" on page 2-54. About Messages Messages contains the following links: ■ Define Login Message. See "Defining a Login Message" on page 2-58 ■ Set System Message. See "Defining a System Message" on page 2-58 ■ Manage Site-Specific Tasks. See "Creating a Site-Specific Tasks List" on page 2-59. About Manage Logs and Files Manage Logs and Files contains the following links: ■ Set SQL Workshop logs. See "Deleting SQL Workshop Logs" on page 2-54. ■ Page View Activity Log, with option to truncate. See "Deleting Page View Activity Log Entries" on page 2-55. ■ Developer Activity Log, with option to truncate. See "Deleting Developer Activity Log Entries" on page 2-55. ■ External Click Counting Log, with option to truncate. See "Deleting Click Counting Log Entries" on page 2-56 ■ Login Access Log. See "Deleting the Login Access Log" on page 2-56. ■ Manage Log Interval. See "Managing Log Intervals" on page 2-56. About Self Service Sign Up Self Service Sign Up contains the following links: See Also: "Managing Existing Workspaces" on page 2-69 and "About the Manage Workspaces Page" on page 2-5
  • 63.
    What Is anInstance Administrator? Oracle Application Express Hosted Instance Administration 2-5 ■ Manage New Service Signup Wizard. See "Managing a New Service Signup Wizard" on page 2-60. ■ Run New Service Signup Wizard. See "Running a New Service Signup Wizard" on page 2-61 About the Manage Workspaces Page Instance administrators use the Manage Workspaces page to manage workspaces for an Oracle Application Express instance. This topic provides information about the links on this page. About Workspace Actions Manage Workspaces contains the following links: ■ Create Workspace. See "Creating Workspaces" on page 2-64. ■ Remove Workspace. See "Deleting a Workspace" on page 2-69. ■ Lock Workspace. See "Locking a Workspace" on page 2-73. ■ Manage Workspace to Schema Assignments. See "Managing Workspace to Schema Assignments" on page 2-73. ■ Manage Developers and Users. See "Managing Users in an Oracle Application Express Instance" on page 2-84. ■ Manage Component Availability. See "Managing Component Availability" on page 2-77. About Workspace Reports Use Workspace Reports to access the following links: ■ Existing Workspaces. See "Managing Existing Workspaces" on page 2-69. ■ Workspace Details. See "Viewing Workspace Details" on page 2-79. ■ Workspace Database Privileges. See "Viewing Workspace Database Privileges" on page 2-81. ■ Workspaces with Only Sample Application. See "Viewing Workspaces with Only a Sample Application" on page 2-72. ■ Manage File Utilization. See "Viewing File Size and File Count by Workspace" on page 2-81. About Export Import Use Export Import to access the following links: ■ Import Workspaces. See "Importing a Workspace" on page 2-82. ■ Export Workspaces. See "Exporting a Workspace" on page 2-82. About Manage Application Use Manage Workspaces to access the following links: ■ Application Attributes. See "Viewing Application Attributes" on page 2-82. ■ Build Status. See "Changing Application Build Status Set During Deployment" on page 2-83. ■ Parsing Schemas. See "Viewing the Parsing Schemas Report" on page 2-84.
  • 64.
    Logging In ToOracle Application Express Administration Services 2-6 Oracle Application Express Administration Guide Logging In To Oracle Application Express Administration Services Instance administrators are responsible for managing an entire Oracle Application Express instance. To perform these tasks, an Instance administrator logs in to the Oracle Application Express Administration Services application. To log in to Oracle Application Express Administration Services: 1. In a web browser, navigate to the Oracle Application Express Administration Services application. By default, Oracle Application Express Administration Services installs to the following location: ■ If your setup uses the Oracle Application Express Listener, go to: http://hostname:port/apex/apex_admin Where: – hostname is the name of the system where Oracle Application Express Listener is installed. – port is the port number assigned when configuring the Oracle Application Express Listener. In a default installation, this number is 8080. To learn more, see Oracle Application Express Listener Installation and Configuration Guide. – apex is the service name defined when configuring the Oracle Application Express Listener. ■ If your setup uses the embedded PL/SQL gateway, go to: http://hostname:port/apex/apex_admin Where: – hostname is the name of the system where Oracle XML DB Protocol Server is installed. – port is the port number assigned to HTTP on the Oracle XML DB Protocol Server. In a default installation, this number is 8080. If you are using the Oracle Database 12c multitenant architecture, then each PDB will have a distinct port number. See "Verifying the Port Assigned to HTTP on the Oracle XML DB Protocol Server" in Oracle Application Express Application Builder User's Guide. – apex is the database access descriptor (DAD) defined in the configuration file. ■ If your setup uses Apache and mod_plsql, go to: http://hostname:port/pls/apex/apex_admin Where: – hostname is the name of the system where Oracle HTTP Server is installed. – port is the port number assigned to Oracle HTTP Server. In a default installation, this number is 7777. – pls is the indicator to use the mod_plsql cartridge. – apex is the database access descriptor (DAD) defined in the mod_plsql configuration file.
  • 65.
    Managing Workspace andChange Requests Oracle Application Express Hosted Instance Administration 2-7 For users who have upgraded from earlier releases, or who have a custom configuration, this value may be htmldb or something else. Verify your DAD with your Instance administrator. The Login page appears. 2. In Username, enter admin. 3. In Password, enter the Instance administrator account password you specified when you installed Oracle Application Express. 4. Click Login to Administration. Oracle Application Express Administration Services appears. Managing Workspace and Change Requests An Instance administrator is responsible for reviewing and managing workspace requests and change request. A Workspace Request enables users to request workspaces directly in a self-service fashion. For example, users could click a link on the login page to access a request form. Once the Instance administrator approves the workspace request, each user is automatically emailed the appropriate login information. To learn more about configuring an instance to use workspace requests, see "Specifying a Provisioning Mode" on page 2-65. A Change Request enables users to modify an existing workspace (for example, add a new schema or increase the disk space limit). Topics: ■ Viewing Requests on the Instance Administration Home Page ■ Viewing Pending Requests ■ Managing Workspace Requests ■ Managing Change Requests Viewing Requests on the Instance Administration Home Page Instance administrators can view pending and new service requests on the Oracle Application Express Instance Administration (Instance Administration) home page. The Pending Requests region lists the total number of new service requests and service change requests. To view a more detailed report, click the number listed. Tip: admin is the default Instance administrator account. To create additional Instance administrator accounts, see "Creating New User Accounts" on page 2-84 See Also: Oracle Application Express Installation Guide for information about installing Oracle Application Express See Also: "Specifying a Provisioning Mode" on page 2-65, "Enabling Service Requests" on page 2-18, and "Making a Service Request" on page 1-9
  • 66.
    Managing Workspace andChange Requests 2-8 Oracle Application Express Administration Guide The Workspace Requests report displays at the bottom on the page. This report lists service requests by date. To view a specific request, click the description. Viewing Pending Requests To view workspace requests from the Manage Service Requests page: 1. Log in to Oracle Application Express Administration Services. See "Logging In To Oracle Application Express Administration Services" on page 2-6. 2. Click Manage Requests. From Manage Service Requests page, you can choose three tabs: ■ Open Requests ■ All Workspace Requests ■ All Change Requests 3. Open Requests displays new service requests and change requests. To approve or decline a new request, click the Edit icon. Tip: To view the new Service Requests report page, see "Monitoring Activity Across a Development Instance" on page 2-87 Tip: All Change Requests pages display as interactive reports. You can customize the appearance of each page using the Search bar at the top of each page. See "Customizing Interactive Reports" in Oracle Application Express Application Builder User's Guide.
  • 67.
    Managing Workspace andChange Requests Oracle Application Express Hosted Instance Administration 2-9 4. Click the All Workspace Requests tab. To edit the request, click the Edit icon. To approve or decline the request, click Provision in the Action column. To learn more, see "Managing Workspace Requests" on page 2-9. 5. Click All Change Requests. To view a request, click View Request. To learn more, see "Managing Change Requests" on page 2-12. Managing Workspace Requests A Workspace Request enables a user to request a workspace by clicking a link on the login page to access a request form. Once submitted, the Instance administrator can review the request and either approve or decline it. To learn more about configuring an instance to use workspace requests, see "Specifying a Provisioning Mode" on page 2-65.
  • 68.
    Managing Workspace andChange Requests 2-10 Oracle Application Express Administration Guide Topics: ■ Approving or Declining a Pending Workspace Request ■ Changing the Status of an Existing Workspace Request ■ Deleting a Workspace Request Approving or Declining a Pending Workspace Request To approve or decline a pending workspace request: 1. Log in to Oracle Application Express Administration Services. See "Logging In To Oracle Application Express Administration Services" on page 2-6. 2. Click Manage Requests. 3. Click the All Workspace Requests tab. The Workspace Requests page displays as an interactive report. To customize the report, use the Search bar at the top of the page. See "Customizing Interactive Reports" in Oracle Application Express Application Builder User's Guide. 4. Locate a request to review. 5. To edit or review the request, click the Edit icon. On the Provision Request page you can: ■ Edit the request and click Apply Changes. ■ Delete the request by clicking Delete. 6. Return to the All Workspace Requests page. 7. To approve a request: a. Click Provision in the Actions column. b. On the Provisioning Administration page, click Approve. c. Review the email message. d. If needed, update the message and click Approve and Send Email. If you selected the Provisioning Status, Email Verification, an email containing a verification link is sent to the user. To create the workspace, the user must click the verification link to create the workspace. See "Specifying a Provisioning Mode" on page 2-65. 8. To decline a request: a. Click Provision in the Actions column. b. On the Provisioning Administration page, click Decline. c. Review the email message. d. To add information, such as the reason for declining a request, update the message and then click Decline and Send Email. The email is sent to the user notifying them the request was declined. More About the Approval Process If you are using Email Verification, when an Instance administrator approves a workspace request, the following events occur: 1. An email containing a verification link is sent to the user. 2. When user clicks the verification link, the workspace is created.
  • 69.
    Managing Workspace andChange Requests Oracle Application Express Hosted Instance Administration 2-11 3. Another email is sent to the user containing login credentials (that is, the workspace name, Username, and password). 4. The status of the workspace request changes from Accepted to Approved. If the user fails to click the verification link, you can quickly delete the request by clicking the DELETE link in the Action column. When an Error Occurs If an error occurs during the workspace creation process, the status of the request reverts to Requested and an email is sent to the user containing the following message: Please contact administrator. Once the issue is resolved, the administrator can again repeat the previous procedure and approve the request. Changing the Status of an Existing Workspace Request To change the status of an existing workspace request: 1. Log in to Oracle Application Express Administration Services. See "Logging In To Oracle Application Express Administration Services" on page 2-6. 2. Click Manage Requests. 3. Click the All Workspace Requests tab. The Workspace Requests page displays as an interactive report. To customize the report, use the Search bar at the top of the page. See "Customizing Interactive Reports" in Oracle Application Express Application Builder User's Guide. 4. To review all workspace requests, deselect Filter Status_Code = '1' . 5. Locate a request to review. 6. Click the Adjust link in the Actions column. The Adjust Request page appears. 7. From the Project Status list, select a new status. 8. Click Apply Changes. Deleting a Workspace Request To delete a workspace request: 1. Log in to Oracle Application Express Administration Services. See "Logging In To Oracle Application Express Administration Services" on page 2-6. 2. Click Manage Requests. 3. Click All Workspace Requests. Note: Be careful when setting the Project Status to Requested. Although Requested enables you to provision a workspace, it could result in data corruption due to the manner in which accounts are provisioned. The provisioning system assumes Requested workspace requests do not have the corresponding schemas and dictionary entries for a Workspace administrator or developers. If you must change the Project Status for an Approved workspace to Requested, terminate the service first and then change the status to Requested.
  • 70.
    Managing Workspace andChange Requests 2-12 Oracle Application Express Administration Guide The Workspace Requests page appears. 4. Uncheck the Filter Status_Code = '1' to review all workspace requests. 5. Click the Edit icon for the request you want to delete. 6. On the Provision Request page, click the appropriate button: ■ If the Project Status is Approved, click Terminate or Delete. ■ If the Project Status is Declined, Requested, Terminated, or Accepted, click Delete. 7. Click Delete Request. Managing Change Requests A Change Request enables users to modify an existing workspace (for example, by adding a new schema or increasing the disk space limit). Once submitted, the Instance administrator reviews and either approves or declines the change request. Topics: ■ Viewing Requests from the All Change Requests Page ■ Approving or Declining a Pending Change Request Viewing Requests from the All Change Requests Page To view change requests from the Workspace Requests page: 1. Log in to Oracle Application Express Administration Services. See "Logging In To Oracle Application Express Administration Services" on page 2-6. 2. Click Manage Requests. 3. Under Manage Requests, click the All Change Requests tab. This page displays as an interactive report. To customize the report, use the Search bar at the top of the page. See "Customizing Interactive Reports" in Oracle Application Express Application Builder User's Guide. 4. See the next topic, "Approving or Declining a Pending Workspace Request" on page 2-10. Approving or Declining a Pending Change Request To approve or decline a pending change request: 1. Log in to Oracle Application Express Administration Services. See "Logging In To Oracle Application Express Administration Services" on page 2-6. 2. Click Manage Requests. 3. Under Manage Requests, click the All Change Requests tab. This page displays as an interactive report. To customize the report, use the Search bar at the top of the page. See "Customizing Interactive Reports" in Oracle Application Express Application Builder User's Guide. 4. Locate the request and click View Request under the Action column. The View Change Request page appears. Note that the buttons that display depend upon the nature of the change request. 5. Select one of the following:
  • 71.
    Managing Instance Settings OracleApplication Express Hosted Instance Administration 2-13 ■ To approve a request for a schema, click Create Schema. ■ To approve a request for additional disk space, click Add Space. ■ To approve a request to terminate the service, click Terminate Service. ■ To deny a request, click Deny Request. ■ To delete a request and deny it, select Delete this request if denying? and then click Deny Request. Managing Instance Settings Instance administrators use the settings under Manage Instance to manage and configure an Oracle Application Express instance. Topics: ■ Managing Feature Configuration ■ Configuring Security Settings ■ Configuring Instance Settings ■ Including an Agreement or Survey When Running the Signup Wizard ■ Purging Inactive Workspaces ■ Viewing Information About Installed Packaged Database Applications ■ Monitoring the Progress Packaged Application Installations ■ Managing Public Themes ■ Managing Template Applications ■ Managing Session State ■ Managing the Mail Queue ■ Viewing Installed Translations ■ Managing Interactive Report Subscriptions ■ Managing Logs and Files ■ Managing a Runtime Environment ■ Managing Messages ■ About the Self Service Sign Up Wizard Managing Feature Configuration Use the Feature Configuration page to configure application development and SQL Workshop and control database monitoring. Topics: ■ Disabling PL/SQL Program Unit Editing ■ Disabling the Creation of Demonstration Objects in a New Workspace ■ Disabling the Creation of Websheet Objects ■ Enabling and Disabling SQL Access in Websheets See Also: "Specifying a Provisioning Mode" on page 2-65
  • 72.
    Managing Instance Settings 2-14Oracle Application Express Administration Guide ■ Configuring Packaged Application Installation Options ■ Configuring SQL Workshop ■ Enabling Database Monitoring ■ Enabling Application Activity Logging ■ Enabling Service Requests Disabling PL/SQL Program Unit Editing By default, developers can change and compile PL/SQL source code when browsing database procedures, packages, and functions in Object Browser. As an Instance administrator, you can control PL/SQL program unit editing for an entire instance by making a selection from Allow PL/SQL Program Unit Editing. To disable PL/SQL program unit editing: 1. Log in to Oracle Application Express Administration Services. See "Logging In To Oracle Application Express Administration Services" on page 2-6. 2. Click Manage Instance. 3. Under Instance Settings, click Feature Configuration. 4. Locate the Application Development section. 5. For Allow PL/SQL Program Unit Editing, select No. 6. Click Apply Changes. Disabling the Creation of Demonstration Objects in a New Workspace When an Instance administrator creates a new workspace, Oracle Application Express automatically creates sample applications within the workspace. To disable the creation of sample applications: 1. Log in to Oracle Application Express Administration Services. See "Logging In To Oracle Application Express Administration Services" on page 2-6. 2. Click Manage Instance. 3. Under Instance Settings, click Feature Configuration. 4. Locate the Application Development section. 5. For Create demonstration objects in new workspaces, select No. 6. Click Apply Changes. Disabling the Creation of Websheet Objects When an Instance administrator creates a new workspace, Oracle Application Express automatically creates sample Websheet objects within the workspace. To disable the creation of sample Websheet objects: 1. Log in to Oracle Application Express Administration Services. See "Logging In To Oracle Application Express Administration Services" on page 2-6. See Also: "Managing Component Availability" on page 2-77 See Also: "Disabling PL/SQL Program Unit Editing for a Workspace" on page 1-13 for information about disabling PL/SQL program unit editing for a specific workspace
  • 73.
    Managing Instance Settings OracleApplication Express Hosted Instance Administration 2-15 2. Click Manage Instance. 3. Under Instance Settings, click Feature Configuration. 4. Locate the Application Development section. 5. For Create Websheet objects in new workspaces, select No. 6. Click Apply Changes. Enabling and Disabling SQL Access in Websheets An Instance administrator can control the ability to use the SQL tag and the ability to create SQL reports in Application Express Websheets. When disabled, all Websheet applications in all workspaces in the instance are prevented from using the SQL tag or creating SQL reports. To control SQL access in Websheets: 1. Log in to Oracle Application Express Administration Services. See "Logging In To Oracle Application Express Administration Services" on page 2-6. 2. Click Manage Instance. 3. Under Instance Settings, click Feature Configuration. 4. Locate the Application Development section. 5. For Enable SQL and PL/SQL Access in Websheets, select Yes or No. 6. Click Apply Changes. Configuring Packaged Application Installation Options When installing a packaged application, Instance administrators can specify a number of installation options. To configure packaged application installation options: 1. Log in to Oracle Application Express Administration Services. See "Logging In To Oracle Application Express Administration Services" on page 2-6. 2. Click Manage Instance. 3. Under Instance Settings, click Feature Configuration. 4. Under Packaged Application Install Options, select Yes or No for these options: ■ Allow HTTP Header Variable authentication - Select Yes to enable HTTP Header Variable authentication when installing a packaged application. Otherwise, select No. ■ Allow LDAP Directory authentication - Select Yes to enable LDAP Directory authentication. Otherwise, select No. ■ Allow Oracle Application Server Single Sign-On authentication - Select Yes to enable Oracle Application Server Single Sign-On authentication. Otherwise, select No. 5. Click Apply Changes. See Also: "Utilizing Packaged Applications" in Oracle Application Express Application Builder User's Guide
  • 74.
    Managing Instance Settings 2-16Oracle Application Express Administration Guide Configuring SQL Workshop As an Instance administrator, you can use the attributes under SQL Workshop to configure basic SQL Workshop behavior. To configure SQL Workshop: 1. Log in to Oracle Application Express Administration Services. See "Logging In To Oracle Application Express Administration Services" on page 2-6. 2. Click Manage Instance. 3. Under Instance Settings, click Feature Configuration. 4. Under SQL Workshop, enter the attributes described in Table 2–1. 5. Click Apply Changes. Enabling Database Monitoring Setting Enable Database Monitoring to Yes enables monitoring within SQL Workshop. Before you can access the Database Monitoring page, an Instance administrator must enable database monitoring. To enable database monitoring: 1. Log in to Oracle Application Express Administration Services. See "Logging In To Oracle Application Express Administration Services" on page 2-6. 2. Click Manage Instance. 3. Under Instance Settings, click Feature Configuration. 4. Scroll down to Monitoring. Table 2–1 SQL Workshop Attributes Attribute Description SQL Commands Maximum Inactivity in minutes Identify the maximum amount of time a transactional command in the SQL Command Processor waits before timing out. SQL Scripts Maximum Script Output Size in bytes Identify the maximum amount of output a single SQL script can generate. SQL scripts are run from the SQL Workshop. SQL Scripts Maximum Workspace Output Size in bytes Identify the maximum amount of space all scripts within a workspace may consume. SQL script results are the output generated when running SQL scripts from the Script Editor or from the SQL Scripts home page. SQL Scripts Maximum Script Size in bytes Identify the maximum size of a SQL script used within the SQL Workshop. Enable Transactional SQL Commands Select Yes to enable transactional SQL commands for the entire Oracle Application Express instance. Enabling this feature permits SQL Command Processor users to issue multiple SQL commands within the same physical database transaction. When you select Yes, an Autocommit check box appears on the SQL Command Processor page. By default, this option is set to No. See Also: "Monitoring the Database" in Oracle Application Express SQL Workshop Guide
  • 75.
    Managing Instance Settings OracleApplication Express Hosted Instance Administration 2-17 5. For Enable Database Monitoring, select Yes. 6. Click Apply Changes. Enabling Application Activity Logging Application Activity Logging controls how application activity is logged for all applications on this instance. To configuring application activity logging: 1. Log in to Oracle Application Express Administration Services. See "Logging In To Oracle Application Express Administration Services" on page 2-6. 2. Click Manage Instance. 3. Under Instance Settings, click Feature Configuration. 4. Scroll down to Monitoring. 5. For Application Activity Logging, select one of the following: ■ Use Application Settings (default) - Use the Logging attribute of each application to determine if activity is logged. ■ Never - Disable activity logging for all applications in the instance. ■ Always - Enable activity logging for all applications in the instance. 6. Click Apply Changes. Enabling Application Tracing Instance administrators can control whether developers or users can generate database trace files simply by specifying &p_trace=YES on the URL when displaying a page. The ability to generate a trace file is already controlled if the application has Debug enabled. To control application tracing at the instance-level: 1. Log in to Oracle Application Express Administration Services. See "Logging In To Oracle Application Express Administration Services" on page 2-6. 2. Click Manage Instance. 3. Under Instance Settings, click Feature Configuration. 4. Scroll down to Monitoring. 5. From Enable Application Tracing, select: ■ Yes - Any application which has Debug enabled can also generate a server-side database trace file for a page using &p_trace=YES on the URL. To Note: Only users having a database user account that has been granted a DBA role can access the Database Monitor page. See Also: "Monitoring Activity Across a Development Instance" on page 2-87 See Also: "Monitoring Activity Across a Development Instance" on page 2-87
  • 76.
    Managing Instance Settings 2-18Oracle Application Express Administration Guide learn more, see "Enabling SQL Tracing and Using TKPROF" in Oracle Application Express Application Builder User's Guide. ■ No - Tracing cannot be enabled for any application on the instance. If someone attempts to run an application with &p_trace=YES in the URL, the page renders but the request to generate the SQL trace file is silently ignored. 6. Click Apply Changes. Enabling Service Requests Controls the ability for workspace administrators to make service requests from Workspace Administration. Service Requests include the ability to request a new schema, request storage, or request termination of their workspace. To enable service requests: 1. Log in to Oracle Application Express Administration Services. See "Logging In To Oracle Application Express Administration Services" on page 2-6. 2. Click Manage Instance. 3. Under Instance Settings, click Feature Configuration. 4. Scroll down to Workspace Administration. 5. For Enable Service Requests, select Yes. 6. Click Apply Changes. Configuring Security Settings Instance administrators can configure security settings, such as turning off cookies used to populate the login form in Application Express, controlling access to accounts, and setting up password policies. Topics: ■ Turning Off Cookies Used to Populate the Login Form ■ Disabling Access to Oracle Application Express Administration Services ■ Disabling Workspace Login Access ■ Controlling Public File Upload ■ Restricting User Access by IP Address ■ Configuring a Proxy Server for an Instance ■ Requiring HTTPS ■ Controlling RESTful Access ■ Configuring Session Timeout ■ Excluding Domains from Regions of Type URL and Web Services ■ Configuring Login Controls ■ Enabling Login Controls for All Workspaces See Also: "Available Parameter Values" in Oracle Application Express API Reference to learn about the TRACING_ENABLED parameter See Also: "Managing Workspace and Change Requests" on page 2-7
  • 77.
    Managing Instance Settings OracleApplication Express Hosted Instance Administration 2-19 ■ About Strong Password Policies ■ Configuring Password Policies ■ Restricting Access to Oracle Application Express by Database Access Descriptor (DAD) ■ Defining Authorized URLs Turning Off Cookies Used to Populate the Login Form Instance administrators can control if a convenience cookie is sent to a user's computer whenever a developer or administrator logs in to a workspace from the Application Express Login page. If Set Workspace Cookie option is set to Yes, Oracle Application Express sends a persistent cookie that: ■ combines the last used workspace name and user name ■ has a lifetime of six months ■ is read to populate the Application Express Workspace Login form (but not the Oracle Application Express Administration Services Login form) To turn off cookies used to populate the login form: 1. Log in to Oracle Application Express Administration Services. See "Logging In To Oracle Application Express Administration Services" on page 2-6. 2. Click Manage Instance. 3. Under Instance Settings, click Security. 4. Locate the Security section. 5. For Set Workspace Cookie, select No. 6. Click Apply Changes. Disabling Access to Oracle Application Express Administration Services Instance administrators can restrict user access to Oracle Application Express Administration Services and prevent a user from logging in to Oracle Application Express Administration Services. Disabling administrator login in production environments prevents unauthorized users from logging in to Application Express Administration Services and possibly compromising user login credentials. To disable user access to Oracle Application Express Administration Services: 1. Log in to Oracle Application Express Administration Services. See "Logging In To Oracle Application Express Administration Services" on page 2-6. 2. Click Manage Instance. 3. Under Instance Settings, click Security. 4. Locate the Security section. Note: If your computer has received this cookie, you can physically remove it from its persistent location on disk using browser tools or system utilities. The cookie is named ORA_WWV_REMEMBER_UN. In older releases of Oracle Application Express, this cookie was named ORACLE_PLATFORM_REMEMBER_UN. It may exist for each Oracle Application Express service accessed having distinct hostname and path components.
  • 78.
    Managing Instance Settings 2-20Oracle Application Express Administration Guide 5. For Disable Administrator Login, select Yes. 6. Click Apply Changes. Setting this value and logging out prevents anyone from logging in to Oracle Application Express Administration Services. Enabling Administrator Login To reverse this setting and enable administrator login: 1. Connect in SQL*Plus and connect to the database where Oracle Application Express is installed as SYS, for example: ■ On Windows: SYSTEM_DRIVE: sqlplus /nolog SQL> CONNECT SYS as SYSDBA Enter password: SYS_password ■ On UNIX and Linux: $ sqlplus /nolog SQL> CONNECT SYS as SYSDBA Enter password: SYS_password 2. Run the following statement: ALTER SESSION SET CURRENT_SCHEMA = APEX_040200; 3. Run the following statements: BEGIN APEX_INSTANCE_ADMIN.SET_PARAMETER('DISABLE_ADMIN_LOGIN', 'N'); commit; END; / Disabling Workspace Login Access Developers and Workspace administrators log in to the Oracle Application Express development environment to access the Application Builder, SQL Workshop, Team Development and Administration. To restrict access to these applications, select Yes from Disable Workspace Login. This option effectively sets a Runtime-Only environment while still allowing Instance administrators to log in to Instance Administration. Selecting Yes in production environments prevents developers from changing applications or data. To disable user access to the Internal workspace: 1. Log in to Oracle Application Express Administration Services. See "Logging In To Oracle Application Express Administration Services" on page 2-6. 2. Click Manage Instance. 3. Under Instance Settings, click Security. 4. Locate the Security section. 5. From Disable Workspace Login, select Yes. Selecting Yes prevents users from logging in to the Internal workspace. See Also: "Managing a Runtime Environment" on page 2-57
  • 79.
    Managing Instance Settings OracleApplication Express Hosted Instance Administration 2-21 6. Click Apply Changes. Controlling Public File Upload Use the Allow Public File Upload attribute to control whether unauthenticated users can upload files in applications that provide file upload controls. To control file upload: 1. Log in to Oracle Application Express Administration Services. See "Logging In To Oracle Application Express Administration Services" on page 2-6. 2. Click Manage Instance. 3. Under Instance Settings, click Security. 4. Locate the Security section. 5. From Allow Public File Upload, select one of the following: ■ Yes - Enables unauthenticated users to upload files in applications in the Internal workspace. ■ No - Prevents unauthenticated users from uploading files in applications in the Internal workspace. 6. Click Apply Changes. Restricting User Access by IP Address Instance administrators can restrict user access to an Oracle Application Express instance by creating a runtime setting named RESTRICT_IP_RANGE. To restrict user access by IP address: 1. Log in to Oracle Application Express Administration Services. See "Logging In To Oracle Application Express Administration Services" on page 2-6. 2. Click Manage Instance. 3. Under Instance Settings, click Security. 4. Locate the Security section. 5. For Disable Administrator Login, select No. 6. In Restrict Access by IP Address, enter a comma-delimited list of IP addresses. Use an asterisk (*) to specify a wildcard. You can enter IP addresses from one to four levels. For example: 141, 141.* ... 192.128.23.1 ... 7. Click Apply Changes. Configuring a Proxy Server for an Instance You can configure an entire Oracle Application Express instance to use a proxy for all outbound HTTP traffic. Setting a proxy at the instance-level supersedes any proxies Note: When using wildcards, do not include additional numeric values after wildcard characters. For example, 138.*.41.2.
  • 80.
    Managing Instance Settings 2-22Oracle Application Express Administration Guide defined at the application-level or in web service references. If a proxy is specified, regions of type URL, Web services, and report printing will use the proxy. To configure a proxy for an Oracle Application Express instance: 1. Log in to Oracle Application Express Administration Services. See "Logging In To Oracle Application Express Administration Services" on page 2-6. 2. Click Manage Instance. 3. Under Instance Settings, click Security. 4. Locate the Security section. 5. In Instance Proxy, enter the address of the proxy to be used for the entire instance. 6. Click Apply Changes. Requiring HTTPS Secure Socktets Layer (SSL) is a protocol for managing the security of data transmitted on the Internet. For web applications, SSL is implemented by using the HTTPS protocol. Oracle recommends running Oracle Application Express applications using SSL (HTTPS protocol) to prevent any sensitive data from being sent over an unencrypted (cleartext) communication channel. You can configure both your Oracle Application Express instance and all related applications to require HTTPS by configuring the Require HTTPS and Require Outbound HTTPS attributes. Topics: ■ Requiring HTTPS for an Instance ■ Requiring HTTPS for Outbound Traffic ■ Reversing Require HTTPS ■ Reversing Require Outbound HTTPS Requiring HTTPS for an Instance To require HTTPS for an Oracle Application Express instance: 1. Log in to Oracle Application Express Administration Services. See "Logging In To Oracle Application Express Administration Services" on page 2-6. 2. Click Manage Instance. 3. Under Instance Settings, click Security. 4. Locate the Security section. 5. For Require HTTPS, select Yes. 6. Click Apply Changes. Requiring HTTPS for Outbound Traffic To require HTTPS for outbound traffic only: 1. Log in to Oracle Application Express Administration Services. See "Logging In To Oracle Application Express Administration Services" on page 2-6. Note: If you set Require HTTPS to Yes, you are only able to log in to an Oracle Application Express workspace or Oracle Application Express Administration Services over HTTPS.
  • 81.
    Managing Instance Settings OracleApplication Express Hosted Instance Administration 2-23 2. Click Manage Instance. 3. Under Instance Settings, click Security. 4. Locate the Security section. 5. For Require Outbound HTTPS, select Yes. 6. Click Apply Changes. Reversing Require HTTPS To reverse Require HTTPS: 1. Connect in SQL*Plus or SQL Developer with the Application Express engine schema as the current schema, for example: ■ On Windows: SYSTEM_DRIVE: sqlplus /nolog SQL> CONNECT SYS as SYSDBA Enter password: SYS_password ■ On UNIX and Linux: $ sqlplus /nolog SQL> CONNECT SYS as SYSDBA Enter password: SYS_password 2. Run the following statement: ALTER SESSION SET CURRENT_SCHEMA = APEX_040200; 3. Run the following statements: BEGIN APEX_INSTANCE_ADMIN.SET_PARAMETER('REQUIRE_HTTPS', 'N'); commit; end; / Reversing Require Outbound HTTPS To reverse Require Outbound HTTPS: 1. Connect in SQL*Plus or SQL Developer with the Application Express engine schema as the current schema, for example: ■ On Windows: SYSTEM_DRIVE: sqlplus /nolog SQL> CONNECT SYS as SYSDBA Enter password: SYS_password ■ On UNIX and Linux: $ sqlplus /nolog SQL> CONNECT SYS as SYSDBA Enter password: SYS_password 2. Run the following statement: ALTER SESSION SET CURRENT_SCHEMA = APEX_040200; 3. Run the following statements: BEGIN APEX_INSTANCE_ADMIN.SET_PARAMETER('REQUIRE_OUT_HTTPS', 'N'); commit;
  • 82.
    Managing Instance Settings 2-24Oracle Application Express Administration Guide end; / Controlling RESTful Access Use the Allow RESTful Access attribute to control whether developers can expose report regions as RESTful services. To enable RESTful Access: 1. Log in to Oracle Application Express Administration Services. See "Logging In To Oracle Application Express Administration Services" on page 2-6. 2. Click Manage Instance. 3. Under Instance Settings, click Security. 4. Locate the RESTful Access section. 5. From Allow RESTful Access, select one of the following: ■ Yes - Enables developers to expose report regions as RESTful services. ■ No - Prevents developers from exposing report regions as RESTful services. 6. Click Apply Changes. Configuring Session Timeout Use the attributes under Session Timeout to reduce exposure to abandoned computers with an open web browser at the application level. To manage session settings for an Oracle Application Express instance: 1. Log in to Oracle Application Express Administration Services. See "Logging In To Oracle Application Express Administration Services" on page 2-6. 2. Click Manage Instance. 3. Under Instance Settings, click Security. 4. Under Session Timeout For Application Express, specify the following attributes: ■ Maximum Session Length in Seconds - Enter a positive integer to control how many seconds an application session is allowed to exist. This setting is superseded by the application-level setting. Leave the value null in order to revert to the default value of 8 hours (28800 seconds). Enter 0 to have the session exist indefinitely. This session duration may be superseded by the operation of the job that runs every hour which deletes sessions older than 12 hours. ■ Maximum Session Idle Time in Seconds - Enter a positive integer to control how many seconds a session may remain idle for Oracle Application Express applications. This setting is superseded by the application-level setting. Leave the value null in order to revert to the default value of 1 hour (3600 seconds). Set to 0 to prevent session idle time checks from being performed. 5. Click Apply Changes. See Also: "Using RESTful Services" in Oracle Application Express SQL Workshop Guide
  • 83.
    Managing Instance Settings OracleApplication Express Hosted Instance Administration 2-25 Excluding Domains from Regions of Type URL and Web Services It is possible to restrict regions of type URL and Web services for the entire Oracle Application Express instance. The Instance administrator defines excluded domains and regions of type URL. If a web reference or region of type URL contains an excluded domain, an error displays informing the user that it is restricted. To exclude a domain from regions of type URL and Web services: 1. Log in to Oracle Application Express Administration Services. See "Logging In To Oracle Application Express Administration Services" on page 2-6. 2. Click Manage Instance. 3. Under Instance Settings, click Security. 4. In Domain Must Not Contain, enter a colon-delimited list of excluded domains, for example: mycompany.com:yourcompany.com:abccompany.com 5. Click Apply Changes. Configuring Login Controls Instance administrators can configure how Oracle Application Express handles failed login attempts. To configure general login controls: 1. Log in to Oracle Application Express Administration Services. See "Logging In To Oracle Application Express Administration Services" on page 2-6. 2. Click Manage Instance. 3. Under Instance Settings, click Security. 4. Scroll down to General Login Control. 5. Under General Login Control: a. Delay after failed login attempts in Seconds - Enter a positive integer value for the delay in seconds between login attempts. Enter 0 to disable the countdown and enable immediate access. If the delay is greater than 0, Oracle Application Express always displays the countdown, even on the first login failure. b. Method for computing the delay - Select a method for computing the delay for failed logins. The computation methods are based on recent data in the Login Access Log. See item help for further details. c. Inbound Proxy Servers - Enter a comma-separated list of IP addresses for well known proxy servers, through which requests come in. Oracle Application Express uses this list to compute the actual client address from the HTTP Headers X-Forwarded-For and REMOTE_ADDR. 6. Click Apply Changes. See Also: "Session Timeout" in Oracle Application Express Application Builder User's Guide
  • 84.
    Managing Instance Settings 2-26Oracle Application Express Administration Guide Enabling Login Controls for All Workspaces By default, no login controls are enabled across an Oracle Application Express instance. Instance administrators can enable login controls for all accounts in all workspaces across an entire development instance. Account login controls include: ■ Require user account expiration and locking ■ Set up a maximum number of failed login attempts ■ Set the lifetime of a password before prompted for a new one If the Instance administrator does not enable login controls for an entire instance then each Workspace administrator can enable controls on a workspace-by-workspace basis. See "Enabling Account Login Controls for a Workspace" on page 1-11. Note that Account Login control applies to end-user accounts created using the Application Express end-user account management interface. To enable login controls for all workspaces: 1. Log in to Oracle Application Express Administration Services. See "Logging In To Oracle Application Express Administration Services" on page 2-6. 2. Click Manage Instance. 3. Under Instance Settings, click Security. 4. Scroll down to Workspace Login control. 5. Under Workspace Login Control: a. Require User Account Expiration and Locking - Select Yes to enable Application Express user account expiration and locking features across all workspaces in an instance. This selection prevents the same feature from being disabled at the workspace-level. Select No to relinquish control to each Workspace administrator. b. Maximum Login Failures Allowed - Enter a integer for the maximum number of consecutive unsuccessful authentication attempts allowed before a developer or administrator account is locked. If you do not specify a value in this field, the default value is 4. This setting applies to administrator and developer accounts. It does not apply to end user accounts. The value you enter is used as the default for the workspace-level Maximum Login Failures Allowed preference if the Workspace administrator does not specify a value. That preference is used for end-user accounts within the respective workspace. c. Account Password Lifetime (days) - Enter a number for the maximum number of days a developer or administrator account password may be used before the account expires. If you do not specify a value in this field, a default value is 45 days. This setting applies to accounts used to access the Application Express administration and development environment only. It does not apply to end user accounts. The value you enter is used as the default workspace-level End User Account Lifetime preference, if the Workspace administrator specifies no value. That preference is used for end-user accounts within the respective workspace. 6. Click Apply Changes.
  • 85.
    Managing Instance Settings OracleApplication Express Hosted Instance Administration 2-27 About Strong Password Policies Instance administrators can enable password policies for: ■ All users across all workspaces (that is, Workspace administrators, developers, and end users). Instance administrators can set up restrictions for all users, including password characters, lengths, words, and differences in consecutive passwords. ■ Users logging in to Oracle Application Express Administration Services. Turning on the strong password requirement for Oracle Application Express adds another layer of security to prevent hackers from determining an administrator’s password. When this option is selected, passwords must meet these requirements: – consist of at least six characters – contain at least one lowercase alphabetic character, one uppercase alphabetic character, one numeric digit, and one punctuation character – cannot include the username – cannot include the word Internal – cannot contain any words shown in the Must Not Contain Workspace Name field in this section Configuring Password Policies To configure password policies: 1. Log in to Oracle Application Express Administration Services. See "Logging In To Oracle Application Express Administration Services" on page 2-6. 2. Click Manage Instance. 3. Under Instance Settings, click Security. 4. To set up a password policy for Workspace administrators, developers, and end users, scroll down to Workspace Password Policy and specify the attributes described in Table 2–2. Tip: This feature applies only to accounts created using the Application Express user creation and management facilities. It provides additional authentication security for applications. See "Managing Application Express Users" on page 1-16. Table 2–2 Workspace Password Policy Attributes Attribute Description Minimum Password Length Enter a number to set a minimum character length for passwords for workspace administrator, developer, and end user accounts. Minimum Password Differences Enter a positive integer or 0. When users change their password, the new password must differ from the old password by this number of characters. The old and new passwords are compared, character-by-character, for differences such that each difference in any position common to the old and new passwords counts toward the required minimum difference. This setting applies to accounts for workspace administrators, developers, and end users.
  • 86.
    Managing Instance Settings 2-28Oracle Application Express Administration Guide Next, set up a password policy for Application Express service administrators. 5. Scroll down to the Service Administrator Password Policy and specify one of the following: a. Use policy specified in Workspace Password Policy - Applies the password rules specified in Workspace Password Policy to service administrator passwords. b. Use default strong password policy - Applies the default strong password policy to service administrator passwords. To learn more, see item Help. 6. Click Apply Changes. Restricting Access to Oracle Application Express by Database Access Descriptor (DAD) mod_plsql and the embedded PL/SQL gateway support a directive which enables you to name a PL/SQL function which is called for each HTTP request. You can use Must Contain At Least One Alphabetic Character Select Yes to require that workspace administrator, developer, and end user account passwords contain at least one alphabetic character as specified in the Alphabetic Characters field. Must Contain At Least One Numeric Character Select Yes to require that workspace administrator, developer, and end user account passwords contain at least one Arabic numeric character (for example, 0,1,2,3,4,5,6,7,8,9). Must Contain At Least One Punctuation Character Select Yes to require that workspace administrator, developer, and end user account passwords contain at least one punctuation character as specified in the Punctuation Characters field. Must Contain At Least One Upper Case Character Select Yes to require that workspace administrator, developer, and end user account passwords contain at least one uppercase alphabetic character. Must Contain At Least One Lower Case Character Select Yes to require that workspace administrator, developer, and end user account passwords contain at least one lowercase alphabetic character. Must Not Contain Username Select Yes to prevent workspace administrator, developer, and end user account passwords from containing the username. Must Not Contain Workspace Name. Select Yes to prevent workspace administrator, developer, and end user account passwords from containing the workspace name, regardless of case. Must Not Contain Enter words, separated by colons, that workspace administrator, developer, and end user account passwords must not contain. These words may not appear in the password in any combination of uppercase or lowercase. This feature improves security by preventing the creation of simple, easy-to-guess passwords based on words like hello, guest, welcome, and so on. Alphabetic Characters Enter new or edit the existing alphabetic characters. This is the set of characters used in password validations involving alphabetic characters. Punctuation Characters Enter new or edit existing punctuation characters. This is the set of characters used in password validations involving punctuation characters. Table 2–2 (Cont.) Workspace Password Policy Attributes Attribute Description
  • 87.
    Managing Instance Settings OracleApplication Express Hosted Instance Administration 2-29 this functionality to restrict the procedures that can be called through the embedded PL/SQL gateway or mod_plsql. The function returns TRUE if the named procedure in the current request is allowed and FALSE if it is not allowed. You can use this function to enforce access restrictions for Oracle Application Express on a per-database access descriptor (DAD) basis. Oracle Application Express ships with a request validation function named wwv_ flow_epg_include_modules.authorize. This function specifies access restrictions appropriate for the standard DAD configured for Oracle Application Express. During installation, the installer also creates a PL/SQL function in the Oracle Application Express product schema (APEX_040200). You can change and recompile this function to restrict access. The source code for this function is not wrapped and can be found in the Oracle Application Express product core directory in the file named wwv_flow_epg_include_local.sql. The source code is as follows CREATE OR REPLACE FUNCTION wwv_flow_epg_include_mod_local( PROCEDURE_NAME IN VARCHAR2) RETURN BOOLEAN IS BEGIN RETURN FALSE; -- remove this statement when you add procedure names to the "IN" list IF UPPER(procedure_name) IN ( '') THEN RETURN TRUE; ELSE RETURN FALSE; END IF; END wwv_flow_epg_include_mod_local; / To add names of procedures that should be allowed: 1. Remove or comment out the RETURN FALSE statement that immediately follows the BEGIN statement: ... BEGIN RETURN FALSE; -- remove this statement when you add procedure names to the "IN" list ... 2. Add names to the clause representing procedure names that should be allowed to be invoked in HTTP requests. For example to allow procedures PROC1 and PROC2 the IN list you would write IN ('PROC1', 'PROC2'). After changing the source code of this function, alter the Oracle Application Express product schema (APEX_040200) and compile the function in that schema. To alter the product schema, APEX_040200 1. Log in to SQL Command Line (SQL*Plus) as SYS. 2. Alter the product schema (APEX_040200) by entering the following command: ALTER SESSION SET CURRENT_SCHEMA APEX_040200; See Also: Oracle Application Express Installation Guide
  • 88.
    Managing Instance Settings 2-30Oracle Application Express Administration Guide 3. Compile the function wwv_flow_epg_include_local.sql. The wwv_flow_epg_include_mod_local function is called by Oracle Application Express's request validation function which itself is called by the embedded PL/SQL gateway or mod_plsql. The Oracle Application Express function first evaluates the request and based on the procedure name, approves it, rejects it, or passes it to the local function, wwv_flow_epg_include_mod_local, which can evaluate the request using its own rules. When you create new Database Access Descriptors for use with Oracle Application Express, the request validation function directive should be specified. Specifically, the function wwv_flow_epg_include_modules.authorize should be named in the directive PlsqlRequestValidationFunction in the Database Access Descriptor entry in dads.conf. If you have no additional restrictions beyond those implemented in the wwv_flow_ epg_include_modules.authorize function, there is no need to take any action with respect to the source code for the wwv_flow_epg_include_mod_local function. The PL/SQL Request Validation Function directive is only available in Oracle Application Server 10g and Oracle HTTP Server 11g or later, as well as the embedded PL/SQL gateway in Oracle Database 11g or later. This directive is not available in Oracle HTTP Server Release 9.0.3. Defining Authorized URLs In previous releases of Oracle Application Express, developers can use a URL as an argument in Oracle Application Express procedures that redirect to the defined URL. Examples include APEX_UTIL.COUNT_CLICK (p_url parameter) and WWV_FLOW_ CUSTOM_AUTH_STD.LOGOUT (p_next_url parameter). Instance administrators can define a list of authorized URLs. When a URL is provided as an argument to these procedures, it is verified internally against this list. To manage the Authorized URLs list: 1. Log in to Oracle Application Express Administration Services. See "Logging In To Oracle Application Express Administration Services" on page 2-6. 2. Click Manage Instance. 3. Under Instance Settings, click Security. 4. Click the Authorized URLs tab. 5. To add a new URL: a. Click Create. b. Authorized URL - Enter an authorized URL that can be used as the parameter value to certain Application Express procedures. The entire authorized URL value is compared with the URL parameter value in Oracle Application Express procedures. If there is an exact match up to and including the entire length of the Authorized URL value, then the URL parameter value is permitted. c. Description - Enter a description of the URL. d. Click Apply Changes. 6. To edit an existing URL: a. Click the Edit icon adjacent to the URL.
  • 89.
    Managing Instance Settings OracleApplication Express Hosted Instance Administration 2-31 b. Edit the Authorized URL and Description fields. c. Click Apply Changes. 7. To delete an existing URL: a. Click the Edit icon adjacent to the URL. b. Click Delete. Configuring Instance Settings Instance Settings control Oracle Application Express configuration and apply to all workspaces within the current Oracle Application Express instance. Topics: ■ Enabling Self Service Workspace Provisioning ■ Disabling Email Provisioning ■ Configuring Storage ■ Configuring Email ■ Configuring Wallet Information ■ Configuring Report Printing ■ Configuring Online Help ■ Configuring Workspace Size Options for Requests ■ Managing Application ID Range Enabling Self Service Workspace Provisioning Use the Self Service section of the Instance Setting page to determine how the process of provisioning (or creating) a workspace works for your Oracle Application Express development instance. In Manual provision mode, an Instance administrator creates new workspaces and notifies the Workspace administrator of the login information. In Request or Email Verification provision modes, users request workspaces directly in a self-service fashion. In this scenario, users use a link on the login page to access a request form. After the workspace request has been granted, users are automatically emailed the appropriate login information. To specify a provisioning mode: 1. Log in to Oracle Application Express Administration Services. See "Logging In To Oracle Application Express Administration Services" on page 2-6. 2. Click Manage Instance. 3. Under Instance Settings, click Instance Settings. 4. Locate the Self Service region. 5. Make a selection from Provisioning Status: ■ Manual - An Instance administrator manually creates new workspaces and notifies the Workspace administrator of the login information. See Also: Oracle Application Express API Reference See Also: "Creating Workspaces" on page 2-64
  • 90.
    Managing Instance Settings 2-32Oracle Application Express Administration Guide ■ Request - Users request workspaces directly in a self-service fashion. Selecting this option displays a link on the Login page enabling users to request a workspace. When a user requests a workspace, each request is submitted to a queue for approval. When the request is approved, the user is sent an email containing login credentials (the workspace name, Username, and password). ■ Request with Email Verification - Works similar to Request except each user receives an initial email containing a verification link. Clicking this link validates the user’s email address and then the request is processed. Then another email is sent to the user containing login credentials (that is, the workspace name, Username, and password). 6. For Require Verification Code, select Yes or No to specify whether a verification code is displayed and required for someone to request a new workspace. 7. If you select Request with Email Verification: ■ Require Verification Code - Determines if a verification code displays and is required during the request process. Select Yes or No. 8. For Notification Email Address, enter the email address to receive notification email messages for new workspace requests and change workspace requests. If not specified, no workspace request notification email messages is sent. 9. Click Apply Changes. Disabling Email Provisioning Use Email Provisioning to disable workspace provisioning when provisioning with Email Verification. Use the Message field to display a message to the user that explains why email provisioning is disabled. To disable email provisioning: 1. Log in to Oracle Application Express Administration Services. See "Logging In To Oracle Application Express Administration Services" on page 2-6. 2. Click Manage Instance. 3. Under Instance Settings, click Instance Settings. 4. From Email Provisioning, select Disabled. Selecting Disabled completely disables workspace provisioning when provisioning with Email Verification. 5. In Message, enter a message that explains why email provisioning is disabled. 6. Click Apply Changes. Note: To enable users to request a workspace using a link on the Login page, an Instance administrator must choose the provisioning status of Request or Email Verification as described in the previous procedure. If the provisioning status is set to Manual, no link appears on the login page. See Also: "Disabling Email Provisioning" on page 2-32, "Configuring Email" on page 2-35, and "Managing Workspace and Change Requests" on page 2-7
  • 91.
    Managing Instance Settings OracleApplication Express Hosted Instance Administration 2-33 Configuring Storage Instance administrators can configure the following storage options: require a new schema when requesting a workspace, auto extend tablespaces, or delete uploaded files are a specified number of days. Topics: ■ Requiring a New Schema ■ Enabling Auto Extend Tablespaces ■ Enabling Bigfile Tablespaces ■ Enabling Encrypted Tablespaces ■ Deleting Uploaded Files Requiring a New Schema To require a new schema when creating a workspace: 1. Log in to Oracle Application Express Administration Services. See "Logging In To Oracle Application Express Administration Services" on page 2-6. 2. Click Manage Instance. 3. Under Instance Settings, click Instance Settings. 4. Scroll down to Storage. 5. From Require New Schema, select one of the following: ■ Yes - Requires users to request a new schema when they request a new workspace. ■ No - Enables users to select an existing schema when they request a new workspace. 6. Auto Extend Tablespaces, select Yes or No. 7. Click Apply Changes. Enabling Auto Extend Tablespaces If Auto Extend Tablespaces is enabled, tablespaces provisioned with Oracle Application Express are created with a data file that is one tenth the requested size. The data file automatically extends up to the requested size. For example, if a user requests a 100 MB workspace, the initial size of the data file is 10 MB and automatically extends up to a maximum size of 100 MB. To enable Auto Extend Tablespaces: 1. Log in to Oracle Application Express Administration Services. See "Logging In To Oracle Application Express Administration Services" on page 2-6. 2. Click Manage Instance. 3. Under Instance Settings, click Instance Settings. 4. Scroll down to Storage. 5. To enable Auto Extend Tablespaces, select Yes. 6. Click Apply Changes. Enabling Bigfile Tablespaces When a workspace is provisioned, Oracle Application Express creates the associated database user, tablespace, and data file. If Bigfile Tablespaces is enabled, tablespaces provisioned with Oracle Application Express are created as bigfile tablespaces. A bigfile tablespace is a tablespace with a single, but
  • 92.
    Managing Instance Settings 2-34Oracle Application Express Administration Guide very large data file. Traditional smallfile tablespaces, in contrast, can contain multiple datafiles, but the files cannot be as large. Oracle does not recommend using bigfile tablespaces on platforms that do not support large file sizes and can limit tablespace capacity. Refer to your operating system specific documentation for information about maximum supported file sizes. 1. Log in to Oracle Application Express Administration Services. See "Logging In To Oracle Application Express Administration Services" on page 2-6. 2. Click Manage Instance. 3. Under Instance Settings, click Instance Settings. 4. Scroll down to Storage. 5. For Bigfile Tablespaces, select Yes. 6. Click Apply Changes. Enabling Encrypted Tablespaces If Encrypted Tablespaces is enabled, tablespaces provisioned with Oracle Application Express are created as encrypted tablespaces using the Oracle database feature Transparent Data Encryption (TDE). TDE encrypts sensitive data stored in data files. To prevent unauthorized decryption, TDE stores the encryption keys in a security module external to the database. To be able to exploit this feature in Application Express, an encryption wallet must be created and with a master encryption key set. Additionally, the encryption wallet must be open before provisioning a new Application Express workspace. To enable Encrypted Tablespaces: 1. Log in to Oracle Application Express Administration Services. See "Logging In To Oracle Application Express Administration Services" on page 2-6. 2. Click Manage Instance. 3. Under Instance Settings, click Instance Settings. 4. Scroll down to Storage. 5. For Encrypted Tablespaces, select Yes. 6. Click Apply Changes. Deleting Uploaded Files Use Delete Uploaded Files After (days) to specify the number of days after which Oracle Application Express automatically deletes uploaded files. Note this automatic deletion process applies to all workspaces in an Oracle Application Express instance. The types of files that are deleted include: ■ Application Export ■ CSS Export ■ Images Export ■ Page Export See Also: "Available Parameter Values" in Oracle Application Express API Reference to learn about the BIGFILE_TABLESPACES_ENABLED parameter See Also: "Available Parameter Values" in Oracle Application Express API Reference to learn about the ENCRYPTED_TABLESPACES_ ENABLED parameter
  • 93.
    Managing Instance Settings OracleApplication Express Hosted Instance Administration 2-35 ■ Plug-in ■ Script Export ■ Spreadsheet / Text Data Import ■ Static Files Export ■ Themes ■ User Interface Defaults ■ Workspace Export ■ XML Data Import To configure when export and import files are deleted: 1. Log in to Oracle Application Express Administration Services. See "Logging In To Oracle Application Express Administration Services" on page 2-6. 2. Click Manage Instance. 3. Under Instance Settings, click Instance Settings. 4. Scroll down to Storage. 5. In Delete Uploaded Files After (days), enter the number of days after which Oracle Application Express deletes uploaded files. Enter a positive, whole number. If this setting is null, then no files are automatically deleted. 6. Click Apply Changes. Configuring Email To enable Oracle Application Express to send mail, an Instance administrator must configure email settings. Additionally, if you are running Oracle Application Express with Oracle Database 11g or later, you must enable outbound mail. Starting with Oracle Database 11g Release 1 (11.1), the ability to interact with network services is disabled by default. For more information, see "Enabling Network Services in Oracle Database 12c" for your configuration scenario in Oracle Application Express Installation Guide. Topics: ■ Configuring Email in a Full Development Environment ■ Configuring Email in a Runtime Environment ■ Determining Email Settings in a Runtime Environment Tip: To view a summary of deleted files, see the Automatic File Delete Log. See "Monitoring Activity Across a Development Instance" on page 2-87 Tip: You can configure Oracle Application Express to automatically email users their login credentials when a new workspace request has been approved. To learn more, see "Specifying a Provisioning Mode" on page 2-65. See Also: "Managing the Mail Queue" on page 2-53 and "APEX_ MAIL" in Oracle Application Express API Reference
  • 94.
    Managing Instance Settings 2-36Oracle Application Express Administration Guide Configuring Email in a Full Development Environment To configure Oracle Application Express to send mail in a full development environment: 1. Log in to Oracle Application Express Administration Services. See "Logging In To Oracle Application Express Administration Services". 2. Click Manage Instance. 3. Under Instance Settings, click Instance Settings. 4. Under Email, enter the following: a. Application Express Instance URL - Enter the URL to the Oracle Application Express instance, inclusive of the DAD and trailing slash. b. Application Express Images URL - Enter the URL to the Oracle Application Express images directory, inclusive of the trailing slash. c. SMTP Host Address - Defines the server address of the SMTP server. By default on installation, this is set to localhost. If you are using another server as an SMTP relay, change this parameter to that server's address. d. SMTP Host Port - Defines the port the SMTP server listens to for mail requests. The default setting is 25. e. SMTP Authentication Username - If you enter a username, Oracle Application Express authenticates against it when sending emails. Prior to Oracle Database 11g Release 2 (11.2.0.2), only the SMTP authentication scheme "LOGIN" is supported. On newer database versions, all authentication schemes of UTL_SMTP are supported. f. SMTP Authentication Password - If you enter a password, Oracle Application Express authenticates against it when sending emails. Prior to Oracle Database 11g Release 2, Release 11.2.0.2, only the SMTP authentication scheme "LOGIN" is supported. On newer database versions, all authentication schemes of UTL_SMTP are supported. g. Use SSL/TLS - Beginning with Oracle Database 11g Release 2 (11.2.0.2), Oracle Application Express supports secure SMTP connections. Options include: – Yes - A secure connection with SSL/TLS is made before SMTP communication. – After connection is established - Oracle Application Express sends the SMTP command STARTTLS immediately after the connection is opened. – No - A non-secure connection is opened. h. Default Email From Address - Defines the from address for tasks that generate email, such as approving a provision request or resetting a password. i. Maximum Emails per Workspace - Defines the number of email messages that can be sent with the APEX_MAIL API per workspace per 24 hour period. 5. Click Apply Changes. Configuring Email in a Runtime Environment To configure Oracle Application Express to send mail in a runtime environment: 1. Start SQL*Plus and connect to the database where Oracle Application Express is installed as SYS. For example: ■ On Windows: SYSTEM_DRIVE: sqlplus /nolog
  • 95.
    Managing Instance Settings OracleApplication Express Hosted Instance Administration 2-37 SQL> CONNECT SYS as SYSDBA Enter password: SYS_password ■ On UNIX and Linux: $ sqlplus /nolog SQL> CONNECT SYS as SYSDBA Enter password: SYS_password 2. Run the following statement: ALTER SESSION SET CURRENT_SCHEMA = APEX_040200 3. Run the following statement: BEGIN APEX_INSTANCE_ADMIN.SET_PARAMETER(PARAMETER_NAME, PARAMETER_VALUE); END; For a description of email parameters, see "Configuring Email in a Full Development Environment" on page 2-36. Determining Email Settings in a Runtime Environment To determine email settings in runtime environment: 1. Start SQL*Plus and connect to the database where Oracle Application Express is installed as SYS. For example: ■ On Windows: SYSTEM_DRIVE: sqlplus /nolog SQL> CONNECT SYS as SYSDBA Enter password: SYS_password ■ On UNIX and Linux: $ sqlplus /nolog SQL> CONNECT SYS as SYSDBA Enter password: SYS_password 2. Run the following statement: ALTER SESSION SET CURRENT_SCHEMA = APEX_040200 3. Run the following statement: SELECT APEX_INSTANCE_ADMIN.GET_PARAMETER(PARAMETER_NAME) FROM DUAL; For a description of email parameters, see "Configuring Email in a Full Development Environment" on page 2-36. See Also: "SET_PARAMETER Procedure" in Oracle Application Express API Reference See Also: "GET_PARAMETER Function" in Oracle Application Express API Reference
  • 96.
    Managing Instance Settings 2-38Oracle Application Express Administration Guide Configuring Wallet Information Secure Sockets Layer (SSL) is an industry standard protocol that uses RSA public key cryptography with symmetric key cryptography to provide authentication, encryption, and data integrity. When SSL is enabled, https displays in the URL. If you call a SSL-enabled URL (for example, by invoking a Web service), or create a region of type URL that is SSL-enabled, you must create a wallet. A wallet is a password-protected container that stores authentication and signing credentials (including private keys, certificates, and trusted certificates) needed by SSL. Topics: ■ Creating a Wallet ■ Configuring a Wallet in a Full Development Environment ■ Configuring a Wallet in a Runtime Environment ■ Determining Wallet Settings in a Runtime Environment Creating a Wallet To create a wallet: 1. The database administrator must create a wallet on the Oracle Application Express database instance. See "Using Oracle Wallet Manager" in Oracle Database Enterprise User Security Administrator's Guide. 2. The Instance administrator configures the Wallet section of the Instance Settings page to specify the file system path to the wallet and the wallet password (if required). Configuring a Wallet in a Full Development Environment To specify wallet settings in a full development environment: 1. Log in to Oracle Application Express Administration Services. See "Logging In To Oracle Application Express Administration Services" on page 2-6. 2. Click Manage Instance. 3. Under Instance Settings, click Instance Settings. 4. Scroll down to Wallet. 5. In Wallet, enter the path on the file system where the wallet is located using the following format: file:directory-path 6. If a password is required to open the wallet: a. Enter a password in the Wallet Password field. b. Select Check to confirm that you wish to change the wallet password. 7. Click Apply Changes. Configuring a Wallet in a Runtime Environment To specify wallet settings in a runtime environment: See Also: "Working with SSL Enabled Web Services" in Oracle Application Express Application Builder User's Guide and "Using Oracle Wallet Manager" in Oracle Database Enterprise User Security Administrator's Guide
  • 97.
    Managing Instance Settings OracleApplication Express Hosted Instance Administration 2-39 1. Start SQL*Plus and connect to the database where Oracle Application Express is installed as SYS. For example: ■ On Windows: SYSTEM_DRIVE: sqlplus /nolog SQL> CONNECT SYS as SYSDBA Enter password: SYS_password ■ On UNIX and Linux: $ sqlplus /nolog SQL> CONNECT SYS as SYSDBA Enter password: SYS_password 2. Run the following statement: ALTER SESSION SET CURRENT_SCHEMA = APEX_040200 3. Run the following statement: BEGIN APEX_INSTANCE_ADMIN.SET_PARAMETER(PARAMETER_NAME, PARAMETER_VALUE); END; For a description of wallet parameters, see Table 2–3 on page 2-39. Determining Wallet Settings in a Runtime Environment To determine wallet settings in a runtime environment: 1. Start SQL*Plus and connect to the database where Oracle Application Express is installed as SYS. For example: ■ On Windows: SYSTEM_DRIVE: sqlplus /nolog SQL> CONNECT SYS as SYSDBA Enter password: SYS_password ■ On UNIX and Linux: $ sqlplus /nolog SQL> CONNECT SYS as SYSDBA Enter password: SYS_password 2. Run the following statement: ALTER SESSION SET CURRENT_SCHEMA = APEX_040200 3. Run the following statement: Table 2–3 Wallet Parameters Parameter Name Description WALLET_PATH The path to the wallet on the file system, for example: file:/home/username/wallets WALLET_PWD The password associated with the wallet. See Also: "SET_PARAMETER Procedure" in Oracle Application Express API Reference
  • 98.
    Managing Instance Settings 2-40Oracle Application Express Administration Guide SELECT APEX_INSTANCE_ADMIN.GET_PARAMETER(PARAMETER_NAME) FROM DUAL; For a description of wallet parameters, see Table 2–3 on page 2-39. Configuring Report Printing Oracle Application Express provides several features so that end users can download and print reports in various formats, including PDF. To set up this functionality, different users must configure the following printing settings: 1. Site Level: Instance administrators must specify the level of functionality (Standard or Advanced) for an entire Oracle Application Express instance, as described in this section. 2. Application Level: Workspace administrators and developers can define Report Queries and Report Layouts. Report Queries and Report Layouts are stored under Shared Components and are not tied to a specific page. 3. Page/Region Level: Developers can edit the Report regions on specific pages to enable printing. This, in turn, enables end users to print regions as reports in various formats. See "Configuring Classic Report Region Print Attributes" in Oracle Application Express Application Builder User's Guide. Topics: ■ Configuring Report Printing in a Full Development Environment ■ Configuring Report Printing Settings in a Runtime Environment ■ Determining Report Printing Settings in a Runtime Environment Configuring Report Printing in a Full Development Environment To configure the printing of reports in a full development environment: 1. Log in to Oracle Application Express Administration Services. See "Logging In To Oracle Application Express Administration Services" on page 2-6. 2. Click Manage Instance. 3. Under Instance Settings, click Instance Settings. 4. Scroll down to Report Printing. 5. For Printer Server: – APEX Listener - Select this option if you are using the APEX Listener 2.0 or newer. This option enables you to use the basic printing functionality, which includes creating report queries and printing report regions using the default templates provided in Application Express and using your own customized XSL-FO templates. See Also: "GET_PARAMETER Function" in Oracle Application Express Application Builder User's Guide Tip: If you are running Oracle Application Express with Oracle Database 11g Release 1 (11.1) or later, you must enable network services to use report printing. See "Enable Network Services in Oracle Database 12c" for your configuration scenario in Oracle Application Express Installation Guide.
  • 99.
    Managing Instance Settings OracleApplication Express Hosted Instance Administration 2-41 – External (Apache FOP) - Select this option if you are using Apache FOP on an external J2EE server. This option enables you to use the basic printing functionality, which includes creating report queries and printing report regions using the default templates provided in Application Express and using your own customized XSL-FO templates. – Oracle BI Publisher - This option requires a valid license of Oracle BI Publisher (also known as Oracle XML Publisher). This option enables you to take report query results and convert them from XML to RTF format using Oracle BI Publisher. Select this option to upload your own customized RTF or XSL-FO templates for printing reports within Application Express. 6. The following options apply to External (Apache FOP) and Oracle BI Publisher: ■ For Print Server Protocol, select the protocol that the print server uses. ■ For Print Server Host Address, specify the host address of the print server engine. ■ For Print Server Port, define the port of the print server engine. By default, this is set to 8888 when the report server is installed. 7. Click Apply Changes. Configuring Report Printing Settings in a Runtime Environment To configure report printing settings in a runtime environment: 1. Start SQL*Plus and connect to the database where Oracle Application Express is installed as SYS. For example: ■ On Windows: SYSTEM_DRIVE: sqlplus /nolog SQL> CONNECT SYS as SYSDBA Enter password: SYS_password ■ On UNIX and Linux: $ sqlplus /nolog SQL> CONNECT SYS as SYSDBA Enter password: SYS_password 2. Run the following statement: ALTER SESSION SET CURRENT_SCHEMA = APEX_040200 3. Run the following statement: Note: The APEX Listener option does not require an external print server, instead the report data and stylesheet are downloaded to the listener, rendered into PDF format by the listener and then sent to the client. The PDF documents in this setup are not returned back into the database, thus the print APIs are not supported when using the APEX Listener-based configuration. See Also: PDF Printing in Application Express to learn more about installing and configuring Oracle BI Publisher. Go to: http://www.oracle.com/technetwork/developer-tools/apex/ap plication-express/configure-printing-093060.html
  • 100.
    Managing Instance Settings 2-42Oracle Application Express Administration Guide BEGIN APEX_INSTANCE_ADMIN.SET_PARAMETER(PARAMETER_NAME, PARAMETER_VALUE); END; For a description of available parameters, see Table 2–4. Determining Report Printing Settings in a Runtime Environment To determine report printing settings in a runtime environment: 1. Start SQL*Plus and connect to the database where Oracle Application Express is installed as SYS. For example: ■ On Windows: SYSTEM_DRIVE: sqlplus /nolog SQL> CONNECT SYS as SYSDBA Enter password: SYS_password ■ On UNIX and Linux: $ sqlplus /nolog SQL> CONNECT SYS as SYSDBA Enter password: SYS_password 2. Run the following statement: ALTER SESSION SET CURRENT_SCHEMA = APEX_040200 3. Run the following statement: SELECT APEX_INSTANCE_ADMIN.GET_PARAMETER(PARAMETER_NAME) FROM DUAL; Table 2–4 Report Printing Parameters in Runtime Environment Parameter Name Description PRINT_BIB_LICENSED Specify either standard support or advanced support. Advanced support requires an Oracle BI Publisher license. Valid values include: ■ STANDARD ■ ADVANCED ■ APEX_LISTENER PRINT_SVR_HOST Specifies the host address of the print server converting engine, for example, localhost. Enter the appropriate host address if the print server is installed at another location. PRINT_SVR_PORT Defines the port of the print server engine, for example 8888. Value must be a positive integer. PRINT_SVR_PROTOCOL Valid values include: ■ http ■ https PRINT_SVR_SCRIPT Defines the script that is the print server engine, for example: /xmlpserver/convert See Also: "SET_PARAMETER Procedure" in Oracle Application Express API Reference
  • 101.
    Managing Instance Settings OracleApplication Express Hosted Instance Administration 2-43 For a description of available parameters, see Table 2–4 on page 2-42. Configuring Online Help Developers can access the Oracle Application Express online documentation library by clicking the Help link in the upper right corner of the Oracle Application Express development environment. Instance administrators can redirect this Help link by configuring the Help URL attribute. To configure the location of Oracle Application Express Help link: 1. Log in to Oracle Application Express Administration Services. See "Logging In To Oracle Application Express Administration Services" on page 2-6. 2. Click Manage Instance. 3. Under Instance Settings, click Instance Settings. 4. Scroll down to Help. 5. In Help URL, edit the URL. This URL displays when users click the Help link from within Oracle Application Express. 6. Click Apply Changes. Configuring Workspace Size Options for Requests Instance administrators can configure the workspace sizes available when users request: ■ a new workspace and schema ■ additional space for an existing workspace To configure workspace size options: 1. Log in to Oracle Application Express Administration Services. See "Logging In To Oracle Application Express Administration Services" on page 2-6. 2. Click Manage Instance. 3. Under Instance Settings, click Instance Settings. 4. Scroll down to New Workspace Request Size and Workspace Change Request Size. Specify the following: ■ Size in Megabytes - Edit the default numbers to change the size options. ■ Display - Select Yes for all the size options you want to appear in the select list for workspace size. ■ Default - Select the default value to appear in the storage field for workspace and change requests. 5. Click Apply Changes. See Also: "GET_PARAMETER Function" in Oracle Application Express API Reference See Also: "About the Oracle Application Express Documentation" in Oracle Application Express Application Builder User's Guide See Also: "Enabling Auto Extend Tablespaces" on page 2-33
  • 102.
    Managing Instance Settings 2-44Oracle Application Express Administration Guide Managing Application ID Range Instance administrators can control the range for IDs of new database or Websheet applications. If you separate ID ranges in large multi-instance installations, you can easily move workspaces between the instances and keep their application IDs. To enable ID ranges, you must specify at least an ID Minimum. To configure the application ID ranges: 1. Log in to Oracle Application Express Administration Services. See "Logging In To Oracle Application Express Administration Services" on page 2-6. 2. Click Manage Instance. 3. Under Instance Settings, click Instance Settings. 4. Scroll down to Application ID Range and specify the following: ■ ID Minimum - Enter the lower range for database and Websheet application IDs. ■ ID Maximum - Enter the maximum range for database and Websheet application IDs. 5. Click Apply Changes. Including an Agreement or Survey When Running the Signup Wizard Instance administrators have the option to create and include an agreement or survey when users run the New Signup Wizard. Topics: ■ Defining an Agreement ■ Defining a Signup Survey Defining an Agreement When users run the New Service Signup Wizard, Instance administrators can require they accept an agreement before the wizards submits the service request. To include and define an agreement: 1. Log in to Oracle Application Express Administration Services. See "Logging In To Oracle Application Express Administration Services" on page 2-6. 2. Click Manage Instance. 3. Under Instance Settings, click Manage New Service Signup Wizard. 4. For Enable Agreement: ■ Yes - Includes the agreement you define when users run the New Signup Service Wizard. ■ No - Excludes the agreement you define when users run the New Signup Service Wizard. 5. In Agreement Text, enter the text of the agreement 6. Click Apply Changes. Defining a Signup Survey Instance administrators can also include survey questions users must complete when running the New Service Signup Wizard.
  • 103.
    Managing Instance Settings OracleApplication Express Hosted Instance Administration 2-45 To include and define a survey: 1. Log in to Oracle Application Express Administration Services. See "Logging In To Oracle Application Express Administration Services" on page 2-6. 2. Click Manage Instance. 3. Under Instance Settings, click Manage New Service Signup Wizard. 4. Scroll down to Survey Questions. 5. For Enable Survey: ■ Yes - Includes the survey questions you define when users run the New Signup Service Wizard. ■ No - Excludes the survey questions you define when users run the New Signup Service Wizard. 6. Under Question, enter questions and answers. Enter all answers for each question in one field, delimited by a new line. Use the Pre Text and Post Text fields to include introductory and closing text. 7. Click Apply Changes. Purging Inactive Workspaces Inactive workspaces consume valuable storage space and degrade system performance. By enabling Workspace Purge Settings, you can configure Oracle Application Express to purge inactive workspaces. If a workspace is designated as inactive, a notification email is sent to each workspace administrator indicating that the workspace is purged in a specific number of days. The workspace administrator can prevent the workspace from being purged by following an embedded link and following the online instructions. Configuring Workspace Purge Settings To configure workspace purge settings: 1. Log in to Oracle Application Express Administration Services. See "Logging In To Oracle Application Express Administration Services" on page 2-6. 2. Click Manage Instance. 3. Under Instance Settings, click Workspace Purge Settings. 4. On the Workspace Purge Settings, configure the following: a. Enabled - Select Yes to enable the workspace purge process. Select No to disable the workspace purge process. See Also: "Viewing the Signup Survey Report" on page 2-89 See Also: To view reports concerning purging inactive workspaces, see "Monitoring Activity Across a Development Instance" on page 2-87 See Also: "Configuring Email" on page 2-35 and "Sending Email from an Application" in Oracle Application Express Application Builder User's Guide
  • 104.
    Managing Instance Settings 2-46Oracle Application Express Administration Guide b. Language - Select the language of the text of emails sent to workspace administrators of inactive workspaces. Note that only one language can be selected for each instance. c. Purge Administration Email Address - Enter the email address (or From address) from which emails are sent to workspace administrators. d. Send Summary Email To - Enter a list of email addresses separated by commas. Recipients will receive a daily email summary of the purge process. e. Days Until Purge - Enter the number of days before a workspace is physically purged. For example, entering 10 means a workspace will be purged 10 days after it is added to the inactive list. f. Reminder Days in Advance - Enter the number of days before the purge date to send a reminder email to workspace administrators. Reminder email criteria includes: – The workspace is on the inactive list – There has been no activity in the workspace – The workspace administrator has not chosen to follow the link in the email to prevent the workspace from being purged g. Days Inactive - Enter the number of days of inactivity before a workspace is classified as inactive. Inactivity includes not logging into the workspace and the no runtime activity of any application in the workspace. h. Grace Period (Days) - Enter the number of days for the grace period. The grace period starts after workspace administrators click the link in the email to not have their workspace purged. If there is no activity during the grace period, the workspace is added back to the list of inactive workspaces. i. Maximum Execution Time (Hours) - Enter the number limiting the number of hours that the purge process may execute per run of the workspace purge job. j. Maximum Number of Workspaces - Enter the maximum number of workspaces to be purged per run of the workspace purge job. k. Maximum Number of Emails - Enter the maximum number of reminder emails and workspace inactive emails to be send per run of the workspace purge job. 5. Click Apply Changes. Viewing Information About Installed Packaged Database Applications Instance administrators can view the popularity of any given packaged database and Websheet application on a given instance. For example, they can see how many workspaces have installed Sample Calendar. Topics: ■ Viewing Packaged Database Applications ■ Viewing Packaged Websheet Applications Viewing Packaged Database Applications To view a summary of packaged database applications: 1. Log in to Oracle Application Express Administration Services. See "Logging In To Oracle Application Express Administration Services" on page 2-6.
  • 105.
    Managing Instance Settings OracleApplication Express Hosted Instance Administration 2-47 2. Click Manage Instance. 3. Under Manage Shared Components, click Packaged Database Applications. The Packaged Database Applications page appears. Viewing Packaged Websheet Applications To view a summary of packaged Websheet applications: 1. Log in to Oracle Application Express Administration Services. See "Logging In To Oracle Application Express Administration Services" on page 2-6. 2. Click Manage Instance. 3. Under Manage Shared Components, click Packaged Websheet Applications. The Packaged Websheet Applications page appears. The report displays total elapsed time to install each packaged applications. Note that the packaged application log is kept only up to 60 days. Any log older than 60 days is deleted. Monitoring the Progress Packaged Application Installations Instance administrators have the ability to view the progress of a packaged application installation. To monitor packaged application installation progress: 1. Log in to Oracle Application Express Administration Services. See "Logging In To Oracle Application Express Administration Services" on page 2-6. 2. Click Manage Instance. 3. Under Manage Shared Components, click Monitor Packaged Application Installations. The Packaged Applications Installations page appears. You can customize the page using the Search bar at the top. See "Customizing Interactive Reports" in Oracle Application Express Application Builder User's Guide. The report displays total elapsed time to install each packaged application. Click the number in the Events column to view the log in detail. Tip: The Packaged Database Applications page displays as an interactive report. You can customize the appearance of the page using the Search bar at the top of the page. See "Customizing Interactive Reports" in Oracle Application Express Application Builder User's Guide. Tip: The Packaged Websheet Applications page displays as an interactive report. You can customize the appearance of the page using the Search bar at the top of the page. See "Customizing Interactive Reports" in Oracle Application Express Application Builder User's Guide. Note: The Packaged Application log is kept for up to 60 days. Any log older than 60 days is deleted.
  • 106.
    Managing Instance Settings 2-48Oracle Application Express Administration Guide Managing Public Themes Instance administrators manage the theme repository for an entire Oracle Application Express instance. Only an Instance administrators can add or delete a theme from the repository. When you create a public theme, you add it to the theme repository. Public themes are available when you create an application or when you create a theme for an existing application. Topics: ■ Adding a Public Theme to the Theme Repository ■ Deleting a Public Theme ■ Modifying a Public Theme ■ About Exporting a Public Theme Adding a Public Theme to the Theme Repository To add a theme to the Theme repository: 1. Log in to Oracle Application Express Administration Services. See "Logging In To Oracle Application Express Administration Services" on page 2-6. 2. Click Manage Instance. 3. Under Manage Shared Components, click Public Themes. The Public Themes page appears. 4. Select Create. 5. For Workspace, select a workspace and click Next. 6. For Application, select an application and click Next. 7. For Theme, select a theme and click Next. 8. For Name, specify the following: a. Theme Number - Enter a number that uniquely identifies a theme within a workspace. b. Theme Name - Enter a name for the workspace theme. c. Description - Enter a description. d. Click Next. 9. Click Create Public Theme. Deleting a Public Theme To delete a public theme: 1. Log in to Oracle Application Express Administration Services. See "Logging In To Oracle Application Express Administration Services" on page 2-6. 2. Click Manage Instance. 3. Under Manage Shared Components, click Public Themes. See Also: "Managing Workspace Themes" in Oracle Application Express Application Builder User's Guide
  • 107.
    Managing Instance Settings OracleApplication Express Hosted Instance Administration 2-49 The Public Themes page appears. 4. Select the theme to be deleted. 5. Click Delete. Modifying a Public Theme You cannot edit a public theme directly. To modify a public theme, you must create a new application using the theme, modify it, and then manually add it to the theme repository. To modify a public theme: 1. Create an application using the theme you want to modify. See "Creating a Database Application" in Oracle Application Express Application Builder User's Guide. 2. Modify the theme. See "Editing a Theme" in Oracle Application Express Application Builder User's Guide. 3. Delete the existing public theme. See "Deleting a Template Application" on page 50. 4. Add the modified theme to the theme repository. See "Adding an Application to the Template Applications Repository" on page 2-50. About Exporting a Public Theme You export a theme in the same way you export any related application files. Exporting a public theme involves the following steps: 1. Create an application using the theme you want to modify. See "Creating a Database Application" in Oracle Application Express Application Builder User's Guide. 2. Export the application. See "Exporting an Application" in Oracle Application Express Application Builder User's Guide. 3. Import the exported file into the target Oracle Application Express instance. See "Importing an Application, Page or Component Export" in Oracle Application Express Application Builder User's Guide. 4. Install the exported file from the Export Repository. See "Installing Export Files" in Oracle Application Express Application Builder User's Guide. Managing Template Applications Instance administrators manage the template application repository for an entire Oracle Application Express. Developers can use templates applications when they run the Create Application Wizard to quickly create robust applications. Only an instance administrator can add or remove a template application from the repository. To create a template application, you must first export the application and then add it to the template application repository. Topics: ■ Adding an Application to the Template Applications Repository ■ Deleting a Template Application ■ Editing a Template Application See Also: "Creating a Database Application from a Template" in Oracle Application Express Application Builder User's Guide
  • 108.
    Managing Instance Settings 2-50Oracle Application Express Administration Guide Adding an Application to the Template Applications Repository To add an application to the template application repository: 1. Export the application. See "Exporting an Application" in Oracle Application Express Application Builder User's Guide. 2. Log in to Oracle Application Express Administration Services. See "Logging In To Oracle Application Express Administration Services" on page 2-6. 3. Click Manage Instance. 4. Under Manage Shared Components, click Template Applications. The Template Applications page appears. 5. Select Load Template Application. 6. For Specify File: a. Import File - Click Choose File and select an application export file. b. File Type - Select the type of application export file to import, Database Application Export or Websheet Application Export. c. File Character Set - Select the character set encoding of the application export file to be imported. d. Click Next. 7. For Application Details: a. Template Application - Specify an integer value that identifies the application. The application ID must be unique within your Oracle Application Express instance. Application IDs in the range of 3000 to 9000 are reserved for internal use by Application Express. b. Name - Enter a name to identify the application to developers. c. Alias - Enter an alternate alphanumeric application identifier. You can use this identifier in place of the application ID. d. Click Next. A confirmation page appears. 8. Click Create. Deleting a Template Application To delete a public application template: 1. Log in to Oracle Application Express Administration Services. See "Logging In To Oracle Application Express Administration Services" on page 2-6. 2. Click Manage Instance. 3. Under Manage Shared Components, click Template Applications. The Template Applications page appears. 4. Select the template application to be deleted. The Edit Properties page appears. 5. Click Delete. The Confirm Delete page appears.
  • 109.
    Managing Instance Settings OracleApplication Express Hosted Instance Administration 2-51 6. Click Ok. Editing a Template Application You cannot directly edit the pages of a template application. To modify the pages of a template application, you must create a new application using the template application, modify it, export it, and then manually add it to the template application repository. You can edit the properties of a template application. Topics: ■ Modifying the Pages of a Template Application ■ Editing Template Application Properties Modifying the Pages of a Template Application To modify the pages of a template application: 1. Create an application using the application template. See "Creating a Database Application from a Template" in Oracle Application Express Application Builder User's Guide. 2. Export the application. See "Exporting an Application and Related Files" in Oracle Application Express Application Builder User's Guide. 3. Upload the exported file to the Template Application repository. See "Adding an Application to the Template Applications Repository" on page 2-50. Editing Template Application Properties To modify the properties of a template application: 1. Log in to Oracle Application Express Administration Services. See "Logging In To Oracle Application Express Administration Services" on page 2-6. 2. Click Manage Instance. 3. Under Manage Shared Components, click Template Applications. The Template Applications page appears. 4. Select the application template to be modified. The Edit Properties page appears. 5. Modify the template application properties, such as the Template Application Name. To learn more, see item Help. 6. Click Apply Changes. Managing Session State A session is a logical construct used to establish persistence (or stateful behavior) across page views. Each session is assigned a unique ID, which the Application Express engine uses to store and retrieve an application's working set of data (or session state) before and after each page view. An automatic process clears sessions older than 24 hours every eight hours. Instance administrators can also purge them manually. An Instance administrator can view session state statistics and purge the session state on the Session State page. Topics: ■ Viewing Session Details Before Purging
  • 110.
    Managing Instance Settings 2-52Oracle Application Express Administration Guide ■ Purging Sessions by Age ■ Viewing Session Statistics Before Purging Viewing Session Details Before Purging Before purging sessions, Instance administrators can use the Recent Sessions page to first view a listing of recent sessions and then drill down on session details. To view a listing of recent sessions: 1. Log in to Oracle Application Express Administration Services. See "Logging In To Oracle Application Express Administration Services" on page 2-6. 2. Click Manage Instance. 3. Under Manage Meta Data, click Session State. The Session State page appears. 4. Click Recent Sessions, with drill down to session details. 5. On the Recent Sessions page, you can: ■ Click a session number to view additional details. ■ Click Purge Sessions to delete the displayed sessions. Purging Sessions by Age Using the Purge Session page, Instance administrators can purge sessions by age. To purge sessions by age: 1. Log in to Oracle Application Express Administration Services. See "Logging In To Oracle Application Express Administration Services" on page 2-6. 2. Click Manage Instance. 3. Under Manage Meta Data, click Session State. The Session State page appears. 4. Click Purge Sessions, by age. 5. On the Purge Sessions page, specify: ■ The maximum number of sessions to be purged ■ The age of sessions to be purged 6. To view a report of session statistics, click Count Sessions. 7. To purge the selected sessions, click Purge Sessions. Viewing Session Statistics Before Purging On the Session State Statistics page, Instance administrators can view statistics about current sessions before purging. To view session state statistics: 1. Log in to Oracle Application Express Administration Services. See "Logging In To Oracle Application Express Administration Services" on page 2-6. 2. Click Manage Instance. See Also: "Managing Session State" in Oracle Application Express Application Builder User's Guide
  • 111.
    Managing Instance Settings OracleApplication Express Hosted Instance Administration 2-53 3. Under Manage Meta Data, click Session State. The Session State page appears. 4. Select Session State Statistics. 5. Click Purge Sessions to delete the current sessions. Managing the Mail Queue Instance administrators can manage email sent from applications by monitoring email messages in the mail queue and mail log. To manage messages in the mail queue: 1. Log in to Oracle Application Express Administration Services. See "Logging In To Oracle Application Express Administration Services" on page 2-6. 2. Click Manage Instance. 3. Under Manage Meta Data, click Mail Queue. The Mail Queue page appears. If there is an issue sending an email (for example, because of a bad email address or unavailable mail server) then the mail message remains in the queue along with the last encountered error. For every subsequent attempt to send the email, the gap in time increases between send attempts (for example, 1 minute, 2 minutes, 4 minutes, 8 minutes, 16 minutes, and so on). 4. Use the following buttons to manage messages in the mail queue: ■ Send All Mail - Pushes the messages in the queue. The calculated delay for messages which encounter an error is observed. ■ Force Send All Mail - The calculated delay for messages which encounter an error is ignored and an attempt is made to push all messages in the queue. ■ Delete - Deletes selected messages. ■ Reset - Resets the page pagination. Viewing Installed Translations Instance administrators can view a page showing which translated languages have been installed within the current development instance. To view the list of installed translations: 1. Log in to Oracle Application Express Administration Services. See "Logging In To Oracle Application Express Administration Services" on page 2-6. 2. Click Manage Instance. 3. Under Manage Meta Data, click Installed Translations. The Installed Translations page appears. This page displays a list of languages and indicates if the translations have been loaded. Tip: To view the Mail Log, see "Monitoring Activity Across a Development Instance" on page 2-87 See Also: "Configuring Email" on page 2-35 and "Sending Email from an Application" in Oracle Application Express Application Builder User's Guide
  • 112.
    Managing Instance Settings 2-54Oracle Application Express Administration Guide Managing Interactive Report Subscriptions Instance administrators can manage the interactive report subscriptions within the current development instance. To remove an interactive report subscription: 1. Log in to Oracle Application Express Administration Services. See "Logging In To Oracle Application Express Administration Services" on page 2-6. 2. Click Manage Instance. 3. Under Manage Meta Data, click Interactive Report Subscriptions. The Interactive Report Subscriptions page appears. 4. Find the subscription you want to remove and select the check box to the left. 5. Click Delete Checked. Managing Logs and Files Instance administrators can delete log entries. Topics: ■ Deleting SQL Workshop Logs ■ Deleting Page View Activity Log Entries ■ Deleting Developer Activity Log Entries ■ Deleting Click Counting Log Entries ■ Deleting the Login Access Log ■ Managing Log Intervals Deleting SQL Workshop Logs The SQL Workshop logs maintain a history of recent commands and scripts run in the SQL Commands. To delete log files entries: 1. Log in to Oracle Application Express Administration Services. See "Logging In To Oracle Application Express Administration Services" on page 2-6. 2. Click Manage Instance. 3. Under Manage Logs and Files, click SQL Workshop Logs. 4. Click one of the following: See Also: "Managing Application Globalization" in Oracle Application Express Application Builder User's Guide Tip: The Interactive Report Subscriptions page displays as an interactive report. You can customize the appearance of the page using the Search bar at the top of the page. See "Customizing Interactive Reports" in Oracle Application Express Application Builder User's Guide. See Also: "REMOVE_SUBSCRIPTION Procedure" in Oracle Application Express API Reference
  • 113.
    Managing Instance Settings OracleApplication Express Hosted Instance Administration 2-55 ■ Script File executions log entries ■ SQL Command Processor history entries 5. On the Clean up Logs page: ■ To delete entries by age, specify the age of the entries to be deleted and click Delete Entries. ■ To delete all entries, click Truncate Log. Deleting Page View Activity Log Entries Page view activity logs track user activity for an application. Developers enable logging within their application using the Logging attribute on the Edit Application Definition page. The Application Express engine uses two logs to track user activity. At any given time, one log is designated as current. For each rendered page view, the Application Express engine inserts one row into the log file. A log switch occurs at the interval listed on the Page View Activity Logs page. At that point, the Application Express engine removes all entries in the noncurrent log and designates it as current. To truncate the activity logs manually: 1. Log in to Oracle Application Express Administration Services. See "Logging In To Oracle Application Express Administration Services" on page 2-6. 2. Click Manage Instance. 3. Under Manage Logs and Files, click Page View Activity Logs, with option to truncate. The Page View Activity Logs page appears. 4. Click Truncate Logs. 5. Click either Truncate Log 1 or Truncate Log 2. Deleting Developer Activity Log Entries The Developer Activity Log tracks changes to applications within an individual workspace. Log entries older than one month are automatically deleted. To delete Developer Activity Log entries: 1. Log in to Oracle Application Express Administration Services. See "Logging In To Oracle Application Express Administration Services" on page 2-6. 2. Click Manage Instance. 3. Under Manage Logs and Files, click Developer Activity Logs, with option to delete entries. The Developer Activity Log page appears. 4. On the Developer Activity Log page, click Manage. See Also: "Accessing a Command from Command History"in Oracle Application Express SQL Workshop Guide See Also: "Editing the Application Definition" in Oracle Application Express Application Builder User's Guide See Also: "Viewing Workspace Dashboards" on page 1-38
  • 114.
    Managing Instance Settings 2-56Oracle Application Express Administration Guide 5. Specify the age of the entries to be deleted and click Delete Entries. Deleting Click Counting Log Entries The External Clicks Log counts clicks from an Oracle Application Express application to an external site. You can implement this functionality using the APEX_ UTIL.COUNT_CLICK procedure. To delete click counting log entries: 1. Log in to Oracle Application Express Administration Services. See "Logging In To Oracle Application Express Administration Services" on page 2-6. 2. Click Manage Instance. 3. Under Manage Logs and Files, click External Click Counting Log, with option to truncate. The External Click Counting Log page appears. 4. On the External Click Counting Log page, click Manage. 5. Specify the age of the entries to be deleted and click Delete Entries. Deleting the Login Access Log This table records authentication events by developers and administrators accessing the Oracle Application Express environment and by end users of Oracle Application Express applications that use the built-in login APIs available to developers. Log entries are aged out of the log tables and purged periodically. To truncate the Login Access log: 1. Log in to Oracle Application Express Administration Services. See "Logging In To Oracle Application Express Administration Services" on page 2-6. 2. Click Manage Instance. 3. Under Manage Logs and Files, click Login Access Log. The Login Access Log page appears. 4. Click Manage. 5. On the Manage Login Access Log page, click Delete Entries. Managing Log Intervals Use the Manage Log Interval page to set the minimum number of days to retrain log information for log files. To manage the log interval: 1. Log in to Oracle Application Express Administration Services. See "Logging In To Oracle Application Express Administration Services" on page 2-6. 2. Click Manage Instance. 3. Under Manage Logs and Files, click Manage Log Interval. The Manage Log Interval page appears. See Also: "About the Developer Activity Dashboard" on page 1-40 for information about the Developer Activity Log See Also: "COUNT_CLICK Procedure" in Oracle Application Express API Reference
  • 115.
    Managing Instance Settings OracleApplication Express Hosted Instance Administration 2-57 4. For each log type, enter the duration of the interval in days. The maximum value that can be specified is 180 days, with a default value of 14 days. Keeping log information for longer periods can degrade runtime performance. 5. Click Apply Changes. Managing a Runtime Environment An Oracle Application Express runtime environment enables you to run production applications, but it does not provide a web interface for administration. A runtime environment only includes the packages necessary to run your application, making it a more hardened environment. You administer the Oracle Application Express runtime environment using SQL*Plus and the APEX_INSTANCE_ADMIN API. To learn more, see "APEX_INSTANCE_ ADMIN" in Oracle Application Express API Reference. To install an exported application into a runtime installation, you must: 1. Export the workspace from the Application Express instance where the application was developed as described in "Exporting and Importing a Workspace" on page 2-81. 2. Use SQL*Plus to import your workspace in to the runtime environment: ■ Connect as APEX_040200, SYS, SYSTEM, or any schema to which the role APEX_ADMINISTRATOR_ROLE has been granted. ■ Run the workspace import file. If the workspace export file was created with a version of Oracle Application Express lower than 3.2, you must connect as APEX_040200. 3. Export and then import your application using SQL*Plus in to the runtime environment. See "Exporting an Application and Related Files" in Oracle Application Express Application Builder User's Guide. Managing Messages Instance administrators can communicate with all users in an Oracle Application Express instance by creating login and system messages. Typically, administrators use a login message with a system message to communicate with all system users, such as regarding privacy notices or access restrictions. See Also: SET_LOG_SWITCH_INTERVAL Procedure in Oracle Application Express API Reference Tip: Websheets are not supported in an Oracle Application Express runtime environment. Tip: The APEX_ADMINISTRATOR_ROLE must be granted directly to a user and not through another database role. See Also: "Creating a Workspace Manually in a Runtime Environment" on page 2-67, "Managing Workspace to Schema Assignments" on page 2-73, "Removing a Schema Mapping from a Workspace in a Runtime Environment" on page 2-76, and "Deleting Workspaces in a Runtime Development Environment" on page 2-70
  • 116.
    Managing Instance Settings 2-58Oracle Application Express Administration Guide Topics: ■ Defining a Login Message ■ Defining a System Message ■ Creating a Site-Specific Tasks List Defining a Login Message A login message displays on the Oracle Application Express login page. Instance administrators can create a login message using the Login Message section of the Messages page. To create a login message: 1. Log in to Oracle Application Express Administration Services. See "Logging In To Oracle Application Express Administration Services" on page 2-6. 2. Click Manage Instance. 3. Under Messages, click Define Login Message. 4. In Message, enter a message. The message can contain any text and can optionally include HTML formatting. 5. Click Apply Changes. To disable a login message: 1. Log in to Oracle Application Express Administration Services. See "Logging In To Oracle Application Express Administration Services" on page 2-6. 2. Click Manage Instance. 3. Under Messages, click Define Login Message. 4. For Login Message, select No Message. 5. Click Apply Changes. Defining a System Message System messages display on the Workspace home page, Application Builder home page, Application home page, SQL Workshop home page, and the Oracle Application Express Utilities page. Instance administrators can create a system message using the System Message section of the Messages page. Creating a System Message To create a system message: 1. Log in to Oracle Application Express Administration Services. See "Logging In To Oracle Application Express Administration Services" on page 2-6. 2. Click Manage Instance. 3. Under Messages, click Define System Message. 4. For System Message, select Custom Message. 5. In Message, enter a message. The message can contain any text and can optionally include HTML formatting. Tip: You can also access the Set System Message page by clicking Edit System Message icon on the Instance Administration home page.
  • 117.
    Managing Instance Settings OracleApplication Express Hosted Instance Administration 2-59 6. Click Apply Changes. Disabling a System Message To disable a system message: 1. Log in to Oracle Application Express Administration Services. See "Logging In To Oracle Application Express Administration Services" on page 2-6. 2. Click Manage Instance. 3. Under Messages, click Define System Message. 4. For System Message, select No Message. 5. Click Apply Changes. Creating a Site-Specific Tasks List The Site-Specific Tasks list is a list of links that appears on the Workspace home page or login page. If links are defined, a Site-Specific Tasks region appears. If no Site-Specific Tasks are defined, the region does not display. This feature enables Instance administrators to customize the Workspace home page for an entire development instance. Typical uses for the Site-Specific Tasks list include links to training, discussion forums, and user feedback applications. Topics: ■ Adding a New Task ■ Editing an Existing Task ■ Deleting a Task Adding a New Task To add a new task to a Site-Specific Tasks list: 1. Log in to Oracle Application Express Administration Services. See "Logging In To Oracle Application Express Administration Services" on page 2-6. 2. Click Manage Instance. 3. Under Messages, click Site-Specific Tasks. The Site-Specific Tasks page appears. 4. To create a new link, click Create. 5. On the Create/Edit Site-Specific Tasks page, you can specify the following: a. Display Sequence - Indicate the relative order of this task within the list. b. Display Location - Indicate the page on which the task should display (that is, the Workspace Login page or Workspace home page). c. Task Name - Enter a name for this task. d. Tasks Link - Enter the link target for this task using either a relative URL (for example, using f?p syntax) or an absolute URL (such as http://otn.oracle.com). e. Displayed - Select Yes to display the task link. 6. Click Create. Editing an Existing Task To edit an existing task: See Also: "Using f?p Syntax to Link Pages" in Oracle Application Express Application Builder User's Guide
  • 118.
    Managing Instance Settings 2-60Oracle Application Express Administration Guide 1. Log in to Oracle Application Express Administration Services. See "Logging In To Oracle Application Express Administration Services" on page 2-6. 2. Click Manage Instance. 3. Under Messages, click Site-Specific Tasks. The Site-Specific Tasks page appears. 4. Select the task name. 5. On the Create/Edit Site-Specific Tasks page, edit the appropriate attributes. 6. Click Apply Changes. Deleting a Task To delete an existing task: 1. Log in to Oracle Application Express Administration Services. See "Logging In To Oracle Application Express Administration Services" on page 2-6. 2. Click Manage Instance. 3. Under Messages, click Site-Specific Tasks. The Site-Specific Tasks page appears. 4. Select the task name. 5. Click Delete. About the Self Service Sign Up Wizard Instance administrators can specify if the Sign Up wizard displays a sign up agreement and survey questions and answers. Topics: ■ Managing a New Service Signup Wizard ■ Running a New Service Signup Wizard Managing a New Service Signup Wizard As an instance administrator, you can require users accept an agreement before the New Service Signup Wizard submits a request. You can also include a survey when users run the New Service Signup Wizard. To manage a New Service Signup Wizard: 1. Log in to Oracle Application Express Administration Services. See "Logging In To Oracle Application Express Administration Services" on page 2-6. 2. Click Manage Instance. 3. Under Self Service Sign Up, click Manage New Service Signup Wizard. The Sign Up Survey page appears. 4. Under Agreement, make these selections: ■ Enable Agreement - Select Yes to display agreement displayed during the New Service Signup Wizard. Otherwise, select No. ■ Agreement Text - Enter the agreement text. 5. Under Survey Questions, make these selections.
  • 119.
    Managing Schemas Oracle ApplicationExpress Hosted Instance Administration 2-61 ■ Enable Survey - Select Yes to display survey questions during the New Service Signup Wizard. Otherwise, select No. ■ Questions - Enter the question text. ■ Answers - Enter all answers for each question in the same field, delimited by a new line. Each question can have any number of answers. ■ Pre Text - Enter text that displays before the survey questions. ■ Post Text - Enter text that displays after the survey questions. 6. Click Apply Changes. Running a New Service Signup Wizard To run a newNew Service Signup Wizard: 1. Log in to Oracle Application Express Administration Services. See "Logging In To Oracle Application Express Administration Services" on page 2-6. 2. Click Manage Instance. 3. Under Self Service Sign Up, click Run New Service Signup Wizard. The first page of the Self Service Sign Up Wizard appears. Managing Schemas This section describes how to manage the schemas within an Oracle Application Express instance. Topics: ■ Determining the Oracle Application Express Engine Schema ■ Understanding Oracle Default Schema Restrictions Determining the Oracle Application Express Engine Schema A schema is a logical container for the database objects. Instance administrators may need to perform certain actions within the Application Express engine schema. For example, in order for an Instance administrator to have the ability to assign Oracle default schemas, the database administrator (DBA) must explicitly grant the privilege by running the APEX_SITE_ADMIN.UNRESTRICT_SCHEMA procedure within the Application Express engine. To determine the current Application Express engine schema for your Oracle Application Express instance: 1. Use SQL*Plus to connect to the database. 2. Run the following query in a schema with DBA privileges (for example, SYSTEM). SELECT DISTINCT TABLE_OWNER FROM all_synonyms WHERE SYNONYM_NAME = 'WWV_FLOW' and OWNER = 'PUBLIC' See Also: "Viewing the Parsing Schemas Report" on page 2-84 and "Managing Workspace to Schema Assignments" on page 2-73 See Also: "Understanding Oracle Default Schema Restrictions" on page 2-62 for information about the APEX_SITE_ ADMIN.UNRESTRICT_SCHEMA procedure
  • 120.
    Managing Schemas 2-62 OracleApplication Express Administration Guide Understanding Oracle Default Schema Restrictions When Oracle Application Express installs, the Instance administrator does not have the ability to assign Oracle default schemas to workspaces. Default schemas such as SYS, SYSTEM, and RMAN are reserved by Oracle for various product features and for internal use. Access to a default schema can be a very powerful privilege. For example, a workspace with access to the default schema SYSTEM can run applications that parse as the SYSTEM user. In order for an Instance administrator to have the ability to assign most Oracle default schemas to workspaces, the database administrator (DBA) must explicitly grant the privilege using SQL*Plus to run a procedure within the APEX_ SITE_ADMIN_PRIVS package. Note, however, that beginning with Oracle Application Express release 3.1, the SYS and SYSTEM schemas may no longer be used by workspaces as parsing schemas. Topics: ■ Granting the Privilege to Assign Oracle Default Schemas ■ Revoking the Privilege to Assign Oracle Default Schemas ■ Working with Restricted Schemas ■ Determining the Privilege Status Granting the Privilege to Assign Oracle Default Schemas The DBA can grant an Instance administrator the ability to assign Oracle schemas to workspaces by using SQL*Plus to run the APEX_SITE_ADMIN_PRIVS.UNRESTRICT_ SCHEMA procedure from within the Application Express engine schema. For example: EXEC APEX_040200.APEX_SITE_ADMIN_PRIVS.UNRESTRICT_SCHEMA(p_schema => 'RMAN'); COMMIT; This example would enable the Instance administrator to assign the RMAN schema to any workspace. Revoking the Privilege to Assign Oracle Default Schemas The DBA can revoke this privilege using SQL*Plus to run the APEX_SITE_ADMIN_ PRIVS.RESTRICT_SCHEMA procedure from within the Application Express engine schema. For example: EXEC APEX_040200.APEX_SITE_ADMIN_PRIVS.RESTRICT_SCHEMA(p_schema => 'RMAN'); Note: All schema and workspace names used as arguments to procedures in the APEX_SITE_ADMIN_PRIVS package are used exactly as they are provided by the caller. For example, if you pass an argument value such as p_schema =>'system', the lower-case schema name 'system' is recorded and referenced. This example could return unexpected results if you really meant to reference the common schema name SYSTEM, which would be referenced using upper case. See Also: "Determining the Oracle Application Express Engine Schema" on page 2-61
  • 121.
    Managing Schemas Oracle ApplicationExpress Hosted Instance Administration 2-63 COMMIT; This example would prevent the Instance administrator from assigning the RMAN schema to any workspace. It does not, however, prevent workspaces that have already had the RMAN schema assigned to them from using the RMAN schema. Working with Restricted Schemas If a schema has been designated as restricted using the RESTRICT_SCHEMA procedure, the DBA can designate specific workspaces as exceptions by running the APEX_SITE_ ADMIN_PRIVS.CREATE_EXCEPTION procedure. For example: EXEC APEX_040200.APEX_SITE_ADMIN_PRIVS.CREATE_EXCEPTION(p_schema => 'RMAN', p_ workspace=> 'DBA_WORKSPACE'); EXEC APEX_040200.APEX_SITE_ADMIN_PRIVS.CREATE_EXCEPTION(p_schema => 'RMAN', p_ workspace => 'AUDITOR_WORKSPACE'); COMMIT; This example would prevent the Instance administrator from assigning the RMAN schema to the workspace named AUDITOR_WORKSPACE. However this restriction only applies to workspace provisioning requests processed after the REMOVE_ EXCEPTION procedure has been run. If the AUDITOR_WORKSPACE has the RMAN schema assigned to it, this method would not prevent that workspace from continuing to use the schema. Removing Workspace Exceptions for a Schema The DBA can remove all workspace exceptions for a schema by using SQL*Plus to run the APEX_SITE_ADMIN_ PRIVS.REMOVE_SCHEMA_EXCEPTIONS procedure from within the Application Express engine schema. For example: EXEC APEX_040200.APEX_SITE_ADMIN_PRIVS.REMOVE_SCHEMA_EXCEPTIONS(p_schema => 'RMAN'); COMMIT; This example would prevent the Instance administrator from assigning the RMAN schema to any workspaces if the RMAN schema were already restricted, but had one or more exceptions previously created for it. Removing Schema Exceptions for a Workspace The DBA can remove all schema exceptions for a workspace by using SQL*Plus to run the APEX_SITE_ADMIN_PRIVS.REMOVE_ WORKSPACE_EXCEPTIONS procedure from within the Application Express engine schema. For example: EXEC APEX_040200.APEX_SITE_ADMIN_PRIVS.REMOVE_WORKSPACE_EXCEPTIONS(p_workspace => 'AUDITOR_WORKSPACE'); COMMIT; This example would prevent the Instance administrator from assigning any restricted schemas to the workspace named AUDITOR_WORKSPACE if that workspace had exceptions previously created for it with respect to any restricted schemas. Determining the Privilege Status The DBA can determine the current status of the privilege by using SQL*Plus to run the APEX_SITE_ADMIN_PRIVS.REPORT procedure. For example: SET SERVEROUTPUT ON See Also: "Determining the Oracle Application Express Engine Schema" on page 2-61
  • 122.
    Creating Workspaces 2-64 OracleApplication Express Administration Guide EXEC APEX_040200.APEX_SITE_ADMIN_PRIVS.REPORT; This example would display the text of a query that dumps the tables that defines the schema and workspace restrictions. SELECT a.schema "SCHEMA",b.workspace_name "WORKSPACE" FROM WWV_FLOW_RESTRICTED_ SCHEMAS a, WWV_FLOW_RSCHEMA_EXCEPTIONS b WHERE b.schema_id (+)= a.id; When reviewing the output of this query, remember the following: ■ A schema name in the SCHEMA column indicates that the schema is restricted. ■ Schemas that are not listed are not restricted and may be assigned to any workspace. ■ A workspace name next to a schema name means that an exception exists for the schema for the named workspace. You can run this query in SQL*Plus as shown above, or you can change it and format the output. Creating Workspaces When users log in to Oracle Application Express, they log in to a shared work area called a workspace. A workspace is a virtual private database allowing multiple users to work within the same Oracle Application Express installation while keeping their objects, data and applications private. Each workspace has a unique numeric ID and name. To make changes to their workspace, Workspace administrators submit change requests to an Instance administrator. Only an Instance administrator can approve change requests or provision new workspaces. Topics: ■ About Workspace Provisioning ■ Specifying a Provisioning Mode ■ Creating a Workspace Manually ■ Creating Multiple Workspaces About Workspace Provisioning When an Instance administrator creates a new workspace with a new schema, a new tablespace and data file are created for that schema. If Oracle-managed files is enabled, it manages the data file for the new tablespace. Using Oracle-managed files simplifies the administration of the Oracle database and eliminates the need for the database administrator (DBA) to directly manage the operating system files that comprise the database. Using Oracle-managed files, the DBA specifies operations in terms of database objects rather than file names. The data file for the new tablespaces are named according to the Oracle-managed files conventions. The placement of these files is determined by the database initialization parameter DB_CREATE_FILE_DEST. If the Oracle-Managed Files is not enabled, the data file is created in the same directory as the first data file of the tablespace in which Oracle Application Express is installed. See Also: "Managing Workspace and Change Requests" on page 2-7 and "Managing Existing Workspaces" on page 2-69
  • 123.
    Creating Workspaces Oracle ApplicationExpress Hosted Instance Administration 2-65 Specifying a Provisioning Mode The Instance administrator determines how the process of provisioning (or creating) a workspace works for a specific Oracle Application Express instance. In Manual provision mode, an Instance administrator creates new workspaces and notifies the Workspace administrator of the login information. In Request or Email Verification provision modes, users request workspaces directly in a self-service fashion. In this scenario, users use a link on the login page to access a request form. After the workspace request has been granted, users are automatically emailed the appropriate login information. To specify a provisioning mode: 1. Log in to Oracle Application Express Administration Services. See "Logging In To Oracle Application Express Administration Services" on page 2-6. 2. Click Manage Instance. 3. Under Instance Settings, click Instance Settings. 4. Under Self Service, select a provisioning status: ■ Manual - An Instance administrator manually creates new workspaces and notifies the Workspace administrator of the login information. ■ Request - Users request workspaces directly in a self-service fashion. Selecting this option displays a link on the Login page enabling users to request a workspace. When a user requests a workspace, each request is submitted to a queue for approval. When the request is approved, the user is sent an email containing login credentials (the workspace name, Username, and password). ■ Email Verification - Works similar to Request except each user receives an initial email containing a verification link. Clicking this link validates the user’s email address and then the request is processed. Then another email is sent to the user containing login credentials (that is, the workspace name, Username, and password). If you select Email Verification, you can disable workspace provisioning and send users a message: a. Locate the Email Provisioning section. b. From Email Provisioning, select Disabled. c. In the Message field, enter message that explains why email provisioning is disabled. 5. If you select Request or Email Verification: ■ Development Service URL - Enter a URL for the service (optional). This value is used in the email when the request is approved. If this setting is not present, the URL is derived from your environment. ■ Require Verification Code - Determines if a verification code displays and is required during the request process. Select Yes or No. 6. Click Apply Changes. See Also: "Using Oracle Managed Files" in Oracle Database Administrator's Guide
  • 124.
    Creating Workspaces 2-66 OracleApplication Express Administration Guide Creating a Workspace Manually Instance administrators can provision a workspace manually in either a full development environment or a runtime environment. Topics: ■ Creating Workspace Manually in a Full Development Environment ■ Creating a Workspace Manually in a Runtime Environment Creating Workspace Manually in a Full Development Environment Instance administrators can provision a workspace manually by running the Create Workspace Wizard. To create a workspace manually: 1. Log in to Oracle Application Express Administration Services. See "Logging In To Oracle Application Express Administration Services" on page 2-6. 2. Click Manage Workspaces. 3. Under Workspace Actions, click Create Workspace. The Create Workspace Wizard appears. 4. For Identify Workspace, enter the following: a. Workspace Name - Enter a unique workspace name. b. Workspace ID - Leave Workspace ID blank to have the new Workspace ID automatically generated. A Workspace ID must be a positive integer greater than 100000. c. Workspace Description - Enter a workspace description. d. Click Next. 5. For Identify Workspace, enter a workspace name and description and click Next. 6. For Identify Schema, specify whether you are re-using an existing schema or creating a new one. If you are using an existing schema: a. For Re-use existing schema, select Yes. b. Select a schema from the list. c. Click Next. If you are creating a new schema: a. For Re-use existing schema, select No. Note: To enable users to request a workspace using a link on the Login page, you must choose the provisioning status of Request or Email Verification as described in the previous procedure. If the provisioning status is set to Manual, no link appears on the login page. See Also: "Configuring Email" on page 2-35 and "Managing Workspace and Change Requests" on page 2-7
  • 125.
    Creating Workspaces Oracle ApplicationExpress Hosted Instance Administration 2-67 b. Enter a schema name and password. c. Specify a space quota. d. Click Next. 7. For Identify Administrator, enter the Workspace administrator information and click Next. 8. Confirm your selections and click Create Workspace. Creating a Workspace Manually in a Runtime Environment To add a workspace in a runtime environment: 1. Start SQL*Plus and connect to the database where Oracle Application Express is installed as SYS. For example: ■ On Windows: SYSTEM_DRIVE: sqlplus /nolog SQL> CONNECT SYS as SYSDBA Enter password: SYS_password ■ On UNIX and Linux: $ sqlplus /nolog SQL> CONNECT SYS as SYSDBA Enter password: SYS_password 2. Run the following statement: ALTER SESSION SET CURRENT_SCHEMA = APEX_040200 3. Run the following statement: BEGIN APEX_INSTANCE_ADMIN.ADD_WORKSPACE(WORKSPACE_ID,WORKSPACE_NAME, SCHEMA_NAME, SCHEMA_LIST) END; Where: ■ WORKSPACE_ID is the ID for the workspace. Auto-assigned if NULL. ■ WORKSPACE_NAME is the name of the workspace. ■ SCHEMA_NAME is the name of the primary schema to associate with the workspace. ■ SCHEMA_LIST is a colon delimited list of additional schemas to associate with the workspace. Creating Multiple Workspaces Instance administrators can provision multiple workspaces by running the Create Multiple Workspaces Wizard. To create multiple workspaces: 1. Log in to Oracle Application Express Administration Services. See "Logging In To Oracle Application Express Administration Services" on page 2-6. 2. Click Manage Workspaces. 3. Under Workspace Actions, click Create Multiple Workspaces.
  • 126.
    Creating Workspaces 2-68 OracleApplication Express Administration Guide The Create Multiple Workspaces Wizard appears. 4. Under Provision Workspace Using, select one of the following: ■ System Generated Workspace Names ■ Statically Prefixed Workspace Name with Sequential Integer Suffix ■ Email Domain Name as Workspace Name, with Sequential Integer Suffix for duplicates 5. Depending upon the option you select in the previous step, make the following selections: ■ System Generated Workspace Names – Workspace Count – Install Sample Application – Install Sample Websheet – Install Sample DEPT and EMP Tables – Space Quota (MB) – Resource Manager Consumer Group – Allow workspaces to be automatically purged – Workspace Description. ■ Statically Prefixed Workspace Name with Sequential Integer Suffix – Workspace Prefix – Workspace Count – Install Sample Application – Install Sample Websheet – Install Sample DEPT and EMP Tables – Space Quota (MB) – Resource Manager Consumer Group – Allow workspaces to be automatically purged – Workspace Description ■ Email Domain Name as Workspace Name, with Sequential Integer Suffix for duplicates – Install Sample Application – Install Sample Websheet – Install Sample DEPT and EMP Tables – Space Quota (MB) – Resource Manager Consumer Group – Allow workspaces to be automatically purged – Email Addresses Tip: To learn more about a specific field, see item Help.
  • 127.
    Managing Existing Workspaces OracleApplication Express Hosted Instance Administration 2-69 – Workspace Description 6. Click Next. 7. Confirm your choices and click Provision Workspaces. Managing Existing Workspaces This section describes how Instance administrators can manage existing workspaces within an Oracle Application Express instance. Topics: ■ Deleting a Workspace ■ Locking a Workspace ■ Managing Workspace to Schema Assignments ■ Managing Component Availability ■ Performing a Workspace Search ■ Viewing Existing Workspaces ■ Editing Workspace Details ■ Viewing Workspace Details ■ Viewing Workspace Database Privileges ■ Viewing File Size and File Count by Workspace ■ Exporting and Importing a Workspace ■ Viewing Application Attributes ■ Changing Application Build Status Set During Deployment ■ Viewing the Parsing Schemas Report Deleting a Workspace Deleting a workspace does not remove any of the associated database objects. To remove the associated schemas, a database administrator (DBA) must use a standard database administration tool, such as Oracle Enterprise Manager or SQL*Plus. Topics: ■ Deleting Workspaces in a Full Development Environment ■ Deleting Workspaces in a Runtime Development Environment ■ About Deleting Inactive Workspaces See Also: "Creating Workspaces" on page 2-64, "Managing Schemas" on page 2-61, "Managing Users in an Oracle Application Express Instance" on page 2-84, and "Monitoring Activity Across a Development Instance" on page 2-87 See Also: SQL*Plus User's Guide and Reference, "Viewing Workspace Details" on page 2-79, and "Creating Workspaces" on page 2-64
  • 128.
    Managing Existing Workspaces 2-70Oracle Application Express Administration Guide Deleting Workspaces in a Full Development Environment To delete a workspace in a full development environment: 1. Log in to Oracle Application Express Administration Services. See "Logging In To Oracle Application Express Administration Services" on page 2-6. 2. Click Manage Workspaces. 3. Under Workspace Reports, click Existing Workspaces. 4. Under the Action column, click Delete. 5. Follow the on-screen instructions. Deleting Workspaces in a Runtime Development Environment To delete a workspace in a runtime development environment: 1. Start SQL*Plus and connect to the database where Oracle Application Express is installed as SYS. For example: ■ On Windows: SYSTEM_DRIVE: sqlplus /nolog SQL> CONNECT SYS as SYSDBA Enter password: SYS_password ■ On UNIX and Linux: $ sqlplus /nolog SQL> CONNECT SYS as SYSDBA Enter password: SYS_password 2. Run the following statement: ALTER SESSION SET CURRENT_SCHEMA = APEX_040200 3. Run the following statement: BEGIN APEX_INSTANCE_ADMIN.REMOVE_WORKSPACE(WORKSPACE_NAME, DROP_USER, DROP_ TABLESPACE) END; Where: ■ WORKSPACE_NAME is the name of the workspace. ■ DROP_USER is either Y or N. The default is N. ■ DROP_TABLESPACE is either Y or N. The default is N. About Deleting Inactive Workspaces If you are managing a large hosted Oracle Application Express instance, manually deleting inactive workspaces can free up resources for other users. The process of manually deleting inactive workspaces consists of the following steps: 1. Identify inactive workspaces. 2. Remove the resources associated with each inactive workspace. 3. Delete the inactive workspaces.
  • 129.
    Managing Existing Workspaces OracleApplication Express Hosted Instance Administration 2-71 Topics: ■ Identifying Inactive Workspaces ■ Viewing Workspaces with Only a Sample Application ■ Removing the Resources Associated with Inactive Workspaces ■ Deleting Inactive Workspaces Identifying Inactive Workspaces The first step in determining if a workspace is inactive is to establish some basic rules. A common approach is to base the rules on the Oracle Application Express activity records found in the current Application Express engine schema. The following DDL (data definition language) creates a table of all workspaces requested before June 28, 2004 but that have been inactive since June 10, 2004. In this example, inactivity is determined by checking a key within the Application Express engine schema for the most recent updates by each workspace. ALTER SESSION SET CURRENT_SCHEMA = APEX_040200; CREATE TABLE ws_to_purge AS SELECT c.security_group_id, c.company_name, c.admin_email, c.request_date, SYSDATE last_updated_on, 'Y' ok_to_delete FROM wwv_flow_provision_company c WHERE c.request_date <= to_date('20040628','YYYYMMDD') AND ( not exists (SELECT NULL /* Activity Log */ FROM wwv_flow_activity_log l WHERE l.security_group_id = c.security_group_id AND l.time_stamp > to_date('20040610','YYYYMMDD')) ) AND NOT EXISTS (SELECT NULL /* workspace applications */ FROM wwv_flows f WHERE f.security_group_id = c.security_group_id AND f.last_updated_on > to_date('20040610','YYYYMMDD')) AND NOT EXISTS (SELECT NULL /* Pages */ FROM wwv_flow_steps s WHERE s.security_group_id = c.security_group_id AND s.last_updated_on > to_date('20040610','YYYYMMDD')) AND NOT EXISTS (SELECT NULL /* Regions */ FROM wwv_flow_page_plugs p WHERE p.security_group_id = c.security_group_id AND p.last_updated_on > to_date('20040610','YYYYMMDD')) AND NOT EXISTS (SELECT NULL /* Items */ FROM wwv_flow_step_items i WHERE i.security_group_id = c.security_group_id AND i.last_updated_on > to_date('20040610','YYYYMMDD')) AND NOT EXISTS Tip: To systematically purge inactive workspaces you must configure Workspace Purge settings. See "Purging Inactive Workspaces" on page 2-45. See Also: "Determining the Oracle Application Express Engine Schema"
  • 130.
    Managing Existing Workspaces 2-72Oracle Application Express Administration Guide (SELECT NULL /* Templates */ FROM wwv_flow_templates t WHERE t.security_group_id = c.security_group_id AND t.last_updated_on > to_date('20040610','YYYYMMDD')) AND NOT EXISTS (SELECT NULL /* Files uploaded */ FROM wwv_flow_file_objects$ o WHERE o.security_group_id = c.security_group_id AND o.created_on > to_date('20040610','YYYYMMDD')) AND NOT EXISTS (SELECT NULL /* SQL Workshop history */ FROM wwv_flow_sw_sql_cmds s WHERE s.security_group_id = c.security_group_id AND s.created_on > to_date('20040610','YYYYMMDD')); After you identify inactive workspaces, you can purge them. Purging inactive workspaces is a two-step process: ■ First, remove the resources (that is, the database schemas, tablespaces, and data files) associated with each inactive workspace. ■ Second, drop the inactive workspaces from Oracle Application Express. Viewing Workspaces with Only a Sample Application Another way to identify potentially inactive workspaces is to view the Workspaces with Only Sample Application report. To view a report or workspaces only containing only a sample application. 1. Log in to Oracle Application Express Administration Services. See "Logging In To Oracle Application Express Administration Services" on page 2-6. 2. Click Manage Workspaces. 3. Under Workspace Reports, click Workspaces with Only Sample Application. The Workspaces with Only Sample Applications page appears. This page displays as an interactive report. To customize the report, use the Search bar at the top of the page. See "Customizing Interactive Reports" in Oracle Application Express Application Builder User's Guide. Removing the Resources Associated with Inactive Workspaces After you have identified inactive workspaces in a single table, the next step is to remove them. To remove the resources associated with inactive workspaces: 1. Identify the schemas used by the workspaces to be deleted by joining the table containing the identified inactive workspaces to wwv_flow_company_schemas. 2. Drop the schemas, tablespaces, and data files used exclusively by the inactive workspaces from the database. You can identify the schemas to drop by running a query similar to the following: SELECT s.schema FROM ws_to_purge ws, wwv_flow_company_schemas s WHERE s.security_group_id = ws.security_group_id Note: Before removing the schemas, tablespaces, or data files associated with inactive workspaces, make sure these resources are not being used in any other workspace or application.
  • 131.
    Managing Existing Workspaces OracleApplication Express Hosted Instance Administration 2-73 AND ws.ok_to_delete = 'Y'; Deleting Inactive Workspaces Once you remove the resources associated with an inactive workspace, you can delete the workspace. You can delete inactive workspaces manually using the Oracle Application Express Administration Services application. Or, you can delete them programmatically as shown in the following PL/SQL example. BEGIN FOR c1 IN (SELECT security_group_id FROM ws_to_purge WHERE ok_to_delete = 'Y') LOOP WWV_FLOW_PROVISIONING.TERMINATE_SERVICE_BY_SGID(c1.security_group_id); END LOOP; END; Locking a Workspace Instance administrators can lock a workspace to address security or performance issues. Locking a workspace immediately locks all workspace administrator, developer and user accounts in the workspace. It also changes the status of all applications in the workspace to Unavailable. To lock a workspace: 1. Log in to Oracle Application Express Administration Services. See "Logging In To Oracle Application Express Administration Services" on page 2-6. 2. Click Manage Workspaces. 3. Under Workspace Actions, click Lock Workspace. 4. For Workspace, select the workspace you want to lock and click Next. 5. Review the information about applications and users and click Lock Workspace. Managing Workspace to Schema Assignments When users log in to Oracle Application Express, they log in to a shared work area called a workspace. Each workspace can have multiple associated (or mapped) schemas. By associating a workspace with a schema, developers in that workspace can: ■ Build applications that interact with the database objects in that schema. ■ Create new database objects in that schema. Topics: ■ Viewing Schema and Workspace Assignments in a Development Environment ■ Viewing Schema and Workspace Assignments in a Runtime Environment ■ Editing Existing Schema and Workspace Assignments ■ Associating Additional Schemas with a Workspace ■ Removing a Schema Mapping from a Workspace in a Runtime Environment Warning: Locking a workspace makes it permanently inaccessible.
  • 132.
    Managing Existing Workspaces 2-74Oracle Application Express Administration Guide ■ Creating a New Schema Viewing Schema and Workspace Assignments in a Development Environment Instance administrators can view the existing schema to workspace assignment on the Manage Workspace to Schema Assignments page. To view the existing schema to workspace assignment: 1. Log in to Oracle Application Express Administration Services. See "Logging In To Oracle Application Express Administration Services" on page 2-6. 2. Click Manage Workspaces. 3. Under Workspace Actions, click Manage Workspace to Schema Assignments. The Manage Workspace to Schema Assignments page appears and lists all workspaces in your environment along with their associated schemas. This page displays as an interactive report. To customize the report, use the Search bar at the top of the page. See "Customizing Interactive Reports" in Oracle Application Express Application Builder User's Guide. Viewing Schema and Workspace Assignments in a Runtime Environment To view the existing schema to workspace assignment in a runtime environment: 1. Start SQL*Plus and connect to the database where Oracle Application Express is installed as SYS. For example: ■ On Windows: SYSTEM_DRIVE: sqlplus /nolog SQL> CONNECT SYS as SYSDBA Enter password: SYS_password ■ On UNIX and Linux: $ sqlplus /nolog SQL> CONNECT SYS as SYSDBA Enter password: SYS_password 2. Run the following statement: ALTER SESSION SET CURRENT_SCHEMA = APEX_040200 3. Run the following statement: SELECT APEX_INSTANCE_ADMIN.GET_SCHEMAS(WORKSPACE_NAME) FROM DUAL; Where WORKSPACE_NAME is the name of the workspace. Editing Existing Schema and Workspace Assignments To edit an existing schema and workspace assignment: 1. Log in to Oracle Application Express Administration Services. See "Logging In To Oracle Application Express Administration Services" on page 2-6. 2. Click Manage Workspaces. See Also: "Managing Schemas" on page 2-61 and "Viewing the Parsing Schemas Report" on page 2-84
  • 133.
    Managing Existing Workspaces OracleApplication Express Hosted Instance Administration 2-75 3. Under Manage Workspaces, click Manage Workspace to Schema Assignments. The Manage Workspace to Schema Assignments page appears. 4. To edit an existing workspace to schema assignment: a. Select the workspace name. The Edit Schema to Workspace Assignment page appears. b. Select a new workspace or schema. c. Click Apply Changes. Associating Additional Schemas with a Workspace Instance administrators can associate (or map) additional existing schemas to a workspace. Associating Additional Schemas in a Full Development Environment To associate additional schemas with a workspace: 1. Log in to Oracle Application Express Administration Services. See "Logging In To Oracle Application Express Administration Services" on page 2-6. 2. Click Manage Workspaces. 3. Under Workspace Actions, click Manage Workspace to Schema Assignments. The Manage Workspace to Schema Assignments page appears. 4. Click Add Schema. The Add Schema wizard appears. 5. For New or Existing Schema, select Existing and click Next. 6. Follow the on-screen instructions to associate the existing schema to a workspace. 7. To verify that the new schema is added to the workspace: a. Log in to the workspace on Oracle Application Express. b. Review the Workspace Schemas list on the Workspace home page. The list shows all schemas currently associated with this workspace. Associating Additional Schemas in a Runtime Environment To associate additional schemas with a workspace in a runtime environment: 1. Start SQL*Plus and connect to the database where Oracle Application Express is installed as SYS. For example: ■ On Windows: SYSTEM_DRIVE: sqlplus /nolog SQL> CONNECT SYS as SYSDBA Enter password: SYS_password ■ On UNIX and Linux: $ sqlplus /nolog SQL> CONNECT SYS as SYSDBA Enter password: SYS_password 2. Run the following statement: ALTER SESSION SET CURRENT_SCHEMA = APEX_040200
  • 134.
    Managing Existing Workspaces 2-76Oracle Application Express Administration Guide 3. Run the following statement: BEGIN APEX_INSTANCE_ADMIN.ADD_SCHEMA(WORKSPACE_NAME, SCHEMA_NAME) END; Where: ■ WORKSPACE_NAME is the name of the workspace. ■ SCHEMA_NAME is the name of the schema. Removing a Schema Mapping from a Workspace in a Runtime Environment To remove a schema mapping from a workspace in a runtime environment: 1. Start SQL*Plus and connect to the database where Oracle Application Express is installed as SYS. For example: ■ On Windows: SYSTEM_DRIVE: sqlplus /nolog SQL> CONNECT SYS as SYSDBA Enter password: SYS_password ■ On UNIX and Linux: $ sqlplus /nolog SQL> CONNECT SYS as SYSDBA Enter password: SYS_password 2. Run the following statement: ALTER SESSION SET CURRENT_SCHEMA = APEX_040200 3. Run the following statement: BEGIN APEX_INSTANCE_ADMIN.REMOVE_SCHEMA(WORKSPACE_NAME, SCHEMA_NAME) END; Where: ■ WORKSPACE_NAME is the name of the workspace. ■ SCHEMA_NAME is the name of the schema. Creating a New Schema Instance administrators can create a new schema and associate it with a workspace. To create a new schema for a workspace: 1. Log in to Oracle Application Express Administration Services. See "Logging In To Oracle Application Express Administration Services" on page 2-6. 2. Click Manage Workspaces. 3. Under Workspace Actions, click Manage Workspace to Schema Assignments. The Manage Workspace to Schema Assignments page appears. 4. Click Add Schema. The Add Schema wizard appears.
  • 135.
    Managing Existing Workspaces OracleApplication Express Hosted Instance Administration 2-77 5. For New or Existing Schema, select New and click Next. 6. For Choose Workspace, select the workspace to associate the new schema with and click Next. 7. For Identify Schema: a. Schema - Enter a unique name containing only letters. b. Password - Enter a case-sensitive password. c. Default Tablespace - Identify the default tablespace that you want this schema to use. d. Temporary Tablespace - Identify the temporary tablespace you want this schema to use. e. Click Next. 8. Confirm the information and click Add Schema. 9. To verify that the new schema is added to the workspace: a. Log in to the workspace on Oracle Application Express. b. Review the Workspace Schemas list on the Workspace home page. The list shows all schemas associated with this workspace. Managing Component Availability Instance administrators can control which components are available within an Oracle Application Express instance. Configurable components include: Websheets, SQL Workshop, Application Builder, and Team Development. To configure component availability: 1. Log in to Oracle Application Express Administration Services. See "Logging In To Oracle Application Express Administration Services" on page 2-6. 2. Click Manage Workspaces. 3. Under Workspace Actions, click Manage Component Availability. The Component Availability page appears. This page displays as an interactive report. To customize the report, use the Search bar at the top of the page. See "Customizing Interactive Reports" in Oracle Application Express Application Builder User's Guide. 4. Locate the workspace for which you want to enable or disable components. 5. Click the Edit icon adjacent to the workspace name. The Workspace Settings page appears. 6. Under Workspace Settings, select Yes to enable a component or No to disable it. Options include: ■ Enable Application Builder ■ Enable SQL Workshop ■ Enable PL/SQL Editing in SQL Workshop Tip: To verify that the new schema name is unique, open the select list and search for the name.
  • 136.
    Managing Existing Workspaces 2-78Oracle Application Express Administration Guide ■ Enable Team Development 7. Click Apply Changes. Defining a Workspace Message You can display a message on the workspace home page by defining a Workspace Message. To define a workspace message: 1. Log in to Oracle Application Express Administration Services. See "Logging In To Oracle Application Express Administration Services" on page 2-6. 2. Click Manage Workspaces. 3. Under Workspace Actions, click Manage Component Availability. The Component Availability page appears. This page displays as an interactive report. To customize the report, use the Search bar at the top of the page. See "Customizing Interactive Reports" in Oracle Application Express Application Builder User's Guide. 4. Locate the workspace for which you want to define a workspace message. 5. Under Workspace Message, enter a message in the Message field. To format the display, include standard HTML tags. 6. Click Apply Changes. Performing a Workspace Search To perform a workspace search: 1. Log in to Oracle Application Express Administration Services. See "Logging In To Oracle Application Express Administration Services" on page 2-6. 2. Under Workspace Tasks, click Find a Workspace. The Workspace Search page appears This page displays as an interactive report. To customize the report, use the Search bar at the top of the page. See "Customizing Interactive Reports" in Oracle Application Express Application Builder User's Guide. 3. To view workspace details, click the workspace name. See "About the Workspace Summary Report" on page 2-80. Viewing Existing Workspaces Use the Existing Workspaces report to view an interactive report of existing workspaces. From the Existing Workspaces report, you can view or edit workspace details. To access the Existing Workspaces report: 1. Log in to Oracle Application Express Administration Services. See "Logging In To Oracle Application Express Administration Services" on page 2-6. 2. Click Manage Workspaces. 3. Under Workspace Reports, click Existing Workspaces. The Existing Workspaces page appears
  • 137.
    Managing Existing Workspaces OracleApplication Express Hosted Instance Administration 2-79 This page displays as an interactive report. To customize the report, use the Search bar at the top of the page. See "Customizing Interactive Reports" in Oracle Application Express Application Builder User's Guide. 4. To edit workspace information, click the Edit icon adjacent to the workspace name. See "Editing Workspace Details" on page 2-79 5. To view workspace details, click the workspace name. The Workspace Summary Report. See "About the Workspace Summary Report" on page 2-80. Editing Workspace Details To edit workspace details: 1. Log in to Oracle Application Express Administration Services. See "Logging In To Oracle Application Express Administration Services" on page 2-6. 2. Click Manage Workspaces. 3. Under Workspace Reports, click Existing Workspaces. The Existing Workspaces report appears. 4. To edit workspace details, click the Edit icon adjacent to the workspace name. The Edit Workspace Information page appears. 5. Edit the appropriate attributes. To learn more about a specific attribute, click the item label. When Help is available, the item label changes to red when you pass your cursor over it and the cursor changes to an arrow and question mark. 6. Click Apply Changes. Viewing Workspace Details Instance administrators can view workspace information by viewing the Workspace Summary Report. To view workspace details: 1. Log in to Oracle Application Express Administration Services. See "Logging In To Oracle Application Express Administration Services" on page 2-6. 2. Click Manage Workspaces. 3. Under Workspace Reports, click Workspace Details. The Workspace Details page appears. 4. Make a selection from the Workspace list at the top of the page and click Set. The Workspace Summary Report page appears.
  • 138.
    Managing Existing Workspaces 2-80Oracle Application Express Administration Guide The following buttons appear above the report: ■ Remove - Click Remove to remove the current workspace. ■ Edit - Click Edit to edit workspace details. ■ Schema Assignments - Click Schema Assignments to manage workspace schema assignments. ■ Manage Users - Click Manage Users to edit or create new users. ■ Email - Click Email send this report by email. About the Workspace Summary Report The Workspace Summary Report is divided into the following major sections: ■ Workspace. Displays high-level information about selected workspace. ■ Workspace Schemas. Displays the schema name, and default tablespace, privileges granted, and database role privileges. When users log in to Oracle Application Express, they log in to a shared work area called a workspace. Each workspace can have multiple associated schemas. By associating a workspace with a schema, developers can build applications that interact with the objects in that schema and create new database objects in that schema. To edit workspace to schema assignments, click Workspace to Schema Assignments. See "Managing Schemas" on page 2-61. ■ Database Applications. Lists details about the database applications within the workspace. ■ Workspace Websheets. Lists details about the websheets within the workspace. ■ Packaged Applications. Lists packaged application within the workspace. ■ SQL Workshop. Lists the number of SQL scripts, SQL script results, and SQL Command history. ■ Team Development. Lists the number of features, milestones, bugs, To Dos, feedback entries, news entries, and links.
  • 139.
    Managing Existing Workspaces OracleApplication Express Hosted Instance Administration 2-81 ■ Workspace Application Activity Summary. Details statistics about workspace applications. Other sections include: ■ 5 Most Active Applications ■ Developer Activity Summary ■ Database Object Counts by Object Type ■ 5 Top Tables by Row Count, Reported by Schema Viewing Workspace Database Privileges Instance administrators can view a summary of workspace database privileges on the Workspace Database Privileges page. To view workspace database privileges: 1. Log in to Oracle Application Express Administration Services. See "Logging In To Oracle Application Express Administration Services" on page 2-6. 2. Click Manage Workspaces. 3. Under Workspace Reports, click Workspace Database Privileges. The Workspace Database Privileges page appears. This page displays as an interactive report. To customize the report, use the Search bar at the top of the page. See "Customizing Interactive Reports" in Oracle Application Express Application Builder User's Guide. 4. To view workspace details, click the workspace name. The Workspace Summary report appears. See "About the Workspace Summary Report" on page 2-80. Viewing File Size and File Count by Workspace To view total file size and file count by workspace: 1. Log in to Oracle Application Express Administration Services. See "Logging In To Oracle Application Express Administration Services" on page 2-6. 2. Click Manage Workspaces. 3. Under Workspace Reports, click Manage File Utilization. The File Utilization by Workspace page appears. This page displays as an interactive report. To customize the report, use the Search bar at the top of the page. See "Customizing Interactive Reports" in Oracle Application Express Application Builder User's Guide. Exporting and Importing a Workspace To move a workspace and all associated users to a new Oracle Application Express instance, an Instance administrator must export the workspace. When you export a workspace, Oracle Application Express generates a text file. This file contains information about your workspace, all the users in your workspace, and any groups in your workspace (if applicable). You can use this file to import your workspace into another Oracle Application Express instance.
  • 140.
    Managing Existing Workspaces 2-82Oracle Application Express Administration Guide Exporting a workspace and importing it into a new database instance enables developers to import application components. Therefore, to provide maximum capabilities Oracle recommends that when building new environments (for example, for production or testing) create these workspaces by importing the development workspaces. Keep in mind, this method only imports workspace, users, and groups. This file does not contain: ■ The schemas associated with this workspace or the objects in those schemas. ■ Any applications, images, cascading style sheets, and static text files. These items must be exported separately. Topics: ■ Exporting a Workspace ■ Importing a Workspace Exporting a Workspace To export a workspace: 1. Log in to Oracle Application Express Administration Services. See "Logging In To Oracle Application Express Administration Services" on page 2-6. 2. Click Manage Workspaces. 3. Under Export Import, click Export Workspace. 4. Select a workspace and then click Export Workspace. 5. To export the selected workspace, click Save File. 6. Follow the on-screen instructions. Importing a Workspace To import a workspace: 1. Log in to Oracle Application Express Administration Services. See "Logging In To Oracle Application Express Administration Services" on page 2-6. 2. Click Manage Workspaces. 3. Under Export Import, click Import Workspace. 4. Click Browse, select a workspace export file, and click Next. 5. To install the workspace, click Install. 6. Follow the on-screen instructions. Viewing Application Attributes Instance administrators can view applications by workspace on the Application Attributes page. To view the Application Attributes page: See Also: "Deploying an Application" in Oracle Application Express Application Builder User's Guide
  • 141.
    Managing Existing Workspaces OracleApplication Express Hosted Instance Administration 2-83 1. Log in to Oracle Application Express Administration Services. See "Logging In To Oracle Application Express Administration Services" on page 2-6. 2. Click Manage Workspaces. 3. Under Manage Applications, click Application Attributes. The Application Attributes page appears. This page displays as an interactive report. To customize the report, use the Search bar at the top of the page. See "Customizing Interactive Reports" in Oracle Application Express Application Builder User's Guide. Changing Application Build Status Set During Deployment Every Oracle Application Express application has an application-level attribute called Build Status. You can use this attribute to prevent an application from being modified by other developers. Build Status has two settings: ■ Run and Build Application - Developers can both run and edit an application. ■ Run Application Only - Developers can only run an application. Setting the Build Status to Run Application Only is an effective way to prevent other developers from modifying it. You can change the Build Status of an application as follows: ■ Developers and administrators can change the Build Status attribute on the Edit Application page. See "Availability" in Oracle Application Express Application Builder User's Guide. ■ Workspace administrators can change the Build Status of applications within the current workspace on the Manage Application Build Status page. See "Changing Build Status for Multiple Applications" on page 1-34. ■ Instance administrators can change the Build Status of an application on the Build Status page as described in the next section. To change a Build Status as an Instance administrator: 1. Log in to Oracle Application Express Administration Services. See "Logging In To Oracle Application Express Administration Services" on page 2-6. 2. Click Manage Workspaces. 3. Under Manage Applications, click Build Status. The Build Status page appears. This page displays as an interactive report. To customize the report, use the Search bar at the top of the page. See "Customizing Interactive Reports" in Oracle Application Express Application Builder User's Guide. 4. Click the Edit icon adjacent to the appropriate application. The Edit Build Status page appears. 5. Select an alternate build status and click Apply Changes. Tip: Note that if you select Build Application Only during deployment, the only way to change this setting is change it on the Build Status page in Oracle Application Express Administration Services.
  • 142.
    Managing Users inan Oracle Application Express Instance 2-84 Oracle Application Express Administration Guide Viewing the Parsing Schemas Report Instance administrators can use the Parsing Schemas report to identify the current parsing schema of each application in any workspace. This attribute identifies the Oracle database schema whose privileges are used when Application Express dynamically executes the application's SQL and PL/SQL code at runtime. To view the Parsing Schemas report: 1. Log in to Oracle Application Express Administration Services. See "Logging In To Oracle Application Express Administration Services" on page 2-6. 2. Click Manage Workspaces. 3. Under Manage Applications, click Parsing Schemas. The Parsing Schemas page appears. This page displays as an interactive report. To customize the report, use the Search bar at the top of the page. See "Customizing Interactive Reports" in Oracle Application Express Application Builder User's Guide. Managing Users in an Oracle Application Express Instance Instance administrators can manage all user accounts within an Oracle Application Express instance on the Manage Developers and Users page. User accounts are particularly useful if a workspace utilizes Application Express Authentication. When setting up user accounts, Instance administrators can take advantage of some manageability attributes, such as allowing the accounts to be locked, their password to have a fixed lifetime, and their password to require change on first use. Topics: ■ Creating New User Accounts ■ Editing an Existing User Account ■ Deleting User Accounts Creating New User Accounts To create a new user account: 1. Log in to Oracle Application Express Administration Services. See "Logging In To Oracle Application Express Administration Services" on page 2-6. See Also: "Managing Schemas" on page 2-61 and "Managing Workspace to Schema Assignments" on page 2-73 See Also: ■ "Workspace and Application Administration" on page 1-1 ■ "Managing Application Express Users" on page 1-16 ■ "Application Express Account Credentials" in Oracle Application Express Application Builder User's Guide Tip: You can also access the Create/Edit User page by clicking Create User on the Workspace Tasks list on the Instance Administration home page.
  • 143.
    Managing Users inan Oracle Application Express Instance Oracle Application Express Hosted Instance Administration 2-85 2. Click Manage Workspaces. 3. Under Manage Workspaces, click Manage Developers and Users. The Manage Developers and Users page appears. 4. Click Create User. The Create/Edit User page appears. 5. Under User Attributes, enter: a. Username - Enter the username used to log in to the system. Restrictions include: – Maximum length of 100 characters – No spaces – Only these special characters are permitted: amerpsand (@) and period (.) b. Email Address - Enter the valid email address for this user. c. First Name - Enter the first or given name to further identify the user (optional). d. Last Name - Enter the last or family name to further identify the user (optional). e. Description - Enter comments about this user (optional). f. Default Date Format - Specify the default Oracle date format for the user. This option controls the default date format within SQL Workshop. 6. Under Account Privileges: a. Workspace - Select a workspace in which to create the user. b. Default Schema - Specify the default schema used for data browsing, application creation, and SQL script execution. c. User is an administrator - Select Yes or No to specify if this user should have workspace administrator privileges. Administrators are given access to all components. Additionally, they can manage user accounts, groups, and development services. Components may not be available if they are switched off by Instance Administrators. d. User is a developer - Select Yes or No to specify if this user should have developer privileges. Developers create and modify applications and database objects and view developer activity, session state, workspace activity, application, and schema reports. Developers must have access to either Application Builder, SQL Workshop, or both. Components may not be available if they are switched off by Instance Administrators. e. Application Builder Access - Determines whether a developer has access to the Application Builder. f. SQL Workshop Access - Determines whether a developer has access to the SQL Workshop. g. Team Development Access - Determines whether a developer has access to the Team Development. h. Account Availability - Select Locked to prevent the account from being used. Select Unlocked to allow the account to be used.
  • 144.
    Managing Users inan Oracle Application Express Instance 2-86 Oracle Application Express Administration Guide 7. Under Password: ■ Password - Enter a case-sensitive password. ■ Confirm Password - Enter the password again. ■ Require Change of Password On First Use - Select No to require this user to change his or her password at first log in. Select Yes to require the user to change the password immediately after logging in the first time. 8. Click Create or Create and Create Another. Editing an Existing User Account To edit an existing user account: 1. Log in to Oracle Application Express Administration Services. See "Logging In To Oracle Application Express Administration Services" on page 2-6. 2. Click Manage Workspaces. 3. Under Manage Workspaces, click Manage Developers and Users. The Manage Developers and Users page appears. This page displays as an interactive report. To customize the report, use the Search bar at the top of the page. See "Customizing Interactive Reports" in Oracle Application Express Application Builder User's Guide. 4. To edit account details, click the Edit icon adjacent to the user name. To learn more about a specific attribute, click the item label. When Help is available, the item label changes to red when you pass your cursor over it and the cursor changes to an arrow and question mark. 5. Make the appropriate changes. 6. Click Apply Changes. Deleting User Accounts To delete a user account: 1. Log in to Oracle Application Express Administration Services. See "Logging In To Oracle Application Express Administration Services" on page 2-6. 2. Click Manage Workspaces. 3. Under Manage Workspaces, click Manage Developers and Users. The Manage Developers and Users page appears. This page displays as an interactive report. To customize the report, use the Search bar at the top of the page. See "Customizing Interactive Reports" in Oracle Application Express Application Builder User's Guide. 4. Select a user. Tip: An Instance administrator can configure these settings for an entire Oracle Application Express instance and define password complexity policies. See "Enabling Login Controls for All Workspaces" on page 2-26. "About Strong Password Policies" on page 2-27, and "Configuring Password Policies" on page 2-27 See Also: "Creating New User Accounts" on page 2-84
  • 145.
    Monitoring Activity Acrossa Development Instance Oracle Application Express Hosted Instance Administration 2-87 The Create/Edit User page appears. 5. Click Delete User. 6. Confirm your selection and click OK. Monitoring Activity Across a Development Instance Instance administrators can monitor end user and developer activity for an Oracle Application Express instance on the Monitor Activity page. Topics: ■ Monitoring Activity ■ Viewing the Signup Survey Report Monitoring Activity To monitor activity: 1. Log in to Oracle Application Express Administration Services. See "Logging In To Oracle Application Express Administration Services" on page 2-6. 2. Click Monitor Activity. The Monitor Activity page appears. See Also: "Viewing Workspace Dashboards" on page 1-38
  • 146.
    Monitoring Activity Acrossa Development Instance 2-88 Oracle Application Express Administration Guide The Monitor Activity page is divided into the following sections: ■ Page Views - View activity by application, user, workspace, day, or REST access. ■ Workspace Purge - View a dashboard summary, inactive workspaces, workspaces purged, workspaces that became active, or a workspace purge log. ■ Environment Reports - View a summary of used operating systems, browser types, user agent, or external sites. ■ Calendar Reports - View workspaces by date last used, page views by day and then by application and user, or by hour. ■ Service Requests - View new service requests or signup survey activity. ■ Logs - View the mail log, jobs log, automatic delete log, or monitor packaged application installations. ■ Login Attempts - View login attempts or developer last login. ■ Developer Activity - View application changes by developer or workspace. Click the appropriate link to view reports across all workspaces. 3. To viewing archived activity, click the Archived Activity tab and follow the on-screen instructions. 4. To view the Dasboard, click the Dashboard tab.
  • 147.
    Monitoring Activity Acrossa Development Instance Oracle Application Express Hosted Instance Administration 2-89 Viewing the Signup Survey Report Instance administrators can also include survey questions users must complete when running the New Service Signup Wizard. To view the Signup Survey report: 1. Log in to Oracle Application Express Administration Services. See "Logging In To Oracle Application Express Administration Services" on page 2-6. 2. Click Monitor Activity. The Monitor Activity page appears. 3. Under Service Requests, click the Signup Survey. The Signup Survey appears displaying the survey questions, answers, and the number of responses. 4. To clear the Signup Survey report, click Reset Report. See Also: "Viewing Workspace Dashboards" on page 1-38 See Also: "Defining a Signup Survey" on page 2-44
  • 148.
    Monitoring Activity Acrossa Development Instance 2-90 Oracle Application Express Administration Guide
  • 149.
    A About DBMS_SCHEDULER JobsA-1 AAbout DBMS_SCHEDULER Jobs The DBMS_SCHEDULER package provides a collection of scheduling functions and procedures that can be called from any PL/SQL program. DBMS_SCHEDULER Jobs In Oracle Application Express Table A–1 describes DBMS_SCHEDULER jobs that are created in the database when you install Oracle Application Express. Table A–1 DBMS_SCHEDULER Jobs Job Name Description ORACLE_APEX_PURGE_SESSIONS Purges sessions older than 12 hours (the default). This job runs every hour. See Also: "Managing Session State" on page 2-51 ORACLE_APEX_MAIL_QUEUE Sends mail that is in the mail queue every 5 minutes. See Also: "APEX_MAIL" in Oracle Application Express API Reference and "Configuring Email" on page 2-35. ORACLE_APEX_WS_NOTIFICATIONS Determines Websheet notifications that must be sent every 30 minutes. See Also: "About Websheet Applications" in Oracle Application Express Application Builder User's Guide ORACLE_APEX_DAILY_MAINTENANCE Performs nightly maintenance, every day at 0100. This job archives the activity summary and runs the workspace purge process. See Also: "Purging Inactive Workspaces" on page 2-45
  • 150.
    DBMS_SCHEDULER Jobs InOracle Application Express A-2 Oracle Application Express Administration Guide
  • 151.
    Index-1 Index A Activity, 1-39 Administration Services enablingaccess, 2-20 logging in to, 2-6 restricting access, 2-19 administrator roles, 1-16 agreement, including with Signup Wizard, 2-44 APEX_SITE_ADMIN_PRIVS CREATE_EXCEPTION, 2-63 REMOVE_WORKSPACE_EXCEPTIONS, 2-63 REPORT, 2-63 RESTRICT_SCHEMA, 2-62 UNRESTRICT_SCHEMA, 2-62 APEX_SITE_ADMIN_PRIVS.REMOVE_SCHEMA_ EXCEPTIONS, 2-63 APEX_SITE_ADMIN_PRIVS.REMOVE_ WORKSPACE_EXCEPTIONS, 2-63 Application Builder Defaults, 1-42 configuring, 1-42 Application Builder, enabling, 1-12 Application Express engine, determining schema for, 2-61 Application Express user groups adding users, 1-25 creating, 1-24 editing, 1-24 Application Express users changing user password, 1-23 creating, 1-17, 2-84 creating multiple, 1-19 deleting accounts, 1-22, 2-86 deleting multiple users, 1-22 editing accounts, 1-20, 2-86 grouping, 1-24 managing, 1-16 Application Express, about, 1-4 application ID ranges, configuring, 2-44 application models deleting, 1-35 application reports, 1-36 applications enabling activity logging, 2-17 enabling tracing, 2-17 Applications reports Applications Dashboard, 1-41 B build status changing, 1-34 changing as instance administrator, 2-83 C change requests, 2-12 approving, 2-12 managing, 2-12 Change Requests page, 2-12 character set, 1-6 Create Workspace Wizard, 2-66 D DAD, restricting access, 2-28 dashboards, 1-39, 1-40, 1-41 viewing, 1-38 database dashboards, 1-41 database version, 1-6 database, about version, 1-4 Detailed Tablespace Utilization report, 1-10 Developer Activity, 1-40 Developer activity log, deleting, 2-55 developer logs, purging, 1-26 E email configuring, 2-35 configuring for a runtime instance, 2-36 configuring for development instance, 2-36 determining email settings in runtime instance, 2-37 mail queue, 2-53 viewing mail log, 2-53 export, workspace, 2-81 External click counting log, deleting, 2-56 External Clicks Log, purging, 1-26
  • 152.
    Index-2 F feature configuration configure SQLWorkshop, 2-16 creating Websheet objects, 2-14 creation of demonstration objects in new workspace, 2-14 disabling PL/SQL program unit editing, 2-14 disabling SQL Access in Websheets, 2-15 enabling application activity logging, 2-17 enabling database monitoring, 2-16 enabling service requests, 2-18 enabling tracing, 2-17 Packaged Application Installation Options, 2-15 G groups adding users, 1-25 creating, 1-24 editing, 1-24 managing Application Express users, 1-24 removing users, 1-25 H help, configuring URL, 2-43 HTTPS requiring for an instance, 2-22 reversing requirement for an instance, 2-23 I import, workspace, 2-81 Installed Translations page, 2-53 instance proxy setting, 2-21 instance settings auto extend tablespaces, 2-33 configuring a wallet, 2-38 configuring email, 2-35, 2-36 configuring online Help, 2-43 configuring workspace size options, 2-43 deleting uploaded files, 2-34 disabling email provisioning, 2-32 managing application ID ranges, 2-44 requiring a new schema, 2-33 self service provisioning, 2-31 interactive report manage saved reports, 1-8 manage subscriptions, 1-8 IP address, restricting by IP address, 2-21 L log entries, deleting, 2-54 Login Access log, deleting entries, 2-56 login controls configuring for an instance, 2-25 configuring for workspace, 2-26 enabling for workspace, 1-11 login message creating, 2-58 disabling, 2-58 logs, purging, 1-25 M mail queue, viewing, 2-53 Manage Export Repository, 1-6 Manage Instance page, 2-3 Manage Service page, 1-7 Manage Workspaces page, 2-5 messages login, 2-57 system, 2-57 monitor activity Archived Activity, 2-87 Calendar Reports, 2-88 Dashboard, 2-87 Developer Activity, 2-88 Environment Reports, 2-88 Login Attempts, 2-88 Logs, 2-88 Page Views, 2-88 Realtime Monitor Reports, 2-87 Service Requests, 2-88 Workspace Purge, 2-88 O Online Help, configuring, 2-43 Oracle Application Express application owner, 1-5 CGI environment, 1-6 character set, 1-6 current time (on server), 1-5 current user, 1-5 database version, 1-6 host schema, 1-5 language preference, 1-5 last DDL time, 1-5 managing component availability, 2-77 online resources, 1-5 schema compatibility, 1-5 version, 1-5 web server software, 1-6 workspace ID, 1-5 workspace name, 1-5 Oracle Application Express administrator, 2-1 approving a change request, 2-12 approving a workspace request, 2-10 changing a workspace request, 2-11 changing build status, 2-83 creating a workspace manually, 2-66 creating user accounts, 2-84 deleting a workspace, 2-69 deleting a workspace request, 2-11 deleting log entries, 2-54 deleting user accounts, 2-86 editing user accounts, 2-86 editing workspace details, 2-79
  • 153.
    Index-3 emailing workspace summary,2-79 exporting and importing a workspace, 2-81 locking a workspace, 2-73 managing email, 2-53 managing instance settings, 2-31 managing schemas, 2-73 managing session state, 2-51 managing users, 2-84 Oracle default schemas, 2-62 provisioning a workspace, 2-64 purging inactive workspaces, 2-70 viewing database privileges, 2-81 viewing Parse as Schemas report, 2-84 viewing pending new service requests, 2-7 viewing pending requests, 2-7 viewing report attributes, 2-82 viewing workpace summary, 2-79 viewing workspaces, 2-78 Oracle default schemas determining administrator privilege status, 2-62 removing default restrictions, 2-62 revoking administrator privileges, 2-62 Oracle Technology Network, 1-5 Discussion Forum, 1-5 Oracle-managed files, 2-64 OTN, Discussion Forum, 1-5 outbound HTTP traffic, setting proxy, 2-21 P packaged application monitoring installation progress, 2-47 viewing packaged database application, 2-46 viewing packaged Websheet application, 2-47 packaged application install options Allow HTTP Header Variable authentication, 2-15 Allow LDAP Directory authentication, 2-15 Allow Oracle Application Server Single Sign-On authentication, 2-15 packaged applications installation options, 2-15 packaged database application, viewing summary, 2-46 packaged Websheet application, viewing summary, 2-47 Page View Activity logs, deleting, 2-55 pages, purging cached, 1-33 password policies about strong, 2-27 configuring, 2-27 password, resetting from Administration page, 1-4 Performance, 1-40 PL/SQL editing, disabling, 1-13 PL/SQL program unit editing, 2-14 preferences creating a workspace announcement, 1-15 for a workspace, 1-11 purging for a specific user, 1-30 provisioning mode Email Verification, 2-65 Manual, 2-65 Request, 2-65 specifying, 2-65 proxy, setting for instance, 2-21 public file upload, disabling, 2-21 public themes adding, 2-48 deleting, 2-48 exporting, 2-49 managing, 2-48 modifying, 2-49 R regions, purging cached, 1-33 report Detailed Tablespace Utilization, 1-10 used and free space, 1-10 report printing configuring, 2-40 configuring in full development instance, 2-40 configuring in runtime instance, 2-41 determining settings in runtime instance, 2-42 reports Active Sessions, 1-37 Activity Dashboard, 1-39 Application Attributes, 2-82 Application Changes by Application, 1-37 Application Changes by Developer, 1-37 Database Dashboard, 1-41 Developer Activity Dashboard, 1-40 monitor activity, 1-36 monitoring activity, 1-38 Parse as Schemas, 2-84 Performance Dashboard, 1-40 schema, 1-38 Users Dashboard, 1-39 Websheet Dashboard, 1-41 Workspace Dashboard, 1-39 RESTRICT_IP_RANGE, 2-21 restricting user access, 2-21 runtime settings, RESTRICT_IP_RANGE, 2-21 S schema associating with workspace, 2-75 creating new, 2-76 determining for Application Express, 2-61 editing schema mapping, 2-74 reports, 1-38 requesting new, 1-10 schema mapping, 2-73 editing, 2-74 removing in runtime instance, 2-76 viewing in development instance, 2-74 viewing in runtime instance, 2-74 Secure Sockets Layer (SSL), 2-38 security settings
  • 154.
    Index-4 access to AdministrationServices, 2-19 authorized URLs, 2-30 configuring login controls for an instance, 2-25 configuring password policies, 2-27 configuring session timeout, 2-24 disabling access to Internal applications, 2-20 disabling cookies to populate login form, 2-19 disabling public file upload, 2-21 disabling workspace login, 2-20 enabling access to Administration Services, 2-20 enabling login controls for a workspace, 2-26 enabling RESTful access, 2-24 excluding domains, 2-25 excluding URL regions, 2-25 requiring HTTPS, 2-22 restricting access by DAD, 2-28 restricting access by IP address, 2-21 reversing HTTPS requirement, 2-23 setting instance proxy, 2-21 service request enabling for workspace, 2-18 managing, 2-7 more storage, 1-10 new schema, 1-10 new workspace, 1-11 requesting, 1-9 terminate service, 1-10 service, terminating, 1-10 session state managing, 1-26, 2-51 purging current session, 1-28 removing, 1-27 viewing session details, 1-27 session, purging by age, 1-28 sign up agreement, including in Signup wizard, 2-60 Signup Wizard, 2-60 creating survey questions, 2-60 enabling an agreement, 2-60 including agreement, 2-44 including survey, 2-44 site-specific tasks lists, 2-59 adding a task, 2-59 deleting a task, 2-60 editing a task, 2-59 SQL Workshop deleting logs, 2-54 enabling, 1-13 SSL-enabled URLs, 2-38 storage, requesting more, 1-10 survey creating questions, 2-60 including with Signup Wizard, 2-44, 2-60 system message creating, 2-58 disabling, 2-58 T Team Development enabling, 1-14 enabling support for file attachments, 1-14 template applications adding to repository, 2-50 deleting, 2-50 editing, 2-51 editing properties, 2-51 managing, 2-49 modifying pages, 2-51 translation, viewing installed, 2-53 U user access, restricting access by IP address, 2-21 user account creating, 2-84 deleting, 2-86 editing, 2-86 user preferences managing, 1-26 purging, 1-30 purging for current user, 1-30 removing programmatically, 1-32 resetting using a page process, 1-32 setting, 1-31 viewing by user, 1-29 viewing for current user, 1-29 user roles developer, 1-16, 2-1 Instance administrator, 1-16, 2-1 Oracle Application Express administrator, 1-16 Workspace administrator, 1-16 Workspace administrators, 1-16, 2-1 Users Dashboard, 1-39 V viewing, dashboards, 1-38 W wallet configuring, 2-38 configuring in full development instance, 2-38 configuring in runtime instance, 2-38 creating, 2-38 determining settings in runtime instance, 2-39 Websheet Dashboard, 1-41 Websheet Database Objects, 1-6 workspace about provisioning, 2-64 administration, 2-1 configuring preferences, 1-11 creating in development environment, 2-66 creating in runtime environment, 2-67 creating manually, 2-66 creating new tablespaces, 2-64 dashboard, 1-39 deleting, 2-69 deleting inactive, 2-73 determining available space, 1-10 editing, 2-79
  • 155.
    Index-5 exporting and importing,2-81 identifying inactive, 2-71 locking, 2-73 login controls, 1-11 managing, 1-1 managing files, 1-6 managing Websheet objects, 1-6 provisioning, 2-64 purging, 2-70 purging inactive, 2-45 removing resources, 2-72 requesting new, 1-11 size options for requests, 2-43 specifying a provisioning mode, 2-65 terminating, 1-10 viewing, 2-78 Workspace Administration page, 1-1 Workspace administrator, 1-1 changing build status, 1-34 requesting a database schema, 1-10 requesting additional storage, 1-10 requesting service termination, 1-10 viewing schema reports, 1-38 viewing workspace utilization, 1-15 workspace announcement, creating, 1-15 Workspace Database Privileges, 2-81 workspace login, disabling, 2-20 workspace message, defining, 2-78 workspace preferences Application Builder, 1-12 login controls, 1-11 PL/SQL editing, 1-13 SQL Workshop, 1-13 Team Development, 1-14 workspace report having only sample applications, 2-72 viewing file size and count, 2-81 workspace requests approving, 2-10 changing, 2-11 configuring size options, 2-43 Workspace Requests page, 2-8 Workspace Summary Report emailing, 2-79 viewing, 2-79 Workspace Utilization Report viewing, 1-15
  • 156.