![Step 2: Set up authentication
‣ Create ~/.pyrax.cfg with:
[default]
identity_type = rackspace
keyring_username = yourusername
debug=True
‣ Also, in the code itself, username and API Key:
pyrax.set_credentials("annegentle",
"486edc1d76c0981b7a5f998c9f4b8849")](https://image.slidesharecdn.com/openstackoverviewpyladiesatx-130607095419-phpapp02/85/OpenStack-How-To-PyLadies-ATX-9-320.jpg)
![Step 3: Run tutorial, spin up servers
‣ Create pyrax_tutorial.py file
https://gist.github.com/EdLeafe/5665994
#!/usr/bin/env python
# -*- coding: utf-8 -*-
import pyrax
# First you need to authenticate.
pyrax.keyring_auth()
# Create a shortcut alias for
cloudservers
cs = pyrax.cloudservers
# Get the image for Ubuntu 12.04
image = [img for img in cs.list_images()
if "Ubuntu 12.04" in img.name][0]
# Flavors are RAM/disk combinations.
flavor = cs.list_flavors()[0]
# Create the first server
server1 =
cs.servers.create(name=“Buntuone",
image=image.id,
flavor=flavor.id)
…](https://image.slidesharecdn.com/openstackoverviewpyladiesatx-130607095419-phpapp02/85/OpenStack-How-To-PyLadies-ATX-10-320.jpg)


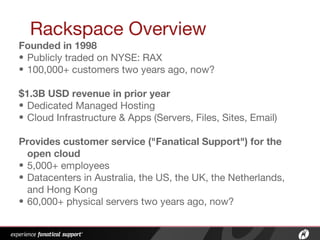


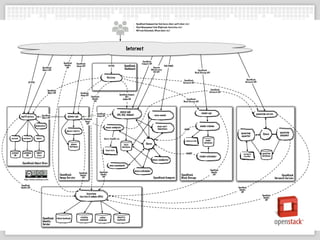
The document discusses OpenStack, an open-source platform for building public and private clouds, providing step-by-step instructions on how to use and contribute to it. It highlights the necessary tools such as Pyrax, authentication setup, and the process for creating servers, along with guidelines for contributing to the OpenStack community. Additionally, it gives an overview of Rackspace, the company behind OpenStack, detailing its history, customer base, revenue, and global presence.