Openshift for Beginners:Demo on building and deploying
application from scratch with in Openshift
2.
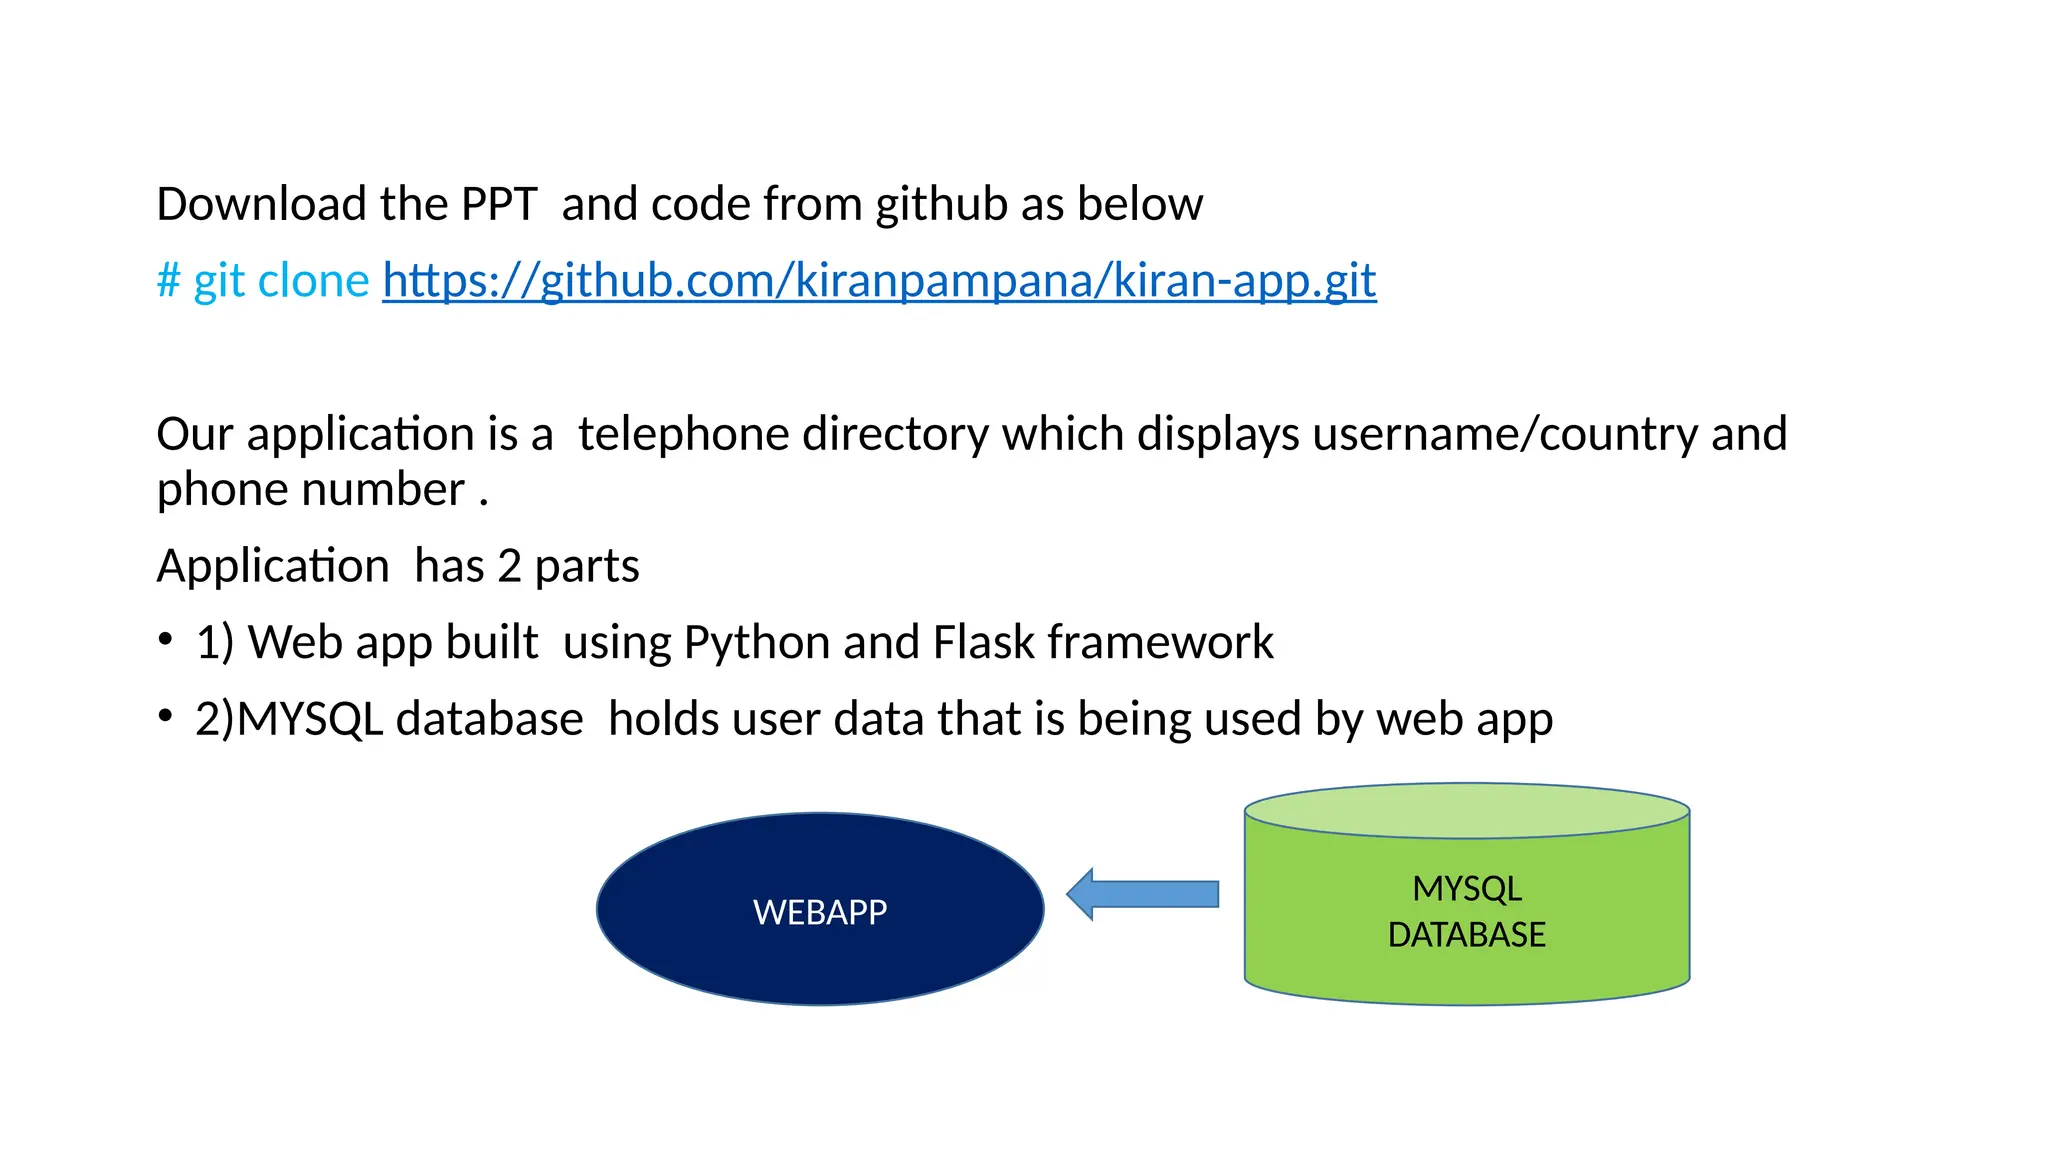
Download the PPTand code from github as below
# git clone https://github.com/kiranpampana/kiran-app.git
Our application is a telephone directory which displays username/country and
phone number .
Application has 2 parts
• 1) Web app built using Python and Flask framework
• 2)MYSQL database holds user data that is being used by web app
WEBAPP
MYSQL
DATABASE
3.
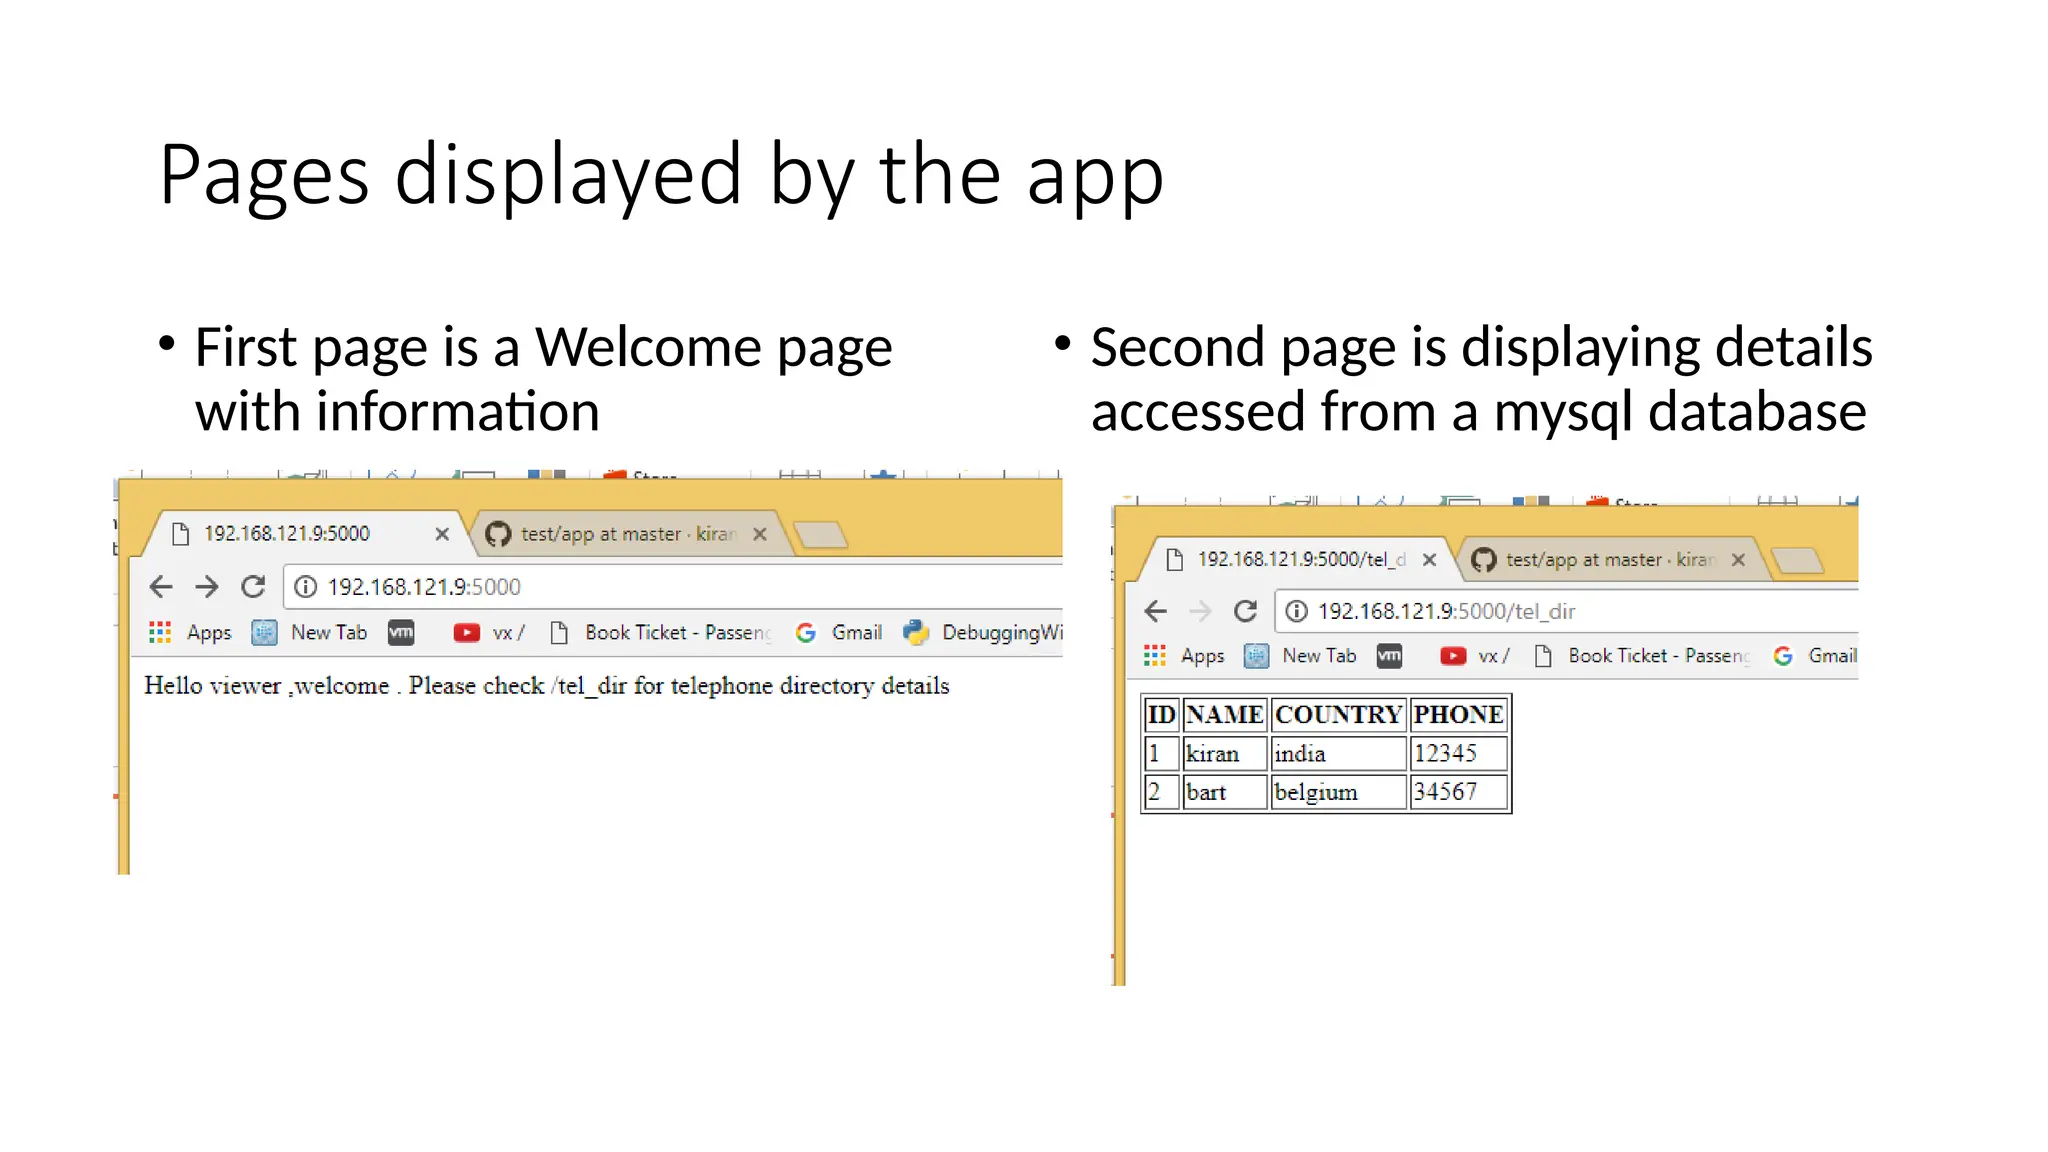
Pages displayed bythe app
• First page is a Welcome page
with information
• Second page is displaying details
accessed from a mysql database
4.
We need toknow about containers/pods. But why ?
Pods are the basic building blocks of Openshift.
Pod is a group of one or more containers.
What are containers ?
Lets find out why we need containers and understand them by comparing
with Virtual machines , as VM’s are well understood
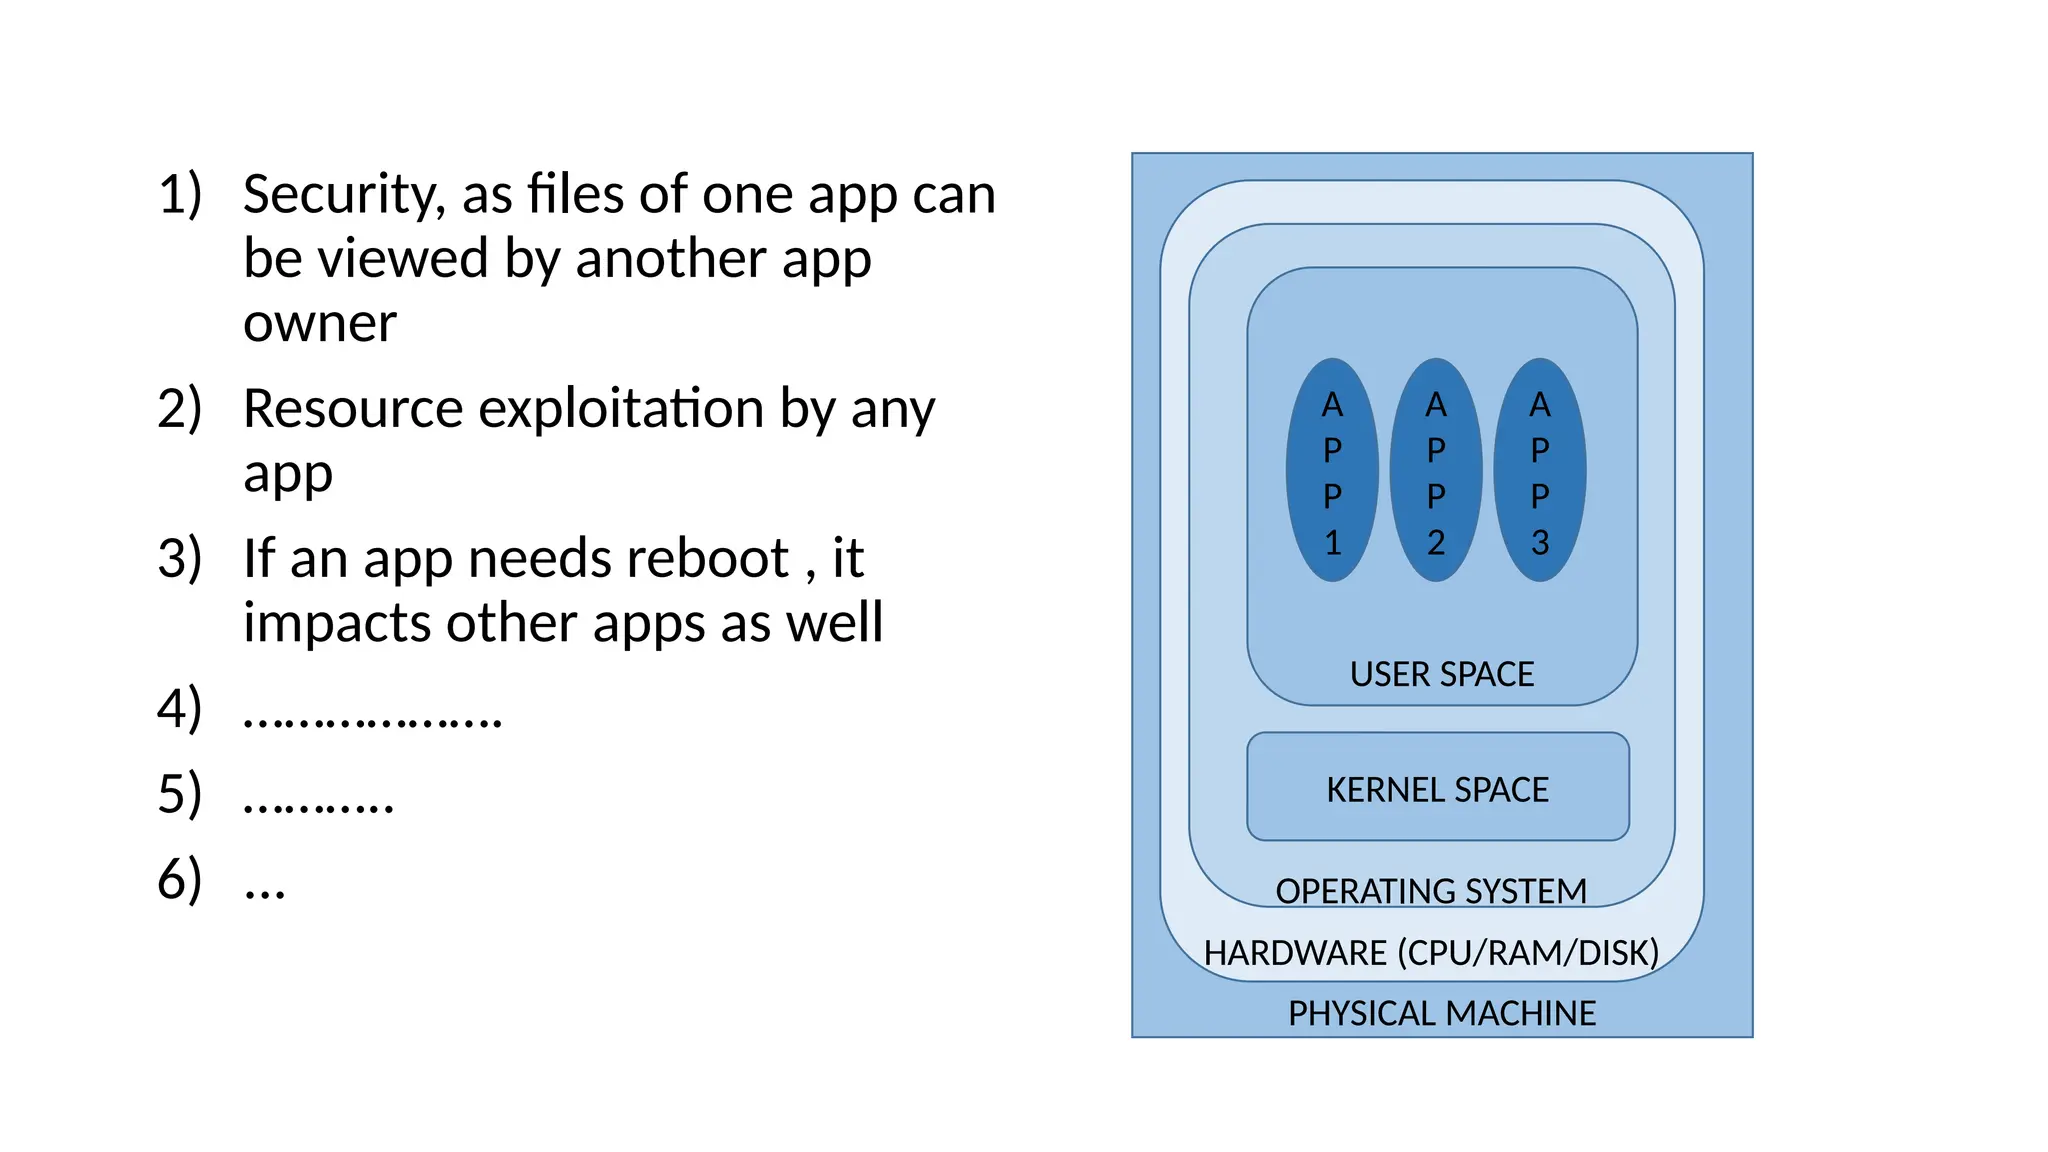
1) Security, asfiles of one app can
be viewed by another app
owner
2) Resource exploitation by any
app
3) If an app needs reboot , it
impacts other apps as well
4) ……………….
5) ………..
6) ...
PHYSICAL MACHINE
HARDWARE (CPU/RAM/DISK)
OPERATING SYSTEM
USER SPACE
KERNEL SPACE
A
P
P
1
A
P
P
2
A
P
P
3
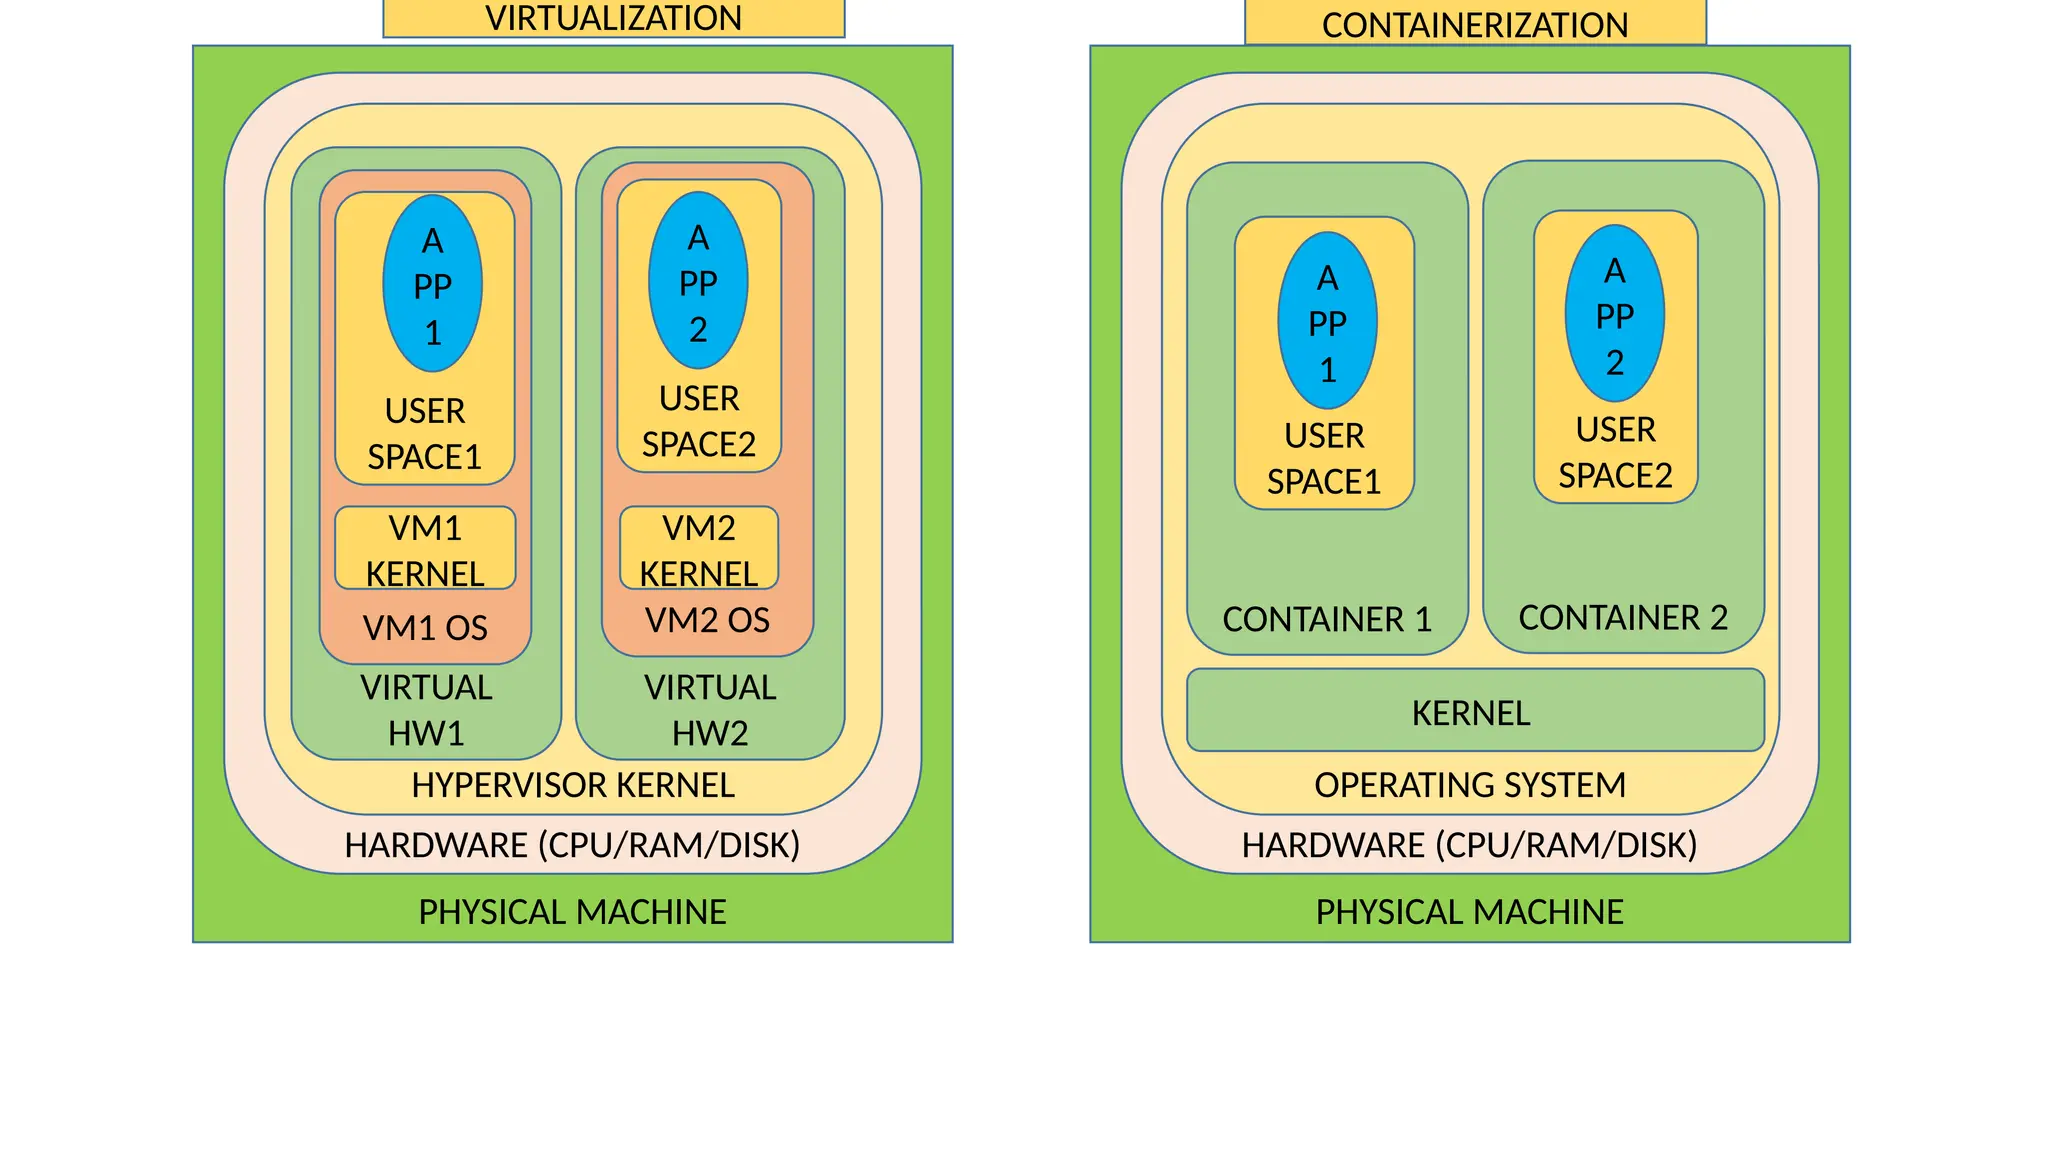
8.
In-order to addressproblems with
traditional system we need Physical or
Logical separation between applications
PHYSICAL MACHINE
HARDWARE (CPU/RAM/DISK)
HYPERVISORKERNEL
VIRTUAL
HW1
VM1 OS
USER
SPACE1
VM1
KERNEL
A
PP
1
VIRTUAL
HW2
VM2 OS
VM2
KERNEL
USER
SPACE2
A
PP
2
PHYSICAL MACHINE
HARDWARE (CPU/RAM/DISK)
OPERATING SYSTEM
KERNEL
CONTAINER 1 CONTAINER 2
USER
SPACE1
USER
SPACE2
A
PP
1
A
PP
2
VIRTUALIZATION CONTAINERIZATION
11.
Containerization Virtualization
Are aboutvirtualizing the operating system
subsystems(Network,Filesystems,Process…)
Based on emulating Hardware or are about
virtualizing hardware
Single kernel Multiple kernels
Initially embraced by service providers Initially embraced by enterprises
Under resource crunch containers are stable then
VMs as only one kernel tries to solve problem
Under resource crunch VM's running on
hypervisors are unstable as one+ kernels start to
solve the same problem
Lightness makes them far more dense and elastic Less elasticity and density
12.
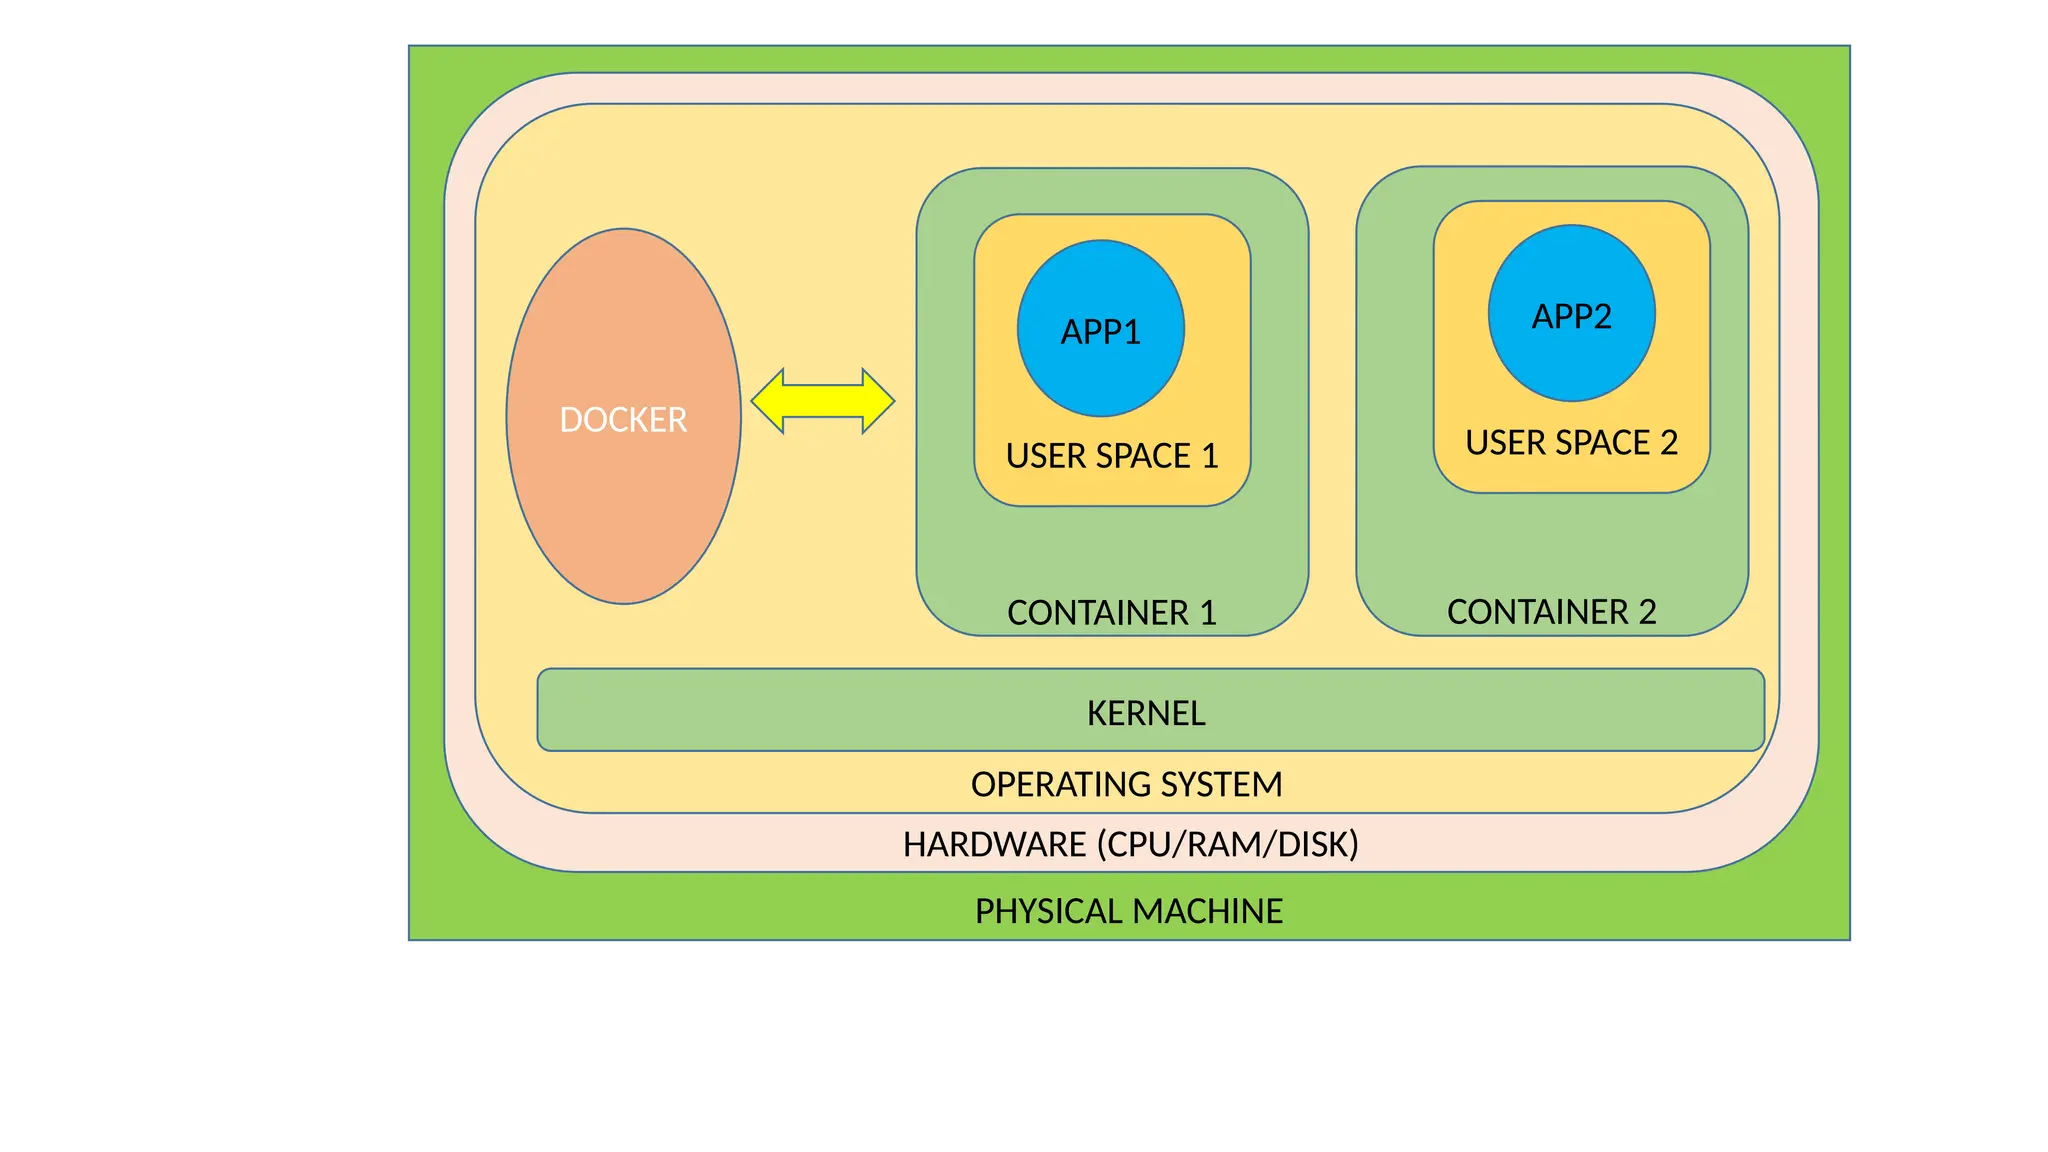
We need toknow about docker . But why ?
Docker is a tool for managing
containers .Rkt is similar tool like docker .
Openshift uses docker
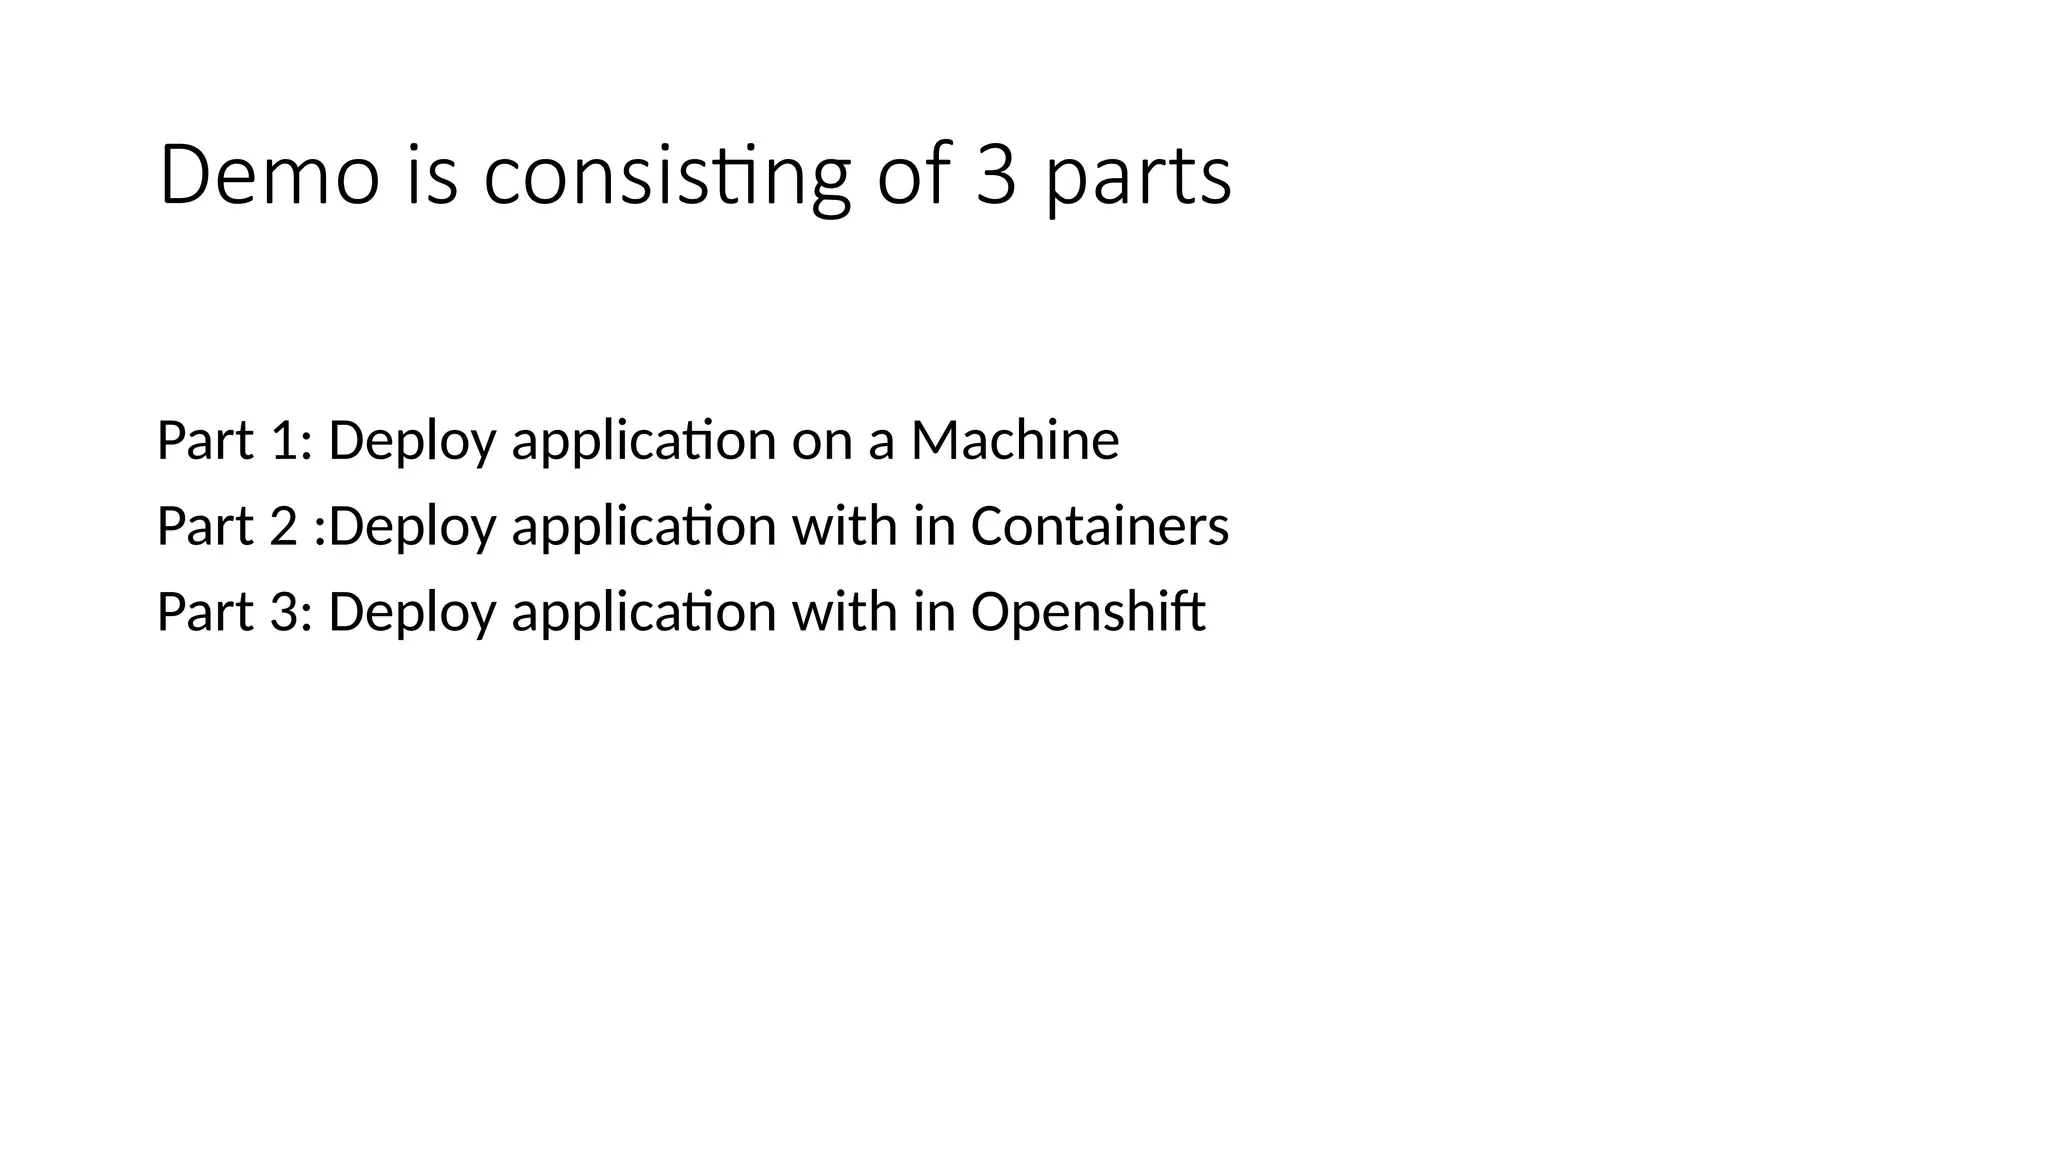
Demo is consistingof 3 parts
Part 1: Deploy application on a Machine
Part 2 :Deploy application with in Containers
Part 3: Deploy application with in Openshift
15.
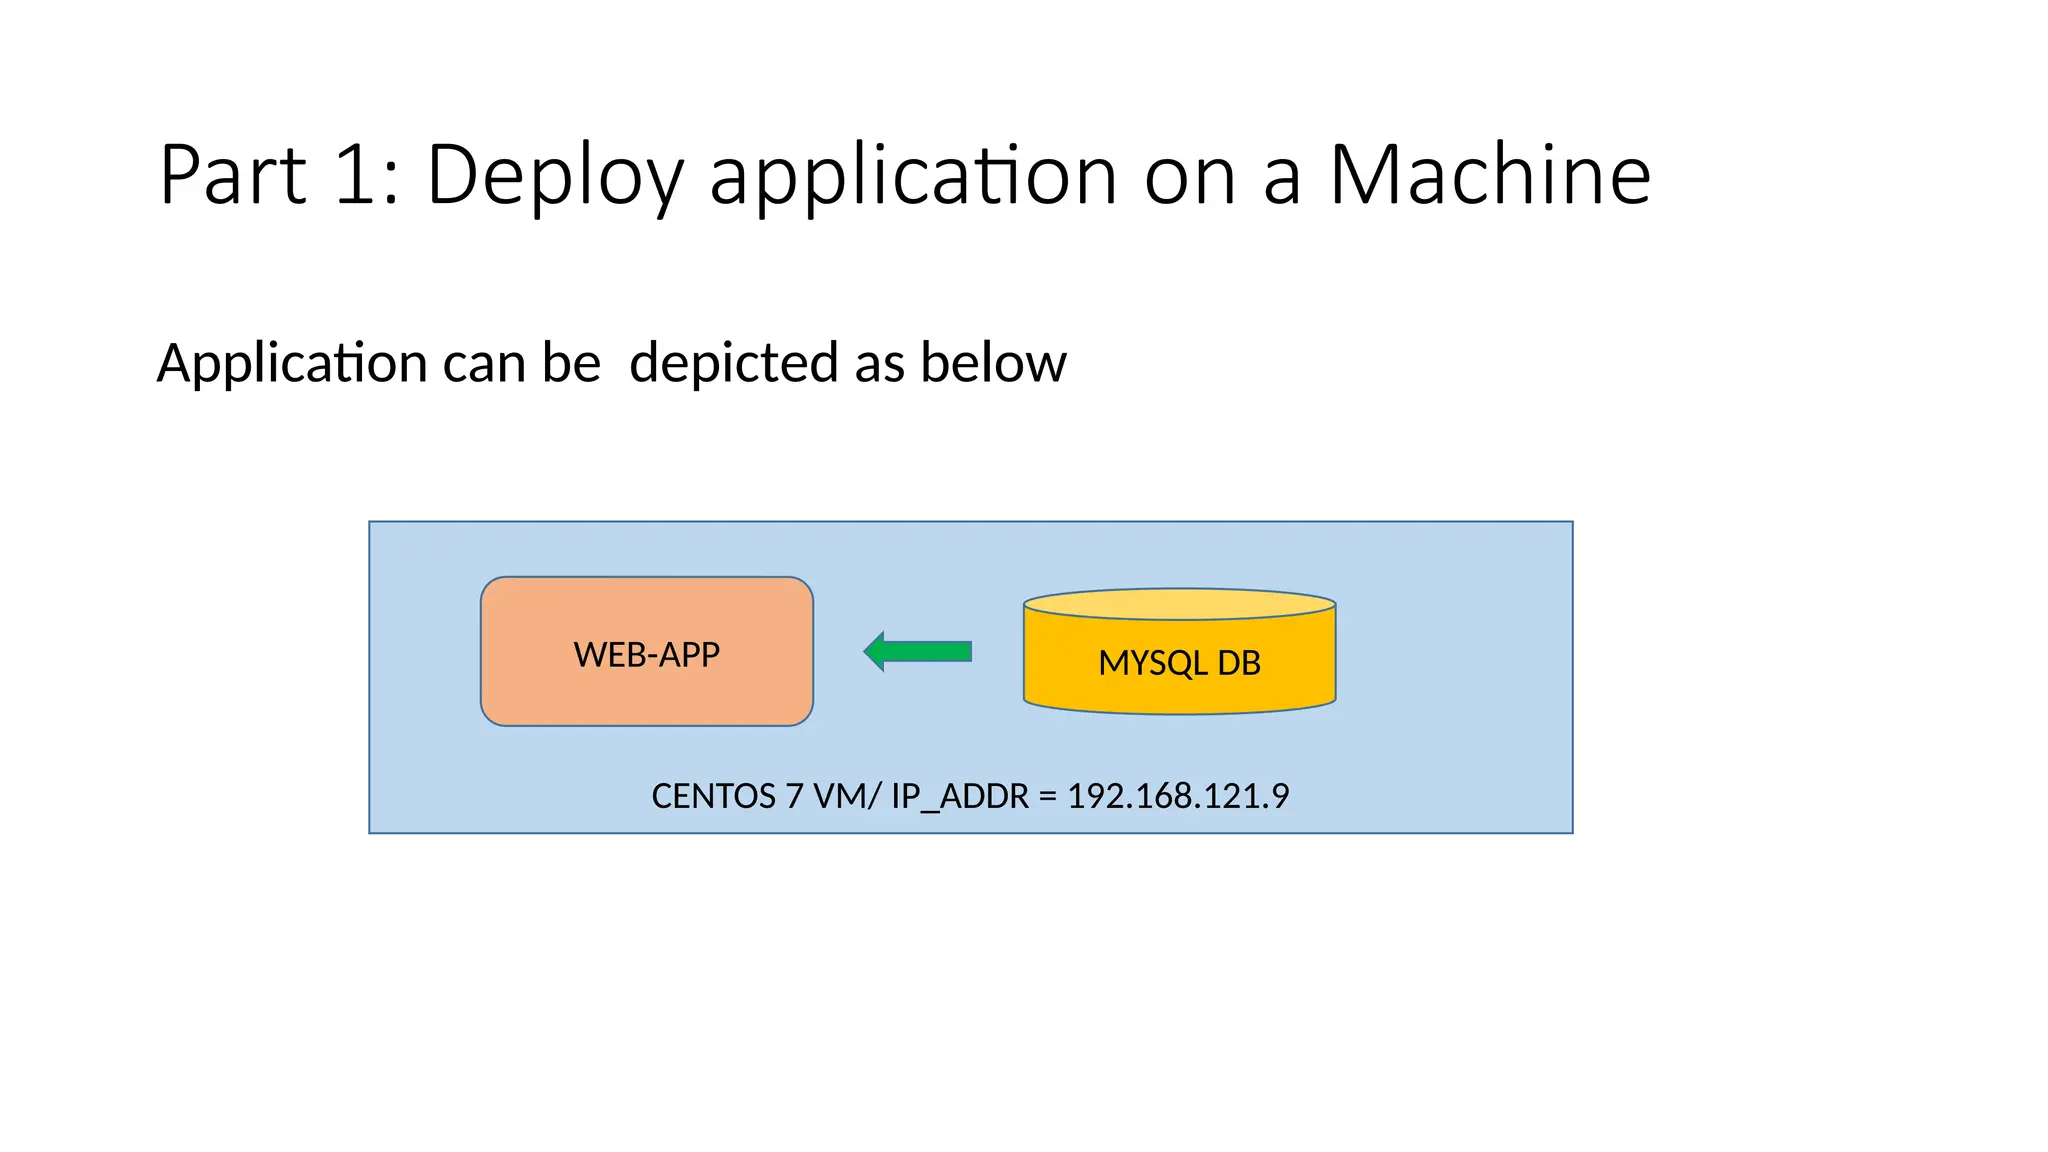
Part 1: Deployapplication on a Machine
Application can be depicted as below
CENTOS 7 VM/ IP_ADDR = 192.168.121.9
WEB-APP MYSQL DB
16.
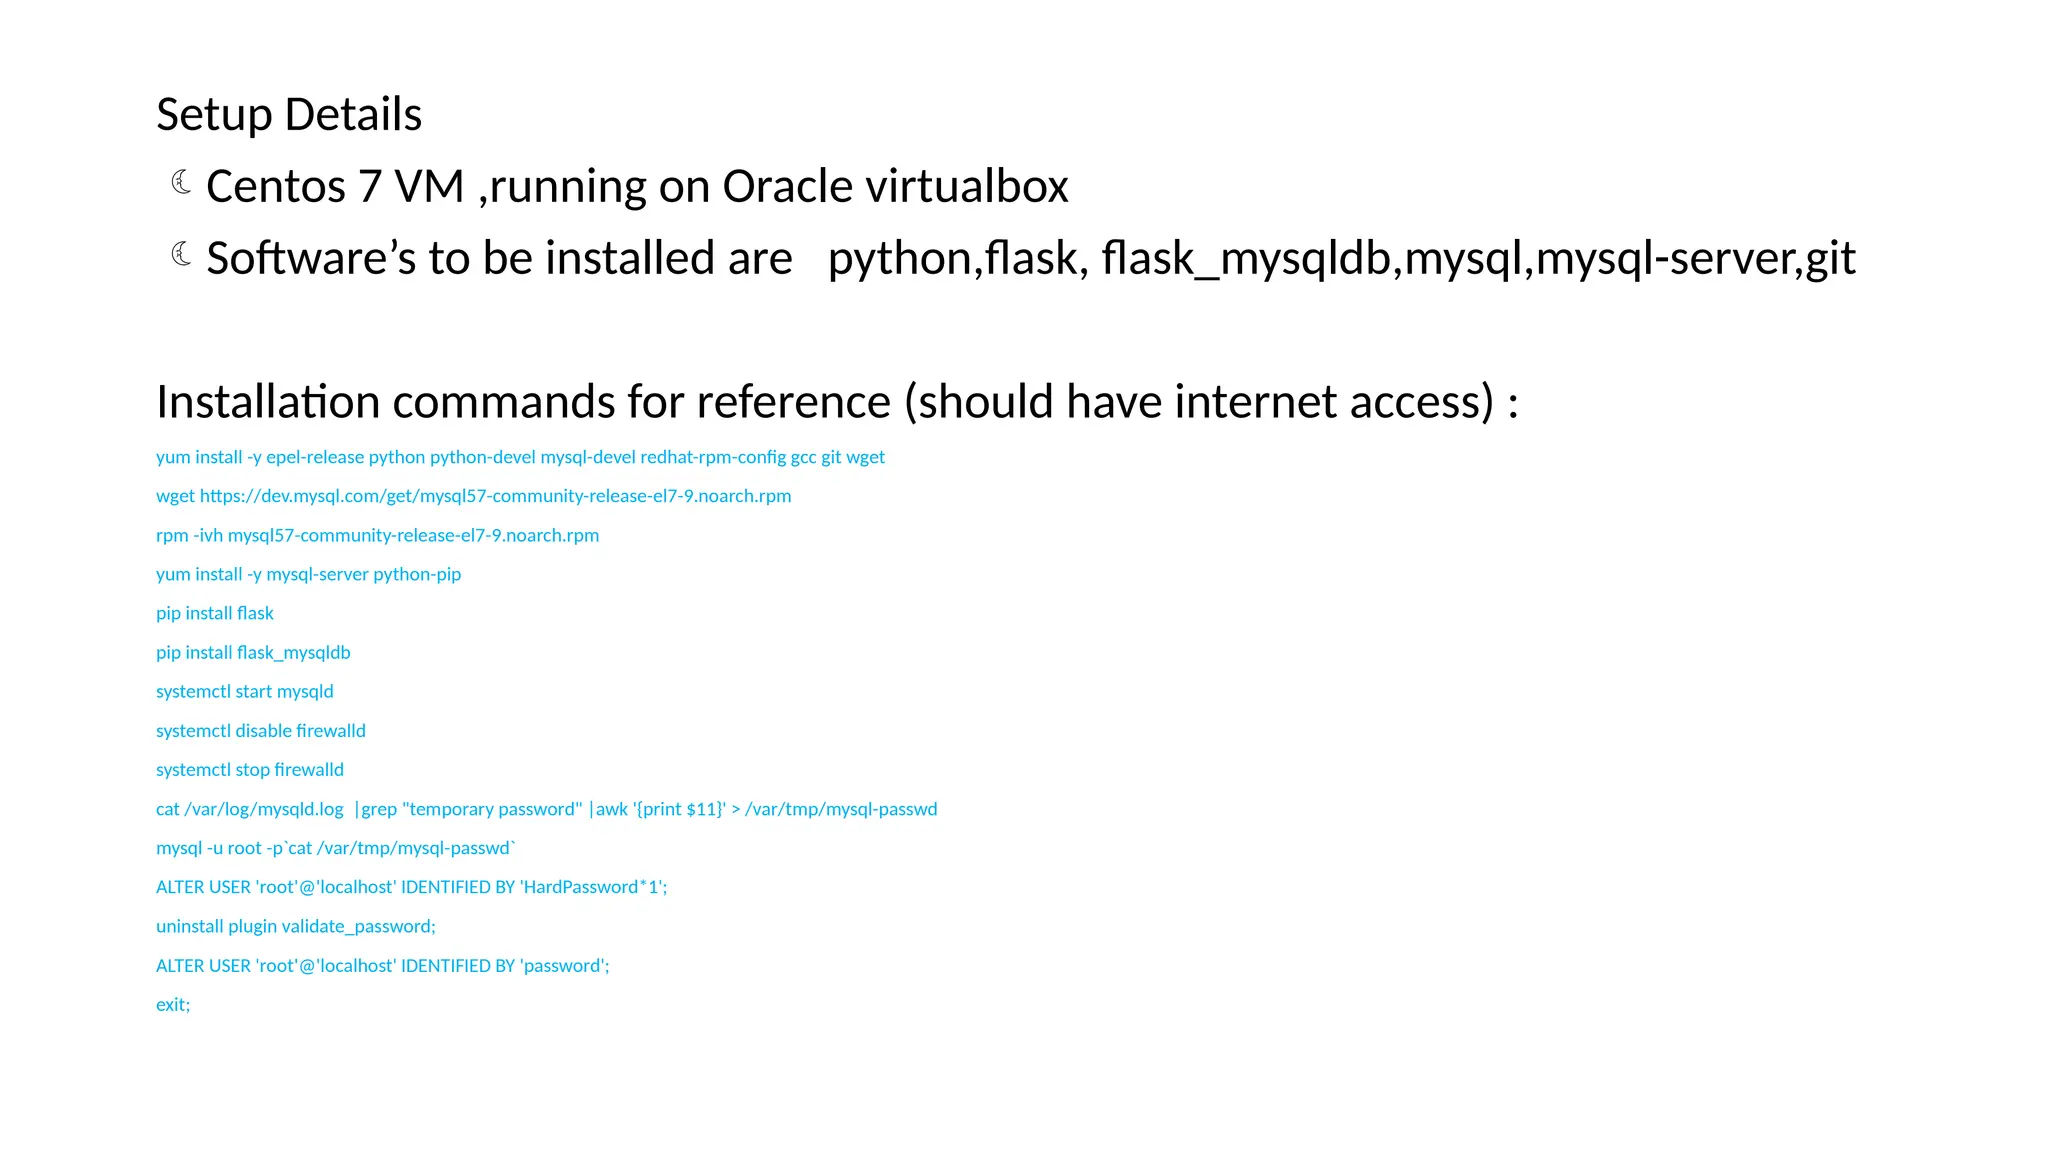
Setup Details
Centos 7VM ,running on Oracle virtualbox
Software’s to be installed are python,flask, flask_mysqldb,mysql,mysql-server,git
Installation commands for reference (should have internet access) :
yum install -y epel-release python python-devel mysql-devel redhat-rpm-config gcc git wget
wget https://dev.mysql.com/get/mysql57-community-release-el7-9.noarch.rpm
rpm -ivh mysql57-community-release-el7-9.noarch.rpm
yum install -y mysql-server python-pip
pip install flask
pip install flask_mysqldb
systemctl start mysqld
systemctl disable firewalld
systemctl stop firewalld
cat /var/log/mysqld.log |grep "temporary password" |awk '{print $11}' > /var/tmp/mysql-passwd
mysql -u root -p`cat /var/tmp/mysql-passwd`
ALTER USER 'root'@'localhost' IDENTIFIED BY 'HardPassword*1';
uninstall plugin validate_password;
ALTER USER 'root'@'localhost' IDENTIFIED BY 'password';
exit;
17.
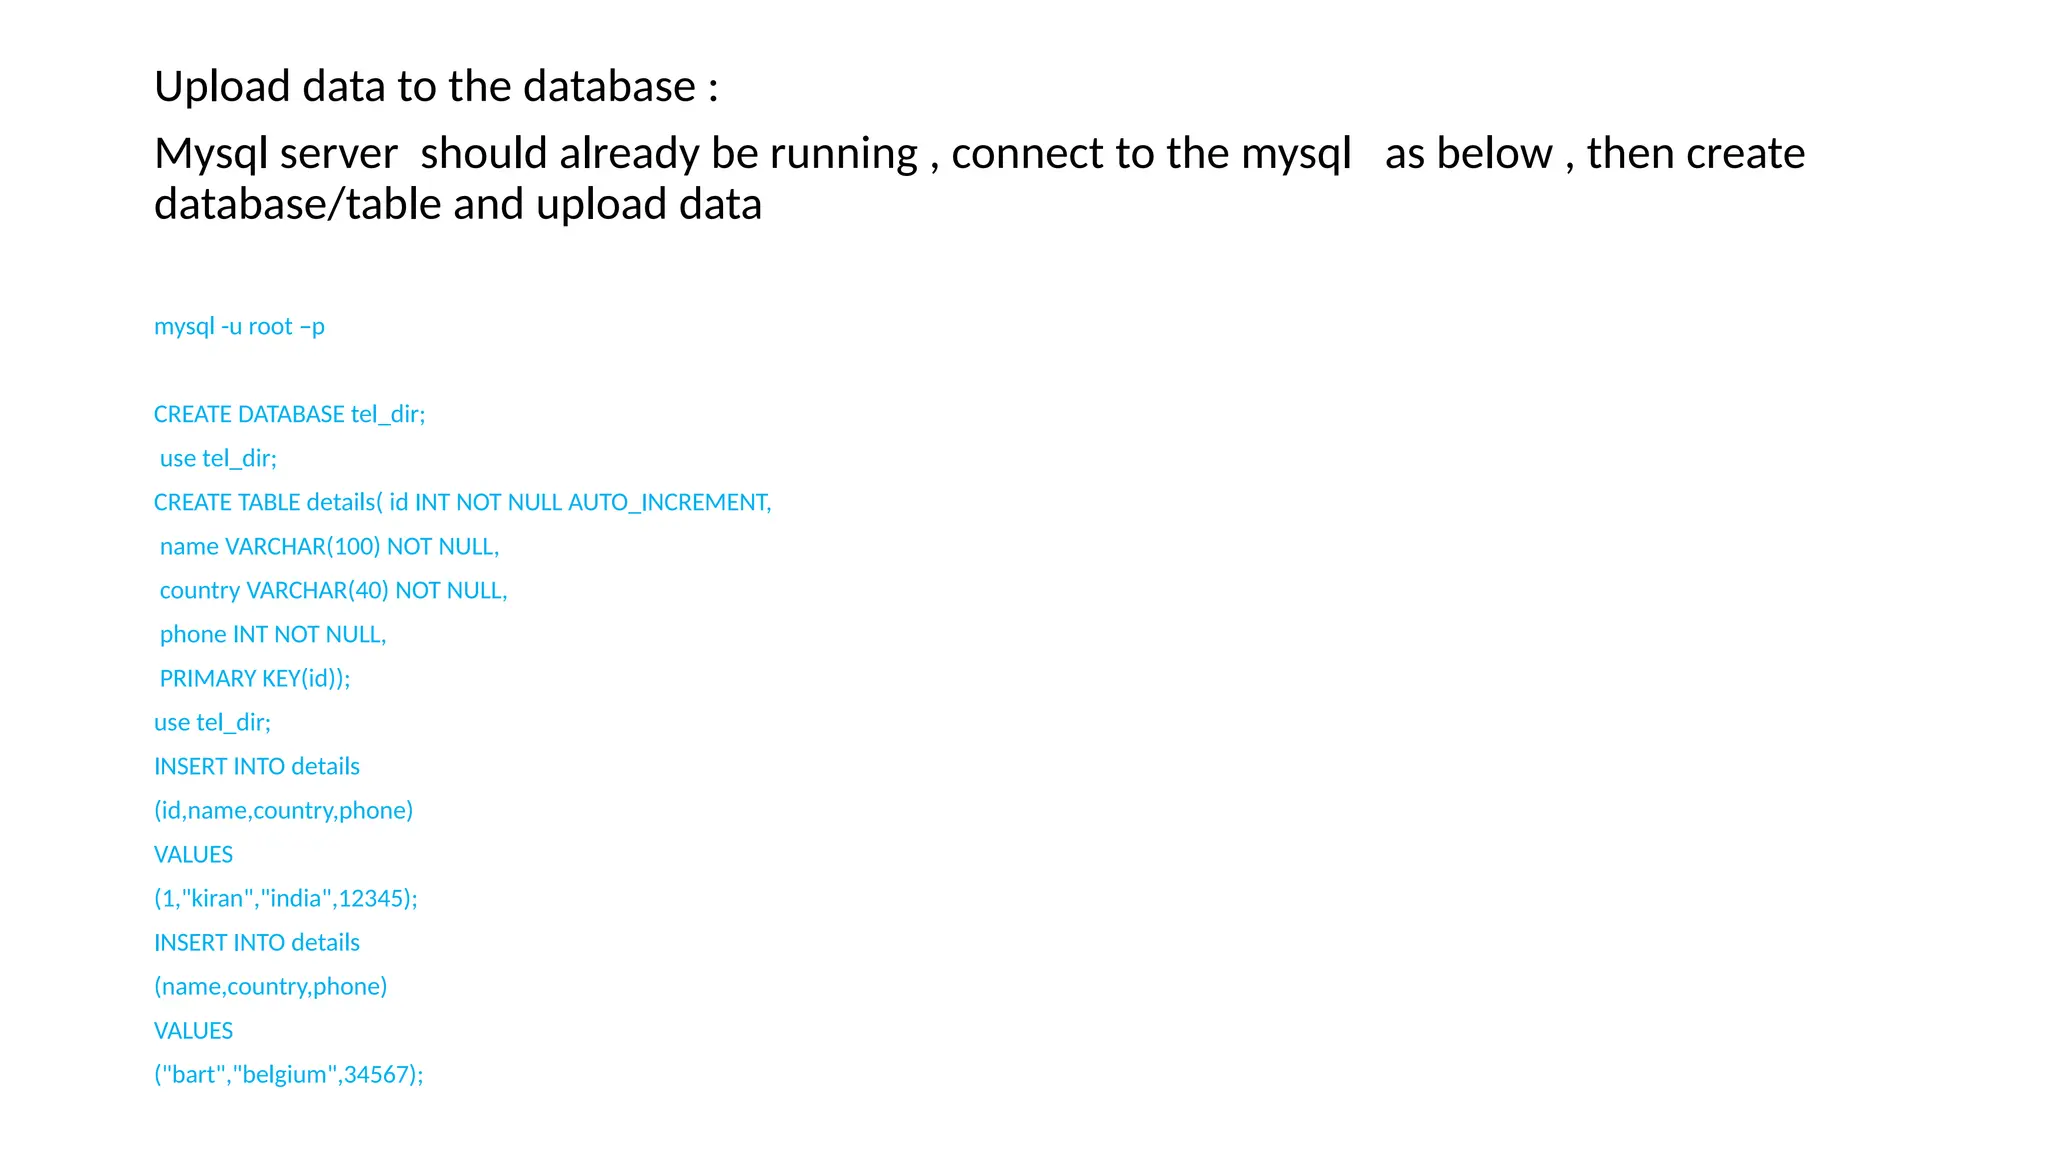
Upload data tothe database :
Mysql server should already be running , connect to the mysql as below , then create
database/table and upload data
mysql -u root –p
CREATE DATABASE tel_dir;
use tel_dir;
CREATE TABLE details( id INT NOT NULL AUTO_INCREMENT,
name VARCHAR(100) NOT NULL,
country VARCHAR(40) NOT NULL,
phone INT NOT NULL,
PRIMARY KEY(id));
use tel_dir;
INSERT INTO details
(id,name,country,phone)
VALUES
(1,"kiran","india",12345);
INSERT INTO details
(name,country,phone)
VALUES
("bart","belgium",34567);
18.
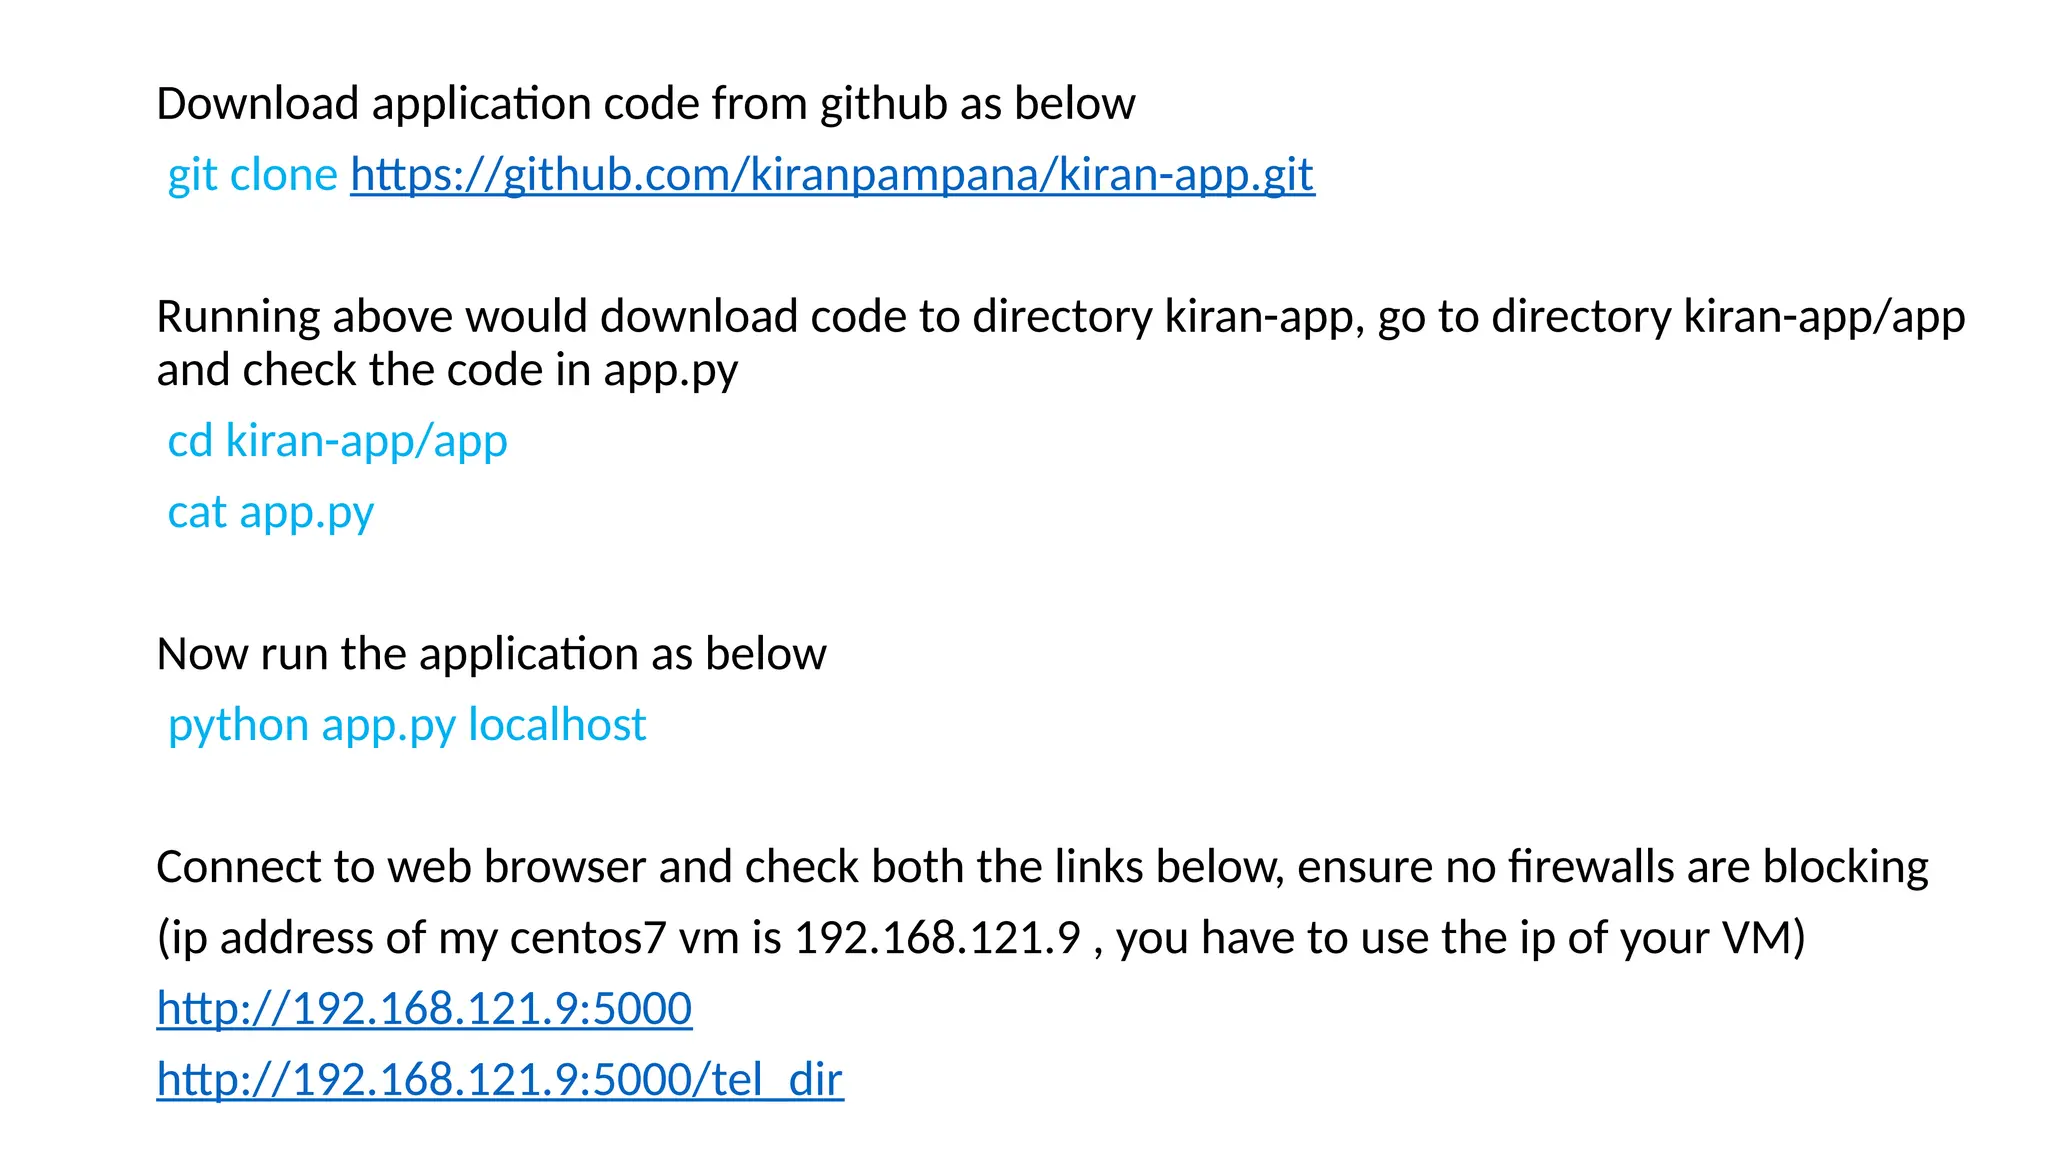
Download application codefrom github as below
git clone https://github.com/kiranpampana/kiran-app.git
Running above would download code to directory kiran-app, go to directory kiran-app/app
and check the code in app.py
cd kiran-app/app
cat app.py
Now run the application as below
python app.py localhost
Connect to web browser and check both the links below, ensure no firewalls are blocking
(ip address of my centos7 vm is 192.168.121.9 , you have to use the ip of your VM)
http://192.168.121.9:5000
http://192.168.121.9:5000/tel_dir
19.
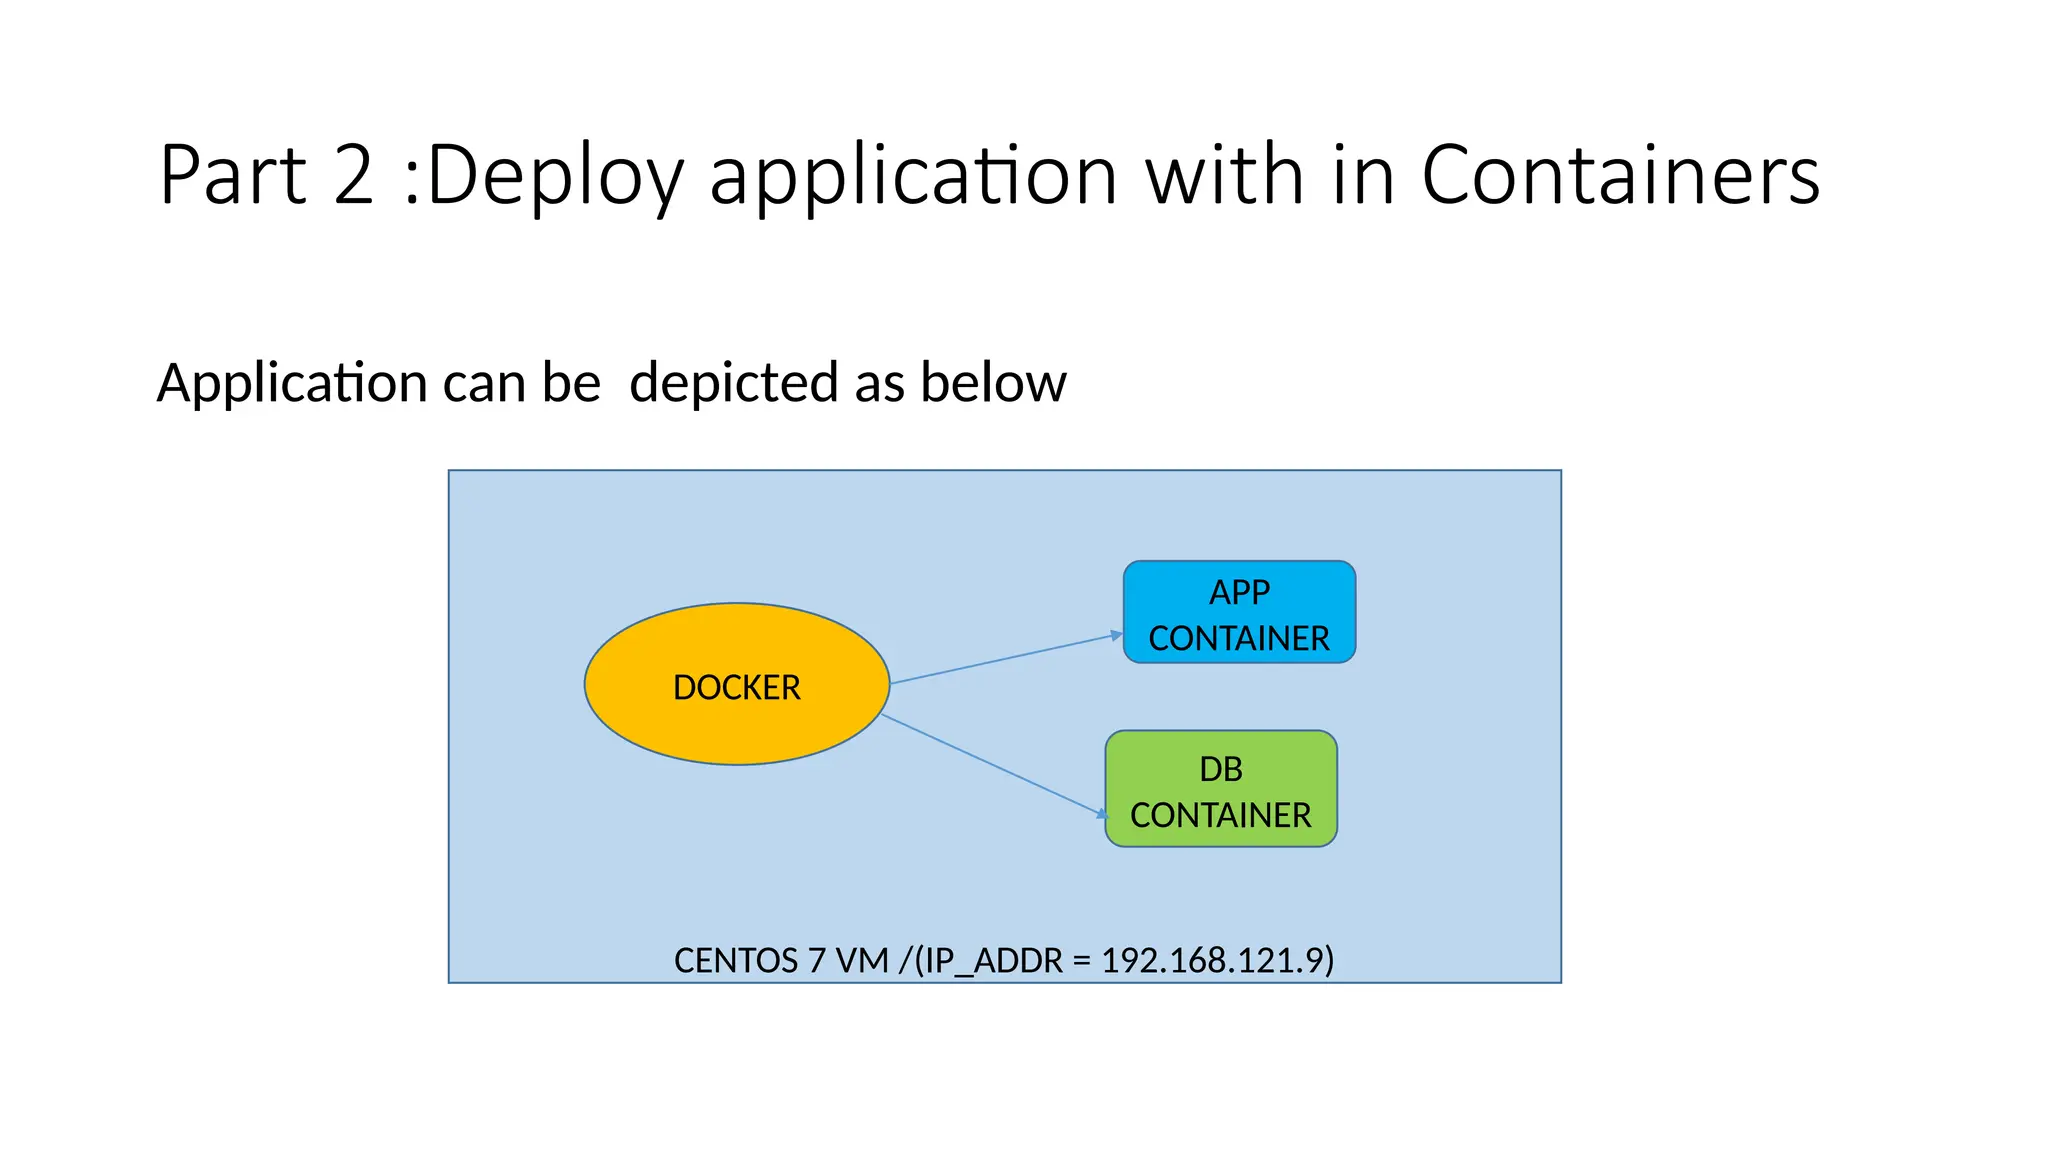
Part 2 :Deployapplication with in Containers
Application can be depicted as below
CENTOS 7 VM /(IP_ADDR = 192.168.121.9)
APP
CONTAINER
DB
CONTAINER
DOCKER
20.
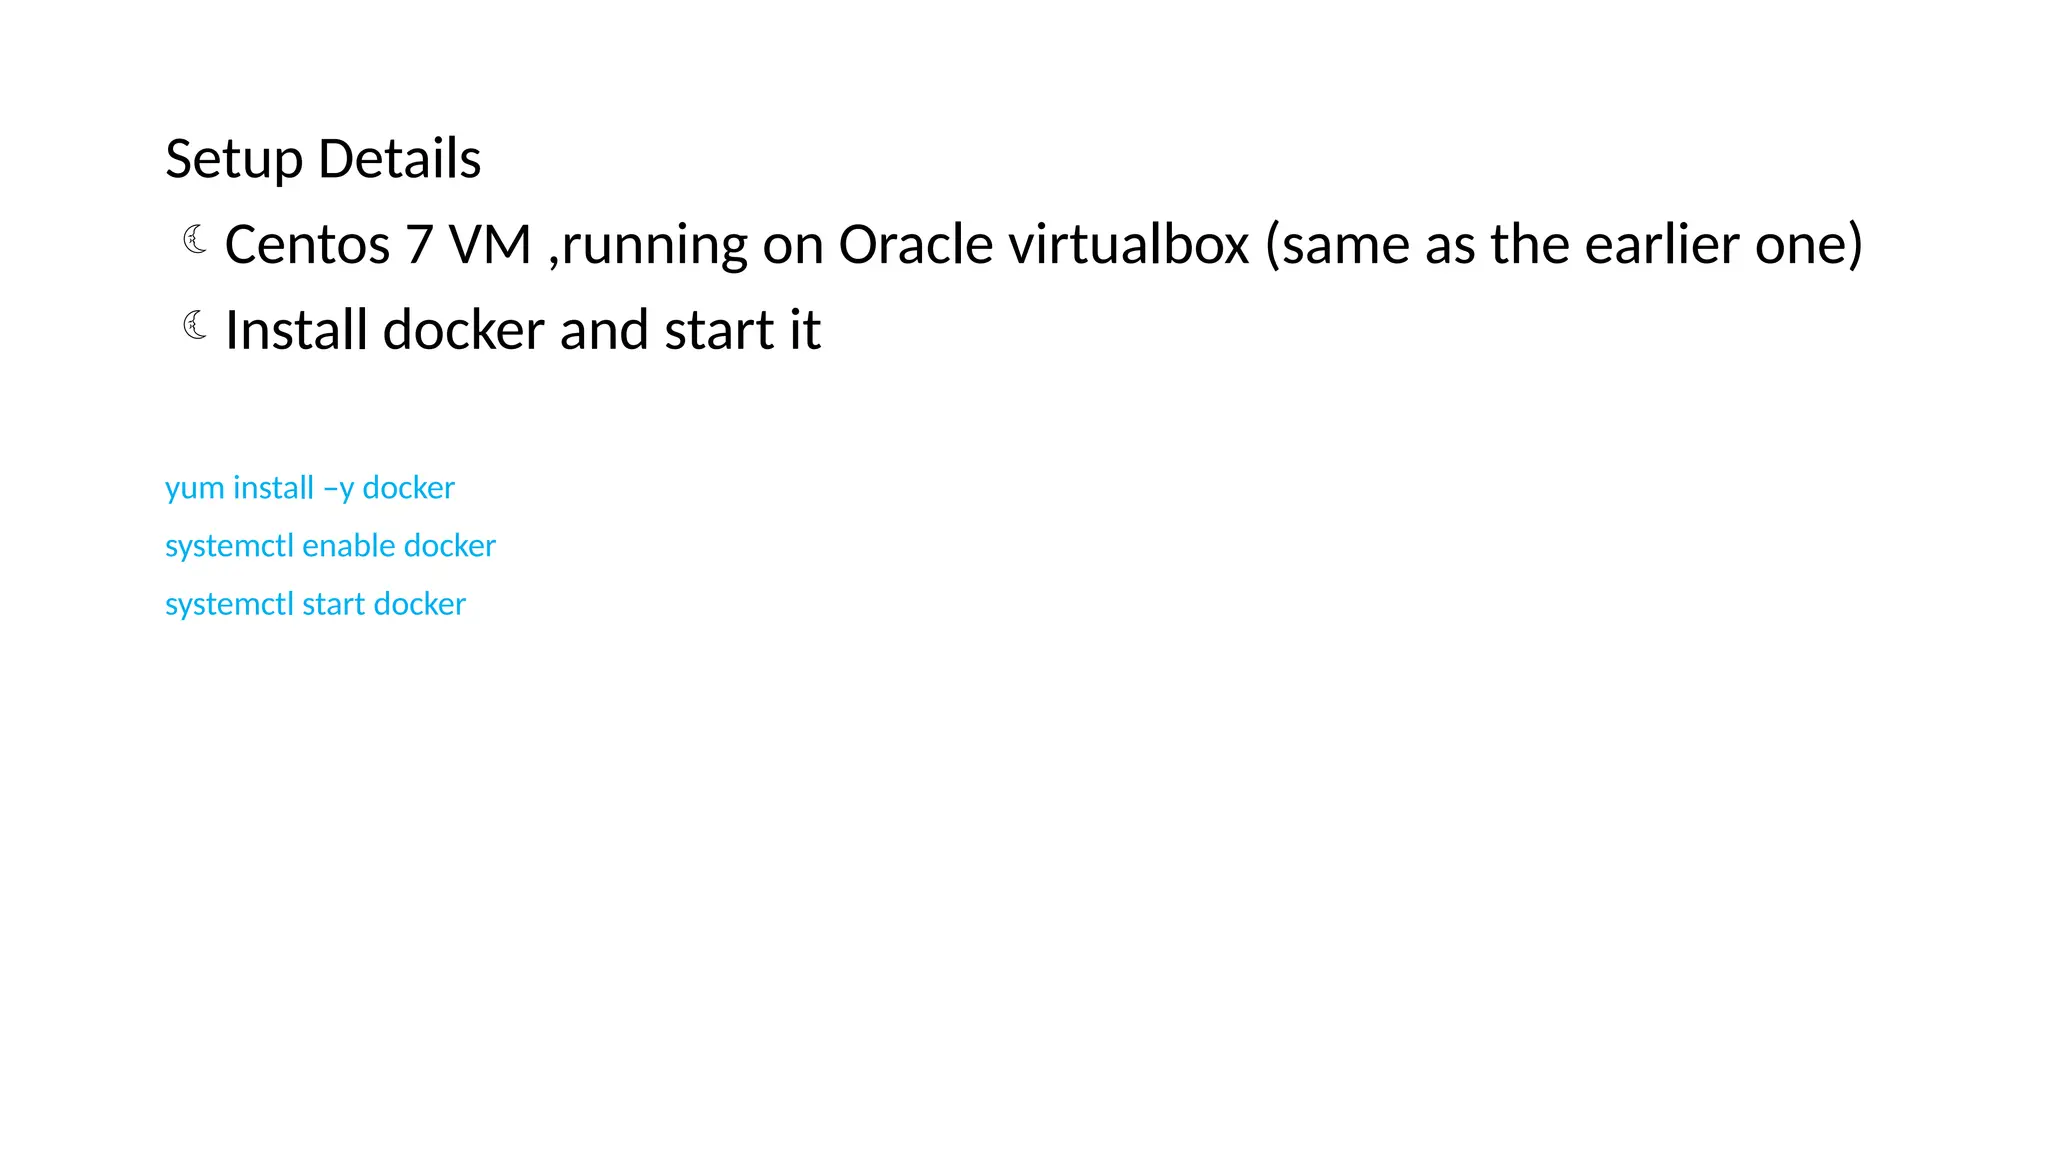
Setup Details
Centos 7VM ,running on Oracle virtualbox (same as the earlier one)
Install docker and start it
yum install –y docker
systemctl enable docker
systemctl start docker
21.
Create and Startdatabase container as below
docker run -itd --name db -e MYSQL_ROOT_PASSWORD=password
mysql
Connect to container
docker exec –it db bash
22.
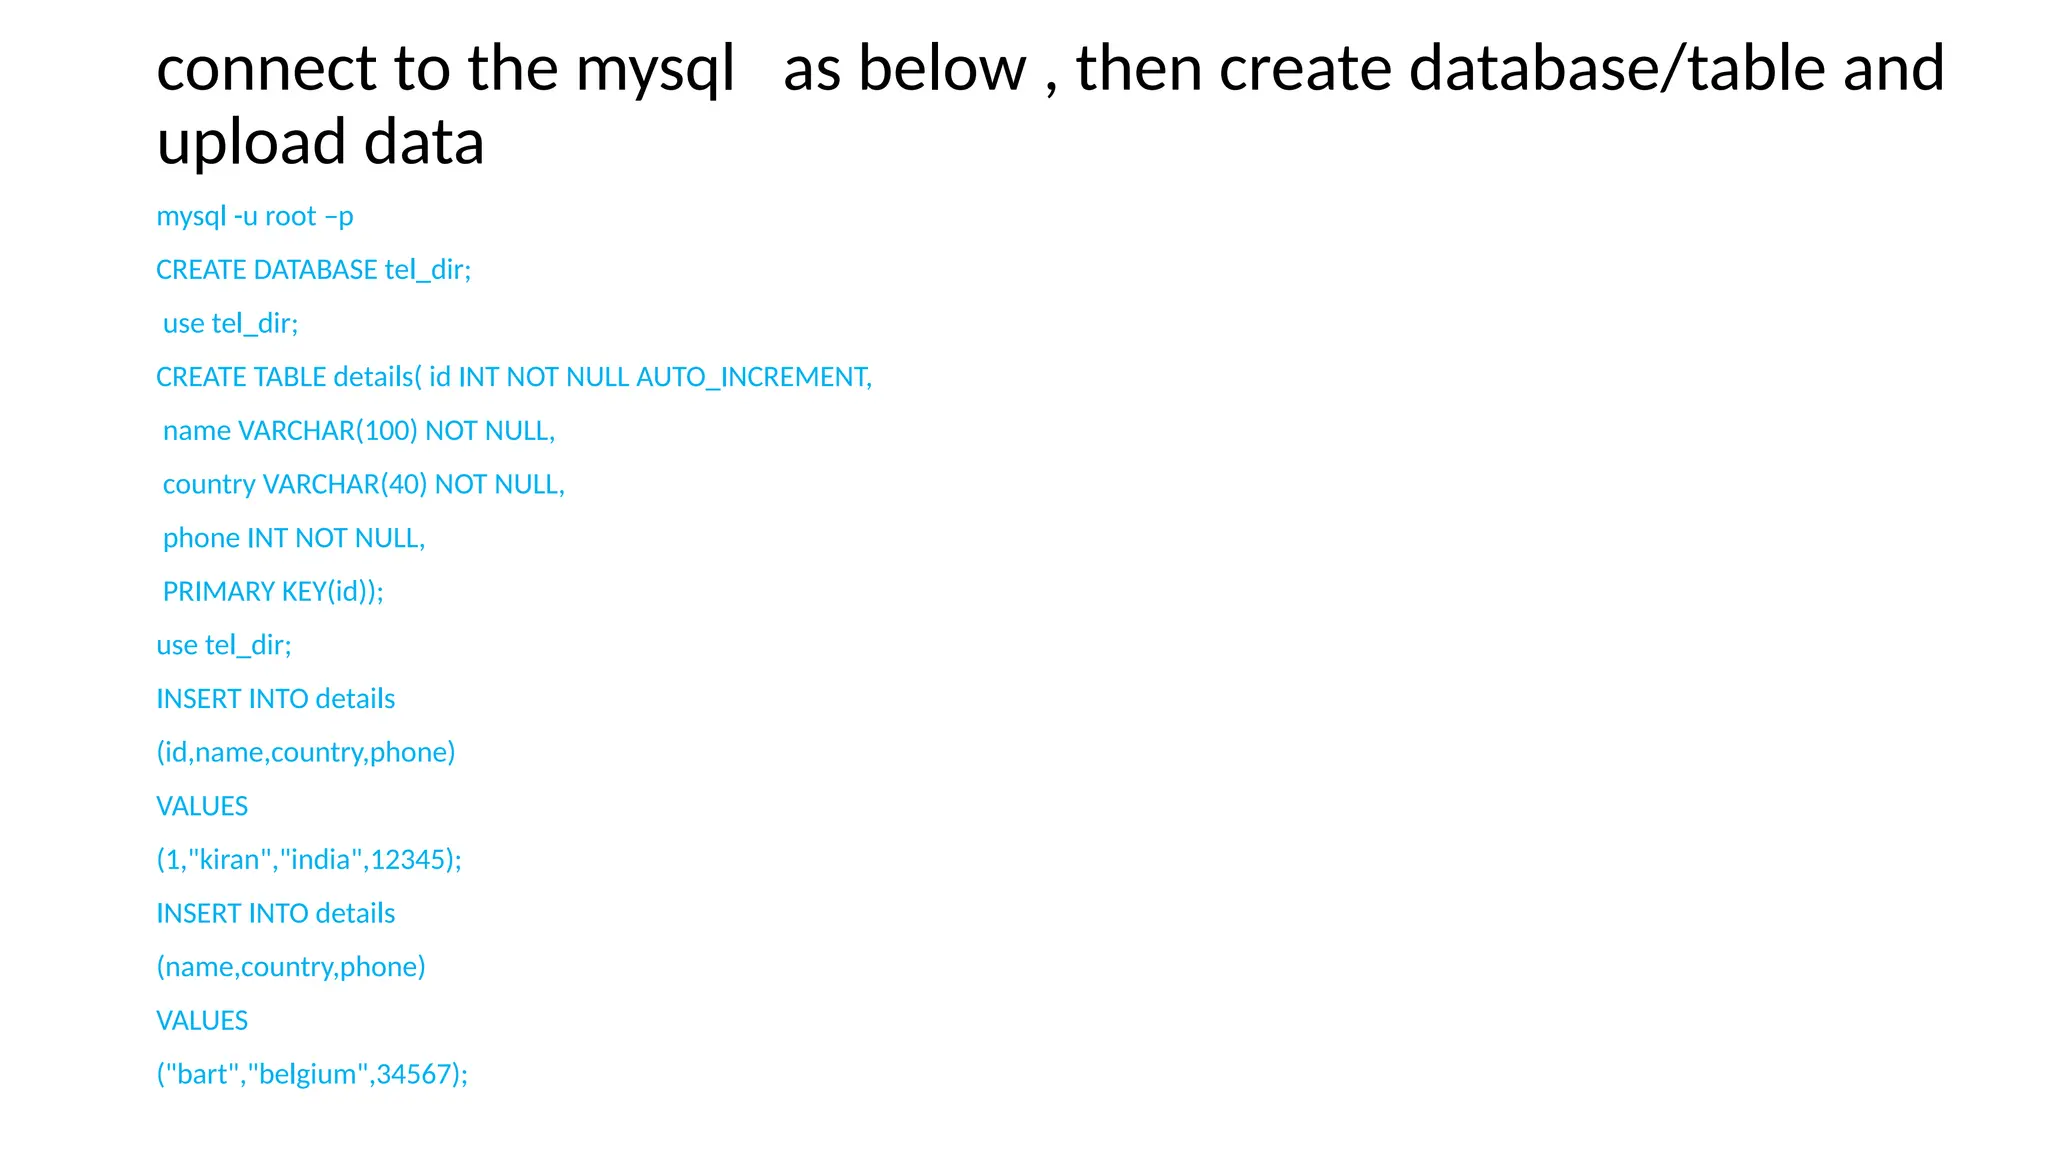
connect to themysql as below , then create database/table and
upload data
mysql -u root –p
CREATE DATABASE tel_dir;
use tel_dir;
CREATE TABLE details( id INT NOT NULL AUTO_INCREMENT,
name VARCHAR(100) NOT NULL,
country VARCHAR(40) NOT NULL,
phone INT NOT NULL,
PRIMARY KEY(id));
use tel_dir;
INSERT INTO details
(id,name,country,phone)
VALUES
(1,"kiran","india",12345);
INSERT INTO details
(name,country,phone)
VALUES
("bart","belgium",34567);
23.
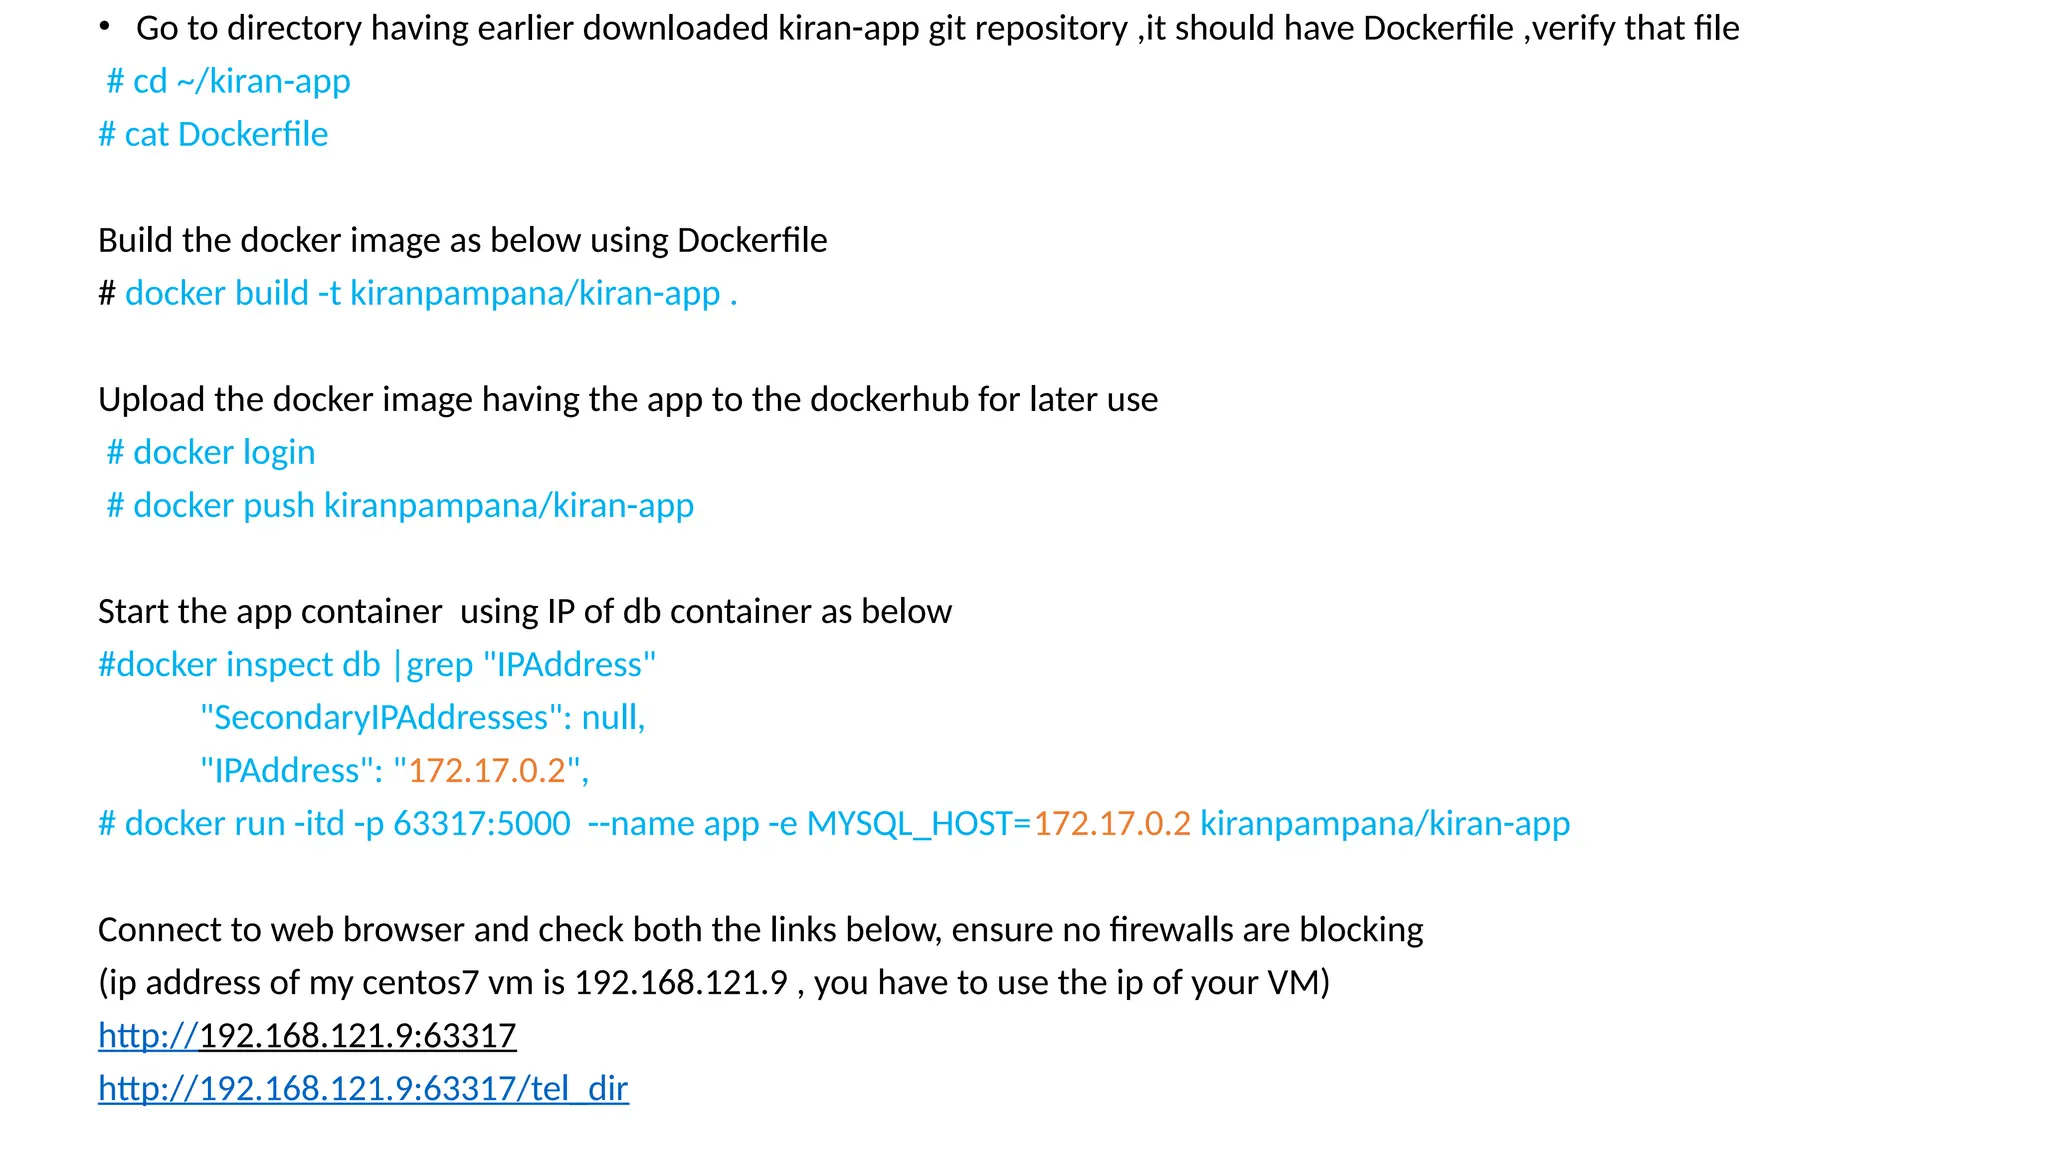
• Go todirectory having earlier downloaded kiran-app git repository ,it should have Dockerfile ,verify that file
# cd ~/kiran-app
# cat Dockerfile
Build the docker image as below using Dockerfile
# docker build -t kiranpampana/kiran-app .
Upload the docker image having the app to the dockerhub for later use
# docker login
# docker push kiranpampana/kiran-app
Start the app container using IP of db container as below
#docker inspect db |grep "IPAddress"
"SecondaryIPAddresses": null,
"IPAddress": "172.17.0.2",
# docker run -itd -p 63317:5000 --name app -e MYSQL_HOST=172.17.0.2 kiranpampana/kiran-app
Connect to web browser and check both the links below, ensure no firewalls are blocking
(ip address of my centos7 vm is 192.168.121.9 , you have to use the ip of your VM)
http://192.168.121.9:63317
http://192.168.121.9:63317/tel_dir
24.
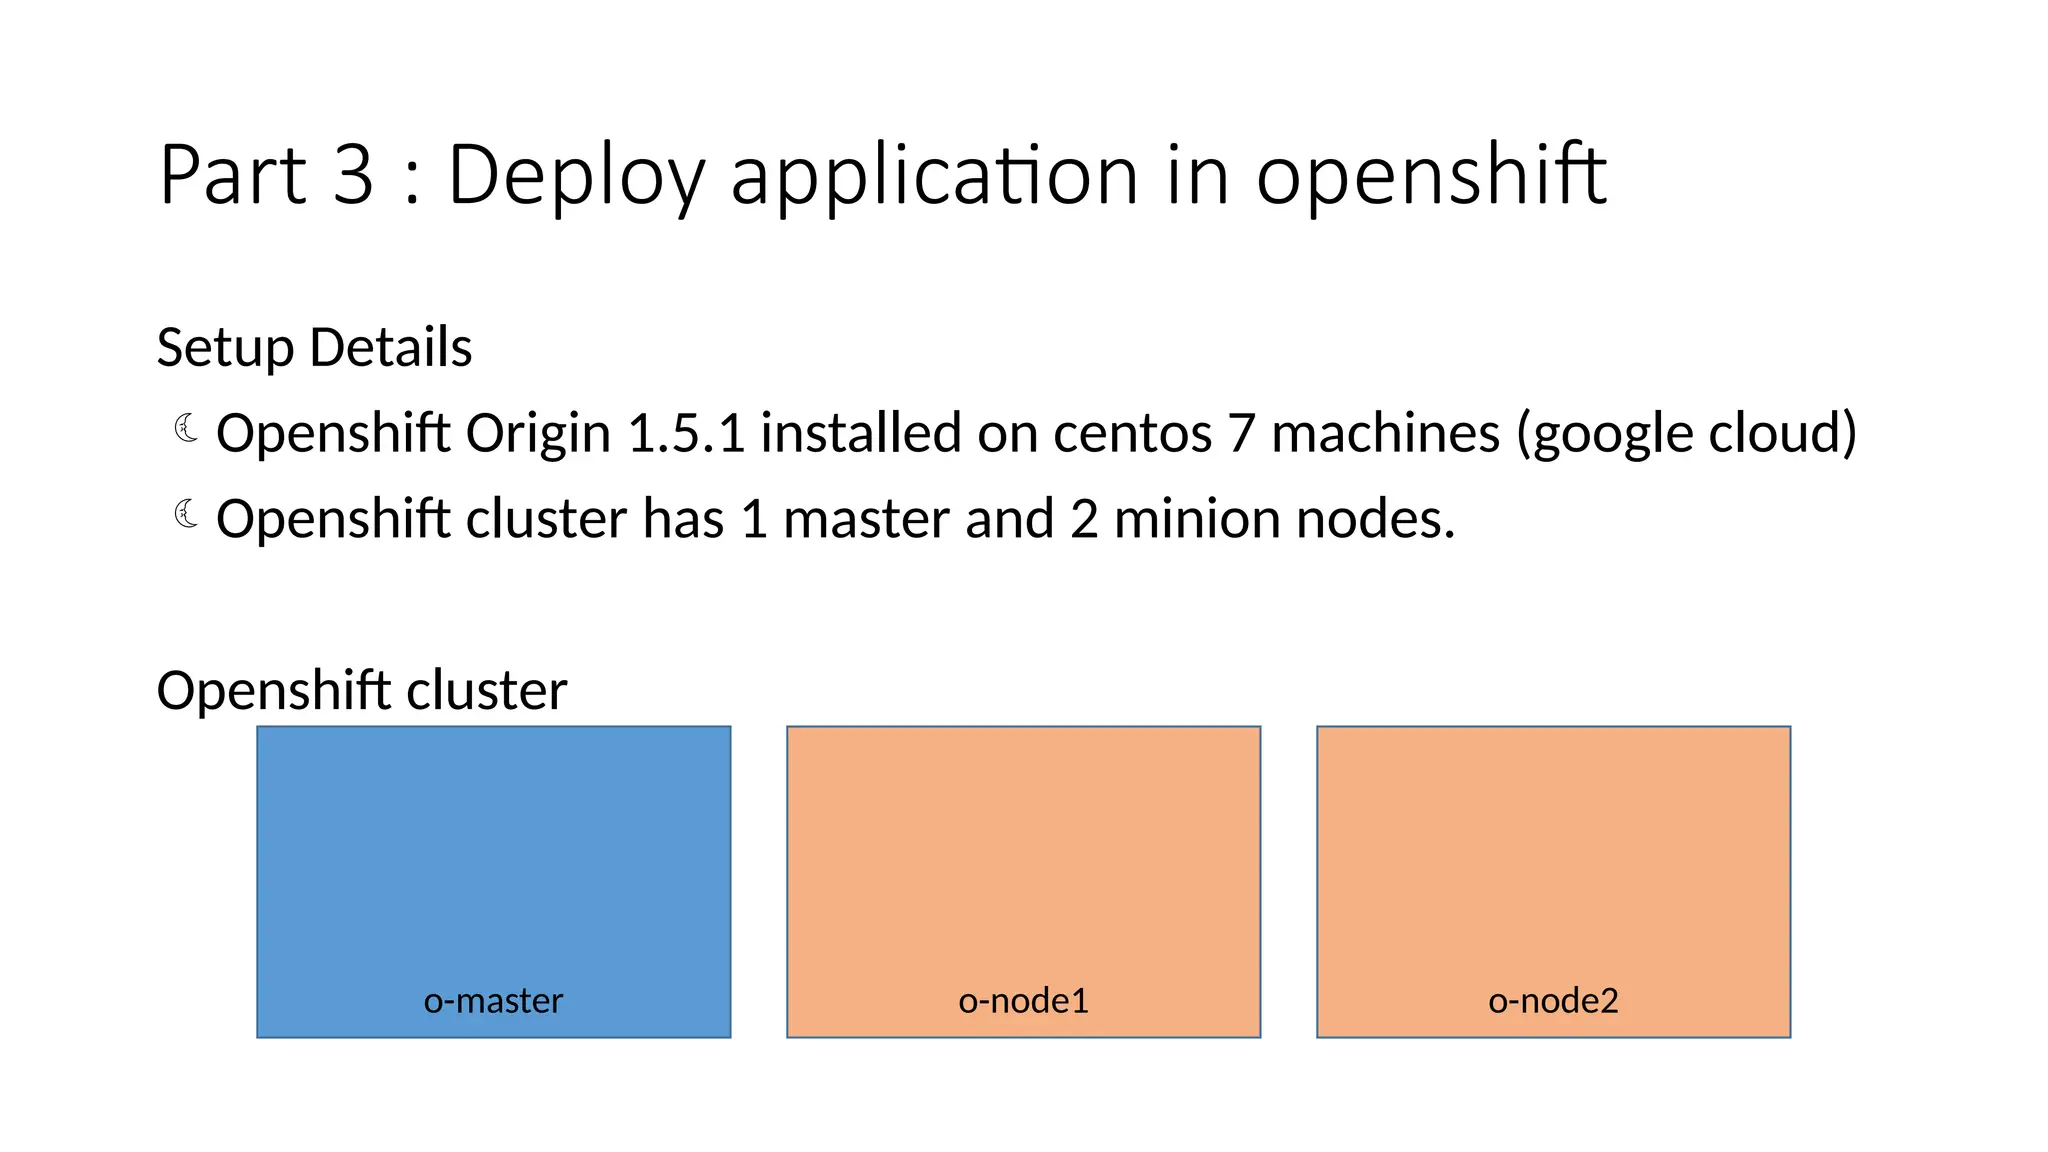
Part 3 :Deploy application in openshift
Setup Details
Openshift Origin 1.5.1 installed on centos 7 machines (google cloud)
Openshift cluster has 1 master and 2 minion nodes.
Openshift cluster
o-master o-node2
o-node1
25.
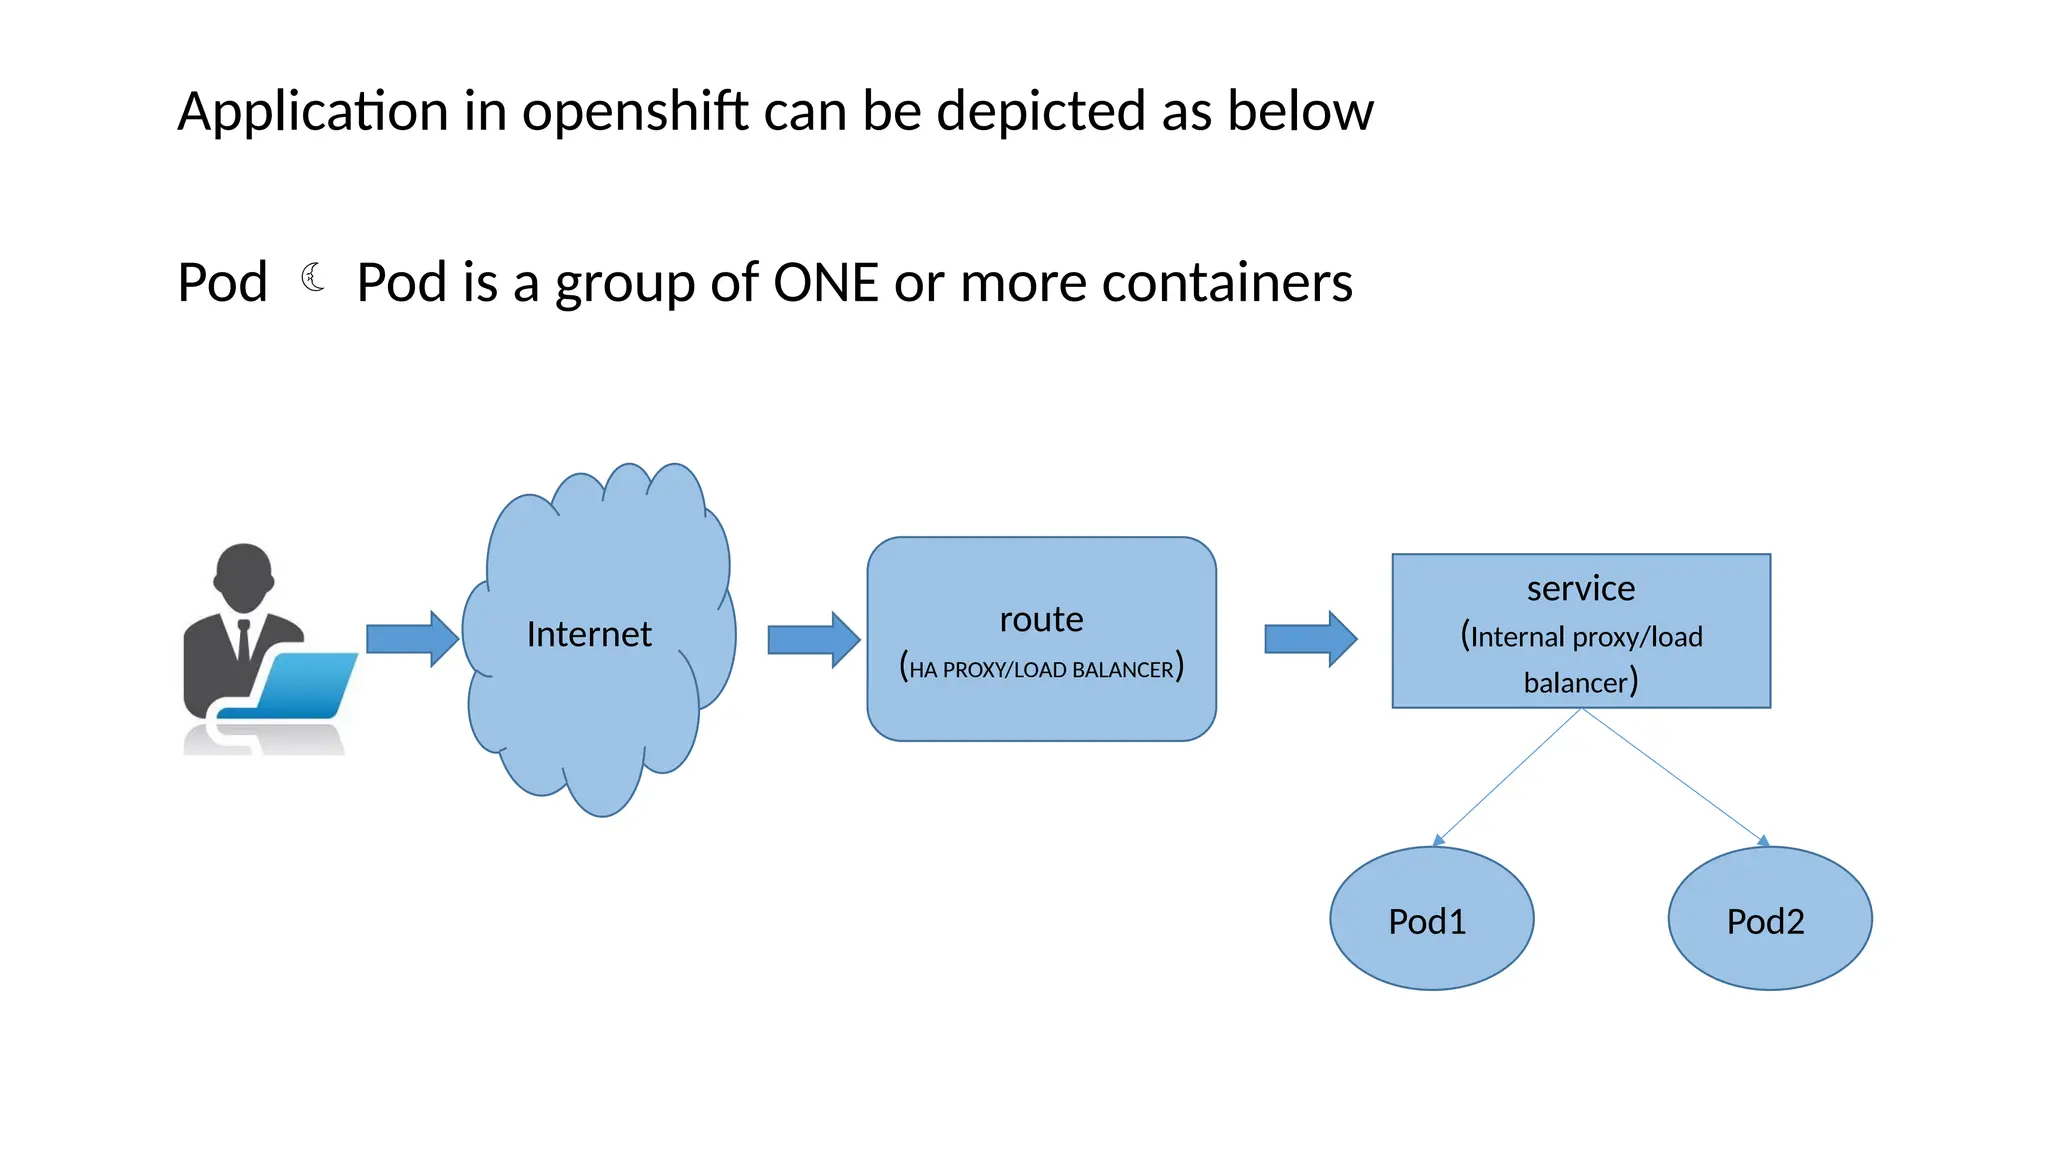
Application in openshiftcan be depicted as below
Pod Pod is a group of ONE or more containers
Internet route
(HA PROXY/LOAD BALANCER)
service
(Internal proxy/load
balancer)
Pod1 Pod2
26.
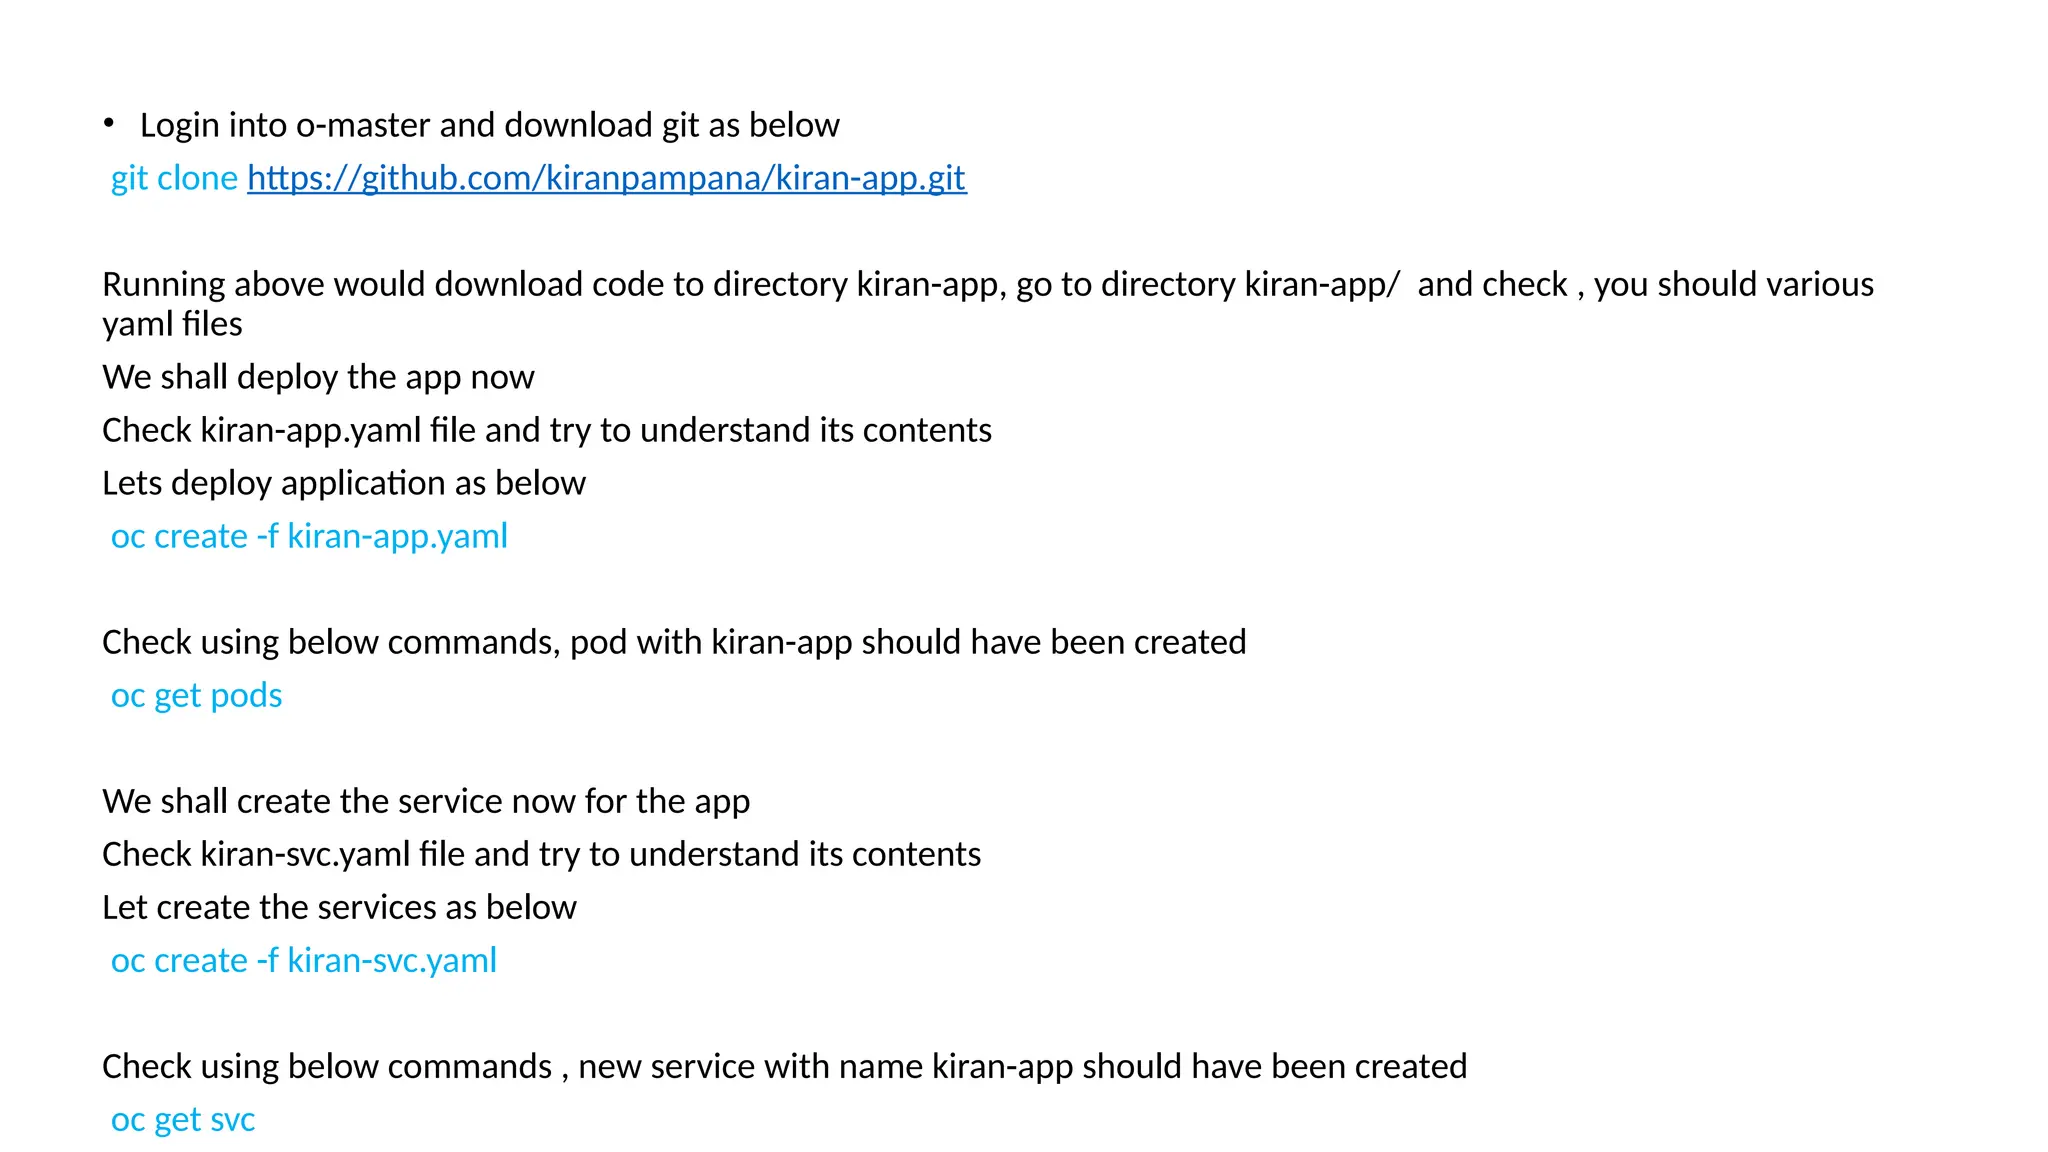
• Login intoo-master and download git as below
git clone https://github.com/kiranpampana/kiran-app.git
Running above would download code to directory kiran-app, go to directory kiran-app/ and check , you should various
yaml files
We shall deploy the app now
Check kiran-app.yaml file and try to understand its contents
Lets deploy application as below
oc create -f kiran-app.yaml
Check using below commands, pod with kiran-app should have been created
oc get pods
We shall create the service now for the app
Check kiran-svc.yaml file and try to understand its contents
Let create the services as below
oc create -f kiran-svc.yaml
Check using below commands , new service with name kiran-app should have been created
oc get svc
27.
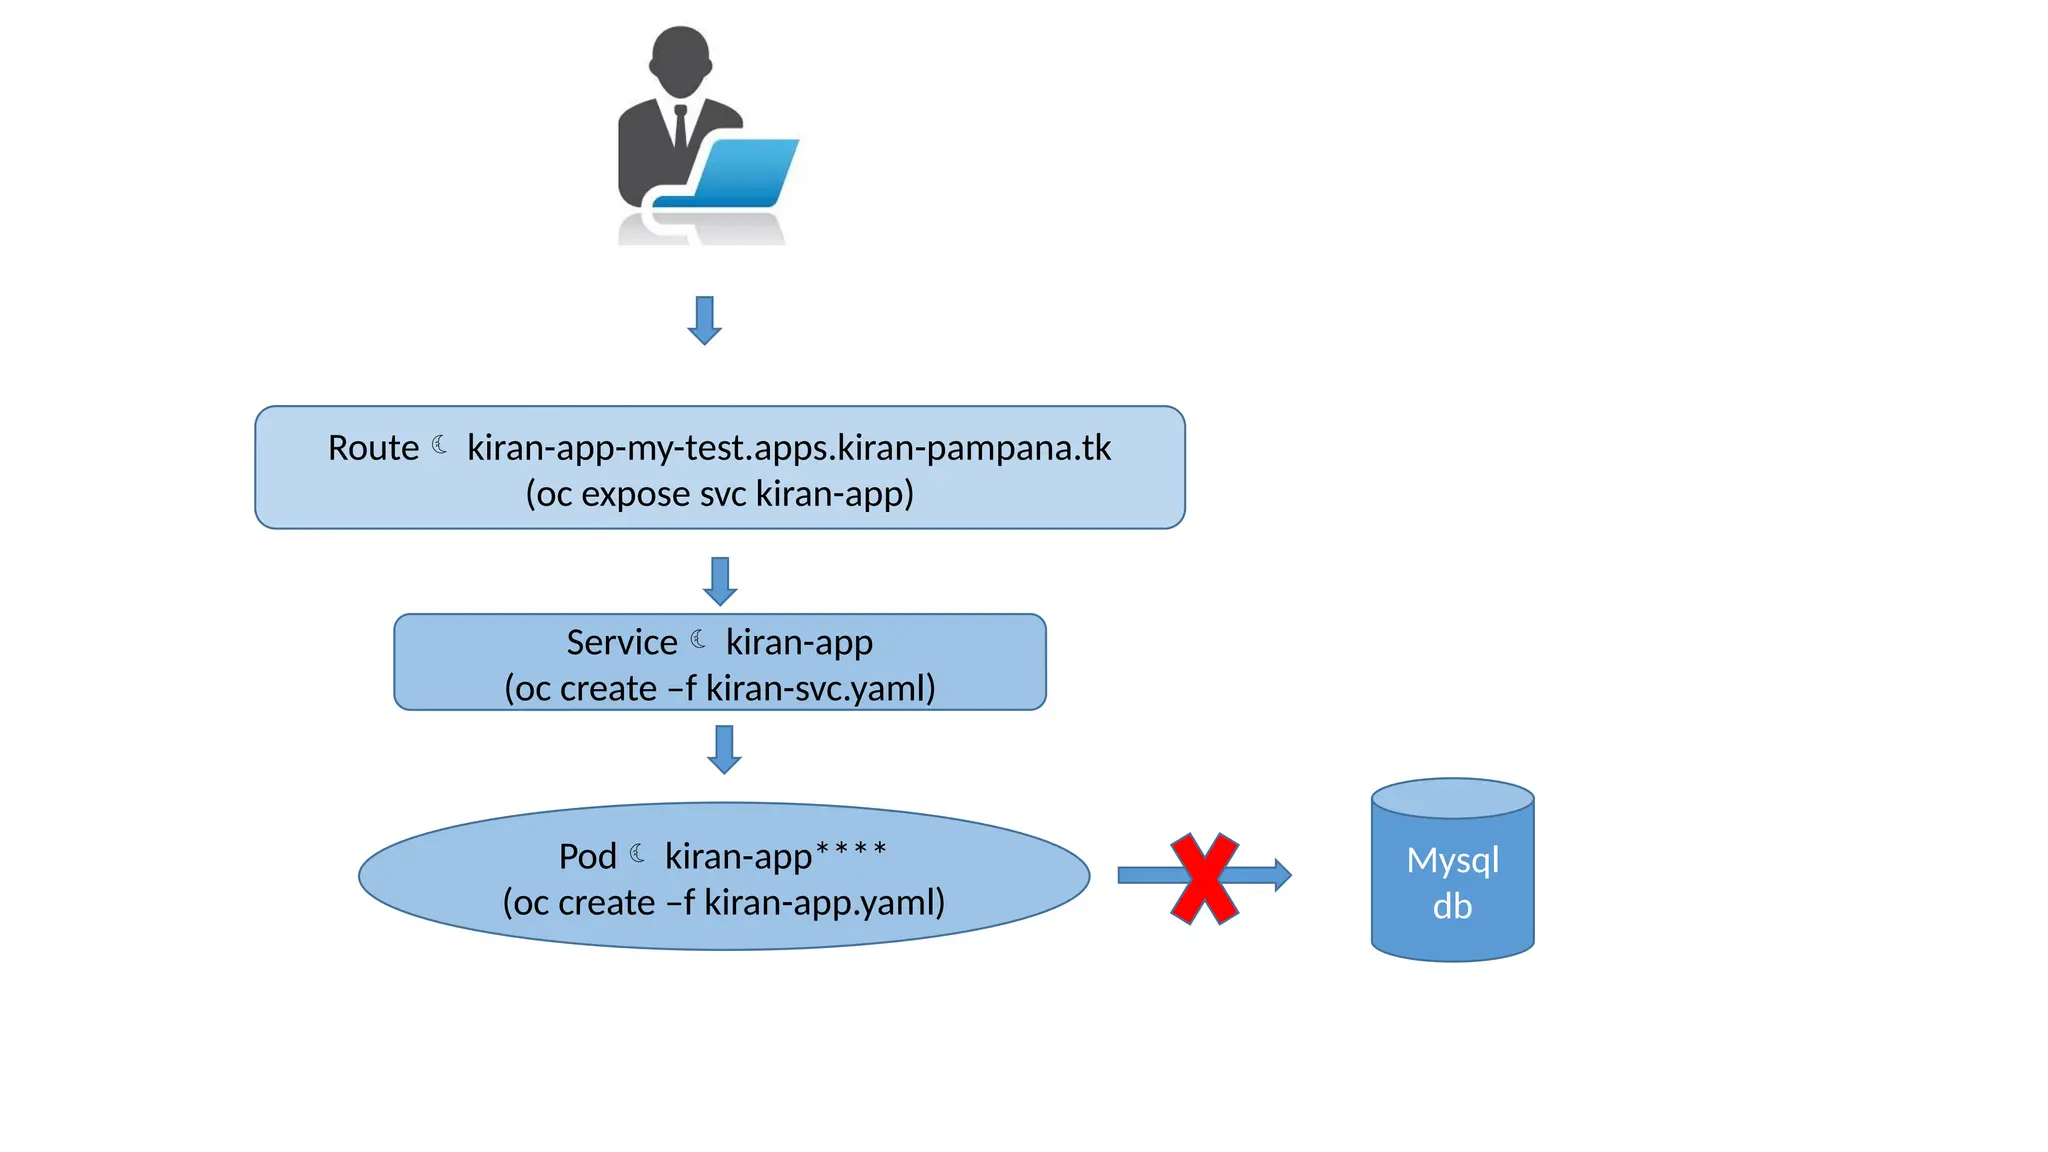
We shall createa route for the kiran-app service as below
oc expose svc kiran-app
Check the new route created as below
oc get route
Use the route obtained above to access the app , for my case its
http://kiran-app-my-test.apps.kiran-pampana.tk
Try to access http://kiran-app-my-test.apps.kiran-pampana.tk/tel_dir ,it
should through error because db is not yet created
28.
Pod kiran-app****
(oc create–f kiran-app.yaml)
Service kiran-app
(oc create –f kiran-svc.yaml)
Route kiran-app-my-test.apps.kiran-pampana.tk
(oc expose svc kiran-app)
Mysql
db
29.
We shall deploythe db now
Check mysql-db.yaml file and try to understand its contents
Lets deploy application as below
oc create -f mysql-db.yaml
Check using below commands, pod with mysql-** should have been created
oc get pods
We shall create the service now for the app
Check mysql-svc.yaml file and try to understand its contents
Let create the services as below
oc create -f mysql-svc.yaml
Check using below commands , new service with name mysql should have been created
oc get svc
30.
Connect to themysql pod as below after by identifying it
oc get pods
oc rsh mysql-***
Connect to database and upload data as below
mysql -u root –p
CREATE DATABASE tel_dir;
use tel_dir;
CREATE TABLE details( id INT NOT NULL AUTO_INCREMENT,
name VARCHAR(100) NOT NULL,
country VARCHAR(40) NOT NULL,
phone INT NOT NULL,
PRIMARY KEY(id));
use tel_dir;
INSERT INTO details
(id,name,country,phone)
VALUES
(1,"kiran","india",12345);
INSERT INTO details
(name,country,phone)
VALUES
("bart","belgium",34567);
31.
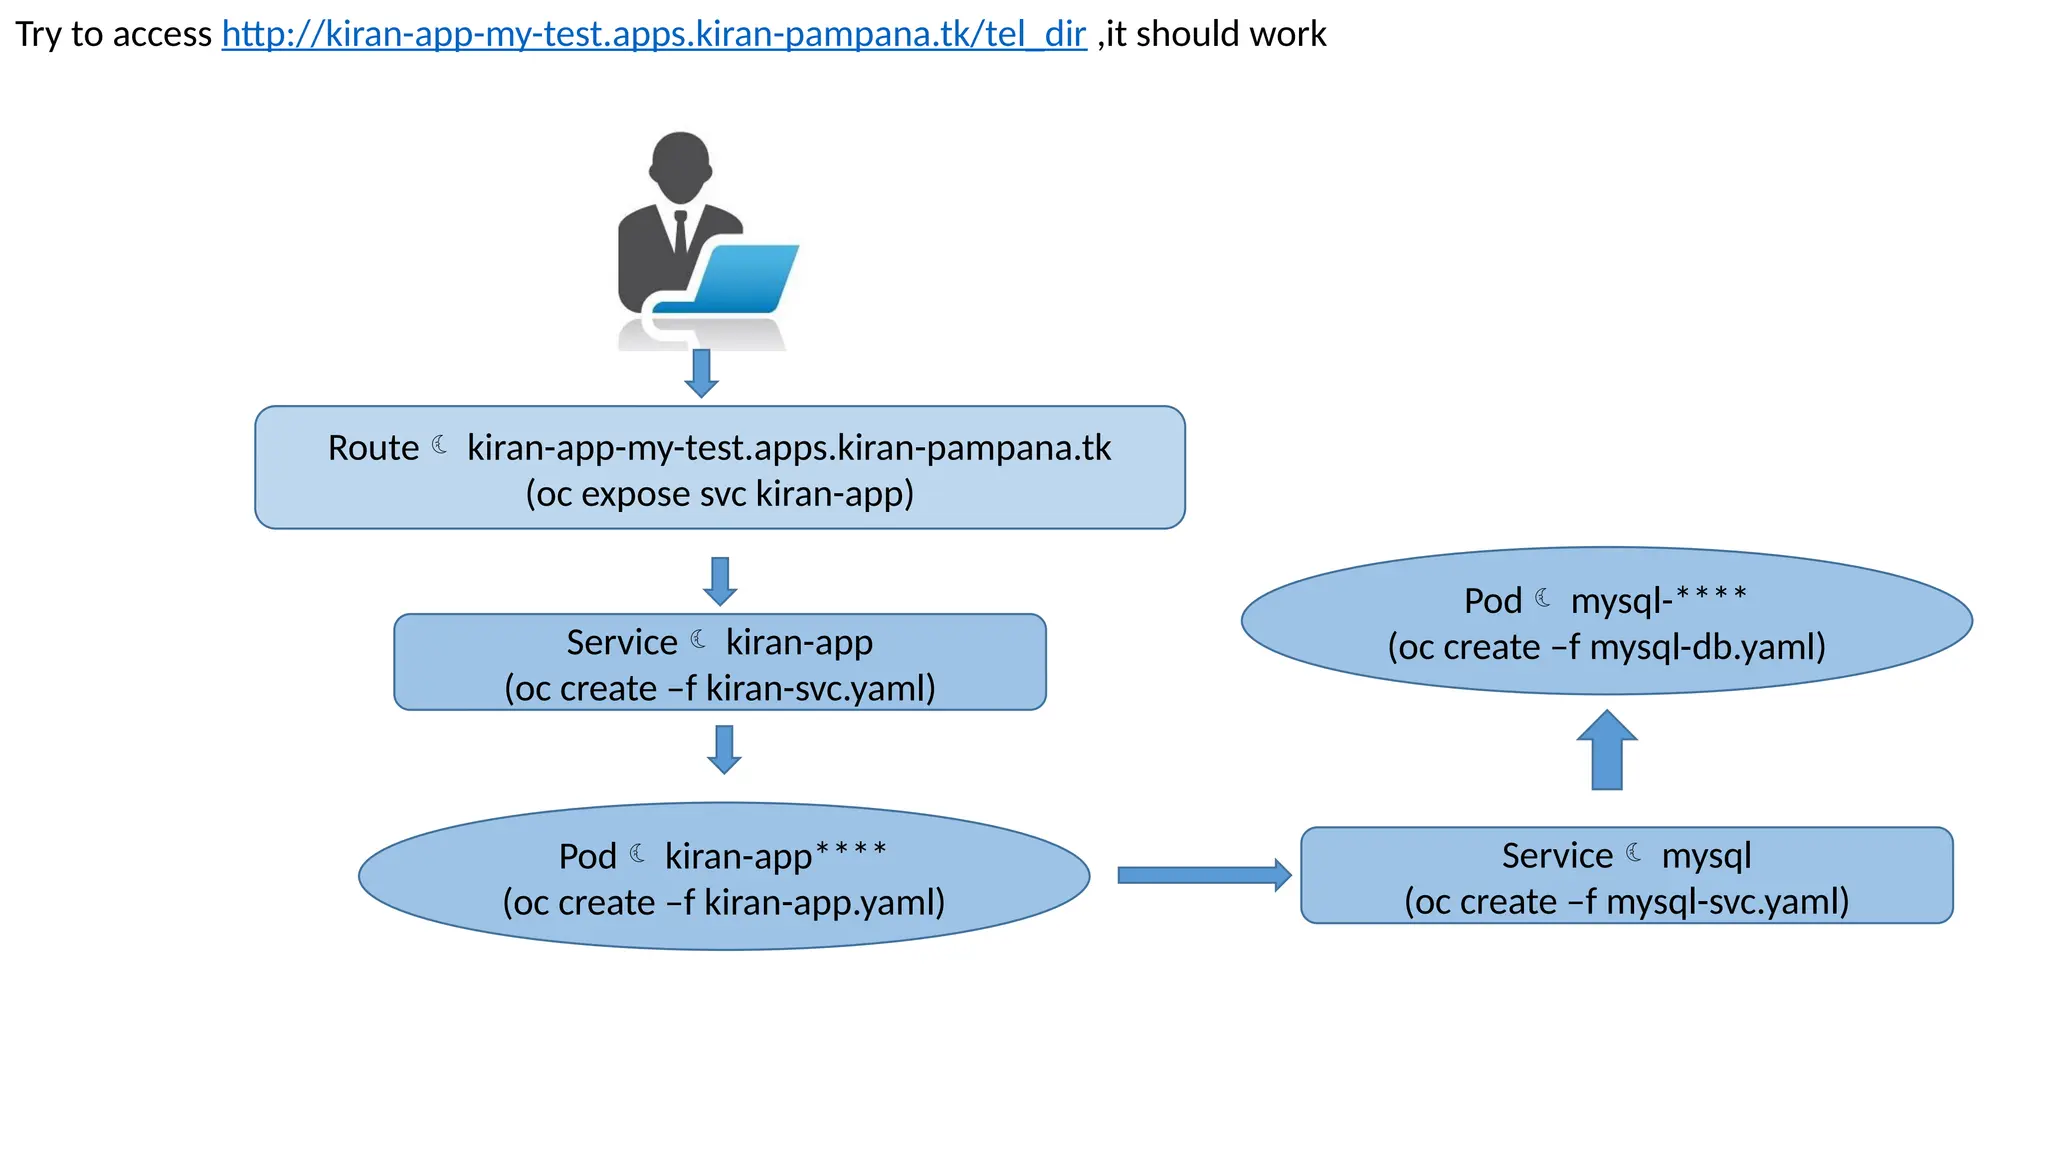
Pod kiran-app****
(oc create–f kiran-app.yaml)
Service kiran-app
(oc create –f kiran-svc.yaml)
Route kiran-app-my-test.apps.kiran-pampana.tk
(oc expose svc kiran-app)
Try to access http://kiran-app-my-test.apps.kiran-pampana.tk/tel_dir ,it should work
Service mysql
(oc create –f mysql-svc.yaml)
Pod mysql-****
(oc create –f mysql-db.yaml)


![[DevDay 2017] OpenShift Enterprise - Speaker: Linh Do - DevOps Engineer at Ax...](https://cdn.slidesharecdn.com/ss_thumbnails/linhdoopenshiftenterprises-170420095822-thumbnail.jpg?width=640&height=640&fit=bounds)