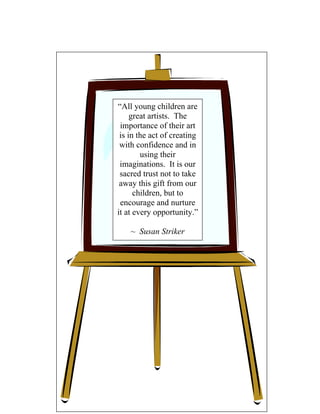
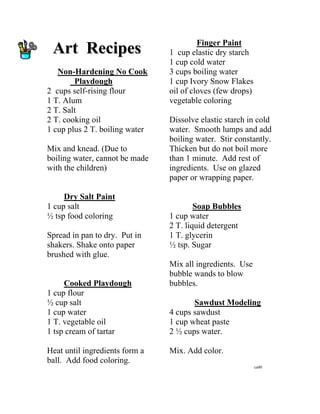
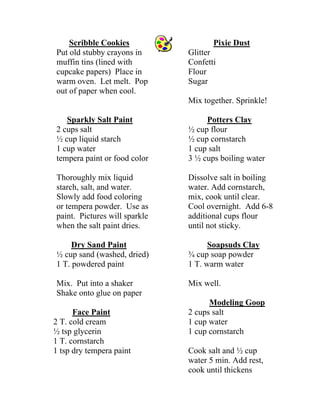
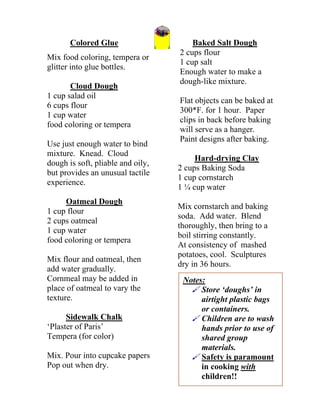
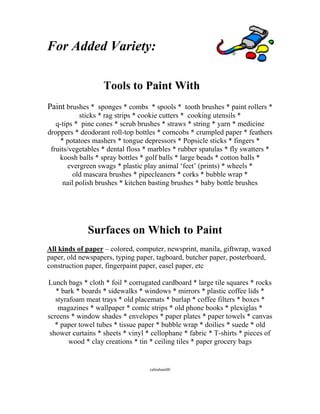
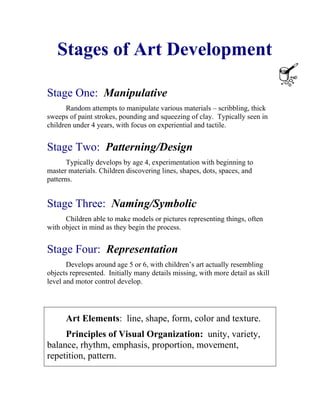
2. “All young children are great artists. The importance of their art is in the act of creating with confidence and in using their imaginations. It is our sacred trust not to take away this gift from our children, but to encourage and nurture it at every opportunity.”
~ Susan Striker
3. AArrtt RReecciippeess Non-Hardening No Cook Playdough
2 cups self-rising flour
1 T. Alum
2 T. Salt
2 T. cooking oil
1 cup plus 2 T. boiling water
Mix and knead. (Due to boiling water, cannot be made with the children) Dry Salt Paint
1 cup salt
½ tsp food coloring
Spread in pan to dry. Put in shakers. Shake onto paper brushed with glue. Cooked Playdough
1 cup flour
½ cup salt
1 cup water
1 T. vegetable oil
1 tsp cream of tartar
Heat until ingredients form a ball. Add food coloring. Finger Paint
1 cup elastic dry starch
1 cup cold water
3 cups boiling water
1 cup Ivory Snow Flakes
oil of cloves (few drops)
vegetable coloring
Dissolve elastic starch in cold water. Smooth lumps and add boiling water. Stir constantly. Thicken but do not boil more than 1 minute. Add rest of ingredients. Use on glazed paper or wrapping paper. Soap Bubbles
1 cup water
2 T. liquid detergent
1 T. glycerin
½ tsp. Sugar
Mix all ingredients. Use bubble wands to blow bubbles. Sawdust Modeling
4 cups sawdust
1 cup wheat paste
2 ½ cups water.
Mix. Add color.
ca00
4. Easy Playdough
2 cups flour
1 cup salt
tempera paint
water
Mix flour, salt and paint with enough water to make the correct consistency. Sally’s Playdough Recipe
1 cup flour
1 cup water
1 T. oil
1 T. alum
½ cup salt
2 T. vanilla
food coloring
Mix all dry ingredients. Add oil and water. Cook over medium heat, stirring constantly until it reaches the consistency of mashed potatoes. Remove from heat, add vanilla and color. Divide into balls and knead in color. Paste
½ cup flour
½ cup water Clean Mud
4 rolls of toilet paper (torn)
3 bars Ivory Soap (shaved)
1 gallon warm water
½ tsp. bleach
large tub
Place torn toilet paper in tub. Add grated soap. Add warm water. Mix and knead.Add water when dry. Gak
Mix equal parts white glue to liquid starch. (Gak has the texture and consistency of Silly Putty) Goop
½ cup cornstarch
¼ cup water
food coloring
Mix in media table. Let children explore texture – it is wet, but feels dry to the touch. Puffy Paint
Mix equal parts of flour, salt, water, liquid tempera (for color). Put in squeeze container. Use on heavy paper.
ca00
5. Scribble Cookies
Put old stubby crayons in muffin tins (lined with cupcake papers) Place in warm oven. Let melt. Pop out of paper when cool. Sparkly Salt Paint
2 cups salt
½ cup liquid starch
1 cup water
tempera paint or food color
Thoroughly mix liquid starch, salt, and water. Slowly add food coloring or tempera powder. Use as paint. Pictures will sparkle when the salt paint dries. Dry Sand Paint
½ cup sand (washed, dried)
1 T. powdered paint
Mix. Put into a shaker
Shake onto glue on paper Face Paint
2 T. cold cream
½ tsp glycerin
1 T. cornstarch
1 tsp dry tempera paint Pixie Dust
Glitter
Confetti
Flour
Sugar
Mix together. Sprinkle! Potters Clay
½ cup flour
½ cup cornstarch
1 cup salt
3 ½ cups boiling water
Dissolve salt in boiling water. Add cornstarch, mix, cook until clear. Cool overnight. Add 6-8 additional cups flour until not sticky. Soapsuds Clay
¾ cup soap powder
1 T. warm water
Mix well. Modeling Goop
2 cups salt
1 cup water
1 cup cornstarch
Cook salt and ½ cup water 5 min. Add rest, cook until thickens
6. Colored Glue
Mix food coloring, tempera or glitter into glue bottles. Cloud Dough
1 cup salad oil
6 cups flour
1 cup water
food coloring or tempera
Use just enough water to bind mixture. Knead. Cloud dough is soft, pliable and oily, but provides an unusual tactile experience. Oatmeal Dough
1 cup flour
2 cups oatmeal
1 cup water
food coloring or tempera
Mix flour and oatmeal, then add water gradually. Cornmeal may be added in place of oatmeal to vary the texture. Sidewalk Chalk
‘Plaster of Paris’
Tempera (for color)
Mix. Pour into cupcake papers
Pop out when dry. Baked Salt Dough
2 cups flour
1 cup salt
Enough water to make a
dough-like mixture.
Flat objects can be baked at
300*F. for 1 hour. Paper
clips in back before baking
will serve as a hanger.
Paint designs after baking. Hard-drying Clay
2 cups Baking Soda
1 cup cornstarch
1 ¼ cup water
Mix cornstarch and baking
soda. Add water. Blend
thoroughly, then bring to a
boil stirring constantly.
At consistency of mashed
potatoes, cool. Sculptures
dry in 36 hours.
Notes:
Store ‘doughs’ in airtight plastic bags or containers.
Children are to wash hands prior to use of shared group materials.
Safety is paramount in cooking with children!!
7. Growth and Learning through Manipulative Art Materials
(doughs, clays and squeezables)
Emotional Development
Feelings of success and competency
Sense of control
Calming and soothing
Stress reducing/ self behavior modifier
Outlet for feelings
Tension reliving
Social Development
Seen in all stages of play:
Solitary
Parallel
Associative
Cooperative
Promotes sharing
Builds social language
Social ‘icebreaker’
Cognitive Development
Causeeffect
Part/whole relationships
Special relationships
Matching/comparing
Language development
Properties
Physical Development
Lg and small muscle develop.
Fingerdexterity
Pincher grip (pre-writing)
Eye-hand coordination
Establishment of handedness
Musclestrength
Creative Development
Open-ended
Creative expression/exploration
Mallable/ changeable
Individualism
Development of imagination
8. Guidelines for Open-ended Art
- Never alter or ‘fix’ a child’s work
- Provide a wide variety of interesting materials and choices
- Add new materials weekly, incorporating your theme if possible
- Never tell a child what to create
- Emphasize the process, not the end product
- Don’t ask “What is it?”; Say “Tell me about it”
- Ask the child if and where he/she would like his name put
- Let children explore materials
- Let children come up with their own ideas and use materials creatively
- Provide materials for 3-D and on-going artwork projects
- Encourage, do not force participation
- Do not do models or samples for the children
- Throw away any colorbooks or dittos in the room
- All materials should be at the children’s level, and accessible
- Playdough and the art easel should be open the majority of each day
- Encourage children to express feelings and personal experiences through art
- Display art in a variety of ways – it should not all ‘match’
- Talk about texture, color, smell, shape, etc and the experience
- Let the children be as independent as possible, and encourage self- help skills and responsibility in cleaning up art
- Educate parents as to the value and learning in open-ended art
- Teach and model appropriate use and respect of materials
- Allow ample time for children to create and explore
- Incorporate books on fine art in your classroom
- Children should be doing their own cutting – it’s okay if a circle doesn’t remotely resemble a circle yet. This is how they develop these fine muscles – and makes it ‘their’ work and experience.
- There is no ‘right’ or ‘wrong’ way, or end product.
- The art area should have lots and lots of a variety of different collage materials, and always be an open, available choice for children
cabraham
9. WHAT CAN YOU SAY TO
CHILDREN ABOUT THEIR ART?…
“I see circles in your picture.”
“You filled up the whole paper.”
“Do you have a story you want to tell me about your picture?”
“Would you like me to write something on your picture?”
“Tell me about how you made the blue lines so smooth.”
“I feel happy when I look at your picture. The colors are very bright.”
“I can see you worked hard on that.”
“You used red, yellow and orange in your picture.”
“You’ve got all kinds of lines in your picture.”
Remember – when we say something very specific about a
child’s work, it is much more meaningful than an insincere
“That’s beautiful!”… and shows that we are truly looking
at what they did.
10. How Creative is your “Creative Art?”…
Is there a ‘right way’ or a ‘wrong way’?…
Or is it open-ended?
Do all the pieces look basically alike?…
Or is every child’s piece original and unique?
Does it require a great deal of teacher preparation or assistance?
Or can the child work independently?
Does the activity emphasize the end product?
Or the process and experience?
Does the child need to follow a predetermined outline?
Or can the child express his/her own ideas and feelings?
Is the experience ‘Teacher-directed’ and initiated?
Or child directed and initiated?
And finally…
WHOSE HANDS ARE BUSIER – THE CHILD’S OR THE ADULT’S?
11. Dear Mom and Dad,
It may not look like much, but my scribbles are very important! Scribbling is the first step in learning to write, and I am developing the muscles I will need to hold a pencil!
Sometimes a scribble is not just a scribble!
Love,
Your toddler
12. For Added Variety:
Tools to Paint With
Paint brushes * sponges * combs * spools * tooth brushes * paint rollers * sticks * rag strips * cookie cutters * cooking utensils *
q-tips * pine cones * scrub brushes * straws * string * yarn * medicine droppers * deodorant roll-top bottles * corncobs * crumpled paper * feathers * potatoes mashers * tongue depressors * Popsicle sticks * fingers * fruits/vegetables * dental floss * marbles * rubber spatulas * fly swatters * koosh balls * spray bottles * golf balls * large beads * cotton balls * evergreen swags * plastic play animal ‘feet’ (prints) * wheels *
old mascara brushes * pipecleaners * corks * bubble wrap *
nail polish brushes * kitchen basting brushes * baby bottle brushes
Surfaces on Which to Paint
All kinds of paper – colored, computer, newsprint, manila, giftwrap, waxed paper, old newspapers, typing paper, tagboard, butcher paper, posterboard, construction paper, fingerpaint paper, easel paper, etc
Lunch bags * cloth * foil * corrugated cardboard * large tile squares * rocks * bark * boards * sidewalks * windows * mirrors * plastic coffee lids * styrafoam meat trays * old placemats * burlap * coffee filters * boxes * magazines * wallpaper * comic strips * old phone books * plexiglas * screens * window shades * envelopes * paper plates * paper towels * canvas * paper towel tubes * tissue paper * bubble wrap * doilies * suede * old shower curtains * sheets * vinyl * cellophane * fabric * T-shirts * pieces of wood * clay creations * tin * ceiling tiles * paper grocery bags
cabraham00
13. Mixers to Add Variety to Paint Texture
Sand * coffee grounds * baby powder * detergent powder * water (to change consistency) * rice * glitter * sugar * cornmeal * salt * oatmeal * soap flakes * baking powder * syrup * cooking oil * shaving crème * glue * confetti *
Media For at the Easel
Finger paint * tempera paint (with a variety of textures – see above) *
Watercolors * diluted food coloring * berry juices * dried up markers dipped in water * chalk * chalk dipped in water * shaving cream * crayons *
oil sticks * colored pencils * markers (thick/thin)* highlighters * scribble cookies * several crayons tied together * spray bottles with diluted paint or colored water * graphite pencils * calligraphy pens * charcoal sticks * glitter pens * colored glue * stamp pads * paint brushes tied together
Collage Materials
Cut up straws * yarn * fabric scraps * magazines * greeting cards * ribbon * tissue paper scraps * twine * glitter * egg shells * stamps * small wood scraps * confetti * packaging materials * bows * streamers * fringe * fake fur scraps * velvet * wrapping paper * Popsicle sticks * paper scraps * wallpaper books * pompom balls * googlie eyes * doilies * trim * colored pasta * cotton balls * q-tips * Easter grass * raffia * catalogs * buttons * sequins * feathers * felt * foil * lace * rickrack * seeds * shredded paper * dried flower petals * ceramic tiles * colored wire * spools * crepe paper * * beads * bread bag closures * All types of paper (listed above)
Materials for 3-D Projects
Milk cartons * Paper plates * Paper towel rolls * gift/shoe boxes * spools * frozen food trays * chicken wire * clothespins * coffee cans * shells
14. Stages of Art Development
Stage One: Manipulative
Random attempts to manipulate various materials – scribbling, thick sweeps of paint strokes, pounding and squeezing of clay. Typically seen in children under 4 years, with focus on experiential and tactile.
Stage Two: Patterning/Design
Typically develops by age 4, experimentation with beginning to master materials. Children discovering lines, shapes, dots, spaces, and patterns.
Stage Three: Naming/Symbolic
Children able to make models or pictures representing things, often with object in mind as they begin the process.
Stage Four: Representation
Develops around age 5 or 6, with children’s art actually resembling objects represented. Initially many details missing, with more detail as skill level and motor control develop.
Art Elements: line, shape, form, color and texture.
Principles of Visual Organization: unity, variety, balance, rhythm, emphasis, proportion, movement, repetition, pattern.
15. Where to get Free Art Materials
Alteration Shops/Tailors:
- spools
- fabric scraps
- buttons
- samples
- remnants
Builders/Carpet Floor Stores:
- carpet samples
- floor samples
- tile samples
- discontinued tile
- packaging materials
- old wallpaper sample books
- paint swatches
- large tubes (packaging)
- wood scraps
- discontinued knobs and handles
Photography Stores:
- empty film canisters
- mis-cut mapboard
- centers from mapboard frames
- old promotional pictures
Copy/Print Shops:
- computer paper
- scrap paper
- mis-printed envelops, stationary, forms
- ends of paper rolls
- packaging materials
- pads of paper ‘ends’
- ‘punches’ from paper that has been 3-hole punched
16. What message does a child get from Teacher – directed product art and craft activities:
The adult’s ideas are more important than mine. In comparison, someone else’s work is always better than mine. Different is not better - all being the
same is the goal. Art is not about expressing myself or my ideas. I can’t do it right. If it’s good my Teacher will like it – and me. I don’t have to think – just do what my Teacher says. I don’t know what to do unless the Teacher tells me.
17. This is not about me or about what I want to do.
““AAllll cchhiillddrreenn aarree aarrttiissttss,, aanndd iitt iiss aann iinnddiiccttmmeenntt ooff oouurr ccuullttuurree tthhaatt ssoo mmaannyy ooff tthheemm lloossee tthheeiirr ccrreeaattiivviittyy,, tthheeiirr uunnffeetttteerreedd iimmaaggiinnaattiioonnss,, aass tthheeyy ggrrooww oollddeerr.. BBuutt tthheeyy ssttaarrtt ooffff wwiitthhoouutt sseellff-- ccoonnsscciioouussnneessss aass tthheeyy ppaaiinntt tthheeiirr ppuurrppllee fflloowweerrss,, tthheeiirr aannaattoommiiccaallllyy iimmppoossssiibbllee ppeeooppllee,, tthheeiirr tthhuunnddeerroouuss,, ssuullpphhuurroouuss sskkiieess.. TThheeyy ddoonn’’tt wwoorrrryy tthhaatt tthheeyy mmaayy nnoott bbee aass ggoooodd aass DDiiCChhiirrccoo oorr BBrraaccqquuee;; tthheeyy kknnooww iinnttuuiittiivveellyy tthhaatt iitt iiss ffoollllyy ttoo mmaakkee ccoommppaarriissoonnss,, aanndd tthheeyy ggoo aahheeaadd aanndd ssaayy wwhhaatt tthheeyy wwaanntt ttoo ssaayy..””
18. - Madeleine L’Engle
Maybe Tomorrow He could soar to the highest mountains,
by Lindy T. Redmond He could dream in his mind
He could nurture his talents,
“Me do it,” said the 2 year old, His gifts he could now fine.
“Mom, me will do it now,”
“Oh no, my dear,” she replied, The teacher came into his room
“I must show you how!” And greeted everyone
“Let me try it,” he called at 3 “Take out your crayons and paper,
“Let me make my bed,” we’re going to have some fun.”
“No, you will have lumps in it, “Use this tracer to make a bunny
Color this instead.” And neatly print your name,
They’ll all be brown with long ears,
So she placed the coloring book They’ll all look just the same.”
Near him on the table,
“Now try to color in the lines
The best you are able.” “But I don’t want my bunny
“But Mom, I want to draw the world To stand up straight and tall
And all the butterflies, I want him crouched among the grass
I want to make the mountains tall, And to be white, that’s all.”
And make rainbows in the skies.” “They’ll be nicer if we keep
Them looking alike too,
“Color carefully,” she replied,``` Now please sit down start your work
And color the flowers red, We’ve got a lot to do.”
Color the sky all light blue
Stay in the lines,” she said.
And as the 4 year old one day So slowly he took his seat,
His shoes he tried to tie, His eyes had lost their thrill,
His father said, “I’ll teach you how He now knew just what he’d face,
And later YOU can try.” Monotony and drill.
“Maybe later,” thought the lad,
And so it was, from birth to 5, “She’ll let me make my own,
The others told him HOW, Maybe tomorrow I can paint
They gave him restraints and set the laws My picture all alone.”
Of what they would allow.
Then one day the yellow bus So on the next clear morning,
Came right up to his door, They took their crayons out,
The little boy thought for sure “Oh boy, I’ll make the sky orange
That NOW he could explore. I’ll be different, without a doubt.”
“Color carefully,” she replied,
He now could dream and imagine “And color the flowers red,
19. And experiment on his own, Color the sky light blue
He could paint HIS colors Stay in the lines,” she said.
And investigate all alone. “Maybe tomorrow, maybe never.” Thought the boy as he colored the sky light blue.
1. Provides a means of communication and
expression
2. Serves as an emotional release
3. Heightens aesthetic awareness and sensitivity
4. Develops and promotes creative thinking
5. Develops an appreciation for individuality
6. Serves as a balance in classroom activities
7. Assists in the development of physical
coordination
8. Strengthens self-concept and self confidence
9. Increases self understanding
10. Enhances the ability to visualize
11. Helps develop fine motor skills
12. Provides opportunities for problem-
solving and decision making
13. Provides insight and assists the adult in
understanding the child
14. Develops self-help skills
15. Illustrates cause and effect
20. This is a reminder that to children, the process is much more important than the finished product… GENUIS AT WORK The artist bend over his easel And took up his palette and brush He sketched in the curve of an outline In colors both vivid and lush. I watched him add highlights and shadows With deftness and delicacy, Convinced that no Ruebens of Titan Worked with greater concentration than he. He splashed on a bit of ripe crimson. He blended in scarlet and maize. Then at length he leaned back from his canvas And appraised it with critical gaze. Slowly he turned and presented That completed creation of his. “See, Teacher! My pictures all finished. Now help me decide what it is.” - Adelaide Holl
21. I am learning through art!
In the Art Area I am expressing myself and being creative. I am using my small muscles and am developing eye-hand coordination. I am seeing cause and effect, and the different properties of my materials. All of my creations are unique and special –
22. like me!
Creative, Visually Appealing Ways to
Display Children’s Artwork /Projects
Í Have a variety of different types of art and mediums. Mix it up – stay away from a bulletin board with just fingerpainting or just collages. When the art displayed is diverse, each piece looks even more unique.
Í Incorporate real photographs of the children working on the art or projects. This helps the children remember doing the work displayed, adding more opportunities for language development, and gives parents additional insight as to the process involved.
Í Add dictation. The children’s words describing their work (or
some other aspect) should accompany the art as well.
Í Include 3-D pieces. This adds dimension to your display. Think of interesting or unusual ways for the children to “frame” their work if they would like. (mirrors, pap
Í
er
Í m
hape.
Í
Í
Í s more. Often those really nice, colorful
teacher borders take away from
the children’s work – which
plates, contrasting paper, corrugated cardboard, hanging, etc) Chronicle a project (with pictures and dictation) fro
start to finish. Show a how project evolves and takes s
Í Place as much as possible at the child’s eye level. The blue “Tacky-tape” (sticky, gum-like moldable adh
esive) typically is kindest on painted walls, and is least likely to remove paint when artwork is taken down. If you want to put a “title” on the bulletin board as a header, stay away from “cutesy” plays on words. Those are adult-oriented, and over the children’s heads. Get input from the children. If it is right before Halloween, and the various
creations are about spiders, a heading like “Our Spider Project” or “What We Know About Spiders” is appropriate. Sometimes less i
23. should be the focus.
PROCESS/
AD
- Watch how I do this. Let’s
-
he
rectangle goes here. The
e windows.
- Color in the lines so your
y looks
nice.
-
- That is a nice picture, but
He needs arms.
-
today for art.
-
- Here is a container with all
-
would like to use from the
PRODUCT/ ULT-ORIENTED
OPEN-ENDED We’re all making butterflies
all make our snowmen out of the clay. We’re going to make a bus out of these shapes. T
circles are the wheels. The squares are th
- Glue all around here where I put the glue.
- Can you make a nice flower for your mom?
picture of the bo
The sun is yellow.
- I cut out these witches for you to glue yarn on for hair.
you forgot to draw the arms on the boy.
- See if you can make one just like mine.
Clay is fun to roll and smoosh flat. I wonder what kinds of things you will make with your clay today?
kinds of shapes of paper. You can glue them together and come up with some interesting designs or pictures if you’d like.
- The paints are all out. You can choose which colors you would like to use, and if you would like a thick brush or a thin brush to work with. You can pick whatever you
art shelf, and create whatever you want. Let me know if you would like me to put your words on your work when you are finished.
24. - You can use the scissors tocut either paper or the
f you
Seasonal Art Ideas:
- colored pipe
-
- al containers to
-
- kie
-
shells,
- the season to
- wrapping
-
- Make ‘stencils’ out of butter
tub lids by tracing seasonal
shapes and cutting them out
Tie 2-5 crayons (of holiday
or seasonal colors) together
to draw with, if they choose.
magazines in the art area. There is also glue i
decide you want to glue them.
Put out holiday-
cleaners /or confetti Add holiday/seasonal colors to shaving cream
- Use holiday shaped pasta for collages
- Put holiday/seasonal colors out at the easel Use season
hold collage materials for variety and to renew interest Cut holiday/seasonal shapes out of sponges Put holiday/seasonal coo
cutters in with the playdough Use seasonal items from nature to paint with or in
of the plastic lids.
-
your media table (pinecones, corncobs, leaves,
etc.) Key into nature! Add smells of
your playdough or paints (pumpkin spice in the fall, cinnamon in the winter, etc.) Put scraps of
paper in the art area. Color the glue a holiday- related color.
25. Additional Resources on
Creative, Open-ended Art –
isplay – Great Ways to Showcase
Author Unknown, “On D
Children’s Creations”, Scholastic Early Childhood Today,
ing
February 1997, Page 43 Lowenfeld, Victor. “What You Don’t Learn from Color
an Elephant. What About Color Books?”, Texas Child
Care Quarterly, issue – unknown, Pages 58-59 Swanson, Lou. “Changes – How Our Nursery School Replaced Adult-Directed Art Projects With Child-Directed
Experiences and Changed to an Accredited, Child-Sensitive
Developmentally Appropriate School”, Young Children,
e
May 1994, Pages 69 – 73 erez, Jeannine. “100 Ways to Paint a Pictur ”, First
P
Teacher, January/February 1997, Page 26 haw-Perry, Eunice. “Creative Minds
S”, Early Childhood
Today, February 1997, Pages 36 – 45 Armstrong, Thomas. “Seeing Things in New Ways”,
Early Childhood Today, February 1997, Pages 32 – 35
26. eas
Staff Training Id
on Open-ended Art:
Experiencing Apples Materials Needed: 3 – 4 apples. A ditto of a picture of an apcrayons, a knife, pens, paper, 3 ta
ple,
bles for staff to sit at.
Directions for Activity: One table can only color the ditto of anapple; one table can only look at the apples – but cannot touch em; the third table can experience the apples any way they
l, etc.; which table would
ave more language development; meaningfulness and relevance
ve memories that
th
choose (cut them up, smell, etc.) Groups then write down what they learned based on this experience only (not on any previous knowledge or experience ith apples.)
w
Discuss value of tactilel, taste, sme
h
o f each tables’ experience; which table will ha
will last longer and why; etc…
Rating Creative Art
27. Materials Needed: Copies of handout “How Creative is Your
reative Art?”, 10 – 15 examples (good and not-so-good) of
children’s artwork. (Be careful to offend with too many not-so-irections
for Activity
C
good examples from one room or teacher)
D : Staff must rate and categorize whether
Painting with Hats/Helmets
aterials Needed
art is open-ended or teacher-directed. Discuss results, benefits.
M : Easel paper, hardhat, paintbrush (taped onto a
ardhat), paint, ductape
h
Direction for Activity: Have adults paint at easel with the hats that have the paintbrushes attached to them. Discuss experience
nd appeal to children.
aterials Needed
a
Gelatin Rainbows
M : Clear Knox gelatin, small bowls (to use as
olds), eye droppers, trays, food coloring and water
mDirections for Activity: The day prior, make gelatin as per the directions on the box. Remove from bowls (upside down) onto
ays. Dip droppers into food coloring and insert into gelatin.
iscuss experience and appeal to children.
Pla
ou
ow
tr
D
ce several wallpaper sample books and collage materials t, and have participants create an original project on their n.
28. The activities listed above are for teachers to take back to
their classrooms. Facilitating these activities hands-on with the
adults gives them a better perspective and understanding of the
experience for children.