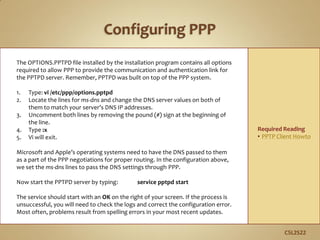
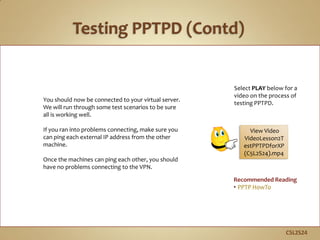
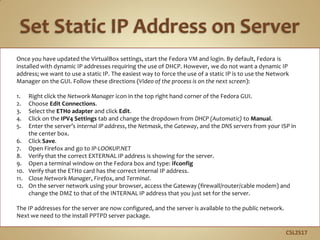
1. This material is based on work supported by the
National Science Foundation under Grant No. 0802551
Any opinions, findings, and conclusions or recommendations expressed in this material are those of
the author (s) and do not necessarily reflect the views of the National Science Foundation C5L2S1
2. U the
A virtual private network (VPN ) is a special connection between
computers that allows a user to connect remotely to other
computer systems or networks using a private, secure, encrypted
channel that prevents others from viewing the contents of the
communication between the computers.
VPN is a very useful technology for employees working remotely
or employees who need to connect to remote computer systems
in a secure manner. VPN may be used on local networks or across
the Internet. Consequently, it is a very important tool.
In this lesson, you will explore virtual private networks,
tunneling, SSH, installation of a VPN server, and other related
technologies. Understanding VPN technology and the various
ways it is implemented and used is a necessary skill for Linux
administrators. A misconfigured VPN can pose serious threats to
an organization. So learn it well!
C5L2S2
3. U the
You should know what will be expected of you when
you complete this lesson. These expectations are
presented as objectives. Objectives are short
statements of expectations that tell you what you
must be able to do, perform, learn, or adjust after
reviewing the lesson.
Lesson Objective:
Given the need to secure data communications, the
student will be able to propose appropriate tools to
secure data during remote data transmissions
between two or more systems and will be able to
configure VPN service between computer systems
across the Internet to facilitate secure transmissions.
C5L2S3
4. C5L2S4
In this lesson, you will explore:
Virtual Private Networks
IPSec Virtual Private Networks
PPTP Virtual Private Networks
SSH / SSL Tunnels
The PPTPD VPN Server
5. C5L2S5
This lesson uses Fedora Linux for demonstration. To
complete this lesson successfully, you must have
access to:
Fedora Linux on bare metal or as a virtual install
10 Gb of hard drive space dedicated to the
operating system’s use
A command shell
Internet for research
Word processor
Use the resources on the right to configure your
system for Fedora.
Resources:
• Download Virtualbox
• Virtualbox for Linux Hosts
• Install Fedora to Virtualbox
• Virtualbox manual
• Using Virtualbox with Ubuntu
(process similar to Fedora)
6. C5L2S6
This lesson includes a tutorial on installation and configuration of
a virtual private network (VPN). It is critical you only attempt to
follow these instructions on your personal home network or a
network provided in a computer lab by your school for this
purpose.
Do not attempt VPN install or configuration on a public school
network or your employer’s network . Failure to take heed may
result in your termination or loss of employment.
The VPN setup and the firewall changes demonstrated could be
seen as a FERPA and/or HIPAA violation if configured incorrectly
or without permission in certain settings. If done on your
employer’s network, you may also be in violation of the
company’s computer usage agreement.
Most networks have a single VPN setup and monitored by the IT
department—not rogue Linux Administration students practicing
their VPN setups. Be wise!
7. When Internet communications first started, information was unencrypted and
sent via text. Services such as Telnet, FTP, and even email where left open to
interception and copying (theft) of data at multiple points along the way.
As the use of the Internet grew, so did the need for secure communications.
Credit card transactions, banking transactions, and any other personal
information required the need for security, so a firewall was used. The firewall
was installed to keep un-wanted people away from private data. Employees
within the company would be able to access the Internet, but users outside would
not be able to access information within.
This updated security created additional problems for remote users. For instance,
employees working from home or from clients’ sites or other locations would no
longer have access to the company’s internal network or to resources available to
users in the main office (those within the network) because the firewall would
block access.
The goal of VPN is to provide a secure method for remote users to access an
internal network, or specific internal networked resources. The data is sent in an
encrypted format, and anyone who tries to copy the data stream would only get
nonsensical data or gibberish.
C5L2S7
Required Reading
• Why Use VPN?
• VPN
8. There are two types of VPN’s:
The first is the Remote-Access type. This type of VPN is commonly used
for an individual to access a central network. We will call this a User-to-
LAN connection. The user connects to the Internet from any ISP (Internet
Service Provider) and then creates a secure connection to the central
network. Once that secure connection is created, he or she can access
the the resources on that central network.
The second type of VPN is a Site-To-Site VPN. With this VPN, an entire
location (or remote network) may be connected to a main network. An
example of this would be a bank with several connected branches. The
main office would have a network and then each branch would have a
secure connection (VPN) into the man office so communications and
sharing of resources between the two sites would be secure.
Both of these networks allow the user(s) in the remote location to be a
full part of the internal central network without fear of security and data
breaches.
C5L2S8
Recommended Reading
• How Does VPN Work?
9. The well designed VPN is both fast and secure. It will contain as many of the following features as
possible:
Data Security: This is the most important service that any VPN provides. All Internet traffic is routed
over public networks and is visible to all computers in it’s path. Therefore data encryption and
confidentiality is critical. Encryption is the process of taking all the data that one computer is
transmitting and encoding it into a form that only the other computer will be able to decode.
Data Integrity: Data must not be changed while it is in transit, and the reliable VPN includes checks to
ensure that data does not change. Data changing during transmission is a sign of tampering.
Data Origin Authentication: The VPN must verify the source of the data. The identity of the sender can
be spoofed (or faked) and the VPN server must know the true source of the data.
Anti Replay: The VPN server must be able to detect and reject replayed (or duplicated) packets and
this helps prevent spoofing.
Data Tunneling/Traffic Flow Confidentiality: Tunneling is the process of encapsulating (or hiding) an
entire packet of data inside of another packet while sending it over the network. Data tunneling is
helpful when you may wish to hide the identity of the sending device. Only the trusted peer (or
receiving system) is able to identify the true source of data.
C5L2S9
10. C5L2S10
Most VPN’s use one of these protocols to provide encryption:
IPSec: Internet Protocol Security Protocol (IPSec) provides enhanced
security features such as stronger encryption algorithms and more
comprehensive authentication. IPSec has two encryption modes: Tunnel
and Transport.
The tunnel mode encrypts the header and the payload of each packet
while the transport mode only encrypts the payload. The payload is the
data being sent, and the header is the identifying information for each
packet. Only systems that are IPsec compliant can use this protocol. All
of the devices must have a common key or certificate and must have
very similar security policies setup.
PPTP/MPPE: PPTP was created by the PPTP Forum, a consortium which
includes US Robotics, Microsoft, 3COM, Ascend, and ECI Telematics.
PPTP supports multi-protocol VPNs with 40-bit and 128-bit encryption
using a protocol called Microsoft Point-to-Point Encryption (MPPE). It is
important to realize that by itself, PPTP does not provide data
encryption.
Continued on next screen . . .
Recommended Reading
• How Stuff Works
11. C5L2S11
L2TP/IPsec: Commonly called L2TP over IPSec, this provides the security
of the IPsec protocol over the tunneling of Lay 2 Tunneling Protocol
(L2TP). L2TP is the product of a partnership between the members of
the PPTP forum, Cisco, and the Internet Engineering Task Force (IETF).
This protocol is primarily used for remote access with VPN’s since the
Windows 2000 operating system. Internet Service Providers (ISPs) can
also provide L2TP connections for dial-in users, and then encrypt that
traffic with IPsec between their access-point and the remote office
network server.
SSH/SSL: SSL stands for Secure Socket Layer, and SSH is a secure shell. It
is possible to create a tunnel between two computers by using a
combination of SSH and SSL. The client (or remote) computer would
start an SSH session to a computer on the main network. In turn, this
client would tunnel all of it’s communication over this tunnel, thus
encrypting the flow of data.
Recommended Reading
• How Stuff Works
12. There are several VPN products available including:
Desktop software client for each remote user
Dedicated hardware such as a VPN concentrator or
Firewall
Dedicated VPN server for dial-up services
Network Access Server (NAS) used by service provider for
remote user VPN access
Private network and policy management center.
The Linux VPN we will setup is a cross between the Dedicated
VPN server and the Desktop Software client for each remote
user.
C5L2S12
Recommended Reading
• Choosing VPN
14. You will need to gather and document the following before setting
up your VPN:
Server External IP address: This is the external or public IP
address of your server.
Server Internal IP address: This is the internal IP address of the
server.
Server Gateway address: Your outbound gateway IP address,
sometimes called the “next hop”
Server DNS: The Domain Name Service IP addresses provided by
your ISP.
Client’s IP Address: Helpful information to know.
You can get the external IP addresses for both client and server by
using a web browser on the respective machine and going to:
http://www.ip-lookup.net
http://whois.domaintools.com
Once you have this information, you may continue the lesson.
C5L2S14
Recommended Reading
• IP Lookup
15. If you use VirtualBox to setup your VPN, you MUST have two physical
network cards on the test computer or you must have access to a dedicated
Fedora server that has a public IP address. If your test machine has two
network cards, follow these directions:
1. Open VirtualBox, but do not start the machine.
2. From VirtualBox manager, select (highlight) your virtual Fedora install
and then click the Settings icon on the menu bar.
3. Click the Networks icon on the menu bar.
4. Change the Attached to combo box to Bridged Adapter for any active
network interfaces.
5. Do the same for the second virtual machine. (I will be using a VM running
Windows XP.)
6. Make sure both virtual machines are found using a separate connection
and thus on two separate networks.
7. Save your settings.
8. Start your Fedora virtual machine.
9. Log in. We will continue the installation on the next screen.
The setting of the Bridged Adapter allows the virtual machine to interact with
the network on its own and not share the IP address of the host machine.
C5L2S15
Select PLAY below for a
video on Virtual Box
settings.
Recommended Reading
• VirtualBox Network
View Video
VideoLesson2VBoxSe
ttings(C5L2S15).mp4
17. Once you have updated the VirtualBox settings, start the Fedora VM and login. By default, Fedora is
installed with dynamic IP addresses requiring the use of DHCP. However, we do not want a dynamic IP
address; we want to use a static IP. The easiest way to force the use of a static IP is to use the Network
Manager on the GUI. Follow these directions (Video of the process is on the next screen):
1. Right click the Network Manager icon in the top right hand corner of the Fedora GUI.
2. Choose Edit Connections.
3. Select the ETH0 adapter and click Edit.
4. Click on the IPV4 Settings tab and change the dropdown from DHCP (Automatic) to Manual.
5. Enter the server’s internal IP address, the Netmask, the Gateway, and the DNS servers from your ISP in
the center box.
6. Click Save.
7. Open Firefox and go to IP-LOOKUP.NET
8. Verify that the correct EXTERNAL IP address is showing for the server.
9. Open a terminal window on the Fedora box and type: ifconfig
10. Verify that the ETH0 card has the correct internal IP address.
11. Close Network Manager, Firefox, and Terminal.
12. On the server network using your browser, access the Gateway (firewall/router/cable modem) and
change the DMZ to that of the INTERNAL IP address that you just set for the server.
The IP addresses for the server are now configured, and the server is available to the public network.
Next we need to the install PPTPD server package.
C5L2S17
18. C5L2S18
Recommended Reading
• Static IP on Fedora
Select PLAY below for a
video on setting a static
IP address on a Fedora
VM.
View Video
VideoLesson2StaticIPFedora(C
5L2S18).mp4
19. C5L2S19
Open the terminal window on your Fedora machine and then log into a root session using su. Follow
these directions to update your server and install PPTPD:
1. Type: yum upgrade
2. Accept any updates that need to be installed.
3. Type: rpm –Uvh http://poptop.sourceforge.net/yum/beta/packages/pptpd-1.3.4-2.fc14.i686.rpm
4. Accept any dependencies that need to be installed.
The POPTOP software (PPTPD) server is now installed. We will begin the configuration process with
the PPTPD.CONF file.
Recommended Reading
• Install PPTPD
• PopTop
Select PLAY below for a
video on package updates.
View Video
VideoLesson2UpdateInstall
(C5L2S20).mp4
20. C5L2S20
The PPTPD.CONF file installed by the installation program contains
all options required to configure the PPTPD server to run properly.
So, we need to use it to make a few adjustments. Follow these
directions:
1. Type: vi /etc/pptpd.conf
2. Locate the line stimeout and change the value to 60
3. Locate the line connections 100 and change the value to 10
4. Type :x
5. Vi will exit.
The changes above increases the timeout value from 10 seconds to
60 seconds, which allows slow Internet connections to connect
without a timeout error. We also dropped the number of users who
can connect to your network concurrently (at a single time) from
100 to 10.
Next, we will configure our users and password in chap-secrets.
Required Reading
• PPTP Man Page
• PPTPD.conf
Select PLAY below for a
video on configuring
PPTPD.
View Video
VideoLesson2Configur
ePPTPD(C5L2S19).mp4
21. C5L2S21
The CHAP-SECRETS file is located in /etc/ppp and is readable by the root user
only. The permissions on this file must be rw by root only. Any other
permission will cause the scripts to fail. The CHAP-SECRETS file is the main
user/password table for connections authenticated by PPP. To configure this
file and create a user-id and password for logging in and testing your server,
follow these directions:
1. Type: vi /etc/ppp/chap-secrets (You need to be a root user)
2. Use your cursor and go to the last line of the file.
3. Type: A
4. Press [ENTER].
5. Type:
testuser * “VeryBigPassword” *
* testuser “VeryBigPassword” *
6. Press [ESC] to exit insert mode.
7. Type: :x to exit vi.
Look at the file that is commented out. You just created a user id of testuser
with a password of VeryBigPassword. These user IDs and passwords are case
sensitive, so enter them carefully and document them for later use.
Required Reading
• CHAP Secrets File
22. C5L2S22
The OPTIONS.PPTPD file installed by the installation program contains all options
required to allow PPP to provide the communication and authentication link for
the PPTPD server. Remember, PPTPD was built on top of the PPP system.
1. Type: vi /etc/ppp/options.pptpd
2. Locate the lines for ms-dns and change the DNS server values on both of
them to match your server’s DNS IP addresses.
3. Uncomment both lines by removing the pound (#) sign at the beginning of
the line.
4. Type :x
5. Vi will exit.
Microsoft and Apple’s operating systems need to have the DNS passed to them
as a part of the PPP negotiations for proper routing. In the configuration above,
we set the ms-dns lines to pass the DNS settings through PPP.
Now start the PPTPD server by typing: service pptpd start
The service should start with an OK on the right of your screen. If the process is
unsuccessful, you will need to check the logs and correct the configuration error.
Most often, problems result from spelling errors in your most recent updates.
Required Reading
• PPTP Client Howto
23. C5L2S23
One of the most frequent uses of a Linux PPTPD server is to provide an access point to a company’s internal
network for the “road warriors” as they travel for business or for employees working at home. So, we need to
test our VPN configuration to be sure it works. We will use a Windows XP machine as the client:
1. Start a virtual (or actual) Windows machine. The directions here are for Windows XP
2. Select Start -> Control Panel -> Network Connections
3. Select File -> New
4. Click Next on the wizard
5. Select Connect to my network at workplace and click Next
6. Select Virtual Private Network and click Next
7. Enter TEST for company name and click Next
8. Select Do Not dial Initial Connection and click Next
9. Enter the Public IP address of your test server
10. Click Next
11. Click Finish
12. Enter your username and password from the chat-secrets
13. Click Save this user and password for Me Only
14. Do NOT click CONNECT
15. Click Properties
16. Click the Networking tab
17. Select PPTP VPN for Type of Networking.
18. Click OK
19. Click Connect
24. C5L2S24
You should now be connected to your virtual server.
We will run through some test scenarios to be sure
all is working well.
If you ran into problems connecting, make sure you
can ping each external IP address from the other
machine.
Once the machines can ping each other, you should
have no problems connecting to the VPN.
Recommended Reading
• PPTP HowTo
Select PLAY below for a
video on the process of
testing PPTPD.
View Video
VideoLesson2T
estPPTPDforXP
(C5L2S24).mp4
25. C5L2S25
If you followed all the directions in this lesson, you
made significant changes to the firewall of the
network on which your test server is installed.
Specifically, you opened a path by using the DMZ
functionality of your gateway.
Take this opportunity to navigate to those settings
and return them to their original state (i.e. before you
made the changes).
Leaving a DMZ path open can cause a security risk if a
machine with the same IP address of your test server
becomes available.
26. In this lesson, we discussed the various types of VPN’s available. We
briefly discussed SSH, PPTP, PPP, L2TP, and IPSEC. We then setup and
configured a PPTP server and then connected to it with a Windows
client.
VPN’s are important in the workplace and in academic settings
because they provide additional security while allowing remote users
to access the internal network. Using a VPN, a remote user can access
all the resources (including printers, file servers, fax gateways, voice
services, and development servers) available to internal users. This
access allows employees working at home to be just as productive as
those working in the office.
Problems do occur with VPN’s, and it is important to check the log files
on both client and server to diagnose these problems. Most logging is
done in /var/log/messages and /var/log/auth.log depending on the
distribution and the Operating System.
C5L226
Recommended Reading
VPN Howto