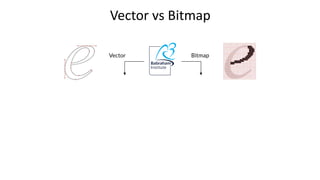
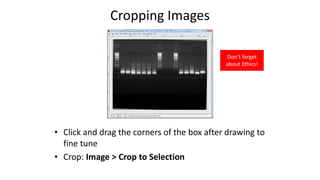
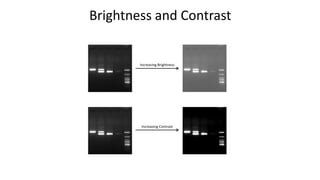
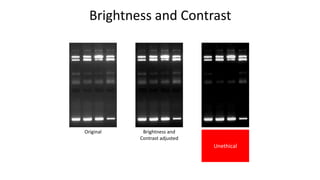
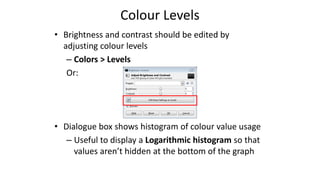
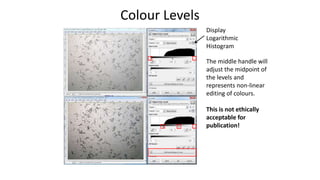
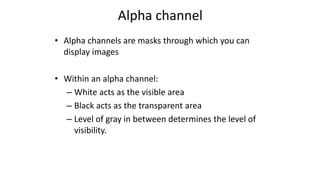
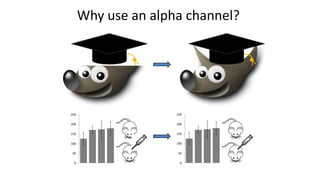
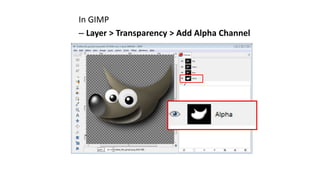
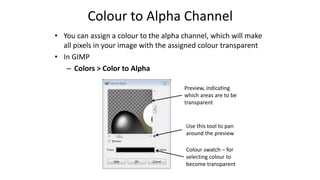
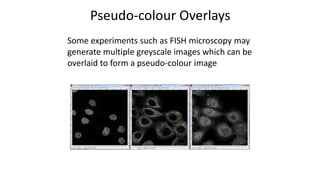
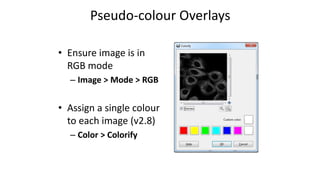
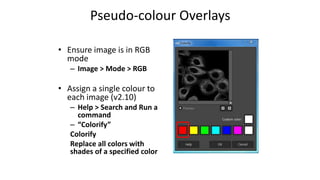
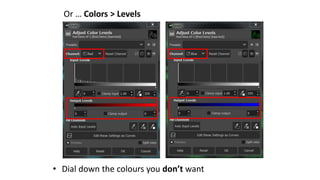
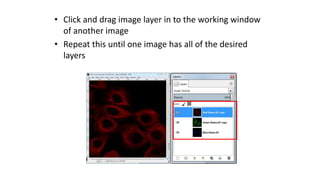
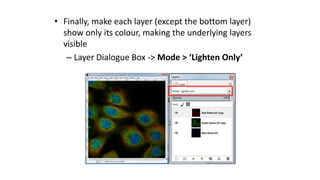
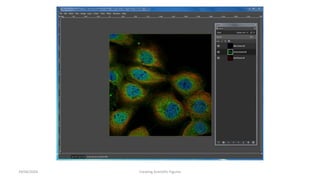
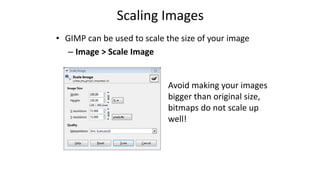
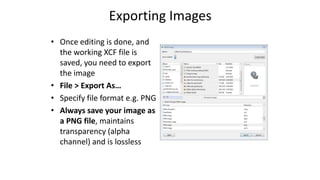
GIMP Tutorial
v2018-11
Boo Virk, Simon Andrews, Jo Montgomery
Babraham.bioinformatics@babraham.ac.uk
What is GIMP
• GNU Image Manipulation Program
• Bitmap Graphics Editor
• Open Source
• Cross Platform
• Not for Vector editing
www.gimp.org
Vector vs Bitmap
Getting GIMP
• Open Source
• Cross Platform
www.gimp.org
• View Toolbox – Windows > New toolbox or (Ctrl + B)
• View Layers Dialogue box – Windows > Dockable Dialogs >
Layers or (Ctrl + L)
• GIMP can do a lot of things – will show you small selection of
tools that are ethically acceptable to use for figure production
Basic Layout
Opening Images
• To open an image for editing:
– Drag file onto a new GIMP window
or
– File > Open or (Ctrl + O)
• After opening, save a working copy of the file
• GIMP saves files as XCF files by default, but you can
export files in other formats (e.g. PNG)
Straightening Images
• Drag a horizontal guide line onto your image (from top ruler)
to intersect an area that should be perfectly horizontal
• Using the ‘Rotate’ tool (Shift + R) rotate the image so
that it lines up with the guideline
• When you start to rotate the image, a dialogue box will
appear
Straightening Images
• When finished click the rotate button to apply
• To remove guideline: Image > Guides > Remove all Guides
Cropping Images
• Useful to crop unnecessary edges away
• Can reduce file size when bringing images into a
vector file
• Use the ‘Rectangle Select’ tool (R) to draw a box
around the area of the image you want to keep
• Click and drag the corners of the box after drawing to
fine tune
• Crop: Image > Crop to Selection
Cropping Images
Don’t forget
about Ethics!
Brightness and Contrast
Increasing Brightness
Increasing Contrast
Brightness and Contrast
• Adjusting brightness and contrast can help the clarity of your image
• In GIMP,
– Colours > Brightness-Contrast
• If a selection box is marked, brightness and contrast will be adjusted in
selected area only
Brightness and Contrast
Original Brightness and
Contrast adjusted
Brightness and
Contrast adjusted
too much
image is
oversaturated
Unethical
Colour Levels
• Brightness and contrast should be edited by
adjusting colour levels
– Colors > Levels
Or:
• Dialogue box shows histogram of colour value usage
– Useful to display a Logarithmic histogram so that
values aren’t hidden at the bottom of the graph
Colour Levels
Display
Logarithmic
Histogram
The middle handle will
adjust the midpoint of
the levels and
represents non-linear
editing of colours.
This is not ethically
acceptable for
publication!
Alpha channel
• Alpha channels are masks through which you can
display images
• Within an alpha channel:
– White acts as the visible area
– Black acts as the transparent area
– Level of gray in between determines the level of
visibility.
Why use an alpha channel?
0
50
100
150
200
250
0
50
100
150
200
250
In GIMP
– Layer > Transparency > Add Alpha Channel
Colour to Alpha Channel
• You can assign a colour to the alpha channel, which will make
all pixels in your image with the assigned colour transparent
• In GIMP
– Colors > Color to Alpha
Use this tool to pan
around the preview
Preview, indicating
which areas are to be
transparent
Colour swatch – for
selecting colour to
become transparent
Pseudo-colour Overlays
Some experiments such as FISH microscopy may
generate multiple greyscale images which can be
overlaid to form a pseudo-colour image
• Ensure image is in
RGB mode
– Image > Mode > RGB
• Assign a single colour
to each image (v2.8)
– Color > Colorify
Pseudo-colour Overlays
• Ensure image is in RGB
mode
– Image > Mode > RGB
• Assign a single colour to
each image (v2.10)
– Help > Search and Run a
command
– “Colorify”
Colorify
Replace all colors with
shades of a specified color
Pseudo-colour Overlays
Or … Colors > Levels
• Dial down the colours you don’t want
• Once images are correct colours, we need to overlay
them
• Open Layers dialogue box (if not already open)
– Windows > Dockable Dialogues > Layers
– (Ctrl+L)
Pseudo-colour Overlays
• Click and drag image layer in to the working window
of another image
• Repeat this until one image has all of the desired
layers
• Finally, make each layer (except the bottom layer)
show only its colour, making the underlying layers
visible
– Layer Dialogue Box -> Mode > ‘Lighten Only’
29/04/2024 Creating Scientific Figures
Scaling Images
• GIMP can be used to scale the size of your image
– Image > Scale Image
Avoid making your images
bigger than original size,
bitmaps do not scale up
well!
Exporting Images
• Once editing is done, and
the working XCF file is
saved, you need to export
the image
• File > Export As…
• Specify file format e.g. PNG
• Always save your image as
a PNG file, maintains
transparency (alpha
channel) and is lossless

Novo GIMP Tutorial da versão mais recente

  • 1.
    GIMP Tutorial v2018-11 Boo Virk,Simon Andrews, Jo Montgomery Babraham.bioinformatics@babraham.ac.uk
  • 2.
    What is GIMP •GNU Image Manipulation Program • Bitmap Graphics Editor • Open Source • Cross Platform • Not for Vector editing www.gimp.org
  • 3.
  • 4.
    Getting GIMP • OpenSource • Cross Platform www.gimp.org
  • 5.
    • View Toolbox– Windows > New toolbox or (Ctrl + B) • View Layers Dialogue box – Windows > Dockable Dialogs > Layers or (Ctrl + L) • GIMP can do a lot of things – will show you small selection of tools that are ethically acceptable to use for figure production Basic Layout
  • 6.
    Opening Images • Toopen an image for editing: – Drag file onto a new GIMP window or – File > Open or (Ctrl + O) • After opening, save a working copy of the file • GIMP saves files as XCF files by default, but you can export files in other formats (e.g. PNG)
  • 7.
    Straightening Images • Draga horizontal guide line onto your image (from top ruler) to intersect an area that should be perfectly horizontal • Using the ‘Rotate’ tool (Shift + R) rotate the image so that it lines up with the guideline • When you start to rotate the image, a dialogue box will appear
  • 8.
    Straightening Images • Whenfinished click the rotate button to apply • To remove guideline: Image > Guides > Remove all Guides
  • 9.
    Cropping Images • Usefulto crop unnecessary edges away • Can reduce file size when bringing images into a vector file • Use the ‘Rectangle Select’ tool (R) to draw a box around the area of the image you want to keep
  • 10.
    • Click anddrag the corners of the box after drawing to fine tune • Crop: Image > Crop to Selection Cropping Images Don’t forget about Ethics!
  • 11.
    Brightness and Contrast IncreasingBrightness Increasing Contrast
  • 12.
    Brightness and Contrast •Adjusting brightness and contrast can help the clarity of your image • In GIMP, – Colours > Brightness-Contrast • If a selection box is marked, brightness and contrast will be adjusted in selected area only
  • 13.
    Brightness and Contrast OriginalBrightness and Contrast adjusted Brightness and Contrast adjusted too much image is oversaturated Unethical
  • 14.
    Colour Levels • Brightnessand contrast should be edited by adjusting colour levels – Colors > Levels Or: • Dialogue box shows histogram of colour value usage – Useful to display a Logarithmic histogram so that values aren’t hidden at the bottom of the graph
  • 15.
    Colour Levels Display Logarithmic Histogram The middlehandle will adjust the midpoint of the levels and represents non-linear editing of colours. This is not ethically acceptable for publication!
  • 16.
    Alpha channel • Alphachannels are masks through which you can display images • Within an alpha channel: – White acts as the visible area – Black acts as the transparent area – Level of gray in between determines the level of visibility.
  • 17.
    Why use analpha channel? 0 50 100 150 200 250 0 50 100 150 200 250
  • 18.
    In GIMP – Layer> Transparency > Add Alpha Channel
  • 19.
    Colour to AlphaChannel • You can assign a colour to the alpha channel, which will make all pixels in your image with the assigned colour transparent • In GIMP – Colors > Color to Alpha Use this tool to pan around the preview Preview, indicating which areas are to be transparent Colour swatch – for selecting colour to become transparent
  • 20.
    Pseudo-colour Overlays Some experimentssuch as FISH microscopy may generate multiple greyscale images which can be overlaid to form a pseudo-colour image
  • 21.
    • Ensure imageis in RGB mode – Image > Mode > RGB • Assign a single colour to each image (v2.8) – Color > Colorify Pseudo-colour Overlays
  • 22.
    • Ensure imageis in RGB mode – Image > Mode > RGB • Assign a single colour to each image (v2.10) – Help > Search and Run a command – “Colorify” Colorify Replace all colors with shades of a specified color Pseudo-colour Overlays
  • 23.
    Or … Colors> Levels • Dial down the colours you don’t want
  • 24.
    • Once imagesare correct colours, we need to overlay them • Open Layers dialogue box (if not already open) – Windows > Dockable Dialogues > Layers – (Ctrl+L) Pseudo-colour Overlays
  • 25.
    • Click anddrag image layer in to the working window of another image • Repeat this until one image has all of the desired layers
  • 26.
    • Finally, makeeach layer (except the bottom layer) show only its colour, making the underlying layers visible – Layer Dialogue Box -> Mode > ‘Lighten Only’
  • 27.
  • 28.
    Scaling Images • GIMPcan be used to scale the size of your image – Image > Scale Image Avoid making your images bigger than original size, bitmaps do not scale up well!
  • 29.
    Exporting Images • Onceediting is done, and the working XCF file is saved, you need to export the image • File > Export As… • Specify file format e.g. PNG • Always save your image as a PNG file, maintains transparency (alpha channel) and is lossless

Editor's Notes

  • #22 Version 2.8 still works like this. They have removed this function from newer versions. For version 2.10, see next slide.
  • #23 V 2.10 you can either add a plug-in (code) or just follow these simple steps