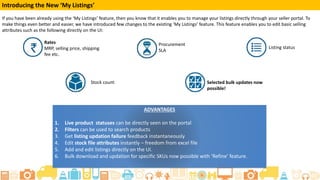
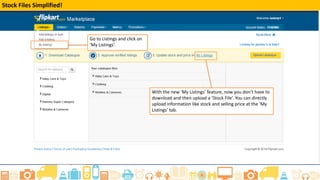
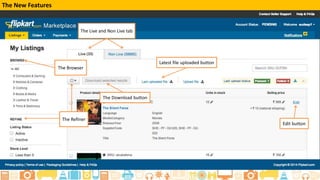
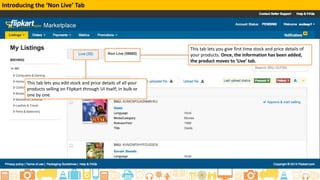
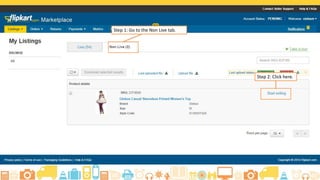
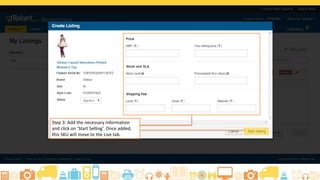
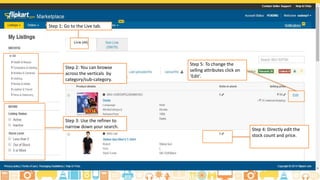
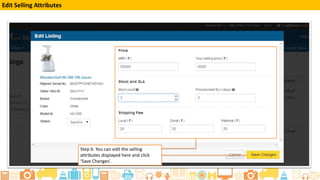
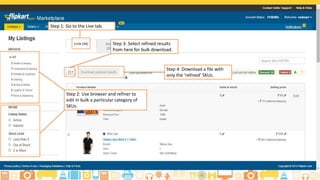
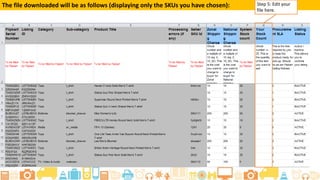
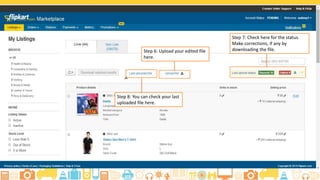
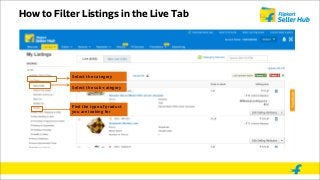
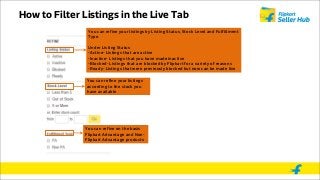
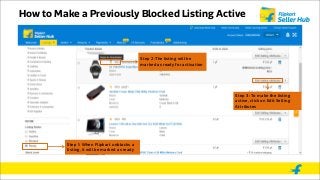
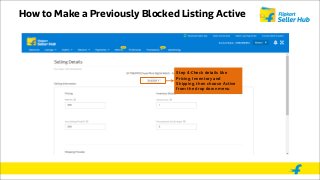
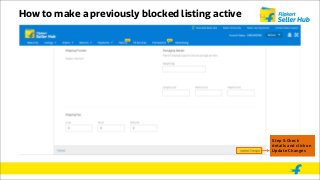
In this module we will discuss:
Guidelines while adding product image
What is a size chart?
What are the benefits of size chart
How can you upload size chart?
After completing this tutorial, you will be able to:
Understand Benefits of Product Listing Ads
Explain the functions of the Advertising tab
Create an Ad Campaign on the seller portal
2. Learning Objectives
After completing this tutorial you will able to:-
• Understand ‘My Listings’ tab
• Learn How to Make a Listing Active
• Know How to Update Listings with a Bulk
Upload
• Learn How to Filter Listings in the Live Tab
• Know How to Edit the Price and Stock Details
for Live Listings
• How to Make a Previously Blocked Listing
Active
3. The ‘My Listings’ tab
Once you have added listings (either by adding existing products or creating your own catalogue), these listings move to
the ‘My Listings’ tab. Under this tab, you can manage/edit your listings directly through the seller portal.
Login to your Flipkart Seller
Account
Click on Listings and select My
Listings from the drop down menu
4. The Live and Non Live Tab
Listings that you, the seller have not
started selling are found here
Listings - both active and inactive
which are/were live on Flipkart
can be found here
6. How to Make a Listing Active
Step 3: To make
the listing active,
click on Approve
and Start Selling
Step 1:Head to
the Non Live
Tab
Step 2: Click on
the QC Verified
tab
7. How to Make a Listing Active
Choose Active from the drop
down menu, add Pricing and
Inventory details like MRP,
Selling and Stock Count,
Procurement SLA
The Maximum
Retail Price
Number of items you have in
stock
Number of days required to
keep the item ready for pick-
up
Price that
which you
would like to
sell the
product
8. How to Make a Listing Active
Add your Shipping
provider, packing
details and
Shipping Fees for
Local, Zonal and
National Shipping
The shipper that will
handle the delivery
This is the delivery charge
seller can charge the buyer.
Based on buyer's zone,
corresponding charges will
be taken.
The packing details such
as weight, length, breath
of the package Step 4:Once all the details
are added , click on Update
Changes to make the
listing Active and it will be
moved to the Live Tab.
10. How to Update Listings with a Bulk Upload
Step 2: Click on
Download
selected results
Step 1:Select the
listings you want
to make live
11. How to Update Listings with a Bulk Upload
●
Step 3: Fill in details such
as MRP,
Your Selling Price,
Price Error Check, Local
Shipping Charge (per qty),
Zonal Shipping Charge (per
qty),
National Shipping Charge
(per qty), Selling Region
Restriction Your Stock
Count
Procurement SLA, Listing
Status
Fulfillment By, Shipping
Provider
Package Length, Package
Breadth, Package Height,
and Package Weight
12. How to Update Listings with a Bulk Upload
Step 4: After you fill in
the details on the excel,
click on upload file to
Upload your listings in
bulk
13. How to Edit the Price and Stock Details for Live Listings
14. How to Edit the Price and Stock Details for Live
Listings
Step 1:Click on
the Live Tab
Step 3:Click on the Edit
Selling Attributes of the
Listing you would like to edit
Step 2:Listings can be
blocked for the following
reasons < To be added>
15. How to Edit the Price and Stock Details for Live
Listings
Step 4: Choose
Active from the
drop down
menu, add
Pricing and
Inventory details
like MRP, Selling
and Stock Count,
Procurement
SLA
16. How to Edit the Price and Stock Details for Live
Listings
Step 5: Add your
Shipping provider
and Shipping Fees
for Local, Zonal
and National
Shipping
Once all the details
are added , click on
Update Changes to
make the changes
live
17. How to Filter Listings in the Live Tab
Listings can be filtered in two ways. You can:
• Browse by Category
• Refine by
Listing Status
Stock Level
Fulfillment Type
18. How to Filter Listings in the Live Tab
Select the category
Select the sub-category
Find the type of product
you are looking for
19. How to Filter Listings in the Live Tab
You can refine your listings by Listing Status, Stock Level and Fulfillment
Type.
Under Listing Status
-Active- Listings that are active
-Inactive- Listings that you have made inactive
-Blocked- Listings that are blocked by Flipkart for a variety of reasons
-Ready- Listings that were previously blocked but now can be made live
You can refine your listings
according to the stock you
have available
You can refine on the basis
Flipkart Advantage and Non-
Flipkart Advantage products
20. How to Make a Previously Blocked Listing Active
21. How to View a Blocked Listing
Step 1: To see which listings are
blocked, filter your listings by
Listings Status and select blocked
Step 2:By hovering on the red
mark, you will be able to see the
reason the listing was blocked
22. How to Make a Previously Blocked Listing Active
Step 1: When Flipkart unblocks a
listing, it will be marked as ready
Step 2:The listing will be
marked as ready for activation
Step 3: To make the listing
active, click on Edit Selling
Attributes
23. How to Make a Previously Blocked Listing Active
Step 4:Check details like
Pricing, Inventory and
Shipping, then choose Active
from the drop down menu
24. How to make a previously blocked listing active
Step 5:Check
details and click on
Update Changes
25. Summary
You have completed the tutorial ‘My Listings’.
Now you will be able to:
• Understand ‘My Listings’ tab
• How to Make a Listing Active
• How to Update Listings with a Bulk Upload
• How to Filter Listings in the Live Tab
• How to Edit the Price and Stock Details for Live
Listings
• How to Make a Previously Blocked Listing
Active
You can also learn how to edit your catalogue,
just click here < to be hyperlinked>