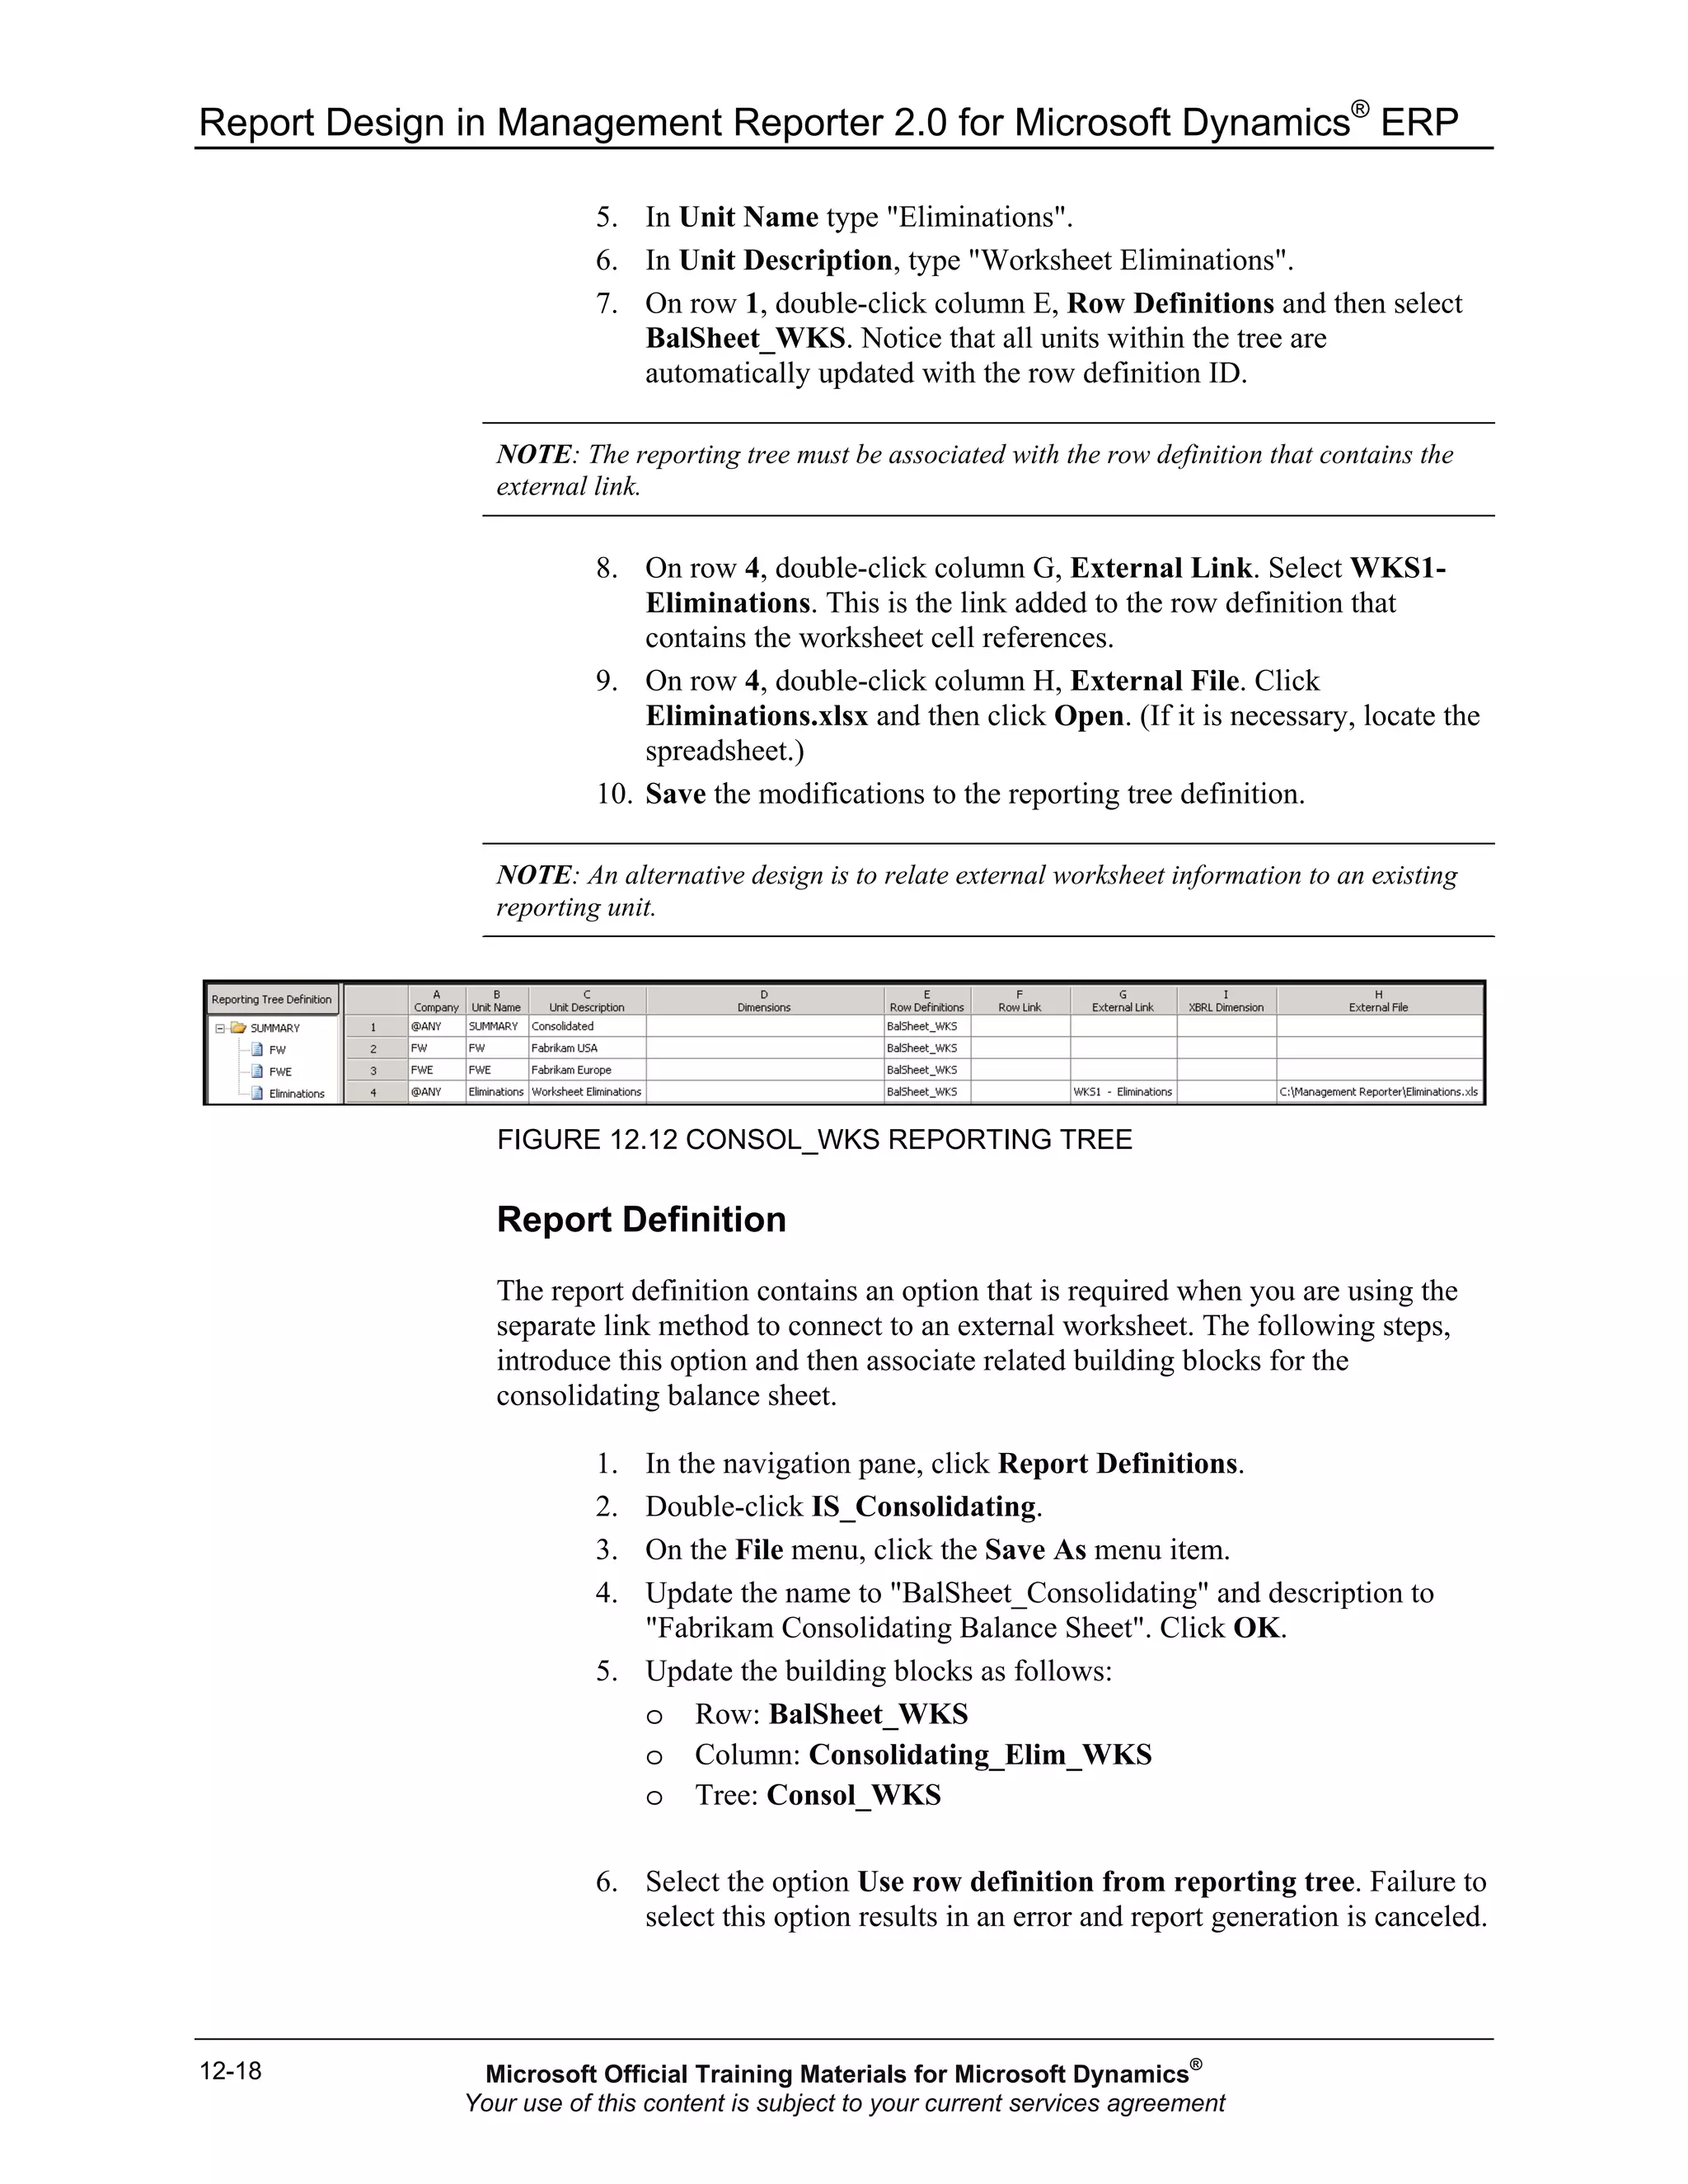
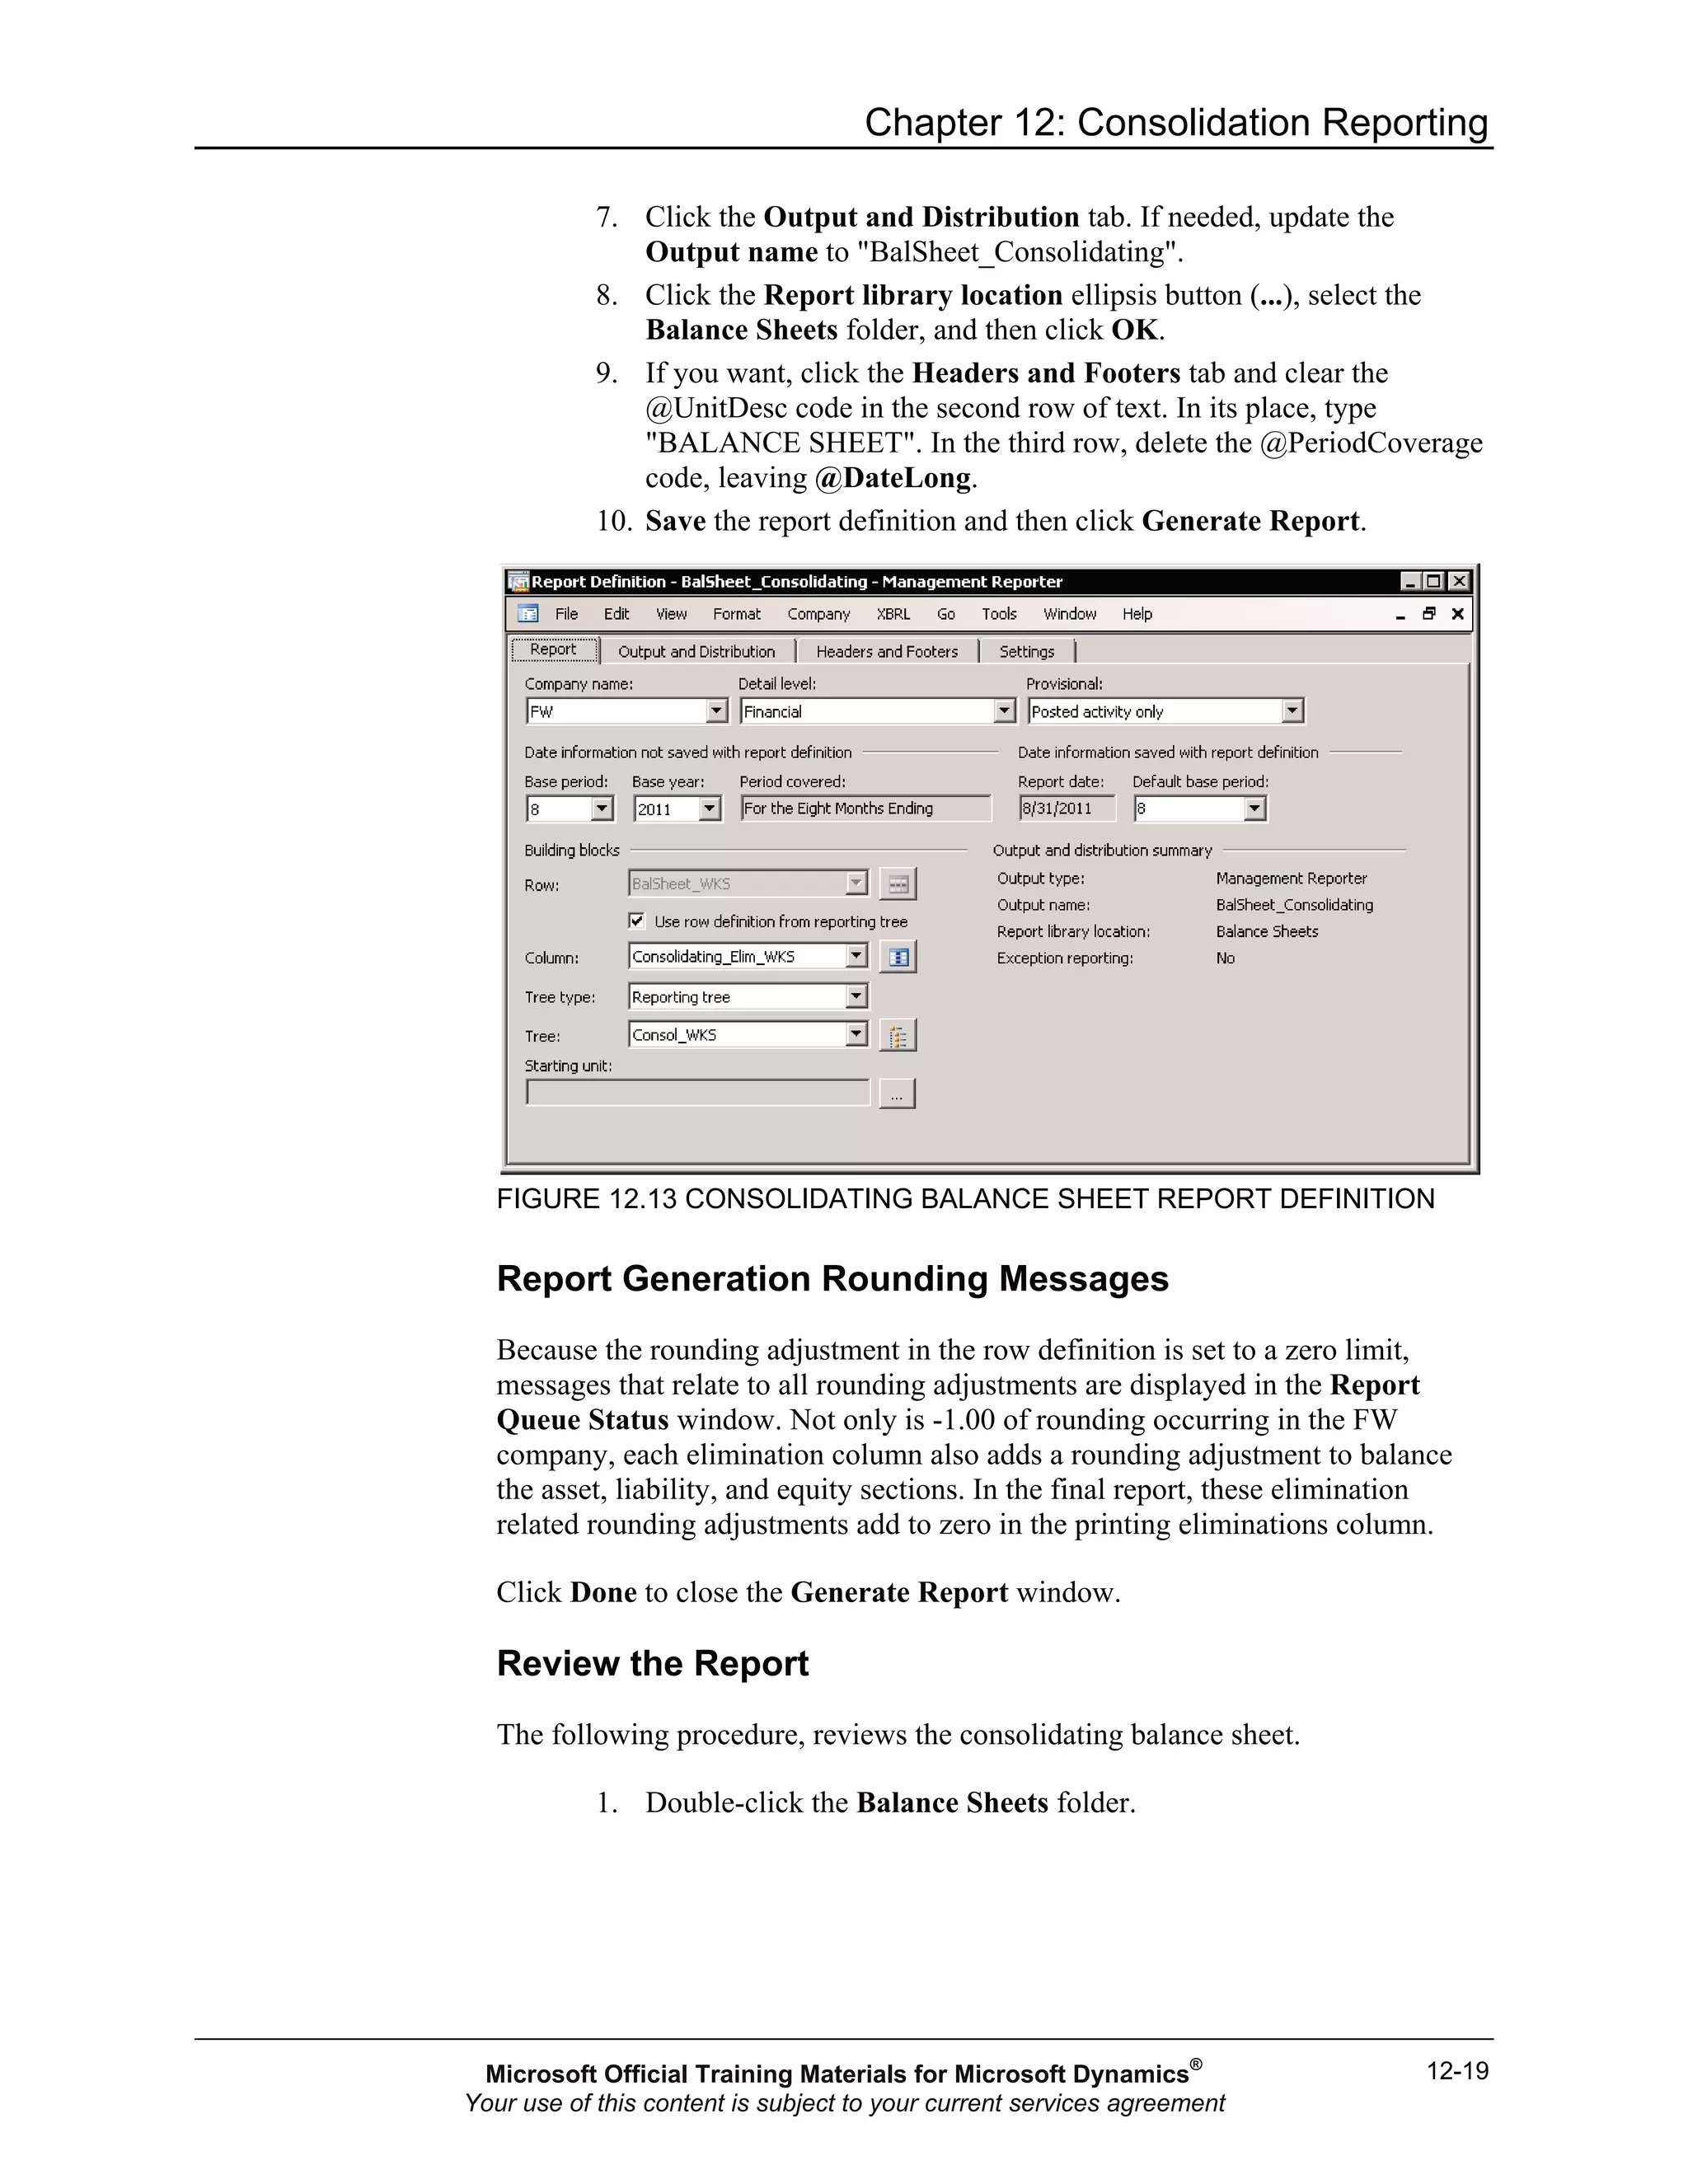
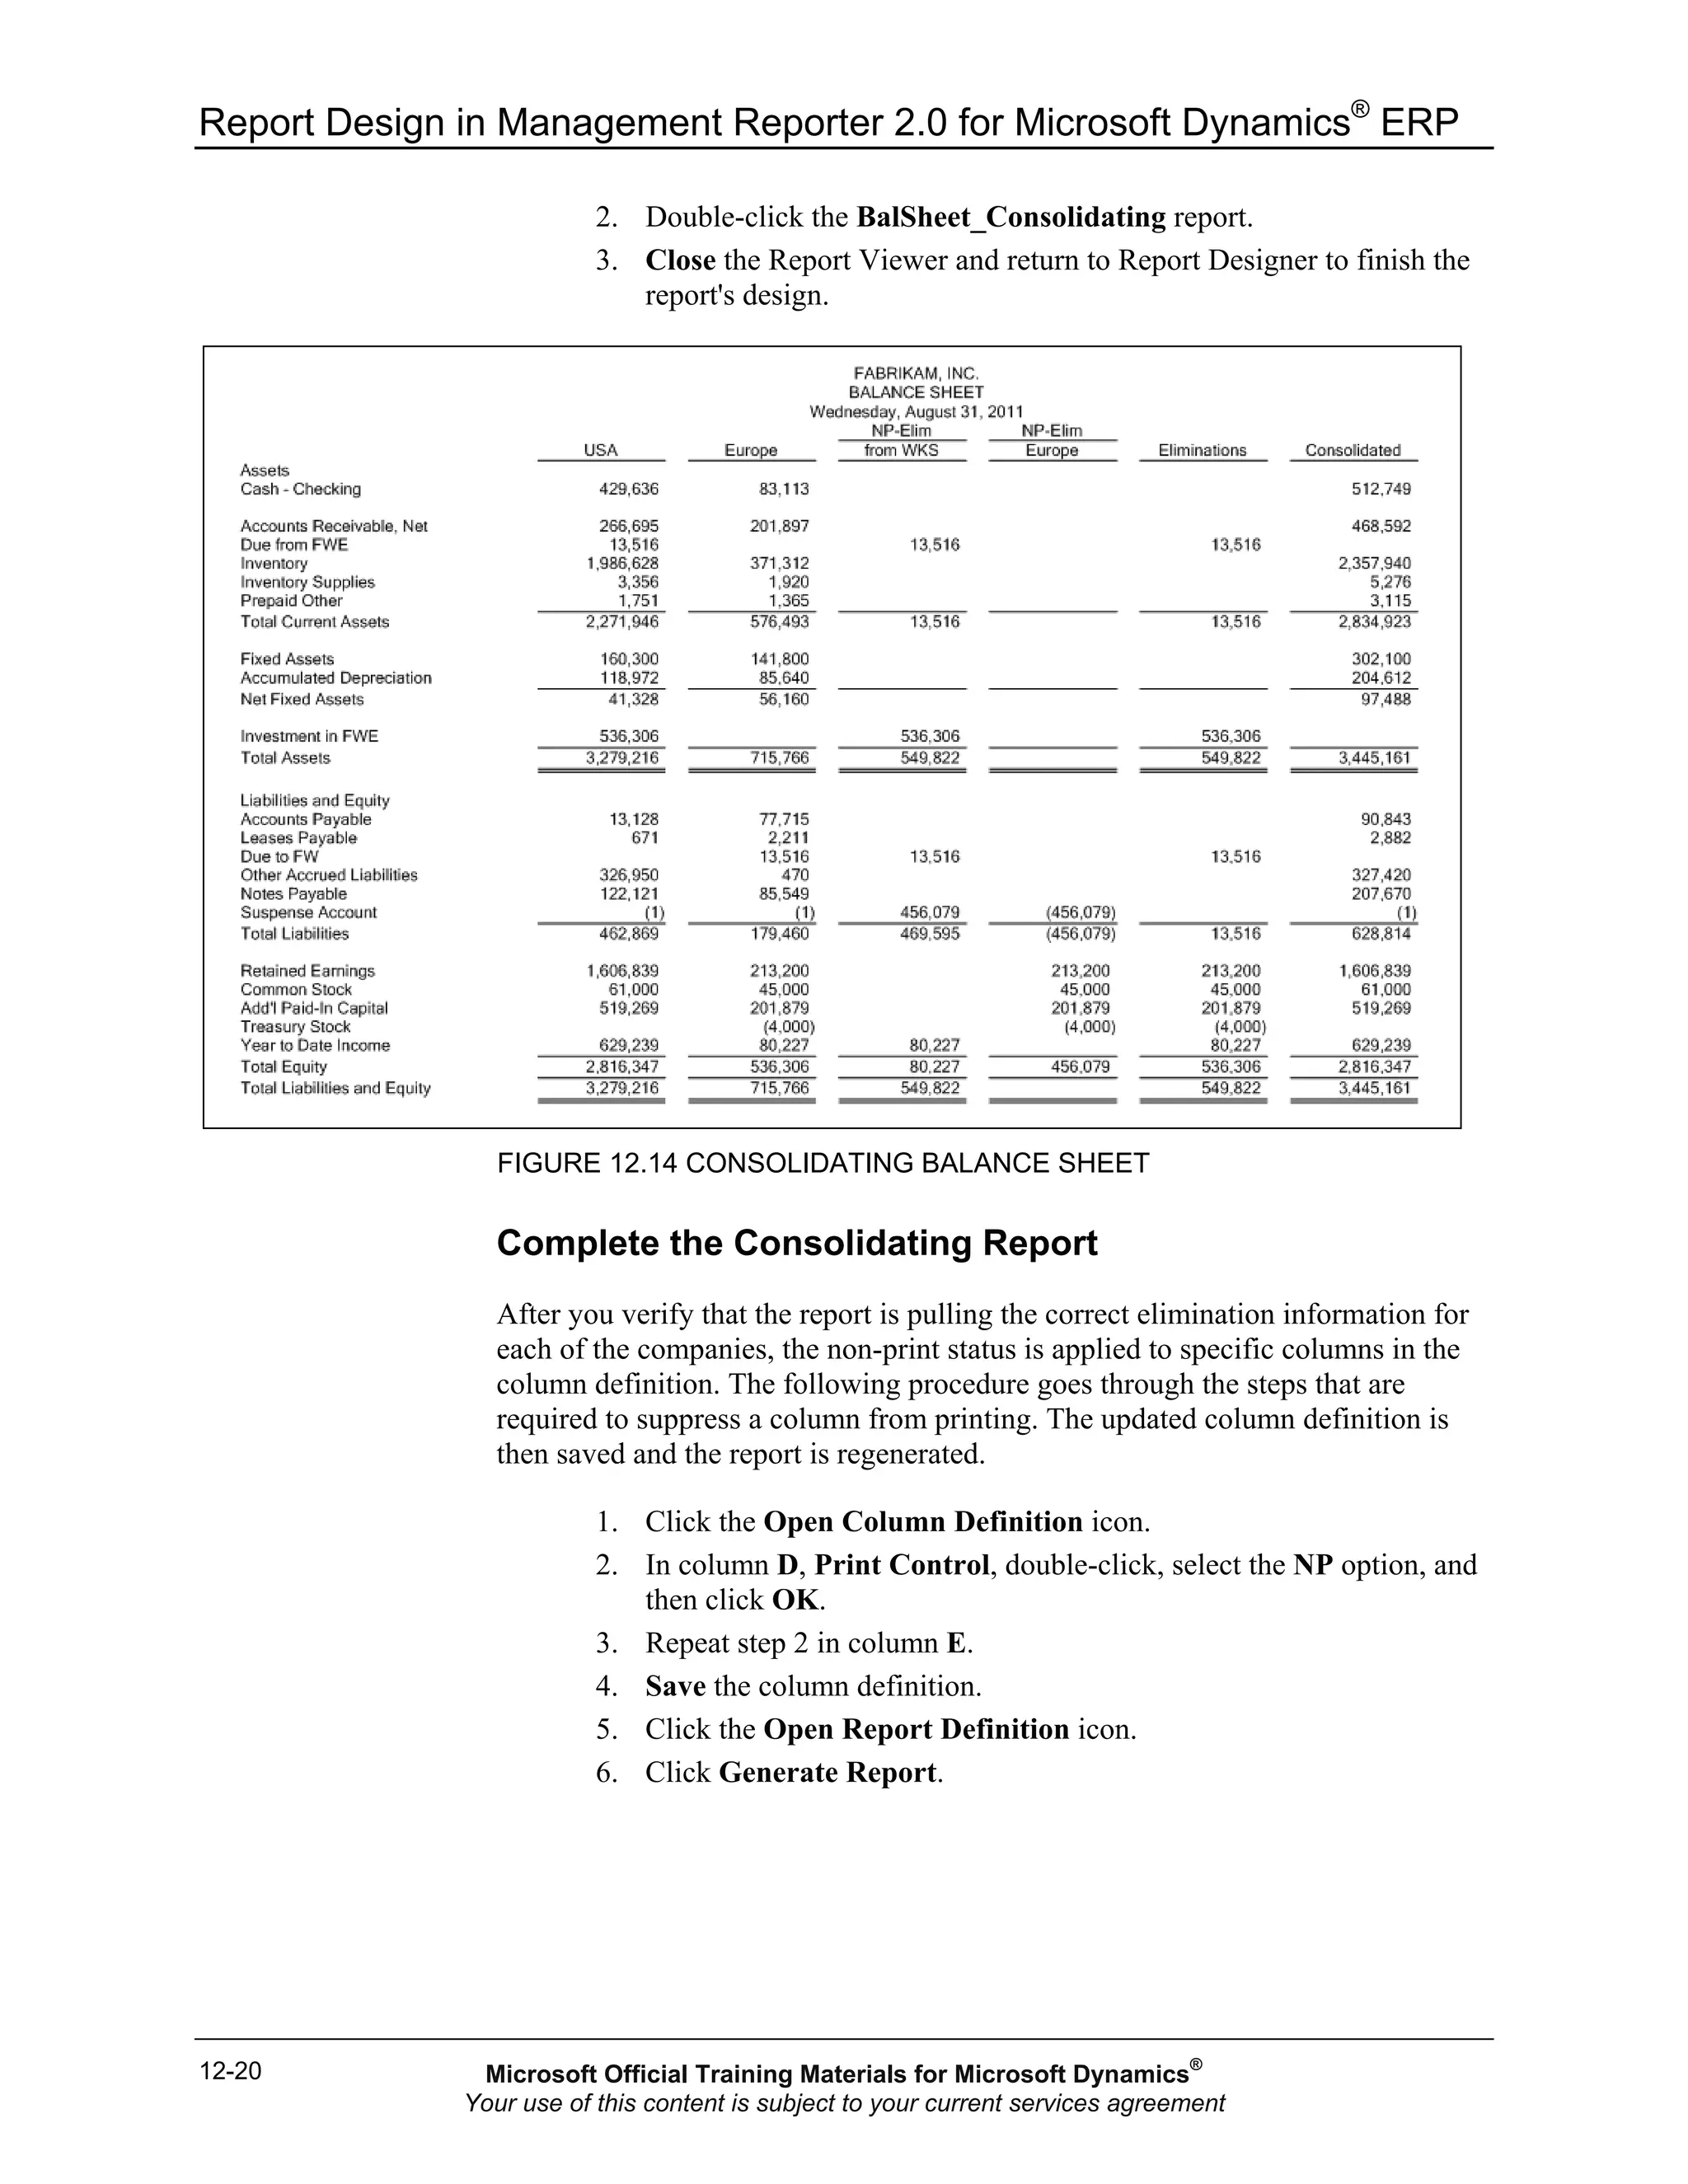
Chapter 12: Consolidation Reporting
12-1
CHAPTER 12: CONSOLIDATION REPORTING
Objectives
The objectives are:
• Examine the basics of multi-company reporting in Management
Reporter
• Explore creating a reporting tree that connects to multiple companies
• Practice building a consolidating column definition
• Examine defining a multi-company row definition
• Review the steps required to create a report definition
• Explore the use of sort commands
• Examine the separate method of linking to an external spreadsheet
• Define a consolidating balance sheet that uses a separate worksheet
link
Introduction
Many organizations need to prepare financial statements that report on multiple
companies in either a consolidating or a consolidated format. If the consolidation
companies engage in intercompany transactions, then elimination entries are also
incorporated into the design.
This part of the training works on designing a reporting tree that accesses both
the Fabrikam, Inc. (FW) and the Fabrikam Europe, Inc. (FWE) companies. This
reporting tree is then associated with a column definition to present the
companies' activity in a side by side or consolidating format.
Intercompany eliminations are added to the design in two methods: dimension
filters in the column definition and external worksheet linking.
NOTE: Refer to the Side by Side Reporting course for more information on dimension
filters and reporting unit restrictions.
Microsoft Official Training Materials for Microsoft Dynamics®
Your use of this content is subject to your current services agreement
Report Design in Management Reporter 2.0 for Microsoft Dynamics®
ERP
12-2
Consolidation Overview
How multiple companies are defined in the source system determines how the
report is designed. If multiple companies are held in a single database and they
are referenced through an account segment or dimension, then Management
Reporter connects to a single company and the row definition or column
definition is used to define specific company activity. Multiple companies can
also be found in the same database and created as separate companies. The
training demonstration data is an example of this. If the companies are defined in
multiple databases, then multiple companies are defined in Management Reporter
and a reporting tree definition is required in addition to the row and column
definitions.
If the companies that are being consolidated have unique dimension structures,
then not only is each company defined as a separate reporting unit in the
reporting tree, but each reporting unit also has its own link to the financial
dimension in the row definition.
Multi-Company Reporting Trees
The reporting tree is important when you are linking to multiple companies for
consolidating or consolidated reports. Users can define multiple companies as
separate companies within Management Reporter or define company data in a
Microsoft®
Office Excel®
spreadsheet that is accessed through the External Link
and External File fields in the reporting tree definition. The reporting tree reads
the external link information from an associated row definition.
This lesson begins by defining a simple multiple company reporting tree and then
adding an external worksheet to supply intercompany elimination details.
Define the Consolidating Tree
In the following steps, define a three-unit reporting tree that consolidates the FW
and FWE companies.
1. On the File menu, point to New and then click Reporting Tree
Definition. Notice that a single reporting unit is defined on row 1.
The @ANY text defined in column A allows any company to be
reported in the summary unit.
2. Click the Unit Description field and update the default text to
Consolidated.
3. Double-click row 2 in the Company field and select FW.
4. Click the Unit Name field and type "FW".
5. Click the Unit Description field and type "Fabrikam USA".
Microsoft Official Training Materials for Microsoft Dynamics®
Your use of this content is subject to your current services agreement
Chapter 12: Consolidation Reporting
12-3
6. Repeat steps 3 through 5 for the FWE, Fabrikam Europe company.
7. Save the reporting tree with the name "Consol" and the description
"Fabrikam Consolidation".
FIGURE 12.1 CONSOL REPORTING TREE DEFINITION
Consolidating Column Definitions
When users design consolidating reports that display multiple companies in a
side by side presentation, the column definition works in combination with the
reporting tree through the Reporting Unit Selection function.
If the companies engage in intercompany transactions, elimination columns are
defined to display and back out intercompany activity. The combination of
reporting unit restrictions and dimension filter functions are used to target
specific accounts within each company, which are then deducted from the
consolidated company total.
Create a Consolidating Column Design
The following steps guide users through creating a year-to-date consolidating
column definition using the reporting unit selection function.
1. On the File menu, point to New and then click Column Definition.
2. In column A, double-click the Column Type and select DESC.
3. In column B, select the FD column type option.
4. Double-click Periods Covered and select YTD.
5. Double-click Reporting Unit and verify that the Consol reporting
tree is displayed. Click the FW reporting unit and then click OK.
6. Click the Header 2 row and type "USA". In column C, repeat steps
3 through 5, selecting the FWE company.
7. In the header, type "Europe".
8. Copy the data in columns B and C, and paste into columns D and E.
9. In column D, Header 1, type "NP-Elim".
10. Repeat step 9 in column E. These two columns are nonprinting in the
completed report; however, it is good design practice to display the
columns until the report's accuracy is verified.
Microsoft Official Training Materials for Microsoft Dynamics®
Your use of this content is subject to your current services agreement
Report Design in Management Reporter 2.0 for Microsoft Dynamics®
ERP
12-4
11. Double-click column D, Dimension Filter.
12. Double-click in the Natural field and type "???9". This code filters
any account ending in 9, the intercompany activity in the database.
13. Copy and paste the dimension filter from column D to column E.
Add Calculating Columns
In the following steps, calculation columns are added to combine the two
elimination columns and define the consolidated results.
1. In column F, double-click Column Type and then select CALC.
2. In Formula, type "D+E".
IMPORTANT: When a calculation references columns that are nonprinting (NP), they
must be specifically defined in the formula. Nonprinting columns that are defined in a
range formula (D:E) are ignored when the calculation is performed.
3. In Header 2, type "Eliminations".
4. In column G, select the CALC column type and type the formula
"B+C-F".
5. In Header 2, type "Consolidated".
6. Save the column definition with the name "Consoldating_Elim" and
the description "Fabrikam Consolidating with filter eliminations".
FIGURE 12.2 CONSOLIDATING_ELIM COLUMN DEFINITION
Microsoft Official Training Materials for Microsoft Dynamics®
Your use of this content is subject to your current services agreement
Chapter 12: Consolidation Reporting
12-5
Consolidating Row Definitions
As explained in "Consolidation Overview" lesson, the design of the row
definition for multi-company consolidations depends on the chart of dimensions
for each of the consolidation companies.
In this exercise, the consolidating income statement uses the row definition,
IS_Dtl. This detailed income statement contains the income and expense
accounts that are active in the FW company, the default company at the time that
the row definition was created. To accommodate the consolidation report,
account dimensions that are active in the FWE company must also be added.
Modify the IS_Dtl Row Definition
In the following steps, modify the detailed income statement row definition to
accommodate intercompany activity in the FWE company.
1. In the navigation pane, click Row Definitions.
2. Double-click IS_Dtl.
3. On row code 310, double-click column J, Link to Financial
Dimensions, then double-click in the Natural field.
4. In the To field, type "4509". Although this account is not defined in
the FW company, it is required that you pull intercompany cost of
goods sold from the FWE company. Intercompany sales are defined
on row code 130 through the account code 410?.
NOTE: The Sales and COGS rows display two methods to pull any accounts ending in
zero through nine: using a wildcard (?) or using a range.
5. Click OK.
6. Save the updates to the row definition.
FIGURE 12.3 COST OF GOOD SOLD RANGE OF ACCOUNTS
Microsoft Official Training Materials for Microsoft Dynamics®
Your use of this content is subject to your current services agreement
Report Design in Management Reporter 2.0 for Microsoft Dynamics®
ERP
12-6
Consolidating Report Definition
Consolidation reports that relate the column definition to a reporting tree through
the reporting unit selection function require the same reporting tree in the report
definition.
Define the IS_Consolidating Report
In the following steps, create a new report definition that is associated with the
income statement row definition and consolidating column and reporting tree
definitions.
1. On the File menu, point to New and then click Report Definition.
2. Click the Default base period, type "8", and press the Tab key to
exit the field. The report date now displays 8/31/2011.
3. Click the Row drop-down and select IS_Dtl.
4. Click the Column drop-down and select Consolidating_Elim.
5. Click the Tree type drop-down and select Reporting Tree.
6. Click the Tree drop-down and select Consol.
7. Click the Output and Distribution tab.
8. Click the Report library location ellipsis button (...) and expand the
Library. Click the Income Statements folder and then click OK.
9. Click the Settings tab.
10. In Rounding precision, click the drop-down and select Whole
Dollars.
11. In Reporting unit selection, click Include specific number of
levels down from starting unit. Accept the default setting of zero
(0). As a result, only the summary of the consolidated unit displays
in the generated report.
12. Click the Other button and then click the Landscape orientation.
13. Click OK to close the Report Settings dialog box.
Microsoft Official Training Materials for Microsoft Dynamics®
Your use of this content is subject to your current services agreement
Chapter 12: Consolidation Reporting
12-7
14. Save the report definition with the name "IS_Consolidating" and the
description "Fabrikam Consolidating Income Statement".
FIGURE 12.4 IS_CONSOLIDATING SETTINGS
Generate the Report
In the following steps, you will generate, review, and then fine-tune the report
display.
1. Click Generate Report.
2. Double-click the Income Statements folder and then double-click
IS_Consolidating. The consolidating report displays eliminating
entries for each of the two companies that are summarized in a single
eliminations column. Notice that the Gross Profit % row displays the
result of the column calculations in both the Eliminations and
Consolidated columns (USA+Europe-Eliminations), not the result of
Gross Profit divided by Net Sales. This display is corrected through
the calculation priority in the report definition settings.
Microsoft Official Training Materials for Microsoft Dynamics®
Your use of this content is subject to your current services agreement
Report Design in Management Reporter 2.0 for Microsoft Dynamics®
ERP
12-8
3. Close the Report Viewer to return to the Report Designer.
FIGURE 12.5 IN PROGRESS CONSOLIDATING INCOME STATEMENT
Adjust the Report Display
The following steps adjust the report definition's calculation priority and the
individual company's elimination columns are set to nonprinting.
1. In the IS_Consolidating report definition, click the Settings tab.
2. In Calculation priority, click Perform column calculations first
and then row.
3. Save the changes to the report definition.
4. Click the Open Column Definition icon.
5. In column D, double-click Print Control.
6. Select NP and then click OK.
7. Repeat steps 5 and 6 in column E.
8. Save the change to the column definition.
Microsoft Official Training Materials for Microsoft Dynamics®
Your use of this content is subject to your current services agreement
Chapter 12: Consolidation Reporting
12-9
Generate the Completed Report
In the following procedure, the report is generated again to display the completed
design.
1. Click the Open Report Definition icon.
2. Click Generate Report.
3. Double-click the Income Statements folder and then double-click
IS_Consolidating.
4. Review the completed design and then close the Report Viewer.
NOTE: To define a consolidated report, return to the column definition and select the NP
print control for the individual companies and elimination columns.
FIGURE 12.6 CONSOLIDATING INCOME STATEMENT
Microsoft Official Training Materials for Microsoft Dynamics®
Your use of this content is subject to your current services agreement
Report Design in Management Reporter 2.0 for Microsoft Dynamics®
ERP
12-10
Sort Commands
The reports created to this point display rows of data exactly as defined in the
row definition. However, sort commands are available to display data in one of
the following options:
• Alphabetically, based on the description column
• Ascending or descending values, based on a numeric column
• Ascending or descending absolute values, based on a numeric
column
The following three items are added to the row definition when you are defining
a sort:
1. Format code - select from one of the following:
a. SORT
b. ASORT
c. SORTDESC
d. ASORTDESC
2. The related row codes to include in the sort
3. The column ID that the sort is based on
Add an Alphabetical Sort
The following steps add a description-based sort to the expense section of the
consolidating income statement.
1. In the navigation pane, click Row Definitions.
2. Double-click IS_Dtl.
3. On the File menu, click the Save As menu item.
4. Update the name to IS_Dtl_ExpSort and then click OK.
5. Click row code 460, right-click and then select Insert Row.
NOTE: Sort rows do not display or add a row to the completed report and can be placed
anywhere in the row definition.
On the new row, double-click Format Code and select SORT.
6. In column D, Related Rows, type "490:940".
NOTE: The resulting sort is inclusive of the beginning and ending rows, so do not define
descriptive headers or underscores in the row range.
Microsoft Official Training Materials for Microsoft Dynamics®
Your use of this content is subject to your current services agreement
Chapter 12: Consolidation Reporting
12-11
7. Column A of the column definition displays the row descriptions and
is the basis of the alphabetical sort. In column H, Column
Restriction, type "A".
8. Save the row definition.
FIGURE 12.7 SORT BASED ON DESCRIPTION COLUMN
Expenses Sorted by Description
In the following steps, update the report's building blocks to the row definition
that contains the sort information and then re-generate the report.
1. In the navigation pane, click Report Definitions.
2. Double-click IS_Consolidating.
3. On the Report tab, click the Row drop-down and select
IS_Dtl_ExpSort.
4. Save the update to the report definition and then click Generate
Report.
5. Double-click the Income Statements folder and then double-click
IS_Consolidating.
Microsoft Official Training Materials for Microsoft Dynamics®
Your use of this content is subject to your current services agreement
Report Design in Management Reporter 2.0 for Microsoft Dynamics®
ERP
12-12
6. Close the Report Viewer and return to the Report Designer.
FIGURE 12.8 SORT BASED ON DESCRIPTION COLUMN
Add an Absolute Value Sort
In the following procedure, the expense section sort is modified to display the
results based on descending absolute values for the USA (FW) company. Sorting
by absolute value ignores the sign of the number being sorted.
1. Click the Open Row Definition icon.
2. On row code 445, double-click Format Code, and select
ASORTDESC.
3. In column H, Column Restriction, type "B". Column B in the
column definition displays the financial results of the FW company.
4. Save the row definition.
5. Click the Open Report Definition icon.
6. Click Generate Report.
7. Double-click the Income Statements folder and then double-click
IS_Consolidating.
8. Close the Report Viewer and return to the Report Designer.
FIGURE 12.9 ABSOLUTE VALUE DESCENDING SORT
Microsoft Official Training Materials for Microsoft Dynamics®
Your use of this content is subject to your current services agreement
Chapter 12: Consolidation Reporting
12-13
External Worksheet Linking
Management Reporter offers two methods for linking spreadsheet data into a
report: the combined link method and the separate link method. The combined
link method is explored in the "Statements of Cash Flow" course, in the design of
the FASB style statement of cash flow. The separate link method is used to
define eliminations in the upcoming "Consolidating Balance Sheet with Separate
Link" lesson.
The separate link method of adding external data to a report works within the
following design guidelines:
• Connect to one or more Microsoft®
Office Excel®
worksheets
• The reporting tree definition supplies the spreadsheet file name and
location
• The row definition supplies the spreadsheet cell references in one or
more external row links
NOTE: When you are connecting to multiple worksheets, the design of the worksheet
determines the number of external links that are added to the row definition. If the cell
references are consistent across all worksheets (or tabs in a workbook), then a single
external link is used.
• The separate link method is used to add spreadsheet data to a WKS
column type
• Similar to the combined link method, cell references can be absolute
or dynamic, depending on the design of the spreadsheet
• The period offset codes /RPO and /CPO are used with dynamic cell
references to count down rows or across columns, determined by the
report's base period
Microsoft Official Training Materials for Microsoft Dynamics®
Your use of this content is subject to your current services agreement
Report Design in Management Reporter 2.0 for Microsoft Dynamics®
ERP
12-14
Define the Eliminations Spreadsheet
The following steps explain how to use Microsoft Excel to create a worksheet
that contains some accounts that are eliminated in the consolidating balance
sheet. The eliminations worksheet is then used to show how to pull worksheet
data into a report using the separate link method.
1. Start Microsoft Excel.
2. In the new worksheet, type the information as shown in the table.
Make sure that the cell references are the same because these are
used in the "Row Definition with External Link" exercise.
A B
1 Account Elimination Amount
2 Due from FWE 13,516
3 Due to FW 13,516
4 Investment in FWE 536,306
5 Net Income 80,227
3. Save the worksheet with the name Eliminations.xlsx to either the
desktop or the Management Reporter files location folder. On the
Tools menu, click Options to determine the default file location.
Consolidating Balance Sheet with Separate Link
This lesson introduces using a separate worksheet link to pull data from
Microsoft Excel into the eliminations column of the consolidating balance sheet.
Because the spreadsheet data is presented in a column, the separate link method
is required.
In the separate link method, all three building block definitions contribute to the
link's setup. In addition, the report definition is set to pull worksheet related data
from the reporting tree.
• Row definition - contains worksheet cell references in one or more
external worksheet links.
o If the worksheet is designed with periodic data, then the related
period offset code (/CPO or /RPO) is also required.
o If multiple WKS type columns are defined in the column
definition, then the related column is also entered in the link
syntax; for example C=B4, E=C4
Microsoft Official Training Materials for Microsoft Dynamics®
Your use of this content is subject to your current services agreement
Chapter 12: Consolidation Reporting
12-15
• Column definition - contains one or more WKS type columns.
• Reporting tree definition - is associated to the external link in the
row definition in addition to the location of the worksheet file.
For training purposes, the existing balance sheet report is used as a template
when you are designing the consolidating balance sheet.
Row Definition with External Link
The existing BalSheet row definition is used as a basis for the consolidating
balance sheet. The following procedure guides you through performing a Save
As and modifying the design to incorporate Fabrikam Europe accounts and an
external worksheet link.
1. On the navigation pane, click Row Definitions and then double-click
BalSheet.
2. On the File menu, click the Save As menu item.
3. Modify the name to "BalSheet_WKS" and description to
"Consolidation Balance Sheet with ext link". Click OK.
4. Double-click column J, Link to Financial Dimension, to open the
Row Links dialog box.
5. Click New.
6. Click the Link type drop-down and select External Worksheet.
7. Click the Description field, type "Eliminations" and then click OK.
Notice that column K, Link to External Worksheet is added to the
row definition.
8. On row code 220, Due from FWE, type "B2" in the worksheet link
column.
9. On row code 580, type "B4" in the worksheet link column.
10. Click row code 820 and right-click. Select Insert Row.
11. Type the description "Due to FW". In Normal Balance, select C and
in the Link to Financial Dimension column, type the account
"2209". Type "B3" in the worksheet link.
12. On row code 1120, type "B5" in the worksheet link.
Microsoft Official Training Materials for Microsoft Dynamics®
Your use of this content is subject to your current services agreement
Report Design in Management Reporter 2.0 for Microsoft Dynamics®
ERP
12-16
13. Save the changes to the row definition.
FIGURE 12.10 BALSHEET_WKS ROW DEFINITION
Column Definition with WKS Column
The following procedure, changes the existing consolidations column design by
adding a worksheet link column. The Fabrikam Europe account filter is also
changed to pull balance sheet related elimination accounts.
1. On the navigation pane, click Column Definitions and then double-
click Consolidating_Elim.
2. On the File menu, click the Save As menu item.
Microsoft Official Training Materials for Microsoft Dynamics®
Your use of this content is subject to your current services agreement
Chapter 12: Consolidation Reporting
12-17
3. Modify the name to "Consolidating_Elim_WKS" and description to
"Fabrikam Consolidating with filter and WKS eliminations". Click
OK.
4. Double-click column D, Column Type and select WKS (Amounts
from external worksheet).
5. Click Reporting Unit and press the Delete key to clear the tree
reference.
6. Click Header 2 and update the text to read, "from WKS".
7. Double-click column E, Dimension Filter. Update the Natural field
to 3??? to eliminate equity accounts from the Europe company.
Click OK.
8. In columns D and E, clear the NP (non-print) print control. The non-
print status is added back after the report's accuracy is verified.
9. Save the column definition.
FIGURE 12.11 CONSOLIDATING_ELIM_WKS COLUMN DEFINITION
Reporting Tree with Link Information
The reporting tree is a required component when you are using the separate link
method to access worksheet data. The following steps, explain how to change the
existing consolidation tree to accommodate a worksheet link.
1. On the navigation pane, click Reporting Tree Definitions and then
double-click Consol.
2. On the File menu, click the Save As menu item.
3. Change the name to read "Consol_WKS" and the description to
"Consolidating with worksheet link". Click OK.
4. On row 4, double-click column A, Company and then select
@ANY.
Microsoft Official Training Materials for Microsoft Dynamics®
Your use of this content is subject to your current services agreement
Report Design in Management Reporter 2.0 for Microsoft Dynamics®
ERP
12-18
5. In Unit Name type "Eliminations".
6. In Unit Description, type "Worksheet Eliminations".
7. On row 1, double-click column E, Row Definitions and then select
BalSheet_WKS. Notice that all units within the tree are
automatically updated with the row definition ID.
NOTE: The reporting tree must be associated with the row definition that contains the
external link.
8. On row 4, double-click column G, External Link. Select WKS1-
Eliminations. This is the link added to the row definition that
contains the worksheet cell references.
9. On row 4, double-click column H, External File. Click
Eliminations.xlsx and then click Open. (If it is necessary, locate the
spreadsheet.)
10. Save the modifications to the reporting tree definition.
NOTE: An alternative design is to relate external worksheet information to an existing
reporting unit.
FIGURE 12.12 CONSOL_WKS REPORTING TREE
Report Definition
The report definition contains an option that is required when you are using the
separate link method to connect to an external worksheet. The following steps,
introduce this option and then associate related building blocks for the
consolidating balance sheet.
1. In the navigation pane, click Report Definitions.
2. Double-click IS_Consolidating.
3. On the File menu, click the Save As menu item.
4. Update the name to "BalSheet_Consolidating" and description to
"Fabrikam Consolidating Balance Sheet". Click OK.
5. Update the building blocks as follows:
o Row: BalSheet_WKS
o Column: Consolidating_Elim_WKS
o Tree: Consol_WKS
6. Select the option Use row definition from reporting tree. Failure to
select this option results in an error and report generation is canceled.
Microsoft Official Training Materials for Microsoft Dynamics®
Your use of this content is subject to your current services agreement
Chapter 12: Consolidation Reporting
12-19
7. Click the Output and Distribution tab. If needed, update the
Output name to "BalSheet_Consolidating".
8. Click the Report library location ellipsis button (...), select the
Balance Sheets folder, and then click OK.
9. If you want, click the Headers and Footers tab and clear the
@UnitDesc code in the second row of text. In its place, type
"BALANCE SHEET". In the third row, delete the @PeriodCoverage
code, leaving @DateLong.
10. Save the report definition and then click Generate Report.
FIGURE 12.13 CONSOLIDATING BALANCE SHEET REPORT DEFINITION
Report Generation Rounding Messages
Because the rounding adjustment in the row definition is set to a zero limit,
messages that relate to all rounding adjustments are displayed in the Report
Queue Status window. Not only is -1.00 of rounding occurring in the FW
company, each elimination column also adds a rounding adjustment to balance
the asset, liability, and equity sections. In the final report, these elimination
related rounding adjustments add to zero in the printing eliminations column.
Click Done to close the Generate Report window.
Review the Report
The following procedure, reviews the consolidating balance sheet.
1. Double-click the Balance Sheets folder.
Microsoft Official Training Materials for Microsoft Dynamics®
Your use of this content is subject to your current services agreement
Report Design in Management Reporter 2.0 for Microsoft Dynamics®
ERP
12-20
2. Double-click the BalSheet_Consolidating report.
3. Close the Report Viewer and return to Report Designer to finish the
report's design.
FIGURE 12.14 CONSOLIDATING BALANCE SHEET
Complete the Consolidating Report
After you verify that the report is pulling the correct elimination information for
each of the companies, the non-print status is applied to specific columns in the
column definition. The following procedure goes through the steps that are
required to suppress a column from printing. The updated column definition is
then saved and the report is regenerated.
1. Click the Open Column Definition icon.
2. In column D, Print Control, double-click, select the NP option, and
then click OK.
3. Repeat step 2 in column E.
4. Save the column definition.
5. Click the Open Report Definition icon.
6. Click Generate Report.
Microsoft Official Training Materials for Microsoft Dynamics®
Your use of this content is subject to your current services agreement
Chapter 12: Consolidation Reporting
12-21
7. Double-click the Balance Sheets folder.
8. Double-click the BalSheet_Consolidating report.
FIGURE 12.15 FINALIZED CONSOLIDATING BALANCE SHEET
Summary
This part of training introduced the following design elements of consolidation
reports.
• When users are consolidating multiple companies with different
account structures, multiple links to the financial data source are
defined in the row definition. These links are then related to the
appropriate company in the reporting tree.
• When users are consolidating multiple companies with intercompany
transactions, eliminating entries can be isolated through either a
dimension filter, external worksheet link, or a combination of both.
• The separate linking method requires related information in the row,
column, reporting tree, and report definition.
Procedures in this training, showed how to use the separate link method to report
on elimination data; however, you can use Excel to supply any form of data, such
as statistical information or budget amounts.
The benefit from this part of training is that users expand their report design
knowledge to include side by side consolidations and adding Excel data to a
report.
Microsoft Official Training Materials for Microsoft Dynamics®
Your use of this content is subject to your current services agreement
Report Design in Management Reporter 2.0 for Microsoft Dynamics®
ERP
12-22
Test Your Knowledge
Test your knowledge with the following questions.
1. Which of the following is a valid row link type when you are using the
separate link method to access worksheet data?
( ) Financial Dimensions
( ) External Worksheet
( ) Financial Dimensions + Worksheet
( ) All of the above
2. Which of the following have design elements that are required when you are
using the separate link method to access worksheet data? (Select all that
apply)
( ) Row Definition
( ) Column Definition
( ) Reporting Tree Definition
( ) Report Definition
3. Which of the following are required elements when you are designing a
reporting tree that contains a worksheet link? (Select all that apply)
( ) Row Definition
( ) Row Link
( ) External Link
( ) External File
Microsoft Official Training Materials for Microsoft Dynamics®
Your use of this content is subject to your current services agreement
Chapter 12: Consolidation Reporting
12-23
Quick Interaction: Lessons Learned
Take a moment and write down three key points you have learned from this
chapter.
1.
2.
3.
Microsoft Official Training Materials for Microsoft Dynamics®
Your use of this content is subject to your current services agreement
Report Design in Management Reporter 2.0 for Microsoft Dynamics®
ERP
12-24
Solutions
Test Your Knowledge
1. Which of the following is a valid row link type when you are using the
separate link method to access worksheet data?
( ) Financial Dimensions
(•) External Worksheet
( ) Financial Dimensions + Worksheet
( ) All of the above
2. Which of the following have design elements that are required when you are
using the separate link method to access worksheet data? (Select all that
apply)
(√) Row Definition
(√) Column Definition
(√) Reporting Tree Definition
(√) Report Definition
3. Which of the following are required elements when you are designing a
reporting tree that contains a worksheet link? (Select all that apply)
(√) Row Definition
( ) Row Link
(√) External Link
(√) External File
Microsoft Official Training Materials for Microsoft Dynamics®
Your use of this content is subject to your current services agreement

Mr20 enus 12-Report Design in Management Reporter 2.0 for Microsoft Dynamics® ERP

  • 1.
    Chapter 12: ConsolidationReporting 12-1 CHAPTER 12: CONSOLIDATION REPORTING Objectives The objectives are: • Examine the basics of multi-company reporting in Management Reporter • Explore creating a reporting tree that connects to multiple companies • Practice building a consolidating column definition • Examine defining a multi-company row definition • Review the steps required to create a report definition • Explore the use of sort commands • Examine the separate method of linking to an external spreadsheet • Define a consolidating balance sheet that uses a separate worksheet link Introduction Many organizations need to prepare financial statements that report on multiple companies in either a consolidating or a consolidated format. If the consolidation companies engage in intercompany transactions, then elimination entries are also incorporated into the design. This part of the training works on designing a reporting tree that accesses both the Fabrikam, Inc. (FW) and the Fabrikam Europe, Inc. (FWE) companies. This reporting tree is then associated with a column definition to present the companies' activity in a side by side or consolidating format. Intercompany eliminations are added to the design in two methods: dimension filters in the column definition and external worksheet linking. NOTE: Refer to the Side by Side Reporting course for more information on dimension filters and reporting unit restrictions. Microsoft Official Training Materials for Microsoft Dynamics® Your use of this content is subject to your current services agreement
  • 2.
    Report Design inManagement Reporter 2.0 for Microsoft Dynamics® ERP 12-2 Consolidation Overview How multiple companies are defined in the source system determines how the report is designed. If multiple companies are held in a single database and they are referenced through an account segment or dimension, then Management Reporter connects to a single company and the row definition or column definition is used to define specific company activity. Multiple companies can also be found in the same database and created as separate companies. The training demonstration data is an example of this. If the companies are defined in multiple databases, then multiple companies are defined in Management Reporter and a reporting tree definition is required in addition to the row and column definitions. If the companies that are being consolidated have unique dimension structures, then not only is each company defined as a separate reporting unit in the reporting tree, but each reporting unit also has its own link to the financial dimension in the row definition. Multi-Company Reporting Trees The reporting tree is important when you are linking to multiple companies for consolidating or consolidated reports. Users can define multiple companies as separate companies within Management Reporter or define company data in a Microsoft® Office Excel® spreadsheet that is accessed through the External Link and External File fields in the reporting tree definition. The reporting tree reads the external link information from an associated row definition. This lesson begins by defining a simple multiple company reporting tree and then adding an external worksheet to supply intercompany elimination details. Define the Consolidating Tree In the following steps, define a three-unit reporting tree that consolidates the FW and FWE companies. 1. On the File menu, point to New and then click Reporting Tree Definition. Notice that a single reporting unit is defined on row 1. The @ANY text defined in column A allows any company to be reported in the summary unit. 2. Click the Unit Description field and update the default text to Consolidated. 3. Double-click row 2 in the Company field and select FW. 4. Click the Unit Name field and type "FW". 5. Click the Unit Description field and type "Fabrikam USA". Microsoft Official Training Materials for Microsoft Dynamics® Your use of this content is subject to your current services agreement
  • 3.
    Chapter 12: ConsolidationReporting 12-3 6. Repeat steps 3 through 5 for the FWE, Fabrikam Europe company. 7. Save the reporting tree with the name "Consol" and the description "Fabrikam Consolidation". FIGURE 12.1 CONSOL REPORTING TREE DEFINITION Consolidating Column Definitions When users design consolidating reports that display multiple companies in a side by side presentation, the column definition works in combination with the reporting tree through the Reporting Unit Selection function. If the companies engage in intercompany transactions, elimination columns are defined to display and back out intercompany activity. The combination of reporting unit restrictions and dimension filter functions are used to target specific accounts within each company, which are then deducted from the consolidated company total. Create a Consolidating Column Design The following steps guide users through creating a year-to-date consolidating column definition using the reporting unit selection function. 1. On the File menu, point to New and then click Column Definition. 2. In column A, double-click the Column Type and select DESC. 3. In column B, select the FD column type option. 4. Double-click Periods Covered and select YTD. 5. Double-click Reporting Unit and verify that the Consol reporting tree is displayed. Click the FW reporting unit and then click OK. 6. Click the Header 2 row and type "USA". In column C, repeat steps 3 through 5, selecting the FWE company. 7. In the header, type "Europe". 8. Copy the data in columns B and C, and paste into columns D and E. 9. In column D, Header 1, type "NP-Elim". 10. Repeat step 9 in column E. These two columns are nonprinting in the completed report; however, it is good design practice to display the columns until the report's accuracy is verified. Microsoft Official Training Materials for Microsoft Dynamics® Your use of this content is subject to your current services agreement
  • 4.
    Report Design inManagement Reporter 2.0 for Microsoft Dynamics® ERP 12-4 11. Double-click column D, Dimension Filter. 12. Double-click in the Natural field and type "???9". This code filters any account ending in 9, the intercompany activity in the database. 13. Copy and paste the dimension filter from column D to column E. Add Calculating Columns In the following steps, calculation columns are added to combine the two elimination columns and define the consolidated results. 1. In column F, double-click Column Type and then select CALC. 2. In Formula, type "D+E". IMPORTANT: When a calculation references columns that are nonprinting (NP), they must be specifically defined in the formula. Nonprinting columns that are defined in a range formula (D:E) are ignored when the calculation is performed. 3. In Header 2, type "Eliminations". 4. In column G, select the CALC column type and type the formula "B+C-F". 5. In Header 2, type "Consolidated". 6. Save the column definition with the name "Consoldating_Elim" and the description "Fabrikam Consolidating with filter eliminations". FIGURE 12.2 CONSOLIDATING_ELIM COLUMN DEFINITION Microsoft Official Training Materials for Microsoft Dynamics® Your use of this content is subject to your current services agreement
  • 5.
    Chapter 12: ConsolidationReporting 12-5 Consolidating Row Definitions As explained in "Consolidation Overview" lesson, the design of the row definition for multi-company consolidations depends on the chart of dimensions for each of the consolidation companies. In this exercise, the consolidating income statement uses the row definition, IS_Dtl. This detailed income statement contains the income and expense accounts that are active in the FW company, the default company at the time that the row definition was created. To accommodate the consolidation report, account dimensions that are active in the FWE company must also be added. Modify the IS_Dtl Row Definition In the following steps, modify the detailed income statement row definition to accommodate intercompany activity in the FWE company. 1. In the navigation pane, click Row Definitions. 2. Double-click IS_Dtl. 3. On row code 310, double-click column J, Link to Financial Dimensions, then double-click in the Natural field. 4. In the To field, type "4509". Although this account is not defined in the FW company, it is required that you pull intercompany cost of goods sold from the FWE company. Intercompany sales are defined on row code 130 through the account code 410?. NOTE: The Sales and COGS rows display two methods to pull any accounts ending in zero through nine: using a wildcard (?) or using a range. 5. Click OK. 6. Save the updates to the row definition. FIGURE 12.3 COST OF GOOD SOLD RANGE OF ACCOUNTS Microsoft Official Training Materials for Microsoft Dynamics® Your use of this content is subject to your current services agreement
  • 6.
    Report Design inManagement Reporter 2.0 for Microsoft Dynamics® ERP 12-6 Consolidating Report Definition Consolidation reports that relate the column definition to a reporting tree through the reporting unit selection function require the same reporting tree in the report definition. Define the IS_Consolidating Report In the following steps, create a new report definition that is associated with the income statement row definition and consolidating column and reporting tree definitions. 1. On the File menu, point to New and then click Report Definition. 2. Click the Default base period, type "8", and press the Tab key to exit the field. The report date now displays 8/31/2011. 3. Click the Row drop-down and select IS_Dtl. 4. Click the Column drop-down and select Consolidating_Elim. 5. Click the Tree type drop-down and select Reporting Tree. 6. Click the Tree drop-down and select Consol. 7. Click the Output and Distribution tab. 8. Click the Report library location ellipsis button (...) and expand the Library. Click the Income Statements folder and then click OK. 9. Click the Settings tab. 10. In Rounding precision, click the drop-down and select Whole Dollars. 11. In Reporting unit selection, click Include specific number of levels down from starting unit. Accept the default setting of zero (0). As a result, only the summary of the consolidated unit displays in the generated report. 12. Click the Other button and then click the Landscape orientation. 13. Click OK to close the Report Settings dialog box. Microsoft Official Training Materials for Microsoft Dynamics® Your use of this content is subject to your current services agreement
  • 7.
    Chapter 12: ConsolidationReporting 12-7 14. Save the report definition with the name "IS_Consolidating" and the description "Fabrikam Consolidating Income Statement". FIGURE 12.4 IS_CONSOLIDATING SETTINGS Generate the Report In the following steps, you will generate, review, and then fine-tune the report display. 1. Click Generate Report. 2. Double-click the Income Statements folder and then double-click IS_Consolidating. The consolidating report displays eliminating entries for each of the two companies that are summarized in a single eliminations column. Notice that the Gross Profit % row displays the result of the column calculations in both the Eliminations and Consolidated columns (USA+Europe-Eliminations), not the result of Gross Profit divided by Net Sales. This display is corrected through the calculation priority in the report definition settings. Microsoft Official Training Materials for Microsoft Dynamics® Your use of this content is subject to your current services agreement
  • 8.
    Report Design inManagement Reporter 2.0 for Microsoft Dynamics® ERP 12-8 3. Close the Report Viewer to return to the Report Designer. FIGURE 12.5 IN PROGRESS CONSOLIDATING INCOME STATEMENT Adjust the Report Display The following steps adjust the report definition's calculation priority and the individual company's elimination columns are set to nonprinting. 1. In the IS_Consolidating report definition, click the Settings tab. 2. In Calculation priority, click Perform column calculations first and then row. 3. Save the changes to the report definition. 4. Click the Open Column Definition icon. 5. In column D, double-click Print Control. 6. Select NP and then click OK. 7. Repeat steps 5 and 6 in column E. 8. Save the change to the column definition. Microsoft Official Training Materials for Microsoft Dynamics® Your use of this content is subject to your current services agreement
  • 9.
    Chapter 12: ConsolidationReporting 12-9 Generate the Completed Report In the following procedure, the report is generated again to display the completed design. 1. Click the Open Report Definition icon. 2. Click Generate Report. 3. Double-click the Income Statements folder and then double-click IS_Consolidating. 4. Review the completed design and then close the Report Viewer. NOTE: To define a consolidated report, return to the column definition and select the NP print control for the individual companies and elimination columns. FIGURE 12.6 CONSOLIDATING INCOME STATEMENT Microsoft Official Training Materials for Microsoft Dynamics® Your use of this content is subject to your current services agreement
  • 10.
    Report Design inManagement Reporter 2.0 for Microsoft Dynamics® ERP 12-10 Sort Commands The reports created to this point display rows of data exactly as defined in the row definition. However, sort commands are available to display data in one of the following options: • Alphabetically, based on the description column • Ascending or descending values, based on a numeric column • Ascending or descending absolute values, based on a numeric column The following three items are added to the row definition when you are defining a sort: 1. Format code - select from one of the following: a. SORT b. ASORT c. SORTDESC d. ASORTDESC 2. The related row codes to include in the sort 3. The column ID that the sort is based on Add an Alphabetical Sort The following steps add a description-based sort to the expense section of the consolidating income statement. 1. In the navigation pane, click Row Definitions. 2. Double-click IS_Dtl. 3. On the File menu, click the Save As menu item. 4. Update the name to IS_Dtl_ExpSort and then click OK. 5. Click row code 460, right-click and then select Insert Row. NOTE: Sort rows do not display or add a row to the completed report and can be placed anywhere in the row definition. On the new row, double-click Format Code and select SORT. 6. In column D, Related Rows, type "490:940". NOTE: The resulting sort is inclusive of the beginning and ending rows, so do not define descriptive headers or underscores in the row range. Microsoft Official Training Materials for Microsoft Dynamics® Your use of this content is subject to your current services agreement
  • 11.
    Chapter 12: ConsolidationReporting 12-11 7. Column A of the column definition displays the row descriptions and is the basis of the alphabetical sort. In column H, Column Restriction, type "A". 8. Save the row definition. FIGURE 12.7 SORT BASED ON DESCRIPTION COLUMN Expenses Sorted by Description In the following steps, update the report's building blocks to the row definition that contains the sort information and then re-generate the report. 1. In the navigation pane, click Report Definitions. 2. Double-click IS_Consolidating. 3. On the Report tab, click the Row drop-down and select IS_Dtl_ExpSort. 4. Save the update to the report definition and then click Generate Report. 5. Double-click the Income Statements folder and then double-click IS_Consolidating. Microsoft Official Training Materials for Microsoft Dynamics® Your use of this content is subject to your current services agreement
  • 12.
    Report Design inManagement Reporter 2.0 for Microsoft Dynamics® ERP 12-12 6. Close the Report Viewer and return to the Report Designer. FIGURE 12.8 SORT BASED ON DESCRIPTION COLUMN Add an Absolute Value Sort In the following procedure, the expense section sort is modified to display the results based on descending absolute values for the USA (FW) company. Sorting by absolute value ignores the sign of the number being sorted. 1. Click the Open Row Definition icon. 2. On row code 445, double-click Format Code, and select ASORTDESC. 3. In column H, Column Restriction, type "B". Column B in the column definition displays the financial results of the FW company. 4. Save the row definition. 5. Click the Open Report Definition icon. 6. Click Generate Report. 7. Double-click the Income Statements folder and then double-click IS_Consolidating. 8. Close the Report Viewer and return to the Report Designer. FIGURE 12.9 ABSOLUTE VALUE DESCENDING SORT Microsoft Official Training Materials for Microsoft Dynamics® Your use of this content is subject to your current services agreement
  • 13.
    Chapter 12: ConsolidationReporting 12-13 External Worksheet Linking Management Reporter offers two methods for linking spreadsheet data into a report: the combined link method and the separate link method. The combined link method is explored in the "Statements of Cash Flow" course, in the design of the FASB style statement of cash flow. The separate link method is used to define eliminations in the upcoming "Consolidating Balance Sheet with Separate Link" lesson. The separate link method of adding external data to a report works within the following design guidelines: • Connect to one or more Microsoft® Office Excel® worksheets • The reporting tree definition supplies the spreadsheet file name and location • The row definition supplies the spreadsheet cell references in one or more external row links NOTE: When you are connecting to multiple worksheets, the design of the worksheet determines the number of external links that are added to the row definition. If the cell references are consistent across all worksheets (or tabs in a workbook), then a single external link is used. • The separate link method is used to add spreadsheet data to a WKS column type • Similar to the combined link method, cell references can be absolute or dynamic, depending on the design of the spreadsheet • The period offset codes /RPO and /CPO are used with dynamic cell references to count down rows or across columns, determined by the report's base period Microsoft Official Training Materials for Microsoft Dynamics® Your use of this content is subject to your current services agreement
  • 14.
    Report Design inManagement Reporter 2.0 for Microsoft Dynamics® ERP 12-14 Define the Eliminations Spreadsheet The following steps explain how to use Microsoft Excel to create a worksheet that contains some accounts that are eliminated in the consolidating balance sheet. The eliminations worksheet is then used to show how to pull worksheet data into a report using the separate link method. 1. Start Microsoft Excel. 2. In the new worksheet, type the information as shown in the table. Make sure that the cell references are the same because these are used in the "Row Definition with External Link" exercise. A B 1 Account Elimination Amount 2 Due from FWE 13,516 3 Due to FW 13,516 4 Investment in FWE 536,306 5 Net Income 80,227 3. Save the worksheet with the name Eliminations.xlsx to either the desktop or the Management Reporter files location folder. On the Tools menu, click Options to determine the default file location. Consolidating Balance Sheet with Separate Link This lesson introduces using a separate worksheet link to pull data from Microsoft Excel into the eliminations column of the consolidating balance sheet. Because the spreadsheet data is presented in a column, the separate link method is required. In the separate link method, all three building block definitions contribute to the link's setup. In addition, the report definition is set to pull worksheet related data from the reporting tree. • Row definition - contains worksheet cell references in one or more external worksheet links. o If the worksheet is designed with periodic data, then the related period offset code (/CPO or /RPO) is also required. o If multiple WKS type columns are defined in the column definition, then the related column is also entered in the link syntax; for example C=B4, E=C4 Microsoft Official Training Materials for Microsoft Dynamics® Your use of this content is subject to your current services agreement
  • 15.
    Chapter 12: ConsolidationReporting 12-15 • Column definition - contains one or more WKS type columns. • Reporting tree definition - is associated to the external link in the row definition in addition to the location of the worksheet file. For training purposes, the existing balance sheet report is used as a template when you are designing the consolidating balance sheet. Row Definition with External Link The existing BalSheet row definition is used as a basis for the consolidating balance sheet. The following procedure guides you through performing a Save As and modifying the design to incorporate Fabrikam Europe accounts and an external worksheet link. 1. On the navigation pane, click Row Definitions and then double-click BalSheet. 2. On the File menu, click the Save As menu item. 3. Modify the name to "BalSheet_WKS" and description to "Consolidation Balance Sheet with ext link". Click OK. 4. Double-click column J, Link to Financial Dimension, to open the Row Links dialog box. 5. Click New. 6. Click the Link type drop-down and select External Worksheet. 7. Click the Description field, type "Eliminations" and then click OK. Notice that column K, Link to External Worksheet is added to the row definition. 8. On row code 220, Due from FWE, type "B2" in the worksheet link column. 9. On row code 580, type "B4" in the worksheet link column. 10. Click row code 820 and right-click. Select Insert Row. 11. Type the description "Due to FW". In Normal Balance, select C and in the Link to Financial Dimension column, type the account "2209". Type "B3" in the worksheet link. 12. On row code 1120, type "B5" in the worksheet link. Microsoft Official Training Materials for Microsoft Dynamics® Your use of this content is subject to your current services agreement
  • 16.
    Report Design inManagement Reporter 2.0 for Microsoft Dynamics® ERP 12-16 13. Save the changes to the row definition. FIGURE 12.10 BALSHEET_WKS ROW DEFINITION Column Definition with WKS Column The following procedure, changes the existing consolidations column design by adding a worksheet link column. The Fabrikam Europe account filter is also changed to pull balance sheet related elimination accounts. 1. On the navigation pane, click Column Definitions and then double- click Consolidating_Elim. 2. On the File menu, click the Save As menu item. Microsoft Official Training Materials for Microsoft Dynamics® Your use of this content is subject to your current services agreement
  • 17.
    Chapter 12: ConsolidationReporting 12-17 3. Modify the name to "Consolidating_Elim_WKS" and description to "Fabrikam Consolidating with filter and WKS eliminations". Click OK. 4. Double-click column D, Column Type and select WKS (Amounts from external worksheet). 5. Click Reporting Unit and press the Delete key to clear the tree reference. 6. Click Header 2 and update the text to read, "from WKS". 7. Double-click column E, Dimension Filter. Update the Natural field to 3??? to eliminate equity accounts from the Europe company. Click OK. 8. In columns D and E, clear the NP (non-print) print control. The non- print status is added back after the report's accuracy is verified. 9. Save the column definition. FIGURE 12.11 CONSOLIDATING_ELIM_WKS COLUMN DEFINITION Reporting Tree with Link Information The reporting tree is a required component when you are using the separate link method to access worksheet data. The following steps, explain how to change the existing consolidation tree to accommodate a worksheet link. 1. On the navigation pane, click Reporting Tree Definitions and then double-click Consol. 2. On the File menu, click the Save As menu item. 3. Change the name to read "Consol_WKS" and the description to "Consolidating with worksheet link". Click OK. 4. On row 4, double-click column A, Company and then select @ANY. Microsoft Official Training Materials for Microsoft Dynamics® Your use of this content is subject to your current services agreement
  • 18.
    Report Design inManagement Reporter 2.0 for Microsoft Dynamics® ERP 12-18 5. In Unit Name type "Eliminations". 6. In Unit Description, type "Worksheet Eliminations". 7. On row 1, double-click column E, Row Definitions and then select BalSheet_WKS. Notice that all units within the tree are automatically updated with the row definition ID. NOTE: The reporting tree must be associated with the row definition that contains the external link. 8. On row 4, double-click column G, External Link. Select WKS1- Eliminations. This is the link added to the row definition that contains the worksheet cell references. 9. On row 4, double-click column H, External File. Click Eliminations.xlsx and then click Open. (If it is necessary, locate the spreadsheet.) 10. Save the modifications to the reporting tree definition. NOTE: An alternative design is to relate external worksheet information to an existing reporting unit. FIGURE 12.12 CONSOL_WKS REPORTING TREE Report Definition The report definition contains an option that is required when you are using the separate link method to connect to an external worksheet. The following steps, introduce this option and then associate related building blocks for the consolidating balance sheet. 1. In the navigation pane, click Report Definitions. 2. Double-click IS_Consolidating. 3. On the File menu, click the Save As menu item. 4. Update the name to "BalSheet_Consolidating" and description to "Fabrikam Consolidating Balance Sheet". Click OK. 5. Update the building blocks as follows: o Row: BalSheet_WKS o Column: Consolidating_Elim_WKS o Tree: Consol_WKS 6. Select the option Use row definition from reporting tree. Failure to select this option results in an error and report generation is canceled. Microsoft Official Training Materials for Microsoft Dynamics® Your use of this content is subject to your current services agreement
  • 19.
    Chapter 12: ConsolidationReporting 12-19 7. Click the Output and Distribution tab. If needed, update the Output name to "BalSheet_Consolidating". 8. Click the Report library location ellipsis button (...), select the Balance Sheets folder, and then click OK. 9. If you want, click the Headers and Footers tab and clear the @UnitDesc code in the second row of text. In its place, type "BALANCE SHEET". In the third row, delete the @PeriodCoverage code, leaving @DateLong. 10. Save the report definition and then click Generate Report. FIGURE 12.13 CONSOLIDATING BALANCE SHEET REPORT DEFINITION Report Generation Rounding Messages Because the rounding adjustment in the row definition is set to a zero limit, messages that relate to all rounding adjustments are displayed in the Report Queue Status window. Not only is -1.00 of rounding occurring in the FW company, each elimination column also adds a rounding adjustment to balance the asset, liability, and equity sections. In the final report, these elimination related rounding adjustments add to zero in the printing eliminations column. Click Done to close the Generate Report window. Review the Report The following procedure, reviews the consolidating balance sheet. 1. Double-click the Balance Sheets folder. Microsoft Official Training Materials for Microsoft Dynamics® Your use of this content is subject to your current services agreement
  • 20.
    Report Design inManagement Reporter 2.0 for Microsoft Dynamics® ERP 12-20 2. Double-click the BalSheet_Consolidating report. 3. Close the Report Viewer and return to Report Designer to finish the report's design. FIGURE 12.14 CONSOLIDATING BALANCE SHEET Complete the Consolidating Report After you verify that the report is pulling the correct elimination information for each of the companies, the non-print status is applied to specific columns in the column definition. The following procedure goes through the steps that are required to suppress a column from printing. The updated column definition is then saved and the report is regenerated. 1. Click the Open Column Definition icon. 2. In column D, Print Control, double-click, select the NP option, and then click OK. 3. Repeat step 2 in column E. 4. Save the column definition. 5. Click the Open Report Definition icon. 6. Click Generate Report. Microsoft Official Training Materials for Microsoft Dynamics® Your use of this content is subject to your current services agreement
  • 21.
    Chapter 12: ConsolidationReporting 12-21 7. Double-click the Balance Sheets folder. 8. Double-click the BalSheet_Consolidating report. FIGURE 12.15 FINALIZED CONSOLIDATING BALANCE SHEET Summary This part of training introduced the following design elements of consolidation reports. • When users are consolidating multiple companies with different account structures, multiple links to the financial data source are defined in the row definition. These links are then related to the appropriate company in the reporting tree. • When users are consolidating multiple companies with intercompany transactions, eliminating entries can be isolated through either a dimension filter, external worksheet link, or a combination of both. • The separate linking method requires related information in the row, column, reporting tree, and report definition. Procedures in this training, showed how to use the separate link method to report on elimination data; however, you can use Excel to supply any form of data, such as statistical information or budget amounts. The benefit from this part of training is that users expand their report design knowledge to include side by side consolidations and adding Excel data to a report. Microsoft Official Training Materials for Microsoft Dynamics® Your use of this content is subject to your current services agreement
  • 22.
    Report Design inManagement Reporter 2.0 for Microsoft Dynamics® ERP 12-22 Test Your Knowledge Test your knowledge with the following questions. 1. Which of the following is a valid row link type when you are using the separate link method to access worksheet data? ( ) Financial Dimensions ( ) External Worksheet ( ) Financial Dimensions + Worksheet ( ) All of the above 2. Which of the following have design elements that are required when you are using the separate link method to access worksheet data? (Select all that apply) ( ) Row Definition ( ) Column Definition ( ) Reporting Tree Definition ( ) Report Definition 3. Which of the following are required elements when you are designing a reporting tree that contains a worksheet link? (Select all that apply) ( ) Row Definition ( ) Row Link ( ) External Link ( ) External File Microsoft Official Training Materials for Microsoft Dynamics® Your use of this content is subject to your current services agreement
  • 23.
    Chapter 12: ConsolidationReporting 12-23 Quick Interaction: Lessons Learned Take a moment and write down three key points you have learned from this chapter. 1. 2. 3. Microsoft Official Training Materials for Microsoft Dynamics® Your use of this content is subject to your current services agreement
  • 24.
    Report Design inManagement Reporter 2.0 for Microsoft Dynamics® ERP 12-24 Solutions Test Your Knowledge 1. Which of the following is a valid row link type when you are using the separate link method to access worksheet data? ( ) Financial Dimensions (•) External Worksheet ( ) Financial Dimensions + Worksheet ( ) All of the above 2. Which of the following have design elements that are required when you are using the separate link method to access worksheet data? (Select all that apply) (√) Row Definition (√) Column Definition (√) Reporting Tree Definition (√) Report Definition 3. Which of the following are required elements when you are designing a reporting tree that contains a worksheet link? (Select all that apply) (√) Row Definition ( ) Row Link (√) External Link (√) External File Microsoft Official Training Materials for Microsoft Dynamics® Your use of this content is subject to your current services agreement