Moonlight photography
•
0 likes•35 views

HOW TO PHOTOGRAPH LANDSCAPES AT NIGHT BY MOONLIGHT

Recommended
More Related Content
What's hot
What's hot (20)
Similar to Moonlight photography
Similar to Moonlight photography (20)
More from Leo Erwin Garcia
More from Leo Erwin Garcia (20)
Recently uploaded
Recently uploaded (20)
Moonlight photography
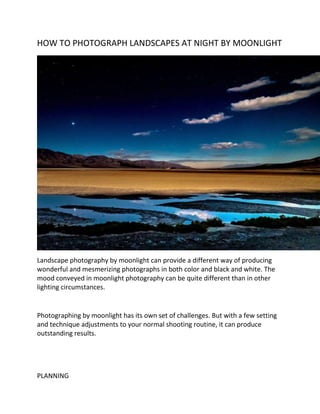
- 1. HOW TO PHOTOGRAPH LANDSCAPES AT NIGHT BY MOONLIGHT Landscape photography by moonlight can provide a different way of producing wonderful and mesmerizing photographs in both color and black and white. The mood conveyed in moonlight photography can be quite different than in other lighting circumstances. Photographing by moonlight has its own set of challenges. But with a few setting and technique adjustments to your normal shooting routine, it can produce outstanding results. PLANNING
- 2. TIMING The best time to shoot is the night of the full moon, but a couple of days either side of that date will also work. An app that I found very useful in the planning moonlit shoots is PhotoPills. This app offers 3D augmented reality views including times and from what direction the moon will rise and set. You can also easily program it for a particular day and time for help in planning dates, times, and locations to set up for the shoot. It also shows paths of the sun and the Milky Way in the same manner. During a full moon, fewer stars are visible than during a new moon. But if you find a location with very little light pollution, then you’ll be able to capture more stars (and maybe even a planet or two). If you’re hoping to get great shots of a starry sky or the Milky Way rather than a moonlit landscape, then schedule your shoot around the new moon rather than the full moon. As always, aim for a location with very little light pollution, and use the PhotoPills app to help you find the best positioning to capture the Milky Way LOCATION Areas that have the least light pollution possible have the darkest skies, and that is most preferable when deciding on a location to shoot. A useful website to help find “dark” locations is Dark Sky. SCOUTING If this is less than a well-travelled area or path I like to visit the location and first walk the layout in daylight. Some of the places I have been are quite rugged and desolate and I felt a lot more comfortable in knowing the trail beforehand. It is just a little unnerving to be out in the desert or hills alone and lost at night. If possible take a partner along with you and carry a physical map, as some remote locations still do not have cell service so your phone’s map may not work. Also,
- 3. add a compass app on your phone, or better yet, carry a real compass. In addition to a good quality camera and lenses here some additional items to consider using. A sturdy tripod – this is an absolute necessity. Cable release or remote shutter release – a must to reduce camera shake. If you do not have a cable release or remote shutter release you can use the self-timer on the camera. Extra batteries for your camera – as you may wish to use the Live View mode during your shoot and that really drains the battery. Cheat Sheets – listing maximum exposure times for each lens used to prevent star trails and camera settings.
- 4. Lighting – in addition to a bright flashlight to use while walking you may find a headlamp is useful so you have both hands free to use. Consider a headlamp that offers a red light setting in order to help preserve your “night vision”. CAMERA SETTINGS Shooting moonlit landscapes is quite different from shooting using sunlight as your light source. The moon reflects between 3 and 12 per cent of light from the sun so you will be operating in a very low light situation. Some adjustments will need to be made within the exposure triangle (aperture, ISO and shutter speed) to achieve optimum results. APERTURE You will need to set the lens used to the widest aperture possible as you wish to keep the shutter speed and ISO to a minimum. Realize that this may not be the optimum setting of the lens used to obtain maximum sharpness (usually for most lenses it is f/8 to f/11) and some depth of field will be lost so you may want to adjust the ISO and shutter speed accordingly to increase sharpness and depth of field. ISO It is recommended to keep the ISO settings low when possible, but with a good quality camera sensor, amazing results may still be obtained with up to 3200 ISO and even higher. I prefer to keep the ISO maximum setting at 3200. Lightroom and other post-processing software greatly help with reducing noise that is inherent with higher ISO settings but it is better to keep the noise down on the original image. SHUTTER SPEED AND HOW TO AVOID STAR TRAILS Due to the earth’s rotation if an exposure is set beyond a certain time frame then the stars will seem to be out of focus and appear as streaks or trails of light. To avoid this you will need to keep your exposure time less than the time that star trails will appear in the photograph.
- 5. There is a way to calculate this maximum exposure time and that is the “500 Rule”. Here is the formula. For a full-frame sensor simply divide 500 by the focal length of the lens and that will tell you the maximum shutter speed to avoid star trails. Example: Lens focal length – 25mm 500 divided by 25 = 20 So the maximum shutter speed for that lens would be 20 seconds. For a cropped sensor you will need to calculate the equivalent focal length used in a full-frame camera. To do this, multiply the focal length of the lens for a cropped sensor camera by 1.5. Example: 30mm lens for a cropped sensor equals 45mm 500 divided by 45 = 11.1 So the maximum shutter speed for that lens used on a cropped sensor camera would be 11.1 seconds. My camera has a full-frame sensor so these are the calculations for maximum exposure times to avoid star trails with my lenses rounded down to the nearest second and I try not to push the time frame to the limit. 14mm – 35 seconds
- 6. 18-35mm zoom – 27 to 14 seconds 24-85mm zoom – 20 to 5 seconds 70-200mm – 7 to 2 seconds OTHER SETTINGS FOR MOONLIGHT PHOTOGRAPHY Image Stabilization (also known as Vibration Reduction) – if your lens or camera offers this feature it is recommended to turn it off when using a tripod as this will sometimes add blur to an image. Auto Focus – set to off as some cameras have a difficult time autofocusing in low light situations. If you wish to check the focus, turn on the Live View and “zoom in” using the viewing screen to review the image or scene. Flash – off. White balance – I set to auto and adjust if necessary in post-processing. RAW or JPEG – no debate, RAW. If you are serious about producing photographs
- 7. and not snapshots, RAW is the only way to shoot. Manual or M or B setting – you will need to set it to one of these modes as more control is needed of the camera than the other settings can provide. Mirror Up or MUP – shoot in the “mirror up” mode or MUP as this reduces camera vibration. TECHNIQUE Start with some test shots and check your focus, settings, and histogram. When checking exposure in the histogram don’t necessarily trust it. Remember this is night, i.e. dark photography. You will find you will need to expose the shot to the “left side” of the histogram. I always bracket a few shots with different exposure, shutter speed, and ISO settings, so I have a few shots to choose from in post-processing. Focus stacking is a way to add control for sharpness and depth of field. Focus stacking is just what it sounds like, stacking or combing different focus depths to achieve optimum focus. There are different software programs for this; Photoshop is the probably the most popular. Software used. Check the sky for planes as they will make their own trails with their lights. If you are not able to wait them out, then their light trails may be able to be removed with a spot removal tool in post-processing. If there are clouds, extra exposure times will help smooth them out and provide an interesting look or “feel” to the photograph. You may also consider “light painting” some foreground objects. There are special flashlights made for this purpose but you may find that a bright LED flashlight may work as well. You may only need to “paint” the foreground objects for just a couple of seconds on 15-30 second exposure. You will need to experiment with
- 8. the amount of time and “painting” used for the shot. Note: You may want to cover the viewfinder eyepiece on the camera when shooting as light from the moon (or any other source such as a flashlight) may come through the viewfinder and interfere with the exposure. Some cameras come with a viewfinder eyepiece cap or cover that slips over the eyepiece viewfinder but as I lost mine the first time out I just cup my hand over the viewfinder eyepiece (without touching the camera body). POST-PROCESSING This topic deserves a whole other article but just one important note here. You may be surprised to see a row of spots or streaks of light that you did not see during the shoot. These are caused by the blinking lights of a plane and the streaks are caused by satellites or “falling stars” and are easily removed using the spot removal tool. I start in Lightroom in my post-processing routine and use the “Visualize Spots” option in the Spot Removal tool to help look for these items.
- 9. CONCLUSION You may find that a new avenue in your photography journey with “moonlighting”. And spending time in nature in moonlit landscapes, enjoying the quiet and beauty while creating wonderful photographs is an added bonus.