Download to read offline


![GoalKicker.com – MongoDB® Notes for Professionals 5
the Shift and Ctrl key together.
Write the command to start the server:
> mongod
It would start the server on port 27017 by default.
Open another command prompt and type the following to start client:
> mongo
By default it connects to the test database. If you see the line like connecting to: test. Then you
have successfully installed MongoDB. Congrats! Now, you can test Hello World to be more confident.
For Linux: Almost same as Mac OS except some equivalent command is needed.
For Debian-based distros (using apt-get):
Import MongoDB Repository key.
$ sudo apt-key adv --keyserver hkp://keyserver.ubuntu.com:80 --recv EA312927
gpg: Total number processed: 1
gpg: imported: 1 (RSA: 1)
Add repository to package list on Ubuntu 16.04.
$ echo "deb http://repo.mongodb.org/apt/ubuntu xenial/mongodb-org/3.2 multiverse"
| sudo tee /etc/apt/sources.list.d/mongodb-org-3.2.list
on Ubuntu 14.04.
$ echo "deb http://repo.mongodb.org/apt/ubuntu trusty/mongodb-org/3.2 multiverse"
| sudo tee /etc/apt/sources.list.d/mongodb-org-3.2.list
Update package list.
$ sudo apt-get update
Install MongoDB.
$ sudo apt-get install mongodb-org
For Red Hat based distros (using yum):
use a text editor which you prefer.
$ vi /etc/yum.repos.d/mongodb-org-3.4.repo
Paste following text.
[mongodb-org-3.4]
name=MongoDB Repository
baseurl=https://repo.mongodb.org/yum/redhat/$releasever/mongodb-org/3.4/x86_64/
gpgcheck=1
enabled=1
gpgkey=https://www.mongodb.org/static/pgp/server-3.4.asc
Update package list.
$ sudo yum update
Install MongoDB
$ sudo yum install mongodb-org](https://image.slidesharecdn.com/mongodbnotesforprofessionals-200412132026/85/Mongo-db-notes-for-professionals-9-320.jpg)
![GoalKicker.com – MongoDB® Notes for Professionals 6
Section 1.5: Basic commands on mongo shell
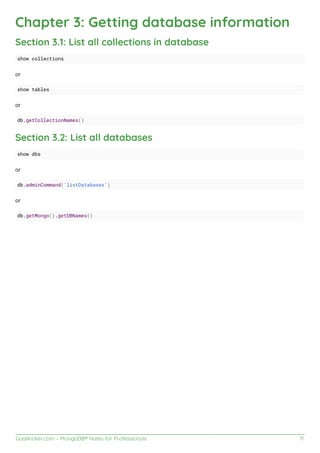
Show all available databases:
show dbs;
Select a particular database to access, e.g. mydb. This will create mydb if it does not already exist:
use mydb;
Show all collections in the database (be sure to select one first, see above):
show collections;
Show all functions that can be used with the database:
db.mydb.help();
To check your currently selected database, use the command db
> db
mydb
db.dropDatabase() command is used to drop a existing database.
db.dropDatabase()
Section 1.6: Hello World
After installation process, the following lines should be entered in mongo shell (client terminal).
> db.world.insert({ "speech" : "Hello World!" });
> cur = db.world.find();x=cur.next();print(x["speech"]);
Hello World!
Explanation:
In the first line, we have inserted a { key : value } paired document in the default database test and in
the collection named world.
In the second line we retrieve the data we have just inserted. The retrieved data is kept in a javascript
variable named cur. Then by the next() function, we retrieved the first and only document and kept it in
another js variable named x. Then printed the value of the document providing the key.](https://image.slidesharecdn.com/mongodbnotesforprofessionals-200412132026/85/Mongo-db-notes-for-professionals-10-320.jpg)
![GoalKicker.com – MongoDB® Notes for Professionals 7
Chapter 2: CRUD Operation
Section 2.1: Create
db.people.insert({name: 'Tom', age: 28});
Or
db.people.save({name: 'Tom', age: 28});
The difference with save is that if the passed document contains an _id field, if a document already exists with that
_id it will be updated instead of being added as new.
Two new methods to insert documents into a collection, in MongoDB 3.2.x:
Use insertOne to insert only one record:
db.people.insertOne({name: 'Tom', age: 28});
Use insertMany to insert multiple records:
db.people.insertMany([{name: 'Tom', age: 28},{name: 'John', age: 25}, {name: 'Kathy', age: 23}])
Note that insert is highlighted as deprecated in every official language driver since version 3.0. The full distinction
being that the shell methods actually lagged behind the other drivers in implementing the method. The same thing
applies for all other CRUD methods
Section 2.2: Update
Update the entire object:
db.people.update({name: 'Tom'}, {age: 29, name: 'Tom'})
// New in MongoDB 3.2
db.people.updateOne({name: 'Tom'},{age: 29, name: 'Tom'}) //Will replace only first matching
document.
db.people.updateMany({name: 'Tom'},{age: 29, name: 'Tom'}) //Will replace all matching documents.
Or just update a single field of a document. In this case age:
db.people.update({name: 'Tom'}, {$set: {age: 29}})
You can also update multiple documents simultaneously by adding a third parameter. This query will update all
documents where the name equals Tom:
db.people.update({name: 'Tom'}, {$set: {age: 29}}, {multi: true})
// New in MongoDB 3.2
db.people.updateOne({name: 'Tom'},{$set:{age: 30}) //Will update only first matching document.
db.people.updateMany({name: 'Tom'},{$set:{age: 30}}) //Will update all matching documents.
If a new field is coming for update, that field will be added to the document.](https://image.slidesharecdn.com/mongodbnotesforprofessionals-200412132026/85/Mongo-db-notes-for-professionals-11-320.jpg)

![GoalKicker.com – MongoDB® Notes for Professionals 9
Note: by default, the _id field will be returned, even if you don't ask for it. If you would like not to get the _id back,
you can just follow the previous example and ask for the _id to be excluded by specifying _id: 0 (or _id: false).If
you want to find sub record like address object contains country, city, etc.
db.people.find({'address.country': 'US'})
& specify field too if required
db.people.find({'address.country': 'US'}, {'name': true, 'address.city': true})Remember that the
result has a `.pretty()` method that pretty-prints resulting JSON:
db.people.find().pretty()
Section 2.5: Update of embedded documents
For the following schema:
{name: 'Tom', age: 28, marks: [50, 60, 70]}
Update Tom's marks to 55 where marks are 50 (Use the positional operator $):
db.people.update({name: "Tom", marks: 50}, {"$set": {"marks.$": 55}})
For the following schema:
{name: 'Tom', age: 28, marks: [{subject: "English", marks: 90},{subject: "Maths", marks: 100},
{subject: "Computes", marks: 20}]}
Update Tom's English marks to 85 :
db.people.update({name: "Tom", "marks.subject": "English"},{"$set":{"marks.$.marks": 85}})
Explaining above example:
By using {name: "Tom", "marks.subject": "English"} you will get the position of the object in the marks array, where
subject is English. In "marks.$.marks", $ is used to update in that position of the marks array
Update Values in an Array
The positional $ operator identifies an element in an array to update without explicitly specifying the position of the
element in the array.
Consider a collection students with the following documents:
{ "_id" : 1, "grades" : [ 80, 85, 90 ] }
{ "_id" : 2, "grades" : [ 88, 90, 92 ] }
{ "_id" : 3, "grades" : [ 85, 100, 90 ] }
To update 80 to 82 in the grades array in the first document, use the positional $ operator if you do not know the
position of the element in the array:
db.students.update(
{ _id: 1, grades: 80 },
{ $set: { "grades.$" : 82 } }](https://image.slidesharecdn.com/mongodbnotesforprofessionals-200412132026/85/Mongo-db-notes-for-professionals-13-320.jpg)
![GoalKicker.com – MongoDB® Notes for Professionals 10
)
Section 2.6: More update operators
You can use other operators besides $set when updating a document. The $push operator allows you to push a
value into an array, in this case we will add a new nickname to the nicknames array.
db.people.update({name: 'Tom'}, {$push: {nicknames: 'Tommy'}})
// This adds the string 'Tommy' into the nicknames array in Tom's document.
The $pull operator is the opposite of $push, you can pull specific items from arrays.
db.people.update({name: 'Tom'}, {$pull: {nicknames: 'Tommy'}})
// This removes the string 'Tommy' from the nicknames array in Tom's document.
The $pop operator allows you to remove the first or the last value from an array. Let's say Tom's document has a
property called siblings that has the value ['Marie', 'Bob', 'Kevin', 'Alex'].
db.people.update({name: 'Tom'}, {$pop: {siblings: -1}})
// This will remove the first value from the siblings array, which is 'Marie' in this case.
db.people.update({name: 'Tom'}, {$pop: {siblings: 1}})
// This will remove the last value from the siblings array, which is 'Alex' in this case.
Section 2.7: "multi" Parameter while updating multiple
documents
To update multiple documents in a collection, set the multi option to true.
db.collection.update(
query,
update,
{
upsert: boolean,
multi: boolean,
writeConcern: document
}
)
multi is optional. If set to true, updates multiple documents that meet the query criteria. If set to false, updates one
document. The default value is false.
db.mycol.find() { "_id" : ObjectId(598354878df45ec5), "title":"MongoDB Overview"} { "_id" :
ObjectId(59835487adf45ec6), "title":"NoSQL Overview"} { "_id" : ObjectId(59835487adf45ec7),
"title":"Tutorials Point Overview"}
db.mycol.update({'title':'MongoDB Overview'}, {$set:{'title':'New MongoDB Tutorial'}},{multi:true})](https://image.slidesharecdn.com/mongodbnotesforprofessionals-200412132026/85/Mongo-db-notes-for-professionals-14-320.jpg)
![GoalKicker.com – MongoDB® Notes for Professionals 12
Chapter 4: Querying for Data (Getting
Started)
Basic querying examples
Section 4.1: Find()
retrieve all documents in a collection
db.collection.find({});
retrieve documents in a collection using a condition ( similar to WHERE in MYSQL )
db.collection.find({key: value});
example
db.users.find({email:"sample@email.com"});
retrieve documents in a collection using Boolean conditions (Query Operators)
//AND
db.collection.find( {
$and: [
{ key: value }, { key: value }
]
})
//OR
db.collection.find( {
$or: [
{ key: value }, { key: value }
]
})
//NOT
db.inventory.find( { key: { $not: value } } )
more boolean operations and examples can be found here
NOTE: find() will keep on searching the collection even if a document match has been found , therefore it is
inefficient when used in a large collection , however by carefully modeling your data and/or using indexes you can
increase the efficiency of find()
Section 4.2: FindOne()
db.collection.findOne({});
the querying functionality is similar to find() but this will end execution the moment it finds one document matching
its condition , if used with and empty object , it will fetch the first document and return it . findOne() mongodb api
documentation
Section 4.3: limit, skip, sort and count the results of the find()
method
Similar to aggregation methods also by the find() method you have the possibility to limit, skip, sort and count the
results. Let say we have following collection:](https://image.slidesharecdn.com/mongodbnotesforprofessionals-200412132026/85/Mongo-db-notes-for-professionals-16-320.jpg)
![GoalKicker.com – MongoDB® Notes for Professionals 13
db.test.insertMany([
{name:"Any", age:"21", status:"busy"},
{name:"Tony", age:"25", status:"busy"},
{name:"Bobby", age:"28", status:"online"},
{name:"Sonny", age:"28", status:"away"},
{name:"Cher", age:"20", status:"online"}
])
To list the collection:
db.test.find({})
Will return:
{ "_id" : ObjectId("592516d7fbd5b591f53237b0"), "name" : "Any", "age" : "21", "status" : "busy" }
{ "_id" : ObjectId("592516d7fbd5b591f53237b1"), "name" : "Tony", "age" : "25", "status" : "busy" }
{ "_id" : ObjectId("592516d7fbd5b591f53237b2"), "name" : "Bobby", "age" : "28", "status" : "online"
}
{ "_id" : ObjectId("592516d7fbd5b591f53237b3"), "name" : "Sonny", "age" : "28", "status" : "away" }
{ "_id" : ObjectId("592516d7fbd5b591f53237b4"), "name" : "Cher", "age" : "20", "status" : "online"
}
To skip first 3 documents:
db.test.find({}).skip(3)
Will return:
{ "_id" : ObjectId("592516d7fbd5b591f53237b3"), "name" : "Sonny", "age" : "28", "status" : "away" }
{ "_id" : ObjectId("592516d7fbd5b591f53237b4"), "name" : "Cher", "age" : "20", "status" : "online"
}
To sort descending by the field name:
db.test.find({}).sort({ "name" : -1})
Will return:
{ "_id" : ObjectId("592516d7fbd5b591f53237b1"), "name" : "Tony", "age" : "25", "status" : "busy" }
{ "_id" : ObjectId("592516d7fbd5b591f53237b3"), "name" : "Sonny", "age" : "28", "status" : "away" }
{ "_id" : ObjectId("592516d7fbd5b591f53237b4"), "name" : "Cher", "age" : "20", "status" : "online"
}
{ "_id" : ObjectId("592516d7fbd5b591f53237b2"), "name" : "Bobby", "age" : "28", "status" : "online"
}
{ "_id" : ObjectId("592516d7fbd5b591f53237b0"), "name" : "Any", "age" : "21", "status" : "busy" }
If you want to sort ascending just replace -1 with 1
To count the results:
db.test.find({}).count()
Will return:
5](https://image.slidesharecdn.com/mongodbnotesforprofessionals-200412132026/85/Mongo-db-notes-for-professionals-17-320.jpg)

![GoalKicker.com – MongoDB® Notes for Professionals 15
db.students.find({firstName:"Prosen"});
{ "_id" : ObjectId("58f2547804951ad51ad206f5"), "studentNo" : "1", "firstName" : "Prosen",
"lastName" : "Ghosh", "age" : "23" }
Similar mySql Query of the above command.
SELECT * FROM students WHERE firstName = "Prosen";
AND Queries
db.students.find({
"firstName": "Prosen",
"age": {
"$gte": 23
}
});
{ "_id" : ObjectId("58f29a694117d1b7af126dca"), "studentNo" : 1, "firstName" : "Prosen", "lastName"
: "Ghosh", "age" : 25 }
Similar mySql Query of the above command.
SELECT * FROM students WHERE firstName = "Prosen" AND age >= 23
Or Queries
db.students.find({
"$or": [{
"firstName": "Prosen"
}, {
"age": {
"$gte": 23
}
}]
});
{ "_id" : ObjectId("58f29a694117d1b7af126dca"), "studentNo" : 1, "firstName" : "Prosen", "lastName"
: "Ghosh", "age" : 25 }
{ "_id" : ObjectId("58f29a694117d1b7af126dcb"), "studentNo" : 2, "firstName" : "Rajib", "lastName"
: "Ghosh", "age" : 25 }
{ "_id" : ObjectId("58f29a694117d1b7af126dcc"), "studentNo" : 3, "firstName" : "Rizve", "lastName"
: "Amin", "age" : 23 }
{ "_id" : ObjectId("58f29a694117d1b7af126dcd"), "studentNo" : 4, "firstName" : "Jabed", "lastName"
: "Bangali", "age" : 25 }
{ "_id" : ObjectId("58f29a694117d1b7af126dce"), "studentNo" : 5, "firstName" : "Gm", "lastName" :
"Anik", "age" : 23 }
Similar mySql Query of the above command.
SELECT * FROM students WHERE firstName = "Prosen" OR age >= 23
And OR Queries
db.students.find({](https://image.slidesharecdn.com/mongodbnotesforprofessionals-200412132026/85/Mongo-db-notes-for-professionals-19-320.jpg)
![GoalKicker.com – MongoDB® Notes for Professionals 16
firstName : "Prosen",
$or : [
{age : 23},
{age : 25}
]
});
{ "_id" : ObjectId("58f29a694117d1b7af126dca"), "studentNo" : 1, "firstName" : "Prosen", "lastName"
: "Ghosh", "age" : 25 }
Similar mySql Query of the above command.
SELECT * FROM students WHERE firstName = "Prosen" AND age = 23 OR age = 25;
IN Queries This queries can improve multiple use of OR Queries
db.students.find(lastName:{$in:["Ghosh", "Amin"]})
{ "_id" : ObjectId("58f29a694117d1b7af126dca"), "studentNo" : 1, "firstName" : "Prosen", "lastName"
: "Ghosh", "age" : 25 }
{ "_id" : ObjectId("58f29a694117d1b7af126dcb"), "studentNo" : 2, "firstName" : "Rajib", "lastName"
: "Ghosh", "age" : 25 }
{ "_id" : ObjectId("58f29a694117d1b7af126dcc"), "studentNo" : 3, "firstName" : "Rizve", "lastName"
: "Amin", "age" : 23 }
Similar mySql query to above command
SELECT * FROM students WHERE lastName IN ('Ghosh', 'Amin')
Section 4.5: find() method with Projection
The basic syntax of find() method with projection is as follows
> db.COLLECTION_NAME.find({},{KEY:1});
If you want to show all documents without the age field then the command is as follows
db.people.find({},{age : 0});
If you want to show all documents the age field then the command is as follows
Section 4.6: Find() method with Projection
In MongoDB, projection means selecting only the necessary data rather than selecting whole of the data of a
document.
The basic syntax of find() method with projection is as follows
> db.COLLECTION_NAME.find({},{KEY:1});
If you want to to show all document without the age field then the command is as follows
> db.people.find({},{age:0});](https://image.slidesharecdn.com/mongodbnotesforprofessionals-200412132026/85/Mongo-db-notes-for-professionals-20-320.jpg)


![GoalKicker.com – MongoDB® Notes for Professionals 20
Chapter 6: Upserts and Inserts
Section 6.1: Insert a document
_id is a 12 bytes hexadecimal number which assures the uniqueness of every document. You can provide _id while
inserting the document. If you didn't provide then MongoDB provide a unique id for every document. These
12 bytes first 4 bytes for the current timestamp, next 3 bytes for machine id, next 2 bytes for process id of
mongodb server and remaining 3 bytes are simple incremental value.
db.mycol.insert({
_id: ObjectId(7df78ad8902c),
title: 'MongoDB Overview',
description: 'MongoDB is no sql database',
by: 'tutorials point',
url: 'http://www.tutorialspoint.com',
tags: ['mongodb', 'database', 'NoSQL'],
likes: 100
})
Here mycol is a collection name, if the collection doesn't exist in the database, then MongoDB will create this
collection and then insert document into it. In the inserted document if we don't specify the _id parameter, then
MongoDB assigns an unique ObjectId for this document.](https://image.slidesharecdn.com/mongodbnotesforprofessionals-200412132026/85/Mongo-db-notes-for-professionals-24-320.jpg)

![GoalKicker.com – MongoDB® Notes for Professionals 23
Chapter 8: Aggregation
Parameter Details
pipeline array(A sequence of data aggregation operations or stages)
options document(optional, available only if pipeline present as an array)
Aggregations operations process data records and return computed results. Aggregation operations group values
from multiple documents together, and can perform a variety of operations on the grouped data to return a single
result. MongoDB provides three ways to perform aggregation: the aggregation pipeline, the map-reduce function,
and single purpose aggregation methods.
From Mongo manual https://docs.mongodb.com/manual/aggregation/
Section 8.1: Count
How do you get the number of Debit and Credit transactions? One way to do it is by using count() function as
below.
> db.transactions.count({cr_dr : "D"});
or
> db.transactions.find({cr_dr : "D"}).length();
But what if you do not know the possible values of cr_dr upfront. Here Aggregation framework comes to play. See
the below Aggregate query.
> db.transactions.aggregate(
[
{
$group : {
_id : '$cr_dr', // group by type of transaction
// Add 1 for each document to the count for this type of transaction
count : {$sum : 1}
}
}
]
);
And the result is
{
"_id" : "C",
"count" : 3
}
{
"_id" : "D",
"count" : 5
}
Section 8.2: Sum
How to get the summation of amount? See the below aggregate query.](https://image.slidesharecdn.com/mongodbnotesforprofessionals-200412132026/85/Mongo-db-notes-for-professionals-27-320.jpg)
![GoalKicker.com – MongoDB® Notes for Professionals 24
> db.transactions.aggregate(
[
{
$group : {
_id : '$cr_dr',
count : {$sum : 1}, //counts the number
totalAmount : {$sum : '$amount'} //sums the amount
}
}
]
);
And the result is
{
"_id" : "C",
"count" : 3.0,
"totalAmount" : 120.0
}
{
"_id" : "D",
"count" : 5.0,
"totalAmount" : 410.0
}
Another version that sums amount and fee.
> db.transactions.aggregate(
[
{
$group : {
_id : '$cr_dr',
count : {$sum : 1},
totalAmount : {$sum : { $sum : ['$amount', '$fee']}}
}
}
]
);
And the result is
{
"_id" : "C",
"count" : 3.0,
"totalAmount" : 128.0
}
{
"_id" : "D",
"count" : 5.0,
"totalAmount" : 422.0
}
Section 8.3: Average
How to get the average amount of debit and credit transactions?
> db.transactions.aggregate(
[
{](https://image.slidesharecdn.com/mongodbnotesforprofessionals-200412132026/85/Mongo-db-notes-for-professionals-28-320.jpg)
![GoalKicker.com – MongoDB® Notes for Professionals 25
$group : {
_id : '$cr_dr', // group by type of transaction (debit or credit)
count : {$sum : 1}, // number of transaction for each type
totalAmount : {$sum : { $sum : ['$amount', '$fee']}}, // sum
averageAmount : {$avg : { $sum : ['$amount', '$fee']}} // average
}
}
]
)
The result is
{
"_id" : "C", // Amounts for credit transactions
"count" : 3.0,
"totalAmount" : 128.0,
"averageAmount" : 40.0
}
{
"_id" : "D", // Amounts for debit transactions
"count" : 5.0,
"totalAmount" : 422.0,
"averageAmount" : 82.0
}
Section 8.4: Operations with arrays
When you want to work with the data entries in arrays you first need to unwind the array. The unwind operation
creates a document for each entry in the array. When you have lot's of documents with large arrays you will see an
explosion in number of documents.
{ "_id" : 1, "item" : "myItem1", sizes: [ "S", "M", "L"] }
{ "_id" : 2, "item" : "myItem2", sizes: [ "XS", "M", "XL"] }
db.inventory.aggregate( [ { $unwind : "$sizes" }] )
An important notice is that when a document doesn't contain the array it will be lost. From mongo 3.2 and up there
are is an unwind option "preserveNullAndEmptyArrays" added. This option makes sure the document is preserved
when the array is missing.
{ "_id" : 1, "item" : "myItem1", sizes: [ "S", "M", "L"] }
{ "_id" : 2, "item" : "myItem2", sizes: [ "XS", "M", "XL"] }
{ "_id" : 3, "item" : "myItem3" }
db.inventory.aggregate( [ { $unwind : { path: "$sizes", includeArrayIndex: "arrayIndex" } }] )
Section 8.5: Aggregate query examples useful for work and
learning
Aggregation is used to perform complex data search operations in the mongo query which can't be done in normal
"find" query.
Create some dummy data:
db.employees.insert({"name":"Adma","dept":"Admin","languages":["german","french","english","hindi"]
,"age":30, "totalExp":10});
db.employees.insert({"name":"Anna","dept":"Admin","languages":["english","hindi"],"age":35,](https://image.slidesharecdn.com/mongodbnotesforprofessionals-200412132026/85/Mongo-db-notes-for-professionals-29-320.jpg)
![GoalKicker.com – MongoDB® Notes for Professionals 26
"totalExp":11});
db.employees.insert({"name":"Bob","dept":"Facilities","languages":["english","hindi"],"age":36,
"totalExp":14});
db.employees.insert({"name":"Cathy","dept":"Facilities","languages":["hindi"],"age":31,
"totalExp":4});
db.employees.insert({"name":"Mike","dept":"HR","languages":["english", "hindi",
"spanish"],"age":26, "totalExp":3});
db.employees.insert({"name":"Jenny","dept":"HR","languages":["english", "hindi",
"spanish"],"age":25, "totalExp":3});
Examples by topic:
1. Match: Used to match documents (like SQL where clause)
db.employees.aggregate([{$match:{dept:"Admin"}}]);
Output:
{ "_id" : ObjectId("54982fac2e9b4b54ec384a0d"), "name" : "Adma", "dept" : "Admin", "languages" : [
"german", "french", "english", "hindi" ], "age" : 30, "totalExp" : 10 }
{ "_id" : ObjectId("54982fc92e9b4b54ec384a0e"), "name" : "Anna", "dept" : "Admin", "languages" : [
"english", "hindi" ], "age" : 35, "totalExp" : 11 }
2. Project: Used to populate specific field's value(s)
project stage will include _id field automatically unless you specify to disable.
db.employees.aggregate([{$match:{dept:"Admin"}}, {$project:{"name":1, "dept":1}}]);
Output:
{ "_id" : ObjectId("54982fac2e9b4b54ec384a0d"), "name" : "Adma", "dept" : "Admin" }
{ "_id" : ObjectId("54982fc92e9b4b54ec384a0e"), "name" : "Anna", "dept" : "Admin" }
db.employees.aggregate({$project: {'_id':0, 'name': 1}})
Output:
{ "name" : "Adma" }
{ "name" : "Anna" }
{ "name" : "Bob" }
{ "name" : "Cathy" }
{ "name" : "Mike" }
{ "name" : "Jenny" }
3. Group: $group is used to group documents by specific field, here documents are grouped by "dept" field's value.
Another useful feature is that you can group by null, it means all documents will be aggregated into one.
db.employees.aggregate([{$group:{"_id":"$dept"}}]);
{ "_id" : "HR" }
{ "_id" : "Facilities" }
{ "_id" : "Admin" }
db.employees.aggregate([{$group:{"_id":null, "totalAge":{$sum:"$age"}}}]);
Output:
{ "_id" : null, "noOfEmployee" : 183 }
4. Sum: $sum is used to count or sum the values inside a group.
db.employees.aggregate([{$group:{"_id":"$dept", "noOfDept":{$sum:1}}}]);
Output:](https://image.slidesharecdn.com/mongodbnotesforprofessionals-200412132026/85/Mongo-db-notes-for-professionals-30-320.jpg)
![GoalKicker.com – MongoDB® Notes for Professionals 27
{ "_id" : "HR", "noOfDept" : 2 }
{ "_id" : "Facilities", "noOfDept" : 2 }
{ "_id" : "Admin", "noOfDept" : 2 }
5. Average: Calculates average of specific field's value per group.
db.employees.aggregate([{$group:{"_id":"$dept", "noOfEmployee":{$sum:1},
"avgExp":{$avg:"$totalExp"}}}]);
Output:
{ "_id" : "HR", "noOfEmployee" : 2, "totalExp" : 3 }
{ "_id" : "Facilities", "noOfEmployee" : 2, "totalExp" : 9 }
{ "_id" : "Admin", "noOfEmployee" : 2, "totalExp" : 10.5 }
6. Minimum: Finds minimum value of a field in each group.
db.employees.aggregate([{$group:{"_id":"$dept", "noOfEmployee":{$sum:1},
"minExp":{$min:"$totalExp"}}}]);
Output:
{ "_id" : "HR", "noOfEmployee" : 2, "totalExp" : 3 }
{ "_id" : "Facilities", "noOfEmployee" : 2, "totalExp" : 4 }
{ "_id" : "Admin", "noOfEmployee" : 2, "totalExp" : 10 }
7. Maximum: Finds maximum value of a field in each group.
db.employees.aggregate([{$group:{"_id":"$dept", "noOfEmployee":{$sum:1},
"maxExp":{$max:"$totalExp"}}}]);
Output:
{ "_id" : "HR", "noOfEmployee" : 2, "totalExp" : 3 }
{ "_id" : "Facilities", "noOfEmployee" : 2, "totalExp" : 14 }
{ "_id" : "Admin", "noOfEmployee" : 2, "totalExp" : 11 }
8. Getting specific field's value from first and last document of each group: Works well when doucument result
is sorted.
db.employees.aggregate([{$group:{"_id":"$age", "lasts":{$last:"$name"},
"firsts":{$first:"$name"}}}]);
Output:
{ "_id" : 25, "lasts" : "Jenny", "firsts" : "Jenny" }
{ "_id" : 26, "lasts" : "Mike", "firsts" : "Mike" }
{ "_id" : 35, "lasts" : "Cathy", "firsts" : "Anna" }
{ "_id" : 30, "lasts" : "Adma", "firsts" : "Adma" }
9. Minumum with maximum:
db.employees.aggregate([{$group:{"_id":"$dept", "noOfEmployee":{$sum:1},
"maxExp":{$max:"$totalExp"}, "minExp":{$min: "$totalExp"}}}]);
Output:
{ "_id" : "HR", "noOfEmployee" : 2, "maxExp" : 3, "minExp" : 3 }
{ "_id" : "Facilities", "noOfEmployee" : 2, "maxExp" : 14, "minExp" : 4 }
{ "_id" : "Admin", "noOfEmployee" : 2, "maxExp" : 11, "minExp" : 10 }
10. Push and addToSet: Push adds a field's value form each document in group to an array used to project data in
array format, addToSet is simlar to push but it omits duplicate values.
db.employees.aggregate([{$group:{"_id":"dept", "arrPush":{$push:"$age"}, "arrSet":
{$addToSet:"$age"}}}]);
Output:](https://image.slidesharecdn.com/mongodbnotesforprofessionals-200412132026/85/Mongo-db-notes-for-professionals-31-320.jpg)
![GoalKicker.com – MongoDB® Notes for Professionals 28
{ "_id" : "dept", "arrPush" : [ 30, 35, 35, 35, 26, 25 ], "arrSet" : [ 25, 26, 35, 30 ] }
11. Unwind: Used to create multiple in-memory documents for each value in the specified array type field, then we
can do further aggregation based on those values.
db.employees.aggregate([{$match:{"name":"Adma"}}, {$unwind:"$languages"}]);
Output:
{ "_id" : ObjectId("54982fac2e9b4b54ec384a0d"), "name" : "Adma", "dept" : "HR", "languages" :
"german", "age" : 30, "totalExp" : 10 }
{ "_id" : ObjectId("54982fac2e9b4b54ec384a0d"), "name" : "Adma", "dept" : "HR", "languages" :
"french", "age" : 30, "totalExp" : 10 }
{ "_id" : ObjectId("54982fac2e9b4b54ec384a0d"), "name" : "Adma", "dept" : "HR", "languages" :
"english", "age" : 30, "totalExp" : 10 }
{ "_id" : ObjectId("54982fac2e9b4b54ec384a0d"), "name" : "Adma", "dept" : "HR", "languages" :
"hindi", "age" : 30, "totalExp" : 10 }
12. Sorting:
db.employees.aggregate([{$match:{dept:"Admin"}}, {$project:{"name":1, "dept":1}}, {$sort: {name:
1}}]);
Output:
{ "_id" : ObjectId("57ff3e553dedf0228d4862ac"), "name" : "Adma", "dept" : "Admin" }
{ "_id" : ObjectId("57ff3e5e3dedf0228d4862ad"), "name" : "Anna", "dept" : "Admin" }
db.employees.aggregate([{$match:{dept:"Admin"}}, {$project:{"name":1, "dept":1}}, {$sort: {name:
-1}}]);
Output:
{ "_id" : ObjectId("57ff3e5e3dedf0228d4862ad"), "name" : "Anna", "dept" : "Admin" }
{ "_id" : ObjectId("57ff3e553dedf0228d4862ac"), "name" : "Adma", "dept" : "Admin" }
13. Skip:
db.employees.aggregate([{$match:{dept:"Admin"}}, {$project:{"name":1, "dept":1}}, {$sort: {name:
-1}}, {$skip:1}]);
Output:
{ "_id" : ObjectId("57ff3e553dedf0228d4862ac"), "name" : "Adma", "dept" : "Admin" }
14. Limit:
db.employees.aggregate([{$match:{dept:"Admin"}}, {$project:{"name":1, "dept":1}}, {$sort: {name:
-1}}, {$limit:1}]);
Output:
{ "_id" : ObjectId("57ff3e5e3dedf0228d4862ad"), "name" : "Anna", "dept" : "Admin" }
15. Comparison operator in projection:
db.employees.aggregate([{$match:{dept:"Admin"}}, {$project:{"name":1, "dept":1, age: {$gt: ["$age",
30]}}}]);
Output:
{ "_id" : ObjectId("57ff3e553dedf0228d4862ac"), "name" : "Adma", "dept" : "Admin", "age" : false }
{ "_id" : ObjectId("57ff3e5e3dedf0228d4862ad"), "name" : "Anna", "dept" : "Admin", "age" : true }
16. Comparison operator in match:
db.employees.aggregate([{$match:{dept:"Admin", age: {$gt:30}}}, {$project:{"name":1, "dept":1}}]);
Output:](https://image.slidesharecdn.com/mongodbnotesforprofessionals-200412132026/85/Mongo-db-notes-for-professionals-32-320.jpg)
![GoalKicker.com – MongoDB® Notes for Professionals 29
{ "_id" : ObjectId("57ff3e5e3dedf0228d4862ad"), "name" : "Anna", "dept" : "Admin" }
List of comparison operators: $cmp, $eq, $gt, $gte, $lt, $lte, and $ne
17. Boolean aggregation opertor in projection:
db.employees.aggregate([{$match:{dept:"Admin"}}, {$project:{"name":1, "dept":1, age: { $and: [ {
$gt: [ "$age", 30 ] }, { $lt: [ "$age", 36 ] } ] }}}]);
Output:
{ "_id" : ObjectId("57ff3e553dedf0228d4862ac"), "name" : "Adma", "dept" : "Admin", "age" : false }
{ "_id" : ObjectId("57ff3e5e3dedf0228d4862ad"), "name" : "Anna", "dept" : "Admin", "age" : true }
18. Boolean aggregation opertor in match:
db.employees.aggregate([{$match:{dept:"Admin", $and: [{age: { $gt: 30 }}, {age: {$lt: 36 }} ] }},
{$project:{"name":1, "dept":1, age: { $and: [ { $gt: [ "$age", 30 ] }, { $lt: [ "$age", 36 ] } ]
}}}]);
Output:
{ "_id" : ObjectId("57ff3e5e3dedf0228d4862ad"), "name" : "Anna", "dept" : "Admin", "age" : true }
List of boolean aggregation opertors: $and, $or, and $not.
Complete refrence: https://docs.mongodb.com/v3.2/reference/operator/aggregation/
Section 8.6: Match
How to write a query to get all departments where average age of employees making less than or $70000 is
greather than or equal to 35?
In order to that we need to write a query to match employees that have a salary that is less than or equal to
$70000. Then add the aggregate stage to group the employees by the department. Then add an accumulator with a
field named e.g. average_age to find the average age per department using the $avg accumulator and below the
existing $match and $group aggregates add another $match aggregate so that we're only retrieving results with an
average_age that is greather than or equal to 35.
db.employees.aggregate([
{"$match": {"salary": {"$lte": 70000}}},
{"$group": {"_id": "$dept",
"average_age": {"$avg": "$age"}
}
},
{"$match": {"average_age": {"$gte": 35}}}
])
The result is:
{
"_id": "IT",
"average_age": 31
}
{
"_id": "Customer Service",](https://image.slidesharecdn.com/mongodbnotesforprofessionals-200412132026/85/Mongo-db-notes-for-professionals-33-320.jpg)
![GoalKicker.com – MongoDB® Notes for Professionals 30
"average_age": 34.5
}
{
"_id": "Finance",
"average_age": 32.5
}
Section 8.7: Get sample data
To get random data from certain collection refer to $sample aggregation.
db.emplyees.aggregate({ $sample: { size:1 } })
where size stands for number of items to select.
Section 8.8: Remove docs that have a duplicate field in a
collection (dedupe)
Note that the allowDiskUse: true option is optional but will help mitigate out of memory issues as this aggregation
can be a memory intensive operation if your collection size is large - so i recommend to always use it.
var duplicates = [];
db.transactions.aggregate([
{ $group: {
_id: { cr_dr: "$cr_dr"},
dups: { "$addToSet": "$_id" },
count: { "$sum": 1 }
}
},
{ $match: {
count: { "$gt": 1 }
}}
],allowDiskUse: true}
)
.result
.forEach(function(doc) {
doc.dups.shift();
doc.dups.forEach( function(dupId){
duplicates.push(dupId);
}
)
})
// printjson(duplicates);
// Remove all duplicates in one go
db.transactions.remove({_id:{$in:duplicates}})
Section 8.9: Left Outer Join with aggregation ( $Lookup)
let col_1 = db.collection('col_1');
let col_2 = db.collection('col_2');
col_1 .aggregate([
{ $match: { "_id": 1 } },
{
$lookup: {
from: "col_2",
localField: "id",](https://image.slidesharecdn.com/mongodbnotesforprofessionals-200412132026/85/Mongo-db-notes-for-professionals-34-320.jpg)
![GoalKicker.com – MongoDB® Notes for Professionals 31
foreignField: "id",
as: "new_document"
}
}
],function (err, result){
res.send(result);
});
This feature was newly released in the mongodb version 3.2 , which gives the user a stage to join one collection
with the matching attributes from another collection
Mongodb $LookUp documentation
Section 8.10: Server Aggregation
Andrew Mao's solution. Average Aggregation Queries in Meteor
Meteor.publish("someAggregation", function (args) {
var sub = this;
// This works for Meteor 0.6.5
var db = MongoInternals.defaultRemoteCollectionDriver().mongo.db;
// Your arguments to Mongo's aggregation. Make these however you want.
var pipeline = [
{ $match: doSomethingWith(args) },
{ $group: {
_id: whatWeAreGroupingWith(args),
count: { $sum: 1 }
}}
];
db.collection("server_collection_name").aggregate(
pipeline,
// Need to wrap the callback so it gets called in a Fiber.
Meteor.bindEnvironment(
function(err, result) {
// Add each of the results to the subscription.
_.each(result, function(e) {
// Generate a random disposable id for aggregated documents
sub.added("client_collection_name", Random.id(), {
key: e._id.somethingOfInterest,
count: e.count
});
});
sub.ready();
},
function(error) {
Meteor._debug( "Error doing aggregation: " + error);
}
)
);
});
Section 8.11: Aggregation in a Server Method
Another way of doing aggregations is by using the Mongo.Collection#rawCollection()
This can only be run on the Server.](https://image.slidesharecdn.com/mongodbnotesforprofessionals-200412132026/85/Mongo-db-notes-for-professionals-35-320.jpg)
![GoalKicker.com – MongoDB® Notes for Professionals 32
Here is an example you can use in Meteor 1.3 and higher:
Meteor.methods({
'aggregateUsers'(someId) {
const collection = MyCollection.rawCollection()
const aggregate = Meteor.wrapAsync(collection.aggregate, collection)
const match = { age: { $gte: 25 } }
const group = { _id:'$age', totalUsers: { $sum: 1 } }
const results = aggregate([
{ $match: match },
{ $group: group }
])
return results
}
})
Section 8.12: Java and Spring example
This is an example code to create and execute the aggregate query in MongoDB using Spring Data.
try {
MongoClient mongo = new MongoClient();
DB db = mongo.getDB("so");
DBCollection coll = db.getCollection("employees");
//Equivalent to $match
DBObject matchFields = new BasicDBObject();
matchFields.put("dept", "Admin");
DBObject match = new BasicDBObject("$match", matchFields);
//Equivalent to $project
DBObject projectFields = new BasicDBObject();
projectFields.put("_id", 1);
projectFields.put("name", 1);
projectFields.put("dept", 1);
projectFields.put("totalExp", 1);
projectFields.put("age", 1);
projectFields.put("languages", 1);
DBObject project = new BasicDBObject("$project", projectFields);
//Equivalent to $group
DBObject groupFields = new BasicDBObject("_id", "$dept");
groupFields.put("ageSet", new BasicDBObject("$addToSet", "$age"));
DBObject employeeDocProjection = new BasicDBObject("$addToSet", new
BasicDBObject("totalExp", "$totalExp").append("age", "$age").append("languages",
"$languages").append("dept", "$dept").append("name", "$name"));
groupFields.put("docs", employeeDocProjection);
DBObject group = new BasicDBObject("$group", groupFields);
//Sort results by age
DBObject sort = new BasicDBObject("$sort", new BasicDBObject("age", 1));
List<DBObject> aggregationList = new ArrayList<>();
aggregationList.add(match);
aggregationList.add(project);
aggregationList.add(group);
aggregationList.add(sort);](https://image.slidesharecdn.com/mongodbnotesforprofessionals-200412132026/85/Mongo-db-notes-for-professionals-36-320.jpg)
![GoalKicker.com – MongoDB® Notes for Professionals 33
AggregationOutput output = coll.aggregate(aggregationList);
for (DBObject result : output.results()) {
BasicDBList employeeList = (BasicDBList) result.get("docs");
BasicDBObject employeeDoc = (BasicDBObject) employeeList.get(0);
String name = employeeDoc.get("name").toString();
System.out.println(name);
}
}catch (Exception ex){
ex.printStackTrace();
}
See the "resultSet" value in JSON format to understand the output format:
[{
"_id": "Admin",
"ageSet": [35.0, 30.0],
"docs": [{
"totalExp": 11.0,
"age": 35.0,
"languages": ["english", "hindi"],
"dept": "Admin",
"name": "Anna"
}, {
"totalExp": 10.0,
"age": 30.0,
"languages": ["german", "french", "english", "hindi"],
"dept": "Admin",
"name": "Adma"
}]
}]
The "resultSet" contains one entry for each group, "ageSet" contains the list of age of each employee of that group,
"_id" contains the value of the field that is being used for grouping and "docs" contains data of each employee of
that group that can be used in our own code and UI.](https://image.slidesharecdn.com/mongodbnotesforprofessionals-200412132026/85/Mongo-db-notes-for-professionals-37-320.jpg)
![GoalKicker.com – MongoDB® Notes for Professionals 34
Chapter 9: Indexes
Section 9.1: Index Creation Basics
See the below transactions collection.
> db.transactions.insert({ cr_dr : "D", amount : 100, fee : 2});
> db.transactions.insert({ cr_dr : "C", amount : 100, fee : 2});
> db.transactions.insert({ cr_dr : "C", amount : 10, fee : 2});
> db.transactions.insert({ cr_dr : "D", amount : 100, fee : 4});
> db.transactions.insert({ cr_dr : "D", amount : 10, fee : 2});
> db.transactions.insert({ cr_dr : "C", amount : 10, fee : 4});
> db.transactions.insert({ cr_dr : "D", amount : 100, fee : 2});
getIndexes() functions will show all the indices available for a collection.
db.transactions.getIndexes();
Let see the output of above statement.
[
{
"v" : 1,
"key" : {
"_id" : 1
},
"name" : "_id_",
"ns" : "documentation_db.transactions"
}
]
There is already one index for transaction collection. This is because MongoDB creates a unique index on the _id
field during the creation of a collection. The _id index prevents clients from inserting two documents with the same
value for the _id field. You cannot drop this index on the _id field.
Now let's add an index for cr_dr field;
db.transactions.createIndex({ cr_dr : 1 });
The result of the index execution is as follows.
{
"createdCollectionAutomatically" : false,
"numIndexesBefore" : 1,
"numIndexesAfter" : 2,
"ok" : 1
}
The createdCollectionAutomatically indicates if the operation created a collection. If a collection does not
exist, MongoDB creates the collection as part of the indexing operation.
Let run db.transactions.getIndexes(); again.
[](https://image.slidesharecdn.com/mongodbnotesforprofessionals-200412132026/85/Mongo-db-notes-for-professionals-38-320.jpg)
![GoalKicker.com – MongoDB® Notes for Professionals 35
{
"v" : 1,
"key" : {
"_id" : 1
},
"name" : "_id_",
"ns" : "documentation_db.transactions"
},
{
"v" : 1,
"key" : {
"cr_dr" : 1
},
"name" : "cr_dr_1",
"ns" : "documentation_db.transactions"
}
]
Now you see transactions collection have two indices. Default _id index and cr_dr_1 which we created. The name
is assigned by MongoDB. You can set your own name like below.
db.transactions.createIndex({ cr_dr : -1 },{name : "index on cr_dr desc"})
Now db.transactions.getIndexes(); will give you three indices.
[
{
"v" : 1,
"key" : {
"_id" : 1
},
"name" : "_id_",
"ns" : "documentation_db.transactions"
},
{
"v" : 1,
"key" : {
"cr_dr" : 1
},
"name" : "cr_dr_1",
"ns" : "documentation_db.transactions"
},
{
"v" : 1,
"key" : {
"cr_dr" : -1
},
"name" : "index on cr_dr desc",
"ns" : "documentation_db.transactions"
}
]
While creating index { cr_dr : -1 } 1 means index will be in ascending order and -1 for descending order.
Version ≥ 2.4
Hashed indexes
Indexes can be defined also as hashed. This is more performant on equality queries, but is not efficient for range
queries; however you can define both hashed and ascending/descending indexes on the same field.](https://image.slidesharecdn.com/mongodbnotesforprofessionals-200412132026/85/Mongo-db-notes-for-professionals-39-320.jpg)
![GoalKicker.com – MongoDB® Notes for Professionals 36
> db.transactions.createIndex({ cr_dr : "hashed" });
> db.transactions.getIndexes(
[
{
"v" : 1,
"key" : {
"_id" : 1
},
"name" : "_id_",
"ns" : "documentation_db.transactions"
},
{
"v" : 1,
"key" : {
"cr_dr" : "hashed"
},
"name" : "cr_dr_hashed",
"ns" : "documentation_db.transactions"
}
]
Section 9.2: Dropping/Deleting an Index
If index name is known,
db.collection.dropIndex('name_of_index');
If index name is not known,
db.collection.dropIndex( { 'name_of_field' : -1 } );
Section 9.3: Sparse indexes and Partial indexes
Sparse indexes:
These can be particularly useful for fields that are optional but which should also be unique.
{ "_id" : "john@example.com", "nickname" : "Johnnie" }
{ "_id" : "jane@example.com" }
{ "_id" : "julia@example.com", "nickname" : "Jules"}
{ "_id" : "jack@example.com" }
Since two entries have no "nickname" specified and indexing will treat unspecified fields as null, the index creation
would fail with 2 documents having 'null', so:
db.scores.createIndex( { nickname: 1 } , { unique: true, sparse: true } )
will let you still have 'null' nicknames.
Sparse indexes are more compact since they skip/ignore documents that don't specify that field. So if you have a
collection where only less than 10% of documents specify this field, you can create much smaller indexes - making
better use of limited memory if you want to do queries like:
db.scores.find({'nickname': 'Johnnie'})](https://image.slidesharecdn.com/mongodbnotesforprofessionals-200412132026/85/Mongo-db-notes-for-professionals-40-320.jpg)

![GoalKicker.com – MongoDB® Notes for Professionals 38
"name" : "cr_dr_1",
"ns" : "documentation_db.transactions"
},
{
"v" : 1,
"key" : {
"cr_dr" : -1
},
"name" : "index on cr_dr desc",
"ns" : "documentation_db.transactions"
}
]
Section 9.5: Compound
db.people.createIndex({name: 1, age: -1})
This creates an index on multiple fields, in this case on the name and age fields. It will be ascending in name and
descending in age.
In this type of index, the sort order is relevant, because it will determine whether the index can support a sort
operation or not. Reverse sorting is supported on any prefix of a compound index, as long as the sort is in the
reverse sort direction for all of the keys in the sort. Otherwise, sorting for compound indexes need to match the
order of the index.
Field order is also important, in this case the index will be sorted first by name, and within each name value, sorted
by the values of the age field. This allows the index to be used by queries on the name field, or on name and age, but
not on age alone.
Section 9.6: Unique Index
db.collection.createIndex( { "user_id": 1 }, { unique: true } )
enforce uniqueness on the defined index (either single or compound). Building the index will fail if the collection
already contains duplicate values; the indexing will fail also with multiple entries missing the field (since they will all
be indexed with the value null) unless sparse: true is specified.
Section 9.7: Single field
db.people.createIndex({name: 1})
This creates an ascending single field index on the field name.
In this type of indexes the sort order is irrelevant, because mongo can traverse the index in both directions.
Section 9.8: Delete
To drop an index you could use the index name
db.people.dropIndex("nameIndex")
Or the index specification document
db.people.dropIndex({name: 1})](https://image.slidesharecdn.com/mongodbnotesforprofessionals-200412132026/85/Mongo-db-notes-for-professionals-42-320.jpg)


![GoalKicker.com – MongoDB® Notes for Professionals 41
Using the same concept above with the forEach() loop to create the batches, we can update the collection in bulk
as follows. In this demonstration the Bulk() API available in MongoDB versions >= 2.6 and < 3.2 uses the
initializeUnorderedBulkOp() method to execute in parallel, as well as in a nondeterministic order, the write
operations in the batches.
It updates all the documents in the clients collection by changing the salary and dob fields to numerical and
datetime values respectively:
var bulk = db.test.initializeUnorderedBulkOp(),
counter = 0; // counter to keep track of the batch update size
db.test.find({
"salary": { "$exists": true, "$type": 2 },
"dob": { "$exists": true, "$type": 2 }
}).snapshot().forEach(function(doc){
var newSalary = parseInt(doc.salary),
newDob = new ISODate(doc.dob);
bulk.find({ "_id": doc._id }).updateOne({
"$set": { "salary": newSalary, "dob": newDob }
});
counter++; // increment counter
if (counter % 1000 == 0) {
bulk.execute(); // Execute per 1000 operations and re-initialize every 1000 update
statements
bulk = db.test.initializeUnorderedBulkOp();
}
});
The next example applies to the new MongoDB version 3.2 which has since deprecated the Bulk() API and
provided a newer set of apis using bulkWrite().
It uses the same cursors as above but creates the arrays with the bulk operations using the same forEach() cursor
method to push each bulk write document to the array. Because write commands can accept no more than 1000
operations, there's need to group operations to have at most 1000 operations and re-intialise the array when the
loop hits the 1000 iteration:
var cursor = db.test.find({
"salary": { "$exists": true, "$type": 2 },
"dob": { "$exists": true, "$type": 2 }
}),
bulkUpdateOps = [];
cursor.snapshot().forEach(function(doc){
var newSalary = parseInt(doc.salary),
newDob = new ISODate(doc.dob);
bulkUpdateOps.push({
"updateOne": {
"filter": { "_id": doc._id },
"update": { "$set": { "salary": newSalary, "dob": newDob } }
}
});
if (bulkUpdateOps.length === 1000) {
db.test.bulkWrite(bulkUpdateOps);
bulkUpdateOps = [];
}
});](https://image.slidesharecdn.com/mongodbnotesforprofessionals-200412132026/85/Mongo-db-notes-for-professionals-45-320.jpg)

![GoalKicker.com – MongoDB® Notes for Professionals 43
Chapter 11: 2dsphere Index
Section 11.1: Create a 2dsphere Index
db.collection.createIndex() method is used to create a 2dsphere index. The blueprint of a 2dsphere index :
db.collection.createIndex( { <location field> : "2dsphere" } )
Here, the location field is the key and 2dsphere is the type of the index. In the following example we are going to
create a 2dsphre index in the places collection.
db.places.insert(
{
loc : { type: "Point", coordinates: [ -73.97, 40.77 ] },
name: "Central Park",
category : "Parks"
})
The following operation will create 2dsphere index on the loc field of places collection.
db.places.createIndex( { loc : "2dsphere" } )](https://image.slidesharecdn.com/mongodbnotesforprofessionals-200412132026/85/Mongo-db-notes-for-professionals-47-320.jpg)

![GoalKicker.com – MongoDB® Notes for Professionals 46
Chapter 13: Java Driver
Section 13.1: Fetch Collection data with condition
To get data from testcollection collection in testdb database where name=dev
import org.bson.Document;
import com.mongodb.BasicDBObject;
import com.mongodb.MongoClient;
import com.mongodb.ServerAddress;
import com.mongodb.client.MongoCollection;
import com.mongodb.client.MongoCursor;
import com.mongodb.client.MongoDatabase;
MongoClient mongoClient = new MongoClient(new ServerAddress("localhost", 27017));
MongoDatabase db = mongoClient.getDatabase("testdb");
MongoCollection<Document> collection = db.getCollection("testcollection");
BasicDBObject searchQuery = new BasicDBObject();
searchQuery.put("name","dev");
MongoCursor<Document> cursor = collection.find(searchQuery).iterator();
try {
while (cursor.hasNext()) {
System.out.println(cursor.next().toJson());
}
} finally {
cursor.close();
}
Section 13.2: Create a database user
To create a user dev with password password123
MongoClient mongo = new MongoClient("localhost", 27017);
MongoDatabase db = mongo.getDatabase("testDB");
Map<String, Object> commandArguments = new BasicDBObject();
commandArguments.put("createUser", "dev");
commandArguments.put("pwd", "password123");
String[] roles = { "readWrite" };
commandArguments.put("roles", roles);
BasicDBObject command = new BasicDBObject(commandArguments);
db.runCommand(command);
Section 13.3: Create a tailable cursor
find(query).projection(fields).cursorType(CursorType.TailableAwait).iterator();
That code applies to the MongoCollection class.
CursorType is an enum and it has the following values:
Tailable
TailableAwait
Corresponding to the old (<3.0) DBCursor addOption Bytes types:](https://image.slidesharecdn.com/mongodbnotesforprofessionals-200412132026/85/Mongo-db-notes-for-professionals-50-320.jpg)

![GoalKicker.com – MongoDB® Notes for Professionals 48
Chapter 14: Python Driver
Parameter Detail
hostX
Optional. You can specify as many hosts as necessary. You would specify multiple hosts, for example,
for connections to replica sets.
:portX Optional. The default value is :27017 if not specified.
database
Optional. The name of the database to authenticate if the connection string includes authentication
credentialsIf /database is not specified and the connection string includes credentials, the driver will
authenticate to the admin database.
?options Connection specific options
Section 14.1: Connect to MongoDB using pymongo
from pymongo import MongoClient
uri = "mongodb://localhost:27017/"
client = MongoClient(uri)
db = client['test_db']
# or
# db = client.test_db
# collection = db['test_collection']
# or
collection = db.test_collection
collection.save({"hello":"world"})
print collection.find_one()
Section 14.2: PyMongo queries
Once you got a collection object, queries use the same syntax as in the mongo shell. Some slight differences are:
every key must be enclosed in brackets. For example:
db.find({frequencies: {$exists: true}})
becomes in pymongo (note the True in uppercase):
db.find({"frequencies": { "$exists": True }})
objects such as object ids or ISODate are manipulated using python classes. PyMongo uses its own ObjectId
class to deal with object ids, while dates use the standard datetime package. For example, if you want to
query all events between 2010 and 2011, you can do:
from datetime import datetime
date_from = datetime(2010, 1, 1)
date_to = datetime(2011, 1, 1)
db.find({ "date": { "$gte": date_from, "$lt": date_to } }):](https://image.slidesharecdn.com/mongodbnotesforprofessionals-200412132026/85/Mongo-db-notes-for-professionals-52-320.jpg)
![GoalKicker.com – MongoDB® Notes for Professionals 49
Section 14.3: Update all documents in a collection using
PyMongo
Let's say you need to add a field to every document in a collection.
import pymongo
client = pymongo.MongoClient('localhost', 27017)
db = client.mydb.mycollection
for doc in db.find():
db.update(
{'_id': doc['_id']},
{'$set': {'newField': 10} }, upsert=False, multi=False)
The find method returns a Cursor, on which you can easily iterate over using the for in syntax. Then, we call the
update method, specifying the _id and that we add a field ($set). The parameters upsert and multi come from
mongodb (see here for more info).](https://image.slidesharecdn.com/mongodbnotesforprofessionals-200412132026/85/Mongo-db-notes-for-professionals-53-320.jpg)


![GoalKicker.com – MongoDB® Notes for Professionals 52
"health" : 1,
"state" : 2,
"stateStr" : "SECONDARY",
...........................
}
],
"ok" : 1
}](https://image.slidesharecdn.com/mongodbnotesforprofessionals-200412132026/85/Mongo-db-notes-for-professionals-56-320.jpg)
![GoalKicker.com – MongoDB® Notes for Professionals 53
Chapter 17: Mongo as a Replica Set
Section 17.1: Mongodb as a Replica Set
We would be creating mongodb as a replica set having 3 instances. One instance would be primary and the other 2
instances would be secondary.
For simplicity, I am going to have a replica set with 3 instances of mongodb running on the same server and thus to
achieve this, all three mongodb instances would be running on different port numbers.
In production environment where in you have a dedicated mongodb instance running on a single server you can
reuse the same port numbers.
Create data directories ( path where mongodb data would be stored in a file)1.
- mkdir c:dataserver1 (datafile path for instance 1)
- mkdir c:dataserver2 (datafile path for instance 2)
- mkdir c:dataserver3 (datafile path for instance 3)
a. Start the first mongod instance2.
Open command prompt and type the following press enter.
mongod --replSet s0 --dbpath c:dataserver1 --port 37017 --smallfiles --oplogSize 100
The above command associates the instance of mongodb to a replicaSet name "s0" and the starts the first instance
of mongodb on port 37017 with oplogSize 100MB
b. Similarly start the second instance of Mongodb2.
mongod --replSet s0 --dbpath c:dataserver2 --port 37018 --smallfiles --oplogSize 100
The above command associates the instance of mongodb to a replicaSet name "s0" and the starts the first instance
of mongodb on port 37018 with oplogSize 100MB
c. Now start the third instance of Mongodb2.
mongod --replSet s0 --dbpath c:dataserver3 --port 37019 --smallfiles --oplogSize 100
The above command associates the instance of mongodb to a replicaSet name "s0" and the starts the first instance
of mongodb on port 37019 with oplogSize 100MB
With all the 3 instances started, these 3 instances are independent of each other currently. We would now need to
group these instances as a replica set. We do this with the help of a config object.
3.a Connect to any of the mongod servers via the mongo shell. To do that open the command prompt and type.
mongo --port 37017
Once connected to the mongo shell, create a config object
var config = {"_id":"s0", members[]};
this config object has 2 attributes](https://image.slidesharecdn.com/mongodbnotesforprofessionals-200412132026/85/Mongo-db-notes-for-professionals-57-320.jpg)
![GoalKicker.com – MongoDB® Notes for Professionals 54
_id: the name of the replica Set ( "s0" )1.
members: [] (members is an array of mongod instances. lets keep this blank for now, we will add2.
members via the push command.
3.b To Push(add) mongod instances to the members array in the config object. On the mongo shell type
config.members.push({"_id":0,"host":"localhost:37017"});
config.members.push({"_id":1,"host":"localhost:37018"});
config.members.push({"_id":2,"host":"localhost:37019"});
We assign each mongod instance an _id and an host. _id can be any unique number and the host should be the
hostname of the server on which its running followed by the port number.
Initiate the config object by the following command in the mongo shell.4.
rs.initiate(config)
Give it a few seconds and we have a replica set of 3 mongod instances running on the server. type the5.
following command to check the status of the replica set and to identify which one is primary and which one
is secondary.
rs.status();
Section 17.2: Check MongoDB Replica Set states
Use the below command to check the replica set status.
Command : rs.status()
Connect any one of replica member and fire this command it will give the full state of the replica set
Example :
{
"set" : "ReplicaName",
"date" : ISODate("2016-09-26T07:36:04.935Z"),
"myState" : 1,
"term" : NumberLong(-1),
"heartbeatIntervalMillis" : NumberLong(2000),
"members" : [
{
"_id" : 0,
"name" : "<IP>:<PORT>,
"health" : 1,
"state" : 1,
"stateStr" : "PRIMARY",
"uptime" : 5953744,
"optime" : Timestamp(1474875364, 36),
"optimeDate" : ISODate("2016-09-26T07:36:04Z"),
"electionTime" : Timestamp(1468921646, 1),
"electionDate" : ISODate("2016-07-19T09:47:26Z"),
"configVersion" : 6,
"self" : true
},
{
"_id" : 1,
"name" : "<IP>:<PORT>",
"health" : 1,](https://image.slidesharecdn.com/mongodbnotesforprofessionals-200412132026/85/Mongo-db-notes-for-professionals-58-320.jpg)
![GoalKicker.com – MongoDB® Notes for Professionals 55
"state" : 2,
"stateStr" : "SECONDARY",
"uptime" : 5953720,
"optime" : Timestamp(1474875364, 13),
"optimeDate" : ISODate("2016-09-26T07:36:04Z"),
"lastHeartbeat" : ISODate("2016-09-26T07:36:04.244Z"),
"lastHeartbeatRecv" : ISODate("2016-09-26T07:36:03.871Z"),
"pingMs" : NumberLong(0),
"syncingTo" : "10.9.52.55:10050",
"configVersion" : 6
},
{
"_id" : 2,
"name" : "<IP>:<PORT>",
"health" : 1,
"state" : 7,
"stateStr" : "ARBITER",
"uptime" : 5953696,
"lastHeartbeat" : ISODate("2016-09-26T07:36:03.183Z"),
"lastHeartbeatRecv" : ISODate("2016-09-26T07:36:03.715Z"),
"pingMs" : NumberLong(0),
"configVersion" : 6
},
{
"_id" : 3,
"name" : "<IP>:<PORT>",
"health" : 1,
"state" : 2,
"stateStr" : "SECONDARY",
"uptime" : 1984305,
"optime" : Timestamp(1474875361, 16),
"optimeDate" : ISODate("2016-09-26T07:36:01Z"),
"lastHeartbeat" : ISODate("2016-09-26T07:36:02.921Z"),
"lastHeartbeatRecv" : ISODate("2016-09-26T07:36:03.793Z"),
"pingMs" : NumberLong(22),
"lastHeartbeatMessage" : "syncing from: 10.9.52.56:10050",
"syncingTo" : "10.9.52.56:10050",
"configVersion" : 6
}
],
"ok" : 1
}
From the above we can know the entire replica set status](https://image.slidesharecdn.com/mongodbnotesforprofessionals-200412132026/85/Mongo-db-notes-for-professionals-59-320.jpg)

![GoalKicker.com – MongoDB® Notes for Professionals 58
mongodb_node_2.pem --sslCAFile ca.pem
mongod --dbpath data/data_3 --replSet rs0 --port 27019 --sslMode requireSSL --sslPEMKeyFile
mongodb_node_3.pem --sslCAFile ca.pem
You now have a 3 Nodes ReplicaSet deployed on your local environment and all their transactions are encrypted.
You cannot connect to this ReplicaSet without using TLS or without providing a Client Certificate trusted by your CA.
Section 18.2: How to connect your Client (Mongo Shell) to a
ReplicaSet?
No Mutual SSL
In this example, we might use the CA File (ca.pem) that you generated during the "How to configure a ReplicaSet to
support TLS/SSL?" section. We will assume that the CA file is located in your current folder.
We will assume that your 3 nodes are running on mongo1:27017, mongo2:27018 and mongo3:27019. (You might
need to modify your /etc/hosts file.)
From MongoDB 3.2.6, if your CA File is registered in your Operating System Trust Store, you can connect to your
ReplicaSet without providing the CA File.
mongo --ssl --host rs0/mongo1:27017,mongo2:27018,mongo3:27019
Otherwise you must provide the CA File.
mongo --ssl --sslCAFile ca.pem --host rs0/mongo1:27017,mongo2:27018,mongo3:27019
You are now connected to your ReplicaSet and all the transactions between your Mongo Shell and your ReplicaSet
are encrypted.
With Mutual SSL
If your ReplicaSet asks for a Client Certificate, you must provide one signed by the CA used by the ReplicaSet
Deployment. The steps to generate the Client Certificate are almost the same as the ones to generate the Server
Certificate.
Indeed, you just need to modify the Common Name Field during the CSR creation. Instead of providing 1 Node
Hostname in the Common Name Field, you need to provide all the ReplicaSet Hostnames separated by a
comma.
openssl req -nodes -newkey rsa:4096 -sha256 -keyout mongodb_client.key -out mongodb_client.csr
...
Common Name (e.g. server FQDN or YOUR name) []: mongo1,mongo2,mongo3
You might face the Common Name size limitation if the Common Name field is too long (more than 64 bytes long).
To bypass this limitation, you must use the SubjectAltName when generating the CSR.
openssl req -nodes -newkey rsa:4096 -sha256 -keyout mongodb_client.key -out mongodb_client.csr -
config <(
cat <<-EOF
[req]
default_bits = 4096
prompt = no
default_md = sha256
req_extensions = req_ext](https://image.slidesharecdn.com/mongodbnotesforprofessionals-200412132026/85/Mongo-db-notes-for-professionals-62-320.jpg)
![GoalKicker.com – MongoDB® Notes for Professionals 59
distinguished_name = dn
[ dn ]
CN = .
[ req_ext ]
subjectAltName = @alt_names
[ alt_names ]
DNS.1 = mongo1
DNS.2 = mongo2
DNS.3 = mongo3
EOF
)
Then you sign the CSR using the CA certificate and key.
openssl x509 -req -in mongodb_client.csr -CA ca.pem -CAkey ca.key -set_serial 00 -out
mongodb_client.crt
Finally, you concat the key and the signed certificate.
cat mongodb_client.key mongodb_client.crt > mongodb_client.pem
To connect to your ReplicaSet, you can now provide the newly generated Client Certificate.
mongo --ssl --sslCAFile ca.pem --host rs0/mongo1:27017,mongo2:27018,mongo3:27019 --sslPEMKeyFile
mongodb_client.pem
You are now connected to your ReplicaSet and all the transactions between your Mongo Shell and your ReplicaSet
are encrypted.](https://image.slidesharecdn.com/mongodbnotesforprofessionals-200412132026/85/Mongo-db-notes-for-professionals-63-320.jpg)


![GoalKicker.com – MongoDB® Notes for Professionals 64
Chapter 22: Backing up and Restoring
Data
Section 22.1: Basic mongodump of local default mongod
instance
mongodump --db mydb --gzip --out "mydb.dump.$(date +%F_%R)"
This command will dump a bson gzipped archive of your local mongod 'mydb' database to the
'mydb.dump.{timestamp}' directory
Section 22.2: Basic mongorestore of local default mongod
dump
mongorestore --db mydb mydb.dump.2016-08-27_12:44/mydb --drop --gzip
This command will first drop your current 'mydb' database and then restore your gzipped bson dump from the
'mydb mydb.dump.2016-08-27_12:44/mydb' archive dump file.
Section 22.3: mongoimport with JSON
Sample zipcode dataset in zipcodes.json stored in c:Usersyc03ak1Desktopzips.json
{ "_id" : "01001", "city" : "AGAWAM", "loc" : [ -72.622739, 42.070206 ], "pop" : 15338, "state" :
"MA" }
{ "_id" : "01002", "city" : "CUSHMAN", "loc" : [ -72.51564999999999, 42.377017 ], "pop" : 36963,
"state" : "MA" }
{ "_id" : "01005", "city" : "BARRE", "loc" : [ -72.10835400000001, 42.409698 ], "pop" : 4546,
"state" : "MA" }
{ "_id" : "01007", "city" : "BELCHERTOWN", "loc" : [ -72.41095300000001, 42.275103 ], "pop" :
10579, "state" : "MA" }
{ "_id" : "01008", "city" : "BLANDFORD", "loc" : [ -72.936114, 42.182949 ], "pop" : 1240, "state" :
"MA" }
{ "_id" : "01010", "city" : "BRIMFIELD", "loc" : [ -72.188455, 42.116543 ], "pop" : 3706, "state" :
"MA" }
{ "_id" : "01011", "city" : "CHESTER", "loc" : [ -72.988761, 42.279421 ], "pop" : 1688, "state" :
"MA" }
to import this data-set to the database named "test" and collection named "zips"
C:Usersyc03ak1>mongoimport --db test --collection "zips" --drop --type json --host
"localhost:47019" --file "c:Usersyc03ak1Desktopzips.json"
--db : name of the database where data is to be imported to
--collection: name of the collection in the database where data is to be improted
--drop : drops the collection first before importing
--type : document type which needs to be imported. default JSON
--host : mongodb host and port on which data is to be imported.
--file : path where the json file is
output :
2016-08-10T20:10:50.159-0700 connected to: localhost:47019](https://image.slidesharecdn.com/mongodbnotesforprofessionals-200412132026/85/Mongo-db-notes-for-professionals-68-320.jpg)
![GoalKicker.com – MongoDB® Notes for Professionals 65
2016-08-10T20:10:50.163-0700 dropping: test.zips
2016-08-10T20:10:53.155-0700 [################........] test.zips 2.1 MB/3.0 MB (68.5%)
2016-08-10T20:10:56.150-0700 [########################] test.zips 3.0 MB/3.0 MB (100.0%)
2016-08-10T20:10:57.819-0700 [########################] test.zips 3.0 MB/3.0 MB (100.0%)
2016-08-10T20:10:57.821-0700 imported 29353 documents
Section 22.4: mongoimport with CSV
Sample test dataset CSV file stored at the location c:Usersyc03ak1Desktoptesting.csv
_id city loc pop state
1 A [10.0, 20.0] 2222 PQE
2 B [10.1, 20.1] 22122 RW
3 C [10.2, 20.0] 255222 RWE
4 D [10.3, 20.3] 226622 SFDS
5 E [10.4, 20.0] 222122 FDS
to import this data-set to the database named "test" and collection named "sample"
C:Usersyc03ak1>mongoimport --db test --collection "sample" --drop --type csv --headerline --host
"localhost:47019" --file "c:Usersyc03ak1Desktoptesting.csv"
--headerline : use the first line of the csv file as the fields for the json document
output :
2016-08-10T20:25:48.572-0700 connected to: localhost:47019
2016-08-10T20:25:48.576-0700 dropping: test.sample
2016-08-10T20:25:49.109-0700 imported 5 documents
OR
C:Usersyc03ak1>mongoimport --db test --collection "sample" --drop --type csv --fields
_id,city,loc,pop,state --host "localhost:47019" --file "c:Usersyc03ak1Desktoptesting.csv"
--fields : comma separated list of fields which needs to be imported in the json document. Output:
2016-08-10T20:26:48.978-0700 connected to: localhost:47019
2016-08-10T20:26:48.982-0700 dropping: test.sample
2016-08-10T20:26:49.611-0700 imported 6 documents](https://image.slidesharecdn.com/mongodbnotesforprofessionals-200412132026/85/Mongo-db-notes-for-professionals-69-320.jpg)
![GoalKicker.com – MongoDB® Notes for Professionals 66
Chapter 23: Upgrading MongoDB version
How to update the version of MongoDB on your machine on different platforms and versions.
Section 23.1: Upgrading to 3.4 on Ubuntu 16.04 using apt
You must have 3.2 to be able to upgrade to 3.4. This example assumes you are using apt.
sudo service mongod stop1.
sudo apt-key adv --keyserver hkp://keyserver.ubuntu.com:80 --recv2.
0C49F3730359A14518585931BC711F9BA15703C6
echo "deb [ arch=amd64,arm64 ] http://repo.mongodb.org/apt/ubuntu xenial/mongodb-org/3.43.
multiverse" | sudo tee /etc/apt/sources.list.d/mongodb-org-3.4.list
sudo apt-get update4.
sudo apt-get upgrade5.
sudo service mongod start6.
Ensure the new version is running with mongo. The shell will print out the MongoDB server version that should be
3.4 now.](https://image.slidesharecdn.com/mongodbnotesforprofessionals-200412132026/85/Mongo-db-notes-for-professionals-70-320.jpg)


The document provides an overview of MongoDB, including instructions for installing MongoDB on different operating systems like Mac OS, Windows, and Linux. It also includes explanations of basic MongoDB terminology and commands for interacting with MongoDB using the mongo shell.