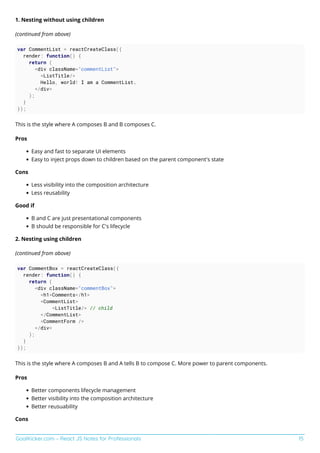
This document provides an overview of React JS and discusses topics such as getting started, components, props, state, lifecycles, forms and user input, routing, and communicating between components. It includes chapters on basic concepts, creating reusable components, setting up React with tools like Webpack and Babel, and differences between using React.createClass and extending React.Component. Sections dive deeper into specific aspects like nesting components, passing props, controlled vs uncontrolled components, and lifecycle methods.


![Contents
About 1
...................................................................................................................................................................................
Chapter 1: Getting started with React 2
...............................................................................................................
Section 1.1: What is ReactJS? 2
........................................................................................................................................
Section 1.2: Installation or Setup 3
..................................................................................................................................
Section 1.3: Hello World with Stateless Functions 4
.......................................................................................................
Section 1.4: Absolute Basics of Creating Reusable Components 5
.............................................................................
Section 1.5: Create React App 6
......................................................................................................................................
Section 1.6: Hello World 7
.................................................................................................................................................
Section 1.7: Hello World Component 8
...........................................................................................................................
Chapter 2: Components 11
...........................................................................................................................................
Section 2.1: Creating Components 11
.............................................................................................................................
Section 2.2: Basic Component 13
...................................................................................................................................
Section 2.3: Nesting Components 14
..............................................................................................................................
Section 2.4: Props 16
........................................................................................................................................................
Section 2.5: Component states - Dynamic user-interface 17
......................................................................................
Section 2.6: Variations of Stateless Functional Components 19
.................................................................................
Section 2.7: setState pitfalls 20
.......................................................................................................................................
Chapter 3: Using ReactJS with TypeScript 22
....................................................................................................
Section 3.1: ReactJS component written in TypeScript 22
...........................................................................................
Section 3.2: Installation and Setup 22
............................................................................................................................
Section 3.3: Stateless React Components in TypeScript 23
.........................................................................................
Section 3.4: Stateless and property-less Components 24
............................................................................................
Chapter 4: State in React 25
......................................................................................................................................
Section 4.1: Basic State 25
...............................................................................................................................................
Section 4.2: Common Antipattern 25
.............................................................................................................................
Section 4.3: setState() 26
.................................................................................................................................................
Section 4.4: State, Events And Managed Controls 28
...................................................................................................
Chapter 5: Props in React 30
......................................................................................................................................
Section 5.1: Introduction 30
..............................................................................................................................................
Section 5.2: Default props 30
..........................................................................................................................................
Section 5.3: PropTypes 31
...............................................................................................................................................
Section 5.4: Passing down props using spread operator 32
.......................................................................................
Section 5.5: Props.children and component composition 33
.......................................................................................
Section 5.6: Detecting the type of Children components 34
........................................................................................
Chapter 6: React Component Lifecycle 35
..........................................................................................................
Section 6.1: Component Creation 35
...............................................................................................................................
Section 6.2: Component Removal 37
.............................................................................................................................
Section 6.3: Component Update 38
................................................................................................................................
Section 6.4: Lifecycle method call in dierent states 39
..............................................................................................
Section 6.5: React Component Container 40
.................................................................................................................
Chapter 7: Forms and User Input 42
.......................................................................................................................
Section 7.1: Controlled Components 42
..........................................................................................................................
Section 7.2: Uncontrolled Components 42
.....................................................................................................................
Chapter 8: React Boilerplate [React + Babel + Webpack] 44
...................................................................
Section 8.1: react-starter project 44
...............................................................................................................................
Section 8.2: Setting up the project 45
.............................................................................................................................](https://image.slidesharecdn.com/reacts-230807194016-d6297c01/85/Reacts-pdf-2-320.jpg)


![GoalKicker.com – React JS Notes for Professionals 9
return <h1>Hello, World!</h1>
}
}
export default HelloWorld
A Component can also receive props. These are properties passed by its parent in order to specify some values the
component cannot know by itself; a property can also contain a function that can be called by the component after
certain events occur - for example, a button could receive a function for its onClick property and call it whenever it
is clicked. When writing a component, its props can be accessed through the props object on the Component itself:
import React from 'react'
class Hello extends React.Component {
render() {
return <h1>Hello, {this.props.name}!</h1>
}
}
export default Hello
The example above shows how the component can render an arbitrary string passed into the name prop by its
parent. Note that a component cannot modify the props it receives.
A component can be rendered within any other component, or directly into the DOM if it's the topmost component,
using ReactDOM.render and providing it with both the component and the DOM Node where you want the React
tree to be rendered:
import React from 'react'
import ReactDOM from 'react-dom'
import Hello from './Hello'
ReactDOM.render(<Hello name="Billy James" />, document.getElementById('main'))
By now you know how to make a basic component and accept props. Lets take this a step further and introduce
state.
For demo sake, let's make our Hello World app, display only the first name if a full name is given.
import React from 'react'
class Hello extends React.Component {
constructor(props){
//Since we are extending the default constructor,
//handle default activities first.
super(props);
//Extract the first-name from the prop
let firstName = this.props.name.split(" ")[0];
//In the constructor, feel free to modify the
//state property on the current context.
this.state = {
name: firstName
}](https://image.slidesharecdn.com/reacts-230807194016-d6297c01/85/Reacts-pdf-13-320.jpg)

![GoalKicker.com – React JS Notes for Professionals 19
Section 2.6: Variations of Stateless Functional Components
const languages = [
'JavaScript',
'Python',
'Java',
'Elm',
'TypeScript',
'C#',
'F#'
]
// one liner
const Language = ({language}) => <li>{language}</li>
Language.propTypes = {
message: React.PropTypes.string.isRequired
}
/**
* If there are more than one line.
* Please notice that round brackets are optional here,
* However it's better to use them for readability
*/
const LanguagesList = ({languages}) => {
<ul>
{languages.map(language => <Language language={language} />)}
</ul>
}
LanguagesList.PropTypes = {
languages: React.PropTypes.array.isRequired
}
/**
* This syntax is used if there are more work beside just JSX presentation
* For instance some data manipulations needs to be done.
* Please notice that round brackets after return are required,
* Otherwise return will return nothing (undefined)
*/
const LanguageSection = ({header, languages}) => {
// do some work
const formattedLanguages = languages.map(language => language.toUpperCase())
return (
<fieldset>
<legend>{header}</legend>
<LanguagesList languages={formattedLanguages} />
</fieldset>
)
}
LanguageSection.PropTypes = {
header: React.PropTypes.string.isRequired,
languages: React.PropTypes.array.isRequired
}
ReactDOM.render(
<LanguageSection](https://image.slidesharecdn.com/reacts-230807194016-d6297c01/85/Reacts-pdf-23-320.jpg)


![GoalKicker.com – React JS Notes for Professionals 40
componentWillUpdate
2.
render
3.
componentDidUpdate
4.
When a component has props changed:
componentWillReceiveProps
1.
shouldComponentUpdate
2.
componentWillUpdate
3.
render
4.
componentDidUpdate
5.
When a component is unmounting:
componentWillUnmount
1.
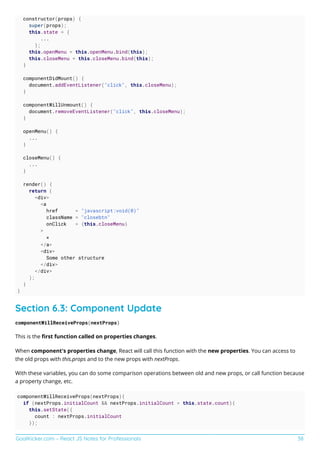
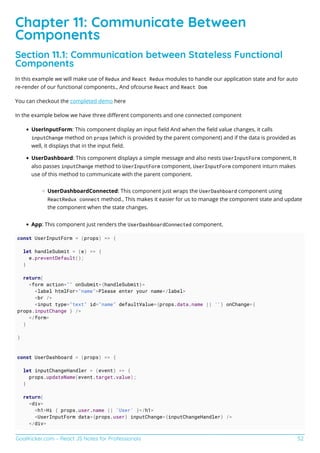
Section 6.5: React Component Container
When building a React application, it is often desirable to divide components based on their primary responsibility,
into Presentational and Container components.
Presentational components are concerned only with displaying data - they can be regarded as, and are often
implemented as, functions that convert a model to a view. Typically they do not maintain any internal state.
Container components are concerned with managing data. This may be done internally through their own state, or
by acting as intermediaries with a state-management library such as Redux. The container component will not
directly display data, rather it will pass the data to a presentational component.
// Container component
import React, { Component } from 'react';
import Api from 'path/to/api';
class CommentsListContainer extends Component {
constructor() {
super();
// Set initial state
this.state = { comments: [] }
}
componentDidMount() {
// Make API call and update state with returned comments
Api.getComments().then(comments => this.setState({ comments }));
}
render() {
// Pass our state comments to the presentational component
return (
<CommentsList comments={this.state.comments} />;
);
}
}
// Presentational Component
const CommentsList = ({ comments }) => (
<div>
{comments.map(comment => (
<div>{comment}</div>
)}
</div>
);](https://image.slidesharecdn.com/reacts-230807194016-d6297c01/85/Reacts-pdf-44-320.jpg)

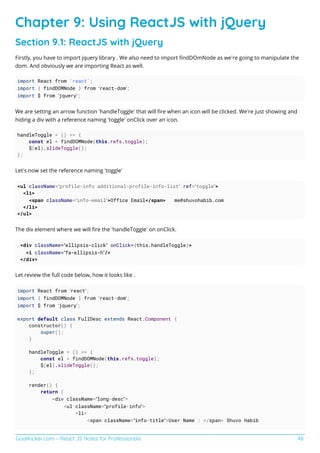
![GoalKicker.com – React JS Notes for Professionals 44
Chapter 8: React Boilerplate [React +
Babel + Webpack]
Section 8.1: react-starter project
About this Project
This is simple boilerplate project. This post will guide you to set up the environment for ReactJs + Webpack + Bable.
Lets get Started
we will need node package manager for fire up express server and manage dependencies throughout the project. if
you are new to node package manager, you can check here. Note : Installing node package manager is require
here.
Create a folder with suitable name and navigate into it from terminal or by GUI.Then go to terminal and type npm
init this will create a package.json file, Nothing scary , it will ask you few question like name of your project
,version, description, entry point, git repository, author, license etc. Here entry point is important because node will
initially look for it when you run the project. At the end it will ask you to verify the information you provide. You can
type yes or modify it. Well that's it , our package.json file is ready.
Express server setup run npm install express@4 --save. This is all the dependencies we needed for this project.Here
save flag is important, without it package.js file will not be updated. Main task of package.json is to store list of
dependencies. It will add express version 4. Your package.json will look like "dependencies": { "express":
"^4.13.4", ............. },
After complete download you can see there is node_modules folder and sub folder of our dependencies. Now on the
root of project create new file server.js file. Now we are setting express server. I am going to past all the code and
explain it later.
var express = require('express');
// Create our app
var app = express();
app.use(express.static('public'));
app.listen(3000, function () {
console.log('Express server is using port:3000');
});
var express = require('express'); this will gave you the access of entire express api.
var app = express(); will call express library as function. app.use(); let the add the functionality to your express
application. app.use(express.static('public')); will specify the folder name that will be expose in our web server.
app.listen(port, function(){}) will here our port will be 3000 and function we are calling will verify that out web server
is running properly. That's it express server is set up.
Now go to our project and create a new folder public and create index.html file. index.html is the default file for you
application and Express server will look for this file. The index.html is simple html file which looks like
<!DOCTYPE html>
<html>
<head>](https://image.slidesharecdn.com/reacts-230807194016-d6297c01/85/Reacts-pdf-48-320.jpg)
![GoalKicker.com – React JS Notes for Professionals 46
Before we actually start hitting commands in the terminal. Take a look at what Babel and Webpack are used for.
You can start your project by running npm init in your terminal. Follow the initial setup. After that, run following
commands in your terminal-
Dependencies:
npm install react react-dom --save
Dev Dependecies:
npm install babel-core babel-loader babel-preset-es2015 babel-preset-react babel-preset-stage-0
webpack webpack-dev-server react-hot-loader --save-dev
Optional Dev Dependencies:
npm install eslint eslint-plugin-react babel-eslint --save-dev
You may refer to this sample package.json
Create .babelrc in your project root with following contents:
{
"presets": ["es2015", "stage-0", "react"]
}
Optionally create .eslintrc in your project root with following contents:
{
"ecmaFeatures": {
"jsx": true,
"modules": true
},
"env": {
"browser": true,
"node": true
},
"parser": "babel-eslint",
"rules": {
"quotes": [2, "single"],
"strict": [2, "never"],
},
"plugins": [
"react"
]
}
Create a .gitignore file to prevent uploading generated files to your git repo.
node_modules
npm-debug.log
.DS_Store
dist
Create webpack.config.js file with following minimum contents.
var path = require('path');
var webpack = require('webpack');](https://image.slidesharecdn.com/reacts-230807194016-d6297c01/85/Reacts-pdf-50-320.jpg)
![GoalKicker.com – React JS Notes for Professionals 47
module.exports = {
devtool: 'eval',
entry: [
'webpack-dev-server/client?http://localhost:3000',
'webpack/hot/only-dev-server',
'./src/index'
],
output: {
path: path.join(__dirname, 'dist'),
filename: 'bundle.js',
publicPath: '/static/'
},
plugins: [
new webpack.HotModuleReplacementPlugin()
],
module: {
loaders: [{
test: /.js$/,
loaders: ['react-hot', 'babel'],
include: path.join(__dirname, 'src')
}]
}
};
And finally, create a sever.js file to be able to run npm start, with following contents:
var webpack = require('webpack');
var WebpackDevServer = require('webpack-dev-server');
var config = require('./webpack.config');
new WebpackDevServer(webpack(config), {
publicPath: config.output.publicPath,
hot: true,
historyApiFallback: true
}).listen(3000, 'localhost', function (err, result) {
if (err) {
return console.log(err);
}
console.log('Serving your awesome project at http://localhost:3000/');
});
Create src/app.js file to see your React project do something.
import React, { Component } from 'react';
export default class App extends Component {
render() {
return (
<h1>Hello, world.</h1>
);
}
}
Run node server.js or npm start in the terminal, if you have defined what start stands for in your package.json](https://image.slidesharecdn.com/reacts-230807194016-d6297c01/85/Reacts-pdf-51-320.jpg)
![GoalKicker.com – React JS Notes for Professionals 51
Section 10.2: React Routing Async
import React from 'react';
import { Route, IndexRoute } from 'react-router';
import Index from './containers/home';
import App from './components/app';
//for single Component lazy load use this
const ContactComponent = () => {
return {
getComponent: (location, callback)=> {
require.ensure([], require => {
callback(null, require('./components/Contact')["default"]);
}, 'Contact');
}
}
};
//for multiple componnets
const groupedComponents = (pageName) => {
return {
getComponent: (location, callback)=> {
require.ensure([], require => {
switch(pageName){
case 'about' :
callback(null, require( "./components/about" )["default"]);
break ;
case 'tos' :
callback(null, require( "./components/tos" )["default"]);
break ;
}
}, "groupedComponents");
}
}
};
export default(
<Route path="/" component={App}>
<IndexRoute component={Index} />
<Route path="/contact" {...ContactComponent()} />
<Route path="/about" {...groupedComponents('about')} />
<Route path="/tos" {...groupedComponents('tos')} />
</Route>
);](https://image.slidesharecdn.com/reacts-230807194016-d6297c01/85/Reacts-pdf-55-320.jpg)
![GoalKicker.com – React JS Notes for Professionals 54
Chapter 12: How to setup a basic webpack,
react and babel environment
Section 12.1: How to build a pipeline for a customized "Hello
world" with images
Step 1: Install Node.js
The build pipeline you will be building is based in Node.js so you must ensure in the first instance that you have this
installed. For instructions on how to install Node.js you can checkout the SO docs for that here
Step 2: Initialise your project as an node module
Open your project folder on the command line and use the following command:
npm init
For the purposes of this example you can feel free to take the defaults or if you'd like more info on what all this
means you can check out this SO doc on setting up package configuration.
Step 3: Install necessary npm packages
Run the following command on the command line to install the packages necessary for this example:
npm install --save react react-dom
Then for the dev dependencies run this command:
npm install --save-dev babel-core babel-preset-react babel-preset-es2015 webpack babel-loader css-
loader style-loader file-loader image-webpack-loader
Finally webpack and webpack-dev-server are things that are worth installing globally rather than as a dependency
of your project, if you'd prefer to add it as a dependency then that will work to, I don't. Here is the command to run:
npm install --global webpack webpack-dev-server
Step 3: Add a .babelrc file to the root of your project
This will setup babel to use the presets you've just installed. Your .babelrc file should look like this:
{
"presets": ["react", "es2015"]
}
Step 4: Setup project directory structure
Set yourself up a directory stucture that looks like the below in the root of your directory:
|- node_modules
|- src/
|- components/
|- images/
|- styles/
|- index.html](https://image.slidesharecdn.com/reacts-230807194016-d6297c01/85/Reacts-pdf-58-320.jpg)

![GoalKicker.com – React JS Notes for Professionals 57
},
module: {
loaders: [
{
test: /.(js|jsx)$/,
exclude: /node_modules/,
loader: 'babel-loader'
},
{
test: /.css$/,
loader: "style!css"
},
{
test: /.gif$/,
loaders: [
'file?name=[path][name].[ext]',
'image-webpack',
]
},
{ test: /.(html)$/,
loader: "file?name=[path][name].[ext]"
}
],
},
};
module.exports = config;
Step 7: Create npm tasks for your pipeline
To do this you will need to add two properties to the scripts key of the JSON defined in the package.json file in the
root of your project. Make your scripts key look like this:
"scripts": {
"start": "webpack-dev-server",
"build": "webpack",
"test": "echo "Error: no test specified" && exit 1"
},
The test script will have already been there and you can choose whether to keep it or not, it's not important to this
example.
Step 8: Use the pipeline
From the command line, if you are in the project root directory you should now be able to run the command:
npm run build
This will bundle up the little application you've built and place it in the dist/ directory that it will create in the root
of your project folder.
If you run the command:
npm start
Then the application you've built will be served up in your default web browser inside of a webpack dev server
instance.](https://image.slidesharecdn.com/reacts-230807194016-d6297c01/85/Reacts-pdf-61-320.jpg)
![GoalKicker.com – React JS Notes for Professionals 62
static defaultProps = {
name: 'Home',
position: 1
};
constructor(props) {
super(props);
}
render() {
return (
<div></div>
);
}
}
export default MyComponent;
Section 13.4: Mixins
We can use mixins only with the React.createClass way.
React.createClass
In this version we can add mixins to components using the mixins property which takes an Array of available
mixins. These then extend the component class.
import React from 'react';
var MyMixin = {
doSomething() {
}
};
const MyComponent = React.createClass({
mixins: [MyMixin],
handleClick() {
this.doSomething(); // invoke mixin's method
},
render() {
return (
<button onClick={this.handleClick}>Do Something</button>
);
}
});
export default MyComponent;
React.Component
React mixins are not supported when using React components written in ES6. Moreover, they will not have support
for ES6 classes in React. The reason is that they are considered harmful.
Section 13.5: Set Initial State
There are changes in how we are setting the initial states.
React.createClass
We have a getInitialState function, which simply returns an Object of initial states.](https://image.slidesharecdn.com/reacts-230807194016-d6297c01/85/Reacts-pdf-66-320.jpg)
![GoalKicker.com – React JS Notes for Professionals 63
import React from 'react';
const MyComponent = React.createClass({
getInitialState () {
return {
activePage: 1
};
},
render() {
return (
<div></div>
);
}
});
export default MyComponent;
React.Component
In this version we declare all state as a simple initialisation property in the constructor, instead of using the
getInitialState function. It feels less "React API" driven since this is just plain JavaScript.
import React from 'react';
class MyComponent extends React.Component {
constructor(props) {
super(props);
this.state = {
activePage: 1
};
}
render() {
return (
<div></div>
);
}
}
export default MyComponent;
Section 13.6: ES6/React “this” keyword with ajax to get data
from server
import React from 'react';
class SearchEs6 extends React.Component{
constructor(props) {
super(props);
this.state = {
searchResults: []
};
}
showResults(response){
this.setState({
searchResults: response.results
})
}](https://image.slidesharecdn.com/reacts-230807194016-d6297c01/85/Reacts-pdf-67-320.jpg)
![GoalKicker.com – React JS Notes for Professionals 66
Section 14.2: HTTP GET request and looping through data
The following example shows how a set of data obtained from a remote source can be rendered into a component.
We make an AJAX request using fetch, which is build into most browsers. Use a fetch polyfill in production to
support older browsers. You can also use any other library for making requests (e.g. axios, SuperAgent, or even
plain Javascript).
We set the data we receive as component state, so we can access it inside the render method. There, we loop
through the data using map. Don't forget to always add a unique key attribute (or prop) to the looped element,
which is important for React's rendering performance.
import React from 'react';
class Users extends React.Component {
constructor() {
super();
this.state = { users: [] };
}
componentDidMount() {
fetch('/api/users')
.then(response => response.json())
.then(json => this.setState({ users: json.data }));
}
render() {
return (
<div>
<h1>Users</h1>
{
this.state.users.length == 0
? 'Loading users...'
: this.state.users.map(user => (
<figure key={user.id}>
<img src={user.avatar} />
<figcaption>
{user.name}
</figcaption>
</figure>
))
}
</div>
);
}
}
ReactDOM.render(<Users />, document.getElementById('root'));
Working example on JSBin.
Section 14.3: Ajax in React without a third party library - a.k.a
with VanillaJS
The following would work in IE9+
import React from 'react'](https://image.slidesharecdn.com/reacts-230807194016-d6297c01/85/Reacts-pdf-70-320.jpg)


![GoalKicker.com – React JS Notes for Professionals 72
The HomePage component provides the UI to register and search for users. Note that it is a typical React component
including state, UI, and behavioral code. The data for the list of registered users is stored in the state variable, but
our reusable List (shown below) encapsulates the UI code for the list.
homepage.js:
import React from 'react'
import {Component} from 'react';
import List from './list';
export default class Temp extends Component{
constructor(props) {
super();
this.state={users:[], showSearchResult: false, searchResult: []};
}
registerClick(){
let users = this.state.users.slice();
if(users.indexOf(this.refs.mail_id.value) == -1){
users.push(this.refs.mail_id.value);
this.refs.mail_id.value = '';
this.setState({users});
}else{
alert('user already registered');
}
}
searchClick(){
let users = this.state.users;
let index = users.indexOf(this.refs.search.value);
if(index >= 0){
this.setState({searchResult: users[index], showSearchResult: true});
}else{
alert('no user found with this mail id');
}
}
hideSearchResult(){
this.setState({showSearchResult: false});
}
render() {
return (
<div>
<input placeholder='email-id' ref='mail_id'/>
<input type='submit' value='Click here to register'
onClick={this.registerClick.bind(this)}/>
<input style={{marginLeft: '100px'}} placeholder='search' ref='search'/>
<input type='submit' value='Click here to register'
onClick={this.searchClick.bind(this)}/>
{this.state.showSearchResult ?
<div>
Search Result:
<List users={[this.state.searchResult]}/>
<p onClick={this.hideSearchResult.bind(this)}>Close this</p>
</div>
:
<div>
Registered users:](https://image.slidesharecdn.com/reacts-230807194016-d6297c01/85/Reacts-pdf-76-320.jpg)
![GoalKicker.com – React JS Notes for Professionals 73
<br/>
{this.state.users.length ?
<List users={this.state.users}/>
:
"no user is registered"
}
</div>
}
</div>
);
}
}
Finally, our stateless functional component List, which is used display both the list of registered users and the
search results, but without maintaining any state itself.
list.js:
import React from 'react';
var colors = ['#6A1B9A', '#76FF03', '#4527A0'];
var List = (props) => {
return(
<div>
{
props.users.map((user, i)=>{
return(
<div key={i} style={{color: colors[i%3]}}>
{user}
</div>
);
})
}
</div>
);
}
export default List;
Reference: https://facebook.github.io/react/docs/components-and-props.html](https://image.slidesharecdn.com/reacts-230807194016-d6297c01/85/Reacts-pdf-77-320.jpg)
![GoalKicker.com – React JS Notes for Professionals 75
Whenever two nodes have different keys
2.
for example, <div key="1">...</div> is different from <div key="2">...</div>
Moreover, what follows is crucial and extremely important to understand if you want to optimise performance
If they [two nodes] are not of the same type, React is not going to even try at matching what they render.
It is just going to remove the first one from the DOM and insert the second one.
Here's why
It is very unlikely that a element is going to generate a DOM that is going to look like what a would
generate. Instead of spending time trying to match those two structures, React just re-builds the tree
from scratch.
Section 17.3: The Basics - HTML DOM vs Virtual DOM
HTML DOM is Expensive
Each web page is represented internally as a tree of objects. This representation is called Document Object Model.
Moreover, it is a language-neutral interface that allows programming languages (such as JavaScript) to access the
HTML elements.
In other words
The HTML DOM is a standard for how to get, change, add, or delete HTML elements.
However, those DOM operations are extremely expensive.
Virtual DOM is a Solution
So React's team came up with the idea to abstract the HTML DOM and create its own Virtual DOM in order to
compute the minimum number of operations we need to apply on the HTML DOM to replicate current state of our
application.
The Virtual DOM saves time from unnecessary DOM modifications.
How Exactly?
At each point of time, React has the application state represented as a Virtual DOM. Whenever application state
changes, these are the steps that React performs in order to optimise performance
Generate a new Virtual DOM that represents the new state of our application
1.
Compare the old Virtual DOM (which represents the current HTML DOM) vs the new Virtual DOM
2.
Based on 2. find the minimum number of operations to transform the old Virtual DOM (which represents the
3.
current HTML DOM) into the new Virtual DOM
to learn more about that - read React's Diff Algorithm
After those operations are found, they are mapped into their equivalent HTML DOM operations
4.](https://image.slidesharecdn.com/reacts-230807194016-d6297c01/85/Reacts-pdf-79-320.jpg)
![GoalKicker.com – React JS Notes for Professionals 78
Chapter 19: Setting Up React Environment
Section 19.1: Simple React Component
We want to be able to compile below component and render it in our webpage
Filename: src/index.jsx
import React from 'react';
import ReactDOM from 'react-dom';
class ToDo extends React.Component {
render() {
return (<div>I am working</div>);
}
}
ReactDOM.render(<ToDo />, document.getElementById('App'));
Section 19.2: Install all dependencies
# install react and react-dom
$ npm i react react-dom --save
# install webpack for bundling
$ npm i webpack -g
# install babel for module loading, bundling and transpiling
$ npm i babel-core babel-loader --save
# install babel presets for react and es6
$ npm i babel-preset-react babel-preset-es2015 --save
Section 19.3: Configure webpack
Create a file webpack.config.js in the root of your working directory
Filename: webpack.config.js
module.exports = {
entry: __dirname + "/src/index.jsx",
devtool: "source-map",
output: {
path: __dirname + "/build",
filename: "bundle.js"
},
module: {
loaders: [
{test: /.jsx?$/, exclude: /node_modules/, loader: "babel-loader"}
]
}
}](https://image.slidesharecdn.com/reacts-230807194016-d6297c01/85/Reacts-pdf-82-320.jpg)
![GoalKicker.com – React JS Notes for Professionals 79
Section 19.4: Configure babel
Create a file .babelrc in the root of our working directory
Filename: .babelrc
{
"presets": ["es2015","react"]
}
Section 19.5: HTML file to use react component
Setup a simple html file in the root of the project directory
Filename: index.html
<!DOCTYPE html>
<html>
<head>
<meta charset="utf-8">
<title></title>
</head>
<body>
<div id="App"></div>
<script src="build/bundle.js" charset="utf-8"></script>
</body>
</html>
Section 19.6: Transpile and bundle your component
Using webpack, you can bundle your component:
$ webpack
This will create our output file in build directory.
Open the HTML page in a browser to see component in action](https://image.slidesharecdn.com/reacts-230807194016-d6297c01/85/Reacts-pdf-83-320.jpg)
![GoalKicker.com – React JS Notes for Professionals 83
JavaScript Expressions
You can pass any JavaScript expression as children, by enclosing it within {}. For example, these expressions are
equivalent:
<MyComponent>foo</MyComponent>
<MyComponent>{'foo'}</MyComponent>
This is often useful for rendering a list of JSX expressions of arbitrary length. For example, this renders an HTML list:
const Item = ({ message }) => (
<li>{ message }</li>
);
const TodoList = () => {
const todos = ['finish doc', 'submit review', 'wait stackoverflow review'];
return (
<ul>
{ todos.map(message => (<Item key={message} message={message} />)) }
</ul>
);
};
Note that JavaScript expressions can be mixed with other types of children.
Functions as Children
Normally, JavaScript expressions inserted in JSX will evaluate to a string, a React element, or a list of those things.
However, props.children works just like any other prop in that it can pass any sort of data, not just the sorts that
React knows how to render. For example, if you have a custom component, you could have it take a callback as
props.children:
const ListOfTenThings = () => (
<Repeat numTimes={10}>
{(index) => <div key={index}>This is item {index} in the list</div>}
</Repeat>
);
// Calls the children callback numTimes to produce a repeated component
const Repeat = ({ numTimes, children }) => {
let items = [];
for (let i = 0; i < numTimes; i++) {
items.push(children(i));
}
return <div>{items}</div>;
};
Children passed to a custom component can be anything, as long as that component transforms them into
something React can understand before rendering. This usage is not common, but it works if you want to stretch
what JSX is capable of.
Ignored Values
Note that false, null, undefined, and true are valid children. But they simply don't render. These JSX expressions](https://image.slidesharecdn.com/reacts-230807194016-d6297c01/85/Reacts-pdf-87-320.jpg)
![GoalKicker.com – React JS Notes for Professionals 85
Chapter 22: React Forms
Section 22.1: Controlled Components
A controlled component is bound to a value and its changes get handled in code using event based callbacks.
class CustomForm extends React.Component {
constructor() {
super();
this.state = {
person: {
firstName: '',
lastName: ''
}
}
}
handleChange(event) {
let person = this.state.person;
person[event.target.name] = event.target.value;
this.setState({person});
}
render() {
return (
<form>
<input
type="text"
name="firstName"
value={this.state.firstName}
onChange={this.handleChange.bind(this)} />
<input
type="text"
name="lastName"
value={this.state.lastName}
onChange={this.handleChange.bind(this)} />
</form>
)
}
}
In this example we initialize state with an empty person object. We then bind the values of the 2 inputs to the
individual keys of the person object. Then as the user types, we capture each value in the handleChange function.
Since the values of the components are bound to state we can rerender as the user types by calling setState().
NOTE: Not calling setState() when dealing with controlled components, will cause the user to type, but not see
the input because React only renders changes when it is told to do so.
It's also important to note that the names of the inputs are same as the names of the keys in the person object.
This allows us to capture the value in dictionary form as seen here.
handleChange(event) {
let person = this.state.person;
person[event.target.name] = event.target.value;
this.setState({person});](https://image.slidesharecdn.com/reacts-230807194016-d6297c01/85/Reacts-pdf-89-320.jpg)
![GoalKicker.com – React JS Notes for Professionals 86
}
person[event.target.name] is the same is a person.firstName || person.lastName. Of course this would
depend on which input is currently being typed in. Since we don't know where the user will be typing, using a
dictionary and matching the input names to the names of the keys, allows us to capture the user input no matter
where the onChange is being called from.](https://image.slidesharecdn.com/reacts-230807194016-d6297c01/85/Reacts-pdf-90-320.jpg)
![GoalKicker.com – React JS Notes for Professionals 88
Major differences from simple pane are:
panel has focus in instance when it is called by script or clicked by mouse;
panel has title static method per component, so it may be extended by other panel component with
overridden title (reason here is that function can be then called again on rendering for localization
purposes, but in bounds of this example title doesn't make sense);
it can contain individual stylesheet declared in css static method (you can pre-load file contents from
PANEL.css).
Section 23.3: Tab
import React from 'react';
class Tab extends React.Component {
constructor(props) {
super(props);
}
render() {
var props = Object.assign({
className: this.props.active ? 'active' : ''
}, this.props);
return React.createElement(
'li', props,
React.createElement(
'span', props,
props.panelClass.title()
)
);
}
}
panelClass property of Tab instance must contain class of panel used for description.
Section 23.4: PanelGroup
import React from 'react';
import Tab from './Tab.js';
class PanelGroup extends React.Component {
constructor(props) {
super(props);
this.setState({
panels: props.panels
});
}
render() {
this.tabSet = [];
this.panelSet = [];
for (let panelData of this.state.panels) {
var tabIsActive = this.state.activeTab == panelData.name;
this.tabSet.push(React.createElement(
Tab, {
name: panelData.name,
active: tabIsActive,
panelClass: panelData.class,
onMouseDown: () => this.openTab(panelData.name)
}](https://image.slidesharecdn.com/reacts-230807194016-d6297c01/85/Reacts-pdf-92-320.jpg)
![GoalKicker.com – React JS Notes for Professionals 90
panels: [
{
name: 'console',
panelClass: ConsolePanel
},
{
name: 'figures',
panelClass: FiguresPanel
}
],
activeTab: 'console'
}
)
),
React.createElement(
Pane, { id: 'side' },
React.createElement(
PanelGroup, {
panels: [
{
name: 'properties',
panelClass: PropertiesPanel
}
],
activeTab: 'properties'
}
)
)
);
}
}
class ConsolePanel extends Panel {
constructor(props) {
super(props);
}
static title() {
return 'Console';
}
}
class FiguresPanel extends Panel {
constructor(props) {
super(props);
}
static title() {
return 'Figures';
}
}
class PropertiesPanel extends Panel {
constructor(props) {
super(props);
}
static title() {
return 'Properties';
}
}](https://image.slidesharecdn.com/reacts-230807194016-d6297c01/85/Reacts-pdf-94-320.jpg)
![GoalKicker.com – React JS Notes for Professionals 92
Chapter 25: React, Webpack & TypeScript
installation
Section 25.1: webpack.config.js
module.exports = {
entry: './src/index',
output: {
path: __dirname + '/build',
filename: 'bundle.js'
},
module: {
rules: [{
test: /.tsx?$/,
loader: 'ts-loader',
exclude: /node_modules/
}]
},
resolve: {
extensions: ['.ts', '.tsx']
}
};
The main components are (in addition to the standard entry, output and other webpack properties):
The loader
For this you need to create a rule that tests for the .ts and .tsx file extensions, specify ts-loader as the loader.
Resolve TS extensions
You also need to add the .ts and .tsx extensions in the resolve array, or webpack won't see them.
Section 25.2: tsconfig.json
This is a minimal tsconfig to get you up and running.
{
"include": [
"src/*"
],
"compilerOptions": {
"target": "es5",
"jsx": "react",
"allowSyntheticDefaultImports": true
}
}
Let's go through the properties one by one:
include
This is an array of source code. Here we have only one entry, src/*, which specifies that everything in the src
directory is to be included in compilation.
compilerOptions.target](https://image.slidesharecdn.com/reacts-230807194016-d6297c01/85/Reacts-pdf-96-320.jpg)
![GoalKicker.com – React JS Notes for Professionals 93
Specifies that we want to compile to ES5 target
compilerOptions.jsx
Setting this to true will make TypeScript automatically compile your tsx syntax from <div /> to
React.createElement("div").
compilerOptions.allowSyntheticDefaultImports
Handy property which will allow you to import node modules as if they are ES6 modules, so instead of doing
import * as React from 'react'
const { Component } = React
you can just do
import React, { Component } from 'react'
without any errors telling you that React has no default export.
Section 25.3: My First Component
import React, { Component } from 'react';
import ReactDOM from 'react-dom';
interface AppProps {
name: string;
}
interface AppState {
words: string[];
}
class App extends Component<AppProps, AppState> {
constructor() {
super();
this.state = {
words: ['foo', 'bar']
};
}
render() {
const { name } = this.props;
return (<h1>Hello {name}!</h1>);
}
}
const root = document.getElementById('root');
ReactDOM.render(<App name="Foo Bar" />, root);
When using TypeScript with React, once you've downloaded the React DefinitelyTyped type definitions (npm
install --save @types/react), every component will require you to add type annotations.
You do this like so:
class App extends Component<AppProps, AppState> { }
where AppProps and AppState are interfaces (or type aliases) for your components' props and state respectively.](https://image.slidesharecdn.com/reacts-230807194016-d6297c01/85/Reacts-pdf-97-320.jpg)
![GoalKicker.com – React JS Notes for Professionals 94
Chapter 26: How and why to use keys in
React
Whenever you are rendering a list of React components, each component needs to have a key attribute. The key
can be any value, but it does need to be unique to that list.
When React has to render changes on a list of items, React just iterates over both lists of children at the same time
and generates a mutation whenever there's a difference. If there are no keys set for the children, React scans each
child. Otherwise, React compares the keys to know which were added or removed from the list
Section 26.1: Basic Example
For a class-less React component:
function SomeComponent(props){
const ITEMS = ['cat', 'dog', 'rat']
function getItemsList(){
return ITEMS.map(item => <li key={item}>{item}</i>);
}
return (
<ul>
{getItemsList()}
</ul>
);
}
For this example, the above component resolves to:
<ul>
<li key='cat'>cat</li>
<li key='dog'>dog</li>
<li key='rat'>rat</li>
<ul>](https://image.slidesharecdn.com/reacts-230807194016-d6297c01/85/Reacts-pdf-98-320.jpg)
![GoalKicker.com – React JS Notes for Professionals 95
Chapter 27: Keys in react
Keys in react are used to identify a list of DOM elements from the same hierarchy internally.
So if you are iterating over an array to show a list of li elements, each of the li elements needs a unique identifier
specified by the key property. This usually can be the id of your database item or the index of the array.
Section 27.1: Using the id of an element
Here we are having a list of todo items that is passed to the props of our component.
Each todo item has a text and id property. Imagine that the id property comes from a backend datastore and is a
unique numeric value:
todos = [
{
id: 1,
text: 'value 1'
},
{
id: 2,
text: 'value 2'
},
{
id: 3,
text: 'value 3'
},
{
id: 4,
text: 'value 4'
},
];
We set the key attribute of each iterated list element to todo-${todo.id} so that react can identify it internally:
render() {
const { todos } = this.props;
return (
<ul>
{ todos.map((todo) =>
<li key={ `todo-${todo.id}` }>
{ todo.text }
</li>
}
</ul>
);
}
Section 27.2: Using the array index
If you don't have unique database ids at hand, you could also use the numeric index of your array like this:
render() {
const { todos } = this.props;
return (
<ul>
{ todos.map((todo, index) =>](https://image.slidesharecdn.com/reacts-230807194016-d6297c01/85/Reacts-pdf-99-320.jpg)

![GoalKicker.com – React JS Notes for Professionals 101
exclude: /(node_modules)/,
loader: 'babel-loader',
query: {
presets: ['es2015', 'react']
}
}
]
}
};
This file tells webpack to start with the index.js file (assumed to be in src/ ) and convert it into a single bundle.js file
in the out directory.
The module block tells webpack to test all files encountered against the regular expression and if they match, will
invoke the specified loader. (babel-loader in this case) Furthermore, the exclude regex tells webpack to ignore this
special loader for all modules in the node_modules folder, this helps speed up the transpilation process. Lastly, the
query option tells webpack what parameters to pass to babel and is used to pass along the presets we installed
earlier.
Testing the setup
All that is left now is to create the src/index.js file and try packing the application
src/index.js:
'use strict'
import React from 'react'
import { render } from 'react-dom'
const App = () => {
return <h1>Hello world!</h1>
}
render(
<App />,
document. getElementById('app')
)
This file would normally render a simple <h1>Hello world!</h1> Header into the html tag with the id 'app', but for
now it should be enough to transpile the code once.
$./node_modules/.bin/webpack . Will execute the locally installed version of webpack (use $webpack if you
installed webpack globally with -g)
This should create the file out/bundle.js with the transpiled code inside and concludes the example.
Section A.2: Using webpack-dev-server
Setup
After setting up a simple project to use webpack, babel and react issuing $npm i -g webpack-dev-server will install
the development http server for quicker development.
Modifying webpack.config.js
var path = require('path');](https://image.slidesharecdn.com/reacts-230807194016-d6297c01/85/Reacts-pdf-105-320.jpg)
![GoalKicker.com – React JS Notes for Professionals 102
module.exports = {
entry: './src/index.js',
output: {
path: path.resolve(__dirname, 'out'),
publicPath: '/public/',
filename: 'bundle.js'
},
module: {
loaders: [
{
test: /.js$/,
exclude: /(node_modules)/,
loader: 'babel',
query: {
presets: ['es2015', 'react']
}
}
]
},
devServer: {
contentBase: path.resolve(__dirname, 'public'),
hot: true
}
};
The modifications are in
output.publicPath which sets up a path to have our bundle be served from (see Webpack configuration files
for more info)
devServer
contentBase the base path to serve static files from (for example index.html)
hot sets the webpack-dev-server to hot reload when changes get made to files on disk
And finally we just need a simple index.html to test our app in.
index.html:
<!DOCTYPE html>
<html lang="en">
<head>
<meta charset="utf-8">
<title>React Sandbox</title>
</head>
<body>
<div id="app" />
<script src="public/bundle.js"></script>
</body>
</html>
With this setup running $webpack-dev-server should start a local http server on port 8080 and upon connecting
should render a page containing a <h1>Hello world!</h1>.](https://image.slidesharecdn.com/reacts-230807194016-d6297c01/85/Reacts-pdf-106-320.jpg)