Downloaded 140 times


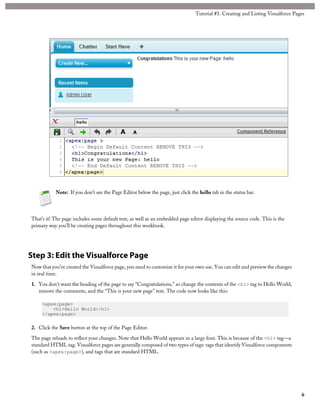


![2. Modify the getMyAccounts() method to read as follows:
public List<Account> getMyAccounts() {
return [SELECT Id, Name, AccountNumber FROM Account ORDER BY
LastModifiedDate DESC LIMIT 10];
}
3. Click Save.
Your page now displays the names of the 10 most recently modified accounts. The Visualforce expression {! myaccounts}
causes Visualforce to execute your getMyAccounts() method in the MyController class. That method returns a list of
account records, which is what the <apex:dataList> component iterates over.
Step 3: Add an Action Method to a Controller
In this lesson you add an action method, a method that is invoked when the user of your Visualforce page clicks on a button
or link. You previously used such a method, save(), on the standard controller—now you’ll write your own. The goal is to
modify the page to dynamically display a selected account record’s list of contacts.
1. Click MyController to edit the controller for your Visualforce page.
2. Below the line public class MyController { add the following two lines:
public Id selectedAccount { get; set; }
public List<Contact> contactsInformation { get; set; }
This creates two properties. The first, selectedAccount, is an identifier, while the second, contactsInformation,
is a list of Contact records.
3. Click AccountWithContacts to edit the Visualforce page, and add the following snippet just below the </apex:form>
line:
<apex:outputPanel id="ContactDetail">
<apex:repeat value="{! contactsInformation}" var="contact">
<p>{! contact.FirstName & ' ' & contact.LastName}</p>
</apex:repeat>
</apex:outputPanel>
This iterates over the list of contacts (remember, contactsInformation is defined to return List<Contact>),
displaying their first and last names.
At this point, you can save the page and you’ll notice no change. What you need to do now is ensure that when an account
name is clicked, the contactsInformation property is populated with that account record’s contacts.
4. Modify your controller by clicking MyController and adding the following before the final brace:
public void accountClicked() {
contactsInformation = [SELECT FirstName, LastName FROM Contact
WHERE AccountID = :selectedAccount];
}
41
Tutorial #13: Creating and Using Custom Controllers](https://image.slidesharecdn.com/workbookvf-130927071314-phpapp01/85/Visualforce-Workbook-43-320.jpg)


This document provides an overview and tutorials for Visualforce development. It introduces Visualforce pages and components, and provides step-by-step tutorials covering topics such as: - Creating and listing Visualforce pages - Adding attributes and using auto-suggest features - Understanding variables, formulas, and conditionals - Using standard controllers to display and manipulate data - Customizing the user interface with custom styles and components - Inputting data with forms - Reusing and templating pages - Creating custom Apex controllers and components The tutorials demonstrate building blocks for Visualforce like pages, components, controllers, and best practices for layout, styling, data handling, and reusability. The document is