Topics
Chapter 1: JavaFX Technology
• Introduction to MAD
• Trends,
• Various platforms,
• Introduction to smart phones
Chapter 2:
• Android platform features and architecture
• Versions
• ART(Android Runtime)
• ADB(Android Debug Bridge).
Chapter 3:
• Android studio and its working environment
• Gradle build system
• Emulator setup
• Application Framework Basics
-Resources , layout, values,
-Asset XML representation and
-Generated R.Javafile , Android manifest file.
-Creating a simple application
3.
JavaFX Technology
• JavaFXis a Java library used to develop Desktop applications
as well as Rich Internet Applications (RIA). The applications
built in JavaFX, can run on multiple platforms including Web,
Mobile and Desktops.
• JavaFX also provides its own components and doesn't
depend upon the operating system.
• It is lightweight and hardware accelerated. It supports
various operating systems including Windows, Linux and
Mac OS.
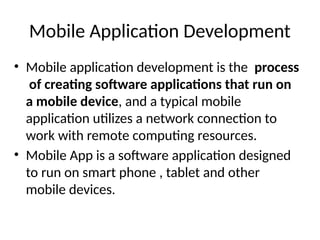
Mobile Application Development
•Mobile application development is the process
of creating software applications that run on
a mobile device, and a typical mobile
application utilizes a network connection to
work with remote computing resources.
• Mobile App is a software application designed
to run on smart phone , tablet and other
mobile devices.
6.
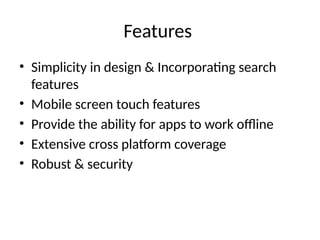
Features
• Simplicity indesign & Incorporating search
features
• Mobile screen touch features
• Provide the ability for apps to work offline
• Extensive cross platform coverage
• Robust & security
7.
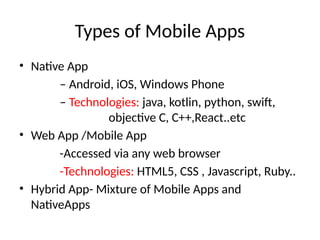
Types of MobileApps
• Native App
– Android, iOS, Windows Phone
– Technologies: java, kotlin, python, swift,
objective C, C++,React..etc
• Web App /Mobile App
-Accessed via any web browser
-Technologies: HTML5, CSS , Javascript, Ruby..
• Hybrid App- Mixture of Mobile Apps and
NativeApps
8.
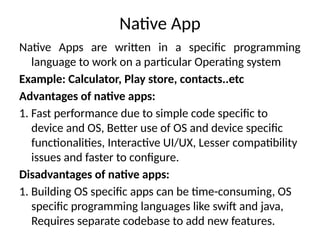
Native App
Native Appsare written in a specific programming
language to work on a particular Operating system
Example: Calculator, Play store, contacts..etc
Advantages of native apps:
1. Fast performance due to simple code specific to
device and OS, Better use of OS and device specific
functionalities, Interactive UI/UX, Lesser compatibility
issues and faster to configure.
Disadvantages of native apps:
1. Building OS specific apps can be time-consuming, OS
specific programming languages like swift and java,
Requires separate codebase to add new features.
9.
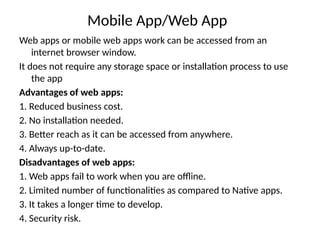
Mobile App/Web App
Webapps or mobile web apps work can be accessed from an
internet browser window.
It does not require any storage space or installation process to use
the app
Advantages of web apps:
1. Reduced business cost.
2. No installation needed.
3. Better reach as it can be accessed from anywhere.
4. Always up-to-date.
Disadvantages of web apps:
1. Web apps fail to work when you are offline.
2. Limited number of functionalities as compared to Native apps.
3. It takes a longer time to develop.
4. Security risk.
10.
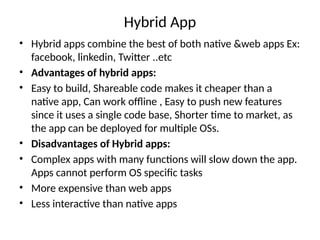
Hybrid App
• Hybridapps combine the best of both native &web apps Ex:
facebook, linkedin, Twitter ..etc
• Advantages of hybrid apps:
• Easy to build, Shareable code makes it cheaper than a
native app, Can work offline , Easy to push new features
since it uses a single code base, Shorter time to market, as
the app can be deployed for multiple OSs.
• Disadvantages of Hybrid apps:
• Complex apps with many functions will slow down the app.
Apps cannot perform OS specific tasks
• More expensive than web apps
• Less interactive than native apps
11.
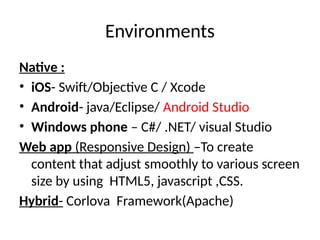
Environments
Native :
• iOS-Swift/Objective C / Xcode
• Android- java/Eclipse/ Android Studio
• Windows phone – C#/ .NET/ visual Studio
Web app (Responsive Design) –To create
content that adjust smoothly to various screen
size by using HTML5, javascript ,CSS.
Hybrid- Corlova Framework(Apache)
12.
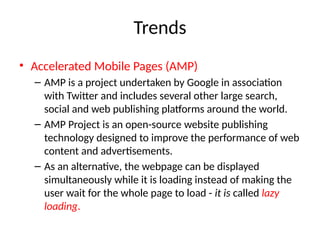
Trends
• Accelerated MobilePages (AMP)
– AMP is a project undertaken by Google in association
with Twitter and includes several other large search,
social and web publishing platforms around the world.
– AMP Project is an open-source website publishing
technology designed to improve the performance of web
content and advertisements.
– As an alternative, the webpage can be displayed
simultaneously while it is loading instead of making the
user wait for the whole page to load - it is called lazy
loading.
13.
Trends
• AR &VR Apps -Augmented Reality (AR) makes the real-life
environment around us into a digital interface by putting virtual
objects in real-time.
– With is technology, one could feel like they are inside the imaginary
world.
• Cloud-driven Mobile Apps
– A cloud-driven or cloud application is simply an mobile application that
runs on the server instead of your device.
– A cloud app will serve same features and characteristics as the pure
desktop or device app, but functions in the cloud storage.
• Enterprise Apps & Micro-apps
– In the world of mobile, a micro app is a consumer-oriented application
delivering highly targeted functionality (e.g. a weather forecast app).
14.
Trends
• Security InApps
– Your phone probably has sensitive information on
it, so it may be a good idea to install some security
software.
• Avast Mobile Security
• AVG (Anti-Virus Guard)
• Sophos Mobile Security
• Avira Antivirus
15.
Trends
• IoT Apps-
Amobile app is a medium between an IoT
device and a mobile phone. The app works as
the primary interface through which we can
manage smart things.
• Location Based Services
16.
Trends
• Wearable –fitnesswatches
• Mobile Wallets: Mobile wallets have simplified online payments
and made them accessible to everyone.
• Cloud-based Apps: Booking a cab ,ordering a food
• Beacon Technology: Retail stores can also use this to enable
cashless and queue-less checkouts.
• Artificial Intelligence and Machine Learning: Chat bots , Speech
Recognition, Text Prediction, financial forecasting
• Block Chain, 5G, Predictive Analytics, Foldable H/w friendly apps
17.
Mobile Application Development
Platforms(MADP)
•It is a type of software that allows a business
to rapidly build test and perhaps deploy
mobile apps for smart phones and tablets.
• Build your own application development
platform
• Buy one of the many third party products .
– Backend as a service, frontend development tools,
many tools for APIs
18.
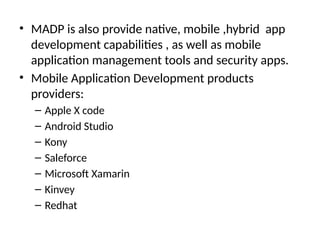
• MADP isalso provide native, mobile ,hybrid app
development capabilities , as well as mobile
application management tools and security apps.
• Mobile Application Development products
providers:
– Apple X code
– Android Studio
– Kony
– Saleforce
– Microsoft Xamarin
– Kinvey
– Redhat
19.
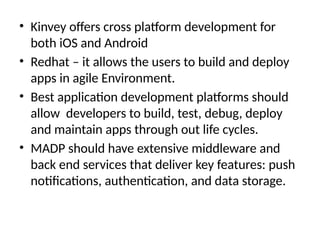
• Kinvey offerscross platform development for
both iOS and Android
• Redhat – it allows the users to build and deploy
apps in agile Environment.
• Best application development platforms should
allow developers to build, test, debug, deploy
and maintain apps through out life cycles.
• MADP should have extensive middleware and
back end services that deliver key features: push
notifications, authentication, and data storage.
20.
Cross platform mobileapp development
• It is a process of building hybrid or Web or
native apps that can run on multiple OS.
• A cross platform tool automatically generates
a code for the target OS
Smart phones
• Asmart phone is a mobile phone with more
advanced computing capabilities and
connectivity than basic feature phones.
• Combined features like PDA, Media player,
digital camera, GPS navigation unit.
23.
A BRIEF HISTORYOF SMARTPHONES
• The first smartphones, the IBM Simon and Nokia Communicator 9000 were
released way back in 1994 and 1996 respectively, and
• integrated the features of a mobile phone and a personal digital assistant (PDA)
for managing calendars and contacts. Both were much larger than regular
phones.
• It wasn’t until 2000 that the first real smartphone, the Ericsson R380, was
released.
• It wasn’t any larger than a regular phone, and in the early 2000s many others
followed suit, with phones like the Palm and BlackBerry achieving big success.
• In 2007, Apple released the iPhone, which eschewed hardware buttons for full
touchscreen control and has been the template for smartphones ever since
24.
A Smartphone can:
•Make voice calls
• Make video calls
• Access the internet and browse the web
• Take photos, and upload them to the web
• Navigate with GPS if the phone has GPS built-in
• Play back music and video stored on the phone
• Manage your contacts and appointments
• Send emails
• Play in-built games
• Run new applications and games downloaded from the
internet
Introduction
• Android isa open source linux based
operating system intended for mobile
computing platforms.
• It is a software stack for mobile operating
system.
• Android is under development by Google and
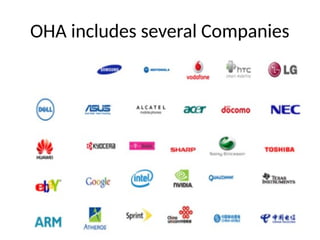
OHA(Open Handset Alliance)
• Android isa complete set of software for
mobile devices such as tablet computers,
notebooks, smart phones, electronic book
readers, set-top boxes etc
• The Android Platform was launched in 2007 by
the Open Handset Alliance, an alliance of
prominent companies that includes Google,
HTC, Motorola, Texas Instruments and others.
29.
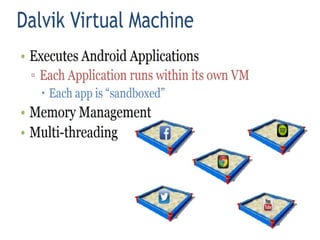
• the applicationsthat run on the Android
Platform are written in Java, there is no Java
Virtual Machine(JVM). Instead, the Java classes
are first compiled into what are known as
Dalvik Executables and run on the Dalvik
Virtual Machine(DVM).
• To create an application for the platform, a
developer requires the Android SDK, which
includes tools and APIs.
30.
• The SDKis supported in many environments including
Linux, Windows, and OS X and can be downloaded
free from http://developer. android.com.
• It contains a linux-based Operating
System, middleware and key mobile applications.
• It can be thought of as a mobile operating system.
But it is not limited to mobile only. It is currently used
in various devices such as mobiles, tablets, televisions
etc.
31.
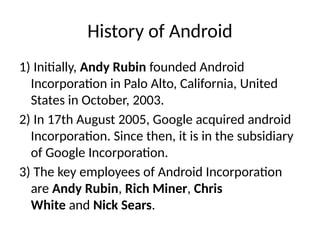
History of Android
1)Initially, Andy Rubin founded Android
Incorporation in Palo Alto, California, United
States in October, 2003.
2) In 17th August 2005, Google acquired android
Incorporation. Since then, it is in the subsidiary
of Google Incorporation.
3) The key employees of Android Incorporation
are Andy Rubin, Rich Miner, Chris
White and Nick Sears.
32.
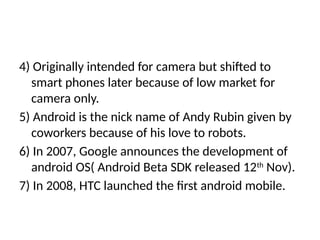
4) Originally intendedfor camera but shifted to
smart phones later because of low market for
camera only.
5) Android is the nick name of Andy Rubin given by
coworkers because of his love to robots.
6) In 2007, Google announces the development of
android OS( Android Beta SDK released 12th
Nov).
7) In 2008, HTC launched the first android mobile.
33.
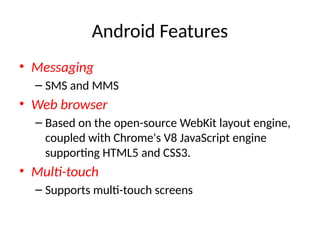
Android Features
• Messaging
–SMS and MMS
• Web browser
– Based on the open-source WebKit layout engine,
coupled with Chrome's V8 JavaScript engine
supporting HTML5 and CSS3.
• Multi-touch
– Supports multi-touch screens
34.
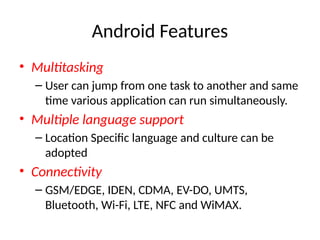
Android Features
• Multitasking
–User can jump from one task to another and same
time various application can run simultaneously.
• Multiple language support
– Location Specific language and culture can be
adopted
• Connectivity
– GSM/EDGE, IDEN, CDMA, EV-DO, UMTS,
Bluetooth, Wi-Fi, LTE, NFC and WiMAX.
35.
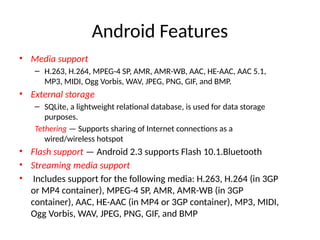
Android Features
• Mediasupport
– H.263, H.264, MPEG-4 SP, AMR, AMR-WB, AAC, HE-AAC, AAC 5.1,
MP3, MIDI, Ogg Vorbis, WAV, JPEG, PNG, GIF, and BMP.
• External storage
– SQLite, a lightweight relational database, is used for data storage
purposes.
Tethering — Supports sharing of Internet connections as a
wired/wireless hotspot
• Flash support — Android 2.3 supports Flash 10.1.Bluetooth
• Streaming media support
• Includes support for the following media: H.263, H.264 (in 3GP
or MP4 container), MPEG-4 SP, AMR, AMR-WB (in 3GP
container), AAC, HE-AAC (in MP4 or 3GP container), MP3, MIDI,
Ogg Vorbis, WAV, JPEG, PNG, GIF, and BMP
36.
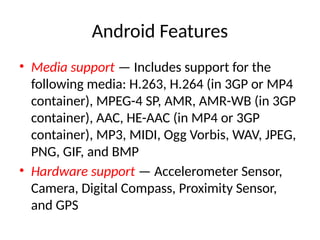
Android Features
• Mediasupport — Includes support for the
following media: H.263, H.264 (in 3GP or MP4
container), MPEG-4 SP, AMR, AMR-WB (in 3GP
container), AAC, HE-AAC (in MP4 or 3GP
container), MP3, MIDI, Ogg Vorbis, WAV, JPEG,
PNG, GIF, and BMP
• Hardware support — Accelerometer Sensor,
Camera, Digital Compass, Proximity Sensor,
and GPS
37.
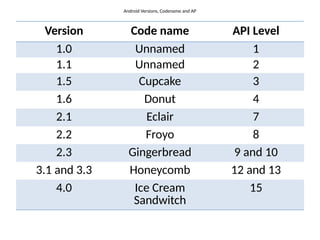
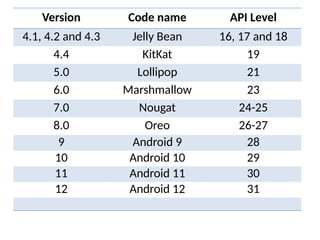
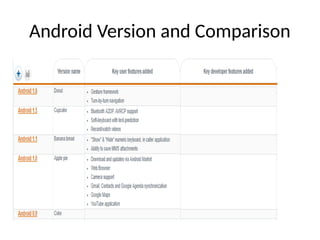
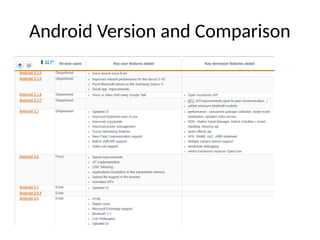
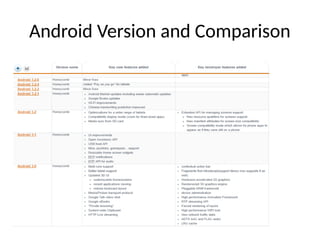
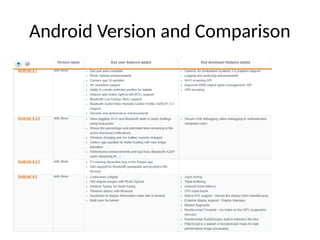
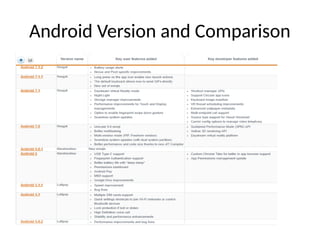
Android Versions, Codenameand AP
Version Code name API Level
1.0 Unnamed 1
1.1 Unnamed 2
1.5 Cupcake 3
1.6 Donut 4
2.1 Eclair 7
2.2 Froyo 8
2.3 Gingerbread 9 and 10
3.1 and 3.3 Honeycomb 12 and 13
4.0 Ice Cream
Sandwitch
15
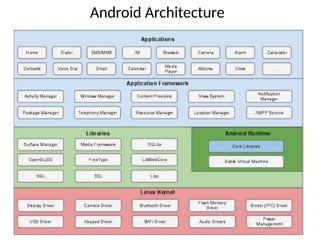
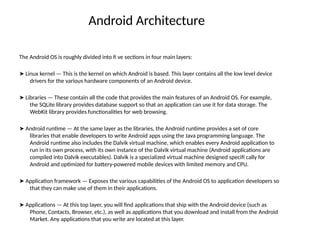
Android Architecture
The AndroidOS is roughly divided into fi ve sections in four main layers:
➤ Linux kernel — This is the kernel on which Android is based. This layer contains all the low level device
drivers for the various hardware components of an Android device.
➤ Libraries — These contain all the code that provides the main features of an Android OS. For example,
the SQLite library provides database support so that an application can use it for data storage. The
WebKit library provides functionalities for web browsing.
➤ Android runtime — At the same layer as the libraries, the Android runtime provides a set of core
libraries that enable developers to write Android apps using the Java programming language. The
Android runtime also includes the Dalvik virtual machine, which enables every Android application to
run in its own process, with its own instance of the Dalvik virtual machine (Android applications are
compiled into Dalvik executables). Dalvik is a specialized virtual machine designed specifi cally for
Android and optimized for battery-powered mobile devices with limited memory and CPU.
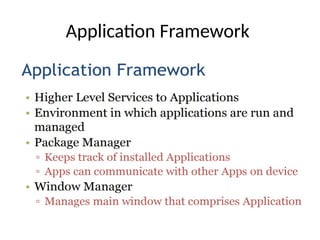
➤ Application framework — Exposes the various capabilities of the Android OS to application developers so
that they can make use of them in their applications.
➤ Applications — At this top layer, you will find applications that ship with the Android device (such as
Phone, Contacts, Browser, etc.), as well as applications that you download and install from the Android
Market. Any applications that you write are located at this layer.
47.
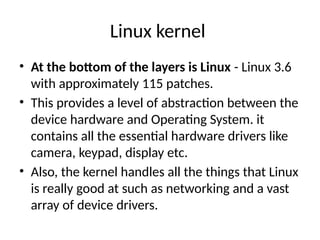
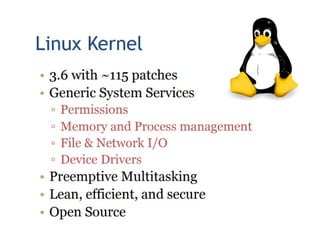
Linux kernel
• Atthe bottom of the layers is Linux - Linux 3.6
with approximately 115 patches.
• This provides a level of abstraction between the
device hardware and Operating System. it
contains all the essential hardware drivers like
camera, keypad, display etc.
• Also, the kernel handles all the things that Linux
is really good at such as networking and a vast
array of device drivers.
49.
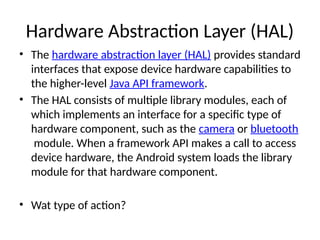
Hardware Abstraction Layer(HAL)
• The hardware abstraction layer (HAL) provides standard
interfaces that expose device hardware capabilities to
the higher-level Java API framework.
• The HAL consists of multiple library modules, each of
which implements an interface for a specific type of
hardware component, such as the camera or bluetooth
module. When a framework API makes a call to access
device hardware, the Android system loads the library
module for that hardware component.
• Wat type of action?
50.
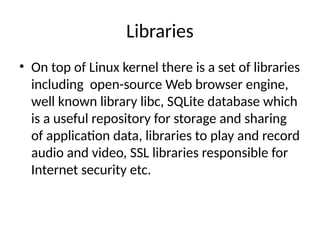
Libraries
• On topof Linux kernel there is a set of libraries
including open-source Web browser engine,
well known library libc, SQLite database which
is a useful repository for storage and sharing
of application data, libraries to play and record
audio and video, SSL libraries responsible for
Internet security etc.
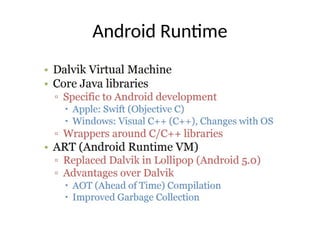
Android Runtime (ART)
•Android Runtime (ART) is an application runtime
environment used by the Android operating system.
• Replacing Dalvik, the process virtual machine originally
used by Android, ART performs the translation of the
application’s bytecode into native instructions that are
later executed by the device’s runtime environment.
(ART introduced in Android L).
• ART is software layer between applications and
operating system.
• It provide mechanism for executing java language.
60.
Android Runtime (ART)
•ART perform two major things to achieve this
– Runs Android framework and Applications using
hybrid model of Interpreter, JIT and profile based
Ahead of time compilation(AOT).
– Memory Management using Memory allocator
and Concurrent compacting Garbage collector.
61.
Android Debug Bridge(ADB)
•Android Debug Bridge (adb) is a versatile command-
line tool that lets you communicate with a device.
• The adb command facilitates a variety of device
actions, such as installing and debugging apps, and it
provides access to a Unix shell that you can use to
run a variety of commands on a device.
• It is a client-server program that includes three
components:
– A client, which sends commands. The client runs on your
development machine. You can invoke a client from a
command-line terminal by issuing an adb command.
62.
Android Debug Bridge(ADB)
–A daemon (adbd), which runs commands on a
device. The daemon runs as a background process
on each device.
– A server, which manages communication between
the client and the daemon. The server runs as a
background process on your development
machine.
63.
Android Studio Features
•Android Studio offers even more features that enhance
your productivity when building Android apps, such as:
– A flexible Gradle-based build system
– A fast and feature-rich emulator
– A unified environment where you can develop for all
Android devices
– Instant Run to push changes to your running app without
building a new APK
– Code templates and GitHub integration to help you build
common app features and import sample code
– Extensive testing tools and frameworks.
64.
Android Studio Features
–Lint tools to catch performance, usability, version
compatibility, and other problems
– C++ and NDK support
– Built-in support for Google Cloud Platform, making
it easy to integrate Google Cloud Messaging and
App Engine
65.
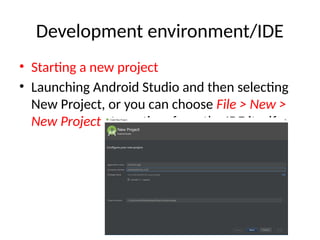
Development environment/IDE
• Startinga new project
• Launching Android Studio and then selecting
New Project, or you can choose File > New >
New Project at any time from the IDE itself.
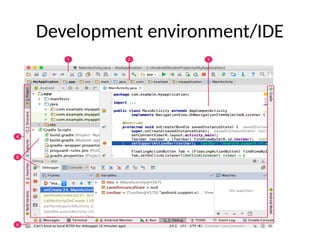
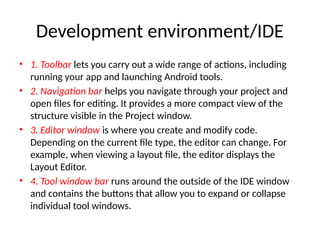
Development environment/IDE
• 1.Toolbar lets you carry out a wide range of actions, including
running your app and launching Android tools.
• 2. Navigation bar helps you navigate through your project and
open files for editing. It provides a more compact view of the
structure visible in the Project window.
• 3. Editor window is where you create and modify code.
Depending on the current file type, the editor can change. For
example, when viewing a layout file, the editor displays the
Layout Editor.
• 4. Tool window bar runs around the outside of the IDE window
and contains the buttons that allow you to expand or collapse
individual tool windows.
70.
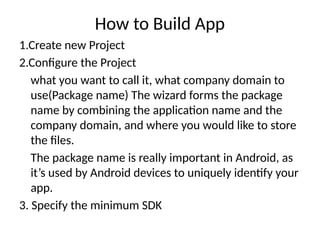
How to BuildApp
1.Create new Project
2.Configure the Project
what you want to call it, what company domain to
use(Package name) The wizard forms the package
name by combining the application name and the
company domain, and where you would like to store
the files.
The package name is really important in Android, as
it’s used by Android devices to uniquely identify your
app.
3. Specify the minimum SDK
71.
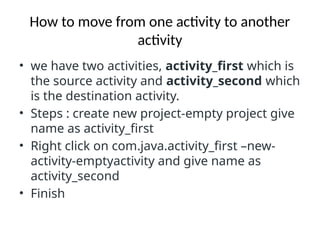
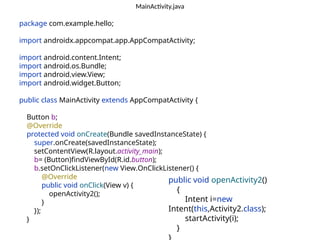
How to movefrom one activity to another
activity
• we have two activities, activity_first which is
the source activity and activity_second which
is the destination activity.
• Steps : create new project-empty project give
name as activity_first
• Right click on com.java.activity_first –new-
activity-emptyactivity and give name as
activity_second
• Finish
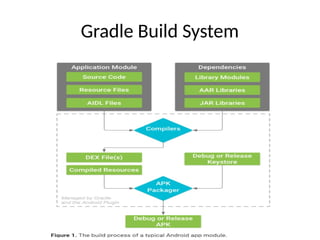
Gradle Build Systemcont..
• Android Studio uses Gradle, an advanced
build toolkit, to automate and manage
the build process, while allowing you to
define flexible custom build configurations.
• Each build configuration can define its
own set of code and resources, while
reusing the parts common to all versions
of your app.
79.
Gradle Build Systemcont..
• Android Studio supports Gradle for doing
the actual building of the app. There's a
class called BuildConfig. java which is
automatically generated by the build
system. This class is updated
automatically by Android's build system
(like the R class)
80.
• Every Androidproject needs a Gradle for
generating an apk (Android Application
Package)from the .java and .xml files in the
project.
• Simply put, a gradle takes all the source files
(java and XML) and applies appropriate
tools, e.g., converts the java files into dex
files and compresses all of them into a
single file known as apk that is actually used.
• There are two types of build.gradle scripts
• Top-level build.gradle
• Module-level build.gradle
81.
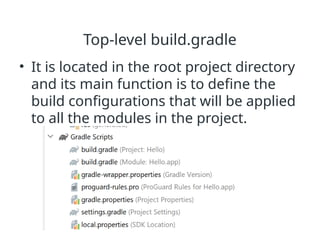
Top-level build.gradle
• Itis located in the root project directory
and its main function is to define the
build configurations that will be applied
to all the modules in the project.
82.
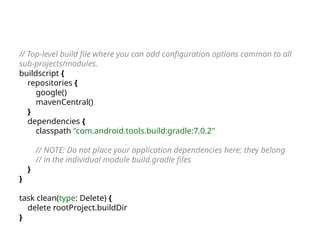
// Top-level buildfile where you can add configuration options common to all
sub-projects/modules.
buildscript {
repositories {
google()
mavenCentral()
}
dependencies {
classpath "com.android.tools.build:gradle:7.0.2"
// NOTE: Do not place your application dependencies here; they belong
// in the individual module build.gradle files
}
}
task clean(type: Delete) {
delete rootProject.buildDir
}
83.
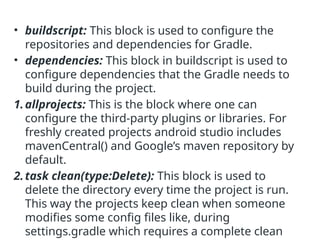
• buildscript: Thisblock is used to configure the
repositories and dependencies for Gradle.
• dependencies: This block in buildscript is used to
configure dependencies that the Gradle needs to
build during the project.
1.allprojects: This is the block where one can
configure the third-party plugins or libraries. For
freshly created projects android studio includes
mavenCentral() and Google’s maven repository by
default.
2.task clean(type:Delete): This block is used to
delete the directory every time the project is run.
This way the projects keep clean when someone
modifies some config files like, during
settings.gradle which requires a complete clean
84.
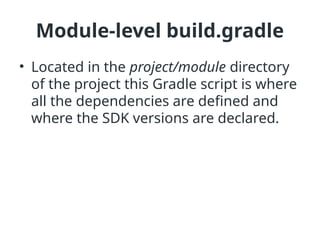
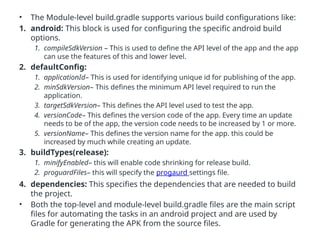
Module-level build.gradle
• Locatedin the project/module directory
of the project this Gradle script is where
all the dependencies are defined and
where the SDK versions are declared.
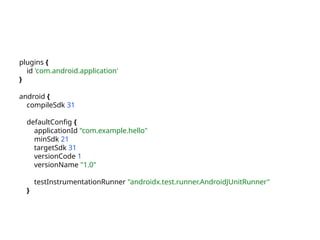
• The Module-levelbuild.gradle supports various build configurations like:
1. android: This block is used for configuring the specific android build
options.
1. compileSdkVersion – This is used to define the API level of the app and the app
can use the features of this and lower level.
2. defaultConfig:
1. applicationId– This is used for identifying unique id for publishing of the app.
2. minSdkVersion– This defines the minimum API level required to run the
application.
3. targetSdkVersion– This defines the API level used to test the app.
4. versionCode– This defines the version code of the app. Every time an update
needs to be of the app, the version code needs to be increased by 1 or more.
5. versionName– This defines the version name for the app. this could be
increased by much while creating an update.
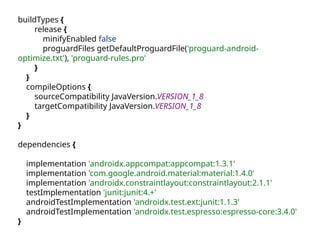
3. buildTypes(release):
1. minifyEnabled– this will enable code shrinking for release build.
2. proguardFiles– this will specify the progaurd settings file.
4. dependencies: This specifies the dependencies that are needed to build
the project.
• Both the top-level and module-level build.gradle files are the main script
files for automating the tasks in an android project and are used by
Gradle for generating the APK from the source files.
88.
Emulator Setup
• Theemulator lets you prototype, develop and test
Android applications without using a physical device.
• Creating AVD
– If you want to emulate a real device, first crate an AVD
with the same device configurations as real device, then
launch this AVD from AVD manager.
• Changing Orientation
– Usually by default when you launch the emulator, its
orientation is vertical, but you can change it orientation by
pressing Ctrl+F11 key from keyboard.
89.
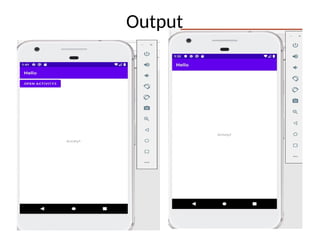
To start theemulator:
1.Open the AVD Manager.
2.Double-click an AVD, or click Run
3.The Android Emulator loads.
• While the emulator is running, you can
run Android Studio projects and choose
the emulator as the target device.
90.
Emulator Commands
• Home- Shifts to main screen
• F2 - Toggles context sensitive menu
• F3 - Bring out call log
• F4 - End call
• F5 - Search
• F6 - Toggle trackball mode
• F7 - Power button
• F8 - Toggle data network
• Ctrl+F5 - Ring Volume up
• Ctrl+F6 - Ring Volume down
91.
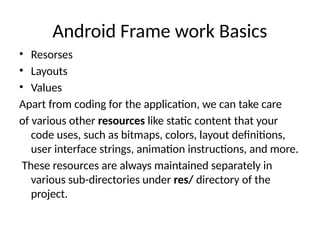
Android Frame workBasics
• Resorses
• Layouts
• Values
Apart from coding for the application, we can take care
of various other resources like static content that your
code uses, such as bitmaps, colors, layout definitions,
user interface strings, animation instructions, and more.
These resources are always maintained separately in
various sub-directories under res/ directory of the
project.
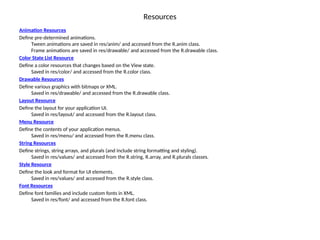
Resources
Animation Resources
Define pre-determinedanimations.
Tween animations are saved in res/anim/ and accessed from the R.anim class.
Frame animations are saved in res/drawable/ and accessed from the R.drawable class.
Color State List Resource
Define a color resources that changes based on the View state.
Saved in res/color/ and accessed from the R.color class.
Drawable Resources
Define various graphics with bitmaps or XML.
Saved in res/drawable/ and accessed from the R.drawable class.
Layout Resource
Define the layout for your application UI.
Saved in res/layout/ and accessed from the R.layout class.
Menu Resource
Define the contents of your application menus.
Saved in res/menu/ and accessed from the R.menu class.
String Resources
Define strings, string arrays, and plurals (and include string formatting and styling).
Saved in res/values/ and accessed from the R.string, R.array, and R.plurals classes.
Style Resource
Define the look and format for UI elements.
Saved in res/values/ and accessed from the R.style class.
Font Resources
Define font families and include custom fonts in XML.
Saved in res/font/ and accessed from the R.font class.
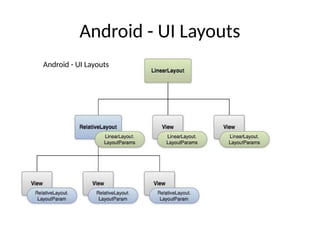
Android Layout Types
•Linear Layout is a view group that aligns all children in
a single direction, vertically or horizontally.
• Relative Layout is a view group that displays child
views in relative positions.
• Table Layout is a view that groups views into rows and
columns.
• Absolute Layout enables you to specify the exact
location of its children.
• Frame Layout is a placeholder on screen that you can
use to display a single view.
97.
Android Layout Types
•List View is a view group that displays a list of
scrollable items.
• Grid View is a View Group that displays items
in a two-dimensional, scrollable grid.
98.
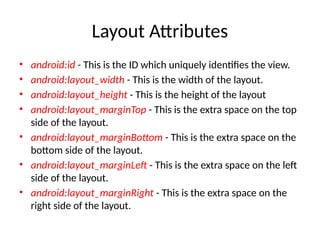
Layout Attributes
• android:id- This is the ID which uniquely identifies the view.
• android:layout_width - This is the width of the layout.
• android:layout_height - This is the height of the layout
• android:layout_marginTop - This is the extra space on the top
side of the layout.
• android:layout_marginBottom - This is the extra space on the
bottom side of the layout.
• android:layout_marginLeft - This is the extra space on the left
side of the layout.
• android:layout_marginRight - This is the extra space on the
right side of the layout.
99.
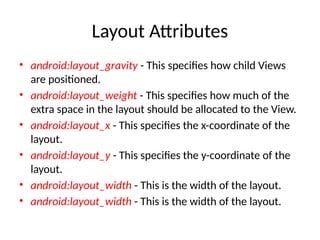
Layout Attributes
• android:layout_gravity- This specifies how child Views
are positioned.
• android:layout_weight - This specifies how much of the
extra space in the layout should be allocated to the View.
• android:layout_x - This specifies the x-coordinate of the
layout.
• android:layout_y - This specifies the y-coordinate of the
layout.
• android:layout_width - This is the width of the layout.
• android:layout_width - This is the width of the layout.
100.
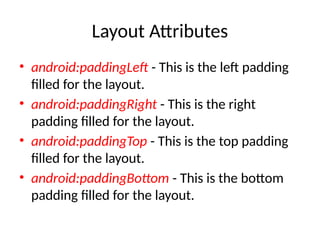
Layout Attributes
• android:paddingLeft- This is the left padding
filled for the layout.
• android:paddingRight - This is the right
padding filled for the layout.
• android:paddingTop - This is the top padding
filled for the layout.
• android:paddingBottom - This is the bottom
padding filled for the layout.
101.
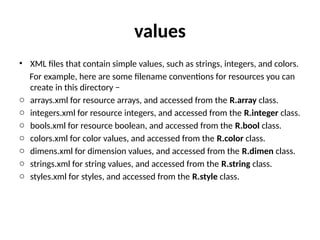
values
• XML filesthat contain simple values, such as strings, integers, and colors.
For example, here are some filename conventions for resources you can
create in this directory −
o arrays.xml for resource arrays, and accessed from the R.array class.
o integers.xml for resource integers, and accessed from the R.integer class.
o bools.xml for resource boolean, and accessed from the R.bool class.
o colors.xml for color values, and accessed from the R.color class.
o dimens.xml for dimension values, and accessed from the R.dimen class.
o strings.xml for string values, and accessed from the R.string class.
o styles.xml for styles, and accessed from the R.style class.
102.
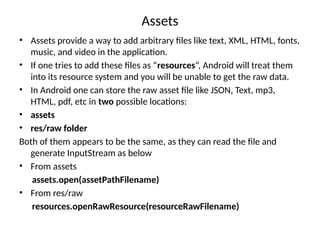
Assets
• Assets providea way to add arbitrary files like text, XML, HTML, fonts,
music, and video in the application.
• If one tries to add these files as “resources“, Android will treat them
into its resource system and you will be unable to get the raw data.
• In Android one can store the raw asset file like JSON, Text, mp3,
HTML, pdf, etc in two possible locations:
• assets
• res/raw folder
Both of them appears to be the same, as they can read the file and
generate InputStream as below
• From assets
assets.open(assetPathFilename)
• From res/raw
resources.openRawResource(resourceRawFilename)
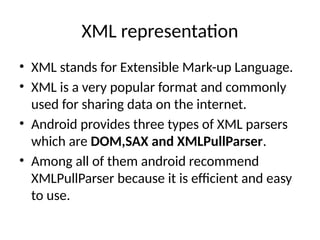
XML representation
• XMLstands for Extensible Mark-up Language.
• XML is a very popular format and commonly
used for sharing data on the internet.
• Android provides three types of XML parsers
which are DOM,SAX and XMLPullParser.
• Among all of them android recommend
XMLPullParser because it is efficient and easy
to use.
105.
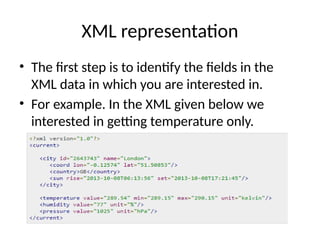
XML representation
• Thefirst step is to identify the fields in the
XML data in which you are interested in.
• For example. In the XML given below we
interested in getting temperature only.
106.
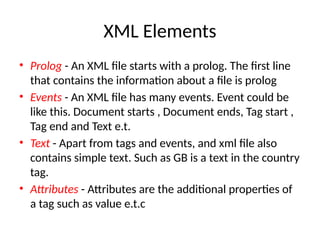
XML Elements
• Prolog- An XML file starts with a prolog. The first line
that contains the information about a file is prolog
• Events - An XML file has many events. Event could be
like this. Document starts , Document ends, Tag start ,
Tag end and Text e.t.
• Text - Apart from tags and events, and xml file also
contains simple text. Such as GB is a text in the country
tag.
• Attributes - Attributes are the additional properties of
a tag such as value e.t.c
107.
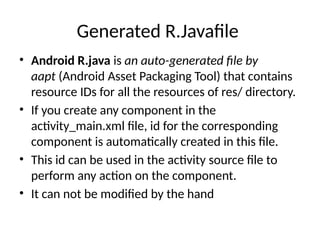
Generated R.Javafile
• AndroidR.java is an auto-generated file by
aapt (Android Asset Packaging Tool) that contains
resource IDs for all the resources of res/ directory.
• If you create any component in the
activity_main.xml file, id for the corresponding
component is automatically created in this file.
• This id can be used in the activity source file to
perform any action on the component.
• It can not be modified by the hand
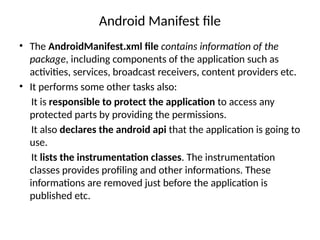
Android Manifest file
•The AndroidManifest.xml file contains information of the
package, including components of the application such as
activities, services, broadcast receivers, content providers etc.
• It performs some other tasks also:
It is responsible to protect the application to access any
protected parts by providing the permissions.
It also declares the android api that the application is going to
use.
It lists the instrumentation classes. The instrumentation
classes provides profiling and other informations. These
informations are removed just before the application is
published etc.
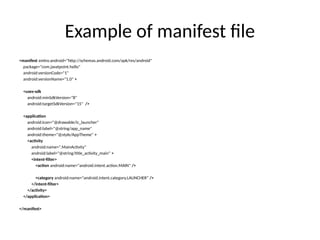
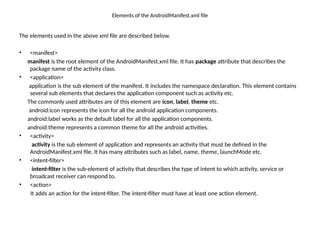
Elements of theAndroidManifest.xml file
The elements used in the above xml file are described below.
• <manifest>
manifest is the root element of the AndroidManifest.xml file. It has package attribute that describes the
package name of the activity class.
• <application>
application is the sub element of the manifest. It includes the namespace declaration. This element contains
several sub elements that declares the application component such as activity etc.
The commonly used attributes are of this element are icon, label, theme etc.
android:icon represents the icon for all the android application components.
android:label works as the default label for all the application components.
android:theme represents a common theme for all the android activities.
• <activity>
activity is the sub element of application and represents an activity that must be defined in the
AndroidManifest.xml file. It has many attributes such as label, name, theme, launchMode etc.
• <intent-filter>
intent-filter is the sub-element of activity that describes the type of intent to which activity, service or
broadcast receiver can respond to.
• <action>
It adds an action for the intent-filter. The intent-filter must have at least one action element.
112.
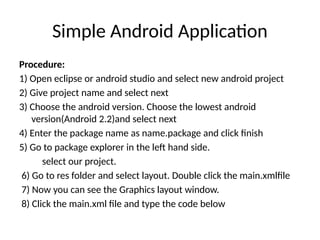
Simple Android Application
Procedure:
1)Open eclipse or android studio and select new android project
2) Give project name and select next
3) Choose the android version. Choose the lowest android
version(Android 2.2)and select next
4) Enter the package name as name.package and click finish
5) Go to package explorer in the left hand side.
select our project.
6) Go to res folder and select layout. Double click the main.xmlfile
7) Now you can see the Graphics layout window.
8) Click the main.xml file and type the code below
113.
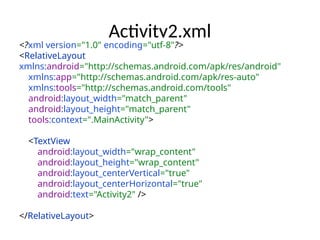
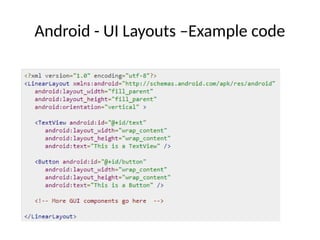
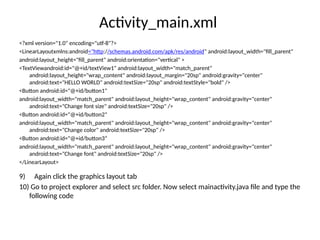
Activity_main.xml
<?xml version="1.0" encoding="utf-8"?>
<LinearLayoutxmlns:android="http://schemas.android.com/apk/res/android"android:layout_width="fill_parent"
android:layout_height="fill_parent" android:orientation="vertical" >
<TextViewandroid:id="@+id/textView1" android:layout_width="match_parent"
android:layout_height="wrap_content" android:layout_margin="20sp" android:gravity="center"
android:text="HELLO WORLD" android:textSize="20sp" android:textStyle="bold" />
<Button android:id="@+id/button1"
android:layout_width="match_parent" android:layout_height="wrap_content" android:gravity="center"
android:text="Change font size" android:textSize="20sp" />
<Button android:id="@+id/button2"
android:layout_width="match_parent" android:layout_height="wrap_content" android:gravity="center"
android:text="Change color" android:textSize="20sp" />
<Button android:id="@+id/button3“
android:layout_width="match_parent" android:layout_height="wrap_content" android:gravity="center"
android:text="Change font" android:textSize="20sp" />
</LinearLayout>
9) Again click the graphics layout tab
10) Go to project explorer and select src folder. Now select mainactivity.java file and type the
following code
114.
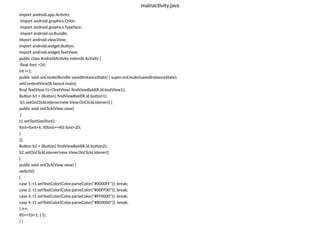
mainactivity.java
import android.app.Activity;
import android.graphics.Color;
importandroid.graphics.Typeface;
import android.os.Bundle;
import android.view.View;
import android.widget.Button;
import android.widget.TextView;
public class AndroidActivity extends Activity {
float font =24;
int i=1;
public void onCreate(Bundle savedInstanceState) { super.onCreate(savedInstanceState);
setContentView(R.layout.main);
final TextView t1=(TextView) findViewById(R.id.textView1);
Button b1 = (Button) findViewById(R.id.button1);
b1.setOnClickListener(new View.OnClickListener() {
public void onClick(View view)
{
t1.setTextSize(font);
font=font+4; if(font==40) font=20;
}
});
Button b2 = (Button) findViewById(R.id.button2);
b2.setOnClickListener(new View.OnClickListener()
{
public void onClick(View view) {
switch(i)
{
case 1: t1.setTextColor(Color.parseColor("#0000FF")); break;
case 2: t1.setTextColor(Color.parseColor("#00FF00")); break;
case 3: t1.setTextColor(Color.parseColor("#FF0000")); break;
case 4: t1.setTextColor(Color.parseColor("#800000")); break;
} i++;
if(i==5)i=1; } });
} }
115.
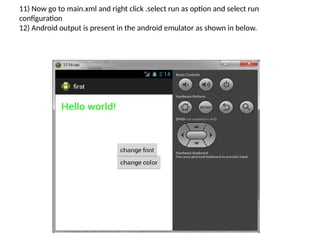
11) Now goto main.xml and right click .select run as option and select run
configuration
12) Android output is present in the android emulator as shown in below.