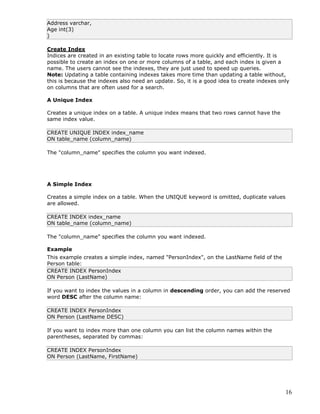
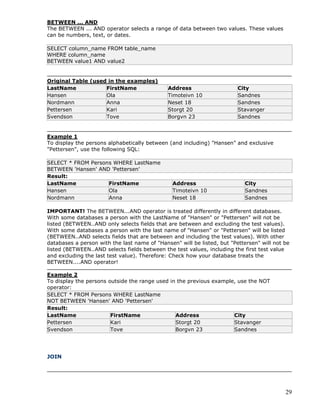
This document provides an overview of databases and Microsoft Access. It defines key database concepts like records, fields, and data types. It explains how to start Microsoft Access and create new or open existing databases, including using the database wizard or creating a blank database. It also introduces some common Microsoft Access objects like tables, forms, and reports. The document serves as an introduction to working with databases in Microsoft Access.
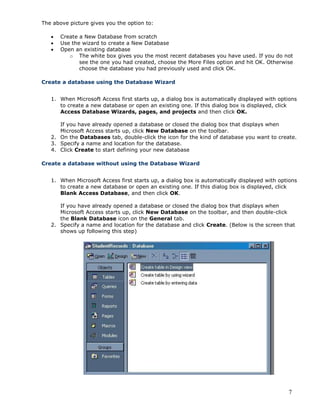
A Relational Database Management System (RDBMS) is a server that manages data for you. The data is structured into tables, where each table has some number of columns, each of which has a name and a type. For example, to keep track of James Bond movies, we might have a “movies” table that records the title (a string), year of release (a number), and the actor who played Bond in each movie (an index into a table of Bond actors).
Discussion post· The proper implementation of a database is es.docxmadlynplamondon
Discussion post
· The proper implementation of a database is essential to the success of the data performance functions of an organization. Identify and evaluate at least three considerations that one must plan for when designing a database.
· Suggest at least two types of databases that would be useful for small businesses, two types for regional level organizations and two types for international companies. Include your rationale for each suggestion.
LP’s post states the following:Top of Form
Question:
The proper implementation of a database is essential to the success of the data performance functions of an organization. Identify and evaluate at least three considerations that one must plan for when designing a database.
Answer:
Planning is the most significant aspect of database design, and here is where most projects for database design will fail because the database does not meet requirements, does not meet expectations, or are just unmanageable. Here you need to be forward-thinking by planning for the future. What information needs to be stored or what things or entities do we need to store information about (Knauff, 2004)? What questions will we need to ask of the database (Knauff, 2004)?
A well-designed database promotes consistent data entry and retrieval and reduces the existence of duplication among the database tables. Relational database tables work together to ensure that the correct data is available when you need it.
The first consideration should be what is the database’s intended purpose. Understanding the purpose will help define the need. Some examples might be “to keep a list of customers,” “to manage inventory,” or “to grade students (Filemaker Staff, n.d.).” All stakeholders need to be involved in this process.
Second is Data integrity. Is the data accurate, consistent, and complete? What kind of categories does the data align with? Identifying these categories is critical to designing an efficient database because different types and amounts of data in each category will be stored. Some example categories might be sales that track “customers,” “products,” and “invoices,” or grades that track “students,” “classes,” and “assignments (Filemaker Staff, n.d.).” Once the categories have been defined the relations can be determined. A good exercise to help with this is to write these out in simple sentences:
“customers order products” and “invoices record customers’ orders.”
Now the organization of the data can begin. The categories above can be used as tables so common data can be grouped.
The third is security. Is the database secure? Will the current policy and rules be sufficient going forward? Who should have access? Who should have access to which tables (Nield, 2016)? Read-only access? Write access? Is this database critical to business operations (Nield, 2016)? What are the D&R plans?
Excessive security creates excessive red tape and obstructs agility, but insufficient security will invite catastrophe (Nield, 2016 ...
MICROSOFT ACCESS 2016Basics-Handouts and LESSON Introduction.pdfJoshCasas1
Microsoft Access is a software application that could help students to create databases and organize data using database tools like, reports, modules, tables and queries. Database Relational is a tool that could organize the data by its relationship (One is to One, One is to Many and Many is to Many.
Search and Society: Reimagining Information Access for Radical FuturesBhaskar Mitra
The field of Information retrieval (IR) is currently undergoing a transformative shift, at least partly due to the emerging applications of generative AI to information access. In this talk, we will deliberate on the sociotechnical implications of generative AI for information access. We will argue that there is both a critical necessity and an exciting opportunity for the IR community to re-center our research agendas on societal needs while dismantling the artificial separation between the work on fairness, accountability, transparency, and ethics in IR and the rest of IR research. Instead of adopting a reactionary strategy of trying to mitigate potential social harms from emerging technologies, the community should aim to proactively set the research agenda for the kinds of systems we should build inspired by diverse explicitly stated sociotechnical imaginaries. The sociotechnical imaginaries that underpin the design and development of information access technologies needs to be explicitly articulated, and we need to develop theories of change in context of these diverse perspectives. Our guiding future imaginaries must be informed by other academic fields, such as democratic theory and critical theory, and should be co-developed with social science scholars, legal scholars, civil rights and social justice activists, and artists, among others.
JMeter webinar - integration with InfluxDB and GrafanaRTTS
Watch this recorded webinar about real-time monitoring of application performance. See how to integrate Apache JMeter, the open-source leader in performance testing, with InfluxDB, the open-source time-series database, and Grafana, the open-source analytics and visualization application.
In this webinar, we will review the benefits of leveraging InfluxDB and Grafana when executing load tests and demonstrate how these tools are used to visualize performance metrics.
Length: 30 minutes
Session Overview
-------------------------------------------
During this webinar, we will cover the following topics while demonstrating the integrations of JMeter, InfluxDB and Grafana:
- What out-of-the-box solutions are available for real-time monitoring JMeter tests?
- What are the benefits of integrating InfluxDB and Grafana into the load testing stack?
- Which features are provided by Grafana?
- Demonstration of InfluxDB and Grafana using a practice web application
To view the webinar recording, go to:
https://www.rttsweb.com/jmeter-integration-webinar
Connector Corner: Automate dynamic content and events by pushing a buttonDianaGray10
Here is something new! In our next Connector Corner webinar, we will demonstrate how you can use a single workflow to:
Create a campaign using Mailchimp with merge tags/fields
Send an interactive Slack channel message (using buttons)
Have the message received by managers and peers along with a test email for review
But there’s more:
In a second workflow supporting the same use case, you’ll see:
Your campaign sent to target colleagues for approval
If the “Approve” button is clicked, a Jira/Zendesk ticket is created for the marketing design team
But—if the “Reject” button is pushed, colleagues will be alerted via Slack message
Join us to learn more about this new, human-in-the-loop capability, brought to you by Integration Service connectors.
And...
Speakers:
Akshay Agnihotri, Product Manager
Charlie Greenberg, Host
Epistemic Interaction - tuning interfaces to provide information for AI supportAlan Dix
Paper presented at SYNERGY workshop at AVI 2024, Genoa, Italy. 3rd June 2024
https://alandix.com/academic/papers/synergy2024-epistemic/
As machine learning integrates deeper into human-computer interactions, the concept of epistemic interaction emerges, aiming to refine these interactions to enhance system adaptability. This approach encourages minor, intentional adjustments in user behaviour to enrich the data available for system learning. This paper introduces epistemic interaction within the context of human-system communication, illustrating how deliberate interaction design can improve system understanding and adaptation. Through concrete examples, we demonstrate the potential of epistemic interaction to significantly advance human-computer interaction by leveraging intuitive human communication strategies to inform system design and functionality, offering a novel pathway for enriching user-system engagements.
Accelerate your Kubernetes clusters with Varnish CachingThijs Feryn
A presentation about the usage and availability of Varnish on Kubernetes. This talk explores the capabilities of Varnish caching and shows how to use the Varnish Helm chart to deploy it to Kubernetes.
This presentation was delivered at K8SUG Singapore. See https://feryn.eu/presentations/accelerate-your-kubernetes-clusters-with-varnish-caching-k8sug-singapore-28-2024 for more details.
Software Delivery At the Speed of AI: Inflectra Invests In AI-Powered QualityInflectra
In this insightful webinar, Inflectra explores how artificial intelligence (AI) is transforming software development and testing. Discover how AI-powered tools are revolutionizing every stage of the software development lifecycle (SDLC), from design and prototyping to testing, deployment, and monitoring.
Learn about:
• The Future of Testing: How AI is shifting testing towards verification, analysis, and higher-level skills, while reducing repetitive tasks.
• Test Automation: How AI-powered test case generation, optimization, and self-healing tests are making testing more efficient and effective.
• Visual Testing: Explore the emerging capabilities of AI in visual testing and how it's set to revolutionize UI verification.
• Inflectra's AI Solutions: See demonstrations of Inflectra's cutting-edge AI tools like the ChatGPT plugin and Azure Open AI platform, designed to streamline your testing process.
Whether you're a developer, tester, or QA professional, this webinar will give you valuable insights into how AI is shaping the future of software delivery.
Key Trends Shaping the Future of Infrastructure.pdfCheryl Hung
Keynote at DIGIT West Expo, Glasgow on 29 May 2024.
Cheryl Hung, ochery.com
Sr Director, Infrastructure Ecosystem, Arm.
The key trends across hardware, cloud and open-source; exploring how these areas are likely to mature and develop over the short and long-term, and then considering how organisations can position themselves to adapt and thrive.
GDG Cloud Southlake #33: Boule & Rebala: Effective AppSec in SDLC using Deplo...James Anderson
Effective Application Security in Software Delivery lifecycle using Deployment Firewall and DBOM
The modern software delivery process (or the CI/CD process) includes many tools, distributed teams, open-source code, and cloud platforms. Constant focus on speed to release software to market, along with the traditional slow and manual security checks has caused gaps in continuous security as an important piece in the software supply chain. Today organizations feel more susceptible to external and internal cyber threats due to the vast attack surface in their applications supply chain and the lack of end-to-end governance and risk management.
The software team must secure its software delivery process to avoid vulnerability and security breaches. This needs to be achieved with existing tool chains and without extensive rework of the delivery processes. This talk will present strategies and techniques for providing visibility into the true risk of the existing vulnerabilities, preventing the introduction of security issues in the software, resolving vulnerabilities in production environments quickly, and capturing the deployment bill of materials (DBOM).
Speakers:
Bob Boule
Robert Boule is a technology enthusiast with PASSION for technology and making things work along with a knack for helping others understand how things work. He comes with around 20 years of solution engineering experience in application security, software continuous delivery, and SaaS platforms. He is known for his dynamic presentations in CI/CD and application security integrated in software delivery lifecycle.
Gopinath Rebala
Gopinath Rebala is the CTO of OpsMx, where he has overall responsibility for the machine learning and data processing architectures for Secure Software Delivery. Gopi also has a strong connection with our customers, leading design and architecture for strategic implementations. Gopi is a frequent speaker and well-known leader in continuous delivery and integrating security into software delivery.
Essentials of Automations: Optimizing FME Workflows with ParametersSafe Software
Are you looking to streamline your workflows and boost your projects’ efficiency? Do you find yourself searching for ways to add flexibility and control over your FME workflows? If so, you’re in the right place.
Join us for an insightful dive into the world of FME parameters, a critical element in optimizing workflow efficiency. This webinar marks the beginning of our three-part “Essentials of Automation” series. This first webinar is designed to equip you with the knowledge and skills to utilize parameters effectively: enhancing the flexibility, maintainability, and user control of your FME projects.
Here’s what you’ll gain:
- Essentials of FME Parameters: Understand the pivotal role of parameters, including Reader/Writer, Transformer, User, and FME Flow categories. Discover how they are the key to unlocking automation and optimization within your workflows.
- Practical Applications in FME Form: Delve into key user parameter types including choice, connections, and file URLs. Allow users to control how a workflow runs, making your workflows more reusable. Learn to import values and deliver the best user experience for your workflows while enhancing accuracy.
- Optimization Strategies in FME Flow: Explore the creation and strategic deployment of parameters in FME Flow, including the use of deployment and geometry parameters, to maximize workflow efficiency.
- Pro Tips for Success: Gain insights on parameterizing connections and leveraging new features like Conditional Visibility for clarity and simplicity.
We’ll wrap up with a glimpse into future webinars, followed by a Q&A session to address your specific questions surrounding this topic.
Don’t miss this opportunity to elevate your FME expertise and drive your projects to new heights of efficiency.
Neuro-symbolic is not enough, we need neuro-*semantic*Frank van Harmelen
Neuro-symbolic (NeSy) AI is on the rise. However, simply machine learning on just any symbolic structure is not sufficient to really harvest the gains of NeSy. These will only be gained when the symbolic structures have an actual semantics. I give an operational definition of semantics as “predictable inference”.
All of this illustrated with link prediction over knowledge graphs, but the argument is general.
Builder.ai Founder Sachin Dev Duggal's Strategic Approach to Create an Innova...Ramesh Iyer
In today's fast-changing business world, Companies that adapt and embrace new ideas often need help to keep up with the competition. However, fostering a culture of innovation takes much work. It takes vision, leadership and willingness to take risks in the right proportion. Sachin Dev Duggal, co-founder of Builder.ai, has perfected the art of this balance, creating a company culture where creativity and growth are nurtured at each stage.
Leading Change strategies and insights for effective change management pdf 1.pdf
MicrosoftAccessHandout.doc
1.
2. 2
Table of Contents
Introduction to Databases .................................................................................................... 3
Microsoft Access Description................................................................................................ 5
Starting Microsoft Access...................................................................................................... 5
Creating New, and Opening Existing Databases.......................................................... 6
Create a database using the Database Wizard ............................................................ 7
Create a database without using the Database Wizard............................................ 7
Create a Table from scratch in Design view.................................................................. 8
Primary Key................................................................................................................................ 9
Switching Views ...................................................................................................................... 10
Entering Data........................................................................................................................... 10
Manipulating Data.................................................................................................................. 10
Advanced Table Features w/Microsoft Access ............................................................ 11
Relationships............................................................................................................................ 12
Forms.......................................................................................................................................... 13
Create a Form using the Wizard....................................................................................... 13
Reports....................................................................................................................................... 14
Create a Report using the Wizard ................................................................................... 14
SQL Statements...................................................................................................................... 14
Create Database, Table, and Index ................................................................................ 15
INSERT INTO Statement ..................................................................................................... 17
Drop Index, Table and Database ..................................................................................... 18
ALTER TABLE............................................................................................................................ 18
SELECT Statement................................................................................................................. 19
WHERE Clause......................................................................................................................... 21
UPDATE Statement................................................................................................................ 23
DELETE Statement................................................................................................................. 24
ORDER BY.................................................................................................................................. 25
AND & OR.................................................................................................................................. 27
IN.................................................................................................................................................. 28
BETWEEN................................................................................................................................... 28
JOIN............................................................................................................................................. 29
Functions ................................................................................................................................... 31
GROUP BY and HAVING....................................................................................................... 32
3. 3
Introduction to Databases
Figure 1-1. Similar to a file cabinet...
In its simplest form, a database is a collection of information that is organized into a list and
stored in a manner similar to a file cabinet, as seen in Figure 1-1. Whenever you make a list
of information, such as names, addresses, products, or invoices, you are, in fact, creating a
database. Technically speaking, you don't even have to use a database program to create a
database. You can make a list of information in all kinds of programs, such as Microsoft
Excel or Word; Even the meek and lowly Notepad program!
A database program, however, is much more powerful than a simple list you keep on paper
or in a Microsoft Word document. A database program lets you:
Store Information: A database stores lists of information that are related to a
particular subject or purpose. It could be a list of aunt Mildred's home recipes, or
business information, such as a list of hundreds of thousands of customers. A
database also makes it easy to add, update, organize, and delete information.
Find Information: You can easily and instantly locate information stored in a
database. For example, you can find all the customers with the last name "Johnson"
or all the customers who live in the 55417 zip code and are older than 65.
Analyze and Print Information: You can perform calculations on information in a
database. For example, you could calculate what percent of your total sales comes
from the state of Texas. You can also present information in a professional-looking
printed report.
Manage Information: Databases make it easy to work with and manage huge
amounts of information. For example, with a few keystrokes you can change the
area code for hundreds of customers in the (612) area code to a new (817) area
code.
Share Information: Most database programs (including Microsoft Access) allow more
than one user to view and work with the same information at once. Such databases
are called databases.
4. 4
Databases usually consist of several parts. A Microsoft Access database may contain up to
seven different database object types. The following figure identifies the database objects
you can use when creating a Microsoft Access database. Some objects you will use all the
time (such as Tables), others you will hardly use (such as Modules).
DATA Dictionary
In database management systems, a file that defines the basic organization of a database.
A data dictionary contains a list of all files in the database, the number of records in each
file, and the names and types of each field.
RECORD
A group of fields in a row make up a record.
SQL
Structured Query Language
SQL is a standard interactive and programming language for getting information from and
updating a database.
5. 5
Microsoft Access Description
Microsoft Access is a powerful program to create and manage your databases. It has
many built in features to assist you in constructing and viewing your information. Access
is much more involved and is a more genuine database application than other programs
such as Microsoft Works.
This tutorial will help you get started with Microsoft Access and may solve some of your
problems, but it is a very good idea to use the Help Files that come with Microsoft
Access, or go to Microsoft's web site located at
http://microsoft.com/office/access/default.htm for further assistance.
First of all you need to understand how Microsoft Access breaks down a database. Some
keywords involved in this process are: Database File, Table, Record, Field, Data-type.
Here is the Hierarchy that Microsoft Access uses in breaking down a database.
Database File: This is your main file that encompasses the
entire database and that is saved to your hard-drive or
floppy disk.
Example) StudentDatabase.mdb
Table:A table is a collection of data about a specific topic.
There can be multiple tables in a database.
Example #1) Students
Example #2) Teachers
Field:Fields are the different categories within a Table.
Tables usually contain multiple fields.
Example #1) Student LastName
Example #2) Student FirstName
Datatypes:Datatypes are the properties of each field. A
field only has 1 datatype.
FieldName) Student LastName
Datatype) Text
Starting Microsoft Access
Two Ways
1. Double click on the Microsoft Access icon on the desktop.
6. 6
2. Click on Start --> Programs --> Microsoft Access
Creating New, and Opening Existing Databases
7. 7
The above picture gives you the option to:
Create a New Database from scratch
Use the wizard to create a New Database
Open an existing database
o The white box gives you the most recent databases you have used. If you do not
see the one you had created, choose the More Files option and hit OK. Otherwise
choose the database you had previously used and click OK.
Create a database using the Database Wizard
1. When Microsoft Access first starts up, a dialog box is automatically displayed with options
to create a new database or open an existing one. If this dialog box is displayed, click
Access Database Wizards, pages, and projects and then click OK.
If you have already opened a database or closed the dialog box that displays when
Microsoft Access starts up, click New Database on the toolbar.
2. On the Databases tab, double-click the icon for the kind of database you want to create.
3. Specify a name and location for the database.
4. Click Create to start defining your new database
Create a database without using the Database Wizard
1. When Microsoft Access first starts up, a dialog box is automatically displayed with options
to create a new database or open an existing one. If this dialog box is displayed, click
Blank Access Database, and then click OK.
If you have already opened a database or closed the dialog box that displays when
Microsoft Access starts up, click New Database on the toolbar, and then double-click
the Blank Database icon on the General tab.
2. Specify a name and location for the database and click Create. (Below is the screen that
shows up following this step)
8. 8
Tables
A table is a collection of data about a specific topic, such as students or contacts. Using a
separate table for each topic means that you store that data only once, which makes your
database more efficient, and reduces data-entry errors.
Tables organize data into columns (called fields) and rows (called records).
Create a Table from scratch in Design view
1. If you haven't already done so, switch to the Database Window You can press F11 to
switch to the Database window from any other window.
2. Double-Click on "Create table in Design view".
(DESIGN VIEW)
9. 9
3. Define each of the fields in your table.
o Under the Field Name column, enter the categories of your table.
o Under Data Type column, enter the type you want for you categories.
The attribute of a variable or field that determines what kind of data it can
hold. For example, in a Microsoft Access database, the Text and Memo field
data types allow the field to store either text or numbers, but the Number
data type will allow the field to store numbers only. Number data type
fields store numerical data that will be used in mathematical calculations.
Use the Currency data type to display or calculate currency values. Other
data types are Date/Time, Yes/No, Auto Number, and OLE object (Picture).
o Under the Description column, enter the text that describes what you field is.
(This field is optional).
o For our tutorial enter the following items:
Primary Key
One or more fields (columns) whose value or values uniquely identify each record in a
table. A primary key does not allow Null values and must always have a unique value. A
primary key is used to relate a table to foreign keys in other tables.
NOTE: You do not have to define a primary key, but it's usually a good idea. If you don't
define a primary key, Microsoft Access asks you if you would like to create one when you
save the table.
For our tutorial, make the Soc Sec # field the primary key, meaning that every student
has a social security number and no 2 are the same.
10. 10
o To do this, simply select the Soc Sec # field and select the primary key button
o After you do this, Save the table
Switching Views
To switch views form the datasheet (spreadsheet view) and the design view, simply click
the button in the top-left hand corner of the Access program.
Datasheet View Design View
Displays the view, which allows you to
enter raw data into your database table.
Displays the view, which allows you to enter fields,
data-types, and descriptions into your database
table.
Entering Data
Click on the Datasheet View and simply start "chugging" away by entering the data into
each field. NOTE: Before starting a new record, the Soc Sec # field must have
something in it, because it is the Primary Key. If you did not set a Primary Key then it is
OK.
Manipulating Data
Adding a new row
o Simply drop down to a new line and enter the information
Updating a record
o Simply select the record and field you want to update, and change its data with
11. 11
what you want
Deleting a record
o Simply select the entire row and hit the Delete Key on the keyboard
Advanced Table Features w/Microsoft Access
Assigning a field a specific set of characters
o Example) Making a Social Security Number only allows 9 characters.
1. Switch to Design View
2. Select the field you want to alter
3. At the bottom select the General Tab
4. Select Field Size
5. Enter the number of characters you want this field to have
Formatting a field to look a specific way (HINT: You do not need to assign a
field a specific set of characters if you do this)
o Example) Formatting Phone Number w/ Area Code (xxx) xxx-xxxx
1. Switch to Design View
2. Select the field you want to format
3. At the bottom select the General Tab
4. Select Input Mask Box and click on the ... button at the right.
5. Select Phone Number option
6. Click on Next
7. Leave !(999) 000-0000 the way it is. This is a default.
8. Click Next
9. Select which option you want it to look like
10. Click Next
11. Click Finish
Selecting a value from a dropdown box with a set of values that you assign to it.
This saves you from typing it in each time
12. 12
o Example)Choosing a city that is either Auburn, Bay City, Flint, Midland, or
Saginaw
1. Switch to Design View
2. Select the field you want to alter (City)
3. At the bottom select the Lookup Tab
4. In the Display Control box, select Combo Box
5. Under Row Source Type, select Value List
6. Under Row Source, enter the values how you want them displayed,
separated by a comma. (Auburn, Bay City, Flint, Midland, Saginaw)
NOTE:This will not alphabetize them for you, so you will have to do
that yourself. It should look something like this:
7. Select in the datasheet view and you should see the change when you go
to the city field.
Relationships
After you've set up multiple tables in your Microsoft Access database, you need a way of telling
Access how to bring that information back together again. The first step in this process is to
define relationships between your tables. After you've done that, you can create queries, forms,
and reports to display information from several tables at once.
A relationship works by matching data in key fields - usually a field with the same name in both
tables. In most cases, these matching fields are the primary key from one table, which provides
a unique identifier for each record, and a foreign key in the other table. For example, teachers
can be associated with the students they're responsible for by creating a relationship between
the teacher's table and the student's table using the TeacherID fields.
Having met the criteria above, follow these steps for creating relationships between tables.
1. In the database window view, at the top, click on Tools ---> Relationships
2. Select the Tables you want to link together, by clicking on them and selecting the Add
Button
3. Drag the primary key of the Parent table (Teacher in this case), and drop it into the same
field in the Child table (Student in this case.)
13. 13
4. Select Enforce Referential Integrity
o When the Cascade Update Related Fields check box is set, changing a primary key
value in the primary table automatically updates the matching value in all related
records.
o When the Cascade Delete Related Records check box is set, deleting a record in
the primary table deletes any related records in the related table
5. Click Create and Save the Relationship
Forms
A form is nothing more than a graphical representation of a table. You can add, update,
delete records in your table by using a form. NOTE: Although a form can be named
different from a table, they both still manipulate the same information and the same exact
data. Hence, if you change a record in a form, it will be changed in the table also.
A form is very good to use when you have numerous fields in a table. This way you can see
all the fields in one screen, whereas if you were in the table view (datasheet) you would
have to keep scrolling to get the field you desire.
Create a Form using the Wizard
It is a very good idea to create a form using the wizard, unless you are an advanced user
and know what you are doing. Microsoft Access does a very good job of creating a form
using the wizard. The following steps are needed to create a basic form:
1. Switch to the Database Window. You can do this by pressing F11 on the keyboard.
2. Click on the Forms button under Objects on the left side of screen
3. Double click on Create Form Using Wizard
4. On the next screen select the fields you want to view on your form. Most of the time
you would select all of them.
5. Click Next
14. 14
6. Select the layout you wish
7. Click Next
8. Select the style you desire...HINT: if you plan on printing your form, I suggest you
use a light background to save on printer toner and ink
9. Click Next
10. Give you form a name, and select Open the Form and enter information
11. Select Finish
12. You should see your form. To adjust the design of your form, simply hit the design
button (same as with the tables), and adjust your form accordingly
Reports
A report is an effective way to present your data in a printed format. Because you have
control over the size and appearance of everything on a report, you can display the
information the way you want to see it.
Create a Report using the Wizard
As with the Form, it is a very good idea to create a report using the wizard, unless you are
an advanced user. Microsoft Access does a very good job using the wizard to create reports.
1. Switch to the Database Window. You can do this by pressing F11 on the keyboard.
2. Click on the Reports button under Objects on the left side of screen
3. Double click on Create Report Using Wizard
4. On the next screen select the fields you want to view on your form. Most of the time
you would select all of them.
5. Click Next
6. Select if you would like to group your files. Keep repeating this step for as many
groupings as you would like.
7. Click Next
8. Select the layout and the paper orientation you desire
9. Click Next
10. Select the style you desire...HINT: if you plan on printing your report, I suggest you
use a light background to save on printer toner and ink
11. Click Next
12. Give you report a name, and select Preview the Report
13. Select Finish
14. You should see your report. To adjust the design of your report, simply hit the design
button (same as with the tables), and adjust your report accordingly
SQL Statements
These statements are broken down into the following categories:
SQL Data Manipulation Language (DML)
SQL (Structured Query Language) is a syntax for executing queries. But the SQL language
also includes a syntax to update, insert, and delete records.
These query and update commands together form the Data Manipulation Language (DML)
part of SQL:
SELECT - extracts data from a database table
UPDATE - updates data in a database table
DELETE - deletes data from a database table
15. 15
INSERT INTO - inserts new data into a database table
SQL Data Definition Language (DDL)
The Data Definition Language (DDL) part of SQL permits database tables to be created or
deleted. We can also define indexes (keys), specify links between tables, and impose
constraints between database tables.
The most important DDL statements in SQL are:
CREATE TABLE - creates a new database table
ALTER TABLE - alters (changes) a database table
DROP TABLE - deletes a database table
CREATE INDEX - creates an index (search key)
DROP INDEX - deletes an index
Create Database, Table, and Index
Create a Database
To create a database:
CREATE DATABASE database_name
Create a Table
To create a table in a database:
CREATE TABLE table_name
(
column_name1 data_type,
column_name2 data_type,
.......
)
Example
This example demonstrates how you can create a table named "Person", with four columns.
The column names will be "LastName", "FirstName", "Address", and "Age":
CREATE TABLE Person
(
LastName varchar,
FirstName varchar,
Address varchar,
Age int
)
This example demonstrates how you can specify a maximum length for some columns:
CREATE TABLE Person
(
LastName varchar(30),
FirstName varchar,
16. 16
Address varchar,
Age int(3)
)
Create Index
Indices are created in an existing table to locate rows more quickly and efficiently. It is
possible to create an index on one or more columns of a table, and each index is given a
name. The users cannot see the indexes, they are just used to speed up queries.
Note: Updating a table containing indexes takes more time than updating a table without,
this is because the indexes also need an update. So, it is a good idea to create indexes only
on columns that are often used for a search.
A Unique Index
Creates a unique index on a table. A unique index means that two rows cannot have the
same index value.
CREATE UNIQUE INDEX index_name
ON table_name (column_name)
The "column_name" specifies the column you want indexed.
A Simple Index
Creates a simple index on a table. When the UNIQUE keyword is omitted, duplicate values
are allowed.
CREATE INDEX index_name
ON table_name (column_name)
The "column_name" specifies the column you want indexed.
Example
This example creates a simple index, named "PersonIndex", on the LastName field of the
Person table:
CREATE INDEX PersonIndex
ON Person (LastName)
If you want to index the values in a column in descending order, you can add the reserved
word DESC after the column name:
CREATE INDEX PersonIndex
ON Person (LastName DESC)
If you want to index more than one column you can list the column names within the
parentheses, separated by commas:
CREATE INDEX PersonIndex
ON Person (LastName, FirstName)
17. 17
INSERT INTO Statement
The INSERT INTO Statement
The INSERT INTO statement is used to insert new rows into a table.
Syntax
INSERT INTO table_name
VALUES (value1, value2,....)
You can also specify the columns for which you want to insert data:
INSERT INTO table_name (column1, column2,...)
VALUES (value1, value2,....)
Insert a New Row
This "Persons" table:
LastName FirstName Address City
Pettersen Kari Storgt 20 Stavanger
And this SQL statement:
INSERT INTO Persons
VALUES ('Hetland', 'Camilla', 'Hagabakka 24', 'Sandnes')
Will give this result:
LastName FirstName Address City
Pettersen Kari Storgt 20 Stavanger
Hetland Camilla Hagabakka 24 Sandnes
Insert Data in Specified Columns
This "Persons" table:
LastName FirstName Address City
Pettersen Kari Storgt 20 Stavanger
Hetland Camilla Hagabakka 24 Sandnes
And This SQL statement:
INSERT INTO Persons (LastName, Address)
VALUES ('Rasmussen', 'Storgt 67')
Will give this result:
LastName FirstName Address City
Pettersen Kari Storgt 20 Stavanger
Hetland Camilla Hagabakka 24 Sandnes
Rasmussen Storgt 67
18. 18
Drop Index, Table and Database
Drop Index
You can delete an existing index in a table with the DROP INDEX statement.
Syntax for Microsoft SQLJet (and Microsoft Access):
DROP INDEX index_name ON table_name
Syntax for MS SQL Server:
DROP INDEX table_name.index_name
Syntax for IBM DB2 and Oracle:
DROP INDEX index_name
Syntax for MySQL:
ALTER TABLE table_name DROP INDEX index_name
Delete a Table or Database
To delete a table (the table structure, attributes, and indexes will also be deleted):
DROP TABLE table_name
To delete a database:
DROP DATABASE database_name
Truncate a Table
What if we only want to get rid of the data inside a table, and not the table itself? Use the
TRUNCATE TABLE command (deletes only the data inside the table):
TRUNCATE TABLE table_name
ALTER TABLE
ALTER TABLE
The ALTER TABLE statement is used to add or drop columns in an existing table.
ALTER TABLE table_name
ADD column_name datatype
ALTER TABLE table_name
DROP COLUMN column_name
19. 19
Note: Some database systems don't allow the dropping of a column in a database table
(DROP COLUMN column_name).
Person:
LastName FirstName Address
Pettersen Kari Storgt 20
Example
To add a column named "City" in the "Person" table:
ALTER TABLE Person ADD City varchar(30)
Result:
LastName FirstName Address City
Pettersen Kari Storgt 20
Example
To drop the "Address" column in the "Person" table:
ALTER TABLE Person DROP COLUMN Address
Result:
LastName FirstName City
Pettersen Kari
SELECT Statement
The SQL SELECT Statement
The SELECT statement is used to select data from a table. The tabular result is stored in a
result table (called the result-set).
Syntax
SELECT column_name(s)
FROM table_name
Note: SQL statements are not case sensitive. SELECT is the same as select.
SQL SELECT Example
To select the content of columns named "LastName" and "FirstName", from the database
table called "Persons", use a SELECT statement like this:
SELECT LastName,FirstName FROM Persons
The database table "Persons":
LastName FirstName Address City
Hansen Ola Timoteivn 10 Sandnes
Svendson Tove Borgvn 23 Sandnes
Pettersen Kari Storgt 20 Stavanger
The result
20. 20
LastName FirstName
Hansen Ola
Svendson Tove
Pettersen Kari
Select All Columns
To select all columns from the "Persons" table, use a * symbol instead of column names,
like this:
SELECT * FROM Persons
Result
LastName FirstName Address City
Hansen Ola Timoteivn 10 Sandnes
Svendson Tove Borgvn 23 Sandnes
Pettersen Kari Storgt 20 Stavanger
The Result Set
The result from a SQL query is stored in a result-set.
Semicolon after SQL Statements?
Semicolon is the standard way to separate each SQL statement in database systems that
allow more than one SQL statement to be executed in the same call to the server.
Some SQL tutorials end each SQL statement with a semicolon. Is this necessary? No, but
some database programs force you to use it.
The SELECT DISTINCT Statement
The DISTINCT keyword is used to return only distinct (different) values.
The SELECT statement returns information from table columns. But what if we only want to
select distinct elements?
With SQL, all we need to do is to add a DISTINCT keyword to the SELECT statement:
Syntax
SELECT DISTINCT column_name(s)
FROM table_name
Using the DISTINCT keyword
To select ALL values from the column named "Company" we use a SELECT statement like
this:
SELECT Company FROM Orders
"Orders" table
Company OrderNumber
Sega 3412
W3Schools 2312
Trio 4678
W3Schools 6798
21. 21
Result
Company
Sega
W3Schools
Trio
W3Schools
Note that "W3Schools" is listed twice in the result-set.
To select only DIFFERENT values from the column named "Company" we use a SELECT
DISTINCT statement like this:
SELECT DISTINCT Company FROM Orders
Result:
Company
Sega
W3Schools
Trio
Now "W3Schools" is listed only once in the result-set.
WHERE Clause
The WHERE clause is used to specify a selection criterion.
The WHERE Clause
To conditionally select data from a table, a WHERE clause can be added to the SELECT
statement.
Syntax
SELECT column FROM table
WHERE column operator value
With the WHERE clause, the following operators can be used:
Operator Description
= Equal
<> Not equal
> Greater than
< Less than
>= Greater than or equal
<= Less than or equal
BETWEEN Between an inclusive range
LIKE Search for a pattern
IN If you know the exact value you want to
return for at least one of the columns
Note: In some versions of SQL the <> operator may be written as !=
22. 22
Using the WHERE Clause
To select only the persons living in the city "Sandnes", we add a WHERE clause to the
SELECT statement:
SELECT * FROM Persons
WHERE City='Sandnes'
"Persons" table
LastName FirstName Address City Year
Hansen Ola Timoteivn 10 Sandnes 1951
Svendson Tove Borgvn 23 Sandnes 1978
Svendson Stale Kaivn 18 Sandnes 1980
Pettersen Kari Storgt 20 Stavanger 1960
Result
LastName FirstName Address City Year
Hansen Ola Timoteivn 10 Sandnes 1951
Svendson Tove Borgvn 23 Sandnes 1978
Svendson Stale Kaivn 18 Sandnes 1980
Using Quotes
Note that we have used single quotes around the conditional values in the examples.
SQL uses single quotes around text values (most database systems will also accept double
quotes). Numeric values should not be enclosed in quotes.
For text values:
This is correct:
SELECT * FROM Persons WHERE FirstName='Tove'
This is wrong:
SELECT * FROM Persons WHERE FirstName=Tove
For numeric values:
This is correct:
SELECT * FROM Persons WHERE Year>1965
This is wrong:
SELECT * FROM Persons WHERE Year>'1965'
The LIKE Condition
The LIKE condition is used to specify a search for a pattern in a column.
Syntax
SELECT column FROM table
WHERE column LIKE pattern
A "%" sign can be used to define wildcards (missing letters in the pattern) both before and
after the pattern.
Using LIKE
The following SQL statement will return persons with first names that start with an 'O':
SELECT * FROM Persons
WHERE FirstName LIKE 'O%'
23. 23
The following SQL statement will return persons with first names that end with an 'a':
SELECT * FROM Persons
WHERE FirstName LIKE '%a'
The following SQL statement will return persons with first names that contain the pattern
'la':
SELECT * FROM Persons
WHERE FirstName LIKE '%la%'
UPDATE Statement
The Update Statement
The UPDATE statement is used to modify the data in a table.
Syntax
UPDATE table_name
SET column_name = new_value
WHERE column_name = some_value
Person:
LastName FirstName Address City
Nilsen Fred Kirkegt 56 Stavanger
Rasmussen Storgt 67
Update one Column in a Row
We want to add a first name to the person with a last name of "Rasmussen":
UPDATE Person SET FirstName = 'Nina'
WHERE LastName = 'Rasmussen'
Result:
LastName FirstName Address City
Nilsen Fred Kirkegt 56 Stavanger
Rasmussen Nina Storgt 67
Update several Columns in a Row
We want to change the address and add the name of the city:
UPDATE Person
SET Address = 'Stien 12', City = 'Stavanger'
WHERE LastName = 'Rasmussen'
24. 24
Result:
LastName FirstName Address City
Nilsen Fred Kirkegt 56 Stavanger
Rasmussen Nina Stien 12 Stavanger
DELETE Statement
The DELETE Statement
The DELETE statement is used to delete rows in a table.
Syntax
DELETE FROM table_name
WHERE column_name = some_value
Person:
LastName FirstName Address City
Nilsen Fred Kirkegt 56 Stavanger
Rasmussen Nina Stien 12 Stavanger
Delete a Row
"Nina Rasmussen" is going to be deleted:
DELETE FROM Person WHERE LastName = 'Rasmussen'
Result
LastName FirstName Address City
Nilsen Fred Kirkegt 56 Stavanger
Delete All Rows
It is possible to delete all rows in a table without deleting the table. This means that the
table structure, attributes, and indexes will be intact:
DELETE FROM table_name
or
DELETE * FROM table_name
Test your SQL Skills
On this page you can test your SQL skills.
We will use the Customers table in the Northwind database:
CompanyName ContactName Address City
25. 25
Alfreds Futterkiste Maria Anders Obere Str. 57 Berlin
Berglunds snabbköp Christina Berglund Berguvsvägen 8 Luleå
Centro comercial Moctezuma Francisco Chang Sierras de Granada 9993 México D.F.
Ernst Handel Roland Mendel Kirchgasse 6 Graz
FISSA Fabrica Inter.
Salchichas S.A.
Diego Roel C/ Moralzarzal, 86 Madrid
Galería del gastrónomo Eduardo Saavedra Rambla de Cataluña, 23 Barcelona
Island Trading Helen Bennett Garden House Crowther
Way
Cowes
Königlich Essen Philip Cramer Maubelstr. 90 Brandenburg
Laughing Bacchus Wine
Cellars
Yoshi Tannamuri 1900 Oak St. Vancouver
Magazzini Alimentari Riuniti Giovanni Rovelli Via Ludovico il Moro 22 Bergamo
North/South Simon Crowther South House 300
Queensbridge
London
Paris spécialités Marie Bertrand 265, boulevard Charonne Paris
Rattlesnake Canyon Grocery Paula Wilson 2817 Milton Dr. Albuquerque
Simons bistro Jytte Petersen Vinbæltet 34 København
The Big Cheese Liz Nixon 89 Jefferson Way Suite 2 Portland
Vaffeljernet Palle Ibsen Smagsløget 45 Århus
Wolski Zajazd Zbyszek
Piestrzeniewicz
ul. Filtrowa 68 Warszawa
To preserve space, the table above is a subset of the Customers table used in the example
below.
Try it Yourself
To see how SQL works, you can copy the SQL statements below and paste them into the
textarea, or you can make your own SQL statements.
SELECT * FROM customers
SELECT CompanyName, ContactName
FROM customers
SELECT * FROM customers
WHERE companyname LIKE 'a%'
SELECT CompanyName, ContactName
FROM customers
WHERE CompanyName > 'g'
AND ContactName > 'g'
ORDER BY
The ORDER BY keyword is used to sort the result.
Sort the Rows
The ORDER BY clause is used to sort the rows.
Orders:
26. 26
Company OrderNumber
Sega 3412
ABC Shop 5678
W3Schools 2312
W3Schools 6798
Example
To display the company names in alphabetical order:
SELECT Company, OrderNumber FROM Orders
ORDER BY Company
Result:
Company OrderNumber
ABC Shop 5678
Sega 3412
W3Schools 6798
W3Schools 2312
Example
To display the company names in alphabetical order AND the OrderNumber in numerical
order:
SELECT Company, OrderNumber FROM Orders
ORDER BY Company, OrderNumber
Result:
Company OrderNumber
ABC Shop 5678
Sega 3412
W3Schools 2312
W3Schools 6798
Example
To display the company names in reverse alphabetical order:
SELECT Company, OrderNumber FROM Orders
ORDER BY Company DESC
Result:
Company OrderNumber
W3Schools 6798
W3Schools 2312
Sega 3412
ABC Shop 5678
Example
To display the company names in reverse alphabetical order AND the OrderNumber in
numerical order:
SELECT Company, OrderNumber FROM Orders
ORDER BY Company DESC, OrderNumber ASC
Result:
27. 27
Company OrderNumber
W3Schools 2312
W3Schools 6798
Sega 3412
ABC Shop 5678
Notice that there are two equal company names (W3Schools) in the result above. The only
time you will see the second column in ASC order would be when there are duplicated
values in the first sort column, or a handful of nulls.
AND & OR
AND & OR
AND and OR join two or more conditions in a WHERE clause.
The AND operator displays a row if ALL conditions listed are true. The OR operator displays
a row if ANY of the conditions listed are true.
Original Table (used in the examples)
LastName FirstName Address City
Hansen Ola Timoteivn 10 Sandnes
Svendson Tove Borgvn 23 Sandnes
Svendson Stephen Kaivn 18 Sandnes
Example
Use AND to display each person with the first name equal to "Tove", and the last name
equal to "Svendson":
SELECT * FROM Persons
WHERE FirstName='Tove'
AND LastName='Svendson'
Result:
LastName FirstName Address City
Svendson Tove Borgvn 23 Sandnes
Example
Use OR to display each person with the first name equal to "Tove", or the last name equal
to "Svendson":
SELECT * FROM Persons
WHERE firstname='Tove'
OR lastname='Svendson'
Result:
LastName FirstName Address City
Svendson Tove Borgvn 23 Sandnes
Svendson Stephen Kaivn 18 Sandnes
28. 28
Example
You can also combine AND and OR (use parentheses to form complex expressions):
SELECT * FROM Persons WHERE
(FirstName='Tove' OR FirstName='Stephen')
AND LastName='Svendson'
Result:
LastName FirstName Address City
Svendson Tove Borgvn 23 Sandnes
Svendson Stephen Kaivn 18 Sandnes
IN
IN
The IN operator may be used if you know the exact value you want to return for at least
one of the columns.
SELECT column_name FROM table_name
WHERE column_name IN (value1,value2,..)
Original Table (used in the examples)
LastName FirstName Address City
Hansen Ola Timoteivn 10 Sandnes
Nordmann Anna Neset 18 Sandnes
Pettersen Kari Storgt 20 Stavanger
Svendson Tove Borgvn 23 Sandnes
Example 1
To display the persons with LastName equal to "Hansen" or "Pettersen", use the following
SQL:
SELECT * FROM Persons
WHERE LastName IN ('Hansen','Pettersen')
Result:
LastName FirstName Address City
Hansen Ola Timoteivn 10 Sandnes
Pettersen Kari Storgt 20 Stavanger
BETWEEN
29. 29
BETWEEN ... AND
The BETWEEN ... AND operator selects a range of data between two values. These values
can be numbers, text, or dates.
SELECT column_name FROM table_name
WHERE column_name
BETWEEN value1 AND value2
Original Table (used in the examples)
LastName FirstName Address City
Hansen Ola Timoteivn 10 Sandnes
Nordmann Anna Neset 18 Sandnes
Pettersen Kari Storgt 20 Stavanger
Svendson Tove Borgvn 23 Sandnes
Example 1
To display the persons alphabetically between (and including) "Hansen" and exclusive
"Pettersen", use the following SQL:
SELECT * FROM Persons WHERE LastName
BETWEEN 'Hansen' AND 'Pettersen'
Result:
LastName FirstName Address City
Hansen Ola Timoteivn 10 Sandnes
Nordmann Anna Neset 18 Sandnes
IMPORTANT! The BETWEEN...AND operator is treated differently in different databases.
With some databases a person with the LastName of "Hansen" or "Pettersen" will not be
listed (BETWEEN..AND only selects fields that are between and excluding the test values).
With some databases a person with the last name of "Hansen" or "Pettersen" will be listed
(BETWEEN..AND selects fields that are between and including the test values). With other
databases a person with the last name of "Hansen" will be listed, but "Pettersen" will not be
listed (BETWEEN..AND selects fields between the test values, including the first test value
and excluding the last test value). Therefore: Check how your database treats the
BETWEEN....AND operator!
Example 2
To display the persons outside the range used in the previous example, use the NOT
operator:
SELECT * FROM Persons WHERE LastName
NOT BETWEEN 'Hansen' AND 'Pettersen'
Result:
LastName FirstName Address City
Pettersen Kari Storgt 20 Stavanger
Svendson Tove Borgvn 23 Sandnes
JOIN
30. 30
Joins and Keys
Sometimes we have to select data from two or more tables to make our result complete.
We have to perform a join.
Tables in a database can be related to each other with keys. A primary key is a column with
a unique value for each row. Each primary key value must be unique within the table. The
purpose is to bind data together, across tables, without repeating all of the data in every
table.
In the "Employees" table below, the "Employee_ID" column is the primary key, meaning
that no two rows can have the same Employee_ID. The Employee_ID distinguishes two
persons even if they have the same name.
When you look at the example tables below, notice that:
The "Employee_ID" column is the primary key of the "Employees" table
The "Prod_ID" column is the primary key of the "Orders" table
The "Employee_ID" column in the "Orders" table is used to refer to the persons in
the "Employees" table without using their names
Employees:
Employee_ID Name
01 Hansen, Ola
02 Svendson, Tove
03 Svendson, Stephen
04 Pettersen, Kari
Orders:
Prod_ID Product Employee_ID
234 Printer 01
657 Table 03
865 Chair 03
Referring to Two Tables
We can select data from two tables by referring to two tables, like this:
Example
Who has ordered a product, and what did they order?
SELECT Employees.Name, Orders.Product
FROM Employees, Orders
WHERE Employees.Employee_ID=Orders.Employee_ID
Result
Name Product
Hansen, Ola Printer
Svendson, Stephen Table
Svendson, Stephen Chair
Example
Who ordered a printer?
SELECT Employees.Name
FROM Employees, Orders
WHERE Employees.Employee_ID=Orders.Employee_ID
AND Orders.Product='Printer'
31. 31
Result
Name
Hansen, Ola
Functions
SQL has a lot of built-in functions for counting and calculations.
Function Syntax
The syntax for built-in SQL functions is:
SELECT function(column) FROM table
Types of Functions
There are several basic types and categories of functions in SQL. The basic types of
functions are:
Aggregate Functions
Scalar functions
Aggregate functions
Aggregate functions operate against a collection of values, but return a single value.
Note: If used among many other expressions in the item list of a SELECT statement, the
SELECT must have a GROUP BY clause!!
"Persons" table (used in most examp les)
Name Age
Hansen, Ola 34
Svendson, Tove 45
Pettersen, Kari 19
Aggregate functions in MS Access
Function Description
AVG(column) Returns the average value of a column
COUNT(column) Returns the number of rows (without a NULL value) of a
column
COUNT(*) Returns the number of selected rows
FIRST(column) Returns the value of the first record in a specified field
LAST(column) Returns the value of the last record in a specified field
MAX(column) Returns the highest value of a column
MIN(column) Returns the lowest value of a column
STDEV(column)
STDEVP(column)
SUM(column) Returns the total sum of a column
VAR(column)
VARP(column)
32. 32
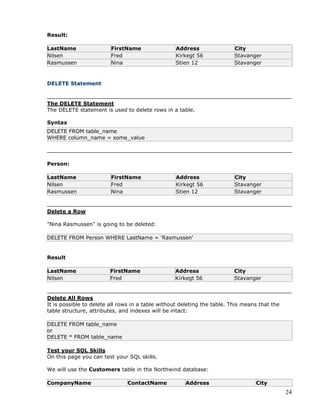
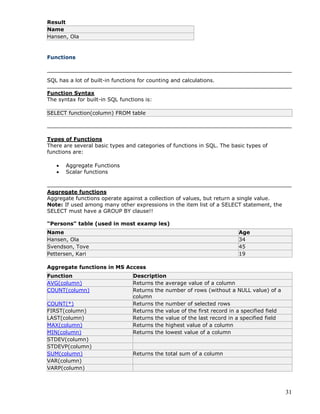
Aggregate functions in SQL Server
Function Description
AVG(column) Returns the average value of a column
BINARY_CHECKSUM
CHECKSUM
CHECKSUM_AGG
COUNT(column) Returns the number of rows (without a NULL value) of a
column
COUNT(*) Returns the number of selected rows
COUNT(DISTINCT column) Returns the number of distinct results
FIRST(column) Returns the value of the first record in a specified field (not
supported in SQLServer2K)
LAST(column) Returns the value of the last record in a specified field (not
supported in SQLServer2K)
MAX(column) Returns the highest value of a column
MIN(column) Returns the lowest value of a column
STDEV(column)
STDEVP(column)
SUM(column) Returns the total sum of a column
VAR(column)
VARP(column)
Scalar functions
Scalar functions operate against a single value, and return a single value based on the input
value.
Useful Scalar Functions in MS Access
Function Description
UCASE(c) Converts a field to upper case
LCASE(c) Converts a field to lower case
MID(c,start[,end]) Extract characters from a text field
LEN(c) Returns the length of a text field
INSTR(c,char) Returns the numeric position of a named character within a
text field
LEFT(c,number_of_char) Return the left part of a text field requested
RIGHT(c,number_of_char) Return the right part of a text field requested
ROUND(c,decimals) Rounds a numeric field to the number of decimals specified
MOD(x,y) Returns the remainder of a division operation
NOW() Returns the current system date
FORMAT(c,format) Changes the way a field is displayed
DATEDIFF(d,date1,date2) Used to perform date calculations
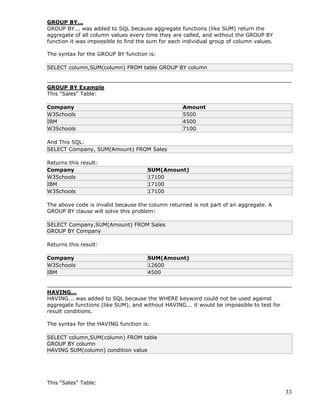
GROUP BY and HAVING
Aggregate functions (like SUM) often need an added GROUP BY functionality.
33. 33
GROUP BY...
GROUP BY... was added to SQL because aggregate functions (like SUM) return the
aggregate of all column values every time they are called, and without the GROUP BY
function it was impossible to find the sum for each individual group of column values.
The syntax for the GROUP BY function is:
SELECT column,SUM(column) FROM table GROUP BY column
GROUP BY Example
This "Sales" Table:
Company Amount
W3Schools 5500
IBM 4500
W3Schools 7100
And This SQL:
SELECT Company, SUM(Amount) FROM Sales
Returns this result:
Company SUM(Amount)
W3Schools 17100
IBM 17100
W3Schools 17100
The above code is invalid because the column returned is not part of an aggregate. A
GROUP BY clause will solve this problem:
SELECT Company,SUM(Amount) FROM Sales
GROUP BY Company
Returns this result:
Company SUM(Amount)
W3Schools 12600
IBM 4500
HAVING...
HAVING... was added to SQL because the WHERE keyword could not be used against
aggregate functions (like SUM), and without HAVING... it would be impossible to test for
result conditions.
The syntax for the HAVING function is:
SELECT column,SUM(column) FROM table
GROUP BY column
HAVING SUM(column) condition value
This "Sales" Table:
34. 34
Company Amount
W3Schools 5500
IBM 4500
W3Schools 7100
This SQL:
SELECT Company,SUM(Amount) FROM Sales
GROUP BY Company
HAVING SUM(Amount)>10000
Returns this result
Company SUM(Amount)
W3Schools 12600