Downloaded 49 times

![Week 2
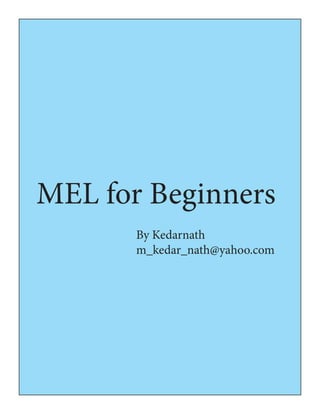
Variables, Data types and Operators
General guidelines
• Always preceded with a “$” symbol ( “$name” )
• You cannot have white spaces or special characters
• Can not start with a number ( “$2” )
• A variable’s type cannot be redefined once it is created, until the Maya session is ended.
• To debug script insert print commands in your expression at points were you would like to know the value of
a variable or object attribute.
Mel has a few basic data types. For MEL beginners it is important to learn the Integer, float, string, vector
and matrix data types. Like any other programming language Maya provides the user with the ability to tempo-
rarily store information through variables.
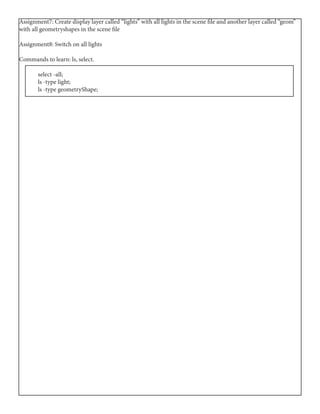
Declaring Variables and Data types
When declaring a variable there is a specific format you need to use. first declare what sort of variable
you are using. Next use a $ sign followed by the name.
int $myInt;
int $myInt = 1;
float $myfloat1 = 1.123;
string $myString = “Hello”;
vector $myvector = <<1.3, 1.2, 1.1>>;
string $myArray[] = {“one”,”two”,”three”,”four”};
int $myArray2[] = {1,2,3,4};
matrix $m[3][5]= <<1,3,5,7,9; 2,4,6,8,1; 4,7,0,3,6>>;
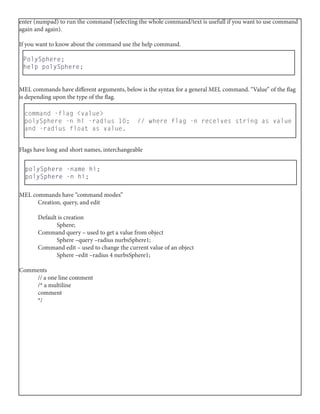
If you are unsure what a variable type is use the whatIs command to find out.
int $myInt = 1;
whatIs “$myInt”;
// Result: int variable //
Operators
Assignment Operator
=
the equals sign sets a variable equal to a value.
float $a = 2.135;
Arithmetic Operators
+
Add two elements](https://image.slidesharecdn.com/melforbeginners-170329020206/85/Mel-for-beginners-9-320.jpg)
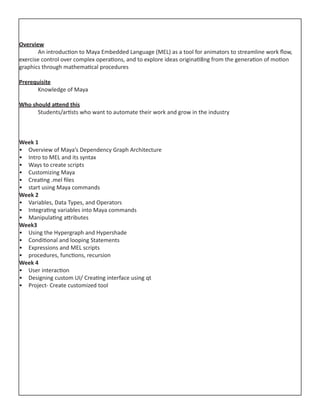
![equal to
A == B
< !=
not equal to
A != B
Logical Operators
Use logical operators when you want to compair two or more values.
||
or
a || b
&&
and
a && b
!
not
!a
Precedence
precedence is the hierarchy in which operators are evaluated. they are as follows:
( ),[ ] !,++,--
*,/,%,^
+,-
<,<=,>,>=
==,!=
&&
||
?:
=,+=,-=,*=,/=
Manipulating Attributes
Manipulating attributes using setAttr and getAttr. In one node there can be several attributes, which can
be changed using “setAttr” command and one can get the data of the attributes using “getAttr”. As discussed
above you should keep data type of attributes in mind.
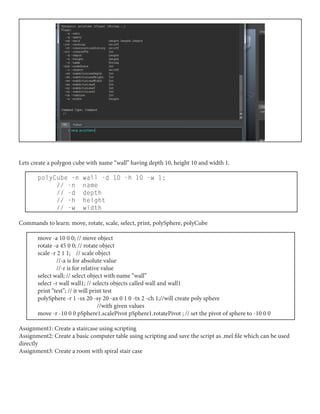
polyCube -n wall;
getAttr wall.translateX;
setAttr wall.translateX 10;
The above set of commands create a cube called wall and set its translation of X to 10. What if we use wall.trans-
late instead of translateX. Translate has 3 values (x, y,z) where as translateX has only x value.
getAttr wall.translateX;
// Result: 10 //
getAttr wall.translate;
// Result: 10 0 0 //](https://image.slidesharecdn.com/melforbeginners-170329020206/85/Mel-for-beginners-11-320.jpg)
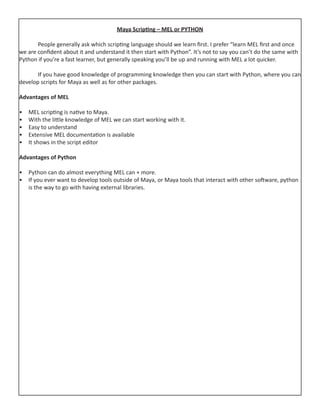
![setAttr wall.translate 10 1 1; //similarly we can set all values of translate
setAttr “lambert2.color” -type double3 1 0 0 ; // similarly we can set attributes of different shaders also.
Where data type of color is double with 3 values of R G B.
To get and store the value of an attribute in a variable we can use getAttr command in single quotes(` `). Which
means return the value of getAttr command.
int $transx =`getAttr wall.translateX`; // it will store the value in variable called transx
print $transx; // to print the value of translation of x-axis.
Assignment4: create 10 lambert shaders and set the color red, incand green, diffuse 1, switch on the refraction
and set the refraction limit to 2.
Integrating variables into Maya commands
Using variables to manipulate attribute values
If you want to set same value to several objects and there is a possibility of modifying the value several
times, then you can store the value in a variable and use the variable in different objects. With this if you change
the value once on the top, automatically other values will be changed.
Create a integer variable called “transx” with value of 5 and set the translate x-axis value of polygon cube called
“wall” to the “transx”.
polyCube -n wall;
int $transx =5;
setAttr wall.translateX $transx; // sets the value of translatex to variable $transx
setAttr wall.translateY $transx; // sets the value of translatey to variable $transx
setAttr wall.translateZ $transx; // sets the value of translatez to variable $transx
Create a integer variable called “trans” with value of 2, create string variable called “name” with value of
lambert3, and set the diffuse of lambert3 shader to trans.
int $trans =2;
string $name = “lambert3”;
setAttr ($name+”.diffuse”) $trans;
Similarly you can set the value of diffuse of the selected shaders to 2.
int $diff =2;
string $names[] = `ls -sl`; // list the selected objects and put in array called $names[]
setAttr ($names[0]+”.diffuse”) $diff;// set the value for first object in the array called $names[]
Assignment5: Create 10 lambert shaders and set the color red, incand green, diffuse 1, switch on the refraction
and set the refraction limit to 2 with a smaller script than in assignment3
Assignment6: Create renderlayers called key,fill,rim.bounce,occ](https://image.slidesharecdn.com/melforbeginners-170329020206/85/Mel-for-beginners-12-320.jpg)

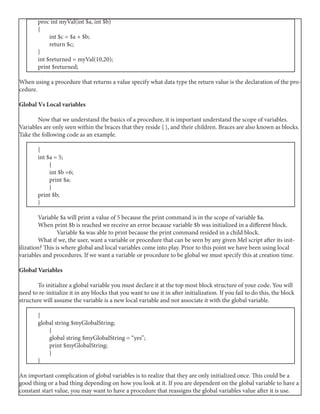
![Loops
For
The “for” loop is mainly used to run commands on the values of an array. It is used to do one task several
times in a loop.
A for loop mainly consists of:
syntax:
for(initial execution; test condition; execute after each loop)
{operation;}
string $myArray [] = {“one”,”two”,”three”,”four”};
int $myArraySize = size($myArray);
for ($i =0; $i<$myArraySize; $i++)
{
if ($myArray[$i] == “one”)
print (“n”+$myArray[$i] + “ apple”);
else
print (“n”+$myArray[$i] + “ apples”);
}
for in
This is an alternate statement for “for” loop, you can use.
int $Vals[5] = {1, 2, 3, 4, 5};
int $elements;
for($elements in $Vals)
{
print (“n current value is “+ $elements+” in Vals.”);
}
While
The while loop runs a command while the test condition holds true
A while loop mainly consists of:
syntax
while (test condition;) {operation;}
string $myArray [] = {“one”,”two”,”three”,”four”};
int $i =0;
while ( $i < size($myArray))
{
if ($myArray[$i] == “one”)
print (“n”+$myArray[$i] + “ apple”);
else
print (“n”+$myArray[$i] + “ apples”);
$i++;//IF you forget this Maya will get stuck in an infinite loop
}](https://image.slidesharecdn.com/melforbeginners-170329020206/85/Mel-for-beginners-15-320.jpg)
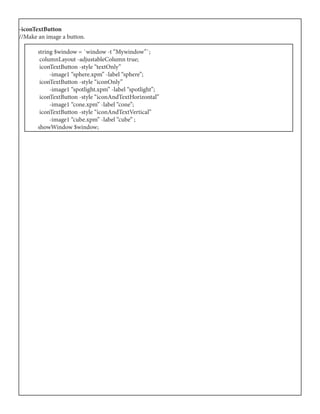
![do while
The do-while loop runs a command while the test condition holds true. While loop does the operation
if the test condition is true, where in do while loop, first it does the operation then checks for the test condition
and it repeatedly does the operation until the test condition will fail or false.
A do-while loop mainly consists of:
syntax
do {operation;} while (test condition);
string $myArray [] = {“one”,”two”,”three”,”four”};
int $i =0;
do
{
if ($myArray[$i] == “one”)
print (“n”+$myArray[$i] + “ apple”);
else
print (“n”+$myArray[$i] + “ apples”);
$i++; //IF you forget this Maya will get stuck in an infinite loop
}
while ( $i < size($myArray));
switch
The switch statement can be used to shorten a would be long list of if statements. The same work can be done
using if elseif statements also.
int $random= rand(0,10);
switch($random)
{
case 0:
print “n case is 0”;
break;
case 1:
print “n case is 1”;
break;
case 2:
print “n case is 2”;
break;
case 3:
print “n case is 3”;
break;
case 4:
print “n case is 4”;
break;
default:
print (“n Case is “ + $random);
}
If you want more than one case to execute if a given case is true then omit its break. This will not stop the
case from executing the cases which follow. The switch will not exit until it reaches the end of the cases or en-
counters another break .](https://image.slidesharecdn.com/melforbeginners-170329020206/85/Mel-for-beginners-16-320.jpg)


![{
string $my[] = `ls -sl`;
int $mysize = size($my);
if ($mysize > 1)
error (“please select only one obj”);
if ($mysize < 1)
error (“please select an obj”);
string $myattX = $my[0] + “.sx”;
string $myattY = $my[0] + “.sy”;
string $myattZ = $my[0] + “.sz”;
window myWin1;
columnLayout;
attrFieldSliderGrp -min 0 -max 10 -at $myattX;
attrFieldSliderGrp -min 0 -max 10 -at $myattY;
attrFieldSliderGrp -min 0 -max 10 -at $myattZ;
showWindow myWin1;
}
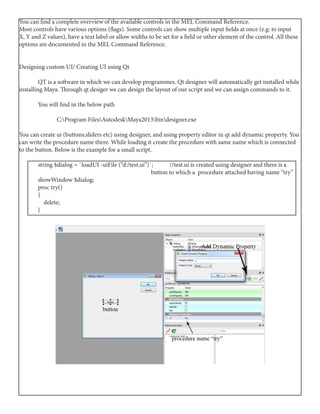
Buttons are pretty easy to understand. You click the button, something happens. To see a full list of options asso-
ciated with buttons consult the maya help menu.
-buttons
//create a list of buttons.](https://image.slidesharecdn.com/melforbeginners-170329020206/85/Mel-for-beginners-22-320.jpg)
![if (`window -exists myButtons`)
{
deleteUI myButtons;
windowPref -remove myButtons;
}
window -widthHeight 155 175 myButtons;
columnLayout -columnWidth 250 -rowSpacing 10 -columnOffset “left” 25;
button -label “Default” -width 100;
button -label “Left” -align “left” -width 100;
button -label “Centre” -align “center” -width 100;
button -label “Right” -align “right” -width 100;
showWindow myButtons;
-radioButtonGrp
//radio button groups that arelinked together.
//click the button to print out its color
string $window = `window`;
columnLayout;
string $group1 = `radioButtonGrp
-numberOfRadioButtons 3
-label “Colors”
-labelArray3 “Red” “Blue” “Green”
-on1 “doWrite(0)”
-on2 “doWrite(1)”
-on3 “doWrite(2)”`;
radioButtonGrp -numberOfRadioButtons 3
-shareCollection $group1
-label “” -labelArray3 “Yellow” “Orange” “Purple”
-on1 “doWrite(3)”
-on2 “doWrite(4)”
-on3 “doWrite(5)”;
showWindow $window;
proc doWrite(int $color)
{
//the value you put into the doWrite() corrilates to this array
string $mycolor[] ={“Red”,”Blue”,”Green”,”Yellow”,”Orange”,”Purple”};
print (“nyou clicked the color “+$mycolor[$color]);
}](https://image.slidesharecdn.com/melforbeginners-170329020206/85/Mel-for-beginners-23-320.jpg)


This document provides an overview of a 4-week course on learning Maya Embedded Language (MEL) for beginners. Week 1 covers Maya's dependency graph architecture and introduces MEL syntax and commands. Week 2 covers variables, data types, operators, and manipulating attributes. Week 3 discusses using the Hypergraph and Hypershade as well as conditional and looping statements. Week 4 covers user interaction, custom UI design, and creating a customized tool project. The document also compares the advantages of MEL and Python for Maya scripting.


![ANI 2201 - Introdution to Autodesk Maya & 3D Modeling - I [2023 - 2026].pptx](https://cdn.slidesharecdn.com/ss_thumbnails/ani2201-introdutiontoautodeskmaya3dmodeling-i2023-2026-250110010620-16ef99ad-thumbnail.jpg?width=640&height=640&fit=bounds)


![Lect 1 Number systems and base conversions. [Autosaved].pptx](https://cdn.slidesharecdn.com/ss_thumbnails/lect1numbersystemsandbaseconversions-260111134109-67c2d865-thumbnail.jpg?width=640&height=640&fit=bounds)
