Download to read offline

![_PIC: 87_gitlab_probfh.png
Now I want to show step by step (16 steps) how we can organize
this Lazarus-Project and build and train an image classifier and
detector. You can open the link in Colab and start with:
1. !apt-get update
Update, as mentioned above, will fetch available software and
update the lists while upgrade will install new versions of
software installed on your computer or in our case on the colab
cloud (actual software updates).
Then it goes like this:
0% [Working]
Ign:1
https://developer.download.nvidia.com/compute/cuda/repos/ubuntu1804/x86_64
InRelease 0% [Connecting to archive.ubuntu.com]
[Connecting to security.ubuntu.com] [Wait
Get:2 https://cloud.r-project.org/bin/linux/ubuntu bionic-cran40/
InRelease [3,626 B]
These steps are done for you with a Jupyter notebook. A Jupyter
Notebook is an open-source web application that allows you to
create and share documents that contain live code, equations,
visualizations, and describing text. So the second more inter-
esting command will be:
2. !apt-get install fpc fpc-source lazarus git subversion
Reading package lists... Done Building dependency tree Reading state
information... Done git is already the newest version (1:2.17.1-1ubuntu0.9).
The following additional packages will be installed:
autoconf automake autopoint autotools-dev debhelper dh-autoreconf dh-strip-
nondeterminism file fp-compiler-3.0.4 fp-docs-3.0.4 fp-ide-3.0.4 fp-units-base-
3.0.4 fp-units-db-3.0.4 fp-units-fcl-3.0.4 fp-units-fv-3.0.4 fp-units-gfx-3.0.4
fp-units-gtk2-3.0.4 fp-units-math-3.0.4 ...
So the last entries of install fpc will be:
Processing triggers for man-db (2.8.3-2ubuntu0.1) ... Processing triggers for
mime-support (3.60ubuntu1) ... Processing triggers for libvlc-bin:amd64 (3.0.8-
0ubuntu18.04.1) ...
Thanks to FPC and git subversion we now can install Lazarus on a
Ubuntu Bionic image machine. Ubuntu is distributed on three types
of images, but we let colab to choose from. You can check your
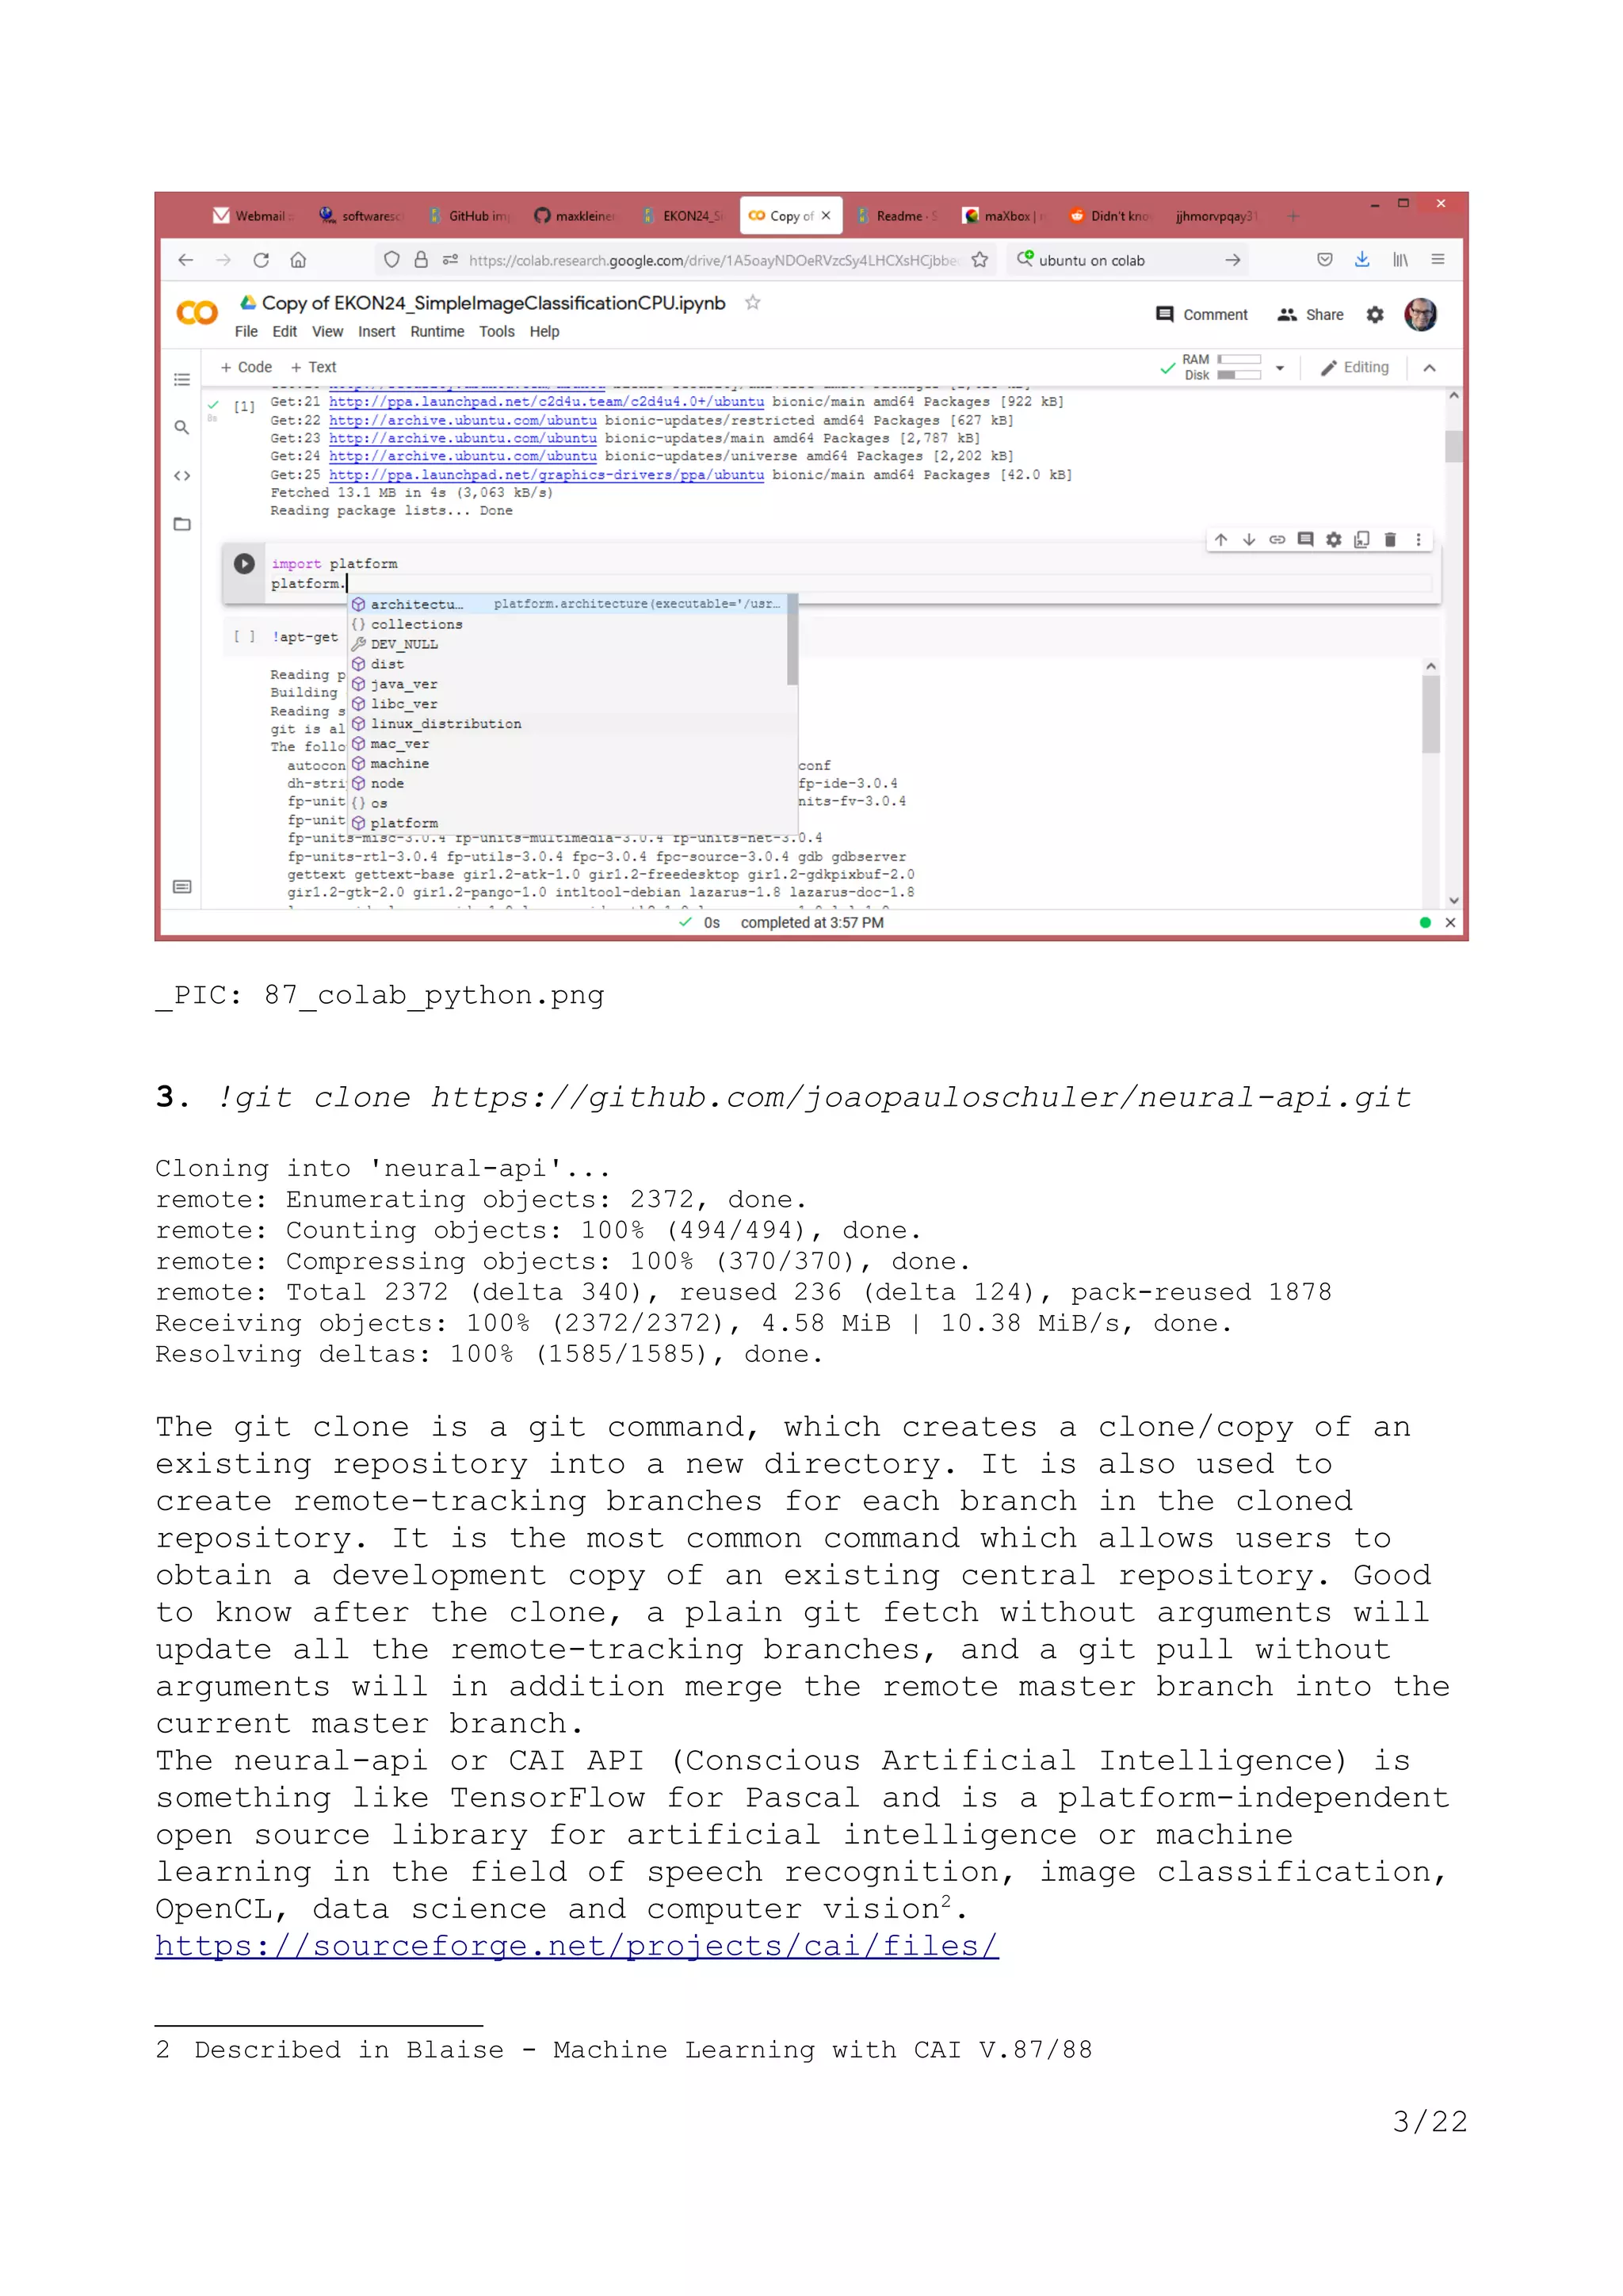
actual platform with a live python notebook script:
import platform
platform.platform()
>>> Linux-5.4.104+-x86_64-with-Ubuntu-18.04-bionic
Our next task should get the API for the neural network working on
the bionic platform!
2/22](https://image.slidesharecdn.com/maxboxstarter87-210929153106/75/maXbox-Starter87-2-2048.jpg)
![Could be that you see some Pascal dialect but the other dialects
of Object Pascal have always aligned themselves closely with the
Delphi dialect of the language. Free Pascal/Lazarus, Oxygene,
Smart Pascal, maXbox, DWScript, PdScript, PascalABC, etc… all do
them. So while there isn’t an official standard of Object Pascal,
the dialects stay close to each other.
Then we use checkout and Lazbuild to prepare more of the project,
above all we compile a package MultiThreadProcsLaz 1.2.1 with in
then end with 1215 lines compiled, 0.1 sec and 5 hints issued:
4. !svn checkout https://svn.code.sf.net/p/lazarus-
ccr/svn/components/multithreadprocs mtprocs
5. !lazbuild mtprocs/multithreadprocslaz.lpk
6. !ls -l neural-api/examples/SimpleImageClassifier/SimpleImageClassifier.lpi
Point 6 shows the project we use:
-rw-r--r-- 1 root root 5694 Sep 23 08:37 neural-
api/examples/SimpleImageClassifier/SimpleImageClassifier.lpi
Now we build the project:
7. !lazbuild neural-api/examples/SimpleImageClassifier/SimpleImageClassifier.lpi
On that platform is the Free Pascal Compiler version 3.0.4+dfsg-
18ubuntu2 [2018/08/29] for x86_64 running. As you maybe know
lazbuild is a command-line tool that builds Lazarus projects and
packages. It checks also recursively all dependencies and compiles
needed packages first. It uses the Free Pascal compiler (FPC) to
compile. OPTIONS-h,--help Displays a short help message. -B,--
build-all build all files of project/package. We check that lpi-
build with:
8. ls -l neural-api/bin/x86_64-linux/bin/SimpleImageClassifier
-rwxr-xr-x 1 root root 1951024 Sep 23 08:43 neural-api/bin/x86_64-
linux/bin/SimpleImageClassifier*
We can see we have execution rights rwx on the project-code in our
scripts. Next step 9 is to get the image based data to train and
test with it and step 10 checks that download:
import os
import urllib.request
if not os.path.isfile('cifar-10-batches-bin/data_batch_1.bin'):
print("Downloading CIFAR-10 Files")
url = 'https://www.cs.toronto.edu/~kriz/cifar-10-binary.tar.gz'
urllib.request.urlretrieve(url, './file.tar')
>>> Downloading CIFAR-10 Files
4/22](https://image.slidesharecdn.com/maxboxstarter87-210929153106/75/maXbox-Starter87-4-2048.jpg)


![Appendix Colab Log Details:
!apt-get update
Ign:1
https://developer.download.nvidia.com/compute/cuda/repos/ubuntu1804/x86_64
InRelease
Get:2 https://cloud.r-project.org/bin/linux/ubuntu bionic-cran40/ InRelease
[3,626 B]
Ign:3 https://developer.download.nvidia.com/compute/machine-
learning/repos/ubuntu1804/x86_64 InRelease
Hit:4 https://developer.download.nvidia.com/compute/cuda/repos/ubuntu1804/x86_64
Release
Hit:5 https://developer.download.nvidia.com/compute/machine-
learning/repos/ubuntu1804/x86_64 Release
Get:6 http://security.ubuntu.com/ubuntu bionic-security InRelease [88.7 kB]
Get:7 https://cloud.r-project.org/bin/linux/ubuntu bionic-cran40/ Packages [67.4
kB]
Get:8 http://ppa.launchpad.net/c2d4u.team/c2d4u4.0+/ubuntu bionic InRelease
[15.9 kB]
Hit:9 http://archive.ubuntu.com/ubuntu bionic InRelease
Get:11 http://archive.ubuntu.com/ubuntu bionic-updates InRelease [88.7 kB]
Hit:13 http://ppa.launchpad.net/cran/libgit2/ubuntu bionic InRelease
Get:14 http://archive.ubuntu.com/ubuntu bionic-backports InRelease [74.6 kB]
Hit:15 http://ppa.launchpad.net/deadsnakes/ppa/ubuntu bionic InRelease
Get:16 http://security.ubuntu.com/ubuntu bionic-security/restricted amd64
Packages [581 kB]
Hit:17 http://ppa.launchpad.net/graphics-drivers/ppa/ubuntu bionic InRelease
Get:18 http://security.ubuntu.com/ubuntu bionic-security/universe amd64 Packages
[1,428 kB]
Get:19 http://ppa.launchpad.net/c2d4u.team/c2d4u4.0+/ubuntu bionic/main Sources
[1,802 kB]
Get:20 http://security.ubuntu.com/ubuntu bionic-security/main amd64 Packages
[2,335 kB]
Get:21 http://archive.ubuntu.com/ubuntu bionic-updates/universe amd64 Packages
[2,202 kB]
Get:22 http://archive.ubuntu.com/ubuntu bionic-updates/restricted amd64 Packages
[613 kB]
Get:23 http://ppa.launchpad.net/c2d4u.team/c2d4u4.0+/ubuntu bionic/main amd64
Packages [922 kB]
Get:24 http://archive.ubuntu.com/ubuntu bionic-updates/main amd64 Packages
[2,770 kB]
Fetched 13.0 MB in 4s (3,425 kB/s)
Reading package lists... Done
!apt-get install fpc fpc-source lazarus git subversion
Reading package lists... Done
Building dependency tree
Reading state information... Done
git is already the newest version (1:2.17.1-1ubuntu0.9).
The following additional packages will be installed:
Setting up dh-strip-nondeterminism (0.040-1.1~build1) ...
Processing triggers for libc-bin (2.27-3ubuntu1.3) ...
/sbin/ldconfig.real: /usr/local/lib/python3.7/dist-
10/22](https://image.slidesharecdn.com/maxboxstarter87-210929153106/75/maXbox-Starter87-10-2048.jpg)
![packages/ideep4py/lib/libmkldnn.so.0 is not a symbolic link
….......
Processing triggers for man-db (2.8.3-2ubuntu0.1) ...
Processing triggers for mime-support (3.60ubuntu1) ...
Processing triggers for libvlc-bin:amd64 (3.0.8-0ubuntu18.04.1) ...
3. !git clone https://github.com/joaopauloschuler/neural-api.git
Cloning into 'neural-api'...
remote: Enumerating objects: 2372, done.
remote: Counting objects: 100% (494/494), done.
remote: Compressing objects: 100% (370/370), done.
remote: Total 2372 (delta 340), reused 236 (delta 124), pack-reused 1878
Receiving objects: 100% (2372/2372), 4.58 MiB | 10.38 MiB/s, done.
Resolving deltas: 100% (1585/1585), done.
4. !svn checkout https://svn.code.sf.net/p/lazarus-
ccr/svn/components/multithreadprocs mtprocs
mtprocs/examples
A mtprocs/examples/parallelloop1.lpr
A mtprocs/examples/parallelloop_nested1.lpi
A mtprocs/examples/parallelloop_nested1.lpr
A mtprocs/examples/recursivemtp1.lpr
A mtprocs/examples/simplemtp1.lpr
A mtprocs/examples/parallelloop1.lpi
A mtprocs/examples/recursivemtp1.lpi
A mtprocs/examples/simplemtp1.lpi
A mtprocs/examples/testmtp1.lpi
A mtprocs/examples/testmtp1.lpr
A mtprocs/Readme.txt
A mtprocs/mtprocs.pas
A mtprocs/mtpcpu.pas
A mtprocs/multithreadprocslaz.lpk
A mtprocs/mtputils.pas
A mtprocs/multithreadprocslaz.pas
Checked out revision 8093.
5. !lazbuild mtprocs/multithreadprocslaz.lpk
6. !ls -l neural-api/examples/SimpleImageClassifier/SimpleImageClassifier.lpi
-rw-r--r-- 1 root root 5694 Sep 23 08:37 neural-
api/examples/SimpleImageClassifier/SimpleImageClassifier.lpi
7. !lazbuild neural-api/examples/SimpleImageClassifier/SimpleImageClassifier.lpi
Hint: (lazarus) [RunTool] /usr/bin/fpc "-iWTOTP"
Hint: (lazarus) [RunTool] /usr/bin/fpc "-va" "compilertest.pas"
TProject.DoLoadStateFile Statefile not found: /content/neural-api/bin/x86_64-
linux/units/SimpleImageClassifier.compiled
Hint: (lazarus) [RunTool] /usr/bin/fpc "-iWTOTP" "-Px86_64" "-Tlinux"
Hint: (lazarus) [RunTool] /usr/bin/fpc "-va" "-Px86_64" "-Tlinux"
"compilertest.pas"
Hint: (11031) End of reading config file /etc/fpc.cfg
Free Pascal Compiler version 3.0.4+dfsg-18ubuntu2 [2018/08/29] for x86_64
Copyright (c) 1993-2017 by Florian Klaempfl and others
(1002) Target OS: Linux for x86-64
11/22](https://image.slidesharecdn.com/maxboxstarter87-210929153106/75/maXbox-Starter87-11-2048.jpg)


The document describes steps to build and train an image classification model using Lazarus, the neural-api library, and Google Colab. It clones the neural-api GitHub repository, installs dependencies like FPC and Lazarus, builds and trains a simple image classifier on the CIFAR-10 dataset, and exports the trained model weights and training logs. The process demonstrates how to leverage Google Colab's GPUs to train deep learning models using Lazarus and Pascal.


![[DSC Europe 25] Behzad Hosseini - AI Agents in the Wild: Deploying Models tha...](https://cdn.slidesharecdn.com/ss_thumbnails/3qtejajvsjqrzwfept2c-10-251212103250-7f2b1068-thumbnail.jpg?width=640&height=640&fit=bounds)


![[DSC Europe 25] Bassam Maharmeh - Artificial Intelligence: Opportunities and ...](https://cdn.slidesharecdn.com/ss_thumbnails/thhfmr2fqpawzj7hsjpg-5-251211083048-2c23204f-thumbnail.jpg?width=640&height=640&fit=bounds)
![[DSC Europe 25] Vladimir Jelic - The AI-Driven Security Shift From Reactive D...](https://cdn.slidesharecdn.com/ss_thumbnails/6g5gj25mtjwayniqem1t-6-251209104645-7a5a5fc6-thumbnail.jpg?width=640&height=640&fit=bounds)

![[DSC Europe 25] Debmalya Biswas - Agentification: the art of transforming man...](https://cdn.slidesharecdn.com/ss_thumbnails/r5azlggvtqiaiiusrqdr-4-251212103249-5a12c89b-thumbnail.jpg?width=640&height=640&fit=bounds)


![[DSC Europe 25] Nikolay Burlutskiy - Best Practices for Building Enterprise M...](https://cdn.slidesharecdn.com/ss_thumbnails/uirvaiuvq8y1w8hzd9tx-7-251212103249-2619edb4-thumbnail.jpg?width=640&height=640&fit=bounds)

![[DSC Europe 25] Branko Dzakula - From Defense to Attack: How AI Redefines Cyb...](https://cdn.slidesharecdn.com/ss_thumbnails/80bdzdxpr3ky2g0qvyk9-8-251211083048-ce5fc1ee-thumbnail.jpg?width=640&height=640&fit=bounds)
