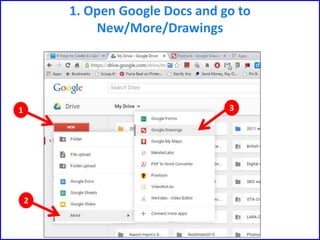
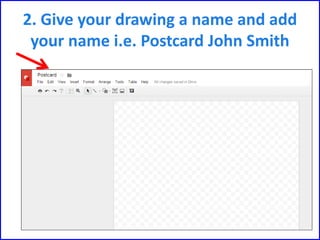
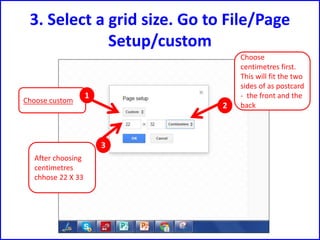
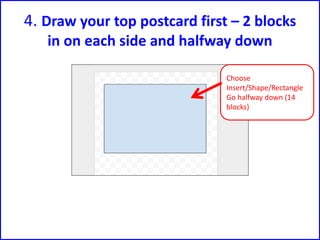
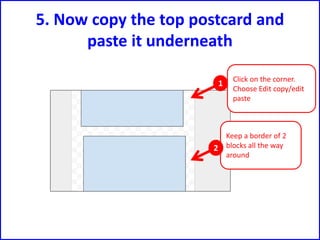
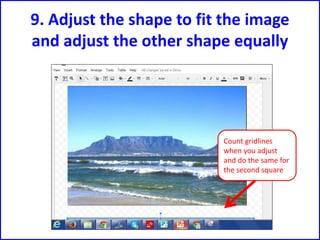
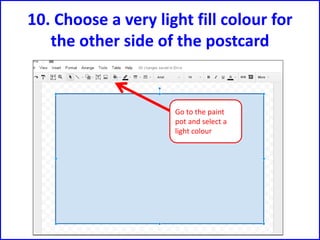
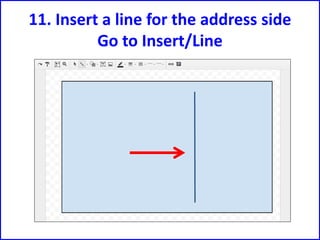
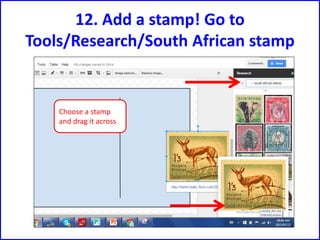
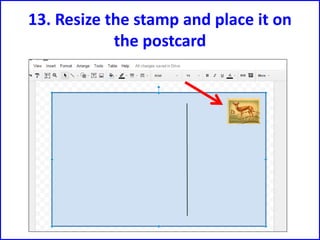
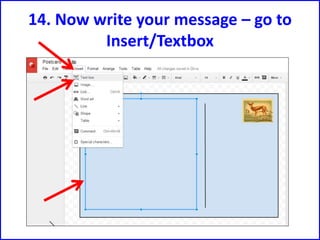
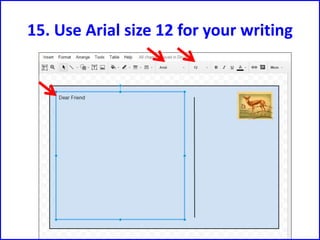
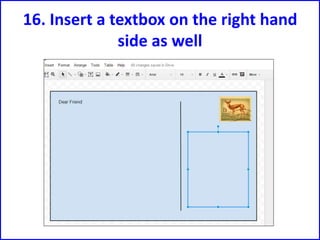
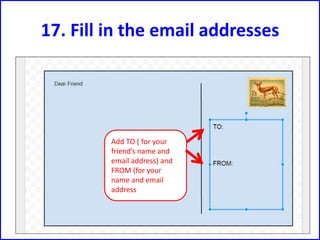
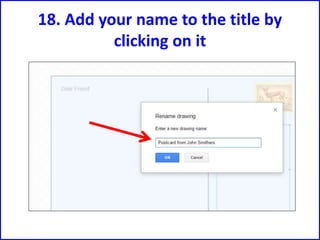
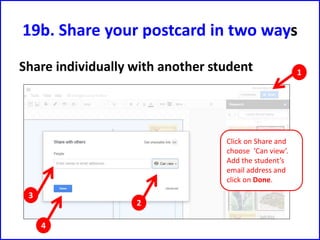
1. Open Google Docs and go to
New/More/Drawings
1
2
3
2. Give your drawing a name and add
your name i.e. Postcard John Smith
3. Select a grid size. Go to File/Page
Setup/custom
Choose
centimetres first.
This will fit the two
sides of as postcard
- the front and the
back
Choose custom
1
2
3
After choosing
centimetres
chhose 22 X 33
4. Draw your top postcard first – 2 blocks
in on each side and halfway down
Choose
Insert/Shape/Rectangle
Go halfway down (14
blocks)
5. Now copy the top postcard and
paste it underneath
Click on the corner.
Choose Edit copy/edit
paste
Keep a border of 2
blocks all the way
around
1
2
5. Select View/100%
Note:
View the grid at
100% -go to
View /100%
6. Search for your postcard image
Go to Tools/Research
Let’s find an
image for the
top of the
postcard
7. Type in what you require
and select images when asked
8. Drag the image across and fit it to
the template
Notice that the
shape is too long
for the picture
9. Adjust the shape to fit the image
and adjust the other shape equally
Count gridlines
when you adjust
and do the same for
the second square
10. Choose a very light fill colour for
the other side of the postcard
Go to the paint
pot and select a
light colour
11. Insert a line for the address side
Go to Insert/Line
12. Add a stamp! Go to
Tools/Research/South African stamp
Choose a stamp
and drag it across
13. Resize the stamp and place it on
the postcard
14. Now write your message – go to
Insert/Textbox
15. Use Arial size 12 for your writing
16. Insert a textbox on the right hand
side as well
17. Fill in the email addresses
Add TO ( for your
friend’s name and
email address) and
FROM (for your
name and email
address
18. Add your name to the title by
clicking on it
19a. Share your postcard in two ways
Share as a complete folder of postcards
If your teacher has created a Shared Folder in
Google Drive with all your drawings in that
shared folder, then your teacher can share the
drawing with a teacher from another school.
19b. Share your postcard in two ways
Share individually with another student
Click on Share and
choose ‘Can view’.
Add the student’s
email address and
click on Done.
1
2
3
4
Make a postcard using Google Draw (by Fiona Beal)

Make a postcard using Google Draw (by Fiona Beal)

  • 2.
    1. Open GoogleDocs and go to New/More/Drawings 1 2 3
  • 3.
    2. Give yourdrawing a name and add your name i.e. Postcard John Smith
  • 4.
    3. Select agrid size. Go to File/Page Setup/custom Choose centimetres first. This will fit the two sides of as postcard - the front and the back Choose custom 1 2 3 After choosing centimetres chhose 22 X 33
  • 5.
    4. Draw yourtop postcard first – 2 blocks in on each side and halfway down Choose Insert/Shape/Rectangle Go halfway down (14 blocks)
  • 6.
    5. Now copythe top postcard and paste it underneath Click on the corner. Choose Edit copy/edit paste Keep a border of 2 blocks all the way around 1 2
  • 7.
    5. Select View/100% Note: Viewthe grid at 100% -go to View /100%
  • 8.
    6. Search foryour postcard image Go to Tools/Research Let’s find an image for the top of the postcard
  • 9.
    7. Type inwhat you require and select images when asked
  • 10.
    8. Drag theimage across and fit it to the template Notice that the shape is too long for the picture
  • 11.
    9. Adjust theshape to fit the image and adjust the other shape equally Count gridlines when you adjust and do the same for the second square
  • 12.
    10. Choose avery light fill colour for the other side of the postcard Go to the paint pot and select a light colour
  • 13.
    11. Insert aline for the address side Go to Insert/Line
  • 14.
    12. Add astamp! Go to Tools/Research/South African stamp Choose a stamp and drag it across
  • 15.
    13. Resize thestamp and place it on the postcard
  • 16.
    14. Now writeyour message – go to Insert/Textbox
  • 17.
    15. Use Arialsize 12 for your writing
  • 18.
    16. Insert atextbox on the right hand side as well
  • 19.
    17. Fill inthe email addresses Add TO ( for your friend’s name and email address) and FROM (for your name and email address
  • 20.
    18. Add yourname to the title by clicking on it
  • 21.
    19a. Share yourpostcard in two ways Share as a complete folder of postcards If your teacher has created a Shared Folder in Google Drive with all your drawings in that shared folder, then your teacher can share the drawing with a teacher from another school.
  • 22.
    19b. Share yourpostcard in two ways Share individually with another student Click on Share and choose ‘Can view’. Add the student’s email address and click on Done. 1 2 3 4