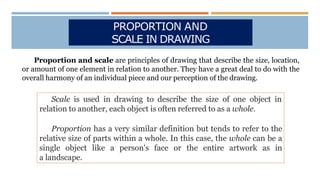
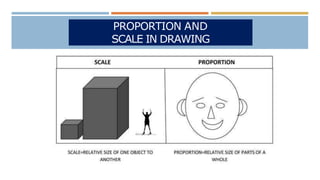
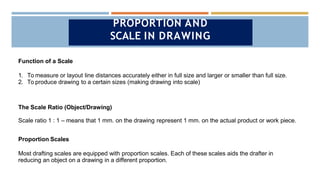
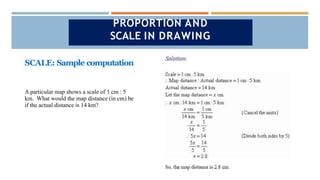
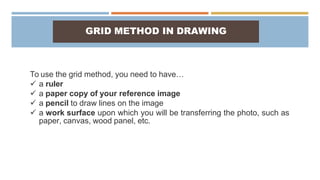
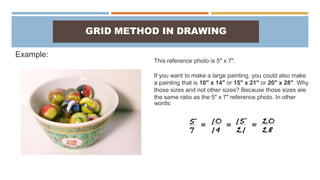
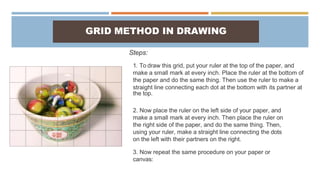
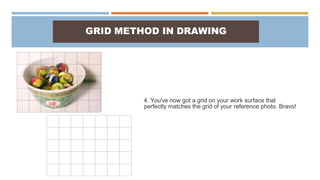
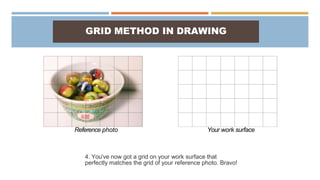
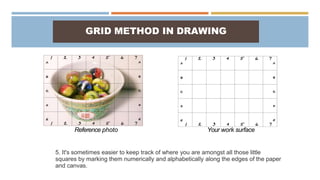
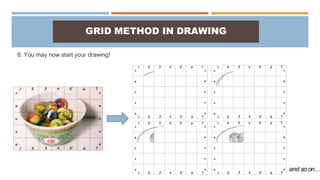
LESSON 6:PREPARE AND INTERPRET TECHNICAL
DRAWING
ILLUSTRATION 7
LO 2. INTERPRET ILLUSTRATION DRAWINGS AND
PLANS
PROPORTION AND
SCALE IN DRAWING
Proportion and scale are principles of drawing that describe the size, location,
or amount of one element in relation to another. They have a great deal to do with the
overall harmony of an individual piece and our perception of the drawing.
Scale is used in drawing to describe the size of one object in
relation to another, each object is often referred to as a whole.
Proportion has a very similar definition but tends to refer to the
relative size of parts within a whole. In this case, the whole can be a
single object like a person's face or the entire artwork as in
a landscape.
PROPORTION AND
SCALE IN DRAWING
PROPORTION AND
SCALE IN DRAWING
Examples of SCALE:
1:10
1/4 in. = 1 ft.
1-to-1
full-size
life-size
monumental
PROPORTION AND
SCALE IN DRAWING
SCALE DRAWING
A drawing that shows a real object
with accurate sizes reduced or enlarged by
a certain amount (called the scale).
The scale is shown as the length in the
drawing, then a colon (":"), then the matching
length on the real thing.
Example: This drawing has a scale of "1:10", so anything
drawn with the size of "1" would have a size of "10" in
the real world, so a measurement of 150mm on the
drawing would be 1500mm on the real horse.
PROPORTION AND
SCALE IN DRAWING
Function of a Scale
1. To measure or layout line distances accurately either in full size and larger or smaller than full size.
2. To produce drawing to a certain sizes (making drawing into scale)
The Scale Ratio (Object/Drawing)
Scale ratio 1 : 1 – means that 1 mm. on the drawing represent 1 mm. on the actual product or work piece.
Proportion Scales
Most drafting scales are equipped with proportion scales. Each of these scales aids the drafter in
reducing an object on a drawing in a different proportion.
PROPORTION AND
SCALE IN DRAWING
Commonly Used Scale
Full-Size Scale – has a ratio of 1:1. This means that 1 mm on the drawing
represents 1 mm of the actual object. The views on the drawing paper are the same size as those of the
actual object.
Reduced Scale (Scaled-down) – has a ratio of 1:2. This means that 1 mm on the drawing represent 2 mm
on the actual object. The views of the actual object are twice the size of the views on the drawing paper.
Enlarged Scale (Scaled-up)
Examples:
Scale 2:1 - This means that every 2 mm on the drawing represent 1 mm on the actual object. The views on
the drawing paper are twice the size of those of the actual object.
Scale 5:1 - This means that every 5 mm on the drawing represent 1mm on the actual object. The views on
the drawing paper are five times larger than those of the actual object.
PROPORTION AND
SCALE IN DRAWING
SCALE: Sample computation
PROPORTION AND
SCALE IN DRAWING
A particular map shows a scale of 1 cm : 5
km. What would the map distance (in cm) be
if the actual distance is 14 km?
GRID METHOD IN DRAWING
• The grid method is an inexpensive, low-tech way to reproduce and/or enlarge an
image that you want to paint or draw.
• The important thing to remember when drawing the grids is that they must have a 1:1
ratio.
• The grid method involves drawing a grid over your reference photo, and then drawing a
grid of equal ratio on your work surface.
• Then you draw the image on your canvas, focusing on one square at a time, until the
entire image has been transferred.
• Once you're finished, you simply erase or paint over the grid lines, and start working on
your painting, which will be now be in perfect proportion.
GRID METHOD IN DRAWING
To use the grid method, you need to have…
 a ruler
 a paper copy of your reference image
 a pencil to draw lines on the image
 a work surface upon which you will be transferring the photo, such as
paper, canvas, wood panel, etc.
GRID METHOD IN DRAWING
Example:
This reference photo is 5" x 7".
If you want to make a large painting, you could also make
a painting that is 10" x 14" or 15" x 21" or 20" x 28". Why
those sizes and not other sizes? Because those sizes are
the same ratio as the 5" x 7" reference photo. In other
words:
GRID METHOD IN DRAWING
Steps:
1. To draw this grid, put your ruler at the top of the paper, and
make a small mark at every inch. Place the ruler at the bottom of
the paper and do the same thing. Then use the ruler to make a
straight line connecting each dot at the bottom with its partner at
the top.
2. Now place the ruler on the left side of your paper, and
make a small mark at every inch. Then place the ruler on
the right side of the paper, and do the same thing. Then,
using your ruler, make a straight line connecting the dots
on the left with their partners on the right.
3. Now repeat the same procedure on your paper or
canvas:
GRID METHOD IN DRAWING
4. You've now got a grid on your work surface that
perfectly matches the grid of your reference photo. Bravo!
GRID METHOD IN DRAWING
4. You've now got a grid on your work surface that
perfectly matches the grid of your reference photo. Bravo!
Reference photo Your work surface
GRID METHOD IN DRAWING
Reference photo Your work surface
5. It's sometimes easier to keep track of where you are amongst all those little
squares by marking them numerically and alphabetically along the edges of the paper
and canvas.
GRID METHOD IN DRAWING
6. You may now start your drawing!
and so on…
Sources:
https://www.art-is-fun.com/grid-method
https://www2.psych.ubc.ca/~rensink/courses/psyc579/07.2-notes.pdf
https://www.peachpit.com/articles/article.aspx?p=2873372&seqNum=3
http://project-handbook.pbworks.com/w/file/fetch/52453142/SWAILES_CC1016_sketching.pdf
https://civilseek.com/free-hand-sketching/
https://schoolworkhelper.net/technical-drawing-alphabet-of-line/

lesson6prepareandinterprettechnicaldrawinglo2-200519105348.pptx

  • 1.
    LESSON 6:PREPARE ANDINTERPRET TECHNICAL DRAWING ILLUSTRATION 7
  • 2.
    LO 2. INTERPRETILLUSTRATION DRAWINGS AND PLANS
  • 3.
    PROPORTION AND SCALE INDRAWING Proportion and scale are principles of drawing that describe the size, location, or amount of one element in relation to another. They have a great deal to do with the overall harmony of an individual piece and our perception of the drawing. Scale is used in drawing to describe the size of one object in relation to another, each object is often referred to as a whole. Proportion has a very similar definition but tends to refer to the relative size of parts within a whole. In this case, the whole can be a single object like a person's face or the entire artwork as in a landscape.
  • 4.
  • 5.
  • 6.
    Examples of SCALE: 1:10 1/4in. = 1 ft. 1-to-1 full-size life-size monumental PROPORTION AND SCALE IN DRAWING
  • 7.
    SCALE DRAWING A drawingthat shows a real object with accurate sizes reduced or enlarged by a certain amount (called the scale). The scale is shown as the length in the drawing, then a colon (":"), then the matching length on the real thing. Example: This drawing has a scale of "1:10", so anything drawn with the size of "1" would have a size of "10" in the real world, so a measurement of 150mm on the drawing would be 1500mm on the real horse. PROPORTION AND SCALE IN DRAWING
  • 8.
    Function of aScale 1. To measure or layout line distances accurately either in full size and larger or smaller than full size. 2. To produce drawing to a certain sizes (making drawing into scale) The Scale Ratio (Object/Drawing) Scale ratio 1 : 1 – means that 1 mm. on the drawing represent 1 mm. on the actual product or work piece. Proportion Scales Most drafting scales are equipped with proportion scales. Each of these scales aids the drafter in reducing an object on a drawing in a different proportion. PROPORTION AND SCALE IN DRAWING
  • 9.
    Commonly Used Scale Full-SizeScale – has a ratio of 1:1. This means that 1 mm on the drawing represents 1 mm of the actual object. The views on the drawing paper are the same size as those of the actual object. Reduced Scale (Scaled-down) – has a ratio of 1:2. This means that 1 mm on the drawing represent 2 mm on the actual object. The views of the actual object are twice the size of the views on the drawing paper. Enlarged Scale (Scaled-up) Examples: Scale 2:1 - This means that every 2 mm on the drawing represent 1 mm on the actual object. The views on the drawing paper are twice the size of those of the actual object. Scale 5:1 - This means that every 5 mm on the drawing represent 1mm on the actual object. The views on the drawing paper are five times larger than those of the actual object. PROPORTION AND SCALE IN DRAWING
  • 10.
    SCALE: Sample computation PROPORTIONAND SCALE IN DRAWING A particular map shows a scale of 1 cm : 5 km. What would the map distance (in cm) be if the actual distance is 14 km?
  • 11.
    GRID METHOD INDRAWING • The grid method is an inexpensive, low-tech way to reproduce and/or enlarge an image that you want to paint or draw. • The important thing to remember when drawing the grids is that they must have a 1:1 ratio. • The grid method involves drawing a grid over your reference photo, and then drawing a grid of equal ratio on your work surface. • Then you draw the image on your canvas, focusing on one square at a time, until the entire image has been transferred. • Once you're finished, you simply erase or paint over the grid lines, and start working on your painting, which will be now be in perfect proportion.
  • 12.
    GRID METHOD INDRAWING To use the grid method, you need to have…  a ruler  a paper copy of your reference image  a pencil to draw lines on the image  a work surface upon which you will be transferring the photo, such as paper, canvas, wood panel, etc.
  • 13.
    GRID METHOD INDRAWING Example: This reference photo is 5" x 7". If you want to make a large painting, you could also make a painting that is 10" x 14" or 15" x 21" or 20" x 28". Why those sizes and not other sizes? Because those sizes are the same ratio as the 5" x 7" reference photo. In other words:
  • 14.
    GRID METHOD INDRAWING Steps: 1. To draw this grid, put your ruler at the top of the paper, and make a small mark at every inch. Place the ruler at the bottom of the paper and do the same thing. Then use the ruler to make a straight line connecting each dot at the bottom with its partner at the top. 2. Now place the ruler on the left side of your paper, and make a small mark at every inch. Then place the ruler on the right side of the paper, and do the same thing. Then, using your ruler, make a straight line connecting the dots on the left with their partners on the right. 3. Now repeat the same procedure on your paper or canvas:
  • 15.
    GRID METHOD INDRAWING 4. You've now got a grid on your work surface that perfectly matches the grid of your reference photo. Bravo!
  • 16.
    GRID METHOD INDRAWING 4. You've now got a grid on your work surface that perfectly matches the grid of your reference photo. Bravo! Reference photo Your work surface
  • 17.
    GRID METHOD INDRAWING Reference photo Your work surface 5. It's sometimes easier to keep track of where you are amongst all those little squares by marking them numerically and alphabetically along the edges of the paper and canvas.
  • 18.
    GRID METHOD INDRAWING 6. You may now start your drawing! and so on…
  • 19.