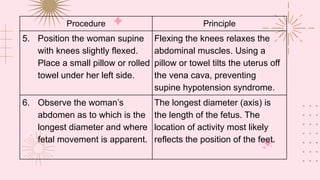
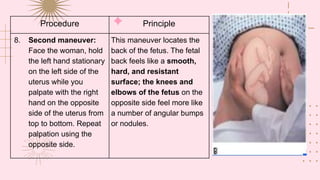
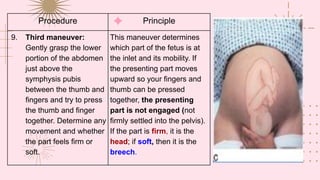
Leopold’s
Maneuver
Prepared by: Jennie J. Pauya, RN
Purpose:
➢ used to determine the
orientation of the fetus through
abdominal palpation.
Procedure Principle
1. Explain the procedure Explanation reduces anxiety and
enhances cooperation.
2. Instruct the woman to void to empty
her bladder.
An empty bladder promotes comfort and
allows for more productive palpation
because fetal contour will not be obscured
by a distended bladder.
3. Wash your hands using warm water. Hand washing prevents the spread of
possible infection. Using warm water aids
in patient comfort and prevents tightening
of abdominal muscles during palpation.
4. Provide privacy. Privacy enhances self-esteem.
Procedure Principle
5. Position the woman supine
with knees slightly flexed.
Place a small pillow or rolled
towel under her left side.
Flexing the knees relaxes the
abdominal muscles. Using a
pillow or towel tilts the uterus off
the vena cava, preventing
supine hypotension syndrome.
6. Observe the woman’s
abdomen as to which is the
longest diameter and where
fetal movement is apparent.
The longest diameter (axis) is
the length of the fetus. The
location of activity most likely
reflects the position of the feet.
Procedure Principle
7. First maneuver:
Stand at the foot of the
woman, facing her, and
place both hands flat
on her abdomen.
Palpate the superior
surface of the fundus.
Determine
consistency, shape,
and mobility.
This maneuver determines
whether the fetal head or
breech is in the fundus. A
head feels more firm than a
breech, is round and hard,
and moves independently of
the body (the breech feels
softer and moves only in
conjunction with the body).
Procedure Principle
8. Second maneuver:
Face the woman, hold
the left hand stationary
on the left side of the
uterus while you
palpate with the right
hand on the opposite
side of the uterus from
top to bottom. Repeat
palpation using the
opposite side.
This maneuver locates the
back of the fetus. The fetal
back feels like a smooth,
hard, and resistant
surface; the knees and
elbows of the fetus on the
opposite side feel more like
a number of angular bumps
or nodules.
Procedure Principle
9. Third maneuver:
Gently grasp the lower
portion of the abdomen
just above the
symphysis pubis
between the thumb and
fingers and try to press
the thumb and finger
together. Determine any
movement and whether
the part feels firm or
soft.
This maneuver determines
which part of the fetus is at
the inlet and its mobility. If
the presenting part moves
upward so your fingers and
thumb can be pressed
together, the presenting
part is not engaged (not
firmly settled into the pelvis).
If the part is firm, it is the
head; if soft, then it is the
breech.
Procedure Principle
10. Fourth maneuver: Place fingers
on both sides of the uterus
approximately 2 in. above the
inguinal ligaments, pressing
downward and inward in the
direction of the birth canal. Allow
fingers to be carried downward.
This maneuver is only done if the fetus is in a cephalic
presentation because it determines fetal attitude and
degree of fetal extension into the pelvis. The fingers of
one hand will slide along the uterine contour and meet no
obstruction, indicating the back of the fetal neck. The other
hand will meet an obstruction an inch or so above the
ligament—this is the fetal brow. The position of the fetal
brow should correspond to the side of the uterus that
contained the elbows and knees of the fetus. If the fetus is
in a poor attitude, the examining fingers will meet an
obstruction on the same side as the fetal back; that is, the
fingers will touch the hyperextended head. If the brow is
very easily palpated (as if it lies just under the skin), the
fetus is probably in a posterior position (the occiput is
pointing toward the woman’s back).
A picture is worth a
thousand words
Fundal Height Measurement
What is fundal height?
➢ Fundal height is the distance between your pubic
bone and the top of your uterus during pregnancy.
Measuring fundal height helps healthcare providers
assess if your baby is growing correctly. It also can
help determine gestational age (term to describe how
far along the pregnancy is) and your baby's position
in your uterus. It's measured in centimeters with
measuring tape. After about 20 weeks of pregnancy,
your fundal height in centimeters should be close to
your baby's gestational age. For example, if you are
24 weeks pregnant, your fundal height should be
around 24 centimeters.
Fundal Height Measurement
Typical fundal (top of the uterus) measurements are:
● Over the symphysis pubis at 12 weeks
● At the umbilicus at 20 weeks
● At the xiphoid process at 36 weeks
McDonald’s rule,
➢ another symphysis–fundal height measurement
(although, again, not documented to be thoroughly
reliable), is an easy method of determining
midpregnancy growth.
➢ Tape measurement from the notch of the symphysis
pubis to over the top of the uterine fundus as a
woman lies supine is equal to the week of gestation
in centimeters between the 20th and 31st weeks of
pregnancy (e.g., in a pregnancy of 24 weeks, the
fundal height should be 24 cm).
Fundal Height Measurement
➢ A fundal height much greater than this standard
suggests a multiple pregnancy, a miscalculated
due date, a large-for-gestational-age (LGA) infant,
hydramnios (increased amniotic fluid volume), or
possibly even gestational trophoblastic disease
➢ A fundal measurement much less than this suggests
the fetus is failing to thrive (e.g., intrauterine growth
restriction),
○ the pregnancy length was miscalculated,
or an anomaly interfering with growth has
developed.
○ McDonald’s rule becomes inaccurate
during the third trimester of pregnancy
because the fetus is growing more in
weight than in height during this time.
Related
Terminologies
Attitude
➢ Refers to the degree of
flexion a fetus assumes
during labor or the relation
of the fetal parts to each
other.
Attitude
Attitude
Good Attitude
➢ Is in complete flexion: the spinal
column is bowed forward, the head is
flexed forward, the arms are flexed
and folded on the chest, the thighs are
flexed onto the abdomen, and the
calves are pressed against the
posterior aspect of the thighs. Normal
fetal position.
Attitude
Moderate Flexion:
➢ the chin is touching the chest
but is in “alert position”. This
position causes the next
widest anteroposterior
diameter, the occipital frontal
diameter, to present to the birth
canal.
Attitude
Poor Flexion:
➢ presents the brow. The back is
arched, the neck is extended, and
the fetus is extended, and a fetus is
in complete extension, presenting
the occipito-mental diameter of the
head to the birth canal (face
presentation). This may occur if
there is less than normal amniotic
fluid (oligohydramnios)
Station
➢ Station refers to the
relationship of the
presenting part of the fetus
to the level of the ischial
spines
Station
➢ When the presenting fetal part is at the level of the
ischial spines, it is at a 0 station (synonymous with
engagement).
➢ If the presenting part is above the spines, the
distance is measured and described as minus
stations, which range from −1 to −4 cm.
➢ If the presenting part is below the ischial spines, the
distance is stated as plus stations (+1 to +4 cm).
➢ At a +3 or +4 station, the presenting part is at the
perineum and can be seen if the vulva is separated
(i.e., it is crowning).
Station
Engagement
➢ refers to the settling of the presenting part of a fetus far
enough into the pelvis that it rests at the level of the ischial
spines, the midpoint of the pelvis.
➢ Descent to this point means the widest part of the fetus (the
presenting skull diameter in a cephalic presentation, or the
intertrochanteric diameter in a breech presentation) has
passed through the pelvis or the pelvic inlet has been proven
adequate for birth.
Engagement
➢ In a primipara, nonengagement of the head at the beginning
of labor suggests that a possible complication such as an
abnormal presentation or position, abnormality of the fetal
head, or cephalopelvic disproportion exists.
➢ In multiparas, engagement may or may not be present at the
beginning of labor. The degree of engagement is established
by a vaginal and cervical examination.
○ A presenting part that is not engaged is said to be
“floating.”
○ One that is descending but has not yet reached the ischial
spines may be referred to as “dipping.”
CREDITS: This presentation template was created by Slidesgo,
including icons by Flaticon, and infographics & images by Freepik
Thanks for
Listening!
Please keep this slide for attribution

Leopold's Maneuver.pdf

  • 1.
  • 2.
    Purpose: ➢ used todetermine the orientation of the fetus through abdominal palpation.
  • 3.
    Procedure Principle 1. Explainthe procedure Explanation reduces anxiety and enhances cooperation. 2. Instruct the woman to void to empty her bladder. An empty bladder promotes comfort and allows for more productive palpation because fetal contour will not be obscured by a distended bladder. 3. Wash your hands using warm water. Hand washing prevents the spread of possible infection. Using warm water aids in patient comfort and prevents tightening of abdominal muscles during palpation. 4. Provide privacy. Privacy enhances self-esteem.
  • 4.
    Procedure Principle 5. Positionthe woman supine with knees slightly flexed. Place a small pillow or rolled towel under her left side. Flexing the knees relaxes the abdominal muscles. Using a pillow or towel tilts the uterus off the vena cava, preventing supine hypotension syndrome. 6. Observe the woman’s abdomen as to which is the longest diameter and where fetal movement is apparent. The longest diameter (axis) is the length of the fetus. The location of activity most likely reflects the position of the feet.
  • 5.
    Procedure Principle 7. Firstmaneuver: Stand at the foot of the woman, facing her, and place both hands flat on her abdomen. Palpate the superior surface of the fundus. Determine consistency, shape, and mobility. This maneuver determines whether the fetal head or breech is in the fundus. A head feels more firm than a breech, is round and hard, and moves independently of the body (the breech feels softer and moves only in conjunction with the body).
  • 6.
    Procedure Principle 8. Secondmaneuver: Face the woman, hold the left hand stationary on the left side of the uterus while you palpate with the right hand on the opposite side of the uterus from top to bottom. Repeat palpation using the opposite side. This maneuver locates the back of the fetus. The fetal back feels like a smooth, hard, and resistant surface; the knees and elbows of the fetus on the opposite side feel more like a number of angular bumps or nodules.
  • 7.
    Procedure Principle 9. Thirdmaneuver: Gently grasp the lower portion of the abdomen just above the symphysis pubis between the thumb and fingers and try to press the thumb and finger together. Determine any movement and whether the part feels firm or soft. This maneuver determines which part of the fetus is at the inlet and its mobility. If the presenting part moves upward so your fingers and thumb can be pressed together, the presenting part is not engaged (not firmly settled into the pelvis). If the part is firm, it is the head; if soft, then it is the breech.
  • 8.
    Procedure Principle 10. Fourthmaneuver: Place fingers on both sides of the uterus approximately 2 in. above the inguinal ligaments, pressing downward and inward in the direction of the birth canal. Allow fingers to be carried downward. This maneuver is only done if the fetus is in a cephalic presentation because it determines fetal attitude and degree of fetal extension into the pelvis. The fingers of one hand will slide along the uterine contour and meet no obstruction, indicating the back of the fetal neck. The other hand will meet an obstruction an inch or so above the ligament—this is the fetal brow. The position of the fetal brow should correspond to the side of the uterus that contained the elbows and knees of the fetus. If the fetus is in a poor attitude, the examining fingers will meet an obstruction on the same side as the fetal back; that is, the fingers will touch the hyperextended head. If the brow is very easily palpated (as if it lies just under the skin), the fetus is probably in a posterior position (the occiput is pointing toward the woman’s back).
  • 10.
    A picture isworth a thousand words
  • 11.
    Fundal Height Measurement Whatis fundal height? ➢ Fundal height is the distance between your pubic bone and the top of your uterus during pregnancy. Measuring fundal height helps healthcare providers assess if your baby is growing correctly. It also can help determine gestational age (term to describe how far along the pregnancy is) and your baby's position in your uterus. It's measured in centimeters with measuring tape. After about 20 weeks of pregnancy, your fundal height in centimeters should be close to your baby's gestational age. For example, if you are 24 weeks pregnant, your fundal height should be around 24 centimeters.
  • 12.
    Fundal Height Measurement Typicalfundal (top of the uterus) measurements are: ● Over the symphysis pubis at 12 weeks ● At the umbilicus at 20 weeks ● At the xiphoid process at 36 weeks McDonald’s rule, ➢ another symphysis–fundal height measurement (although, again, not documented to be thoroughly reliable), is an easy method of determining midpregnancy growth. ➢ Tape measurement from the notch of the symphysis pubis to over the top of the uterine fundus as a woman lies supine is equal to the week of gestation in centimeters between the 20th and 31st weeks of pregnancy (e.g., in a pregnancy of 24 weeks, the fundal height should be 24 cm).
  • 13.
    Fundal Height Measurement ➢A fundal height much greater than this standard suggests a multiple pregnancy, a miscalculated due date, a large-for-gestational-age (LGA) infant, hydramnios (increased amniotic fluid volume), or possibly even gestational trophoblastic disease ➢ A fundal measurement much less than this suggests the fetus is failing to thrive (e.g., intrauterine growth restriction), ○ the pregnancy length was miscalculated, or an anomaly interfering with growth has developed. ○ McDonald’s rule becomes inaccurate during the third trimester of pregnancy because the fetus is growing more in weight than in height during this time.
  • 14.
  • 15.
    Attitude ➢ Refers tothe degree of flexion a fetus assumes during labor or the relation of the fetal parts to each other.
  • 16.
  • 17.
    Attitude Good Attitude ➢ Isin complete flexion: the spinal column is bowed forward, the head is flexed forward, the arms are flexed and folded on the chest, the thighs are flexed onto the abdomen, and the calves are pressed against the posterior aspect of the thighs. Normal fetal position.
  • 18.
    Attitude Moderate Flexion: ➢ thechin is touching the chest but is in “alert position”. This position causes the next widest anteroposterior diameter, the occipital frontal diameter, to present to the birth canal.
  • 19.
    Attitude Poor Flexion: ➢ presentsthe brow. The back is arched, the neck is extended, and the fetus is extended, and a fetus is in complete extension, presenting the occipito-mental diameter of the head to the birth canal (face presentation). This may occur if there is less than normal amniotic fluid (oligohydramnios)
  • 20.
    Station ➢ Station refersto the relationship of the presenting part of the fetus to the level of the ischial spines
  • 21.
    Station ➢ When thepresenting fetal part is at the level of the ischial spines, it is at a 0 station (synonymous with engagement). ➢ If the presenting part is above the spines, the distance is measured and described as minus stations, which range from −1 to −4 cm. ➢ If the presenting part is below the ischial spines, the distance is stated as plus stations (+1 to +4 cm). ➢ At a +3 or +4 station, the presenting part is at the perineum and can be seen if the vulva is separated (i.e., it is crowning).
  • 22.
  • 23.
    Engagement ➢ refers tothe settling of the presenting part of a fetus far enough into the pelvis that it rests at the level of the ischial spines, the midpoint of the pelvis. ➢ Descent to this point means the widest part of the fetus (the presenting skull diameter in a cephalic presentation, or the intertrochanteric diameter in a breech presentation) has passed through the pelvis or the pelvic inlet has been proven adequate for birth.
  • 24.
    Engagement ➢ In aprimipara, nonengagement of the head at the beginning of labor suggests that a possible complication such as an abnormal presentation or position, abnormality of the fetal head, or cephalopelvic disproportion exists. ➢ In multiparas, engagement may or may not be present at the beginning of labor. The degree of engagement is established by a vaginal and cervical examination. ○ A presenting part that is not engaged is said to be “floating.” ○ One that is descending but has not yet reached the ischial spines may be referred to as “dipping.”
  • 26.
    CREDITS: This presentationtemplate was created by Slidesgo, including icons by Flaticon, and infographics & images by Freepik Thanks for Listening! Please keep this slide for attribution