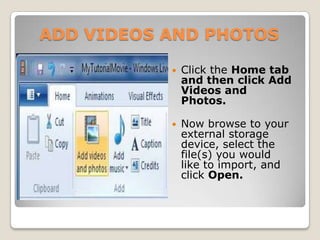
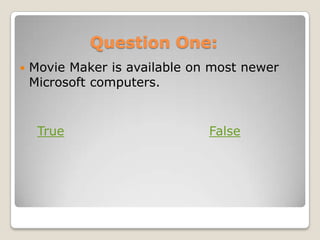
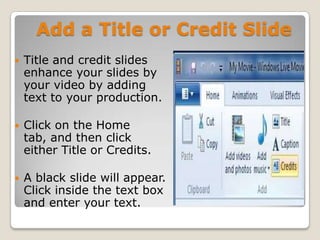
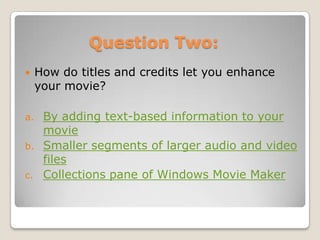
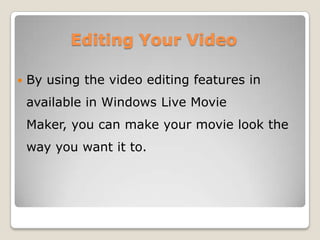
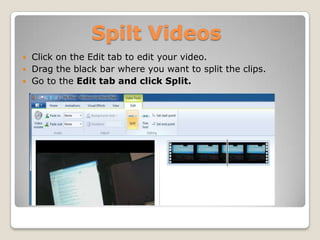
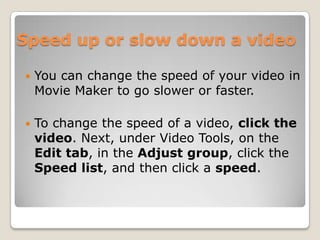
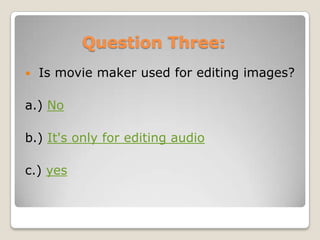
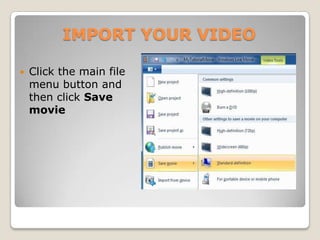
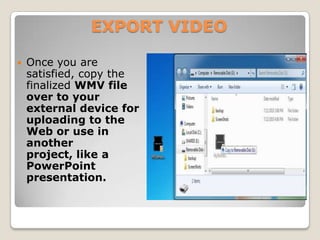
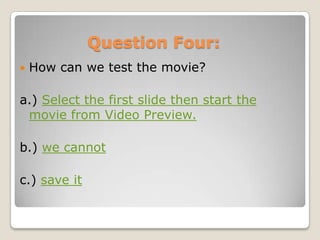
INTRODUCTION
 This is a self-paced training
 for Windows Live Movie
 Maker

Please use the hyperlinks and navigation buttons to
move around within this tutorial.
This tutorial will take approximately 15 minutes.


                                     Continue
What is Windows Live Movie
                Maker?

   Windows Live Movie Maker is a basic video
    editing application that is available to all
    users of Windows Vista and Windows 7 or
    newer Microsoft computers. Anyone who
    would like to download this application to a
    personal computer, open the following link:

   http://explore.live.com/windows-live-
    essentials
Objectives:
   Learners will learn how to:

   Import Video
   Import Photos
   Edit video
   Add a Title or Credit Slide
   Export Video
Target Audience
   This training is for educators at San
    Benito High School who want to keep their
    students engaged in their lessons by the
    use of technology.

   If there are any questions please use the
    back or home buttons to work through
    this tutorial.
ADD VIDEOS AND PHOTOS

              Click the Home tab
               and then click Add
               Videos and
               Photos.

              Now browse to your
               external storage
               device, select the
               file(s) you would
               like to import, and
               click Open.
Question One:
   Movie Maker is available on most newer
    Microsoft computers.


     True                      False
Add a Title or Credit Slide
   Title and credit slides
    enhance your slides by
    your video by adding
    text to your production.

   Click on the Home
    tab, and then click
    either Title or Credits.

   A black slide will appear.
    Click inside the text box
    and enter your text.
Question Two:
    How do titles and credits let you enhance
     your movie?

a.    By adding text-based information to your
      movie
b.    Smaller segments of larger audio and video
      files
c.    Collections pane of Windows Movie Maker
Editing Your Video

   By using the video editing features in
    available in Windows Live Movie
    Maker, you can make your movie look the
    way you want it to.
Spilt Videos
   Click on the Edit tab to edit your video.
   Drag the black bar where you want to split the clips.
   Go to the Edit tab and click Split.
Speed up or slow down a video

   You can change the speed of your video in
    Movie Maker to go slower or faster.

   To change the speed of a video, click the
    video. Next, under Video Tools, on the
    Edit tab, in the Adjust group, click the
    Speed list, and then click a speed.
Question Three:
   Is movie maker used for editing images?

a.) No

b.) It's only for editing audio

c.) yes
IMPORT YOUR VIDEO

   Click the main file
    menu button and
    then click Save
    movie
IMPORT YOUR VIDEO AND SAVE
            YOUR VIDEO
   Then select Standard-
    definition type a
    meaningful file name
    and then click Save.

   Once it has finished
    saving, follow the prompt
    and Play the final
    movie through, just to
    make sure it looks
    exactly the way you
    want. Select the first
    slide from Video
    Preview.
EXPORT VIDEO

   Once you are
    satisfied, copy the
    finalized WMV file
    over to your
    external device for
    uploading to the
    Web or use in
    another
    project, like a
    PowerPoint
    presentation.
Question Four:
   How can we test the movie?

a.) Select the first slide then start the
 movie from Video Preview.

b.) we cannot

c.) save it
You have now successfully
     created a Video.


   Previous    Continue
Conclusion
   In this self-paced tutorial , you learned
    how to create and edit a video.

   We hope that you enjoyed this tutorial
    and that you create many videos to
    capture your memories.


          Previous            Continue
Credits
(Education)
Education, J. H. (n.d.). Retrieved September 6, 2011, from Windows
Live Movie Maker Guide:
http://www.utoledo.edu/education/centers/carver/pdf/Windows_Live_M
ovie_Maker_Guide.pdf


                     Previous

Lab1

  • 1.
    INTRODUCTION This isa self-paced training for Windows Live Movie Maker Please use the hyperlinks and navigation buttons to move around within this tutorial. This tutorial will take approximately 15 minutes. Continue
  • 2.
    What is WindowsLive Movie Maker?  Windows Live Movie Maker is a basic video editing application that is available to all users of Windows Vista and Windows 7 or newer Microsoft computers. Anyone who would like to download this application to a personal computer, open the following link:  http://explore.live.com/windows-live- essentials
  • 3.
    Objectives:  Learners will learn how to:  Import Video  Import Photos  Edit video  Add a Title or Credit Slide  Export Video
  • 4.
    Target Audience  This training is for educators at San Benito High School who want to keep their students engaged in their lessons by the use of technology.  If there are any questions please use the back or home buttons to work through this tutorial.
  • 5.
    ADD VIDEOS ANDPHOTOS  Click the Home tab and then click Add Videos and Photos.  Now browse to your external storage device, select the file(s) you would like to import, and click Open.
  • 6.
    Question One:  Movie Maker is available on most newer Microsoft computers. True False
  • 7.
    Add a Titleor Credit Slide  Title and credit slides enhance your slides by your video by adding text to your production.  Click on the Home tab, and then click either Title or Credits.  A black slide will appear. Click inside the text box and enter your text.
  • 8.
    Question Two:  How do titles and credits let you enhance your movie? a. By adding text-based information to your movie b. Smaller segments of larger audio and video files c. Collections pane of Windows Movie Maker
  • 9.
    Editing Your Video  By using the video editing features in available in Windows Live Movie Maker, you can make your movie look the way you want it to.
  • 10.
    Spilt Videos  Click on the Edit tab to edit your video.  Drag the black bar where you want to split the clips.  Go to the Edit tab and click Split.
  • 11.
    Speed up orslow down a video  You can change the speed of your video in Movie Maker to go slower or faster.  To change the speed of a video, click the video. Next, under Video Tools, on the Edit tab, in the Adjust group, click the Speed list, and then click a speed.
  • 12.
    Question Three:  Is movie maker used for editing images? a.) No b.) It's only for editing audio c.) yes
  • 13.
    IMPORT YOUR VIDEO  Click the main file menu button and then click Save movie
  • 14.
    IMPORT YOUR VIDEOAND SAVE YOUR VIDEO  Then select Standard- definition type a meaningful file name and then click Save.  Once it has finished saving, follow the prompt and Play the final movie through, just to make sure it looks exactly the way you want. Select the first slide from Video Preview.
  • 15.
    EXPORT VIDEO  Once you are satisfied, copy the finalized WMV file over to your external device for uploading to the Web or use in another project, like a PowerPoint presentation.
  • 16.
    Question Four:  How can we test the movie? a.) Select the first slide then start the movie from Video Preview. b.) we cannot c.) save it
  • 17.
    You have nowsuccessfully created a Video. Previous Continue
  • 18.
    Conclusion  In this self-paced tutorial , you learned how to create and edit a video.  We hope that you enjoyed this tutorial and that you create many videos to capture your memories. Previous Continue
  • 19.
    Credits (Education) Education, J. H.(n.d.). Retrieved September 6, 2011, from Windows Live Movie Maker Guide: http://www.utoledo.edu/education/centers/carver/pdf/Windows_Live_M ovie_Maker_Guide.pdf Previous