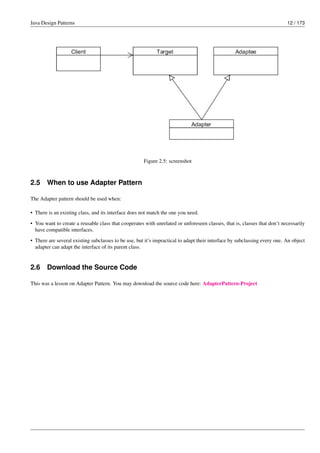
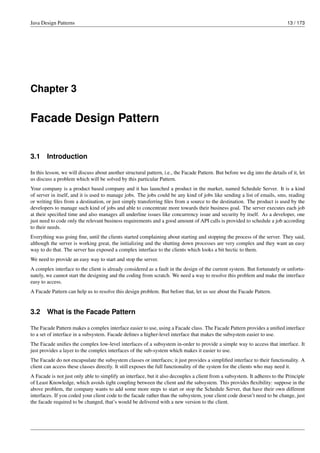
This document provides an introduction to design patterns in Java. It discusses what design patterns are, why they are used, and how to select and categorize them. The document also explores several specific design patterns in detail, including adapter, facade, composite, bridge, singleton, observer, mediator, proxy, chain of responsibility, and flyweight patterns. Code examples are provided to illustrate how to implement each pattern.


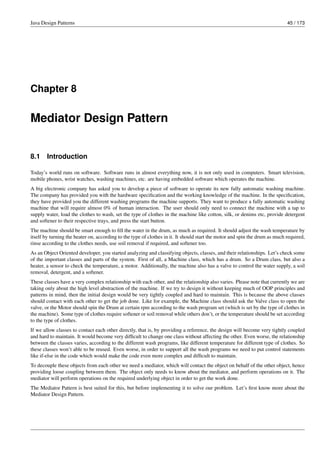
![Java Design Patterns 10 / 173
@Override
public void setCardExpMonthDate(String cardExpMonthDate) {
this.cardExpMonthDate = cardExpMonthDate;
}
@Override
public void setCVVNo(Integer cVVNo) {
this.cVVNo = cVVNo;
}
@Override
public void setTotalAmount(Double totalAmount) {
this.totalAmount = totalAmount;
}
private void setProp(){
setCardOwnerName(this.xpay.getCustomerName());
setCustCardNo(this.xpay.getCreditCardNo());
setCardExpMonthDate(this.xpay.getCardExpMonth()+"/"+this.xpay. ←-
getCardExpYear());
setCVVNo(this.xpay.getCardCVVNo().intValue());
setTotalAmount(this.xpay.getAmount());
}
}
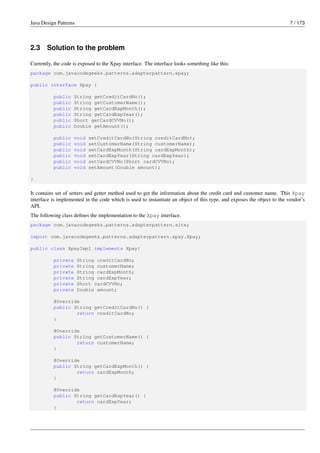
In the above code, we have created an Adapter(XpayToPayDAdapter). The adapter implements the PayD interface, as it
is required to mimic like a PayD type of object. The adapter uses object composition to hold the object, it’s supposed to be
adapting, an Xpay type of object. The object is passed into the adapter through its constructor.
Now, please note that we have two incompatible types of interfaces, which we need to fit together using an adapter in order to
make the code work. These two interfaces have a different set of methods. But the sole purpose of these interfaces is very much
similar, i.e. to provide the customer and credit card info to their specific vendors.
The setProp() method of the above class is used to set the xpay’s properties into the payD’s object. We set the methods
which are similar in work in both the interfaces. However, there is only single method in PayD interface to set the month
and the year of the credit card, as opposed to two methods in the Xpay interface. We joined the result of the two methods
of the Xpay object (this.xpay.getCardExpMonth()+"/"+this.xpay.getCardExpYear()) and sets it into the
setCardExpMonthDate() method.
Let us test the above code and see whether it can solve the Max’s problem.
package com.javacodegeeks.patterns.adapterpattern.site;
import com.javacodegeeks.patterns.adapterpattern.payd.PayD;
import com.javacodegeeks.patterns.adapterpattern.xpay.Xpay;
public class RunAdapterExample {
public static void main(String[] args) {
// Object for Xpay
Xpay xpay = new XpayImpl();
xpay.setCreditCardNo("4789565874102365");
xpay.setCustomerName("Max Warner");
xpay.setCardExpMonth("09");
xpay.setCardExpYear("25");
xpay.setCardCVVNo((short)235);
xpay.setAmount(2565.23);
PayD payD = new XpayToPayDAdapter(xpay);
testPayD(payD);](https://image.slidesharecdn.com/java-design-patterns-231122141503-3378dc32/85/Java-Design-Patterns-pdf-20-320.jpg)
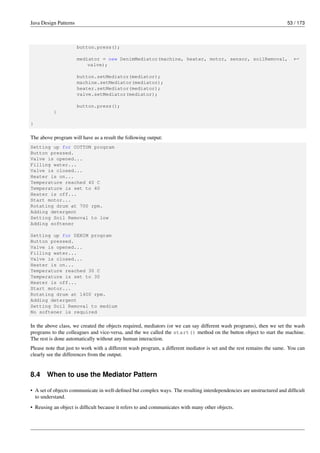
![Java Design Patterns 15 / 173
scheduleServer.destroySystemObjects();
scheduleServer.destoryListeners();
scheduleServer.destoryContext();
scheduleServer.shutdown();
This looks a burden to them, they are not interested in doing all these stuffs, and why would they? Even though this might look
interesting to some of the clients who might be interested in the low-level interface of the system, most of them disliked it.
To resolve this, we will create a facade class which will wrap a server object. This class will provide simple interfaces (methods)
for the client. These interfaces internally will call the methods on the server object. Let us first see the code and then will discuss
more about it.
package com.javacodegeeks.patterns.facadepattern;
public class ScheduleServerFacade {
private final ScheduleServer scheduleServer;
public ScheduleServerFacade(ScheduleServer scheduleServer){
this.scheduleServer = scheduleServer;
}
public void startServer(){
scheduleServer.startBooting();
scheduleServer.readSystemConfigFile();
scheduleServer.init();
scheduleServer.initializeContext();
scheduleServer.initializeListeners();
scheduleServer.createSystemObjects();
}
public void stopServer(){
scheduleServer.releaseProcesses();
scheduleServer.destory();
scheduleServer.destroySystemObjects();
scheduleServer.destoryListeners();
scheduleServer.destoryContext();
scheduleServer.shutdown();
}
}
The above class ScheduleServerFacade is the facade class, which wraps a ScheduleServer object, it instantiates the
server object through its constructor, and has two simple methods: startServer() and stopServer(). These methods
internally perform the starting and the stopping of the server. The client is just needs to call these simple methods. Now, there is
no need to call all the lifecycle and destroy methods, just the simple methods and the rest of the process will be performed by the
facade class.
The code below shows how facade makes a complex interface simple to use.
package com.javacodegeeks.patterns.facadepattern;
public class TestFacade {
public static void main(String[] args) {
ScheduleServer scheduleServer = new ScheduleServer();
ScheduleServerFacade facadeServer = new ScheduleServerFacade(scheduleServer ←-
);
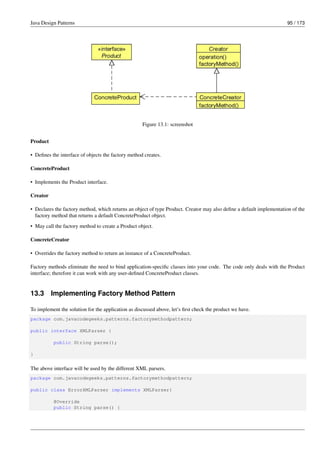
facadeServer.startServer();](https://image.slidesharecdn.com/java-design-patterns-231122141503-3378dc32/85/Java-Design-Patterns-pdf-25-320.jpg)
![Java Design Patterns 22 / 173
@Override
public void setEndTag(String tag) {
this.endTag = tag;
}
@Override
public void setTagBody(String tagBody){
this.tagBody = tagBody;
}
@Override
public void generateHtml() {
System.out.println(startTag+""+tagBody+""+endTag);
}
}
The HtmlElement is the leaf class, and its main job is to implement the operation method, which in this example is the
generateHtml method. It prints the startTag, optionally tagBody if have, and the endTag of the child element.
Let’s test this example.
package com.javacodegeeks.patterns.compositepattern;
public class TestCompositePattern {
public static void main(String[] args) {
HtmlTag parentTag = new HtmlParentElement("<html>");
parentTag.setStartTag("<html>");
parentTag.setEndTag("</html>");
HtmlTag p1 = new HtmlParentElement("<body>");
p1.setStartTag("<body>");
p1.setEndTag("</body>");
parentTag.addChildTag(p1);
HtmlTag child1 = new HtmlElement("<P>");
child1.setStartTag("<P>");
child1.setEndTag("</P>");
child1.setTagBody("Testing html tag library");
p1.addChildTag(child1);
child1 = new HtmlElement("<P>");
child1.setStartTag("<P>");
child1.setEndTag("</P>");
child1.setTagBody("Paragraph 2");
p1.addChildTag(child1);
parentTag.generateHtml();
}
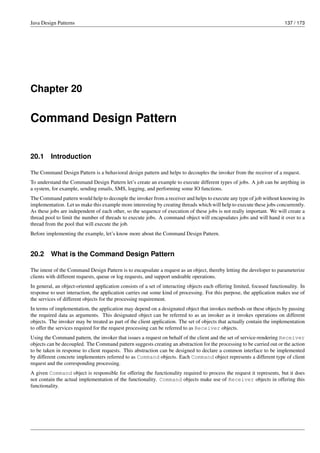
}
The above code will result to the following output:
<html>
<body>
<P>Testing html tag library</P>
<P>Paragraph 2</P>
</body>](https://image.slidesharecdn.com/java-design-patterns-231122141503-3378dc32/85/Java-Design-Patterns-pdf-32-320.jpg)
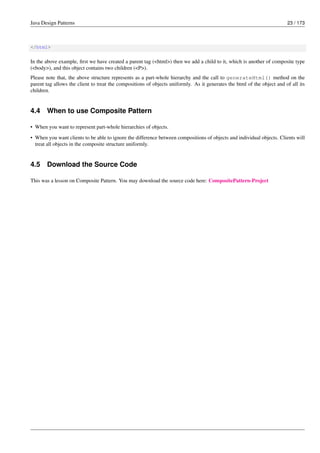

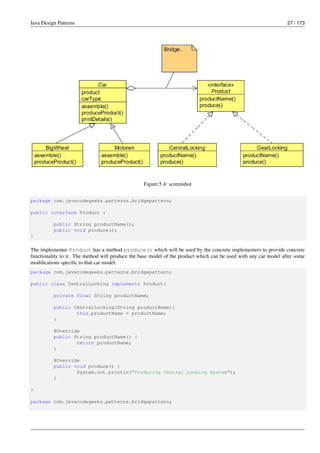
![Java Design Patterns 29 / 173
public void assemble() {
System.out.println("Assembling "+product.productName()+" for "+carType);
}
@Override
public void produceProduct() {
product.produce();
System.out.println("Modifing product "+product.productName()+" according to ←-
"+carType);
}
}
package com.javacodegeeks.patterns.bridgepattern;
public class Motoren extends Car{
private final Product product;
private final String carType;
public Motoren(Product product, String carType) {
super(product, carType);
this.product = product;
this.carType = carType;
}
@Override
public void assemble() {
System.out.println("Assembling "+product.productName()+" for "+carType);
}
@Override
public void produceProduct() {
product.produce();
System.out.println("Modifing product "+product.productName()+" according to ←-
"+carType);
}
}
Now, let’s test the example.
package com.javacodegeeks.patterns.bridgepattern;
public class TestBridgePattern {
public static void main(String[] args) {
Product product = new CentralLocking("Central Locking System");
Product product2 = new GearLocking("Gear Locking System");
Car car = new BigWheel(product , "BigWheel xz model");
car.produceProduct();
car.assemble();
car.printDetails();
System.out.println();
car = new BigWheel(product2 , "BigWheel xz model");
car.produceProduct();
car.assemble();
car.printDetails();
car = new Motoren(product, "Motoren lm model");](https://image.slidesharecdn.com/java-design-patterns-231122141503-3378dc32/85/Java-Design-Patterns-pdf-39-320.jpg)
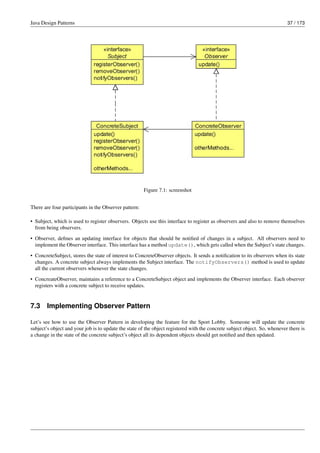
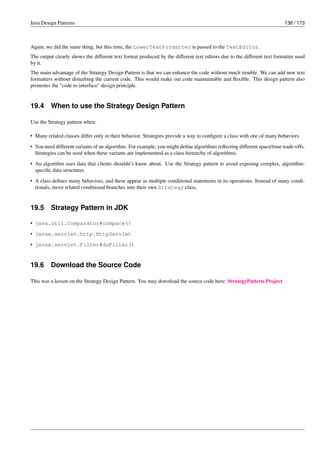
![Java Design Patterns 40 / 173
The above class works as a concrete subject which implements the Subject interface and provides implementation of it. It also
stores the reference to the observers registered to it.
package com.javacodegeeks.patterns.observerpattern;
public class SMSUsers implements Observer{
private final Subject subject;
private String desc;
private String userInfo;
public SMSUsers(Subject subject,String userInfo){
if(subject==null){
throw new IllegalArgumentException("No Publisher found.");
}
this.subject = subject;
this.userInfo = userInfo;
}
@Override
public void update(String desc) {
this.desc = desc;
display();
}
private void display(){
System.out.println("["+userInfo+"]: "+desc);
}
@Override
public void subscribe() {
System.out.println("Subscribing "+userInfo+" to "+subject.subjectDetails()+ ←-
" ...");
this.subject.subscribeObserver(this);
System.out.println("Subscribed successfully.");
}
@Override
public void unSubscribe() {
System.out.println("Unsubscribing "+userInfo+" to "+subject.subjectDetails ←-
()+" ...");
this.subject.unSubscribeObserver(this);
System.out.println("Unsubscribed successfully.");
}
}
The above class is the concrete observer class which implements the Observer interface. It also stores the reference to the
subject it subscribed and optionally a userInfo variable which is used to display the user information.
Now, let’s test the example.
package com.javacodegeeks.patterns.observerpattern;
import java.util.ArrayList;
public class TestObserver {
public static void main(String[] args) {
Subject subject = new CommentaryObject(new ArrayList<Observer>(), "Soccer ←-
Match [2014AUG24]");
Observer observer = new SMSUsers(subject, "Adam Warner [New York]");
observer.subscribe();](https://image.slidesharecdn.com/java-design-patterns-231122141503-3378dc32/85/Java-Design-Patterns-pdf-50-320.jpg)
![Java Design Patterns 41 / 173
System.out.println();
Observer observer2 = new SMSUsers(subject, "Tim Ronney [London]");
observer2.subscribe();
Commentary cObject = ((Commentary)subject);
cObject.setDesc("Welcome to live Soccer match");
cObject.setDesc("Current score 0-0");
System.out.println();
observer2.unSubscribe();
System.out.println();
cObject.setDesc("It’s a goal!!");
cObject.setDesc("Current score 1-0");
System.out.println();
Observer observer3 = new SMSUsers(subject, "Marrie [Paris]");
observer3.subscribe();
System.out.println();
cObject.setDesc("It’s another goal!!");
cObject.setDesc("Half-time score 2-0");
}
}
The above example will produce the following output:
Subscribing Adam Warner [New York] to Soccer Match [2014AUG24] ...
Subscribed successfully.
Subscribing Tim Ronney [London] to Soccer Match [2014AUG24] ...
Subscribed successfully.
[Adam Warner [New York]]: Welcome to live Soccer match
[Tim Ronney [London]]: Welcome to live Soccer match
[Adam Warner [New York]]: Current score 0-0
[Tim Ronney [London]]: Current score 0-0
Unsubscribing Tim Ronney [London] to Soccer Match [2014AUG24] ...
Unsubscribed successfully.
[Adam Warner [New York]]: It’s a goal!!
[Adam Warner [New York]]: Current score 1-0
Subscribing Marrie [Paris] to Soccer Match [2014AUG24] ...
Subscribed successfully.
[Adam Warner [New York]]: It’s another goal!!
[Marrie [Paris]]: It’s another goal!!
[Adam Warner [New York]]: Half-time score 2-0
[Marrie [Paris]]: Half-time score 2-0](https://image.slidesharecdn.com/java-design-patterns-231122141503-3378dc32/85/Java-Design-Patterns-pdf-51-320.jpg)
![Java Design Patterns 43 / 173
this.userInfo = userInfo;
}
public void subscribe() {
System.out.println("Subscribing "+userInfo+" to "+(( ←-
CommentaryObjectObservable)(observable)).subjectDetails()+" ...");
this.observable.addObserver(this);
System.out.println("Subscribed successfully.");
}
public void unSubscribe() {
System.out.println("Unsubscribing "+userInfo+" to "+(( ←-
CommentaryObjectObservable)(observable)).subjectDetails()+" ...");
this.observable.deleteObserver(this);
System.out.println("Unsubscribed successfully.");
}
@Override
public void update(Observable o, Object arg) {
desc = (String)arg;
display();
}
private void display(){
System.out.println("["+userInfo+"]: "+desc);
}
}
Let’s discuss some of the key methods.
The above class implements the Observer interface which has one key method update, which is called when the subject
calls the notifyObservers method. The update method takes an Observable object and an arg as parameters.
The addObserver method is used to register a observer to the subject, and the deleteObserver method is used to remove
the observer from the subject’s list.
Let’s test this example.
package com.javacodegeeks.patterns.observerpattern;
public class Test {
public static void main(String[] args) {
CommentaryObjectObservable obj = new CommentaryObjectObservable("Soccer ←-
Match [2014AUG24]");
SMSUsersObserver observer = new SMSUsersObserver(obj, "Adam Warner [New ←-
York]");
SMSUsersObserver observer2 = new SMSUsersObserver(obj,"Tim Ronney [London]" ←-
);
observer.subscribe();
observer2.subscribe();
obj.setDesc("Welcome to live Soccer match");
obj.setDesc("Current score 0-0");
observer.unSubscribe();
obj.setDesc("It’s a goal!!");
obj.setDesc("Current score 1-0");
}
}
The above example will produce the following output:](https://image.slidesharecdn.com/java-design-patterns-231122141503-3378dc32/85/Java-Design-Patterns-pdf-53-320.jpg)
![Java Design Patterns 44 / 173
Subscribing Adam Warner [New York] to Soccer Match [2014AUG24] ...
Subscribed successfully.
Subscribing Tim Ronney [London] to Soccer Match [2014AUG24] ...
Subscribed successfully.
[Tim Ronney [London]]: Welcome to live Soccer match
[Adam Warner [New York]]: Welcome to live Soccer match
[Tim Ronney [London]]: Current score 0-0
[Adam Warner [New York]]: Current score 0-0
Unsubscribing Adam Warner [New York] to Soccer Match [2014AUG24] ...
Unsubscribed successfully.
[Tim Ronney [London]]: It’s a goal!!
[Tim Ronney [London]]: Current score 1-0
The above class creates a subject and two observers. The subscribe method of the observer adds itself to the subject
observers list. Then setDesc changes the state of the subject which call the setChanged method to set the change flag to
true, and notifies the observers. As a result, observer’s update method is called which internally class the display method to
display the result. Later, one of the observers gets `unsubscribe`d, i.e. it is removed from the observer’s list. Due to which later
commentaries were not updated to it.
Java provides built-in facility for the Observer Pattern, but it comes with its own drawbacks. The Observable is a class,
you have to subclass it. That means you can’t add on the Observable behavior to an existing class that already extends another
superclass. This limits the reuse potential. You can’t even create your own implementation that plays well with Java’s built-in
Observer API. Some of the methods in the Observable API are protected. This means you can’t call the methods like setCha
nge unless you’ve subclassed Observable. And you can’t even create an instance of the Observable class and compose it
with your own objects, you have to subclass. This design violates the “favor composition over inheritance” design principle.
7.5 When to use the Observer Pattern
Use the Observer pattern in any of the following situations:
• When an abstraction has two aspects, one dependent on the other. Encapsulating these aspects in separate objects lets you vary
and reuse them independently.
• When a change to one object requires changing others, and you don’t know how many objects need to be changed.
• When an object should be able to notify other objects without making assumptions about who these objects are. In other words,
you don’t want these objects tightly coupled.
7.6 Download the Source Code
This was a lesson on Observer Pattern. You may download the source code here: ObserverPattern - Lesson 7](https://image.slidesharecdn.com/java-design-patterns-231122141503-3378dc32/85/Java-Design-Patterns-pdf-54-320.jpg)
![Java Design Patterns 52 / 173
public void wash() {
motor.startMotor();
motor.rotateDrum(1400);
System.out.println("Adding detergent");
soilRemoval.medium();
System.out.println("Adding softener");
}
@Override
public void open() {
valve.open();
}
@Override
public void closed() {
valve.closed();
}
@Override
public void on() {
heater.on(30);
}
@Override
public void off() {
heater.off();
}
@Override
public boolean checkTemperature(int temp) {
return sensor.checkTemperature(temp);
}
}
You can clearly see the differences between the two mediator classes. There is different temperature, spinning speed is also
different and no softener is required for the denim wash.
Now test these mediators.
package com.javacodegeeks.patterns.mediatorpattern;
public class TestMediator {
public static void main(String[] args) {
MachineMediator mediator = null;
Sensor sensor = new Sensor();
SoilRemoval soilRemoval = new SoilRemoval();
Motor motor = new Motor();
Machine machine = new Machine();
Heater heater = new Heater();
Valve valve = new Valve();
Button button = new Button();
mediator = new CottonMediator(machine, heater, motor, sensor, soilRemoval, ←-
valve);
button.setMediator(mediator);
machine.setMediator(mediator);
heater.setMediator(mediator);
valve.setMediator(mediator);](https://image.slidesharecdn.com/java-design-patterns-231122141503-3378dc32/85/Java-Design-Patterns-pdf-62-320.jpg)

![Java Design Patterns 57 / 173
public String generateDailyReport() throws RemoteException;
}
This is a remote interface which defines the methods that a client can call remotely. It’s what the client will use as the class type
for your service. Both the Stub and actual service will implement this. The method in the interface returns a String object.
You can return any object from the method; this object is going to be shipped over the wire from the server back to the client, so
it must be Serializable. Please note that all the methods in this interface should throw RemoteException.
package com.javacodegeeks.patterns.proxypattern.remoteproxy;
import java.rmi.Naming;
import java.rmi.RemoteException;
import java.rmi.server.UnicastRemoteObject;
import java.util.Date;
public class ReportGeneratorImpl extends UnicastRemoteObject implements ReportGenerator{
private static final long serialVersionUID = 3107413009881629428L;
protected ReportGeneratorImpl() throws RemoteException {
}
@Override
public String generateDailyReport() throws RemoteException {
StringBuilder sb = new StringBuilder();
sb.append("********************Location X Daily Report********************" ←-
);
sb.append("n Location ID: 012");
sb.append("n Today’s Date: "+new Date());
sb.append("n Total Pizza’s Sell: 112");
sb.append("n Total Price: $2534");
sb.append("n Net Profit: $1985");
sb.append("n ←-
***************************************************************");
return sb.toString();
}
public static void main(String[] args) {
try {
ReportGenerator reportGenerator = new ReportGeneratorImpl();
Naming.rebind("PizzaCoRemoteGenerator", reportGenerator);
} catch (Exception e) {
e.printStackTrace();
}
}
}
The above class is the remote implementation which does the real work. It’s the object that the client wants to call methods on.
The class extends UnicastRemoteObject, in order to work as a remote service object, your object needs some functionality
related to being remote. The simplest way is to extend UnicastRemoteObject from the java.rmi.server package and
let that class do the work for you.
The UnicastRemoteObject class constructor throws a RemoteException, so you need to write a no-arg constructor that
declares a RemoteException.
To make the remote service available to the clients you need to register the service with the RMI registry. You do this by
instantiating it and putting it into the RMI registry. When you register the implementation object, the RMI system actually puts](https://image.slidesharecdn.com/java-design-patterns-231122141503-3378dc32/85/Java-Design-Patterns-pdf-67-320.jpg)
![Java Design Patterns 58 / 173
the stub in the registry, since that’s what a client needs. The Naming.rebind method is used to register the object. It has two
parameters, first a string to name the service and the other parameter takes object which will be fetched by the clients to use the
service.
Now, to create the stub you need to run rmic on the remote implementation class. The rmic tool comes with the Java software
development kid, takes a service implementation and creates a new stub. You should open your command prompt (cmd) and run
rmic from the directory where your remote implementation is located.
The next step is to run the rmiregistry, bring up a terminal and start the registry, just type the command rmiregistry. But be sure
you start it from a directory that has access to your classes.
The final step is to start the service that is, run your concrete implementation of remote class, in this case the class is ReportG
eneratorImpl.
So far, we have created and run a service. Now, let’s see how the client will use it. The report application for the owner of the pizza
company will use this service in order to generate and check the report. We need to provide the interface ReportGenerator
and the stub to the clients which will use the service. You can simply hand-deliver the stub and any other classes or interfaces
required in the service.
package com.javacodegeeks.patterns.proxypattern.remoteproxy;
import java.rmi.Naming;
public class ReportGeneratorClient {
public static void main(String[] args) {
new ReportGeneratorClient().generateReport();
}
public void generateReport(){
try {
ReportGenerator reportGenerator = (ReportGenerator)Naming.lookup(" ←-
rmi://127.0.0.1/PizzaCoRemoteGenerator");
System.out.println(reportGenerator.generateDailyReport());
} catch (Exception e) {
e.printStackTrace();
}
}
}
The above program will have as a result the following output:
********************Location X Daily Report********************
Location ID: 012
Today’s Date: Sun Sep 14 00:11:23 IST 2014
Total Pizza Sell: 112
Total Sale: $2534
Net Profit: $1985
***************************************************************
The above class does a naming lookup and retrieves the object which is used to generate the daily report. You need to provide
the IP of the hostname and the name used to bind the service. The rest of it just looks like a regular old method call.
In conclusion, the Remote Proxy acts as a local representative for an object that lives in a different JVM. A method call on the
proxy results in the call being transferred over the wire, invoked remotely, and the result being returned back to the proxy and
then to the client.
9.4 Virtual Proxy
The Virtual Proxy pattern is a memory saving technique that recommends postponing an object creation until it is needed; it
is used when creating an object the is expensive in terms of memory usage or processing involved. In a typical application,](https://image.slidesharecdn.com/java-design-patterns-231122141503-3378dc32/85/Java-Design-Patterns-pdf-68-320.jpg)
![Java Design Patterns 61 / 173
private double employeeSalary;
private String employeeDesignation;
public Employee(String employeeName,double employeeSalary,String ←-
employeeDesignation){
this.employeeName = employeeName;
this.employeeSalary = employeeSalary;
this.employeeDesignation = employeeDesignation;
}
public String getEmployeeName() {
return employeeName;
}
public double getEmployeeSalary() {
return employeeSalary;
}
public String getEmployeeDesignation() {
return employeeDesignation;
}
public String toString(){
return "Employee Name: "+employeeName+", EmployeeDesignation: "+ ←-
employeeDesignation+", Employee Salary: "+employeeSalary;
}
}
package com.javacodegeeks.patterns.proxypattern.virtualproxy;
import java.util.List;
public class TestVirtualProxy {
public static void main(String[] args) {
ContactList contactList = new ContactListProxyImpl();
Company company = new Company("ABC Company", "India", "+91-011-28458965", ←-
contactList);
System.out.println("Company Name: "+company.getCompanyName());
System.out.println("Company Address: "+company.getCompanyAddress());
System.out.println("Company Contact No.: "+company.getCompanyContactNo());
System.out.println("Requesting for contact list");
contactList = company.getContactList();
List<Employee>empList = contactList.getEmployeeList();
for(Employee emp : empList){
System.out.println(emp);
}
}
}
The above program will have as a result the following output:
Company object created...
Company Name: ABC Company
Company Address: India
Company Contact No.: +91-011-28458965](https://image.slidesharecdn.com/java-design-patterns-231122141503-3378dc32/85/Java-Design-Patterns-pdf-71-320.jpg)
![Java Design Patterns 64 / 173
ReportGenerator reportGenerator;
Staff staff;
public ReportGeneratorProtectionProxy(Staff staff){
this.staff = staff;
}
@Override
public String generateDailyReport() {
if(staff.isOwner()){
ReportGenerator reportGenerator = null;
try {
reportGenerator = (ReportGenerator)Naming.lookup("rmi ←-
://127.0.0.1/PizzaCoRemoteGenerator");
return reportGenerator.generateDailyReport();
} catch (Exception e) {
e.printStackTrace();
}
return "";
}
else{
return "Not Authorized to view report.";
}
}
}
The above class is the concrete implementation of the ReportGeneratorProxy which holds a reference to the ReportGe
nerator interface which is the remote proxy. In the generateDailyReport() method, it checks if the staff is referring
to the owner, then asks the remote proxy to generate the report, otherwise it returns a string with “Not Authorized to view report”
as a message.
package com.javacodegeeks.patterns.proxypattern.protectionproxy;
public class TestProtectionProxy {
public static void main(String[] args) {
Owner owner = new Owner();
ReportGeneratorProxy reportGenerator = new ReportGeneratorProtectionProxy( ←-
owner);
owner.setReportGenerator(reportGenerator);
Employee employee = new Employee();
reportGenerator = new ReportGeneratorProtectionProxy(employee);
employee.setReportGenerator(reportGenerator);
System.out.println("For owner:");
System.out.println(owner.generateDailyReport());
System.out.println("For employee:");
System.out.println(employee.generateDailyReport());
}
}
The above program will have as a result the following output:
For owner:
********************Location X Daily Report********************
Location ID: 012
Today’s Date: Sun Sep 14 13:28:12 IST 2014
Total Pizza Sell: 112
Total Sale: $2534](https://image.slidesharecdn.com/java-design-patterns-231122141503-3378dc32/85/Java-Design-Patterns-pdf-74-320.jpg)
![Java Design Patterns 72 / 173
public VideoFileHandler(String handlerName){
this.handlerName = handlerName;
}
@Override
public void setHandler(Handler handler) {
this.handler = handler;
}
@Override
public void process(File file) {
if(file.getFileType().equals("video")){
System.out.println("Process and saving video file... by "+ ←-
handlerName);
}else if(handler!=null){
System.out.println(handlerName+" fowards request to "+handler. ←-
getHandlerName());
handler.process(file);
}else{
System.out.println("File not supported");
}
}
@Override
public String getHandlerName() {
return handlerName;
}
}
Now, let’s test the code above.
package com.javacodegeeks.patterns.chainofresponsibility;
public class TestChainofResponsibility {
public static void main(String[] args) {
File file = null;
Handler textHandler = new TextFileHandler("Text Handler");
Handler docHandler = new DocFileHandler("Doc Handler");
Handler excelHandler = new ExcelFileHandler("Excel Handler");
Handler audioHandler = new AudioFileHandler("Audio Handler");
Handler videoHandler = new VideoFileHandler("Video Handler");
Handler imageHandler = new ImageFileHandler("Image Handler");
textHandler.setHandler(docHandler);
docHandler.setHandler(excelHandler);
excelHandler.setHandler(audioHandler);
audioHandler.setHandler(videoHandler);
videoHandler.setHandler(imageHandler);
file = new File("Abc.mp3", "audio", "C:");
textHandler.process(file);
file = new File("Abc.jpg", "video", "C:");
textHandler.process(file);
file = new File("Abc.doc", "doc", "C:");
textHandler.process(file);
file = new File("Abc.bat", "bat", "C:");](https://image.slidesharecdn.com/java-design-patterns-231122141503-3378dc32/85/Java-Design-Patterns-pdf-82-320.jpg)

![Java Design Patterns 78 / 173
private static Map<String, Platform> map = new HashMap<>();
private PlatformFactory(){
throw new AssertionError("Cannot instantiate the class");
}
public static synchronized Platform getPlatformInstance(String platformType){
Platform platform = map.get(platformType);
if(platform==null){
switch(platformType){
case "C" : platform = new CPlatform();
break;
case "CPP" : platform = new CPPPlatform();
break;
case "JAVA" : platform = new JavaPlatform();
break;
case "RUBY" : platform = new RubyPlatform();
break;
}
map.put(platformType, platform);
}
return platform;
}
}
The above class contains a static map which holds a String object as key and a Platform type object as its value. We don’t
want to create the instance of this class so just kept its constructor private and throw an AssertionError just to avoid any
accidental creation of the object even within the class.
The main and the only method of this class is the getPlatformInstance method. This is a static method which has a
platformType as its parameter. This platformType is used as the key in the map, it first checks the map whether a
platform object having the key is already exists or not. If no object found, the appropriate platform object gets created, it is
put into the map and then the method returns the object. Next time, when the same platform type object is requested, the same
existing object is returned, instead of a new object.
Also, please note that the getPlatformInstance method is synchronized in order to provide the thread safety while
checking and creating the instance of the object. In the above example, there isn’t any intrinsic property of the object that is
shared, but only the extrinsic property which is the code object provided by the client code.
Now, let’s test the code.
package com.javacodegeeks.patterns.flyweightpattern;
public class TestFlyweight {
public static void main(String[] args) {
Code code = new Code();
code.setCode("C Code...");
Platform platform = PlatformFactory.getPlatformInstance("C");
platform.execute(code);
System.out.println("*************************");
code = new Code();
code.setCode("C Code2...");
platform = PlatformFactory.getPlatformInstance("C");
platform.execute(code);
System.out.println("*************************");
code = new Code();
code.setCode("JAVA Code...");
platform = PlatformFactory.getPlatformInstance("JAVA");
platform.execute(code);
System.out.println("*************************");](https://image.slidesharecdn.com/java-design-patterns-231122141503-3378dc32/85/Java-Design-Patterns-pdf-88-320.jpg)


![Java Design Patterns 87 / 173
@Override
public void buildEngine() {
car.setEngine("3.6L V 6 DOHC and variable valve timing");
}
@Override
public void buildBreaks() {
car.setBreaks("Four-wheel disc brakes: two ventilated. Electronic brake ←-
distribution. StabiliTrak stability control");
}
@Override
public void buildSeats() {
car.setSeats("Driver sports front seat with one power adjustments manual ←-
height, front passenger seat sports front seat with one power ←-
adjustments");
}
@Override
public void buildWindows() {
car.setWindows("Front windows with one-touch on two windows");
}
@Override
public void buildFuelType() {
car.setFuelType("Gasoline 17 MPG city, 28 MPG highway, 20 MPG combined and ←-
380 mi. range");
}
@Override
public Car getCar(){
return car;
}
}
The above two builders create and construct the product, i.e. the car object according to the specification required.
Now, let’s test the Builder.
package com.javacodegeeks.patterns.builderpattern;
public class TestBuilderPattern {
public static void main(String[] args) {
CarBuilder carBuilder = new SedanCarBuilder();
CarDirector director = new CarDirector(carBuilder);
director.build();
Car car = carBuilder.getCar();
System.out.println(car);
carBuilder = new SportsCarBuilder();
director = new CarDirector(carBuilder);
director.build();
car = carBuilder.getCar();
System.out.println(car);
}
}](https://image.slidesharecdn.com/java-design-patterns-231122141503-3378dc32/85/Java-Design-Patterns-pdf-97-320.jpg)


![Java Design Patterns 93 / 173
}
if(this.securityAnswer!=null){
sb.append("n Security Answer: ");
sb.append(securityAnswer);
}
return sb.toString();
}
public static void main(String[] args) {
Form form = new Form.FormBuilder("Dave", "Carter", "DavCarter", "DAvCaEr123 ←-
").passwordHint("MyName").city("NY").language("English").build();
System.out.println(form);
}
}
The above code will produce the following output:
First Name: Dave
Last Name: Carter
User Name: DavCarter
Password: DAvCaEr123
City: NY
Language: English
Password Hint: MyName
As you can clearly see, now a client only needs to provide the mandatory fields and the fields which are important to him. To
create the form object now, we need invoke the FormBuilder constructor which takes the mandatory fields and then we need
to call the set of required methods on it and finally the build method to get the form object.
12.5 When to use the Builder Pattern
Use the Builder pattern when
• The algorithm for creating a complex object should be independent of the parts that make up the object and how they’re
assembled.
• The construction process must allow different representations for the object that’s constructed.
12.6 Builder Pattern in JDK
• java.lang.StringBuilder#append() (unsynchronized)
• java.lang.StringBuffer#append() (synchronized)
• java.nio.ByteBuffer#put() (also on CharBuffer, ShortBuffer, IntBuffer, LongBuffer, FloatBuffer and DoubleBuffer)
• javax.swing.GroupLayout.Group#addComponent()
• All implementations of java.lang.Appendable
12.7 Download the Source Code
This was a lesson on the Builder Pattern. You may download the source code here: Builder Pattern Project](https://image.slidesharecdn.com/java-design-patterns-231122141503-3378dc32/85/Java-Design-Patterns-pdf-103-320.jpg)
![Java Design Patterns 97 / 173
}
The above class is used to display the message fetched by the XML parser to the user. The above class is an abstract class that
contains two important methods. The display method is used to display the message to the user. The getParser method
is the factory method which is implemented by the subclasses to instantiate the parser object and the method is used by the
display method in order to parse the XML and gets the message to display.
Below are the subclasses of the DisplayService which implement the getParser method.
package com.javacodegeeks.patterns.factorymethodpattern;
public class ErrorXMLDisplayService extends DisplayService{
@Override
public XMLParser getParser() {
return new ErrorXMLParser();
}
}
package com.javacodegeeks.patterns.factorymethodpattern;
public class FeedbackXMLDisplayService extends DisplayService{
@Override
public XMLParser getParser() {
return new FeedbackXML();
}
}
package com.javacodegeeks.patterns.factorymethodpattern;
public class OrderXMLDisplayService extends DisplayService{
@Override
public XMLParser getParser() {
return new OrderXMLParser();
}
}
package com.javacodegeeks.patterns.factorymethodpattern;
public class ResponseXMLDisplayService extends DisplayService{
@Override
public XMLParser getParser() {
return new ResponseXMLParser();
}
}
Now, let’s test the factory method.
package com.javacodegeeks.patterns.factorymethodpattern;
public class TestFactoryMethodPattern {
public static void main(String[] args) {](https://image.slidesharecdn.com/java-design-patterns-231122141503-3378dc32/85/Java-Design-Patterns-pdf-107-320.jpg)


![Java Design Patterns 103 / 173
return "TW Feedback XML Message";
}
}
package com.javacodegeeks.patterns.abstractfactorypattern;
public class TWOrderXMLParser implements XMLParser{
@Override
public String parse() {
System.out.println("TW Parsing order XML...");
return "TW Order XML Message";
}
}
package com.javacodegeeks.patterns.abstractfactorypattern;
public class TWResponseXMLParser implements XMLParser{
@Override
public String parse() {
System.out.println("TW Parsing response XML...");
return "TW Response XML Message";
}
}
To avoid a dependency between the client code and the factories, optionally we implemented a factory-producer which has a
static method and is responsible to provide a desired factory object to the client object.
package com.javacodegeeks.patterns.abstractfactorypattern;
public final class ParserFactoryProducer {
private ParserFactoryProducer(){
throw new AssertionError();
}
public static AbstractParserFactory getFactory(String factoryType){
switch(factoryType)
{
case "NYFactory": return new NYParserFactory();
case "TWFactory": return new TWParserFactory();
}
return null;
}
}
Now, let’s test the code.
package com.javacodegeeks.patterns.abstractfactorypattern;
public class TestAbstractFactoryPattern {
public static void main(String[] args) {](https://image.slidesharecdn.com/java-design-patterns-231122141503-3378dc32/85/Java-Design-Patterns-pdf-113-320.jpg)


![Java Design Patterns 109 / 173
public AccessControl getAccessControl() {
return accessControl;
}
public void setAccessControl(AccessControl accessControl) {
this.accessControl = accessControl;
}
@Override
public String toString(){
return "Name: "+userName+", Level: "+level+", Access Control Level:"+ ←-
accessControl.getControlLevel()+", Access: "+accessControl.getAccess();
}
}
The User class has a userName, level and a reference to the AccessControl assigned to it.
We have used an AccessControlProvider class that creates and stores the possible AccessControl objects in advance.
And when the there’s a request to an AccessControl object, it returns a new object created by copying the stored prototypes.
package com.javacodegeeks.patterns.prototypepattern;
import java.util.HashMap;
import java.util.Map;
public class AccessControlProvider {
private static Map<String, AccessControl>map = new HashMap<String, AccessControl>() ←-
;
static{
System.out.println("Fetching data from external resources and creating ←-
access control objects...");
map.put("USER", new AccessControl("USER","DO_WORK"));
map.put("ADMIN", new AccessControl("ADMIN","ADD/REMOVE USERS"));
map.put("MANAGER", new AccessControl("MANAGER","GENERATE/READ REPORTS"));
map.put("VP", new AccessControl("VP","MODIFY REPORTS"));
}
public static AccessControl getAccessControlObject(String controlLevel){
AccessControl ac = null;
ac = map.get(controlLevel);
if(ac!=null){
return ac.clone();
}
return null;
}
}
The getAccessControlObject method fetches a stored prototype object according to the controlLevel passed to it,
from the map and returns a newly created cloned object to the client code.
Now, let’s test the code.
package com.javacodegeeks.patterns.prototypepattern;
public class TestPrototypePattern {
public static void main(String[] args) {
AccessControl userAccessControl = AccessControlProvider. ←-
getAccessControlObject("USER");
User user = new User("User A", "USER Level", userAccessControl);](https://image.slidesharecdn.com/java-design-patterns-231122141503-3378dc32/85/Java-Design-Patterns-pdf-119-320.jpg)

![Java Design Patterns 115 / 173
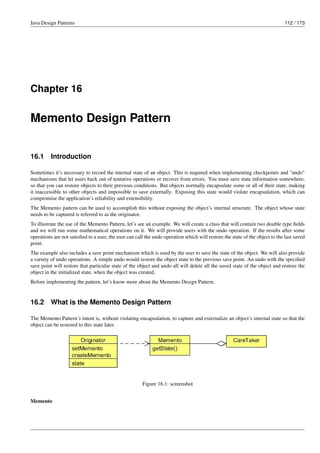
}
public double getX(){
return x;
}
public double getY(){
return y;
}
}
The Memento class is used to store the state of the Originator and stored by the care taker. The class does not have any
setter methods, it is only used to get the state of the object.
package com.javacodegeeks.patterns.mementopattern;
import java.util.HashMap;
import java.util.Map;
public class CareTaker {
private final Map<String, Memento>savepointStorage = new HashMap<String, Memento>() ←-
;
public void saveMemento(Memento memento,String savepointName){
System.out.println("Saving state..."+savepointName);
savepointStorage.put(savepointName, memento);
}
public Memento getMemento(String savepointName){
System.out.println("Undo at ..."+savepointName);
return savepointStorage.get(savepointName);
}
public void clearSavepoints(){
System.out.println("Clearing all save points...");
savepointStorage.clear();
}
}
The above class is the care taker class used to store and provide the requested memento object. The class contains the saveM
emento method is used to save the memento object, the getMemento is used to return the request memento object and the
clearSavepoints method which is used to clear all the savepoints and it deletes all the saved memento objects.
Now, let us test the example.
package com.javacodegeeks.patterns.mementopattern;
public class TestMementoPattern {
public static void main(String[] args) {
CareTaker careTaker = new CareTaker();
Originator originator = new Originator(5, 10, careTaker);
System.out.println("Default State: "+originator);
originator.setX(originator.getY()*51);
System.out.println("State: "+originator);
originator.createSavepoint("SAVE1");](https://image.slidesharecdn.com/java-design-patterns-231122141503-3378dc32/85/Java-Design-Patterns-pdf-125-320.jpg)
![Java Design Patterns 121 / 173
@Override
public void setCredentials() {
System.out.println("Setting credentials for Oracle DB...");
}
@Override
public void setData() {
System.out.println("Setting up data from txt file....");
}
}
The above class is used to connect to an Oracle database and provides data by reading a text file.
Now, let’s test the code.
package com.javacodegeeks.patterns.templatepattern;
public class TestTemplatePattern {
public static void main(String[] args) {
System.out.println("For MYSQL....");
ConnectionTemplate template = new MySqLCSVCon();
template.run();
System.out.println("For Oracle...");
template = new OracleTxtCon();
template.run();
}
}
The above code will result to the following output:
For MYSQL....
Setting MySQL DB drivers...
Setting credentials for MySQL DB...
Setting connection...
Preparing insert statement...
Setting up data from csv file....
Inserting data...
Closing connections...
Destroying connection objects...
For Oracle...
Setting Oracle DB drivers...
Setting credentials for Oracle DB...
Setting connection...
Preparing insert statement...
Setting up data from txt file....
Inserting data...
Closing connections...
Destroying connection objects...
The above output clearly shows how the template pattern works to connect and communicate with the different databases using
the similar way. The pattern keeps the common code under one class and promotes code reusability. It sets a framework and
controls it for the users and allows the users to extends the template in order to provide their specific implementation to some of
the steps.
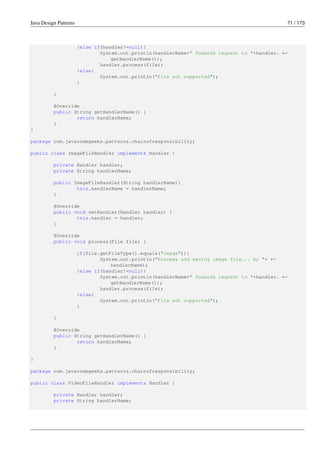
Now, if we enhance the above example by adding a logging mechanism. But some of the users of the code do not want to add
this facility, to implement this we can use a hook. A hook is a simple method inside a template class with a default behavior;
this behavior can be used to alter some optional steps. A user should implement this method which can hook inside the template
class to alter the optional steps of the algorithm.](https://image.slidesharecdn.com/java-design-patterns-231122141503-3378dc32/85/Java-Design-Patterns-pdf-131-320.jpg)
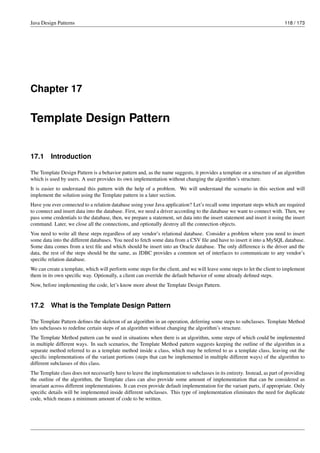
![Java Design Patterns 122 / 173
17.4 Introducing a hook inside the template
Let’s enhance the above example with a hook.
package com.javacodegeeks.patterns.templatepattern;
import java.util.Date;
public abstract class ConnectionTemplate {
private boolean isLoggingEnable = true;
public ConnectionTemplate() {
isLoggingEnable = disableLogging();
}
public final void run() {
setDBDriver();
logging("Drivers set [" + new Date() + "]");
setCredentials();
logging("Credentails set [" + new Date() + "]");
connect();
logging("Conencted");
prepareStatement();
logging("Statement prepared [" + new Date() + "]");
setData();
logging("Data set [" + new Date() + "]");
insert();
logging("Inserted [" + new Date() + "]");
close();
logging("Conenctions closed [" + new Date() + "]");
destroy();
logging("Object destoryed [" + new Date() + "]");
}
public abstract void setDBDriver();
public abstract void setCredentials();
public void connect() {
System.out.println("Setting connection...");
}
public void prepareStatement() {
System.out.println("Preparing insert statement...");
}
public abstract void setData();
public void insert() {
System.out.println("Inserting data...");
}
public void close() {
System.out.println("Closing connections...");
}
public void destroy() {
System.out.println("Destroying connection objects...");
}
public boolean disableLogging() {](https://image.slidesharecdn.com/java-design-patterns-231122141503-3378dc32/85/Java-Design-Patterns-pdf-132-320.jpg)
![Java Design Patterns 123 / 173
return true;
}
private void logging(String msg) {
if (isLoggingEnable) {
System.out.println("Logging....: " + msg);
}
}
}
We introduced two new methods inside the above template class. The disableLogging is the hook which returns a boolean.
By default, the boolean isLoggingEnable, which enables the logging, is true. A user can override this method if logging
should be disabled for his code. The other is a private method used to log the messages.
The below class implements the hook method and returns false, something that switches off the logging mechanism for this
specific work.
package com.javacodegeeks.patterns.templatepattern;
public class MySqLCSVCon extends ConnectionTemplate {
@Override
public void setDBDriver() {
System.out.println("Setting MySQL DB drivers...");
}
@Override
public void setCredentials() {
System.out.println("Setting credentials for MySQL DB...");
}
@Override
public void setData() {
System.out.println("Setting up data from csv file....");
}
@Override
public boolean disableLogging() {
return false;
}
}
Let’s test this code.
package com.javacodegeeks.patterns.templatepattern;
public class TestTemplatePattern {
public static void main(String[] args) {
System.out.println("For MYSQL....");
ConnectionTemplate template = new MySqLCSVCon();
template.run();
System.out.println("For Oracle...");
template = new OracleTxtCon();
template.run();
}
}
The above class will result to the following output:
For MYSQL....
Setting MySQL DB drivers...
Setting credentials for MySQL DB...](https://image.slidesharecdn.com/java-design-patterns-231122141503-3378dc32/85/Java-Design-Patterns-pdf-133-320.jpg)
![Java Design Patterns 124 / 173
Setting connection...
Preparing insert statement...
Setting up data from csv file....
Inserting data...
Closing connections...
Destroying connection objects...
For Oracle...
Setting Oracle DB drivers...
Logging....: Drivers set [Sat Nov 08 23:53:47 IST 2014]
Setting credentials for Oracle DB...
Logging....: Credentails set [Sat Nov 08 23:53:47 IST 2014]
Setting connection...
Logging....: Conencted
Preparing insert statement...
Logging....: Statement prepared [Sat Nov 08 23:53:47 IST 2014]
Setting up data from txt file....
Logging....: Data set [Sat Nov 08 23:53:47 IST 2014]
Inserting data...
Logging....: Inserted [Sat Nov 08 23:53:47 IST 2014]
Closing connections...
Logging....: Conenctions closed [Sat Nov 08 23:53:47 IST 2014]
Destroying connection objects...
Logging....: Object destoryed [Sat Nov 08 23:53:47 IST 2014]
You can clearly see in the output, that logging is off for the MySQL implementation, whereas, on for the Oracle implementation.
17.5 When to use the Template Design Pattern
The Template Method pattern should be used in the following cases:
• To implement the invariant parts of an algorithm once and leave it up to subclasses to implement the behavior that can vary.
• When common behavior among subclasses should be factored and localized in a common class to avoid code duplication. You
first identify the differences in the existing code and then separate the differences into new operations. Finally, you replace the
differing code with a template method that calls one of these new operations.
• To control subclasses extensions. You can define a template method that calls "hook" operations (see Consequences) at specific
points, thereby permitting extensions only at those points.
17.6 Template Pattern in JDK
• java.util.Collections#sort()
• java.io.InputStream#skip()
• java.io.InputStream#read()
• java.util.AbstractList#indexOf()
17.7 Download the Source Code
This was a lesson on the Template Design Pattern. You may download the source code here: TemplatePattern-Project](https://image.slidesharecdn.com/java-design-patterns-231122141503-3378dc32/85/Java-Design-Patterns-pdf-134-320.jpg)
![Java Design Patterns 129 / 173
@Override
public void cook() {
System.out.println("Cooking...");
}
@Override
public void off() {
System.out.println("Cannot switched off while cooking...");
}
}
package com.javacodegeeks.patterns.statepattern;
public class RoboticOff implements RoboticState{
private final Robot robot;
public RoboticOff(Robot robot){
this.robot = robot;
}
@Override
public void walk() {
System.out.println("Walking...");
robot.setRoboticState(robot.getRoboticOn());
}
@Override
public void cook() {
System.out.println("Cannot cook at Off state.");
}
@Override
public void off() {
System.out.println("Already switched off...");
}
}
Now, let’s test the code.
package com.javacodegeeks.patterns.statepattern;
public class TestStatePattern {
public static void main(String[] args) {
Robot robot = new Robot();
robot.walk();
robot.cook();
robot.walk();
robot.off();
robot.walk();
robot.off();
robot.cook();
}
}
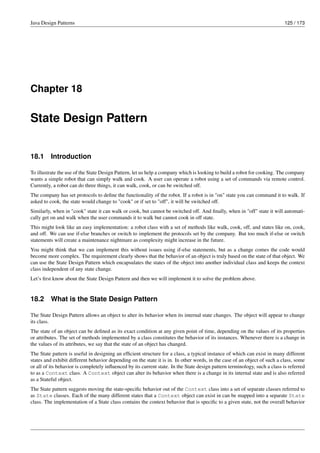
The above code will result to the following output:](https://image.slidesharecdn.com/java-design-patterns-231122141503-3378dc32/85/Java-Design-Patterns-pdf-139-320.jpg)
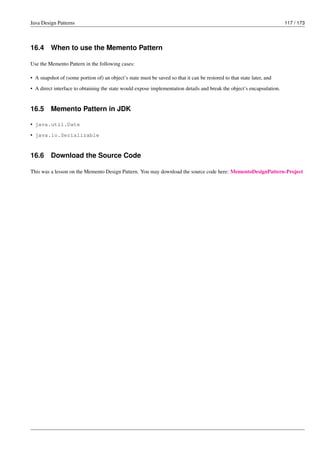
![Java Design Patterns 134 / 173
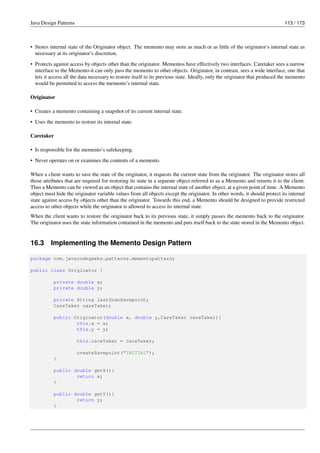
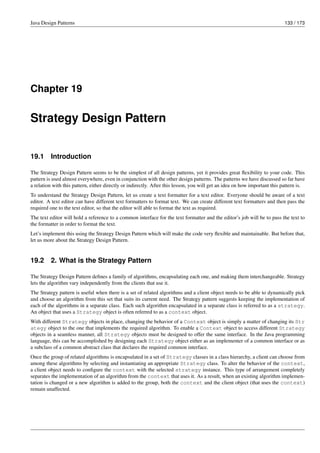
Figure 19.1: - Strategy class diagram
Strategy
• Declares an interface common to all supported algorithms. Context uses this interface to call the algorithm defined by a
ConcreteStrategy.
ConcreteStrategy
• Implements the algorithm using the Strategy interface.
Context
• Is configured with a ConcreteStrategy object.
• Maintains a reference to a Strategy object.
• May define an interface that lets Strategy access its data.
19.3 Implementing the Strategy Design Pattern
Below is the TextFormatter interface implement by all the concrete formatters.
package com.javacodegeeks.patterns.strategypattern;
public interface TextFormatter {
public void format(String text);
}
The above interface contains only one method, format, used to format the text.
package com.javacodegeeks.patterns.strategypattern;
public class CapTextFormatter implements TextFormatter{
@Override
public void format(String text) {
System.out.println("[CapTextFormatter]: "+text.toUpperCase());
}
}](https://image.slidesharecdn.com/java-design-patterns-231122141503-3378dc32/85/Java-Design-Patterns-pdf-144-320.jpg)
![Java Design Patterns 135 / 173
The above class, CapTextFormatter, is a concrete text formatter that implements the TextFormatter interface and the
class is used to change the text into capital case.
package com.javacodegeeks.patterns.strategypattern;
public class LowerTextFormatter implements TextFormatter{
@Override
public void format(String text) {
System.out.println("[LowerTextFormatter]: "+text.toLowerCase());
}
}
The LowerTextFormatter is a concrete text formatter that implements the TextFormatter interface and the class is
used to change the text into small case.
package com.javacodegeeks.patterns.strategypattern;
public class TextEditor {
private final TextFormatter textFormatter;
public TextEditor(TextFormatter textFormatter){
this.textFormatter = textFormatter;
}
public void publishText(String text){
textFormatter.format(text);
}
}
The above class is the TextEditor class which holds a reference to the TextFormatter interface. The class contains the
publishText method which forwards the text to the formatter in order to publish the text in desired format.
Now, let us test the code above.
package com.javacodegeeks.patterns.strategypattern;
public class TestStrategyPattern {
public static void main(String[] args) {
TextFormatter formatter = new CapTextFormatter();
TextEditor editor = new TextEditor(formatter);
editor.publishText("Testing text in caps formatter");
formatter = new LowerTextFormatter();
editor = new TextEditor(formatter);
editor.publishText("Testing text in lower formatter");
}
}
The above code will result to the following output:
[CapTextFormatter]: TESTING TEXT IN CAPS FORMATTER
[LowerTextFormatter]: testing text in lower formatter
In the above class, we have first created a CapTextFormatter and assigned it to the TextEditor instance. Then we called
the publishText method and passed some input text to it.](https://image.slidesharecdn.com/java-design-patterns-231122141503-3378dc32/85/Java-Design-Patterns-pdf-145-320.jpg)
![Java Design Patterns 141 / 173
public class SmsJob implements Job{
private Sms sms;
public void setSms(Sms sms) {
this.sms = sms;
}
@Override
public void run() {
System.out.println("Job ID: "+Thread.currentThread().getId()+" executing ←-
sms jobs.");
if(sms!=null){
sms.sendSms();
}
try {
Thread.sleep(1000);
} catch (InterruptedException e) {
Thread.currentThread().interrupt();
}
}
}
The above classes hold a reference to their respective classes that will be used to get the job done. The classes override the run
method and do the work requested. For example, the SmsJob class is used to send sms, its run method calls the sendSms
method of the Sms object in order to get the job done.
You can set different objects one by one to the same command object.
The below is the ThreadPool class used to create pool of threads and allow a thread to fetch and execute the job from the job
queue.
package com.javacodegeeks.patterns.commandpattern;
import java.util.concurrent.BlockingQueue;
import java.util.concurrent.LinkedBlockingQueue;
public class ThreadPool {
private final BlockingQueue<Job> jobQueue;
private final Thread[] jobThreads;
private volatile boolean shutdown;
public ThreadPool(int n)
{
jobQueue = new LinkedBlockingQueue<>();
jobThreads = new Thread[n];
for (int i = 0; i < n; i++) {
jobThreads[i] = new Worker("Pool Thread " + i);
jobThreads[i].start();
}
}
public void addJob(Job r)
{
try {
jobQueue.put(r);](https://image.slidesharecdn.com/java-design-patterns-231122141503-3378dc32/85/Java-Design-Patterns-pdf-151-320.jpg)
![Java Design Patterns 142 / 173
} catch (InterruptedException e) {
Thread.currentThread().interrupt();
}
}
public void shutdownPool()
{
while (!jobQueue.isEmpty()) {
try {
Thread.sleep(1000);
} catch (InterruptedException e) {
e.printStackTrace();
}
}
shutdown = true;
for (Thread workerThread : jobThreads) {
workerThread.interrupt();
}
}
private class Worker extends Thread
{
public Worker(String name)
{
super(name);
}
public void run()
{
while (!shutdown) {
try {
Job r = jobQueue.take();
r.run();
} catch (InterruptedException e) {
}
}
}
}
}
The above class is used to create n threads (worker threads). Each worker thread will wait for a job in a queue and then execute
the job and will go back to waiting state. The class contains a job queue; when a new job will be added into the queue, a worker
thread from the pool will execute the job.
We also include a shutdownPool method which will used to shut down the pool by interrupting all the worker threads only
when the job queue is empty. The addJob method is used to add jobs to the queues.
Now, let’s test the code.
package com.javacodegeeks.patterns.commandpattern;
public class TestCommandPattern {
public static void main(String[] args)
{
init();
}
private static void init()
{
ThreadPool pool = new ThreadPool(10);](https://image.slidesharecdn.com/java-design-patterns-231122141503-3378dc32/85/Java-Design-Patterns-pdf-152-320.jpg)

![Java Design Patterns 149 / 173
return leftExpression.interpret() - rightExpression.interpret();
}
}
package com.javacodegeeks.patterns.interpreterpattern;
public class Number implements Expression{
private final int n;
public Number(int n){
this.n = n;
}
@Override
public int interpret() {
return n;
}
}
Below is the optional utility class that contains different utility methods used to execute the expression.
package com.javacodegeeks.patterns.interpreterpattern;
public class ExpressionUtils {
public static boolean isOperator(String s) {
if (s.equals("+") || s.equals("-") || s.equals("*"))
return true;
else
return false;
}
public static Expression getOperator(String s, Expression left, Expression right) {
switch (s) {
case "+":
return new Add(left, right);
case "-":
return new Substract(left, right);
case "*":
return new Product(left, right);
}
return null;
}
}
Now, let’s test the example.
package com.javacodegeeks.patterns.interpreterpattern;
import java.util.Stack;
public class TestInterpreterPattern {
public static void main(String[] args) {
String tokenString = "7 3 - 2 1 + *";
Stack<Expression> stack = new Stack<>();
String[] tokenArray = tokenString.split(" ");
for (String s : tokenArray) {](https://image.slidesharecdn.com/java-design-patterns-231122141503-3378dc32/85/Java-Design-Patterns-pdf-159-320.jpg)
![Java Design Patterns 158 / 173
@Override
public double getPrice() {
return pizza.getPrice()+5.20;
}
}
package com.javacodegeeks.patterns.decoratorpattern;
public class Spinach extends PizzaDecorator{
private final Pizza pizza;
public Spinach(Pizza pizza){
this.pizza = pizza;
}
@Override
public String getDesc() {
return pizza.getDesc()+", Spinach (7.92)";
}
@Override
public double getPrice() {
return pizza.getPrice()+7.92;
}
}
We need to decorate our pizza object with these toppings. The above classes contain a reference to a pizza object that needs to
be decorated. The decorator object adds its functionality to the decorator after calling the decorator’s function.
package com.javacodegeeks.patterns.decoratorpattern;
import java.text.DecimalFormat;
public class TestDecoratorPattern {
public static void main(String[] args) {
DecimalFormat dformat = new DecimalFormat("#.##");
Pizza pizza = new SimplyVegPizza();
pizza = new RomaTomatoes(pizza);
pizza = new GreenOlives(pizza);
pizza = new Spinach(pizza);
System.out.println("Desc: "+pizza.getDesc());
System.out.println("Price: "+dformat.format(pizza.getPrice()));
pizza = new SimplyNonVegPizza();
pizza = new Meat(pizza);
pizza = new Cheese(pizza);
pizza = new Cheese(pizza);
pizza = new Ham(pizza);
System.out.println("Desc: "+pizza.getDesc());
System.out.println("Price: "+dformat.format(pizza.getPrice()));
}](https://image.slidesharecdn.com/java-design-patterns-231122141503-3378dc32/85/Java-Design-Patterns-pdf-168-320.jpg)
![Java Design Patterns 159 / 173
}
The above code will results the following output:
Desc: SimplyVegPizza (230), Roma Tomatoes (5.20), Green Olives (5.47), Spinach (7.92)
Price: 248.59
Desc: SimplyNonVegPizza (350), Meat (14.25), Cheese (20.72), Cheese (20.72), Ham (18.12)
Price: 423.81
In the above class, first we have created a SimplyVegPizza and then decorated it with RomaTomatoes, GreenOlives,
and Spinach. The desc in the output shows the toppings added in the SimplyVegPizza and the price are the sum of all.
We did the same thing for the SimplyNonVegPizza and added different topping on it. Please note that you can decorate the
same thing more than once for an object. In the above example, we added cheese twice; it got added twice in the price too,
which can be seen in the output.
The Decorator Design Pattern looks good when you need to add extra functionality to an object with modifying it, at runtime.
But this results in lots of little objects. A design that uses Decorator often results in systems composed of lots of little objects
that all look alike. The objects differ only in the way they are interconnected, not in their class or in the value of their variables.
Although these systems are easy to customize by those who understand them, they can be hard to learn and debug.
22.4 When to use the Decorator Design Pattern
Use the Decorator pattern in the following cases:
• To add responsibilities to individual objects dynamically and transparently, that is, without affecting other objects.
• For responsibilities that can be withdrawn.
• When extension by sub-classing is impractical. Sometimes a large number of independent extensions are possible and would
produce an explosion of subclasses to support every combination. Or a class definition may be hidden or otherwise unavailable
for sub-classing.
22.5 Decorator Design Pattern in Java
• java.io.BufferedInputStream(InputStream)
• java.io.DataInputStream(InputStream)
• java.io.BufferedOutputStream(OutputStream)
• java.util.zip.ZipOutputStream(OutputStream)
• java.util.Collections#checked[List|Map|Set|SortedSet|SortedMap]()
22.6 Download the Source Code
This was a lesson on the Decorator Design Pattern.
You may download the relevant source code here: DecoratorPattern-Project](https://image.slidesharecdn.com/java-design-patterns-231122141503-3378dc32/85/Java-Design-Patterns-pdf-169-320.jpg)
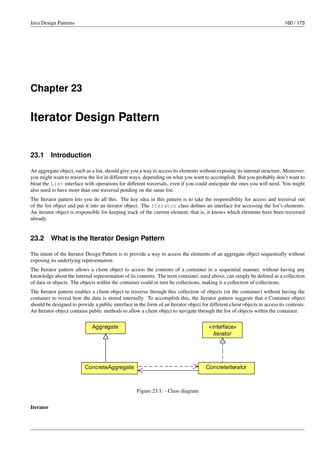
![Java Design Patterns 161 / 173
• Defines an interface for accessing and traversing elements.
ConcreteIterator
• Implements the Iterator interface.
• Keeps track of the current position in the traversal of the aggregate.
Aggregate
• Defines an interface for creating an Iterator object.
ConcreteAggregate
• Implements the Iterator creation interface to return an instance of the proper ConcreteIterator.
23.3 Implementing the Iterator Design Pattern
Let us implement the Iterator Design Pattern using a Shape class. We will store and iterate the Shape objects using an iterator.
package com.javacodegeeks.patterns.iteratorpattern;
public class Shape {
private int id;
private String name;
public Shape(int id, String name){
this.id = id;
this.name = name;
}
public int getId() {
return id;
}
public void setId(int id) {
this.id = id;
}
public String getName() {
return name;
}
public void setName(String name) {
this.name = name;
}
@Override
public String toString(){
return "ID: "+id+" Shape: "+name;
}
}
The simple Shape class has an id and name as its attributes.
package com.javacodegeeks.patterns.iteratorpattern;
public class ShapeStorage {
private Shape []shapes = new Shape[5];](https://image.slidesharecdn.com/java-design-patterns-231122141503-3378dc32/85/Java-Design-Patterns-pdf-171-320.jpg)
![Java Design Patterns 162 / 173
private int index;
public void addShape(String name){
int i = index++;
shapes[i] = new Shape(i,name);
}
public Shape[] getShapes(){
return shapes;
}
}
The above class is used to store the Shape objects. The class contains an array of Shape type, for simplicity we have initialized
that array up to 5. The addShape method is used to add a Shape object to the array and increment the index by one. The
getShapes method returns the array of Shape type.
package com.javacodegeeks.patterns.iteratorpattern;
import java.util.Iterator;
public class ShapeIterator implements Iterator<Shape>{
private Shape [] shapes;
int pos;
public ShapeIterator(Shape []shapes){
this.shapes = shapes;
}
@Override
public boolean hasNext() {
if(pos >= shapes.length || shapes[pos] == null)
return false;
return true;
}
@Override
public Shape next() {
return shapes[pos++];
}
@Override
public void remove() {
if(pos <=0 )
throw new IllegalStateException("Illegal position");
if(shapes[pos-1] !=null){
for (int i= pos-1; i<(shapes.length-1);i++){
shapes[i] = shapes[i+1];
}
shapes[shapes.length-1] = null;
}
}
}
The above class is an Iterator to the Shape class. The class implements the Iterator interface and defines all the methods
of the Iterator interface.
The hasNext method returns a boolean if there’s an item left. The next method returns the next item from the collection and
the remove method remove the current item from the collection.
package com.javacodegeeks.patterns.iteratorpattern;
public class TestIteratorPattern {](https://image.slidesharecdn.com/java-design-patterns-231122141503-3378dc32/85/Java-Design-Patterns-pdf-172-320.jpg)
![Java Design Patterns 163 / 173
public static void main(String[] args) {
ShapeStorage storage = new ShapeStorage();
storage.addShape("Polygon");
storage.addShape("Hexagon");
storage.addShape("Circle");
storage.addShape("Rectangle");
storage.addShape("Square");
ShapeIterator iterator = new ShapeIterator(storage.getShapes());
while(iterator.hasNext()){
System.out.println(iterator.next());
}
System.out.println("Apply removing while iterating...");
iterator = new ShapeIterator(storage.getShapes());
while(iterator.hasNext()){
System.out.println(iterator.next());
iterator.remove();
}
}
}
The above code will result to the following output:
ID: 0 Shape: Polygon
ID: 1 Shape: Hexagon
ID: 2 Shape: Circle
ID: 3 Shape: Rectangle
ID: 4 Shape: Square
Apply removing while iterating...
ID: 0 Shape: Polygon
ID: 2 Shape: Circle
ID: 4 Shape: Square
In the above class, we have created a ShapeStorage object and stores the Shape objects in it. Next, we created a ShapeIt
erator object and assigned it the shapes. We iterated twice, first without calling the remove method and then with the remove
method.
The output shows you the impact of the remove method. At first iteration, the iterator prints all the shapes but when the remove
method is called, it first prints the current shape and moved to the next shape. Then, we called the remove method on it which
removes the current shape and then the iterator points to the next available shape object.
That’s why, the output after "Apply removing while iterating..." shows only 0, 2, and 4 shapes object.
23.4 Internal and External Iterators
An iterator can be designed either as an internal iterator or as an external iterator.
23.4.1 Internal Iterators
• The collection itself offers methods to allow a client to visit different objects within the collection. For example, the java.
util.ResultSet class contains the data and also offers methods such as next to navigate through the item list.
• There can be only one iterator on a collection at any given time.
• The collection has to maintain or save the state of iteration.](https://image.slidesharecdn.com/java-design-patterns-231122141503-3378dc32/85/Java-Design-Patterns-pdf-173-320.jpg)

![Java Design Patterns 171 / 173
public static void main(String[] args) {
System.out.println("Before visitor......... n");
HtmlTag parentTag = new HtmlParentElement("<html>");
parentTag.setStartTag("<html>");
parentTag.setEndTag("</html>");
HtmlTag p1 = new HtmlParentElement("<body>");
p1.setStartTag("<body>");
p1.setEndTag("</body>");
parentTag.addChildTag(p1);
HtmlTag child1 = new HtmlElement("<P>");
child1.setStartTag("<P>");
child1.setEndTag("</P>");
child1.setTagBody("Testing html tag library");
p1.addChildTag(child1);
child1 = new HtmlElement("<P>");
child1.setStartTag("<P>");
child1.setEndTag("</P>");
child1.setTagBody("Paragraph 2");
p1.addChildTag(child1);
parentTag.generateHtml();
System.out.println("nAfter visitor....... n");
Visitor cssClass = new CssClassVisitor();
Visitor style = new StyleVisitor();
parentTag = new HtmlParentElement("<html>");
parentTag.setStartTag("<html>");
parentTag.setEndTag("</html>");
parentTag.accept(style);
parentTag.accept(cssClass);
p1 = new HtmlParentElement("<body>");
p1.setStartTag("<body>");
p1.setEndTag("</body>");
p1.accept(style);
p1.accept(cssClass);
parentTag.addChildTag(p1);
child1 = new HtmlElement("<P>");
child1.setStartTag("<P>");
child1.setEndTag("</P>");
child1.setTagBody("Testing html tag library");
child1.accept(style);
child1.accept(cssClass);
p1.addChildTag(child1);
child1 = new HtmlElement("<P>");
child1.setStartTag("<P>");
child1.setEndTag("</P>");
child1.setTagBody("Paragraph 2");
child1.accept(style);
child1.accept(cssClass);](https://image.slidesharecdn.com/java-design-patterns-231122141503-3378dc32/85/Java-Design-Patterns-pdf-181-320.jpg)


![Al Quran (Chapter 36): Surah Yasin [One of the Names of Prophet Muhammad (pbuh)]](https://cdn.slidesharecdn.com/ss_thumbnails/36-200821002834-thumbnail.jpg?width=640&height=640&fit=bounds)