Introduction to Android Studio for Android app development
1.
INTRODUCTION
A brief backgroundof Android/Android OS, Android versions,
features of Android, architecture of Android, obtaining the
required tools, launching Android application, exploring
Android Studio IDE, Android code completion, debugging
application, publishing application
2.
Contents
• Background
• AndroidVersions
• Features
• Architecture
• Obtaining the required tools
• Launching Android Applications
• Exploring Android Studio IDE
• Android code completion
• Debugging application
• Publishing application
3.
Background
• Android isa mobile operating system that is based on a modified version of
Linux.
• Android OS is Open and Free.
• The main advantage to adopting Android is that it offers a unified approach to
application development.
• Developers need only develop for Android in general, and their applications
should be able to run on numerous different devices, as long as the devices are
powered using Android.
4.
Android Versions
Sl.No.
Android
Version
Release
Date BrandName
1 1 23-Sep-08 1.5 version called Cupcake and 1.6 called Donut.
2 2 26-Oct-09 2.0 & 2.1 named Eclair, 2.2 named Froyo and 2.3 Gingerbread.
3 3 22-Feb-11 Version 3.0 called HoneyCmob.
4 4 18-Oct-11 4.0 called Ice Cream Sandwich, 4.1-2-3 called Jelly bean and 4.4 called KitKat.
5 5 12-Nov-14 5.0-1-1.1 called lollipop.
6 6 05-Oct-15 Android Marshmallow
7 7 22-Aug-16 Android Nougat
8 8 21-Aug-17 Android Oreo
9 9 06-Aug-18 Android Pie
10 10 Sep-3-19 Android Q
11 11 19-Feb-20 Android R
12 12 Feb-18-21 Snow Cone
13 13 Aug-15-22 Tiramisu
14 14 Oct-4-23 Upside Down Cake
15 15 Jul-18-24 Vanilla Ice Cream
6.
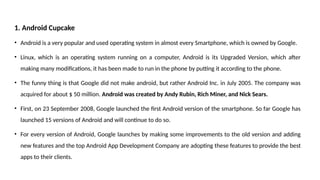
1. Android Cupcake
•Android is a very popular and used operating system in almost every Smartphone, which is owned by Google.
• Linux, which is an operating system running on a computer, Android is its Upgraded Version, which after
making many modifications, it has been made to run in the phone by putting it according to the phone.
• The funny thing is that Google did not make android, but rather Android Inc. in July 2005. The company was
acquired for about $ 50 million. Android was created by Andy Rubin, Rich Miner, and Nick Sears.
• First, on 23 September 2008, Google launched the first Android version of the smartphone. So far Google has
launched 15 versions of Android and will continue to do so.
• For every version of Android, Google launches by making some improvements to the old version and adding
new features and the top Android App Development Company are adopting these features to provide the best
apps to their clients.
7.
• Every yearmany manufacturers sell millions of android devices to people all over the world,
whether it is a phone or a tablet.
• Android handles 88% of the world’s Smartphone Market.
• Right now there are several users of android billions all over the world, which is a statement of
android’s fame.
• We hope you know by now what Android is. So let us now tell you about Android Version Name
List.
8.
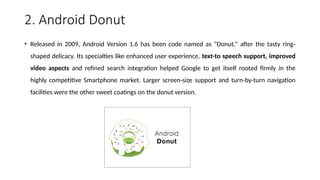
2. Android Donut
•Released in 2009, Android Version 1.6 has been code named as “Donut,” after the tasty ring-
shaped delicacy. Its specialties like enhanced user experience, text-to speech support, improved
video aspects and refined search integration helped Google to get itself rooted firmly in the
highly competitive Smartphone market. Larger screen-size support and turn-by-turn navigation
facilities were the other sweet coatings on the donut version.
9.
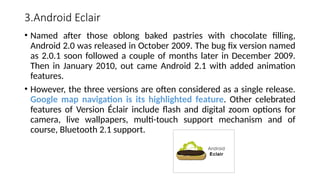
3.Android Eclair
• Namedafter those oblong baked pastries with chocolate filling,
Android 2.0 was released in October 2009. The bug fix version named
as 2.0.1 soon followed a couple of months later in December 2009.
Then in January 2010, out came Android 2.1 with added animation
features.
• However, the three versions are often considered as a single release.
Google map navigation is its highlighted feature. Other celebrated
features of Version Éclair include flash and digital zoom options for
camera, live wallpapers, multi-touch support mechanism and of
course, Bluetooth 2.1 support.
10.
4. Android Froyo
•The next one in the queue, Android 2.2 is about sheer speed and
nothing else. Short for Frozen Yoghurt, Google got this version’s
speed technically enhanced. Yet another unique characteristic
feature was its uniquely redesigned home screen. It ensured better
functionality for the device, with the entire process streamlined.
11.
5. Android Gingerbread
•Named after the popular ginger-flavoured cookies, Android version
2.3 looked new and fresh in various ways. A few of its unique features
included several cameras, SIP internet calling, download manager, a
few sensors like a barometer, gravimeter etc.
12.
6.Honeycomb
• Google introducedAndroid 3.0 in February 2011 and called it,
Honeycomb. Made for tablets, versions 3.1 and 3.2 followed in rapid
succession. Gingerbread was, in fact, Android’s very first tablet-only
update.
13.
7. Android IceCream Sandwich
• Version 4.0 was the outcome of Google’s plan to get the tablet-only
platform of Honeycomb synthesized with a mobile platform. Dubbed
as Ice-cream Sandwich, enhanced functionality was not the only big
change that it brought in. In terms of design too, there were drastic
changes.
• Introduction of default font was another highlight of Ice-cream
Sandwich. From this version onwards, Google effectively brought all
its services under the umbrella, ‘Google Play’.
14.
8. Android JellyBean
• Although primarily meant to enhance functionality and improve user interface,
“Google Now” was indeed the most innovative aspect of Version 4.1. Nicknamed
as Jelly Bean, here was something that could correctly guess what you are up to
search, before you actually go looking for it.
• Apart from the predictive feature, highly interactive notifications too made Jelly
Bean stand out from the rest. Version 4.1 was also noted for its unique in- built
speech-to-text engine, popularly referred to as ‘voice typing’. The outcome has
been an overall performance enhancement that assured an absolutely buttery
smooth user interface.
15.
9. Android KitKat
•Google officially unveiled Android version 4.4, which it named as
Kitkat, in 2013. Nestle offered full support and even kicked off a
special ad campaign on its release.
• However, the code name that Google had initially associated with
Android 4.4 was “Key Lime Pie”. The name was later changed to Kitkat
as they thought key lime pie was not a very popular dessert.
• Google wanted a dessert name that is known by all, and hence
partnered with Nestle for the code name Kitkat. Version 4.4 debuted
on Nexus 5, and can effectively run on quite many devices compared
to earlier Android versions.
16.
• Google Now’feature, introduced initially in Jelly Bean was taken even ahead
with the introduction of Kitkat.
Earlier, you had to touch the gadget to open up the smart artificial intelligence
(AI) assistant. Now with Jelly Bean, all you got to do to initiate the search is to
utter the required phrase to the gadget.
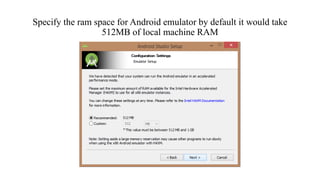
• Another advantage of Version 4.4 was that now the operating system could run
even on devices with lower RAM. 512 MB RAM was the recommended minimum.
The introduction of Emoji on Google’s keyboards was yet another unique aspect
of Kitkat.
17.
10. Android Lollipop
•With Version 5.0, popularly referred to as Lollipop, Android could simply spread
across a wide range of devices from smart phones to televisions and even to
smart watches. Lollipop came out with a brand new runtime. Battery saving
feature ensures excellent battery life on these various devices. It saves your
phone from damage even while its battery is running low.
18.
11. Android Marshmallow
•Android 6.0, named Marshmallow, has been released under the code name
Android M. It has ushered in a fistful of welcome changes that are sure to make a
major impact. Doze mode that cuts down the power consumption drastically
when the device is idle, opt-in app permission, fully supported USB C, inbuilt
fingerprint sensor support system is but a few of them.
19.
12.Android Nougat
• Android“Nougat” was officially released on August 22, 2016.Google Nexus was
the first smart phone which received update of this version. This version had
provided two major features to the smart phone, Split Screen and DOZE power
saving mechanism and faster application installation. Now people can use
multiple applications at once. This was the great achievement. Now smartphone
user have ability of multi tasking. This version gave users ability to reply inline to
notification.
• DOZE power saving mechanism help system to extend battery life. This version
was revolutionary.
20.
13.Android Oreo
• AndroidOreo was released to the public on August 21, 2017.It comes with more
features like picture-in-picture, password autofill, notification dots, smart text
selection, snooze notification. Android Nougat introduce split screen concept.
With Oreo, we get a native picture-in-picture feature. When you’re watching a
video in an app like Netflix or VLC, just hit the Home button and the video will
shrink to a little floating window. You can then open any other app—catch up on
email or even play games while watching the video. Now, if you choose to, you
can let Google automatically fill in login details for apps you’re using. The
notification dots feature will put a little dot in the bottom-right corner of the app
when you have any unread notification.
21.
14.Android Pie
• OnAugust 6, 2018, Google officially announced the final release of Android 9
under the title “Pie”, with the update initially available for current Google Pixel
devices. Google has made lot improvement in this version in terms of design
and security. It uses Material design 2.0 concept, Smartphone can be use in
flexible way.
• It even allows the user to get a MicroSD card formatted and use it as internal
storage, enjoying the same security level.
• Of course, all those versions that have been rolled out by Google till now have
been sweet. Still sweeter ones are yet to come and steal the show.
22.
15. Android 10.0
•Every time Google comes up with latest android version so in September 2019 Android Version 10
has released.
• This Android version is currently available in all-new devices and it’s slowly making its way to
existing phones in the world.
• This Android latest version software brings about a reimagined interface for the Android
gestures, this time doing away with the tape able Back button together and relying on the
completely swipe-driven approach to the system navigation.
23.
16. Android 11
•Android latest version in 2020 is Android 11.0 is in progress. The latest update that has already
made the history by the developer preview its platform that can ever be seen.
• Google announced the first Android 11 preview this 19 February 2020. We can catch most of the
tech community with its nearly a month before it arrives in the market.
• The first Android 11 preview is a preview though it’s rough around the edges that not meant it is
available for the general use in the market. It almost certainly not the complete picture of when
the final software will be available due to this COVID-19.
24.
17. Android 12
•Android 12 delivers even more personal, safe and effortless experiences on your device. Featuring
a totally reimagined UI just for you, new privacy features that are designed for your safety and put
you in control, and more seamless ways to get straight to your gameplay or even switch to a new
device.
• Android 12 was confirmed back at Google IO 2021 in June, showcasing a revamped look and
features that focus more on privacy and interactivity.
• We've since seen the public beta release show off refreshed notifications, better screenshot
support, one-handed mode and much more.
25.
• And afterthe Pixel 6 launch event, Google launched the software update, and it's available
now for older Pixel phones – though the company hasn't confirmed which phones are compatible
(we suspected the Pixel 3 might be the oldest phone to get the update given it was the threshold
for the Android 12 beta).
• Android 12 is the 2021 update for Google's Android operating system, building on 2020's Android
11, which some phones still don't have. But this is more than just an iterative update - Google
describes it as the biggest design change in Android's history, and it certainly shows.
26.
Android 13
• HDRvideo capture
• Legacy copy of speech service implementation removed
• OpenJDK 11 updates
• Themed app icons
• Per-app language preferences
• Faster hyphenation
• Text Conversion APIs
• Bluetooth LE Audio
• Choreographer improvements
• Spatial audio
• Task Manager
• Battery Resource Utilization
• App color theme applied automatically to WebView content
27.
Android 14
• Non-linearfont scaling to 200%
• Ultra HDR for images
• Lossless USB audio
• Schedule exact alarms are denied by default
• OpenJDK 17 updates
• Credential Manager
• Partial access to photos and videos
• Secure full-screen Intent notifications
• Large screen user per-app overrides
28.
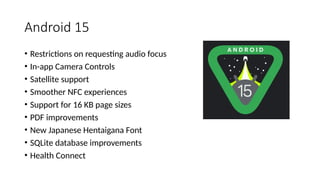
Android 15
• Restrictionson requesting audio focus
• In-app Camera Controls
• Satellite support
• Smoother NFC experiences
• Support for 16 KB page sizes
• PDF improvements
• New Japanese Hentaigana Font
• SQLite database improvements
• Health Connect
29.
Features of Android
•Storage—SQLite, a lightweight relational database, for data storage.
• Connectivity—GSM/EDGE, IDEN, CDMA, EV-DO, UMTS, Bluetooth (includes A2DP and
AVRCP), Wi-Fi, LTE, and WiMAX.
• Messaging—Both SMS and MMS.
• Media support H.263, H.264 (in 3GP or MP4 container), MPEG-4 SP, AMR, AMR-WB (in 3GP
container), AAC, HE-AAC (in MP4 or 3GP container), MP3, MIDI, Ogg Vorbis, WAV, JPEG,
PNG, GIF, and BMP.
30.
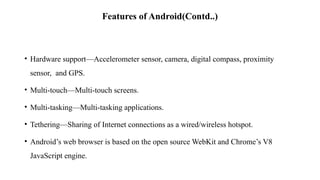
Features of Android(Contd..)
•Hardware support—Accelerometer sensor, camera, digital compass, proximity
sensor, and GPS.
• Multi-touch—Multi-touch screens.
• Multi-tasking—Multi-tasking applications.
• Tethering—Sharing of Internet connections as a wired/wireless hotspot.
• Android’s web browser is based on the open source WebKit and Chrome’s V8
JavaScript engine.
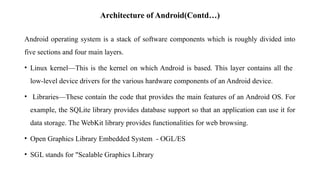
Architecture of Android(Contd…)
Androidoperating system is a stack of software components which is roughly divided into
five sections and four main layers.
• Linux kernel—This is the kernel on which Android is based. This layer contains all the
low-level device drivers for the various hardware components of an Android device.
• Libraries—These contain the code that provides the main features of an Android OS. For
example, the SQLite library provides database support so that an application can use it for
data storage. The WebKit library provides functionalities for web browsing.
• Open Graphics Library Embedded System - OGL/ES
• SGL stands for "Scalable Graphics Library
33.
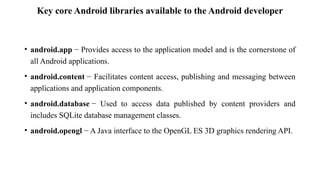
Key core Androidlibraries available to the Android developer
• android.app − Provides access to the application model and is the cornerstone of
all Android applications.
• android.content − Facilitates content access, publishing and messaging between
applications and application components.
• android.database − Used to access data published by content providers and
includes SQLite database management classes.
• android.opengl − A Java interface to the OpenGL ES 3D graphics rendering API.
34.
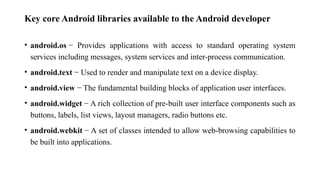
Key core Androidlibraries available to the Android developer
• android.os − Provides applications with access to standard operating system
services including messages, system services and inter-process communication.
• android.text − Used to render and manipulate text on a device display.
• android.view − The fundamental building blocks of application user interfaces.
• android.widget − A rich collection of pre-built user interface components such as
buttons, labels, list views, layout managers, radio buttons etc.
• android.webkit − A set of classes intended to allow web-browsing capabilities to
be built into applications.
35.
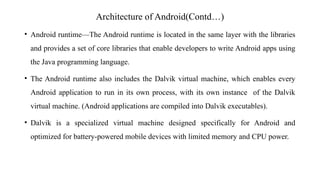
Architecture of Android(Contd…)
•Android runtime—The Android runtime is located in the same layer with the libraries
and provides a set of core libraries that enable developers to write Android apps using
the Java programming language.
• The Android runtime also includes the Dalvik virtual machine, which enables every
Android application to run in its own process, with its own instance of the Dalvik
virtual machine. (Android applications are compiled into Dalvik executables).
• Dalvik is a specialized virtual machine designed specifically for Android and
optimized for battery-powered mobile devices with limited memory and CPU power.
36.
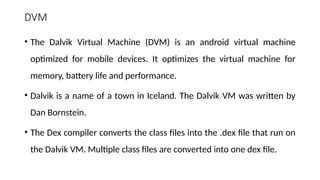
DVM
• The DalvikVirtual Machine (DVM) is an android virtual machine
optimized for mobile devices. It optimizes the virtual machine for
memory, battery life and performance.
• Dalvik is a name of a town in Iceland. The Dalvik VM was written by
Dan Bornstein.
• The Dex compiler converts the class files into the .dex file that run on
the Dalvik VM. Multiple class files are converted into one dex file.
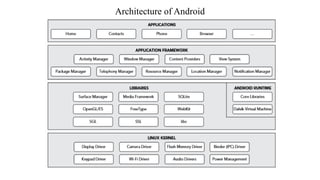
Architecture of Android(Contd…)
•Application framework—The application framework exposes the various capabilities of the Android OS to
application developers so that they can make use of them in their applications.
• The Android framework includes the following key services
Activity Manager − Controls all aspects of the application lifecycle and activity stack.
Content Providers − Allows applications to publish and share data with other applications.
Resource Manager − Provides access to non-code embedded resources such as strings, color settings and user interface
layouts.
Notifications Manager − Allows applications to display alerts and notifications to the user.
View System − An extensible set of views used to create application user interfaces.
• Applications—At this top layer are the applications that ship with the Android device (such as Phone,
Contacts, Browser, and so on), as well as applications that you download and install from the Android
Market. Any applications that you write are located at this layer.
39.
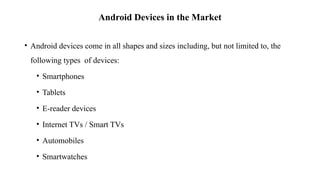
Android Devices inthe Market
• Android devices come in all shapes and sizes including, but not limited to, the
following types of devices:
• Smartphones
• Tablets
• E-reader devices
• Internet TVs / Smart TVs
• Automobiles
• Smartwatches
40.
The Android Market
•Users can simply use the Google Play application that is preinstalled on their
Android devices to directly download third-party applications to their devices.
• Both paid and free applications are available in the Google Play Store, although
paid applications are available only to users in certain countries because of legal
issues.
41.
Obtaining the requiredtools
• Java JDK (Can be downloaded from Oracle website)
• Android Studio(developer.android website)
42.
SDK tools
• SDKtools are generally platform independent and are required no matter which
android platform you are working on. When you install the Android SDK into your
system, these tools get automatically installed.
• Android: This tool lets you manage AVDs, projects, and the installed
components of the SDK
• Ddms: This tool lets you debug Android applications
• Draw 9-Patch:This tool allows you to easily create a Nine-Patch graphic using a
WYSIWYG editor
43.
• Emulator: Thistools let you test your applications without using a physical device
• Mksdcard: Helps you create a disk image (external sdcard storage) that you can use
with the emulator
• Proguard: Shrinks, optimizes, and obfuscates your code by removing unused code
• Sqlite3: Lets you access the SQLite data files created and used by Android applications
• Traceview: Provides a graphical viewer for execution logs saved by your application
• Adb: Android Debug Bridge (adb) is a versatile command line tool that lets you
communicate with an emulator instance or connected Android-powered device.
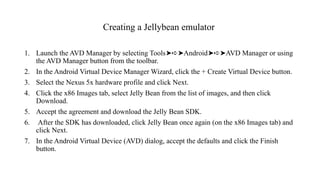
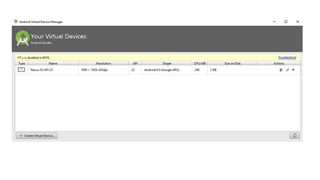
Creating a Jellybeanemulator
1. Launch the AVD Manager by selecting Tools Android AVD Manager or using
➤➪➤ ➤➪➤
the AVD Manager button from the toolbar.
2. In the Android Virtual Device Manager Wizard, click the + Create Virtual Device button.
3. Select the Nexus 5x hardware profile and click Next.
4. Click the x86 Images tab, select Jelly Bean from the list of images, and then click
Download.
5. Accept the agreement and download the Jelly Bean SDK.
6. After the SDK has downloaded, click Jelly Bean once again (on the x86 Images tab) and
click Next.
7. In the Android Virtual Device (AVD) dialog, accept the defaults and click the Finish
button.
59.
The Android DeveloperCommunity
The following are some developer communities and websites that you can turn to
for help if you run into problems while working with Android:
• Stack Overflow (www.stackoverflow.com)—Stack Overflow is a collaboratively
edited question-and-answer site for developers. If you have a question about
Android, chances are someone at Stack Overflow is probably already discussing
the same question. It’s also likely that someone else has already provided the
answer. Best of all, other developers can vote for the best answer so that you can
know which are the answers that are most trustworthy.
60.
The Android DeveloperCommunity(Contd…)
• Google Android Training (http://developer.android.com/training/index.html)— Google has
launched the Android Training site, which contains a number of useful classes grouped by topics.
At the time of writing, the classes mostly contain code snippets that are useful to Android
developers who have started with the basics.
• Android Discuss (http://groups.google.com/group/android-discuss)—Android Discuss is a
discussion group hosted by Google using the Google Groups service. Here, you will be able to
discuss the various aspects of Android programming. This group is monitored closely by the
Android team at Google, so this is good place to clarify your doubts and to learn new tips and
tricks.
61.
Launching Your FirstAndroid Application
• Select Run Run app from the Android Studio menu bar.
➤➪➤
62.
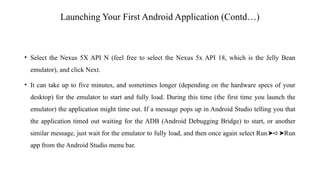
Launching Your FirstAndroid Application (Contd…)
• Select the Nexus 5X API N (feel free to select the Nexus 5x API 18, which is the Jelly Bean
emulator), and click Next.
• It can take up to five minutes, and sometimes longer (depending on the hardware specs of your
desktop) for the emulator to start and fully load. During this time (the first time you launch the
emulator) the application might time out. If a message pops up in Android Studio telling you that
the application timed out waiting for the ADB (Android Debugging Bridge) to start, or another
similar message, just wait for the emulator to fully load, and then once again select Run Run
➤➪➤
app from the Android Studio menu bar.
63.
With the emulatorfully loaded and started, Android Studio can install Hello World
application.
64.
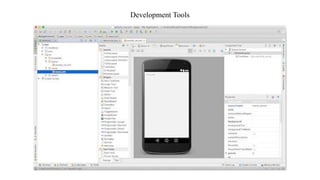
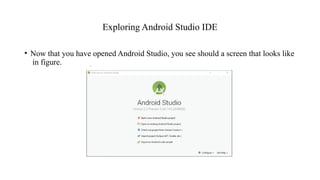
Exploring Android StudioIDE
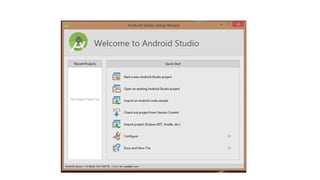
• Now that you have opened Android Studio, you see should a screen that looks like
in figure.
65.
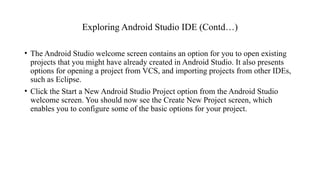
Exploring Android StudioIDE (Contd…)
• The Android Studio welcome screen contains an option for you to open existing
projects that you might have already created in Android Studio. It also presents
options for opening a project from VCS, and importing projects from other IDEs,
such as Eclipse.
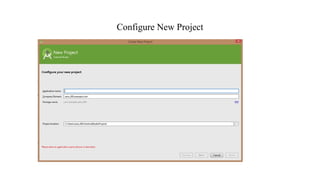
• Click the Start a New Android Studio Project option from the Android Studio
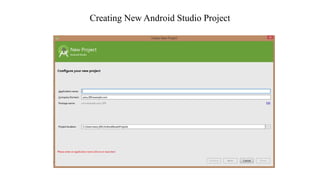
welcome screen. You should now see the Create New Project screen, which
enables you to configure some of the basic options for your project.
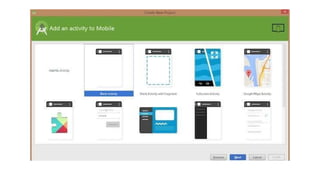
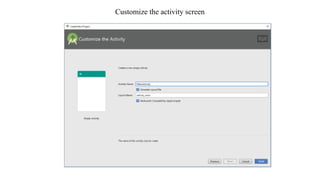
Customize the activityscreen
The Customize the Activity screen contains two options, one for naming your activity, and one for
naming the main layout (presumably to be used by the main activity).
• It is accepted practice in Android development to name your main activity—that is, the activity that is
loaded on startup by your application—as MainActivity. The reason for this is to make it easier to
locate the startup code for your application. If anyone else needs to look at or work with your
application, they should know that the MainActivity is the starting point. All other activities can be
named by their function, for example InputFormActivity or DeleteRecordActivity.
• The layout file follows the “name” naming convention. The startup layout, that is the layout for the
screen elements that will be displayed when your application is started by the user, is the
activity_main layout. All other layouts should be named according to the activity that they support
(activity_input, activity_delete).
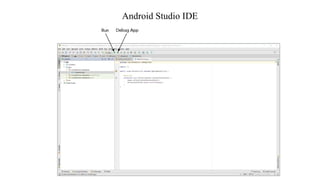
Android Studio IDE
•The upper portion of the IDE represents the menu bars or ribbons. Here, as with most
applications that you have used in the past, you have all of your options for interacting directly
with the IDE. The most important ones to note are the green arrow, which represents the Run
app option, and the green arrow with a bug behind it, which is the Debug App option.
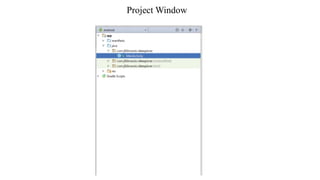
• By default, the left side of the IDE shows the Project window. The Project window enables you
to quickly navigate the files within your project. By default, the Project window is set to the
Android view. To change the view, click the word Android and use the drop-down list of options
to make the change.
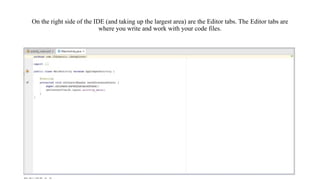
On the rightside of the IDE (and taking up the largest area) are the Editor tabs. The Editor tabs are
where you write and work with your code files.
75.
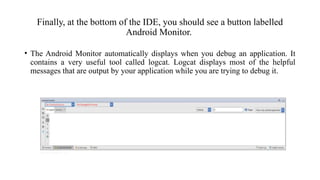
Finally, at thebottom of the IDE, you should see a button labelled
Android Monitor.
• The Android Monitor automatically displays when you debug an application. It
contains a very useful tool called logcat. Logcat displays most of the helpful
messages that are output by your application while you are trying to debug it.
76.
Using Code Completion
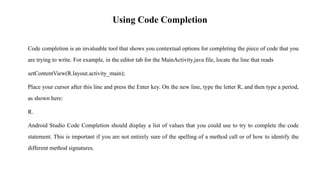
Codecompletion is an invaluable tool that shows you contextual options for completing the piece of code that you
are trying to write. For example, in the editor tab for the MainActivity.java file, locate the line that reads
setContentView(R.layout.activity_main);
Place your cursor after this line and press the Enter key. On the new line, type the letter R, and then type a period,
as shown here:
R.
Android Studio Code Completion should display a list of values that you could use to try to complete the code
statement. This is important if you are not entirely sure of the spelling of a method call or of how to identify the
different method signatures.
77.
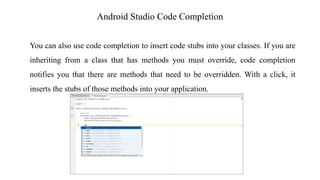
Android Studio CodeCompletion
You can also use code completion to insert code stubs into your classes. If you are
inheriting from a class that has methods you must override, code completion
notifies you that there are methods that need to be overridden. With a click, it
inserts the stubs of those methods into your application.
78.
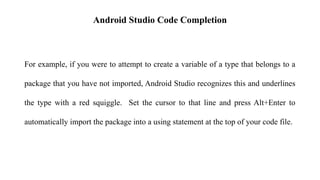
Android Studio CodeCompletion
For example, if you were to attempt to create a variable of a type that belongs to a
package that you have not imported, Android Studio recognizes this and underlines
the type with a red squiggle. Set the cursor to that line and press Alt+Enter to
automatically import the package into a using statement at the top of your code file.
79.
Debugging Your Application
Breakpointsallow you to pause the execution of your code at specific locations and
see what is going on (or what is going wrong).
Setting breakpoints
Breakpoints are a mechanism by which you can tell Android Studio to temporarily
pause execution of your code, which allows you to examine the condition of your
application. This means that you can check on the values of variables in your
application while you are debugging it. Also, you can check whether certain lines of
code are being executed as expected—or at all.
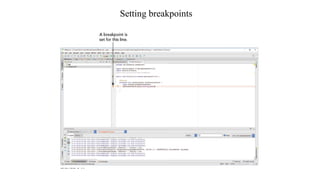
To tell Android Studio that you want to examine a specific line of code during
debugging, you must set a breakpoint at that line. Click the margin of the editor tab
next to line of code you want to break at, to set a breakpoint. A red circle is placed
in the margin, and the corresponding line is highlighted in red.
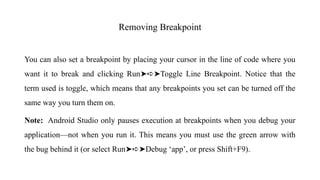
Removing Breakpoint
You canalso set a breakpoint by placing your cursor in the line of code where you
want it to break and clicking Run Toggle Line Breakpoint. Notice that the
➤➪➤
term used is toggle, which means that any breakpoints you set can be turned off the
same way you turn them on.
Note: Android Studio only pauses execution at breakpoints when you debug your
application—not when you run it. This means you must use the green arrow with
the bug behind it (or select Run Debug ‘app’, or press Shift+F9).
➤➪➤
82.
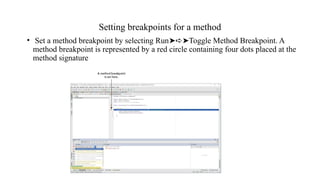
Setting breakpoints fora method
• Set a method breakpoint by selecting Run Toggle Method Breakpoint. A
➤➪➤
method breakpoint is represented by a red circle containing four dots placed at the
method signature
83.
Setting breakpoints fora method
• Android Studio issues a warning that method breakpoints can dramatically slow
down debugging. This is because method breakpoints do more than simple
breakpoints in their default state. By default, method breakpoints are set apart
from simple breakpoints.
• Android Studio pauses execution when the method is hit, and it also
automatically sets a corresponding breakpoint and pauses at the end of the method
84.
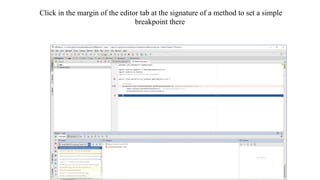
Click in themargin of the editor tab at the signature of a method to set a simple
breakpoint there
85.
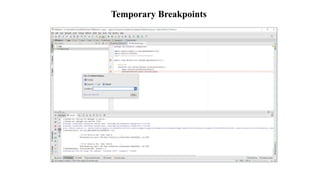
Temporary Breakpoints
• Atemporary breakpoint is useful when you are trying to debug a large loop, or
you just want to make sure a line of code is being hit during execution. To set a
temporary breakpoint, place your cursor at the location in the code where you
want it to break and select Run Toggle Temporary Line Breakpoint.
➤➪➤
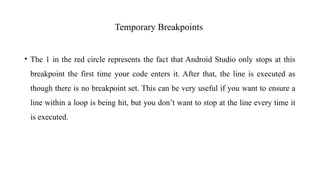
Temporary Breakpoints
• The1 in the red circle represents the fact that Android Studio only stops at this
breakpoint the first time your code enters it. After that, the line is executed as
though there is no breakpoint set. This can be very useful if you want to ensure a
line within a loop is being hit, but you don’t want to stop at the line every time it
is executed.
88.
Conditional Breakpoints
• Acondition breakpoint is a breakpoint at which Android Studio only pauses when
specific conditions are met. To set a conditional breakpoint, first set a simple
breakpoint at the line of code you want to examine, then right-click the simple
breakpoint to bring up the condition context menu.
• From here you can set conditions that tell Android Studio when to pause at a
breakpoint. For example, you can tell Android Studio to only pause at a line of
code when your variable named foo equals true. You would then set the condition
in the breakpoint to
foo == true
• Conditional breakpoints are extremely useful in diagnosing intermittent issues in
complex code blocks.
89.
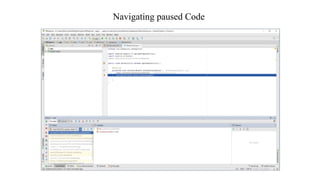
Navigating paused Code
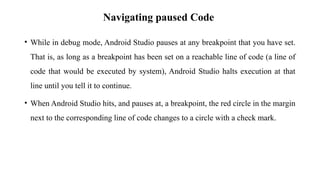
•While in debug mode, Android Studio pauses at any breakpoint that you have set.
That is, as long as a breakpoint has been set on a reachable line of code (a line of
code that would be executed by system), Android Studio halts execution at that
line until you tell it to continue.
• When Android Studio hits, and pauses at, a breakpoint, the red circle in the margin
next to the corresponding line of code changes to a circle with a check mark.
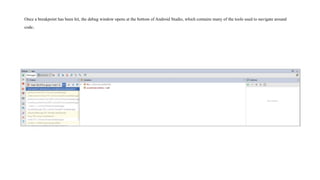
Once a breakpointhas been hit, the debug window opens at the bottom of Android Studio, which contains many of the tools used to navigate around
code.
92.
Navigating paused Code
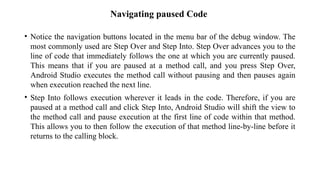
•Notice the navigation buttons located in the menu bar of the debug window. The
most commonly used are Step Over and Step Into. Step Over advances you to the
line of code that immediately follows the one at which you are currently paused.
This means that if you are paused at a method call, and you press Step Over,
Android Studio executes the method call without pausing and then pauses again
when execution reached the next line.
• Step Into follows execution wherever it leads in the code. Therefore, if you are
paused at a method call and click Step Into, Android Studio will shift the view to
the method call and pause execution at the first line of code within that method.
This allows you to then follow the execution of that method line-by-line before it
returns to the calling block.
93.
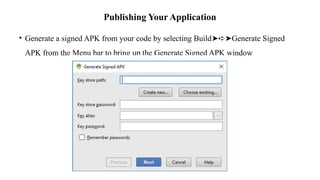
Publishing Your Application
•Generate a signed APK from your code by selecting Build Generate Signed
➤➪➤
APK from the Menu bar to bring up the Generate Signed APK window
94.
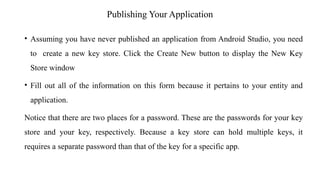
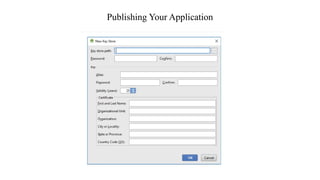
Publishing Your Application
•Assuming you have never published an application from Android Studio, you need
to create a new key store. Click the Create New button to display the New Key
Store window
• Fill out all of the information on this form because it pertains to your entity and
application.
Notice that there are two places for a password. These are the passwords for your key
store and your key, respectively. Because a key store can hold multiple keys, it
requires a separate password than that of the key for a specific app.
Publishing Your Application
•Click OK to return to the Generate Signed APK window.
• In the Generate Signed APK windows, click Next to review and finish the process.
Now that you have a signed APK, you can upload it to the Google Play Store using
the developer console at https://play.google.com/apps/publish/.
Editor's Notes
#29 Enhanced Data Rates for GSM Evolution is three times faster than GSM and is built upon GSM. It is designed to accommodate streaming media on mobile devices. AT&T and T-Mobile have EDGE networks. Advanced Audio Distribution Profile (A2DP) ... The Audio/Video Remote Control Profile (AVRCP)