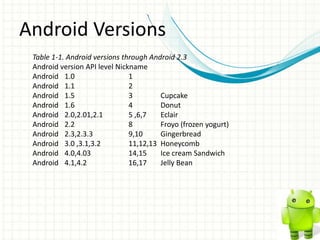
Welcome
INTRODUCTION TO ANDROID

              Bantyder Bahru
              March 30,2013
Today’s Overview

     1   • Android at a glance

     2   • Setting up IDE

     3   • Our first android project

     4   • Building block of android
           apps
         • Best way to learn
     5
           android
Android at glance
• How it was started
• Android Versions
• How many device ?
• Why android as a
  developer?
How it was started


     • Google Acquires Android Inc. in 2005
     • Open Handset Alliance formed in 2007
     • First android SDK released in 2008
Android Versions
 Table 1-1. Android versions through Android 2.3
 Android version API level Nickname
 Android 1.0                   1
 Android 1.1                   2
 Android 1.5                   3        Cupcake
 Android 1.6                   4        Donut
 Android 2.0,2.01,2.1          5 ,6,7   Eclair
 Android 2.2                   8        Froyo (frozen yogurt)
 Android 2.3,2.3.3             9,10     Gingerbread
 Android 3.0 ,3.1,3.2          11,12,13 Honeycomb
 Android 4.0,4.03              14,15    Ice cream Sandwich
 Android 4.1,4.2               16,17    Jelly Bean
How many devices
• people have activated half
  a billion Android devices.
• Also, 1.3 million new ones
  arrive each day.
Why Android as a
developer?
•   Open source platform
•   Cost free development
•   Contains built-in libraries which makes developer's life easy
•   We can develop and test our app without owning a physical device
Setting up
your IDE
•   Download Android
    Bundle
•   Use Existing IDE
Download Android Bundle

Eclipse + ADT(Android Development Tool) +
Android SDK Manager

   1.Go to http://developer.android.com/sdk/index.html
   2.Extract
   3.Run Android SDK Manager
   4.Selet and install Latest SDK
Use Existing IDE

 Download android SDK from
  http://dl.google.com/android/installer_r21.1-
  windows.exe
 Start Eclipse, then select Help→Install New Software
 In the Available Software dialog, click Add.
 In the Add Site dialog that appears, enter a name for the
  remote site (for example,
 “Android Plugin”) in the “Name” field.
 In the “Location” field, enter this URL: https://dl-
  ssl.google.com/android/eclipse/
Use Existing IDE
 Click OK. Back in the Available Software view, you
  should now see “Developer Tools” added
 To the list. Select the checkbox next to Developer
  Tools, which will automatically
 Select the nested tools Android DDMS and Android
  Development Tools. Click Next.
 In the resulting Install Details dialog, the Android DDMS
  and Android Development
 Tools features are listed. Click Next to read and accept
  the license agreement and install any
  dependencies, then click Finish.
 Restart Eclipse.
To Finalize your preparation
         1. Run Android SDK manager
         2. Select Latest SDK and install


Ready to get our hand dirty!!!!!!!
Our first
android
project.
Android Projects
•   Naming
•   Min SDK
•   Target SDK
•   Manifest Files
•   Resource files
•   R file
•   Emulator
BUILDING BLOCK OF
ANDROID APPLICATION
HOW ANDROID
APPLICATION RUN
Building Blocks
1.Activity
2.Intents
3.Services
4.Broadcast Receiver
5.Application Context
Building Blocks
1.Activity
2.Intents
3.Services
4.Broadcast Receiver
5.Application Context
Activity
   • usually a single screen that the user sees on the device at one time
   • Activity has life cycle
Intents
 • Intents are messages that are sent
   among the major building blocks
 • Trigger activity to start
 • Tells service to start , stop or
   broadcast
 • Explicit Intent
 • Implicit Intent
Code Practice
    • Declaring Activity
    • Starting New Activity
       • Explicit Intent
       • Implicit Intent
Code Practice (continued)
     • Switching between activity
     • Returning result from
       activity
     • passing data for another
       activity using intent
Best Way To Learn

                • No more waiting start
                  today
                • Ideas
                • Start Today
Summary
• Configure your IDE
• Understand Building Blocks
• Activity and Intents
Resources
• ORielly Learning Android, Marko Gargenta
• APress Beginning Android 4,Grant Allen
• PACKT,Android 3.0 Application Development
  Cookbook, Kyle Merrifield Mew
• http://developer.android.com
QUESTIONS?
THANK YOU

Introduction to android

  • 1.
  • 2.
    INTRODUCTION TO ANDROID Bantyder Bahru March 30,2013
  • 3.
    Today’s Overview 1 • Android at a glance 2 • Setting up IDE 3 • Our first android project 4 • Building block of android apps • Best way to learn 5 android
  • 4.
  • 5.
    • How itwas started • Android Versions • How many device ? • Why android as a developer?
  • 6.
    How it wasstarted • Google Acquires Android Inc. in 2005 • Open Handset Alliance formed in 2007 • First android SDK released in 2008
  • 7.
    Android Versions Table1-1. Android versions through Android 2.3 Android version API level Nickname Android 1.0 1 Android 1.1 2 Android 1.5 3 Cupcake Android 1.6 4 Donut Android 2.0,2.01,2.1 5 ,6,7 Eclair Android 2.2 8 Froyo (frozen yogurt) Android 2.3,2.3.3 9,10 Gingerbread Android 3.0 ,3.1,3.2 11,12,13 Honeycomb Android 4.0,4.03 14,15 Ice cream Sandwich Android 4.1,4.2 16,17 Jelly Bean
  • 8.
    How many devices •people have activated half a billion Android devices. • Also, 1.3 million new ones arrive each day.
  • 9.
    Why Android asa developer? • Open source platform • Cost free development • Contains built-in libraries which makes developer's life easy • We can develop and test our app without owning a physical device
  • 10.
  • 11.
    Download Android Bundle • Use Existing IDE
  • 12.
    Download Android Bundle Eclipse+ ADT(Android Development Tool) + Android SDK Manager 1.Go to http://developer.android.com/sdk/index.html 2.Extract 3.Run Android SDK Manager 4.Selet and install Latest SDK
  • 13.
    Use Existing IDE Download android SDK from http://dl.google.com/android/installer_r21.1- windows.exe  Start Eclipse, then select Help→Install New Software  In the Available Software dialog, click Add.  In the Add Site dialog that appears, enter a name for the remote site (for example,  “Android Plugin”) in the “Name” field.  In the “Location” field, enter this URL: https://dl- ssl.google.com/android/eclipse/
  • 14.
    Use Existing IDE Click OK. Back in the Available Software view, you should now see “Developer Tools” added  To the list. Select the checkbox next to Developer Tools, which will automatically  Select the nested tools Android DDMS and Android Development Tools. Click Next.  In the resulting Install Details dialog, the Android DDMS and Android Development  Tools features are listed. Click Next to read and accept the license agreement and install any dependencies, then click Finish.  Restart Eclipse.
  • 15.
    To Finalize yourpreparation 1. Run Android SDK manager 2. Select Latest SDK and install Ready to get our hand dirty!!!!!!!
  • 16.
  • 17.
    Android Projects • Naming • Min SDK • Target SDK • Manifest Files • Resource files • R file • Emulator
  • 18.
  • 19.
  • 20.
  • 21.
  • 22.
    Activity • usually a single screen that the user sees on the device at one time • Activity has life cycle
  • 23.
    Intents • Intentsare messages that are sent among the major building blocks • Trigger activity to start • Tells service to start , stop or broadcast • Explicit Intent • Implicit Intent
  • 24.
    Code Practice • Declaring Activity • Starting New Activity • Explicit Intent • Implicit Intent
  • 25.
    Code Practice (continued) • Switching between activity • Returning result from activity • passing data for another activity using intent
  • 26.
    Best Way ToLearn • No more waiting start today • Ideas • Start Today
  • 27.
    Summary • Configure yourIDE • Understand Building Blocks • Activity and Intents
  • 28.
    Resources • ORielly LearningAndroid, Marko Gargenta • APress Beginning Android 4,Grant Allen • PACKT,Android 3.0 Application Development Cookbook, Kyle Merrifield Mew • http://developer.android.com
  • 29.
  • 30.

Editor's Notes

  • #4 This is another option for an Overview slide.
  • #5 This is another option for an Overview slides using transitions.
  • #8 -Google buy Android Inc 2005gPhone was expectedIn 2007 Open HandesetAliance owns android and become opensource-2008 SDK 1.0-Gives more control for developers
  • #9 What is our target market globaly and in Ethiopia?
  • #10 What is our target market globaly and in Ethiopia?
  • #14 1. Download Eclipse can be downloaded from the Eclipse web site, www.eclipse.org/Open Eclipse and choose Help ➤➤ Install New Software. Iin the Install dialog box, click theAdd button to add a new source of plug-ins. Give it a name (e.g., Android) supply the following URL: https://dl-ssl.google.com/android/eclipse/Next and ADT will be installedDownload Android SDK manager from http://developer.android.com. Download the ZIP file that is appropriate for your platform and unzip it in a logical location on your machine3.Run Android SDK Manager4.Selet and install Latest SDK
  • #15 1. Download Eclipse can be downloaded from the Eclipse web site, www.eclipse.org/Open Eclipse and choose Help ➤➤ Install New Software. Iin the Install dialog box, click theAdd button to add a new source of plug-ins. Give it a name (e.g., Android) supply the following URL: https://dl-ssl.google.com/android/eclipse/Next and ADT will be installedDownload Android SDK manager from http://developer.android.com. Download the ZIP file that is appropriate for your platform and unzip it in a logical location on your machine3.Run Android SDK Manager4.Selet and install Latest SDK
  • #16 1. Download Eclipse can be downloaded from the Eclipse web site, www.eclipse.org/Open Eclipse and choose Help ➤➤ Install New Software. Iin the Install dialog box, click theAdd button to add a new source of plug-ins. Give it a name (e.g., Android) supply the following URL: https://dl-ssl.google.com/android/eclipse/Next and ADT will be installedDownload Android SDK manager from http://developer.android.com. Download the ZIP file that is appropriate for your platform and unzip it in a logical location on your machine3.Run Android SDK Manager4.Selet and install Latest SDK
  • #18 Dimensions in,mm,pt(1/72in)dp (device independet pixel)sp(scale independet pixel)Resource color,dimen,string,string-array
  • #19 Use a section header for each of the topics, so there is a clear transition to the audience.
  • #21 Add slides to each topic section as necessary, including slides with tables, graphs, and images. See next section for sampletable, graph, image, and video layouts.
  • #22 Add slides to each topic section as necessary, including slides with tables, graphs, and images. See next section for sampletable, graph, image, and video layouts.
  • #23 Keep it brief. Make your text as brief as possible to maintain a larger font size.
  • #24 Explicit Intent , the sender clearly spells out which specific component should be on the receiving endImplicit Intent, In an implicit intent, the sender specifies the type of receiver.(the system will present options)
  • #25 Keep it brief. Make your text as brief as possible to maintain a larger font size.
  • #26 Keep it brief. Make your text as brief as possible to maintain a larger font size.