INSTRUMENTATION
Brahmaiah Shaik
INSTRUMENTATION
MODULE 2
Resolution
The smallest change in a measured variable to which an instrument will respond.
Sensitivity of Measurement
Sensitivity =
scale deflection
value of measurand producing deflection
Resistance Temperature
307 200
314 230
321 260
328 290
The following resistance values of a platinum resistance thermometer were measured at a
range of temperatures. Determine the measurement sensitivity of the instrument in U/C.
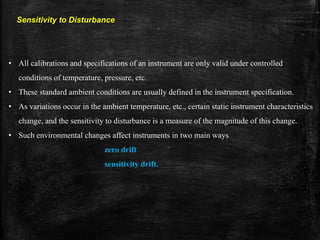
Sensitivity to Disturbance
• All calibrations and specifications of an instrument are only valid under controlled
conditions of temperature, pressure, etc.
• These standard ambient conditions are usually defined in the instrument specification.
• As variations occur in the ambient temperature, etc., certain static instrument characteristics
change, and the sensitivity to disturbance is a measure of the magnitude of this change.
• Such environmental changes affect instruments in two main ways
zero drift
sensitivity drift.
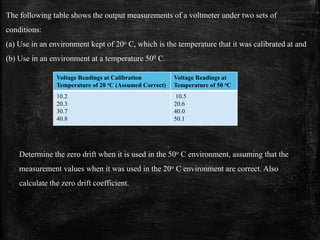
The following table shows the output measurements of a voltmeter under two sets of
conditions:
(a) Use in an environment kept of 20o C, which is the temperature that it was calibrated at and
(b) Use in an environment at a temperature 500 C.
Voltage Readings at Calibration
Temperature of 20 oC (Assumed Correct)
Voltage Readings at
Temperature of 50 oC
10.2
20.3
30.7
40.8
10.5
20.6
40.0
50.1
Determine the zero drift when it is used in the 50o C environment, assuming that the
measurement values when it was used in the 20o C environment are correct. Also
calculate the zero drift coefficient.
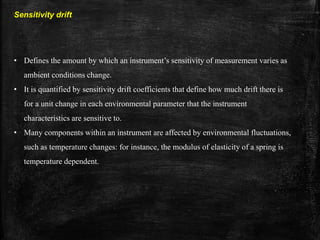
Sensitivity drift
• Defines the amount by which an instrument’s sensitivity of measurement varies as
ambient conditions change.
• It is quantified by sensitivity drift coefficients that define how much drift there is
for a unit change in each environmental parameter that the instrument
characteristics are sensitive to.
• Many components within an instrument are affected by environmental fluctuations,
such as temperature changes: for instance, the modulus of elasticity of a spring is
temperature dependent.
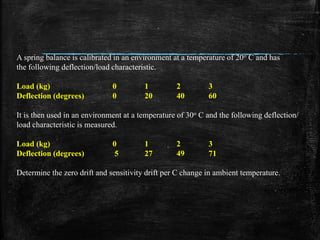
A spring balance is calibrated in an environment at a temperature of 20o C and has
the following deflection/load characteristic.
Load (kg) 0 1 2 3
Deflection (degrees) 0 20 40 60
It is then used in an environment at a temperature of 30o C and the following deflection/
load characteristic is measured.
Load (kg) 0 1 2 3
Deflection (degrees) 5 27 49 71
Determine the zero drift and sensitivity drift per C change in ambient temperature.
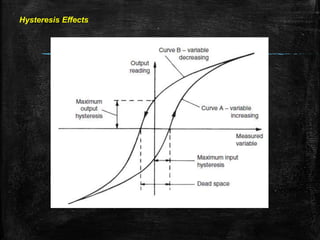
Hysteresis Effects
Dead Space
Dead space is defined as the range of different input values over which there is no change
in output value
Instruments rarely respond instantaneously to changes in the measured variables.
Instead, they exhibit slowness or sluggishness due to such things as mass, thermal capacitance,
fluid capacitance or electric capacitance.
The dynamic behavior of an instrument is determined by subjecting its primary element
(sensing element) to some unknown and predetermined variations in the measured quantity.
The three most common variations in the measured quantity are as follows:
Step change in which the primary element is subjected to an instantaneous and finite change
in measured variable.
Linear change in which the primary element is following a measured variable, changing
linearly with time.
Sinusoidal change in which the primary element follows a measured variable, the magnitude
of which changes in accordance with a sinusoidal function of constant amplitude.
The dynamic characteristics of an instrument are
(i) speed of response,
(ii) fidelity
(iii) lag
(iv) dynamic error.
(i) Speed of Response It is the rapidity with which an instrument responds to changes
in the measured quantity.
(ii) Fidelity It is the degree to which an instrument indicates the changes in the
measured variable without dynamic error (faithful reproduction).
(iii) Lag It is the retardation or delay in the response of an instrument to changes in
the measured variable.
(iv) Dynamic Error It is the difference between the true value of a quantity changing
with time and the value indicated by the instrument, if no static error is assumed.
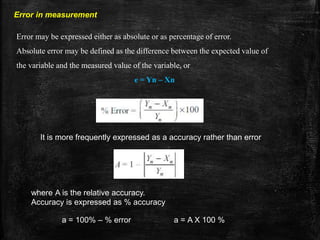
Error in measurement
Error may be expressed either as absolute or as percentage of error.
Absolute error may be defined as the difference between the expected value of
the variable and the measured value of the variable, or
e = Yn – Xn
It is more frequently expressed as a accuracy rather than error
where A is the relative accuracy.
Accuracy is expressed as % accuracy
a = 100% – % error a = A X 100 %
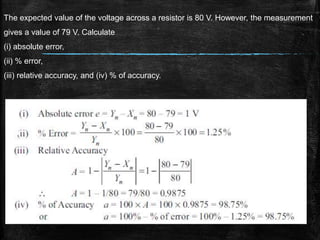
The expected value of the voltage across a resistor is 80 V. However, the measurement
gives a value of 79 V. Calculate
(i) absolute error,
(ii) % error,
(iii) relative accuracy, and (iv) % of accuracy.

Instrumentation introduction 2(Signals and their representation)

  • 1.
  • 2.
  • 3.
    Resolution The smallest changein a measured variable to which an instrument will respond. Sensitivity of Measurement Sensitivity = scale deflection value of measurand producing deflection Resistance Temperature 307 200 314 230 321 260 328 290 The following resistance values of a platinum resistance thermometer were measured at a range of temperatures. Determine the measurement sensitivity of the instrument in U/C.
  • 4.
    Sensitivity to Disturbance •All calibrations and specifications of an instrument are only valid under controlled conditions of temperature, pressure, etc. • These standard ambient conditions are usually defined in the instrument specification. • As variations occur in the ambient temperature, etc., certain static instrument characteristics change, and the sensitivity to disturbance is a measure of the magnitude of this change. • Such environmental changes affect instruments in two main ways zero drift sensitivity drift.
  • 6.
    The following tableshows the output measurements of a voltmeter under two sets of conditions: (a) Use in an environment kept of 20o C, which is the temperature that it was calibrated at and (b) Use in an environment at a temperature 500 C. Voltage Readings at Calibration Temperature of 20 oC (Assumed Correct) Voltage Readings at Temperature of 50 oC 10.2 20.3 30.7 40.8 10.5 20.6 40.0 50.1 Determine the zero drift when it is used in the 50o C environment, assuming that the measurement values when it was used in the 20o C environment are correct. Also calculate the zero drift coefficient.
  • 7.
    Sensitivity drift • Definesthe amount by which an instrument’s sensitivity of measurement varies as ambient conditions change. • It is quantified by sensitivity drift coefficients that define how much drift there is for a unit change in each environmental parameter that the instrument characteristics are sensitive to. • Many components within an instrument are affected by environmental fluctuations, such as temperature changes: for instance, the modulus of elasticity of a spring is temperature dependent.
  • 8.
    A spring balanceis calibrated in an environment at a temperature of 20o C and has the following deflection/load characteristic. Load (kg) 0 1 2 3 Deflection (degrees) 0 20 40 60 It is then used in an environment at a temperature of 30o C and the following deflection/ load characteristic is measured. Load (kg) 0 1 2 3 Deflection (degrees) 5 27 49 71 Determine the zero drift and sensitivity drift per C change in ambient temperature.
  • 9.
  • 10.
    Dead Space Dead spaceis defined as the range of different input values over which there is no change in output value
  • 11.
    Instruments rarely respondinstantaneously to changes in the measured variables. Instead, they exhibit slowness or sluggishness due to such things as mass, thermal capacitance, fluid capacitance or electric capacitance. The dynamic behavior of an instrument is determined by subjecting its primary element (sensing element) to some unknown and predetermined variations in the measured quantity. The three most common variations in the measured quantity are as follows: Step change in which the primary element is subjected to an instantaneous and finite change in measured variable. Linear change in which the primary element is following a measured variable, changing linearly with time. Sinusoidal change in which the primary element follows a measured variable, the magnitude of which changes in accordance with a sinusoidal function of constant amplitude.
  • 12.
    The dynamic characteristicsof an instrument are (i) speed of response, (ii) fidelity (iii) lag (iv) dynamic error. (i) Speed of Response It is the rapidity with which an instrument responds to changes in the measured quantity. (ii) Fidelity It is the degree to which an instrument indicates the changes in the measured variable without dynamic error (faithful reproduction). (iii) Lag It is the retardation or delay in the response of an instrument to changes in the measured variable. (iv) Dynamic Error It is the difference between the true value of a quantity changing with time and the value indicated by the instrument, if no static error is assumed.
  • 13.
    Error in measurement Errormay be expressed either as absolute or as percentage of error. Absolute error may be defined as the difference between the expected value of the variable and the measured value of the variable, or e = Yn – Xn It is more frequently expressed as a accuracy rather than error where A is the relative accuracy. Accuracy is expressed as % accuracy a = 100% – % error a = A X 100 %
  • 14.
    The expected valueof the voltage across a resistor is 80 V. However, the measurement gives a value of 79 V. Calculate (i) absolute error, (ii) % error, (iii) relative accuracy, and (iv) % of accuracy.