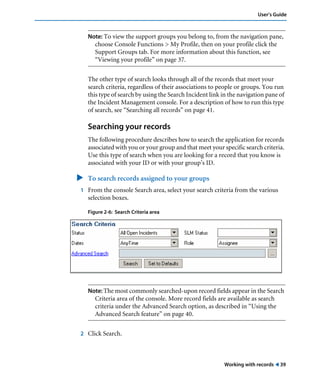
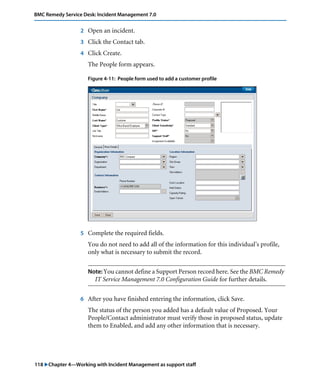
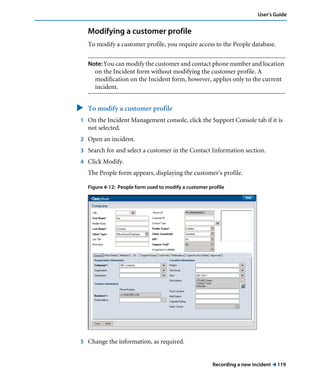
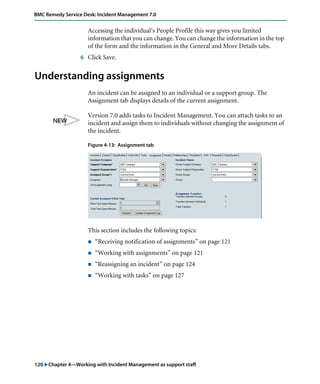
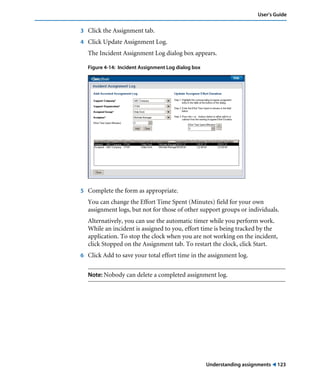
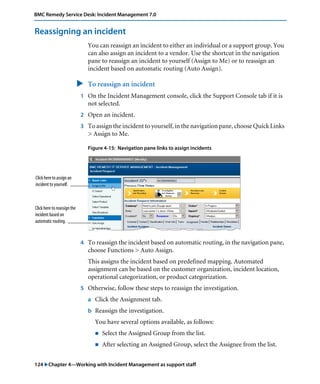
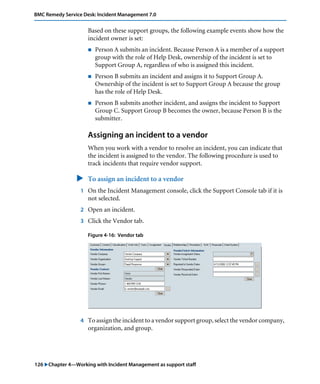
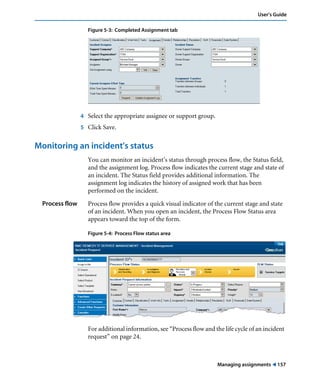
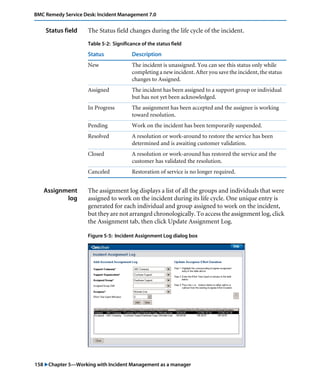
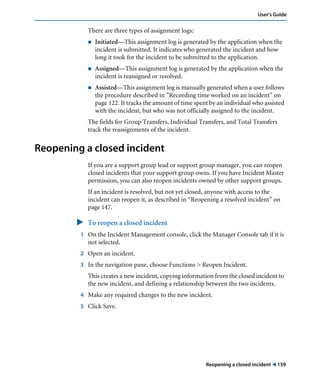
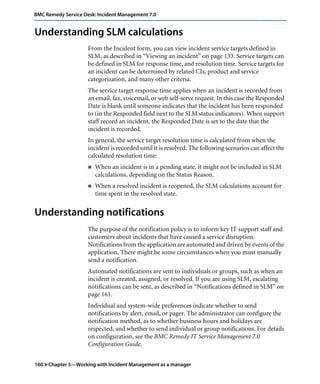
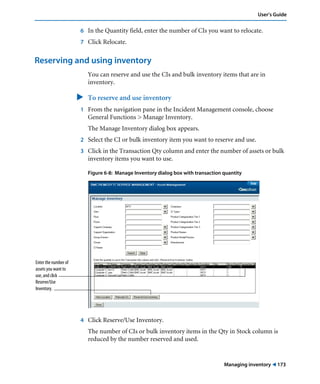
SlideShare a Scribd company logo
1 of 198
Download to read offline
June 2006
Part No: 60845
BMC®Remedy®ServiceDesk:IncidentManagement7.0
User’sGuide
BMC Software, Inc.
www.bmc.com
Copyright 1991–2006 BMC Software, Inc. All rights reserved.
BMC, the BMC logo, all other BMC product or service names, BMC Software, the BMC Software logos, and
all other BMC Software product or service names, are registered trademarks or trademarks of BMC
Software, Inc. All other trademarks belong to their respective companies.
BMC Software, Inc., considers information included in this documentation to be proprietary and
confidential. Your use of this information is subject to the terms and conditions of the applicable end user
license agreement or nondisclosure agreement for the product and the proprietary and restricted rights
notices included in this documentation.
For license information about the OpenSource files used in the licensed program, please read
OpenSourceLicenses.pdf. This file is in the Doc folder of the distribution CD-ROM and in the
documentation download portion of the product download page.
Restricted Rights Legend
U.S. Government Restricted Rights to Computer Software. UNPUBLISHED -- RIGHTS RESERVED UNDER THE
COPYRIGHT LAWS OF THE UNITED STATES. Use, duplication, or disclosure of any data and computer software by the
U.S. Government is subject to restrictions, as applicable, set forth in FAR Section 52.227-14, DFARS 252.227-7013, DFARS
252.227-7014, DFARS 252.227-7015, and DFARS 252.227-7025, as amended from time to time. Contractor/Manufacturer is
BMC Software, Inc., 2101 CityWest Blvd., Houston, TX 77042-2827, USA. Any contract notices should be sent to this address.
Contacting Us
If you need technical support for this product, contact Customer Support by email at
support@remedy.com. If you have comments or suggestions about this documentation, contact
Information Development by email at doc_feedback@bmc.com.
This edition applies to version 7.0 of the licensed program.
Contents ! 3
Contents
Preface. . . . . . . . . . . . . . . . . . . . . . . . . . . . . . . . . . . . . 9
Best Practice and New icons . . . . . . . . . . . . . . . . . . . . . . 10
About the BMC Remedy IT Service Management Suite. . . . . . . . . . . 10
BMC Atrium CMDB 2.0 . . . . . . . . . . . . . . . . . . . . . . . 10
BMC Remedy Asset Management 7.0 . . . . . . . . . . . . . . . . . 11
BMC Remedy Change Management 7.0 . . . . . . . . . . . . . . . . 11
BMC Remedy Incident Management 7.0 . . . . . . . . . . . . . . . . 11
BMC Remedy Problem Management 7.0 . . . . . . . . . . . . . . . . 12
BMC Service Level Management 7.0 . . . . . . . . . . . . . . . . . . 12
Audience . . . . . . . . . . . . . . . . . . . . . . . . . . . . . . . 13
BMC Remedy IT Service Management Suite documents . . . . . . . . . . 13
Chapter 1 Introducing BMC Remedy Incident Management 7.0 . . . . . . . 17
Installing and configuring Incident Management . . . . . . . . . . . . . 18
What’s new in Incident Management 7.0 . . . . . . . . . . . . . . . . . 18
Incident Management user roles. . . . . . . . . . . . . . . . . . . . . 21
Requester . . . . . . . . . . . . . . . . . . . . . . . . . . . . . 21
Support staff . . . . . . . . . . . . . . . . . . . . . . . . . . . . 22
Incident manager . . . . . . . . . . . . . . . . . . . . . . . . . . 23
Process flow and the life cycle of an incident request . . . . . . . . . . . . 24
Chapter 2 Using functions common to all ITSM applications . . . . . . . . . 27
Opening the main application console . . . . . . . . . . . . . . . . . . 28
Using BMC Remedy User client to open a main console . . . . . . . . . 28
4 "Contents
BMC Remedy Service Desk: Incident Management 7.0
Using a browser to open a main console . . . . . . . . . . . . . . . . 30
Working with the Overview console . . . . . . . . . . . . . . . . . . . 31
Opening the Overview console . . . . . . . . . . . . . . . . . . . . 32
Using the Assigned Work table . . . . . . . . . . . . . . . . . . . . 32
Viewing and creating broadcast messages . . . . . . . . . . . . . . . . 36
Using the navigation pane . . . . . . . . . . . . . . . . . . . . . . 36
Using quick actions . . . . . . . . . . . . . . . . . . . . . . . . . 38
Auto-filling fields . . . . . . . . . . . . . . . . . . . . . . . . . . 38
Working with records . . . . . . . . . . . . . . . . . . . . . . . . . 38
Searching for records . . . . . . . . . . . . . . . . . . . . . . . . 38
Printing records . . . . . . . . . . . . . . . . . . . . . . . . . . 41
Modifying records . . . . . . . . . . . . . . . . . . . . . . . . . 42
Working with relationships . . . . . . . . . . . . . . . . . . . . . . . 43
Defining relationships . . . . . . . . . . . . . . . . . . . . . . . . 43
Copying relationships . . . . . . . . . . . . . . . . . . . . . . . . 46
Indicating impacted areas . . . . . . . . . . . . . . . . . . . . . . 47
Modifying relationships . . . . . . . . . . . . . . . . . . . . . . . 48
Performing quick actions on a relationship . . . . . . . . . . . . . . . 49
Removing relationships . . . . . . . . . . . . . . . . . . . . . . . 51
Adding work information . . . . . . . . . . . . . . . . . . . . . . . 51
Creating reminders . . . . . . . . . . . . . . . . . . . . . . . . . . 53
Broadcasting messages. . . . . . . . . . . . . . . . . . . . . . . . 55
Creating broadcast messages . . . . . . . . . . . . . . . . . . . . . 55
Viewing broadcasts . . . . . . . . . . . . . . . . . . . . . . . . . 58
Sending pages and email messages. . . . . . . . . . . . . . . . . . . . 60
Paging a person or on-call group . . . . . . . . . . . . . . . . . . . 60
Sending email . . . . . . . . . . . . . . . . . . . . . . . . . . . 63
Working with reports . . . . . . . . . . . . . . . . . . . . . . . . . 65
Generating a report . . . . . . . . . . . . . . . . . . . . . . . . . 65
Using qualifications to generate a report . . . . . . . . . . . . . . . . 67
Generating a report using saved qualifications . . . . . . . . . . . . . . 70
Chapter 3 Working with the Requester console . . . . . . . . . . . . . . . 73
Requester role. . . . . . . . . . . . . . . . . . . . . . . . . . . . . 74
Service Request Management users . . . . . . . . . . . . . . . . . . . 74
Understanding the Requester console . . . . . . . . . . . . . . . . . . 76
Contents ! 5
User’s Guide
Opening the Requester console . . . . . . . . . . . . . . . . . . . . 77
Functional areas and tasks . . . . . . . . . . . . . . . . . . . . . . 78
Working with service requests . . . . . . . . . . . . . . . . . . . . . 80
Creating a service request . . . . . . . . . . . . . . . . . . . . . . 80
Filtering service requests . . . . . . . . . . . . . . . . . . . . . . . 83
Viewing a service request record. . . . . . . . . . . . . . . . . . . . 84
Modifying a service request. . . . . . . . . . . . . . . . . . . . . . 85
Searching for service requests by Request ID . . . . . . . . . . . . . . 86
Printing a service request. . . . . . . . . . . . . . . . . . . . . . . 86
Canceling a service request . . . . . . . . . . . . . . . . . . . . . . 87
Reopening a service request . . . . . . . . . . . . . . . . . . . . . 87
Completing surveys . . . . . . . . . . . . . . . . . . . . . . . . . 88
Viewing service requests with errors . . . . . . . . . . . . . . . . . . 90
Working with service requests as the Request Master . . . . . . . . . . . 91
Opening a service request record . . . . . . . . . . . . . . . . . . . 92
Reopening a service request . . . . . . . . . . . . . . . . . . . . . 93
Viewing or adding work information . . . . . . . . . . . . . . . . . 94
Viewing the event log and troubleshooting . . . . . . . . . . . . . . . 97
Service Request form. . . . . . . . . . . . . . . . . . . . . . . . . . 98
Working with the Solution database . . . . . . . . . . . . . . . . . . . 101
Viewing broadcast messages . . . . . . . . . . . . . . . . . . . . . . 102
Chapter 4 Working with Incident Management as support staff . . . . . . 103
Understanding the Support Console tab . . . . . . . . . . . . . . . . . 104
Setting application preferences . . . . . . . . . . . . . . . . . . . . . 106
Recording a new incident. . . . . . . . . . . . . . . . . . . . . . . . 108
Using the Process Flow Status wizard to record a new incident . . . . . . 109
Using a template . . . . . . . . . . . . . . . . . . . . . . . . . 112
Using the decision tree. . . . . . . . . . . . . . . . . . . . . . . 114
Using scripts . . . . . . . . . . . . . . . . . . . . . . . . . . . 114
Relating incidents as duplicates . . . . . . . . . . . . . . . . . . . 114
Recording CI unavailability. . . . . . . . . . . . . . . . . . . . . 116
Adding or modifying a customer profile . . . . . . . . . . . . . . . 117
Understanding assignments . . . . . . . . . . . . . . . . . . . . . . 120
Receiving notification of assignments . . . . . . . . . . . . . . . . 121
Working with assignments . . . . . . . . . . . . . . . . . . . . . 121
6 "Contents
BMC Remedy Service Desk: Incident Management 7.0
Reassigning an incident . . . . . . . . . . . . . . . . . . . . . . 124
Working with tasks . . . . . . . . . . . . . . . . . . . . . . . . 127
Investigating and diagnosing an incident . . . . . . . . . . . . . . . . . 132
Viewing an incident . . . . . . . . . . . . . . . . . . . . . . . 133
Searching for a solution . . . . . . . . . . . . . . . . . . . . . . 135
Recording the cost of working on an incident . . . . . . . . . . . . . 139
Resolving an incident . . . . . . . . . . . . . . . . . . . . . . . . . 141
Creating a problem investigation from an incident . . . . . . . . . . . 144
Creating infrastructure change from an incident . . . . . . . . . . . . 146
Reopening a resolved incident . . . . . . . . . . . . . . . . . . . 147
Closing an incident . . . . . . . . . . . . . . . . . . . . . . . . . . 147
Creating known errors and solutions. . . . . . . . . . . . . . . . . . . 149
Creating a known error from an incident . . . . . . . . . . . . . . . 149
Creating a solution database entry from an incident . . . . . . . . . . 150
Chapter 5 Working with Incident Management as a manager . . . . . . . 153
Understanding the Manager Console tab . . . . . . . . . . . . . . . . . 154
Managing assignments . . . . . . . . . . . . . . . . . . . . . . . . . 155
Viewing unassigned incidents. . . . . . . . . . . . . . . . . . . . 155
Assigning an incident . . . . . . . . . . . . . . . . . . . . . . . 156
Monitoring an incident's status . . . . . . . . . . . . . . . . . . . 157
Reopening a closed incident . . . . . . . . . . . . . . . . . . . . . . 159
Understanding SLM calculations . . . . . . . . . . . . . . . . . . . . 160
Understanding notifications . . . . . . . . . . . . . . . . . . . . . . 160
Viewing the audit log . . . . . . . . . . . . . . . . . . . . . . . . . 162
Chapter 6 Managing configuration items . . . . . . . . . . . . . . . . . 163
Creating a CI . . . . . . . . . . . . . . . . . . . . . . . . . . . . . 164
Creating a computer system CI . . . . . . . . . . . . . . . . . . . 164
Creating a bulk inventory CI . . . . . . . . . . . . . . . . . . . . 167
Creating an inventory location CI . . . . . . . . . . . . . . . . . . 169
Managing inventory . . . . . . . . . . . . . . . . . . . . . . . . . . 170
Viewing inventory locations . . . . . . . . . . . . . . . . . . . . 170
Relocating CIs . . . . . . . . . . . . . . . . . . . . . . . . . . 172
Reserving and using inventory . . . . . . . . . . . . . . . . . . . 173
Contents ! 7
User’s Guide
Glossary. . . . . . . . . . . . . . . . . . . . . . . . . . . . . . . . . . . 175
Index. . . . . . . . . . . . . . . . . . . . . . . . . . . . . . . . . . . 189
8 "Contents
BMC Remedy Service Desk: Incident Management 7.0
Preface ! 9
Preface
The BMC Remedy Service Desk: Incident Management 7.0 User’s Guide
describes how to use the BMC® Remedy® Incident Management application.
Incident Management is one of five BMC Remedy IT Service Management
applications.
The BMC® Remedy® IT Service Management Suite
(BMC® Remedy® ITSM Suite) includes:
! The BMC® Remedy® Asset Management application.
! The BMC® Remedy® Change Management application.
! The BMC® Remedy® Service Desk solution (which includes the
BMC® Remedy® Incident Management application and the
BMC® Remedy® Problem Management application).
! The BMC® Service Level Management application.
The applications run in conjunction with the BMC® Remedy® Action
Request System® platform (BMC® Remedy® AR System® platform) and
share a common database. All five applications consume data from the
BMC® Atrium® Configuration Management Database (CMDB) application.
10 "Preface
BMC Remedy Service Desk: Incident Management 7.0
Best Practice and New icons
Documentation for the BMC Remedy ITSM Suite contains two icons.
About the BMC Remedy IT Service Management Suite
There have been several updates to the BMC Remedy ITSM Suite since
version 6.0.
Note the change to the BMC® Remedy® Help Desk application. BMC is now
offering the BMC Remedy Service Desk solution, which contains the
following applications:
! BMC Remedy Incident Management
! BMC Remedy Problem Management
BMC Atrium CMDB 2.0
BMC Atrium CMDB 2.0 is installed with Asset Management, Change
Management, and Service Desk (including Incident Management and
Problem Management). It stores information about configuration items and
their relationships in an inheritance-based data model, and has the ability to
reconcile data from different sources. BMC Atrium CMDB 2.0 provides a
“single source of truth” about your IT environment, enabling other BMC
applications to manage CIs, predict the impact of configuration changes, and
perform other Business Service Management (BSM) functions.
For more information, see the BMC Atrium CMDB 2.0 User’s Guide.
Icon Description
The New icon identifies features or
products that are new or enhanced with
version 7.0.
The Best Practice icon highlights
processes or approaches that BMC has
identified as the most effective way to
leverage certain features in the suite.
About the BMC Remedy IT Service Management Suite ! 11
User’s Guide
BMC Remedy Asset Management 7.0
The BMC Remedy Asset Management application lets IT professionals track
and manage enterprise configuration items (CIs)—and their changing
relationships—throughout the entire CI life cycle. As part of the BMC
Remedy ITSM Suite, Asset Management is integrated with BMC Remedy
Service Desk (which contains the BMC Remedy Incident Management and
BMC Remedy Problem Management applications), BMC Remedy Change
Management, and BMC Service Level Management, and offers flexibility to
support customized business processes.
For more information, see the BMC Remedy Asset Management 7.0 User’s
Guide.
BMC Remedy Change Management 7.0
Using ITIL-compatible best practices, BMC Remedy Change Management
provides IT organizations with the ability to manage changes by enabling
them to assess impact, risk, and resource requirements, and then create plans
and automate approval functions for implementing changes. It provides
scheduling and task assignment functionality, and reporting capabilities for
reviewing performance and improving processes. Because Change
Management is integrated with BMC Atrium CMDB, Change Management
lets you relate changes to other records, such as configuration items
(including services) and incidents.
For more information, see the BMC Remedy Change Management 7.0 User’s
Guide.
BMC Remedy Incident Management 7.0
BMC Remedy Incident Management is used to manage incidents. Incident
management is reactive, and is typically initiated in response to a customer
call or automated event. An example of an automated event might be an alert
from a monitoring system, such as BMC® Service Impact Management
(BMC® SIM). The primary goal of the incident management process,
according to ITIL standards, is “to restore normal service operation as
quickly as possible with minimum disruption to the business, thus ensuring
that the best achievable levels of availability and service are maintained.”
12 "Preface
BMC Remedy Service Desk: Incident Management 7.0
An incident is any event that is not part of the standard operation of a service
and that causes an interruption to or a reduction in the quality of that service.
Normal service operation is the operation of services within the limits
specified by Service Level Management (SLM).
For more information, see the BMC Service Desk: Incident Management 7.0
User’s Guide.
BMC Remedy Problem Management 7.0
BMC Remedy Problem Management is used to manage problem
investigations, known errors, and solution database entries. Problem
management can proactively prevent the occurrence of incidents, errors, and
additional problems. A problem investigation helps an IT organization get to
the root cause of incidents. It initiates actions that help to improve or correct
the situation, preventing the incident from recurring.
After a problem investigation identifies the cause, this information can result
in either a known error or a solution database entry. A known error is a
problem that has been successfully diagnosed and for which a temporary
work-around or permanent solution has been identified. A solution database
entry contains information that might be required to provide or restore a
service.
For more information, see the BMC Service Desk: Problem Management 7.0
User’s Guide.
BMC Service Level Management 7.0
BMC Service Level Management enables a service provider, such as an IT
organization, a customer support group, or an external service provider, to
formally document the needs of its customers or lines of business using
service level agreements, and provide the correct level of service to meet those
needs.
Service Level Management also provides a means to review, enforce, and
report on the level of service provided. It streamlines the most important task
of all, which is the communication between a service provider and its
customers. Multiple service targets can be defined and monitored, acting as
a bridge between IT service support and IT operations. This enables costs to
be controlled and helps to provide a consistent level of service in support of
a key business service.
Audience ! 13
User’s Guide
For more information, see the BMC Service Level Management 7.0 User’s
Guide.
Audience
Incident Management is intended for the following IT professionals:
! IT support staff
! IT managers
The Requester console is intended for any IT user.
BMC Remedy IT Service Management Suite documents
The following table lists the documentation available for the BMC Remedy
ITSM Suite.
Unless otherwise noted, online documentation in Adobe Acrobat (PDF)
format is available on product installation CDs, on the Customer Support
website (http://supportweb.remedy.com), or both. You can order printed
documentation from SMBU-Upgrade@bmc.com.
Note: To access the support website, you must have a support contract.
You can access application Help by clicking on Help links within the
application.
Title Document provides Audience Format
ITSM Configuration Quick Start Start with this reference card to quickly
install and configure applications in the
ITSM suite.
Administrators Print and
PDF
BMC Remedy Action Request
System 7.0 Concepts
Concepts for using the Action Request
System.
Administrators Print and
PDF
BMC Remedy Action Request
System 7.0 Installing
Procedures for installing the Action
Request System.
Administrators Print and
PDF
BMC Atrium CMDB 2.0
Common Data Model Diagram
Hierarchical diagram of all classes in the
CDM, including unique attributes and
applicable relationships.
Administrators PDF
14 "Preface
BMC Remedy Service Desk: Incident Management 7.0
BMC Atrium CMDB 2.0
Common Data Model Help
Description and details of superclasses,
subclasses, attributes, and relationships
for each class.
Administrators HTML
BMC Atrium CMDB 2.0
Concepts and Best Practices Guide
Information about CMDB concepts and
best practices for planning your BMC
Atrium CMDB implementation.
Executives and
administrators
Print and
PDF
BMC Atrium CMDB 2.0
Developer’s Reference Guide
Information about creating API
programs, C and Web Services API
functions and data structures, and a list
of error messages.
Administrators
and
programmers
PDF
BMC Atrium CMDB 2.0 Help Help for using and configuring BMC
Atrium CMDB.
Users and
administrators
Product
Help
BMC Atrium CMDB 2.0
Installation and Configuration
Guide
Information about installing and
configuring BMC Atrium CMDB,
including permissions, class definitions,
reconciliation, and federation.
Administrators Print and
PDF
BMCAtriumCMDB2.0Javadoc
API Help
Information about Java classes, methods,
and variables that integrate with BMC
Atrium CMDB.
Programmers HTML
BMC Atrium CMDB 2.0 Master
Index
Combined index of all books. Everyone Print and
PDF
BMC Atrium CMDB 2.0 Release
Notes
Information about new features and
known issues.
Everyone Print and
PDF
BMC Atrium CMDB 2.0 User’s
Guide
Information about using BMC Atrium
CMDB, including searching for CIs and
relationships, launching federated data,
reporting, and running reconciliation
jobs.
Users Print and
PDF
BMCRemedy7.0ApprovalServer
Guide for Users and
Administrators
Topics on installation and configuration
of the Approval Server, how to use the
Approval Server, and understanding the
approval workflow.
Users and
administrators
Print and
PDF
BMC Remedy IT Service
Management 7.0 Configuration
Guide
Procedures for configuring the BMC
Remedy IT Service Management
applications.
Administrators Print and
PDF
Title Document provides Audience Format
BMC Remedy IT Service Management Suite documents ! 15
User’s Guide
BMC Remedy IT Service
Management 7.0 Installation
Guide
Procedures for installing the BMC
Remedy IT Service Management
applications and solutions: BMC
Remedy Service Desk solution (BMC
Remedy Incident Management and BMC
Remedy Problem Management), BMC
Remedy Change Management, and BMC
Remedy Asset Management.
Administrators Print and
PDF
BMC Remedy Asset
Management 7.0 Help
Help for using BMC Remedy Asset
Management.
Everyone Product
Help
BMC Remedy Asset Management
7.0 Release Notes
Information about known issues in each
release of BMC Remedy Asset
Management. Also provides a list of new
features included with the application.
Everyone Print and
PDF
BMC Remedy Asset Management
7.0 User’s Guide
Procedures for using the BMC Remedy
Asset Management application; includes
new features and overview.
Everyone Print and
PDF
BMC Remedy Change
Management 7.0 Help
Help for using BMC Remedy Change
Management.
Everyone Product
Help
BMC Remedy Change
Management 7.0 Release Notes
Information about known issues in each
release of BMC Remedy Change
Management. Also provides a list of new
features included with the application.
Everyone Print and
PDF
BMC Remedy Change
Management 7.0 User’s Guide
Procedures for using the BMC Remedy
Change Management application;
includes new features and overview.
Everyone Print and
PDF
BMC Remedy Service Desk 7.0
Release Notes
Information about known issues in each
release of BMC Remedy Service Desk:
Incident Management and BMC Remedy
Service Desk: Problem Management.
Also provides a list of new features
included with the application.
Everyone Print and
PDF
BMC Remedy Service Desk:
Incident Management 7.0 Help
Help for using BMC Remedy Incident
Management.
Everyone Product
Help
BMC Remedy Service Desk:
Incident Management 7.0 User’s
Guide
Procedures for using the BMC Remedy
Service Desk: Incident Management
application; includes new features and
overview.
Everyone Print and
PDF
Title Document provides Audience Format
16 "Preface
BMC Remedy Service Desk: Incident Management 7.0
BMC Remedy Service Desk:
Problem Management 7.0 Help
Help for using BMC Remedy Problem
Management.
Everyone Product
Help
BMC Remedy Service Desk:
Problem Management 7.0 User’s
Guide
Procedures for using the BMC Remedy
Service Desk: Problem Management
application; includes new features and
overview.
Everyone Print and
PDF
BMC Service Level Management
7.0 Configuration Guide
Procedures for configuring the BMC
Service Level Management application.
Administrators Print and
PDF
BMC Service Level Management
7.0 Configuration Help
Help for configuring the BMC Service
Level Management application.
Administrators Product
Help
BMC Service Level Management
7.0 Installation Guide
Procedures for installing the BMC
Service Level Management application.
Administrators Print and
PDF
BMC Service Level Management
7.0 Release Notes
Information about known issues in each
release of BMC Service Level
Management. Also provides a list of new
features included with the application.
Everyone PDF
BMC Service Level Management
7.0 User Help
Help for using the BMC Service Level
Management application.
Everyone Product
Help
BMC Service Level Management
7.0 User’s Guide
Procedures for using the BMC Service
Level Management application; includes
new features and overview.
Everyone Print and
PDF
BMC Remedy 7.0 Task
Management Administrator’s
Guide
Procedures to configure Task
Management.
Note: This guide also includes steps to
configure seamless authentication
between BMC Remedy Change
Management and the other
components of BMC Remedy Change
and Configuration Management
(CCM).
Administrators Print and
PDF
Title Document provides Audience Format
Introducing BMC Remedy Incident Management 7.0 ! 17
Chapter
1Introducing BMC Remedy
Incident Management 7.0
The Service Desk: Incident Management application is used to manage
incidents. Incident management is reactive, and is typically initiated in
response to a customer call. The primary goal of the incident management
process, according to ITIL standards, is “to restore normal service operation
as quickly as possible with minimum disruption to the business, thus
ensuring that the best achievable levels of availability and service are
maintained.”
An incident is any event that is not part of the standard operation of a service
and that causes an interruption to or a reduction in the quality of that service.
Normal service operation is the operation of services within the limits
specified by the service target.
The following topics are provided:
! Installing and configuring Incident Management (page 18)
! What’s new in Incident Management 7.0 (page 18)
! Incident Management user roles (page 21)
! Process flow and the life cycle of an incident request (page 24)
18 "Chapter 1—Introducing BMC Remedy Incident Management 7.0
BMC Remedy Service Desk: Incident Management 7.0
Installing and configuring Incident Management
Your administrator installs and configures Incident Management. For
details, see:
! BMC Remedy IT Service Management 7.0 Installation Guide
! BMC Remedy IT Service Management 7.0 Configuration Guide
What’s new in Incident Management 7.0
The new features in this release of Incident Management include:
! Improved ITIL conformance—A new process flow tool helps you follow
ITIL processes for incident management.
! Enhanced user interface—The user interface is now more consistent with
other BMC applications. To help speed use of the application, forms and
dialog boxes have been streamlined, and Quick Action accelerators have
been added.
! Role-based consoles—Support staff, managers, and requesters have
separate consoles. The Requester console provides customer access.
! Permission model—Permissions and functional roles have been
enhanced to provide greater flexibility in setting up user access. For
details, see the BMC Remedy IT Service Management 7.0 Configuration
Guide.
! Task management—You can assign tasks to one or more people without
changing the incident assignment. For previous users of Incident
Management, this replaces the work log action feature. Now you can
assign and view tasks without going into the work log.
! Direct view into CMDB—This allows you to manage configuration items
(CIs) from Incident Management.
! Cost tracking—The cost for each incident can be tracked as the incident
moves between support groups for diagnosis, resolution, and closure,
based on either flat-rate or time-based costs.
What’s new in Incident Management 7.0 ! 19
User’s Guide
! Reporting—Incident Management now includes the reports described in
the following table.
! Service Level Management—If Service Level Management is installed, the
Incident form displays the status of service targets.
! Enhanced audit log—You can now filter the audit log, for example, to see
only date field audit records or assignment changes.
! Terminology changes—You can find terminology changes in the
following table.
Report Description
Group Assignment to Incidents This report lists incidents and their
assigned support groups for a
specified date range.
Open Incident volume by Assignee This bar chart displays the number of
open incidents for each assignee.
Incidents by activity times This report lists all open incidents and
the amount of time since the reported
date.
Resolved and Closed Incident Volume
by Assignee
This bar chart displays the number of
resolved and closed incidents for each
assignee.
Change induced incidents This report lists incidents that were
caused by changes.
Note: This report is available only if
Change Management is installed.
Table 1-1: Key terminology changes in Incident Management
Previous term New term
Associate Relate
Associations Relationships
Automatic Routing Auto Assign
Delete Remove—This change applies only to the
Relationship and Financial tabs, to clarify
the action being performed.
Service Categorization Operational Categorization
20 "Chapter 1—Introducing BMC Remedy Incident Management 7.0
BMC Remedy Service Desk: Incident Management 7.0
What’s new for
Help Desk
users?
This release replaces BMC® Remedy® Help Desk with Incident Management
and Problem Management. New Incident Management features for former
Help Desk users include the features mentioned in the previous paragraphs,
and also the following features:
! Enhanced problem management—Problem investigations have a
separate form. Problem Management includes new processes to manage
the life cycle of a problem investigation and known errors, and to record
solution database entries.
! Navigation pane—Located on the left side of consoles and forms, this
provides access to common functions, such as assigning an incident to
yourself.
! Multi-tenancy—This makes it possible to host multiple companies and
their data on a single server. This feature can also be used for any groups,
such as business units or departments, whose data must be kept separate.
Multi-tenancy is limited to the company level in Incident Management.
Configuration can differ on a per-company basis. Multi-tenancy from the
user’s perspective is accessed by selecting the appropriate company from
the list next to the Company field.
! Incident matching—From the Incident form, users can perform searches
for known errors, solution database entries, problem investigations, and
other incidents that match criteria from the current incident to assist in
the incident resolution process.
! Categorization—This is recorded separately for operational and product
categorization, each with multiple levels to provide greater flexibility. Due
to multi-tenancy, each company or business unit can be configured with
its own categorization.
! Decision tree—This takes the user step-by-step through a questionnaire,
and, based on answers, completes part of the form for a new incident. A
manager or administrator can build decision trees.
Work Log Work Info
Work Log Action Task
Table 1-1: Key terminology changes in Incident Management
Previous term New term
Incident Management user roles ! 21
User’s Guide
! Scripts—These are detailed instructions that an administrator or manager
sets up to help users record important information about an incident.
Scripts can be used when recording or assigning an incident.
! Incident templates—These can be used to populate incident records with
standard information that is entered on a regular basis. A template can
also set a relationship to a configuration item (CI). An administrator can
create templates for commonly occurring incidents, as described in the
BMC Remedy IT Service Management 7.0 Configuration Guide.
! Prioritization—Incident priority is now determined by impact and
urgency. This can be configured by an administrator, as described in the
BMC Remedy IT Service Management 7.0 Configuration Guide.
! Terminology changes—You can find a terminology change in the
following table.
Incident Management user roles
Incident Management provides functionality for IT users with the requester
role, for support staff, and for managers.
Important: The permission model in Incident Management has had several
updates since version 6.0. To define permissions and functional roles,
review the permissions and functional roles sections in the BMC Remedy
IT Service Management 7.0 Configuration Guide.
Requester
IT users can request resolution of incidents through the Requester console.
This console gives requesters access to:
! Public broadcast messages.
! Their own incident and change requests.
! A satisfaction survey, which can be completed on resolution of an incident
or change request.
Table 1-2: Key terminology change between Help Desk and Incident Management
Help Desk term Incident Management term
Bulletin Board Broadcast
22 "Chapter 1—Introducing BMC Remedy Incident Management 7.0
BMC Remedy Service Desk: Incident Management 7.0
The Requester console provides access based on the following permissions:
! Request Console Master—This user is responsible for configuring the
Requester console. The request console master can view all the requests
submitted by other users. This user is more of an administrator than a
support user.
! Registered User—This user has a record in the People form, and the user’s
login information is in the Login/Access Details tab of the People form.
! Guest User—All other users are considered to be guest users even if a user
has a record in the People form. If a user’s login information does not exist
in the user record, then the user is considered a guest user. Guest users
cannot create change requests.
Support staff
First-line support staff are members of the Service Desk. They are the
primary contacts for all customers and are responsible for recording
incidents and coordinating their resolution. Typically, the first-line support
staff own all incidents and are therefore responsible for validating incident
resolutions with their customers.
Second-line and third-line support are considered subject matter experts.
Their main responsibility is to provide an accurate analysis and diagnosis of
their assigned incidents to restore service to the affected customers.
Support staff responsibilities include:
! Creating, classifying, and updating incident records.
! Verifying the Customer Profile data and updating the information if
appropriate.
! Relating CIs to the incident.
! Escalating incidents that need to be resolved based on SLM terms or
perception of urgency.
! Resolving incidents or assigning for resolution.
! Coordinating and validating resolutions with customers.
! Closing incidents and determining customer satisfaction.
Incident Management user roles ! 23
User’s Guide
Support can also participate in the problem management process, as
described in the BMC Remedy Service Desk: Problem Management 7.0 User’s
Guide. They can also participate in the change management process, as
described in the BMC Remedy Change Management 7.0 User’s Guide.
Incident manager
Incident managers are responsible for the quality and integrity of the
incident management processes. Support group leads and managers are
responsible for the work of members of their support group. They coordinate
the assignment of incidents to support staff.
Their responsibilities include:
! Monitoring incidents.
! Monitoring open incidents requiring assignment.
! Managing the assignment of incidents to their appropriate support groups
for resolution.
! Receiving notifications of incident assignments and escalations.
! Facilitating the resolution of escalated incidents in accordance with the
escalation policy.
! Ensuring the resolution of incidents within the support group's service
targets.
! Ensuring the overall completeness and accuracy of closed incidents.
! Reviewing reports.
! Ensuring that incidents requiring root cause analysis are copied into
Problem Management.
! Managing support group membership.
! Managing scripts, templates, and decision trees.
24 "Chapter 1—Introducing BMC Remedy Incident Management 7.0
BMC Remedy Service Desk: Incident Management 7.0
Process flow and the life cycle of an incident request
The Process Flow Status area displays the process flow of the incident request
within the Incident form. A diagram shows the five stages of an incident
request, as indicated by best practices, rooted in ITIL processes. The current
stage of the incident is highlighted. The status of the incident is indicated by
both color and text.
Figure 1-1: Example of selecting an accelerator from the Process Flow Status wizard
The Process Flow Status area also serves as a wizard, guiding you through the
stages of the incident life cycle. At each stage, the diagram provides
accelerators applicable to the current stage. For example, you can use
accelerators to move the incident to a pending state or to the next stage.
When you select an accelerator, a dialog box appears, prompting you to enter
the data required to complete the task. You can also enter optional
recommended data in the dialog box. By using the process flow accelerators,
you are following ITIL best practices.
Process Flow
Status area
Current stage
Process flow and the life cycle of an incident request ! 25
User’s Guide
Figure 1-2: Selecting an accelerator from the Process Flow Status wizard
Figure 1-3: Example of form displayed by Process Flow Status wizard
26 "Chapter 1—Introducing BMC Remedy Incident Management 7.0
BMC Remedy Service Desk: Incident Management 7.0
Table 1-3: The five stages of an incident request
Incident stage Description Tasks
Identification
and recording
This stage initiates the incident
management process. The purpose of
this stage is to accurately record and
recognize disruptions to services
provided by IT to its customers. For
details, see “Recording a new incident”
on page 108.
! Next stage
! Enter pending (or
resume)
! Select template
Investigation
and diagnosis
In this stage, you can search existing
information to identify a possible
solution. If the incident cannot be
resolved or a root cause analysis is
required, you can escalate the incident
to problem management. For details,
see “Investigating and diagnosing an
incident” on page 132.
Next stage
! Generate problem
! Generate change
! Relate CI
! Enter pending (or
resume)
Note: Generatechangeis
available only as a task
if Change
Management is
installed.
Resolution and
recovery
In this stage, you resolve and recover
from the service disruption to enable
the customer to resume work. For
details, see “Resolving an incident” on
page 141.
! Next stage
! Generate problem
! Generate change
! Enter pending (or
resume)
Incident closure In this stage, you make sure that the
incident has successfully restored the
service to the customer and that the
customeris satisfiedwiththeoutcome.
For details, see “Closing an incident”
on page 147.
! Reopen
! Close
Closed In this stage the incident is closed. No
further activities are performed on the
incident.
None
Using functions common to all ITSM applications ! 27
Chapter
2Using functions common to all
ITSM applications
This section contains basic procedures that are common to most forms and
consoles. Most of the information in this section is similar throughout the
ITSM suite.
The following topics are provided:
! Opening the main application console (page 28)
! Working with the Overview console (page 31)
! Working with records (page 38)
! Working with relationships (page 43)
! Adding work information (page 51)
! Creating reminders (page 53)
! Sending pages and email messages (page 60)
! Working with reports (page 65)
28 "Chapter 2—Using functions common to all ITSM applications
BMC Remedy Service Desk: Incident Management 7.0
Opening the main application console
You start an ITSM application by opening its main console. How you do this
depends on whether you want to view the console through the
BMC® Remedy® User client or through a browser. See the following
instructions for information about opening the main console.
Using BMC Remedy User client to open a main console
This section describes how to open an application’s main console from the
IT Home page, by way of BMC Remedy User.
" To open the application’s main console from the BMC Remedy User
tool
1 Choose Start > Programs > Action Request System > BMC Remedy User.
The Login dialog box appears.
Figure 2-1: Login dialog box
2 Perform the following steps:
a In the User Name field, type your user name.
b In the Password field, enter your password.
Opening the main application console ! 29
User’s Guide
c In the Preference Server field, specify the server name if your
administrator set up a preference server for centralized user preferences.
For example, if you have a report server from which you can access
predefined reports, you specify it here.
3 Click OK to log in.
The Home Page form opens automatically. If it does not, perform the
following steps in BMC Remedy User:
a Choose Tools > Options.
b In the Options dialog box, click the Home Page tab.
Figure 2-2: Home Page tab on the Options dialog box
30 "Chapter 2—Using functions common to all ITSM applications
BMC Remedy Service Desk: Incident Management 7.0
c Select the check box to open the home page automatically.
4 When the IT Home page opens, click the Incident Management Console link
from the navigation pane.
Figure 2-3: IT Home page
Using a browser to open a main console
This section describes how to open the Incident Management console from
a browser.
" To open a main console from a browser
1 Type the following URL in to your browser’s address bar:
http://<web_server>:<port>/arsys/apps/<arsystem_server>/Home Page
where:
<web_server> is the fully qualified name of the BMC Remedy Mid Tier
system, specified in the format server_name.company.com.
<port> is an optional port number, which is needed if the web server is not
on the default port (port 80).
<arsystem_server> is the name of your BMC Remedy AR System server.
Navigation pane
Incident
Management
Console link
Working with the Overview console ! 31
User’s Guide
For a list of supported browsers, see the compatibility matrix at:
http://supportweb.remedy.com/Rem/IssuesAndSolutions/
CompatibilityMatrix/index.jsp
2 Enter your user name and password, then click Login.
3 When the IT Home page opens, click the Incident Management Console link
in the navigation pane.
For an illustration of the IT Home page, see Figure 2-3 on page 30.
Working with the Overview console
The Overview console is the primary interface for support staff. It provides
quick access to the information you need and to the procedures that you
perform most often.
This section discusses how to use the Overview console.
Figure 2-4: BMC Remedy IT Service Management Overview console
32 "Chapter 2—Using functions common to all ITSM applications
BMC Remedy Service Desk: Incident Management 7.0
Opening the Overview console
The BMC Remedy IT Service Management Overview console provides quick
access to commonly performed functions.
" To open the Overview console from your desktop
1 Open BMC Remedy User as described in “Using BMC Remedy User client to
open a main console” on page 28.
2 On the Home Page form, under the Remedy Foundation Elements heading,
click the Overview Console link.
The Overview console appears.
" To open the Overview console from a browser
1 Launch your browser as described in “Using a browser to open a main
console” on page 30.
2 On the Home Page form, under the Remedy Foundation Elements heading,
click the Overview Console link.
The Overview console appears.
Using the Assigned Work table
The Assigned Work table lists different types of records. The types of records
that you can select depend on the BMC Remedy applications that are
installed.
Each type of record is identified by a specific prefix:
! CHG—Identifies change requests. BMC Remedy Change Management
must be installed for you to be able to create and view change requests.
! SDB—Identifies solution database entries. BMC Remedy Problem
Management must be installed for you to be able to create and view
solution entries.
! TAS—Identifies tasks. Tasks can be attached to incidents, problem
investigations, or change requests.
! INC—Identifies incidents. BMC Remedy Incident Management must be
installed for you to be able to create and view incidents.
Working with the Overview console ! 33
User’s Guide
! PBI—Identifies problems. BMC Remedy Problem Management must be
installed for you to be able to create and view problems.
! PKE—Identifies known errors. BMC Remedy Problem Management
must be installed for you to be able to create and view known errors.
! PR—Identifies purchase requisitions. BMC Remedy Asset Management
must be installed for you to be able to create and view purchase
requisitions.
You can also change the table’s contents by using the Company filter and
Console View fields at the top left corner of the console:
! Company—Shows records associated with a particular company (useful
in a multi-tenancy environment).
! Personal—Shows all the records that are assigned to you.
! Selected Groups—The options below this heading apply to records that
are assigned to your support groups. When you select an option for
selected groups, you are prompted to select from all support groups for
which you are a member.
! Show All—Shows all records for the groups you select.
! Show Unassigned—Shows all the records that are unassigned to an
individual, but which are assigned to the groups you select.
! All My Groups—Shows all the records that are assigned to all support
groups that you belong to. If you belong to more than one support group,
the records for all those groups appear.
! Show All—Shows all records.
! Show Unassigned—Shows all the records that are unassigned.
In the Windows environment, if there are more records than the application
can show in the table, you can see the next grouping of entries by placing the
pointer in the table and right-clicking, then clicking either Next or Prev.
When using a browser, use the arrow keys at the top corner of the table.
You can create new records by clicking the Create button that appears below
the table.
34 "Chapter 2—Using functions common to all ITSM applications
BMC Remedy Service Desk: Incident Management 7.0
Creating records
From the Overview console, you can create new records for the various ITSM
applications installed on your system. The types of requests you can create
from the Overview console depend on the applications you have installed.
" To create records
1 From the Overview console, click Create.
The Select Request Type dialog box appears.
Figure 2-5: Select Request Type dialog box
2 From the Request Type list, select the type of record you want to create.
Note: The available request types depend on which ITSM applications are
installed on your system.
3 Click Select.
The New form of the application appropriate to the type of record you are
creating appears.
4 Enter all the required information to create the request.
For details on creating a new incident, see “Recording a new incident” on
page 108. For more information about creating other types of records, see the
related application’s user guide.
Working with the Overview console ! 35
User’s Guide
Searching for records
From the Overview console, you can search for records from the various
ITSM applications installed on your system. The types of records you can
search for depend on the applications you have installed.
" To search for records
1 From the Overview console, click Search.
The Select Request Type dialog box appears.
2 From the Request Type list, select the type of record for which you want to
search.
Note: The request types available depend on which ITSM applications are
installed on your system.
3 Click Select.
A search dialog box appropriate to the type of record for which you are
searching appears.
4 Enter search criteria as needed to search for the record.
For more information about searching for records, see “Searching for
records” on page 38.
Refreshing data
After you create or modify a record, click Refresh to see the latest changes in
the Assigned Work table. The Refresh button is located in the top right
corner of the console.
If you have changed the search criteria, you can return to your defaults by
clicking Set to Defaults.
36 "Chapter 2—Using functions common to all ITSM applications
BMC Remedy Service Desk: Incident Management 7.0
Viewing and creating broadcast messages
Use the Broadcast feature, on the lower portion of the console, to view and
create messages that can be viewed by the entire organization or by users in
the support, approver, management, and administrator groups. For
information about using Broadcasts, see “Broadcasting messages” on
page 55.
Using the navigation pane
The pane on the left side of the console is the navigation pane.
Changing the console view
The links under Console View help you filter records that appear in the
Assigned Work table. For more information about using the Console View
functions, see “Using the Assigned Work table” on page 32.
Using console functions
The following links are under the Console Functions heading:
! Select Status Values—Lets you see only those records in a certain state,
which you specify from the Select Status Values dialog box. See “Selecting
status values” on page 37.
! My Profile—Lets you set your profile. See “Viewing your profile” on
page 37.
! Application Preferences—Lets you set your application preferences and
options. This function is also available from the Incident Management
console, as described in “Setting application preferences” on page 106.
Opening other applications
Use the Other Applications links to open other, available ITSM applications.
The links that appear under the Other Applications heading are determined
by the applications that are installed on your system:
! Incident Management—Opens the Incident Management application.
! Change Management—Opens the Change Management application.
! Problem Management—Opens the Problem Management application.
Working with the Overview console ! 37
User’s Guide
! Asset Management—Opens the Asset Management application.
! Approval—Allows you to view all requests pending approval.
! CMDB—Opens the BMC Atrium CMDB Class Manager console.
! SLM—Opens the Service Level Management application.
Selecting status values
You can use the Select Status Values dialog box to filter the requests that
appear in the Overview console based on their status.
" To select status values
1 From the navigation pane in the Overview console, choose Console
Functions > Select Status Values.
The Select Status Values dialog box appears.
2 Select the status values for each category from the lists, then click OK.
The dialog box closes.
3 If the Assigned Work table does not refresh with the filtered records, click
Refresh to reload the table’s contents.
Viewing your profile
You can view and modify your personal profile. When you click My Profile,
the People (Search) form appears. In this form, you can:
! Update company information such as organization, business, and home
address, and so on.
! View permissions.
For detailed information about the People form, see the BMC Remedy IT
Service Management 7.0 Configuration Guide.
" To modify your profile
1 From the navigation pane, choose Console Functions > My Profile.
The People form appears.
2 Update the information at the top of the form, or click the tab corresponding
to the area in which you want to change the profile information.
38 "Chapter 2—Using functions common to all ITSM applications
BMC Remedy Service Desk: Incident Management 7.0
Make your changes by selecting from the various lists that are available.
3 When you finish making the changes, click Save.
Using quick actions
The Overview console lets you perform certain quick actions. From the
Quick Actions list, select the appropriate action, then click Execute.
! Print—Lets you select records and print their contents. See “Printing
records” on page 41.
! Home Page—Opens the Home Page.
Auto-filling fields
As you work with the forms and dialog boxes, you might see a plus sign (+)
included in a field label. You can type part of the information next to these
fields and press ENTER. If an exact match is located, the application
automatically completes the field. If a selection list appears, double-click the
item you want to put in the field. Using auto-fill fields and lists is faster, more
consistent, and more accurate than typing the information.
Working with records
This section discusses some of the common functions related to record
handling.
Searching for records
Two types of searches are available from the Incident Management console.
One type of search looks only through records that are in some way
associated with you through your login ID or group ID (for example, records
created by you, assigned to you or to your support group, and so on) and that
meet your specific search criteria. You execute this type of search from the
Search area near the top of the console. For a description of how to run this
type of search, see “Searching your records” on page 39.
Working with records ! 39
User’s Guide
Note: To view the support groups you belong to, from the navigation pane,
choose Console Functions > My Profile, then on your profile click the
Support Groups tab. For more information about this function, see
“Viewing your profile” on page 37.
The other type of search looks through all of the records that meet your
search criteria, regardless of their associations to people or groups. You run
this type of search by using the Search Incident link in the navigation pane of
the Incident Management console. For a description of how to run this type
of search, see “Searching all records” on page 41.
Searching your records
The following procedure describes how to search the application for records
associated with you or your group and that meet your specific search criteria.
Use this type of search when you are looking for a record that you know is
associated with your ID or with your group’s ID.
" To search records assigned to your groups
1 From the console Search area, select your search criteria from the various
selection boxes.
Figure 2-6: Search Criteria area
Note: The most commonly searched-upon record fields appear in the Search
Criteria area of the console. More record fields are available as search
criteria under the Advanced Search option, as described in “Using the
Advanced Search feature” on page 40.
2 Click Search.
40 "Chapter 2—Using functions common to all ITSM applications
BMC Remedy Service Desk: Incident Management 7.0
The Assigned Work table updates with the results of your search.
3 Scroll through the Assigned Work table to find the specific record you want.
Note: If the search returns a large number of records, use the Advanced
Search feature to help you narrow the results.
You can also search for another record from within an open record by using
the standard BMC Remedy User search function.
Using the Advanced Search feature
If your search returns too broad a range of records, you can perform an
advanced search to narrow the results.
" To use the Advanced Search feature
1 From the Incident Management console, click Advanced Search.
The Advanced Qualification Builder dialog box appears.
Figure 2-7: Advanced Qualification Builder dialog box
2 From the Keywords or Fields selection boxes, select the keywords or record
fields on which you want to search.
To insert operators (+, =, >,<, and so on), click the appropriate operator
button. Do not forget to place literal values between quotation marks. For
example, to search for an incident with a priority of “high,” you would
construct the following search:
'Priority' = "High"
3 Click Select.
The dialog box closes and you return to the main console.
Working with records ! 41
User’s Guide
4 Click Search.
The search results table updates with the results of your search.
Searching all records
The following procedure describes how to search all incidents. Use this type
of search when you are looking for an incident that is not associated with
your ID or your group’s ID, or anytime you need to search all incidents.
" To search all records
1 From the navigation pane in the Incident Management console, choose
General Functions > Search Incident.
A form appears that allows you to perform the search.
The form is laid out in a similar way to the Incident form, and contains the
same tabs and fields. You can use any of the tabs and fields in the form to
specify your search criteria.
2 Using the tabs and fields, build your search condition.
To reduce the number of records found by the search, enter as much
information into the form as you can.
3 When you finish entering your search criteria, click Search.
When the search finishes, the search results table lists all of the records that
match the search criteria.
4 Scroll through the table to find the specific record you want.
5 When you find the record, open it in the Incident form by double-clicking it
in the search results table.
Printing records
You can print a copy of a record to keep for filing purposes or to share with
someone who does not have access to the application.
Use this procedure to print a record.
" To print a record
1 From the navigation pane in the Incident Management console, choose
General Functions > Search Incident.
42 "Chapter 2—Using functions common to all ITSM applications
BMC Remedy Service Desk: Incident Management 7.0
2 Select the record you want to print.
Note: If you already have the record open and want to print it, click Print at
the bottom of the form to open the Business Objects Report Preview
dialog box, then go to step 4.
3 At the bottom of the console, from the Quick Actions list, select Print, then
click Execute.
The Business Objects Report Preview dialog box appears, allowing you to
view the record before you print it.
4 Click the Print icon on the menu bar at the top of the dialog box.
When the print confirmation dialog box appears, click the Print icon to send
the record to your local printer.
5 Close the Business Objects dialog box.
Modifying records
After you generate a record, you can modify or update the information it
contains. Use the following procedure to modify a record.
" To modify a record
1 From the Incident Management console, open the record that you want to
modify.
2 Click the tab that contains the information you want to update.
3 Make the appropriate changes.
4 Click Save.
Working with relationships ! 43
User’s Guide
Working with relationships
By defining and maintaining relationships among records, you can create a
more sophisticated overview of the connections and interdependencies
among the current record and other service issues being tracked by the
application.
An incident can be related to any of the following record types:
! Configuration item
! Another incident
! Solution database entry
! Known error
! Problem investigation
If you have Asset Management and Change Management, an incident can
also be related to the following record types:
! CI unavailability
! Infrastructure change
Defining relationships
Use the following procedure to define a relationship.
" To define a relationship
1 From the Incident Management console, open the incident from which you
want to define a relationship.
2 Click the Relationships tab.
Figure 2-8: Relationships tab
44 "Chapter 2—Using functions common to all ITSM applications
BMC Remedy Service Desk: Incident Management 7.0
3 From the Request Type list at the bottom of the Relationships tab, select the
type of record to which you want to relate the current record.
For example, to relate your incident to a configuration item, select Problem
Investigation from the Request Type list.
4 Click Search.
A dialog box appears that allows you to perform a search.
Figure 2-9: Example of Completed Relationship Search
Note: The content of the dialog box depends on the type of record you chose
in the Request Type list.
5 Complete the search criteria tabs with the relevant information, then click
Search.
Try to supply as much information as possible in the search dialog box to
reduce the overall number of records returned by the search.
The matching results appear in a search results table.
6 From the search results table, select the configuration item with which you
want to create the relationship.
Working with relationships ! 45
User’s Guide
7 From the Relationship Type list at the bottom of the search dialog box, select
the type of relationship you want to create.
8 Click Relate.
An information message dialog box appears, displaying a confirmation
message.
9 Click OK to dismiss the dialog box.
10 Click Close to close the search dialog box.
The Relationships tab appears with the newly created relationship visible in
the Relationships table.
If there are events for the related item, the Current Events dialog box appears.
This dialog box shows all current broadcasts that have been generated and
related to the associated item. Broadcasts can be generated from other ITSM
application modules, too.
11 In the Current Events dialog box, select one of the following options:
! Relate the current record to the originating record.
! Link a record.
! Relate the current record to the selected unavailability record.
The lower table lists any current Unavailability recorded in an incident.
To relate the current record to the origination record
a Select the broadcast from the list.
b Click Originating Record.
To see additional details about the originating record, click Details.
To link a record
a Click Linked Incident.
To relate the current record to the selected unavailability record
a Click Relate.
b To see additional details about the unavailability, click View CI
Unavailability.
c To see information about the record that generated the unavailability,
click Details.
46 "Chapter 2—Using functions common to all ITSM applications
BMC Remedy Service Desk: Incident Management 7.0
An administrator can disable Current Events functionality in the Configure
Incident Rules form. See the BMC Remedy IT Service Management 7.0
Configuration Guide for information about how to do this.
Copying relationships
When you define a relationship between the current record and another
record, the other record might also have one or more records related to it.
Using the Copy Related Relationships form, which you open from the
Relationships tab, you can look at the related record’s other relationships. If
you determine that any of these other relationships should be related to the
current record, you can define the relationship from this form.
By doing this, you can more thoroughly document all of the record
relationships.
Note: You cannot use this procedure to copy related CIs.
" To copy relationships
1 From the Incident Management console, open an incident.
2 Click the Relationships tab.
3 From the Relationships table, select a record related to the current incident.
4 From the Quick Actions list, select Get Related Relationships, then click
Execute.
The Copy Related Relationships dialog box appears. This dialog box contains
a table of all other records related to the record you selected in step 3.
5 From the table of related records, select the other record that you want to
relate to the current record.
Note: To see the details of the other record, select it, then click View. A form
appears with detailed information about the selected record. Use this
feature to help you determine whether you want to relate the other record
to the current record.
6 Click inside the Relationship Type field.
A list of relationship types appears.
Working with relationships ! 47
User’s Guide
Note: The contents of the Relationship Type list depends on the type of
record you are trying to create the relationship with.
7 Select the type of relationship you want to create, then click Select.
A note appears confirming the relationship creation. Click OK to dismiss the
note.
8 Close the Copy Related Relationships form.
The newly created relationship appears in the Relationships table.
Indicating impacted areas
The Impacted Areas dialog box gives you a place to show the region, site,
location, and so on, that are affected by the content of the record. Use the
following procedure to indicate the impacted areas.
" To indicate an impacted area
1 From the Incident Management console, open the incident for which you
want to indicate an impacted area.
2 In the navigation pane, choose Advanced Functions > Impacted Areas.
The Impacted Areas dialog box appears.
Figure 2-10: Impacted Areas dialog box
48 "Chapter 2—Using functions common to all ITSM applications
BMC Remedy Service Desk: Incident Management 7.0
3 Select items from the various lists that help to describe the impacted area
appropriate for the incident you are working on, for example, Company,
Region, and so on.
Note: Required fields are marked with an asterisk.
4 Click Add.
You can add as many impacted areas as necessary. You can also delete areas
that you have previously chosen in this dialog box.
5 When you are finished indicating the impacted areas, click Close.
Modifying relationships
After you define a relationship, you change the relationship type and update
the relationship description. Use the following procedure to modify the
relationship.
" To modify a relationship
1 From the Incident Management console, open the incident that has the
relationship you want to modify.
2 Click the Relationships tab.
3 From the Relationships table, select the relationship you want to modify.
4 From the Quick Actions list, select Modify Relationship Type, then click
Execute.
The Modify Relationship dialog box appears.
Working with relationships ! 49
User’s Guide
Figure 2-11: Modify Relationship dialog box
5 Enter the new relationship details according to the on-screen instructions.
6 Click Save to save your changes.
Performing quick actions on a relationship
You can perform many other actions on a relationship. For a list of these
actions, see Table 2-1 and Table 2-2.
" To perform a quick action
1 From the Incident Management console, open an incident.
2 Click the Relationships tab.
3 From the Relationships table, select the relationship entry for which you
want to perform the action.
4 From the Quick Actions list, select the action you want to perform, such as
Get Impacted Areas.
50 "Chapter 2—Using functions common to all ITSM applications
BMC Remedy Service Desk: Incident Management 7.0
The following table lists available quick actions for any related item.
Additional quick actions are available when you select a related configuration
item, as indicated in the following table.
5 Click Execute.
Table 2-1: Effects of general relationship actions
Relationship action Effect
Get Related Relationships Copies the relationships of the selected
record to the current incident’s
relationships.
Modify Relationship Type Prompts you to modify the relationship
type, as described in “Modifying
relationships” on page 48.
Table 2-2: Effects of relationship actions for related CIs
Relationship action Effect
CI Relationship Viewer Opens a graphical relationship viewer that
shows a selected CI’s relationship with
other records.
Create New CI Unavailability If Asset Management is installed, you can
create CI unavailability for the selected CI.
Get CI Impact/Urgency Copies the impact and urgency of the
selected CI.
Get CI Product Categorization Copies the product categorization from
the selected CI to the classification of the
current incident.
Get CI Resolution Product Cat. Copies the product categorization from
the selected CI to the resolution of the
current incident.
Get Impacted Areas If Asset Management is installed, prompts
you to select impacted areas, as defined in
the selected CI, into the current incident’s
impacted areas.
Adding work information ! 51
User’s Guide
Removing relationships
Use the following procedure to remove a relationship.
" To remove a relationship
1 From the Incident Management console, open the incident that contains the
relationship you want to remove.
2 Click the Relationships tab.
3 In the Relationships table, select the relationship you want to remove.
4 Click Remove. Click Yes when the application prompts you to confirm the
removal.
The application refreshes the Relationships tab.
Adding work information
Work Info is a new feature that replaces the Notes and Notes log fields from
ITSM 6.0. You access this feature from the Work Info tab of the current
record.
Use this feature to add work information regarding activities performed on
the current record. For example, you might want to add work information
about the following activities:
! General Information—Notes about the record; for example, you might
want to add a note that a particular CI was deployed, and include the date.
! Vendor communication—Notes about communication with a vendor,
such as a bulletin received from a vendor.
These are just some of the options available from the Work Info Type list on
the Work Info tab.
" To add work information
1 From the Incident Management console, open the incident that you want to
add the work information to.
2 Click the Work Info tab.
52 "Chapter 2—Using functions common to all ITSM applications
BMC Remedy Service Desk: Incident Management 7.0
Figure 2-12: Work Info tab
3 From the Work Info Type list, select the type of work information you want
to add.
4 From the Source list, select the source of this information.
Information sources can include, for example, email, phone, or the Web.
5 Enter the details of your work information record in the Summary and
Details fields.
6 To add an attachment to the record, right-click in the attachment table and
select Add from the menu that appears.
7 From the Locked list, select Yes or No to lock the log.
Important: If you select Yes, you cannot modify the work log after you save it.
8 From the View Access list, select Internal or Public.
! Internal—If you want users within your organization to see the entry.
! Public—If you want everyone with access to the application to see the
entry, including requesters from the Requester console.
9 Click Save.
10 To see a report of selected work information entries, select one or more
entries, and click Report.
Creating reminders ! 53
User’s Guide
Creating reminders
Use reminders to create notes for yourself and others. You can send the
reminders by email or by BMC Remedy Alert, and can specify when they will
be sent. You can create generic reminders, or you can create reminders that
are associated with a specific request.
For example, you can send yourself a note about a specific incident to remind
yourself to follow up on it.
You can create and view reminders from either the Incident Management
console or from within a specific incident. The location from which you
create or view a reminder determines which reminders you see:
! Incident Management console—You can view all reminders that you
created.
! Incident form—You can view all reminders associated with that incident.
This includes reminders created by other users of Incident Management.
" To create a reminder
1 To open the Reminders dialog box, perform either of the following steps:
! From the navigation pane in the Incident Management console, choose
General Functions > Reminders.
! From the navigation pane in the Incident form, choose Functions >
Reminders.
Note: If you create a reminder from the application’s main console, the
reminder is general in nature. If you open a record and create a reminder,
the reminder is specific to the open record.
2 Click the Create Reminder tab.
54 "Chapter 2—Using functions common to all ITSM applications
BMC Remedy Service Desk: Incident Management 7.0
Figure 2-13: Completed Create Reminder tab
Note: If you are creating the reminder from the main console, skip the next
step.
3 To remove the link between the reminder you are creating and the open
record, select, then delete the contents of the Link to Request-ID field. The
Request-ID and Form fields are populated automatically by the application.
The Request-ID field links the reminder to the open record.
4 From the Notify list, select either Individual or Group, depending on
whether you are sending the reminder to a single person, or a support group.
5 In the Recipient field, type the name of the person or group to whom you
want to send the reminder.
If you type a person’s name and press ENTER, the application automatically
populates the AR Login field. If the application discovers multiple matches
with the name you entered, another dialog box appears that allows you to
specify which of the matching names you want to receive the reminder.
6 In the Time field, enter the date and time you want the application to send
the reminder.
You can type the information directly into the field, or you can click the
button next to the field and select the date and time from the calendar that
appears. By default, the Time field contains the current date and time.
7 In the Subject field, enter information about the reminder.
If you need more space to type the entry, click the Browse button next to the
field. A larger text entry box appears.
Creating reminders ! 55
User’s Guide
The information in this field appears in the subject line if the reminder is sent
by email.
8 In the Message field, type the reminder message text.
If you need more space to type the entry, click the ellipsis button next to the
field. A larger text entry box appears.
9 Click Save.
A confirmation message appears.
10 Click Close to close the Reminders dialog box.
The reminder is sent at the time you specified.
Broadcasting messages
This feature lets you send messages to your entire organization, selected
groups within the organization, and to external customers as well. You can
use this feature to send messages about work in progress, system status,
planned work, and so on. You can also use this feature to view messages that
were broadcast to you from other groups in your organization.
Creating broadcast messages
This section describes how to create a broadcast message using the
New/Modify dialog box. To create a broadcast, you must have the functional
role of Broadcast Submitter. See the BMC Remedy IT Service Management 7.0
Configuration Guide for details.
" To create a broadcast message
1 You can open the New/Modify Broadcast dialog box from two locations, as
follows:
! From the Incident Management console, click Create, which appears
below the Broadcast table. If you create a broadcast from the main
console, it is not related to a specific record.
! From the current record, in the navigation pane, choose Functions >
Broadcast Incident. If you create a broadcast from an incident, a
relationship is created between the broadcast and the incident.
56 "Chapter 2—Using functions common to all ITSM applications
BMC Remedy Service Desk: Incident Management 7.0
Figure 2-14: Completed New/Modify Broadcasts form
2 Enter information in the required fields.
Required fields appear in bold on the Broadcast Details tab.
! Company—Select the company to which this broadcast pertains. Only
users with access to this company will see the broadcast. If you select
Global from the Company list, the broadcast is sent to everyone.
The Company field is mandatory. If you complete the other location
fields, however, you can indicate a very specific part of the company. For
example, you can specify the site, organization, or department.
! Subject—A short description of what the broadcast is about.
! Broadcast Message—The text of your message.
! Broadcast Type—Select a broadcast type from the list.
! Broadcast Start Date and Broadcast End Date—To start the broadcast
now, click in the Broadcast Start Date field, and press ENTER. To select a
date from the calendar, click the Browse button next to the field, then use
the calendar that appears to select the date on which the broadcast is to
start and the date on which you want it to end. You can also specify times
of the day using the Time feature at the bottom of the calendar.
Creating reminders ! 57
User’s Guide
! Broadcast Originated From—This field is completed by the system. The
contents depend on where you are creating the broadcast. If you broadcast
from an incident, this is set to Incident.
! Broadcast Originated From ID—This field is populated by the system,
but only when you create a broadcast from within a record. If you create a
broadcast from the main console, the field appears disabled.
! View Access—Select Internal if you want the broadcast visible only to
members of your organization. Select Public if you also want the broadcast
visible from the Requester console.
! Notify—Select Yes if you want a broadcast notification automatically sent
to an individual or group.
If you select Yes, an Email button and the Notify Support area appears.
! Use the Manual Email button to manually send an email about the
broadcast to a person or group. When the Email System form appears,
enter the recipient’s email address in the Internet Email field, then click
Send Email Now.
! Use the Notify Support area to indicate the group you want to notify of
the broadcast. You must complete all three fields, Support Company,
Support Organization, and Support Group. The notification is sent at
the time and on the date specified in the Broadcast Start Date field.
! Priority—Select a priority level for the broadcast. The choices are Low,
Medium, and High.
3 To add an attachment to the broadcast message, right-click inside the table
and choose Add from the menu that appears.
The Add Attachment dialog box appears. Use this to indicate the file you
want to attach. Click Open to attach the indicated file. You are limited to one
attachment for each broadcast.
4 If you want members of another group to be able to modify the message,
perform the following steps:
a Click the Authoring Groups tab.
b Click Manage Authoring Groups.
The Authoring Group dialog box appears.
c Indicate the group that you want to have authoring rights by selecting
from the menus. Click Add when you are finished.
58 "Chapter 2—Using functions common to all ITSM applications
BMC Remedy Service Desk: Incident Management 7.0
Note: The support group you belong to appears in the table by default.
You can indicate another group, or click Close to dismiss the dialog box.
5 Click Save to save the broadcast message and close the dialog box.
Viewing broadcasts
This section describes how to view broadcast messages. While viewing
broadcasts, you can modify the message (if you belong to an authorized
authoring group), create a new broadcast message, and under some
circumstances (when viewing the message from the current record) relate the
broadcast message to the current record.
When viewing a broadcast from either the Incident Management console or
the Incident form, you can create a new incident from the broadcast. If the
broadcast was created from a problem investigation, CI (configuration item),
CI unavailability, or another incident, the application asks whether you want
to relate the new incident to the originating record.
" To view broadcasts
1 You can view broadcast messages from two locations, as follows:
! From the Incident Management console, select the message you want to
view from the Broadcast table, then click View.
! From the current record, in the navigation pane, choose Quick Links >
View Broadcasts. The View Broadcasts dialog box appears. Select the
message you want to view from the broadcast messages table; the
Broadcast Details tab displays the details of the selected broadcast.
Note: When viewing broadcast messages from the current record, you are
looking at all of the broadcast messages, not just the ones related to the
current record. If the list contains a large number of messages, use the
Broadcast Search Criteria tab to limit the number of messages. For
information about how to do this, see “Limiting the number of messages”
on page 59.
2 To view another message, perform either of the following steps:
Creating reminders ! 59
User’s Guide
! When viewing from the main console, close the View Broadcasts dialog
box, select the broadcast message you want to view from the table, then
click View.
! When viewing from the current record, in the broadcast messages table,
click the message you want to view. The message details appear.
Creating or modifying a broadcast message
To create or modify a broadcast message from the View Broadcasts dialog
box, click either Create or Modify. Both actions open the New/Modify
Broadcast dialog box.
! If you are creating a new message, follow the instructions provided in
“Creating broadcast messages” on page 55.
! If you are modifying the message, edit the fields according to the changes
you want to make. Click Save when you finish making your changes.
Limiting the number of messages
When viewing broadcast messages from the current record, you can limit the
number of messages that appear in the Broadcast table by opening the
Broadcast Search Criteria tab and defining a set of criteria that filters out
messages that do not match.
" To limit the number of messages
1 From the Incident Management console, open an incident.
2 Click the Broadcast Search Criteria tab.
This tab contains search fields where you can specify criteria to reduce the
number of broadcast messages displayed in the table.
3 Complete the fields in the tab.
To return the smallest number of broadcast messages, complete as many of
the fields as possible.
4 When you finish specifying the search criteria, click Search.
60 "Chapter 2—Using functions common to all ITSM applications
BMC Remedy Service Desk: Incident Management 7.0
Sending pages and email messages
Incident Management gives you two methods of sending messages to either
individuals or organizations:
! Pages
! Email
This section describes how to send both types of messages manually.
Note: Notification messages to individuals, based on incident assignments
and other events, can be sent by the application as pages or emails. For
information about configuring notification to be sent as pager or email
messages, see the BMC Remedy IT Service Management 7.0 Configuration
Guide.
Paging a person or on-call group
You can page individuals or the on-call member of a group about the current
record using the Incident Management Paging System feature.
" To page a person or an on-call group
1 From the Incident Management console, open the incident from which you
want to send the page.
2 In the navigation pane, choose Functions > Paging System.
The Paging System dialog box appears.
Sending pages and email messages ! 61
User’s Guide
Figure 2-15: Paging System dialog box
3 Select either:
! Page By Person—To page an individual.
! Page By On-Call Group—To page the on-call member of a specified
group.
4 Select the recipient.
To do this, complete the fields in the Search Criteria area, then click Search.
When the search finishes, click the recipient’s name in the search results
table, then click Select.
If you are sending a page to a person (instead of an on-call group) and need
help determining the correct person, you can see more information about an
individual by selecting his or her name from the list, then clicking View. This
opens the People form, which contains detailed information about the
recipient.
5 Complete the fields in the Paging Information area, as follows, then click
Send Page Now.
62 "Chapter 2—Using functions common to all ITSM applications
BMC Remedy Service Desk: Incident Management 7.0
! Pager Service Provider—Select the recipient’s pager service provider from
the list.
If you are sending a page to a person, you can find this information by
selecting the person’s name from the search results list, then clicking View
(as described in step 4). When the People form appears, click the
Notifications tab and look for the Pager Service Provider field.
Note: To learn more about the service provider, click the button with the
globe icon beside the field to open a link that takes you to the service
provider’s website. This link is configured by your administrator, as
described in the BMC Remedy IT Service Management 7.0 Configuration
Guide.
! Pager Type—The application populates this field automatically, using
information about the recipient already in the application.
! Pager Number—The application auto-populates this field with the
pager’s telephone number, when possible. If the pager number is
unavailable to the application, you must enter the pager number
manually. See Manual Pager Number.
! Pager Email—If the pager has an email address, type it here. If you are
sending the page to a person, this information is available on the
Notifications tab, as described previously.
! Manual Pager Number—If the pager’s telephone number is not available
automatically from the paging system, type the pager’s telephone number
here.
! Alphanumeric Pager Message or Numeric Pager Message—Type your
message in this field. Be aware that only one of these fields is enabled,
depending on the type of pager the recipient carries.
Sending pages and email messages ! 63
User’s Guide
Sending email
You can send messages about the current record using the Incident
Management Email System.
You can use this function to send email to any valid email address. This might
include an SMS recipient or wireless PDA user, if you can send email to the
device.
" To send an email message
1 From the Incident Management console, open the incident from which you
want to send an email message.
2 In the navigation pane, choose Functions > Email System.
The Email System dialog box appears.
Figure 2-16: Completed Email System dialog box
64 "Chapter 2—Using functions common to all ITSM applications
BMC Remedy Service Desk: Incident Management 7.0
3 Indicate the recipient by selecting one of the following options:
! Current Contact—When you open the Email System form, if there is a
current contact assigned to the record, the contact’s name with contact
information appears in the table and is the default recipient.
! Current Assignee—To select the current assignee, click Select Current
Assignee. The current assignee’s name with contact information appears
in the table.
4 To select another recipient, perform the following steps:
a Complete the fields in the People Search Criteria area.
b Click Search.
c When the search finishes, select the recipient’s name in the search results
table.
If you need help determining the correct name in the list, you can see more
information about an individual by selecting their name from the list, then
clicking View. This opens the People form, which contains detailed
information about the recipient.
5 Complete the email information fields. See the list that follows for a
description of the fields.
! Internet Email—This displays the recipient’s email address.
When you select the email recipient, as described in steps 3 and 4, the
internet email address updates from the people record.
! Email Subject Line—By default, the subject line contains the incident ID
number, to which you can append text or over-type.
! Email Message Body—You type the message text here. A series of buttons,
to the right of the Email Message Body field, lets you automatically insert
text from the record into the message text; these buttons let you insert the
following values:
! Status
! Summary
! Details
! Resolution
Working with reports ! 65
User’s Guide
Note: If one or more of these buttons appear disabled, it means the
corresponding field in the record contains no information.
! Email Attachment—You can attach a file to the email message (you are
limited to just one attachment). To do this, right-click inside the Email
Attachment table, then click Add. The Add Attachment dialog box
appears. Navigate to, and then select, the file you want to attach. Click
Open. Details of the attached file appear in the table.
6 Click Send Email Now.
Working with reports
Incident Management provides a variety of predefined reports to give you
quick and easy access to information the application. You use the Report
console to generate these reports. If the predefined reports return more
information than you need, you can manage the scope of the report using
qualifications. For information about using qualifications, see “Using
qualifications to generate a report” on page 67.
Important: If you use Crystal Reports software to modify the prepared
reports supplied with Incident Management, Customer Support can
provide only limited assistance if you have a reporting problem. In
addition, there is no guarantee that problems resulting from these
modifications can be solved. The standard reports included with Incident
Management are designed to be used without modification.
Generating a report
Use this procedure to generate a standard report without using qualifications
(for information about generating reports with qualifications, see “Using
qualifications to generate a report” on page 67).
" To generate a report
1 From the navigation pane in the Incident Management console, choose
General Functions > Reports.
The Report console appears.
66 "Chapter 2—Using functions common to all ITSM applications
BMC Remedy Service Desk: Incident Management 7.0
Figure 2-17: Report console
2 From the Report Name list, select the report you want to generate.
3 If you select a report that requires a date range, the date range field appears.
Select a start date and end date for the report.
Report Description
Incidents by Activity Time This report lists all open incidents and
the amount of time since the reported
date.
Open Incident Volume by Assignee This bar chart displays the number of
open incidents for each assignee.
Resolved and Closed Incident Volume
by Assignee
This bar chart displays the number of
resolved and closed incidents for each
assignee.
Group Assignment to Incidents This report lists incidents and their
assigned support groups for a
specified date range.
Change Induced Incidents This report lists incidents that were
caused by changes.
Note: This report is available only if
Change Management is installed.
Working with reports ! 67
User’s Guide
4 From the Destination list, select one of the following output destinations:
! Screen—Your report appears in a separate dialog box.
! Printer—The report is sent to the printer you specified in the Print Setup
dialog box.
! File—The report is saved to the path and file you specify.
5 Click Run Report.
Using qualifications to generate a report
You can manage the scope of a report by adding qualifications to the criteria
used by the report engine to generate the report content. You can tell the
report to search only certain specified fields for particular values, or build
advanced qualifications using field names, keywords, and operators. By
saving the qualifications, you can rerun the qualified report without having
to re-specify the qualifications.
The following procedure describes how to create basic report qualifications
from the Define Report Qualification area of the Report console. To create a
report using advanced qualifications, see “Using advanced qualifications to
generate a report” on page 69.
" To use qualifications to generate a report
1 From the navigation pane in the Incident Management console, choose
General Functions > Reports.
The Report console appears.
68 "Chapter 2—Using functions common to all ITSM applications
BMC Remedy Service Desk: Incident Management 7.0
Figure 2-18: Report console
2 From the Report Name list, select the name of the report you want to
generate.
3 In the Define Report Qualification area, create your qualifications from the
lists.
For example, to create the qualification
“Cost Center = 001”
select “Cost Center” from the list in the left column, select “=” from the
operand list (middle column), then type “001” in the right column.
You can use all five rows in the area to define qualifications.
4 To save the qualification, click Save Qualification.
You are prompted to name the qualification.
Note: By saving the qualification, you can rerun this report without defining
the qualification again. See “Generating a report using saved
qualifications” on page 70.
5 In the Qualification Name field, enter a name for your qualification, and
click OK.
A message appears stating that your qualification is saved.
6 Click OK.
Working with reports ! 69
User’s Guide
The Report console reappears.
7 From the Destination list, select one of the following output destinations:
! Screen—Your report appears in a separate dialog box.
! Printer—The report is sent to the printer you specified in the Print Setup
dialog box.
! File—The report is saved to the path and file you specify.
8 Click Run Report.
Using advanced qualifications to generate a report
The following procedure describes how to generate a report using advanced
qualifications.
" To generate a report using advanced qualifications
1 From the navigation pane in the Incident Management console, choose
General Functions > Reports.
The Report console appears.
2 From the Report Name list, select the name of the report you want to
generate.
3 Click Advanced Qualification.
The Advanced Qualification Builder dialog box appears.
Figure 2-19: Advanced Qualification Builder dialog box
4 Using the buttons in the qualification builder, construct your qualification.
5 Click Save.
The Report console reappears.
70 "Chapter 2—Using functions common to all ITSM applications
BMC Remedy Service Desk: Incident Management 7.0
Note: By saving the qualification, you can rerun this report without defining
the qualification again. See “Generating a report using saved
qualifications” on page 70.
6 From the Destination list, select one of the following output destinations:
! Screen—Your report appears in a separate dialog box.
! Printer—The report is sent to the printer you specified in the Print Setup
dialog box.
! File—The report is saved to the path and file you specify.
7 Click Run Report.
Generating a report using saved qualifications
You can generate a report using qualifications that you created and saved
previously.
" To generate a report using a saved qualification
1 From the navigation pane in the Incident Management console, choose
General Functions > Reports.
The Report console appears.
2 Click Select Saved Qualification.
The Saved Qualifications dialog box appears.
Figure 2-20: Saved Qualifications dialog box
3 Select the qualification from the table, and click Return Selected.
The Report console reappears.
Working with reports ! 71
User’s Guide
4 From the Destination list, select one of the following output destinations:
! Screen—Your report appears in a separate dialog box.
! Printer—The report is sent to the printer you specified in the Print Setup
dialog box.
! File—The report is saved to the path and file you specify.
5 Click Run Report.
72 "Chapter 2—Using functions common to all ITSM applications
BMC Remedy Service Desk: Incident Management 7.0
Working with the Requester console ! 73
Chapter
3Working with the Requester
console
The Requester console serves as the front end for the BMC Remedy Change
Management and BMC Remedy Incident Management applications. It
provides an easy, user-friendly interface that allows users to quickly submit
requests for change or incidents to IT through the two back-end applications.
The following topics are provided:
! Requester role (page 74)
! Service Request Management users (page 74)
! Understanding the Requester console (page 76)
! Working with service requests (page 80)
! Working with service requests as the Request Master (page 91)
! Service Request form (page 98)
! Working with the Solution database (page 101)
! Viewing broadcast messages (page 102)
74 "Chapter 3—Working with the Requester console
BMC Remedy Service Desk: Incident Management 7.0
Requester role
Requesters are usually employees who need assistance from the IT support
staff. The requester is typically an employee in the organization who must
have a change implemented or an incident resolved. Any member of your
organization can be a requester.
However, the user might not be an employee. Non-employees can also be
requesters, since non-registered users can also submit a service request.
Traditionally, after a requester made a telephone call to a central help desk, a
support staff member logged the request. The BMC Remedy Incident
Management and BMC Remedy Change Management applications provide
user self-provisioning. Using the Requester console, requesters can submit,
track, and (in some cases) resolve their own requests, and, as a result,
improve the overall efficiency. Out of the box, the Change Management and
Incident Management applications are preconfigured to work with the
Requester console. However, the Requester console is not enabled if your
organization turns off this option.
The Requester console is the primary interface from where requesters can
create and view their requests. From the Requester console, you can create a
request and submit it to the back-end application, view previously created
requests, and respond to a survey form after the request has been resolved.
Service Request Management users
There are currently three types of user permissions for accessing the
Requester console to submit service requests:
! Request Master—This user is responsible for troubleshooting service
requests. The request master can view all the requests submitted by other
users and open the Service Request form directly to view the details of a
record. This user is more of an administrator, than a support user.
! Registered User—This user has a record in the People form, and the user’s
AR login information is in the Login/Access Details tab of the People form
or in the AR System User form.
! Unknown User—All other users are considered to be unknown users even
if the user has a record in the People form. If a user’s login information
does not exist in the People record, then the user is considered a unknown
user.
Incident user-guide-700(Remidy)

More Related Content

What's hot

Excel vba visual basic (korol) (1)
Excel vba visual basic (korol) (1)Excel vba visual basic (korol) (1)
Excel vba visual basic (korol) (1)Liceth777
 
Deployment guide series ibm tivoli compliance insight manager sg247531
Deployment guide series ibm tivoli compliance insight manager sg247531Deployment guide series ibm tivoli compliance insight manager sg247531
Deployment guide series ibm tivoli compliance insight manager sg247531Banking at Ho Chi Minh city
 
Solution deployment guide for ibm tivoli composite application manager for we...
Solution deployment guide for ibm tivoli composite application manager for we...Solution deployment guide for ibm tivoli composite application manager for we...
Solution deployment guide for ibm tivoli composite application manager for we...Banking at Ho Chi Minh city
 
Certification guide series ibm tivoli business service manager v4.1.1 impleme...
Certification guide series ibm tivoli business service manager v4.1.1 impleme...Certification guide series ibm tivoli business service manager v4.1.1 impleme...
Certification guide series ibm tivoli business service manager v4.1.1 impleme...Banking at Ho Chi Minh city
 
Implementing ibm tivoli service request manager v7.1 service catalog sg247613
Implementing ibm tivoli service request manager v7.1 service catalog sg247613Implementing ibm tivoli service request manager v7.1 service catalog sg247613
Implementing ibm tivoli service request manager v7.1 service catalog sg247613Banking at Ho Chi Minh city
 
0802 python-tutorial
0802 python-tutorial0802 python-tutorial
0802 python-tutorialZahid Hasan
 
Tivoli data warehouse version 1.3 planning and implementation sg246343
Tivoli data warehouse version 1.3 planning and implementation sg246343Tivoli data warehouse version 1.3 planning and implementation sg246343
Tivoli data warehouse version 1.3 planning and implementation sg246343Banking at Ho Chi Minh city
 
Implementation best practices for ibm tivoli license manager sg247222
Implementation best practices for ibm tivoli license manager sg247222Implementation best practices for ibm tivoli license manager sg247222
Implementation best practices for ibm tivoli license manager sg247222Banking at Ho Chi Minh city
 
Ibm tivoli usage accounting manager v7.1 handbook sg247404
Ibm tivoli usage accounting manager v7.1 handbook sg247404Ibm tivoli usage accounting manager v7.1 handbook sg247404
Ibm tivoli usage accounting manager v7.1 handbook sg247404Banking at Ho Chi Minh city
 
BPM Solution Implementation Guide
BPM Solution Implementation GuideBPM Solution Implementation Guide
BPM Solution Implementation GuideFrancis Benintende
 
Making Better Decisions Using IBM WebSphere Operational Decision Management
Making Better Decisions Using IBM WebSphere Operational Decision ManagementMaking Better Decisions Using IBM WebSphere Operational Decision Management
Making Better Decisions Using IBM WebSphere Operational Decision ManagementIBM Software India
 
Tivoli data warehouse 1.2 and business objects redp9116
Tivoli data warehouse 1.2 and business objects redp9116Tivoli data warehouse 1.2 and business objects redp9116
Tivoli data warehouse 1.2 and business objects redp9116Banking at Ho Chi Minh city
 
bkremer-report-final
bkremer-report-finalbkremer-report-final
bkremer-report-finalBen Kremer
 
Managing Data Center Connectivity TechBook
Managing Data Center Connectivity TechBook Managing Data Center Connectivity TechBook
Managing Data Center Connectivity TechBook EMC
 
PANOS 4.1 Administrators Guide
PANOS 4.1 Administrators GuidePANOS 4.1 Administrators Guide
PANOS 4.1 Administrators GuideAltaware, Inc.
 

What's hot (17)

Excel vba visual basic (korol) (1)
Excel vba visual basic (korol) (1)Excel vba visual basic (korol) (1)
Excel vba visual basic (korol) (1)
 
Deployment guide series ibm tivoli compliance insight manager sg247531
Deployment guide series ibm tivoli compliance insight manager sg247531Deployment guide series ibm tivoli compliance insight manager sg247531
Deployment guide series ibm tivoli compliance insight manager sg247531
 
Solution deployment guide for ibm tivoli composite application manager for we...
Solution deployment guide for ibm tivoli composite application manager for we...Solution deployment guide for ibm tivoli composite application manager for we...
Solution deployment guide for ibm tivoli composite application manager for we...
 
Certification guide series ibm tivoli business service manager v4.1.1 impleme...
Certification guide series ibm tivoli business service manager v4.1.1 impleme...Certification guide series ibm tivoli business service manager v4.1.1 impleme...
Certification guide series ibm tivoli business service manager v4.1.1 impleme...
 
Implementing ibm tivoli service request manager v7.1 service catalog sg247613
Implementing ibm tivoli service request manager v7.1 service catalog sg247613Implementing ibm tivoli service request manager v7.1 service catalog sg247613
Implementing ibm tivoli service request manager v7.1 service catalog sg247613
 
0802 python-tutorial
0802 python-tutorial0802 python-tutorial
0802 python-tutorial
 
Tutorial edit
Tutorial editTutorial edit
Tutorial edit
 
Tivoli data warehouse version 1.3 planning and implementation sg246343
Tivoli data warehouse version 1.3 planning and implementation sg246343Tivoli data warehouse version 1.3 planning and implementation sg246343
Tivoli data warehouse version 1.3 planning and implementation sg246343
 
Implementation best practices for ibm tivoli license manager sg247222
Implementation best practices for ibm tivoli license manager sg247222Implementation best practices for ibm tivoli license manager sg247222
Implementation best practices for ibm tivoli license manager sg247222
 
Sg246399
Sg246399Sg246399
Sg246399
 
Ibm tivoli usage accounting manager v7.1 handbook sg247404
Ibm tivoli usage accounting manager v7.1 handbook sg247404Ibm tivoli usage accounting manager v7.1 handbook sg247404
Ibm tivoli usage accounting manager v7.1 handbook sg247404
 
BPM Solution Implementation Guide
BPM Solution Implementation GuideBPM Solution Implementation Guide
BPM Solution Implementation Guide
 
Making Better Decisions Using IBM WebSphere Operational Decision Management
Making Better Decisions Using IBM WebSphere Operational Decision ManagementMaking Better Decisions Using IBM WebSphere Operational Decision Management
Making Better Decisions Using IBM WebSphere Operational Decision Management
 
Tivoli data warehouse 1.2 and business objects redp9116
Tivoli data warehouse 1.2 and business objects redp9116Tivoli data warehouse 1.2 and business objects redp9116
Tivoli data warehouse 1.2 and business objects redp9116
 
bkremer-report-final
bkremer-report-finalbkremer-report-final
bkremer-report-final
 
Managing Data Center Connectivity TechBook
Managing Data Center Connectivity TechBook Managing Data Center Connectivity TechBook
Managing Data Center Connectivity TechBook
 
PANOS 4.1 Administrators Guide
PANOS 4.1 Administrators GuidePANOS 4.1 Administrators Guide
PANOS 4.1 Administrators Guide
 

Similar to Incident user-guide-700(Remidy)

MFG/PRO QAD Reporting Framework Document Guide
MFG/PRO QAD Reporting Framework Document GuideMFG/PRO QAD Reporting Framework Document Guide
MFG/PRO QAD Reporting Framework Document GuideVinh Nguyen
 
AltiGen Max Communicator Manual
AltiGen Max Communicator ManualAltiGen Max Communicator Manual
AltiGen Max Communicator ManualCTI Communications
 
SAP_HANA_Modeling_Guide_for_SAP_HANA_Studio_en
SAP_HANA_Modeling_Guide_for_SAP_HANA_Studio_enSAP_HANA_Modeling_Guide_for_SAP_HANA_Studio_en
SAP_HANA_Modeling_Guide_for_SAP_HANA_Studio_enJim Miller, MBA
 
The Art of Monitoring (2016).pdf
The Art of Monitoring (2016).pdfThe Art of Monitoring (2016).pdf
The Art of Monitoring (2016).pdfOpenWorld
 
Ibm spss direct_marketing
Ibm spss direct_marketingIbm spss direct_marketing
Ibm spss direct_marketingDũ Lê Anh
 
Certification guide series ibm tivoli usage and accounting manager v7.1 imple...
Certification guide series ibm tivoli usage and accounting manager v7.1 imple...Certification guide series ibm tivoli usage and accounting manager v7.1 imple...
Certification guide series ibm tivoli usage and accounting manager v7.1 imple...Banking at Ho Chi Minh city
 
Call pilot call center setup and operation
Call pilot call center setup and operationCall pilot call center setup and operation
Call pilot call center setup and operationkyawzay htet
 
Mongo db security guide
Mongo db security guideMongo db security guide
Mongo db security guideDeysi Gmarra
 
Mongo db security-guide
Mongo db security-guideMongo db security-guide
Mongo db security-guideDan Llimpe
 
BOOK - IBM tivoli netcool service quality manager data mediation gateway deve...
BOOK - IBM tivoli netcool service quality manager data mediation gateway deve...BOOK - IBM tivoli netcool service quality manager data mediation gateway deve...
BOOK - IBM tivoli netcool service quality manager data mediation gateway deve...Satya Harish
 
Implementing ibm tivoli workload scheduler v 8.2 extended agent for ibm tivol...
Implementing ibm tivoli workload scheduler v 8.2 extended agent for ibm tivol...Implementing ibm tivoli workload scheduler v 8.2 extended agent for ibm tivol...
Implementing ibm tivoli workload scheduler v 8.2 extended agent for ibm tivol...Banking at Ho Chi Minh city
 
Debugger.pdf
Debugger.pdfDebugger.pdf
Debugger.pdfBuTriLn
 
BOOK - IBM Sterling B2B Integration and Managed File Transfer Solutions
BOOK - IBM Sterling B2B Integration and Managed File Transfer SolutionsBOOK - IBM Sterling B2B Integration and Managed File Transfer Solutions
BOOK - IBM Sterling B2B Integration and Managed File Transfer SolutionsSatya Harish
 
Avaya site administrator
Avaya site administratorAvaya site administrator
Avaya site administratorPavan Kumar
 
sum2_abap_unix_hana.pdf
sum2_abap_unix_hana.pdfsum2_abap_unix_hana.pdf
sum2_abap_unix_hana.pdfssuser9f920a1
 

Similar to Incident user-guide-700(Remidy) (20)

AltiGen Max Agent Manual
AltiGen Max Agent  ManualAltiGen Max Agent  Manual
AltiGen Max Agent Manual
 
MFG/PRO QAD Reporting Framework Document Guide
MFG/PRO QAD Reporting Framework Document GuideMFG/PRO QAD Reporting Framework Document Guide
MFG/PRO QAD Reporting Framework Document Guide
 
AltiGen Max Communicator Manual
AltiGen Max Communicator ManualAltiGen Max Communicator Manual
AltiGen Max Communicator Manual
 
Powershell selflearn
Powershell selflearnPowershell selflearn
Powershell selflearn
 
Powershell selflearn
Powershell selflearnPowershell selflearn
Powershell selflearn
 
SAP_HANA_Modeling_Guide_for_SAP_HANA_Studio_en
SAP_HANA_Modeling_Guide_for_SAP_HANA_Studio_enSAP_HANA_Modeling_Guide_for_SAP_HANA_Studio_en
SAP_HANA_Modeling_Guide_for_SAP_HANA_Studio_en
 
The Art of Monitoring (2016).pdf
The Art of Monitoring (2016).pdfThe Art of Monitoring (2016).pdf
The Art of Monitoring (2016).pdf
 
Ibm spss direct_marketing
Ibm spss direct_marketingIbm spss direct_marketing
Ibm spss direct_marketing
 
Certification guide series ibm tivoli usage and accounting manager v7.1 imple...
Certification guide series ibm tivoli usage and accounting manager v7.1 imple...Certification guide series ibm tivoli usage and accounting manager v7.1 imple...
Certification guide series ibm tivoli usage and accounting manager v7.1 imple...
 
Flask docs
Flask docsFlask docs
Flask docs
 
Call pilot call center setup and operation
Call pilot call center setup and operationCall pilot call center setup and operation
Call pilot call center setup and operation
 
Mongo db security guide
Mongo db security guideMongo db security guide
Mongo db security guide
 
Mongo db security-guide
Mongo db security-guideMongo db security-guide
Mongo db security-guide
 
BOOK - IBM tivoli netcool service quality manager data mediation gateway deve...
BOOK - IBM tivoli netcool service quality manager data mediation gateway deve...BOOK - IBM tivoli netcool service quality manager data mediation gateway deve...
BOOK - IBM tivoli netcool service quality manager data mediation gateway deve...
 
Implementing ibm tivoli workload scheduler v 8.2 extended agent for ibm tivol...
Implementing ibm tivoli workload scheduler v 8.2 extended agent for ibm tivol...Implementing ibm tivoli workload scheduler v 8.2 extended agent for ibm tivol...
Implementing ibm tivoli workload scheduler v 8.2 extended agent for ibm tivol...
 
Debugger.pdf
Debugger.pdfDebugger.pdf
Debugger.pdf
 
BOOK - IBM Sterling B2B Integration and Managed File Transfer Solutions
BOOK - IBM Sterling B2B Integration and Managed File Transfer SolutionsBOOK - IBM Sterling B2B Integration and Managed File Transfer Solutions
BOOK - IBM Sterling B2B Integration and Managed File Transfer Solutions
 
Avaya site administrator
Avaya site administratorAvaya site administrator
Avaya site administrator
 
sum2_abap_unix_hana.pdf
sum2_abap_unix_hana.pdfsum2_abap_unix_hana.pdf
sum2_abap_unix_hana.pdf
 
E views 9 command ref
E views 9 command refE views 9 command ref
E views 9 command ref
 

Recently uploaded

Employee wellbeing at the workplace.pptx
Employee wellbeing at the workplace.pptxEmployee wellbeing at the workplace.pptx
Employee wellbeing at the workplace.pptxNirmalaLoungPoorunde1
 
Science 7 - LAND and SEA BREEZE and its Characteristics
Science 7 - LAND and SEA BREEZE and its CharacteristicsScience 7 - LAND and SEA BREEZE and its Characteristics
Science 7 - LAND and SEA BREEZE and its CharacteristicsKarinaGenton
 
Call Girls in Dwarka Mor Delhi Contact Us 9654467111
Call Girls in Dwarka Mor Delhi Contact Us 9654467111Call Girls in Dwarka Mor Delhi Contact Us 9654467111
Call Girls in Dwarka Mor Delhi Contact Us 9654467111Sapana Sha
 
Measures of Central Tendency: Mean, Median and Mode
Measures of Central Tendency: Mean, Median and ModeMeasures of Central Tendency: Mean, Median and Mode
Measures of Central Tendency: Mean, Median and ModeThiyagu K
 
“Oh GOSH! Reflecting on Hackteria's Collaborative Practices in a Global Do-It...
“Oh GOSH! Reflecting on Hackteria's Collaborative Practices in a Global Do-It...“Oh GOSH! Reflecting on Hackteria's Collaborative Practices in a Global Do-It...
“Oh GOSH! Reflecting on Hackteria's Collaborative Practices in a Global Do-It...Marc Dusseiller Dusjagr
 
How to Make a Pirate ship Primary Education.pptx
How to Make a Pirate ship Primary Education.pptxHow to Make a Pirate ship Primary Education.pptx
How to Make a Pirate ship Primary Education.pptxmanuelaromero2013
 
Incoming and Outgoing Shipments in 1 STEP Using Odoo 17
Incoming and Outgoing Shipments in 1 STEP Using Odoo 17Incoming and Outgoing Shipments in 1 STEP Using Odoo 17
Incoming and Outgoing Shipments in 1 STEP Using Odoo 17Celine George
 
Arihant handbook biology for class 11 .pdf
Arihant handbook biology for class 11 .pdfArihant handbook biology for class 11 .pdf
Arihant handbook biology for class 11 .pdfchloefrazer622
 
microwave assisted reaction. General introduction
microwave assisted reaction. General introductionmicrowave assisted reaction. General introduction
microwave assisted reaction. General introductionMaksud Ahmed
 
Sanyam Choudhary Chemistry practical.pdf
Sanyam Choudhary Chemistry practical.pdfSanyam Choudhary Chemistry practical.pdf
Sanyam Choudhary Chemistry practical.pdfsanyamsingh5019
 
Separation of Lanthanides/ Lanthanides and Actinides
Separation of Lanthanides/ Lanthanides and ActinidesSeparation of Lanthanides/ Lanthanides and Actinides
Separation of Lanthanides/ Lanthanides and ActinidesFatimaKhan178732
 
Presiding Officer Training module 2024 lok sabha elections
Presiding Officer Training module 2024 lok sabha electionsPresiding Officer Training module 2024 lok sabha elections
Presiding Officer Training module 2024 lok sabha electionsanshu789521
 
The Most Excellent Way | 1 Corinthians 13
The Most Excellent Way | 1 Corinthians 13The Most Excellent Way | 1 Corinthians 13
The Most Excellent Way | 1 Corinthians 13Steve Thomason
 
POINT- BIOCHEMISTRY SEM 2 ENZYMES UNIT 5.pptx
POINT- BIOCHEMISTRY SEM 2 ENZYMES UNIT 5.pptxPOINT- BIOCHEMISTRY SEM 2 ENZYMES UNIT 5.pptx
POINT- BIOCHEMISTRY SEM 2 ENZYMES UNIT 5.pptxSayali Powar
 
Grant Readiness 101 TechSoup and Remy Consulting
Grant Readiness 101 TechSoup and Remy ConsultingGrant Readiness 101 TechSoup and Remy Consulting
Grant Readiness 101 TechSoup and Remy ConsultingTechSoup
 
The basics of sentences session 2pptx copy.pptx
The basics of sentences session 2pptx copy.pptxThe basics of sentences session 2pptx copy.pptx
The basics of sentences session 2pptx copy.pptxheathfieldcps1
 
A Critique of the Proposed National Education Policy Reform
A Critique of the Proposed National Education Policy ReformA Critique of the Proposed National Education Policy Reform
A Critique of the Proposed National Education Policy ReformChameera Dedduwage
 
Kisan Call Centre - To harness potential of ICT in Agriculture by answer farm...
Kisan Call Centre - To harness potential of ICT in Agriculture by answer farm...Kisan Call Centre - To harness potential of ICT in Agriculture by answer farm...
Kisan Call Centre - To harness potential of ICT in Agriculture by answer farm...Krashi Coaching
 

Recently uploaded (20)

Employee wellbeing at the workplace.pptx
Employee wellbeing at the workplace.pptxEmployee wellbeing at the workplace.pptx
Employee wellbeing at the workplace.pptx
 
Science 7 - LAND and SEA BREEZE and its Characteristics
Science 7 - LAND and SEA BREEZE and its CharacteristicsScience 7 - LAND and SEA BREEZE and its Characteristics
Science 7 - LAND and SEA BREEZE and its Characteristics
 
Call Girls in Dwarka Mor Delhi Contact Us 9654467111
Call Girls in Dwarka Mor Delhi Contact Us 9654467111Call Girls in Dwarka Mor Delhi Contact Us 9654467111
Call Girls in Dwarka Mor Delhi Contact Us 9654467111
 
Measures of Central Tendency: Mean, Median and Mode
Measures of Central Tendency: Mean, Median and ModeMeasures of Central Tendency: Mean, Median and Mode
Measures of Central Tendency: Mean, Median and Mode
 
“Oh GOSH! Reflecting on Hackteria's Collaborative Practices in a Global Do-It...
“Oh GOSH! Reflecting on Hackteria's Collaborative Practices in a Global Do-It...“Oh GOSH! Reflecting on Hackteria's Collaborative Practices in a Global Do-It...
“Oh GOSH! Reflecting on Hackteria's Collaborative Practices in a Global Do-It...
 
How to Make a Pirate ship Primary Education.pptx
How to Make a Pirate ship Primary Education.pptxHow to Make a Pirate ship Primary Education.pptx
How to Make a Pirate ship Primary Education.pptx
 
Incoming and Outgoing Shipments in 1 STEP Using Odoo 17
Incoming and Outgoing Shipments in 1 STEP Using Odoo 17Incoming and Outgoing Shipments in 1 STEP Using Odoo 17
Incoming and Outgoing Shipments in 1 STEP Using Odoo 17
 
Arihant handbook biology for class 11 .pdf
Arihant handbook biology for class 11 .pdfArihant handbook biology for class 11 .pdf
Arihant handbook biology for class 11 .pdf
 
microwave assisted reaction. General introduction
microwave assisted reaction. General introductionmicrowave assisted reaction. General introduction
microwave assisted reaction. General introduction
 
Sanyam Choudhary Chemistry practical.pdf
Sanyam Choudhary Chemistry practical.pdfSanyam Choudhary Chemistry practical.pdf
Sanyam Choudhary Chemistry practical.pdf
 
Staff of Color (SOC) Retention Efforts DDSD
Staff of Color (SOC) Retention Efforts DDSDStaff of Color (SOC) Retention Efforts DDSD
Staff of Color (SOC) Retention Efforts DDSD
 
Separation of Lanthanides/ Lanthanides and Actinides
Separation of Lanthanides/ Lanthanides and ActinidesSeparation of Lanthanides/ Lanthanides and Actinides
Separation of Lanthanides/ Lanthanides and Actinides
 
Model Call Girl in Tilak Nagar Delhi reach out to us at 🔝9953056974🔝
Model Call Girl in Tilak Nagar Delhi reach out to us at 🔝9953056974🔝Model Call Girl in Tilak Nagar Delhi reach out to us at 🔝9953056974🔝
Model Call Girl in Tilak Nagar Delhi reach out to us at 🔝9953056974🔝
 
Presiding Officer Training module 2024 lok sabha elections
Presiding Officer Training module 2024 lok sabha electionsPresiding Officer Training module 2024 lok sabha elections
Presiding Officer Training module 2024 lok sabha elections
 
The Most Excellent Way | 1 Corinthians 13
The Most Excellent Way | 1 Corinthians 13The Most Excellent Way | 1 Corinthians 13
The Most Excellent Way | 1 Corinthians 13
 
POINT- BIOCHEMISTRY SEM 2 ENZYMES UNIT 5.pptx
POINT- BIOCHEMISTRY SEM 2 ENZYMES UNIT 5.pptxPOINT- BIOCHEMISTRY SEM 2 ENZYMES UNIT 5.pptx
POINT- BIOCHEMISTRY SEM 2 ENZYMES UNIT 5.pptx
 
Grant Readiness 101 TechSoup and Remy Consulting
Grant Readiness 101 TechSoup and Remy ConsultingGrant Readiness 101 TechSoup and Remy Consulting
Grant Readiness 101 TechSoup and Remy Consulting
 
The basics of sentences session 2pptx copy.pptx
The basics of sentences session 2pptx copy.pptxThe basics of sentences session 2pptx copy.pptx
The basics of sentences session 2pptx copy.pptx
 
A Critique of the Proposed National Education Policy Reform
A Critique of the Proposed National Education Policy ReformA Critique of the Proposed National Education Policy Reform
A Critique of the Proposed National Education Policy Reform
 
Kisan Call Centre - To harness potential of ICT in Agriculture by answer farm...
Kisan Call Centre - To harness potential of ICT in Agriculture by answer farm...Kisan Call Centre - To harness potential of ICT in Agriculture by answer farm...
Kisan Call Centre - To harness potential of ICT in Agriculture by answer farm...
 

Incident user-guide-700(Remidy)

  • 1. June 2006 Part No: 60845 BMC®Remedy®ServiceDesk:IncidentManagement7.0 User’sGuide
  • 2. BMC Software, Inc. www.bmc.com Copyright 1991–2006 BMC Software, Inc. All rights reserved. BMC, the BMC logo, all other BMC product or service names, BMC Software, the BMC Software logos, and all other BMC Software product or service names, are registered trademarks or trademarks of BMC Software, Inc. All other trademarks belong to their respective companies. BMC Software, Inc., considers information included in this documentation to be proprietary and confidential. Your use of this information is subject to the terms and conditions of the applicable end user license agreement or nondisclosure agreement for the product and the proprietary and restricted rights notices included in this documentation. For license information about the OpenSource files used in the licensed program, please read OpenSourceLicenses.pdf. This file is in the Doc folder of the distribution CD-ROM and in the documentation download portion of the product download page. Restricted Rights Legend U.S. Government Restricted Rights to Computer Software. UNPUBLISHED -- RIGHTS RESERVED UNDER THE COPYRIGHT LAWS OF THE UNITED STATES. Use, duplication, or disclosure of any data and computer software by the U.S. Government is subject to restrictions, as applicable, set forth in FAR Section 52.227-14, DFARS 252.227-7013, DFARS 252.227-7014, DFARS 252.227-7015, and DFARS 252.227-7025, as amended from time to time. Contractor/Manufacturer is BMC Software, Inc., 2101 CityWest Blvd., Houston, TX 77042-2827, USA. Any contract notices should be sent to this address. Contacting Us If you need technical support for this product, contact Customer Support by email at support@remedy.com. If you have comments or suggestions about this documentation, contact Information Development by email at doc_feedback@bmc.com. This edition applies to version 7.0 of the licensed program.
  • 3. Contents ! 3 Contents Preface. . . . . . . . . . . . . . . . . . . . . . . . . . . . . . . . . . . . . 9 Best Practice and New icons . . . . . . . . . . . . . . . . . . . . . . 10 About the BMC Remedy IT Service Management Suite. . . . . . . . . . . 10 BMC Atrium CMDB 2.0 . . . . . . . . . . . . . . . . . . . . . . . 10 BMC Remedy Asset Management 7.0 . . . . . . . . . . . . . . . . . 11 BMC Remedy Change Management 7.0 . . . . . . . . . . . . . . . . 11 BMC Remedy Incident Management 7.0 . . . . . . . . . . . . . . . . 11 BMC Remedy Problem Management 7.0 . . . . . . . . . . . . . . . . 12 BMC Service Level Management 7.0 . . . . . . . . . . . . . . . . . . 12 Audience . . . . . . . . . . . . . . . . . . . . . . . . . . . . . . . 13 BMC Remedy IT Service Management Suite documents . . . . . . . . . . 13 Chapter 1 Introducing BMC Remedy Incident Management 7.0 . . . . . . . 17 Installing and configuring Incident Management . . . . . . . . . . . . . 18 What’s new in Incident Management 7.0 . . . . . . . . . . . . . . . . . 18 Incident Management user roles. . . . . . . . . . . . . . . . . . . . . 21 Requester . . . . . . . . . . . . . . . . . . . . . . . . . . . . . 21 Support staff . . . . . . . . . . . . . . . . . . . . . . . . . . . . 22 Incident manager . . . . . . . . . . . . . . . . . . . . . . . . . . 23 Process flow and the life cycle of an incident request . . . . . . . . . . . . 24 Chapter 2 Using functions common to all ITSM applications . . . . . . . . . 27 Opening the main application console . . . . . . . . . . . . . . . . . . 28 Using BMC Remedy User client to open a main console . . . . . . . . . 28
  • 4. 4 "Contents BMC Remedy Service Desk: Incident Management 7.0 Using a browser to open a main console . . . . . . . . . . . . . . . . 30 Working with the Overview console . . . . . . . . . . . . . . . . . . . 31 Opening the Overview console . . . . . . . . . . . . . . . . . . . . 32 Using the Assigned Work table . . . . . . . . . . . . . . . . . . . . 32 Viewing and creating broadcast messages . . . . . . . . . . . . . . . . 36 Using the navigation pane . . . . . . . . . . . . . . . . . . . . . . 36 Using quick actions . . . . . . . . . . . . . . . . . . . . . . . . . 38 Auto-filling fields . . . . . . . . . . . . . . . . . . . . . . . . . . 38 Working with records . . . . . . . . . . . . . . . . . . . . . . . . . 38 Searching for records . . . . . . . . . . . . . . . . . . . . . . . . 38 Printing records . . . . . . . . . . . . . . . . . . . . . . . . . . 41 Modifying records . . . . . . . . . . . . . . . . . . . . . . . . . 42 Working with relationships . . . . . . . . . . . . . . . . . . . . . . . 43 Defining relationships . . . . . . . . . . . . . . . . . . . . . . . . 43 Copying relationships . . . . . . . . . . . . . . . . . . . . . . . . 46 Indicating impacted areas . . . . . . . . . . . . . . . . . . . . . . 47 Modifying relationships . . . . . . . . . . . . . . . . . . . . . . . 48 Performing quick actions on a relationship . . . . . . . . . . . . . . . 49 Removing relationships . . . . . . . . . . . . . . . . . . . . . . . 51 Adding work information . . . . . . . . . . . . . . . . . . . . . . . 51 Creating reminders . . . . . . . . . . . . . . . . . . . . . . . . . . 53 Broadcasting messages. . . . . . . . . . . . . . . . . . . . . . . . 55 Creating broadcast messages . . . . . . . . . . . . . . . . . . . . . 55 Viewing broadcasts . . . . . . . . . . . . . . . . . . . . . . . . . 58 Sending pages and email messages. . . . . . . . . . . . . . . . . . . . 60 Paging a person or on-call group . . . . . . . . . . . . . . . . . . . 60 Sending email . . . . . . . . . . . . . . . . . . . . . . . . . . . 63 Working with reports . . . . . . . . . . . . . . . . . . . . . . . . . 65 Generating a report . . . . . . . . . . . . . . . . . . . . . . . . . 65 Using qualifications to generate a report . . . . . . . . . . . . . . . . 67 Generating a report using saved qualifications . . . . . . . . . . . . . . 70 Chapter 3 Working with the Requester console . . . . . . . . . . . . . . . 73 Requester role. . . . . . . . . . . . . . . . . . . . . . . . . . . . . 74 Service Request Management users . . . . . . . . . . . . . . . . . . . 74 Understanding the Requester console . . . . . . . . . . . . . . . . . . 76
  • 5. Contents ! 5 User’s Guide Opening the Requester console . . . . . . . . . . . . . . . . . . . . 77 Functional areas and tasks . . . . . . . . . . . . . . . . . . . . . . 78 Working with service requests . . . . . . . . . . . . . . . . . . . . . 80 Creating a service request . . . . . . . . . . . . . . . . . . . . . . 80 Filtering service requests . . . . . . . . . . . . . . . . . . . . . . . 83 Viewing a service request record. . . . . . . . . . . . . . . . . . . . 84 Modifying a service request. . . . . . . . . . . . . . . . . . . . . . 85 Searching for service requests by Request ID . . . . . . . . . . . . . . 86 Printing a service request. . . . . . . . . . . . . . . . . . . . . . . 86 Canceling a service request . . . . . . . . . . . . . . . . . . . . . . 87 Reopening a service request . . . . . . . . . . . . . . . . . . . . . 87 Completing surveys . . . . . . . . . . . . . . . . . . . . . . . . . 88 Viewing service requests with errors . . . . . . . . . . . . . . . . . . 90 Working with service requests as the Request Master . . . . . . . . . . . 91 Opening a service request record . . . . . . . . . . . . . . . . . . . 92 Reopening a service request . . . . . . . . . . . . . . . . . . . . . 93 Viewing or adding work information . . . . . . . . . . . . . . . . . 94 Viewing the event log and troubleshooting . . . . . . . . . . . . . . . 97 Service Request form. . . . . . . . . . . . . . . . . . . . . . . . . . 98 Working with the Solution database . . . . . . . . . . . . . . . . . . . 101 Viewing broadcast messages . . . . . . . . . . . . . . . . . . . . . . 102 Chapter 4 Working with Incident Management as support staff . . . . . . 103 Understanding the Support Console tab . . . . . . . . . . . . . . . . . 104 Setting application preferences . . . . . . . . . . . . . . . . . . . . . 106 Recording a new incident. . . . . . . . . . . . . . . . . . . . . . . . 108 Using the Process Flow Status wizard to record a new incident . . . . . . 109 Using a template . . . . . . . . . . . . . . . . . . . . . . . . . 112 Using the decision tree. . . . . . . . . . . . . . . . . . . . . . . 114 Using scripts . . . . . . . . . . . . . . . . . . . . . . . . . . . 114 Relating incidents as duplicates . . . . . . . . . . . . . . . . . . . 114 Recording CI unavailability. . . . . . . . . . . . . . . . . . . . . 116 Adding or modifying a customer profile . . . . . . . . . . . . . . . 117 Understanding assignments . . . . . . . . . . . . . . . . . . . . . . 120 Receiving notification of assignments . . . . . . . . . . . . . . . . 121 Working with assignments . . . . . . . . . . . . . . . . . . . . . 121
  • 6. 6 "Contents BMC Remedy Service Desk: Incident Management 7.0 Reassigning an incident . . . . . . . . . . . . . . . . . . . . . . 124 Working with tasks . . . . . . . . . . . . . . . . . . . . . . . . 127 Investigating and diagnosing an incident . . . . . . . . . . . . . . . . . 132 Viewing an incident . . . . . . . . . . . . . . . . . . . . . . . 133 Searching for a solution . . . . . . . . . . . . . . . . . . . . . . 135 Recording the cost of working on an incident . . . . . . . . . . . . . 139 Resolving an incident . . . . . . . . . . . . . . . . . . . . . . . . . 141 Creating a problem investigation from an incident . . . . . . . . . . . 144 Creating infrastructure change from an incident . . . . . . . . . . . . 146 Reopening a resolved incident . . . . . . . . . . . . . . . . . . . 147 Closing an incident . . . . . . . . . . . . . . . . . . . . . . . . . . 147 Creating known errors and solutions. . . . . . . . . . . . . . . . . . . 149 Creating a known error from an incident . . . . . . . . . . . . . . . 149 Creating a solution database entry from an incident . . . . . . . . . . 150 Chapter 5 Working with Incident Management as a manager . . . . . . . 153 Understanding the Manager Console tab . . . . . . . . . . . . . . . . . 154 Managing assignments . . . . . . . . . . . . . . . . . . . . . . . . . 155 Viewing unassigned incidents. . . . . . . . . . . . . . . . . . . . 155 Assigning an incident . . . . . . . . . . . . . . . . . . . . . . . 156 Monitoring an incident's status . . . . . . . . . . . . . . . . . . . 157 Reopening a closed incident . . . . . . . . . . . . . . . . . . . . . . 159 Understanding SLM calculations . . . . . . . . . . . . . . . . . . . . 160 Understanding notifications . . . . . . . . . . . . . . . . . . . . . . 160 Viewing the audit log . . . . . . . . . . . . . . . . . . . . . . . . . 162 Chapter 6 Managing configuration items . . . . . . . . . . . . . . . . . 163 Creating a CI . . . . . . . . . . . . . . . . . . . . . . . . . . . . . 164 Creating a computer system CI . . . . . . . . . . . . . . . . . . . 164 Creating a bulk inventory CI . . . . . . . . . . . . . . . . . . . . 167 Creating an inventory location CI . . . . . . . . . . . . . . . . . . 169 Managing inventory . . . . . . . . . . . . . . . . . . . . . . . . . . 170 Viewing inventory locations . . . . . . . . . . . . . . . . . . . . 170 Relocating CIs . . . . . . . . . . . . . . . . . . . . . . . . . . 172 Reserving and using inventory . . . . . . . . . . . . . . . . . . . 173
  • 7. Contents ! 7 User’s Guide Glossary. . . . . . . . . . . . . . . . . . . . . . . . . . . . . . . . . . . 175 Index. . . . . . . . . . . . . . . . . . . . . . . . . . . . . . . . . . . 189
  • 8. 8 "Contents BMC Remedy Service Desk: Incident Management 7.0
  • 9. Preface ! 9 Preface The BMC Remedy Service Desk: Incident Management 7.0 User’s Guide describes how to use the BMC® Remedy® Incident Management application. Incident Management is one of five BMC Remedy IT Service Management applications. The BMC® Remedy® IT Service Management Suite (BMC® Remedy® ITSM Suite) includes: ! The BMC® Remedy® Asset Management application. ! The BMC® Remedy® Change Management application. ! The BMC® Remedy® Service Desk solution (which includes the BMC® Remedy® Incident Management application and the BMC® Remedy® Problem Management application). ! The BMC® Service Level Management application. The applications run in conjunction with the BMC® Remedy® Action Request System® platform (BMC® Remedy® AR System® platform) and share a common database. All five applications consume data from the BMC® Atrium® Configuration Management Database (CMDB) application.
  • 10. 10 "Preface BMC Remedy Service Desk: Incident Management 7.0 Best Practice and New icons Documentation for the BMC Remedy ITSM Suite contains two icons. About the BMC Remedy IT Service Management Suite There have been several updates to the BMC Remedy ITSM Suite since version 6.0. Note the change to the BMC® Remedy® Help Desk application. BMC is now offering the BMC Remedy Service Desk solution, which contains the following applications: ! BMC Remedy Incident Management ! BMC Remedy Problem Management BMC Atrium CMDB 2.0 BMC Atrium CMDB 2.0 is installed with Asset Management, Change Management, and Service Desk (including Incident Management and Problem Management). It stores information about configuration items and their relationships in an inheritance-based data model, and has the ability to reconcile data from different sources. BMC Atrium CMDB 2.0 provides a “single source of truth” about your IT environment, enabling other BMC applications to manage CIs, predict the impact of configuration changes, and perform other Business Service Management (BSM) functions. For more information, see the BMC Atrium CMDB 2.0 User’s Guide. Icon Description The New icon identifies features or products that are new or enhanced with version 7.0. The Best Practice icon highlights processes or approaches that BMC has identified as the most effective way to leverage certain features in the suite.
  • 11. About the BMC Remedy IT Service Management Suite ! 11 User’s Guide BMC Remedy Asset Management 7.0 The BMC Remedy Asset Management application lets IT professionals track and manage enterprise configuration items (CIs)—and their changing relationships—throughout the entire CI life cycle. As part of the BMC Remedy ITSM Suite, Asset Management is integrated with BMC Remedy Service Desk (which contains the BMC Remedy Incident Management and BMC Remedy Problem Management applications), BMC Remedy Change Management, and BMC Service Level Management, and offers flexibility to support customized business processes. For more information, see the BMC Remedy Asset Management 7.0 User’s Guide. BMC Remedy Change Management 7.0 Using ITIL-compatible best practices, BMC Remedy Change Management provides IT organizations with the ability to manage changes by enabling them to assess impact, risk, and resource requirements, and then create plans and automate approval functions for implementing changes. It provides scheduling and task assignment functionality, and reporting capabilities for reviewing performance and improving processes. Because Change Management is integrated with BMC Atrium CMDB, Change Management lets you relate changes to other records, such as configuration items (including services) and incidents. For more information, see the BMC Remedy Change Management 7.0 User’s Guide. BMC Remedy Incident Management 7.0 BMC Remedy Incident Management is used to manage incidents. Incident management is reactive, and is typically initiated in response to a customer call or automated event. An example of an automated event might be an alert from a monitoring system, such as BMC® Service Impact Management (BMC® SIM). The primary goal of the incident management process, according to ITIL standards, is “to restore normal service operation as quickly as possible with minimum disruption to the business, thus ensuring that the best achievable levels of availability and service are maintained.”
  • 12. 12 "Preface BMC Remedy Service Desk: Incident Management 7.0 An incident is any event that is not part of the standard operation of a service and that causes an interruption to or a reduction in the quality of that service. Normal service operation is the operation of services within the limits specified by Service Level Management (SLM). For more information, see the BMC Service Desk: Incident Management 7.0 User’s Guide. BMC Remedy Problem Management 7.0 BMC Remedy Problem Management is used to manage problem investigations, known errors, and solution database entries. Problem management can proactively prevent the occurrence of incidents, errors, and additional problems. A problem investigation helps an IT organization get to the root cause of incidents. It initiates actions that help to improve or correct the situation, preventing the incident from recurring. After a problem investigation identifies the cause, this information can result in either a known error or a solution database entry. A known error is a problem that has been successfully diagnosed and for which a temporary work-around or permanent solution has been identified. A solution database entry contains information that might be required to provide or restore a service. For more information, see the BMC Service Desk: Problem Management 7.0 User’s Guide. BMC Service Level Management 7.0 BMC Service Level Management enables a service provider, such as an IT organization, a customer support group, or an external service provider, to formally document the needs of its customers or lines of business using service level agreements, and provide the correct level of service to meet those needs. Service Level Management also provides a means to review, enforce, and report on the level of service provided. It streamlines the most important task of all, which is the communication between a service provider and its customers. Multiple service targets can be defined and monitored, acting as a bridge between IT service support and IT operations. This enables costs to be controlled and helps to provide a consistent level of service in support of a key business service.
  • 13. Audience ! 13 User’s Guide For more information, see the BMC Service Level Management 7.0 User’s Guide. Audience Incident Management is intended for the following IT professionals: ! IT support staff ! IT managers The Requester console is intended for any IT user. BMC Remedy IT Service Management Suite documents The following table lists the documentation available for the BMC Remedy ITSM Suite. Unless otherwise noted, online documentation in Adobe Acrobat (PDF) format is available on product installation CDs, on the Customer Support website (http://supportweb.remedy.com), or both. You can order printed documentation from SMBU-Upgrade@bmc.com. Note: To access the support website, you must have a support contract. You can access application Help by clicking on Help links within the application. Title Document provides Audience Format ITSM Configuration Quick Start Start with this reference card to quickly install and configure applications in the ITSM suite. Administrators Print and PDF BMC Remedy Action Request System 7.0 Concepts Concepts for using the Action Request System. Administrators Print and PDF BMC Remedy Action Request System 7.0 Installing Procedures for installing the Action Request System. Administrators Print and PDF BMC Atrium CMDB 2.0 Common Data Model Diagram Hierarchical diagram of all classes in the CDM, including unique attributes and applicable relationships. Administrators PDF
  • 14. 14 "Preface BMC Remedy Service Desk: Incident Management 7.0 BMC Atrium CMDB 2.0 Common Data Model Help Description and details of superclasses, subclasses, attributes, and relationships for each class. Administrators HTML BMC Atrium CMDB 2.0 Concepts and Best Practices Guide Information about CMDB concepts and best practices for planning your BMC Atrium CMDB implementation. Executives and administrators Print and PDF BMC Atrium CMDB 2.0 Developer’s Reference Guide Information about creating API programs, C and Web Services API functions and data structures, and a list of error messages. Administrators and programmers PDF BMC Atrium CMDB 2.0 Help Help for using and configuring BMC Atrium CMDB. Users and administrators Product Help BMC Atrium CMDB 2.0 Installation and Configuration Guide Information about installing and configuring BMC Atrium CMDB, including permissions, class definitions, reconciliation, and federation. Administrators Print and PDF BMCAtriumCMDB2.0Javadoc API Help Information about Java classes, methods, and variables that integrate with BMC Atrium CMDB. Programmers HTML BMC Atrium CMDB 2.0 Master Index Combined index of all books. Everyone Print and PDF BMC Atrium CMDB 2.0 Release Notes Information about new features and known issues. Everyone Print and PDF BMC Atrium CMDB 2.0 User’s Guide Information about using BMC Atrium CMDB, including searching for CIs and relationships, launching federated data, reporting, and running reconciliation jobs. Users Print and PDF BMCRemedy7.0ApprovalServer Guide for Users and Administrators Topics on installation and configuration of the Approval Server, how to use the Approval Server, and understanding the approval workflow. Users and administrators Print and PDF BMC Remedy IT Service Management 7.0 Configuration Guide Procedures for configuring the BMC Remedy IT Service Management applications. Administrators Print and PDF Title Document provides Audience Format
  • 15. BMC Remedy IT Service Management Suite documents ! 15 User’s Guide BMC Remedy IT Service Management 7.0 Installation Guide Procedures for installing the BMC Remedy IT Service Management applications and solutions: BMC Remedy Service Desk solution (BMC Remedy Incident Management and BMC Remedy Problem Management), BMC Remedy Change Management, and BMC Remedy Asset Management. Administrators Print and PDF BMC Remedy Asset Management 7.0 Help Help for using BMC Remedy Asset Management. Everyone Product Help BMC Remedy Asset Management 7.0 Release Notes Information about known issues in each release of BMC Remedy Asset Management. Also provides a list of new features included with the application. Everyone Print and PDF BMC Remedy Asset Management 7.0 User’s Guide Procedures for using the BMC Remedy Asset Management application; includes new features and overview. Everyone Print and PDF BMC Remedy Change Management 7.0 Help Help for using BMC Remedy Change Management. Everyone Product Help BMC Remedy Change Management 7.0 Release Notes Information about known issues in each release of BMC Remedy Change Management. Also provides a list of new features included with the application. Everyone Print and PDF BMC Remedy Change Management 7.0 User’s Guide Procedures for using the BMC Remedy Change Management application; includes new features and overview. Everyone Print and PDF BMC Remedy Service Desk 7.0 Release Notes Information about known issues in each release of BMC Remedy Service Desk: Incident Management and BMC Remedy Service Desk: Problem Management. Also provides a list of new features included with the application. Everyone Print and PDF BMC Remedy Service Desk: Incident Management 7.0 Help Help for using BMC Remedy Incident Management. Everyone Product Help BMC Remedy Service Desk: Incident Management 7.0 User’s Guide Procedures for using the BMC Remedy Service Desk: Incident Management application; includes new features and overview. Everyone Print and PDF Title Document provides Audience Format
  • 16. 16 "Preface BMC Remedy Service Desk: Incident Management 7.0 BMC Remedy Service Desk: Problem Management 7.0 Help Help for using BMC Remedy Problem Management. Everyone Product Help BMC Remedy Service Desk: Problem Management 7.0 User’s Guide Procedures for using the BMC Remedy Service Desk: Problem Management application; includes new features and overview. Everyone Print and PDF BMC Service Level Management 7.0 Configuration Guide Procedures for configuring the BMC Service Level Management application. Administrators Print and PDF BMC Service Level Management 7.0 Configuration Help Help for configuring the BMC Service Level Management application. Administrators Product Help BMC Service Level Management 7.0 Installation Guide Procedures for installing the BMC Service Level Management application. Administrators Print and PDF BMC Service Level Management 7.0 Release Notes Information about known issues in each release of BMC Service Level Management. Also provides a list of new features included with the application. Everyone PDF BMC Service Level Management 7.0 User Help Help for using the BMC Service Level Management application. Everyone Product Help BMC Service Level Management 7.0 User’s Guide Procedures for using the BMC Service Level Management application; includes new features and overview. Everyone Print and PDF BMC Remedy 7.0 Task Management Administrator’s Guide Procedures to configure Task Management. Note: This guide also includes steps to configure seamless authentication between BMC Remedy Change Management and the other components of BMC Remedy Change and Configuration Management (CCM). Administrators Print and PDF Title Document provides Audience Format
  • 17. Introducing BMC Remedy Incident Management 7.0 ! 17 Chapter 1Introducing BMC Remedy Incident Management 7.0 The Service Desk: Incident Management application is used to manage incidents. Incident management is reactive, and is typically initiated in response to a customer call. The primary goal of the incident management process, according to ITIL standards, is “to restore normal service operation as quickly as possible with minimum disruption to the business, thus ensuring that the best achievable levels of availability and service are maintained.” An incident is any event that is not part of the standard operation of a service and that causes an interruption to or a reduction in the quality of that service. Normal service operation is the operation of services within the limits specified by the service target. The following topics are provided: ! Installing and configuring Incident Management (page 18) ! What’s new in Incident Management 7.0 (page 18) ! Incident Management user roles (page 21) ! Process flow and the life cycle of an incident request (page 24)
  • 18. 18 "Chapter 1—Introducing BMC Remedy Incident Management 7.0 BMC Remedy Service Desk: Incident Management 7.0 Installing and configuring Incident Management Your administrator installs and configures Incident Management. For details, see: ! BMC Remedy IT Service Management 7.0 Installation Guide ! BMC Remedy IT Service Management 7.0 Configuration Guide What’s new in Incident Management 7.0 The new features in this release of Incident Management include: ! Improved ITIL conformance—A new process flow tool helps you follow ITIL processes for incident management. ! Enhanced user interface—The user interface is now more consistent with other BMC applications. To help speed use of the application, forms and dialog boxes have been streamlined, and Quick Action accelerators have been added. ! Role-based consoles—Support staff, managers, and requesters have separate consoles. The Requester console provides customer access. ! Permission model—Permissions and functional roles have been enhanced to provide greater flexibility in setting up user access. For details, see the BMC Remedy IT Service Management 7.0 Configuration Guide. ! Task management—You can assign tasks to one or more people without changing the incident assignment. For previous users of Incident Management, this replaces the work log action feature. Now you can assign and view tasks without going into the work log. ! Direct view into CMDB—This allows you to manage configuration items (CIs) from Incident Management. ! Cost tracking—The cost for each incident can be tracked as the incident moves between support groups for diagnosis, resolution, and closure, based on either flat-rate or time-based costs.
  • 19. What’s new in Incident Management 7.0 ! 19 User’s Guide ! Reporting—Incident Management now includes the reports described in the following table. ! Service Level Management—If Service Level Management is installed, the Incident form displays the status of service targets. ! Enhanced audit log—You can now filter the audit log, for example, to see only date field audit records or assignment changes. ! Terminology changes—You can find terminology changes in the following table. Report Description Group Assignment to Incidents This report lists incidents and their assigned support groups for a specified date range. Open Incident volume by Assignee This bar chart displays the number of open incidents for each assignee. Incidents by activity times This report lists all open incidents and the amount of time since the reported date. Resolved and Closed Incident Volume by Assignee This bar chart displays the number of resolved and closed incidents for each assignee. Change induced incidents This report lists incidents that were caused by changes. Note: This report is available only if Change Management is installed. Table 1-1: Key terminology changes in Incident Management Previous term New term Associate Relate Associations Relationships Automatic Routing Auto Assign Delete Remove—This change applies only to the Relationship and Financial tabs, to clarify the action being performed. Service Categorization Operational Categorization
  • 20. 20 "Chapter 1—Introducing BMC Remedy Incident Management 7.0 BMC Remedy Service Desk: Incident Management 7.0 What’s new for Help Desk users? This release replaces BMC® Remedy® Help Desk with Incident Management and Problem Management. New Incident Management features for former Help Desk users include the features mentioned in the previous paragraphs, and also the following features: ! Enhanced problem management—Problem investigations have a separate form. Problem Management includes new processes to manage the life cycle of a problem investigation and known errors, and to record solution database entries. ! Navigation pane—Located on the left side of consoles and forms, this provides access to common functions, such as assigning an incident to yourself. ! Multi-tenancy—This makes it possible to host multiple companies and their data on a single server. This feature can also be used for any groups, such as business units or departments, whose data must be kept separate. Multi-tenancy is limited to the company level in Incident Management. Configuration can differ on a per-company basis. Multi-tenancy from the user’s perspective is accessed by selecting the appropriate company from the list next to the Company field. ! Incident matching—From the Incident form, users can perform searches for known errors, solution database entries, problem investigations, and other incidents that match criteria from the current incident to assist in the incident resolution process. ! Categorization—This is recorded separately for operational and product categorization, each with multiple levels to provide greater flexibility. Due to multi-tenancy, each company or business unit can be configured with its own categorization. ! Decision tree—This takes the user step-by-step through a questionnaire, and, based on answers, completes part of the form for a new incident. A manager or administrator can build decision trees. Work Log Work Info Work Log Action Task Table 1-1: Key terminology changes in Incident Management Previous term New term
  • 21. Incident Management user roles ! 21 User’s Guide ! Scripts—These are detailed instructions that an administrator or manager sets up to help users record important information about an incident. Scripts can be used when recording or assigning an incident. ! Incident templates—These can be used to populate incident records with standard information that is entered on a regular basis. A template can also set a relationship to a configuration item (CI). An administrator can create templates for commonly occurring incidents, as described in the BMC Remedy IT Service Management 7.0 Configuration Guide. ! Prioritization—Incident priority is now determined by impact and urgency. This can be configured by an administrator, as described in the BMC Remedy IT Service Management 7.0 Configuration Guide. ! Terminology changes—You can find a terminology change in the following table. Incident Management user roles Incident Management provides functionality for IT users with the requester role, for support staff, and for managers. Important: The permission model in Incident Management has had several updates since version 6.0. To define permissions and functional roles, review the permissions and functional roles sections in the BMC Remedy IT Service Management 7.0 Configuration Guide. Requester IT users can request resolution of incidents through the Requester console. This console gives requesters access to: ! Public broadcast messages. ! Their own incident and change requests. ! A satisfaction survey, which can be completed on resolution of an incident or change request. Table 1-2: Key terminology change between Help Desk and Incident Management Help Desk term Incident Management term Bulletin Board Broadcast
  • 22. 22 "Chapter 1—Introducing BMC Remedy Incident Management 7.0 BMC Remedy Service Desk: Incident Management 7.0 The Requester console provides access based on the following permissions: ! Request Console Master—This user is responsible for configuring the Requester console. The request console master can view all the requests submitted by other users. This user is more of an administrator than a support user. ! Registered User—This user has a record in the People form, and the user’s login information is in the Login/Access Details tab of the People form. ! Guest User—All other users are considered to be guest users even if a user has a record in the People form. If a user’s login information does not exist in the user record, then the user is considered a guest user. Guest users cannot create change requests. Support staff First-line support staff are members of the Service Desk. They are the primary contacts for all customers and are responsible for recording incidents and coordinating their resolution. Typically, the first-line support staff own all incidents and are therefore responsible for validating incident resolutions with their customers. Second-line and third-line support are considered subject matter experts. Their main responsibility is to provide an accurate analysis and diagnosis of their assigned incidents to restore service to the affected customers. Support staff responsibilities include: ! Creating, classifying, and updating incident records. ! Verifying the Customer Profile data and updating the information if appropriate. ! Relating CIs to the incident. ! Escalating incidents that need to be resolved based on SLM terms or perception of urgency. ! Resolving incidents or assigning for resolution. ! Coordinating and validating resolutions with customers. ! Closing incidents and determining customer satisfaction.
  • 23. Incident Management user roles ! 23 User’s Guide Support can also participate in the problem management process, as described in the BMC Remedy Service Desk: Problem Management 7.0 User’s Guide. They can also participate in the change management process, as described in the BMC Remedy Change Management 7.0 User’s Guide. Incident manager Incident managers are responsible for the quality and integrity of the incident management processes. Support group leads and managers are responsible for the work of members of their support group. They coordinate the assignment of incidents to support staff. Their responsibilities include: ! Monitoring incidents. ! Monitoring open incidents requiring assignment. ! Managing the assignment of incidents to their appropriate support groups for resolution. ! Receiving notifications of incident assignments and escalations. ! Facilitating the resolution of escalated incidents in accordance with the escalation policy. ! Ensuring the resolution of incidents within the support group's service targets. ! Ensuring the overall completeness and accuracy of closed incidents. ! Reviewing reports. ! Ensuring that incidents requiring root cause analysis are copied into Problem Management. ! Managing support group membership. ! Managing scripts, templates, and decision trees.
  • 24. 24 "Chapter 1—Introducing BMC Remedy Incident Management 7.0 BMC Remedy Service Desk: Incident Management 7.0 Process flow and the life cycle of an incident request The Process Flow Status area displays the process flow of the incident request within the Incident form. A diagram shows the five stages of an incident request, as indicated by best practices, rooted in ITIL processes. The current stage of the incident is highlighted. The status of the incident is indicated by both color and text. Figure 1-1: Example of selecting an accelerator from the Process Flow Status wizard The Process Flow Status area also serves as a wizard, guiding you through the stages of the incident life cycle. At each stage, the diagram provides accelerators applicable to the current stage. For example, you can use accelerators to move the incident to a pending state or to the next stage. When you select an accelerator, a dialog box appears, prompting you to enter the data required to complete the task. You can also enter optional recommended data in the dialog box. By using the process flow accelerators, you are following ITIL best practices. Process Flow Status area Current stage
  • 25. Process flow and the life cycle of an incident request ! 25 User’s Guide Figure 1-2: Selecting an accelerator from the Process Flow Status wizard Figure 1-3: Example of form displayed by Process Flow Status wizard
  • 26. 26 "Chapter 1—Introducing BMC Remedy Incident Management 7.0 BMC Remedy Service Desk: Incident Management 7.0 Table 1-3: The five stages of an incident request Incident stage Description Tasks Identification and recording This stage initiates the incident management process. The purpose of this stage is to accurately record and recognize disruptions to services provided by IT to its customers. For details, see “Recording a new incident” on page 108. ! Next stage ! Enter pending (or resume) ! Select template Investigation and diagnosis In this stage, you can search existing information to identify a possible solution. If the incident cannot be resolved or a root cause analysis is required, you can escalate the incident to problem management. For details, see “Investigating and diagnosing an incident” on page 132. Next stage ! Generate problem ! Generate change ! Relate CI ! Enter pending (or resume) Note: Generatechangeis available only as a task if Change Management is installed. Resolution and recovery In this stage, you resolve and recover from the service disruption to enable the customer to resume work. For details, see “Resolving an incident” on page 141. ! Next stage ! Generate problem ! Generate change ! Enter pending (or resume) Incident closure In this stage, you make sure that the incident has successfully restored the service to the customer and that the customeris satisfiedwiththeoutcome. For details, see “Closing an incident” on page 147. ! Reopen ! Close Closed In this stage the incident is closed. No further activities are performed on the incident. None
  • 27. Using functions common to all ITSM applications ! 27 Chapter 2Using functions common to all ITSM applications This section contains basic procedures that are common to most forms and consoles. Most of the information in this section is similar throughout the ITSM suite. The following topics are provided: ! Opening the main application console (page 28) ! Working with the Overview console (page 31) ! Working with records (page 38) ! Working with relationships (page 43) ! Adding work information (page 51) ! Creating reminders (page 53) ! Sending pages and email messages (page 60) ! Working with reports (page 65)
  • 28. 28 "Chapter 2—Using functions common to all ITSM applications BMC Remedy Service Desk: Incident Management 7.0 Opening the main application console You start an ITSM application by opening its main console. How you do this depends on whether you want to view the console through the BMC® Remedy® User client or through a browser. See the following instructions for information about opening the main console. Using BMC Remedy User client to open a main console This section describes how to open an application’s main console from the IT Home page, by way of BMC Remedy User. " To open the application’s main console from the BMC Remedy User tool 1 Choose Start > Programs > Action Request System > BMC Remedy User. The Login dialog box appears. Figure 2-1: Login dialog box 2 Perform the following steps: a In the User Name field, type your user name. b In the Password field, enter your password.
  • 29. Opening the main application console ! 29 User’s Guide c In the Preference Server field, specify the server name if your administrator set up a preference server for centralized user preferences. For example, if you have a report server from which you can access predefined reports, you specify it here. 3 Click OK to log in. The Home Page form opens automatically. If it does not, perform the following steps in BMC Remedy User: a Choose Tools > Options. b In the Options dialog box, click the Home Page tab. Figure 2-2: Home Page tab on the Options dialog box
  • 30. 30 "Chapter 2—Using functions common to all ITSM applications BMC Remedy Service Desk: Incident Management 7.0 c Select the check box to open the home page automatically. 4 When the IT Home page opens, click the Incident Management Console link from the navigation pane. Figure 2-3: IT Home page Using a browser to open a main console This section describes how to open the Incident Management console from a browser. " To open a main console from a browser 1 Type the following URL in to your browser’s address bar: http://<web_server>:<port>/arsys/apps/<arsystem_server>/Home Page where: <web_server> is the fully qualified name of the BMC Remedy Mid Tier system, specified in the format server_name.company.com. <port> is an optional port number, which is needed if the web server is not on the default port (port 80). <arsystem_server> is the name of your BMC Remedy AR System server. Navigation pane Incident Management Console link
  • 31. Working with the Overview console ! 31 User’s Guide For a list of supported browsers, see the compatibility matrix at: http://supportweb.remedy.com/Rem/IssuesAndSolutions/ CompatibilityMatrix/index.jsp 2 Enter your user name and password, then click Login. 3 When the IT Home page opens, click the Incident Management Console link in the navigation pane. For an illustration of the IT Home page, see Figure 2-3 on page 30. Working with the Overview console The Overview console is the primary interface for support staff. It provides quick access to the information you need and to the procedures that you perform most often. This section discusses how to use the Overview console. Figure 2-4: BMC Remedy IT Service Management Overview console
  • 32. 32 "Chapter 2—Using functions common to all ITSM applications BMC Remedy Service Desk: Incident Management 7.0 Opening the Overview console The BMC Remedy IT Service Management Overview console provides quick access to commonly performed functions. " To open the Overview console from your desktop 1 Open BMC Remedy User as described in “Using BMC Remedy User client to open a main console” on page 28. 2 On the Home Page form, under the Remedy Foundation Elements heading, click the Overview Console link. The Overview console appears. " To open the Overview console from a browser 1 Launch your browser as described in “Using a browser to open a main console” on page 30. 2 On the Home Page form, under the Remedy Foundation Elements heading, click the Overview Console link. The Overview console appears. Using the Assigned Work table The Assigned Work table lists different types of records. The types of records that you can select depend on the BMC Remedy applications that are installed. Each type of record is identified by a specific prefix: ! CHG—Identifies change requests. BMC Remedy Change Management must be installed for you to be able to create and view change requests. ! SDB—Identifies solution database entries. BMC Remedy Problem Management must be installed for you to be able to create and view solution entries. ! TAS—Identifies tasks. Tasks can be attached to incidents, problem investigations, or change requests. ! INC—Identifies incidents. BMC Remedy Incident Management must be installed for you to be able to create and view incidents.
  • 33. Working with the Overview console ! 33 User’s Guide ! PBI—Identifies problems. BMC Remedy Problem Management must be installed for you to be able to create and view problems. ! PKE—Identifies known errors. BMC Remedy Problem Management must be installed for you to be able to create and view known errors. ! PR—Identifies purchase requisitions. BMC Remedy Asset Management must be installed for you to be able to create and view purchase requisitions. You can also change the table’s contents by using the Company filter and Console View fields at the top left corner of the console: ! Company—Shows records associated with a particular company (useful in a multi-tenancy environment). ! Personal—Shows all the records that are assigned to you. ! Selected Groups—The options below this heading apply to records that are assigned to your support groups. When you select an option for selected groups, you are prompted to select from all support groups for which you are a member. ! Show All—Shows all records for the groups you select. ! Show Unassigned—Shows all the records that are unassigned to an individual, but which are assigned to the groups you select. ! All My Groups—Shows all the records that are assigned to all support groups that you belong to. If you belong to more than one support group, the records for all those groups appear. ! Show All—Shows all records. ! Show Unassigned—Shows all the records that are unassigned. In the Windows environment, if there are more records than the application can show in the table, you can see the next grouping of entries by placing the pointer in the table and right-clicking, then clicking either Next or Prev. When using a browser, use the arrow keys at the top corner of the table. You can create new records by clicking the Create button that appears below the table.
  • 34. 34 "Chapter 2—Using functions common to all ITSM applications BMC Remedy Service Desk: Incident Management 7.0 Creating records From the Overview console, you can create new records for the various ITSM applications installed on your system. The types of requests you can create from the Overview console depend on the applications you have installed. " To create records 1 From the Overview console, click Create. The Select Request Type dialog box appears. Figure 2-5: Select Request Type dialog box 2 From the Request Type list, select the type of record you want to create. Note: The available request types depend on which ITSM applications are installed on your system. 3 Click Select. The New form of the application appropriate to the type of record you are creating appears. 4 Enter all the required information to create the request. For details on creating a new incident, see “Recording a new incident” on page 108. For more information about creating other types of records, see the related application’s user guide.
  • 35. Working with the Overview console ! 35 User’s Guide Searching for records From the Overview console, you can search for records from the various ITSM applications installed on your system. The types of records you can search for depend on the applications you have installed. " To search for records 1 From the Overview console, click Search. The Select Request Type dialog box appears. 2 From the Request Type list, select the type of record for which you want to search. Note: The request types available depend on which ITSM applications are installed on your system. 3 Click Select. A search dialog box appropriate to the type of record for which you are searching appears. 4 Enter search criteria as needed to search for the record. For more information about searching for records, see “Searching for records” on page 38. Refreshing data After you create or modify a record, click Refresh to see the latest changes in the Assigned Work table. The Refresh button is located in the top right corner of the console. If you have changed the search criteria, you can return to your defaults by clicking Set to Defaults.
  • 36. 36 "Chapter 2—Using functions common to all ITSM applications BMC Remedy Service Desk: Incident Management 7.0 Viewing and creating broadcast messages Use the Broadcast feature, on the lower portion of the console, to view and create messages that can be viewed by the entire organization or by users in the support, approver, management, and administrator groups. For information about using Broadcasts, see “Broadcasting messages” on page 55. Using the navigation pane The pane on the left side of the console is the navigation pane. Changing the console view The links under Console View help you filter records that appear in the Assigned Work table. For more information about using the Console View functions, see “Using the Assigned Work table” on page 32. Using console functions The following links are under the Console Functions heading: ! Select Status Values—Lets you see only those records in a certain state, which you specify from the Select Status Values dialog box. See “Selecting status values” on page 37. ! My Profile—Lets you set your profile. See “Viewing your profile” on page 37. ! Application Preferences—Lets you set your application preferences and options. This function is also available from the Incident Management console, as described in “Setting application preferences” on page 106. Opening other applications Use the Other Applications links to open other, available ITSM applications. The links that appear under the Other Applications heading are determined by the applications that are installed on your system: ! Incident Management—Opens the Incident Management application. ! Change Management—Opens the Change Management application. ! Problem Management—Opens the Problem Management application.
  • 37. Working with the Overview console ! 37 User’s Guide ! Asset Management—Opens the Asset Management application. ! Approval—Allows you to view all requests pending approval. ! CMDB—Opens the BMC Atrium CMDB Class Manager console. ! SLM—Opens the Service Level Management application. Selecting status values You can use the Select Status Values dialog box to filter the requests that appear in the Overview console based on their status. " To select status values 1 From the navigation pane in the Overview console, choose Console Functions > Select Status Values. The Select Status Values dialog box appears. 2 Select the status values for each category from the lists, then click OK. The dialog box closes. 3 If the Assigned Work table does not refresh with the filtered records, click Refresh to reload the table’s contents. Viewing your profile You can view and modify your personal profile. When you click My Profile, the People (Search) form appears. In this form, you can: ! Update company information such as organization, business, and home address, and so on. ! View permissions. For detailed information about the People form, see the BMC Remedy IT Service Management 7.0 Configuration Guide. " To modify your profile 1 From the navigation pane, choose Console Functions > My Profile. The People form appears. 2 Update the information at the top of the form, or click the tab corresponding to the area in which you want to change the profile information.
  • 38. 38 "Chapter 2—Using functions common to all ITSM applications BMC Remedy Service Desk: Incident Management 7.0 Make your changes by selecting from the various lists that are available. 3 When you finish making the changes, click Save. Using quick actions The Overview console lets you perform certain quick actions. From the Quick Actions list, select the appropriate action, then click Execute. ! Print—Lets you select records and print their contents. See “Printing records” on page 41. ! Home Page—Opens the Home Page. Auto-filling fields As you work with the forms and dialog boxes, you might see a plus sign (+) included in a field label. You can type part of the information next to these fields and press ENTER. If an exact match is located, the application automatically completes the field. If a selection list appears, double-click the item you want to put in the field. Using auto-fill fields and lists is faster, more consistent, and more accurate than typing the information. Working with records This section discusses some of the common functions related to record handling. Searching for records Two types of searches are available from the Incident Management console. One type of search looks only through records that are in some way associated with you through your login ID or group ID (for example, records created by you, assigned to you or to your support group, and so on) and that meet your specific search criteria. You execute this type of search from the Search area near the top of the console. For a description of how to run this type of search, see “Searching your records” on page 39.
  • 39. Working with records ! 39 User’s Guide Note: To view the support groups you belong to, from the navigation pane, choose Console Functions > My Profile, then on your profile click the Support Groups tab. For more information about this function, see “Viewing your profile” on page 37. The other type of search looks through all of the records that meet your search criteria, regardless of their associations to people or groups. You run this type of search by using the Search Incident link in the navigation pane of the Incident Management console. For a description of how to run this type of search, see “Searching all records” on page 41. Searching your records The following procedure describes how to search the application for records associated with you or your group and that meet your specific search criteria. Use this type of search when you are looking for a record that you know is associated with your ID or with your group’s ID. " To search records assigned to your groups 1 From the console Search area, select your search criteria from the various selection boxes. Figure 2-6: Search Criteria area Note: The most commonly searched-upon record fields appear in the Search Criteria area of the console. More record fields are available as search criteria under the Advanced Search option, as described in “Using the Advanced Search feature” on page 40. 2 Click Search.
  • 40. 40 "Chapter 2—Using functions common to all ITSM applications BMC Remedy Service Desk: Incident Management 7.0 The Assigned Work table updates with the results of your search. 3 Scroll through the Assigned Work table to find the specific record you want. Note: If the search returns a large number of records, use the Advanced Search feature to help you narrow the results. You can also search for another record from within an open record by using the standard BMC Remedy User search function. Using the Advanced Search feature If your search returns too broad a range of records, you can perform an advanced search to narrow the results. " To use the Advanced Search feature 1 From the Incident Management console, click Advanced Search. The Advanced Qualification Builder dialog box appears. Figure 2-7: Advanced Qualification Builder dialog box 2 From the Keywords or Fields selection boxes, select the keywords or record fields on which you want to search. To insert operators (+, =, >,<, and so on), click the appropriate operator button. Do not forget to place literal values between quotation marks. For example, to search for an incident with a priority of “high,” you would construct the following search: 'Priority' = "High" 3 Click Select. The dialog box closes and you return to the main console.
  • 41. Working with records ! 41 User’s Guide 4 Click Search. The search results table updates with the results of your search. Searching all records The following procedure describes how to search all incidents. Use this type of search when you are looking for an incident that is not associated with your ID or your group’s ID, or anytime you need to search all incidents. " To search all records 1 From the navigation pane in the Incident Management console, choose General Functions > Search Incident. A form appears that allows you to perform the search. The form is laid out in a similar way to the Incident form, and contains the same tabs and fields. You can use any of the tabs and fields in the form to specify your search criteria. 2 Using the tabs and fields, build your search condition. To reduce the number of records found by the search, enter as much information into the form as you can. 3 When you finish entering your search criteria, click Search. When the search finishes, the search results table lists all of the records that match the search criteria. 4 Scroll through the table to find the specific record you want. 5 When you find the record, open it in the Incident form by double-clicking it in the search results table. Printing records You can print a copy of a record to keep for filing purposes or to share with someone who does not have access to the application. Use this procedure to print a record. " To print a record 1 From the navigation pane in the Incident Management console, choose General Functions > Search Incident.
  • 42. 42 "Chapter 2—Using functions common to all ITSM applications BMC Remedy Service Desk: Incident Management 7.0 2 Select the record you want to print. Note: If you already have the record open and want to print it, click Print at the bottom of the form to open the Business Objects Report Preview dialog box, then go to step 4. 3 At the bottom of the console, from the Quick Actions list, select Print, then click Execute. The Business Objects Report Preview dialog box appears, allowing you to view the record before you print it. 4 Click the Print icon on the menu bar at the top of the dialog box. When the print confirmation dialog box appears, click the Print icon to send the record to your local printer. 5 Close the Business Objects dialog box. Modifying records After you generate a record, you can modify or update the information it contains. Use the following procedure to modify a record. " To modify a record 1 From the Incident Management console, open the record that you want to modify. 2 Click the tab that contains the information you want to update. 3 Make the appropriate changes. 4 Click Save.
  • 43. Working with relationships ! 43 User’s Guide Working with relationships By defining and maintaining relationships among records, you can create a more sophisticated overview of the connections and interdependencies among the current record and other service issues being tracked by the application. An incident can be related to any of the following record types: ! Configuration item ! Another incident ! Solution database entry ! Known error ! Problem investigation If you have Asset Management and Change Management, an incident can also be related to the following record types: ! CI unavailability ! Infrastructure change Defining relationships Use the following procedure to define a relationship. " To define a relationship 1 From the Incident Management console, open the incident from which you want to define a relationship. 2 Click the Relationships tab. Figure 2-8: Relationships tab
  • 44. 44 "Chapter 2—Using functions common to all ITSM applications BMC Remedy Service Desk: Incident Management 7.0 3 From the Request Type list at the bottom of the Relationships tab, select the type of record to which you want to relate the current record. For example, to relate your incident to a configuration item, select Problem Investigation from the Request Type list. 4 Click Search. A dialog box appears that allows you to perform a search. Figure 2-9: Example of Completed Relationship Search Note: The content of the dialog box depends on the type of record you chose in the Request Type list. 5 Complete the search criteria tabs with the relevant information, then click Search. Try to supply as much information as possible in the search dialog box to reduce the overall number of records returned by the search. The matching results appear in a search results table. 6 From the search results table, select the configuration item with which you want to create the relationship.
  • 45. Working with relationships ! 45 User’s Guide 7 From the Relationship Type list at the bottom of the search dialog box, select the type of relationship you want to create. 8 Click Relate. An information message dialog box appears, displaying a confirmation message. 9 Click OK to dismiss the dialog box. 10 Click Close to close the search dialog box. The Relationships tab appears with the newly created relationship visible in the Relationships table. If there are events for the related item, the Current Events dialog box appears. This dialog box shows all current broadcasts that have been generated and related to the associated item. Broadcasts can be generated from other ITSM application modules, too. 11 In the Current Events dialog box, select one of the following options: ! Relate the current record to the originating record. ! Link a record. ! Relate the current record to the selected unavailability record. The lower table lists any current Unavailability recorded in an incident. To relate the current record to the origination record a Select the broadcast from the list. b Click Originating Record. To see additional details about the originating record, click Details. To link a record a Click Linked Incident. To relate the current record to the selected unavailability record a Click Relate. b To see additional details about the unavailability, click View CI Unavailability. c To see information about the record that generated the unavailability, click Details.
  • 46. 46 "Chapter 2—Using functions common to all ITSM applications BMC Remedy Service Desk: Incident Management 7.0 An administrator can disable Current Events functionality in the Configure Incident Rules form. See the BMC Remedy IT Service Management 7.0 Configuration Guide for information about how to do this. Copying relationships When you define a relationship between the current record and another record, the other record might also have one or more records related to it. Using the Copy Related Relationships form, which you open from the Relationships tab, you can look at the related record’s other relationships. If you determine that any of these other relationships should be related to the current record, you can define the relationship from this form. By doing this, you can more thoroughly document all of the record relationships. Note: You cannot use this procedure to copy related CIs. " To copy relationships 1 From the Incident Management console, open an incident. 2 Click the Relationships tab. 3 From the Relationships table, select a record related to the current incident. 4 From the Quick Actions list, select Get Related Relationships, then click Execute. The Copy Related Relationships dialog box appears. This dialog box contains a table of all other records related to the record you selected in step 3. 5 From the table of related records, select the other record that you want to relate to the current record. Note: To see the details of the other record, select it, then click View. A form appears with detailed information about the selected record. Use this feature to help you determine whether you want to relate the other record to the current record. 6 Click inside the Relationship Type field. A list of relationship types appears.
  • 47. Working with relationships ! 47 User’s Guide Note: The contents of the Relationship Type list depends on the type of record you are trying to create the relationship with. 7 Select the type of relationship you want to create, then click Select. A note appears confirming the relationship creation. Click OK to dismiss the note. 8 Close the Copy Related Relationships form. The newly created relationship appears in the Relationships table. Indicating impacted areas The Impacted Areas dialog box gives you a place to show the region, site, location, and so on, that are affected by the content of the record. Use the following procedure to indicate the impacted areas. " To indicate an impacted area 1 From the Incident Management console, open the incident for which you want to indicate an impacted area. 2 In the navigation pane, choose Advanced Functions > Impacted Areas. The Impacted Areas dialog box appears. Figure 2-10: Impacted Areas dialog box
  • 48. 48 "Chapter 2—Using functions common to all ITSM applications BMC Remedy Service Desk: Incident Management 7.0 3 Select items from the various lists that help to describe the impacted area appropriate for the incident you are working on, for example, Company, Region, and so on. Note: Required fields are marked with an asterisk. 4 Click Add. You can add as many impacted areas as necessary. You can also delete areas that you have previously chosen in this dialog box. 5 When you are finished indicating the impacted areas, click Close. Modifying relationships After you define a relationship, you change the relationship type and update the relationship description. Use the following procedure to modify the relationship. " To modify a relationship 1 From the Incident Management console, open the incident that has the relationship you want to modify. 2 Click the Relationships tab. 3 From the Relationships table, select the relationship you want to modify. 4 From the Quick Actions list, select Modify Relationship Type, then click Execute. The Modify Relationship dialog box appears.
  • 49. Working with relationships ! 49 User’s Guide Figure 2-11: Modify Relationship dialog box 5 Enter the new relationship details according to the on-screen instructions. 6 Click Save to save your changes. Performing quick actions on a relationship You can perform many other actions on a relationship. For a list of these actions, see Table 2-1 and Table 2-2. " To perform a quick action 1 From the Incident Management console, open an incident. 2 Click the Relationships tab. 3 From the Relationships table, select the relationship entry for which you want to perform the action. 4 From the Quick Actions list, select the action you want to perform, such as Get Impacted Areas.
  • 50. 50 "Chapter 2—Using functions common to all ITSM applications BMC Remedy Service Desk: Incident Management 7.0 The following table lists available quick actions for any related item. Additional quick actions are available when you select a related configuration item, as indicated in the following table. 5 Click Execute. Table 2-1: Effects of general relationship actions Relationship action Effect Get Related Relationships Copies the relationships of the selected record to the current incident’s relationships. Modify Relationship Type Prompts you to modify the relationship type, as described in “Modifying relationships” on page 48. Table 2-2: Effects of relationship actions for related CIs Relationship action Effect CI Relationship Viewer Opens a graphical relationship viewer that shows a selected CI’s relationship with other records. Create New CI Unavailability If Asset Management is installed, you can create CI unavailability for the selected CI. Get CI Impact/Urgency Copies the impact and urgency of the selected CI. Get CI Product Categorization Copies the product categorization from the selected CI to the classification of the current incident. Get CI Resolution Product Cat. Copies the product categorization from the selected CI to the resolution of the current incident. Get Impacted Areas If Asset Management is installed, prompts you to select impacted areas, as defined in the selected CI, into the current incident’s impacted areas.
  • 51. Adding work information ! 51 User’s Guide Removing relationships Use the following procedure to remove a relationship. " To remove a relationship 1 From the Incident Management console, open the incident that contains the relationship you want to remove. 2 Click the Relationships tab. 3 In the Relationships table, select the relationship you want to remove. 4 Click Remove. Click Yes when the application prompts you to confirm the removal. The application refreshes the Relationships tab. Adding work information Work Info is a new feature that replaces the Notes and Notes log fields from ITSM 6.0. You access this feature from the Work Info tab of the current record. Use this feature to add work information regarding activities performed on the current record. For example, you might want to add work information about the following activities: ! General Information—Notes about the record; for example, you might want to add a note that a particular CI was deployed, and include the date. ! Vendor communication—Notes about communication with a vendor, such as a bulletin received from a vendor. These are just some of the options available from the Work Info Type list on the Work Info tab. " To add work information 1 From the Incident Management console, open the incident that you want to add the work information to. 2 Click the Work Info tab.
  • 52. 52 "Chapter 2—Using functions common to all ITSM applications BMC Remedy Service Desk: Incident Management 7.0 Figure 2-12: Work Info tab 3 From the Work Info Type list, select the type of work information you want to add. 4 From the Source list, select the source of this information. Information sources can include, for example, email, phone, or the Web. 5 Enter the details of your work information record in the Summary and Details fields. 6 To add an attachment to the record, right-click in the attachment table and select Add from the menu that appears. 7 From the Locked list, select Yes or No to lock the log. Important: If you select Yes, you cannot modify the work log after you save it. 8 From the View Access list, select Internal or Public. ! Internal—If you want users within your organization to see the entry. ! Public—If you want everyone with access to the application to see the entry, including requesters from the Requester console. 9 Click Save. 10 To see a report of selected work information entries, select one or more entries, and click Report.
  • 53. Creating reminders ! 53 User’s Guide Creating reminders Use reminders to create notes for yourself and others. You can send the reminders by email or by BMC Remedy Alert, and can specify when they will be sent. You can create generic reminders, or you can create reminders that are associated with a specific request. For example, you can send yourself a note about a specific incident to remind yourself to follow up on it. You can create and view reminders from either the Incident Management console or from within a specific incident. The location from which you create or view a reminder determines which reminders you see: ! Incident Management console—You can view all reminders that you created. ! Incident form—You can view all reminders associated with that incident. This includes reminders created by other users of Incident Management. " To create a reminder 1 To open the Reminders dialog box, perform either of the following steps: ! From the navigation pane in the Incident Management console, choose General Functions > Reminders. ! From the navigation pane in the Incident form, choose Functions > Reminders. Note: If you create a reminder from the application’s main console, the reminder is general in nature. If you open a record and create a reminder, the reminder is specific to the open record. 2 Click the Create Reminder tab.
  • 54. 54 "Chapter 2—Using functions common to all ITSM applications BMC Remedy Service Desk: Incident Management 7.0 Figure 2-13: Completed Create Reminder tab Note: If you are creating the reminder from the main console, skip the next step. 3 To remove the link between the reminder you are creating and the open record, select, then delete the contents of the Link to Request-ID field. The Request-ID and Form fields are populated automatically by the application. The Request-ID field links the reminder to the open record. 4 From the Notify list, select either Individual or Group, depending on whether you are sending the reminder to a single person, or a support group. 5 In the Recipient field, type the name of the person or group to whom you want to send the reminder. If you type a person’s name and press ENTER, the application automatically populates the AR Login field. If the application discovers multiple matches with the name you entered, another dialog box appears that allows you to specify which of the matching names you want to receive the reminder. 6 In the Time field, enter the date and time you want the application to send the reminder. You can type the information directly into the field, or you can click the button next to the field and select the date and time from the calendar that appears. By default, the Time field contains the current date and time. 7 In the Subject field, enter information about the reminder. If you need more space to type the entry, click the Browse button next to the field. A larger text entry box appears.
  • 55. Creating reminders ! 55 User’s Guide The information in this field appears in the subject line if the reminder is sent by email. 8 In the Message field, type the reminder message text. If you need more space to type the entry, click the ellipsis button next to the field. A larger text entry box appears. 9 Click Save. A confirmation message appears. 10 Click Close to close the Reminders dialog box. The reminder is sent at the time you specified. Broadcasting messages This feature lets you send messages to your entire organization, selected groups within the organization, and to external customers as well. You can use this feature to send messages about work in progress, system status, planned work, and so on. You can also use this feature to view messages that were broadcast to you from other groups in your organization. Creating broadcast messages This section describes how to create a broadcast message using the New/Modify dialog box. To create a broadcast, you must have the functional role of Broadcast Submitter. See the BMC Remedy IT Service Management 7.0 Configuration Guide for details. " To create a broadcast message 1 You can open the New/Modify Broadcast dialog box from two locations, as follows: ! From the Incident Management console, click Create, which appears below the Broadcast table. If you create a broadcast from the main console, it is not related to a specific record. ! From the current record, in the navigation pane, choose Functions > Broadcast Incident. If you create a broadcast from an incident, a relationship is created between the broadcast and the incident.
  • 56. 56 "Chapter 2—Using functions common to all ITSM applications BMC Remedy Service Desk: Incident Management 7.0 Figure 2-14: Completed New/Modify Broadcasts form 2 Enter information in the required fields. Required fields appear in bold on the Broadcast Details tab. ! Company—Select the company to which this broadcast pertains. Only users with access to this company will see the broadcast. If you select Global from the Company list, the broadcast is sent to everyone. The Company field is mandatory. If you complete the other location fields, however, you can indicate a very specific part of the company. For example, you can specify the site, organization, or department. ! Subject—A short description of what the broadcast is about. ! Broadcast Message—The text of your message. ! Broadcast Type—Select a broadcast type from the list. ! Broadcast Start Date and Broadcast End Date—To start the broadcast now, click in the Broadcast Start Date field, and press ENTER. To select a date from the calendar, click the Browse button next to the field, then use the calendar that appears to select the date on which the broadcast is to start and the date on which you want it to end. You can also specify times of the day using the Time feature at the bottom of the calendar.
  • 57. Creating reminders ! 57 User’s Guide ! Broadcast Originated From—This field is completed by the system. The contents depend on where you are creating the broadcast. If you broadcast from an incident, this is set to Incident. ! Broadcast Originated From ID—This field is populated by the system, but only when you create a broadcast from within a record. If you create a broadcast from the main console, the field appears disabled. ! View Access—Select Internal if you want the broadcast visible only to members of your organization. Select Public if you also want the broadcast visible from the Requester console. ! Notify—Select Yes if you want a broadcast notification automatically sent to an individual or group. If you select Yes, an Email button and the Notify Support area appears. ! Use the Manual Email button to manually send an email about the broadcast to a person or group. When the Email System form appears, enter the recipient’s email address in the Internet Email field, then click Send Email Now. ! Use the Notify Support area to indicate the group you want to notify of the broadcast. You must complete all three fields, Support Company, Support Organization, and Support Group. The notification is sent at the time and on the date specified in the Broadcast Start Date field. ! Priority—Select a priority level for the broadcast. The choices are Low, Medium, and High. 3 To add an attachment to the broadcast message, right-click inside the table and choose Add from the menu that appears. The Add Attachment dialog box appears. Use this to indicate the file you want to attach. Click Open to attach the indicated file. You are limited to one attachment for each broadcast. 4 If you want members of another group to be able to modify the message, perform the following steps: a Click the Authoring Groups tab. b Click Manage Authoring Groups. The Authoring Group dialog box appears. c Indicate the group that you want to have authoring rights by selecting from the menus. Click Add when you are finished.
  • 58. 58 "Chapter 2—Using functions common to all ITSM applications BMC Remedy Service Desk: Incident Management 7.0 Note: The support group you belong to appears in the table by default. You can indicate another group, or click Close to dismiss the dialog box. 5 Click Save to save the broadcast message and close the dialog box. Viewing broadcasts This section describes how to view broadcast messages. While viewing broadcasts, you can modify the message (if you belong to an authorized authoring group), create a new broadcast message, and under some circumstances (when viewing the message from the current record) relate the broadcast message to the current record. When viewing a broadcast from either the Incident Management console or the Incident form, you can create a new incident from the broadcast. If the broadcast was created from a problem investigation, CI (configuration item), CI unavailability, or another incident, the application asks whether you want to relate the new incident to the originating record. " To view broadcasts 1 You can view broadcast messages from two locations, as follows: ! From the Incident Management console, select the message you want to view from the Broadcast table, then click View. ! From the current record, in the navigation pane, choose Quick Links > View Broadcasts. The View Broadcasts dialog box appears. Select the message you want to view from the broadcast messages table; the Broadcast Details tab displays the details of the selected broadcast. Note: When viewing broadcast messages from the current record, you are looking at all of the broadcast messages, not just the ones related to the current record. If the list contains a large number of messages, use the Broadcast Search Criteria tab to limit the number of messages. For information about how to do this, see “Limiting the number of messages” on page 59. 2 To view another message, perform either of the following steps:
  • 59. Creating reminders ! 59 User’s Guide ! When viewing from the main console, close the View Broadcasts dialog box, select the broadcast message you want to view from the table, then click View. ! When viewing from the current record, in the broadcast messages table, click the message you want to view. The message details appear. Creating or modifying a broadcast message To create or modify a broadcast message from the View Broadcasts dialog box, click either Create or Modify. Both actions open the New/Modify Broadcast dialog box. ! If you are creating a new message, follow the instructions provided in “Creating broadcast messages” on page 55. ! If you are modifying the message, edit the fields according to the changes you want to make. Click Save when you finish making your changes. Limiting the number of messages When viewing broadcast messages from the current record, you can limit the number of messages that appear in the Broadcast table by opening the Broadcast Search Criteria tab and defining a set of criteria that filters out messages that do not match. " To limit the number of messages 1 From the Incident Management console, open an incident. 2 Click the Broadcast Search Criteria tab. This tab contains search fields where you can specify criteria to reduce the number of broadcast messages displayed in the table. 3 Complete the fields in the tab. To return the smallest number of broadcast messages, complete as many of the fields as possible. 4 When you finish specifying the search criteria, click Search.
  • 60. 60 "Chapter 2—Using functions common to all ITSM applications BMC Remedy Service Desk: Incident Management 7.0 Sending pages and email messages Incident Management gives you two methods of sending messages to either individuals or organizations: ! Pages ! Email This section describes how to send both types of messages manually. Note: Notification messages to individuals, based on incident assignments and other events, can be sent by the application as pages or emails. For information about configuring notification to be sent as pager or email messages, see the BMC Remedy IT Service Management 7.0 Configuration Guide. Paging a person or on-call group You can page individuals or the on-call member of a group about the current record using the Incident Management Paging System feature. " To page a person or an on-call group 1 From the Incident Management console, open the incident from which you want to send the page. 2 In the navigation pane, choose Functions > Paging System. The Paging System dialog box appears.
  • 61. Sending pages and email messages ! 61 User’s Guide Figure 2-15: Paging System dialog box 3 Select either: ! Page By Person—To page an individual. ! Page By On-Call Group—To page the on-call member of a specified group. 4 Select the recipient. To do this, complete the fields in the Search Criteria area, then click Search. When the search finishes, click the recipient’s name in the search results table, then click Select. If you are sending a page to a person (instead of an on-call group) and need help determining the correct person, you can see more information about an individual by selecting his or her name from the list, then clicking View. This opens the People form, which contains detailed information about the recipient. 5 Complete the fields in the Paging Information area, as follows, then click Send Page Now.
  • 62. 62 "Chapter 2—Using functions common to all ITSM applications BMC Remedy Service Desk: Incident Management 7.0 ! Pager Service Provider—Select the recipient’s pager service provider from the list. If you are sending a page to a person, you can find this information by selecting the person’s name from the search results list, then clicking View (as described in step 4). When the People form appears, click the Notifications tab and look for the Pager Service Provider field. Note: To learn more about the service provider, click the button with the globe icon beside the field to open a link that takes you to the service provider’s website. This link is configured by your administrator, as described in the BMC Remedy IT Service Management 7.0 Configuration Guide. ! Pager Type—The application populates this field automatically, using information about the recipient already in the application. ! Pager Number—The application auto-populates this field with the pager’s telephone number, when possible. If the pager number is unavailable to the application, you must enter the pager number manually. See Manual Pager Number. ! Pager Email—If the pager has an email address, type it here. If you are sending the page to a person, this information is available on the Notifications tab, as described previously. ! Manual Pager Number—If the pager’s telephone number is not available automatically from the paging system, type the pager’s telephone number here. ! Alphanumeric Pager Message or Numeric Pager Message—Type your message in this field. Be aware that only one of these fields is enabled, depending on the type of pager the recipient carries.
  • 63. Sending pages and email messages ! 63 User’s Guide Sending email You can send messages about the current record using the Incident Management Email System. You can use this function to send email to any valid email address. This might include an SMS recipient or wireless PDA user, if you can send email to the device. " To send an email message 1 From the Incident Management console, open the incident from which you want to send an email message. 2 In the navigation pane, choose Functions > Email System. The Email System dialog box appears. Figure 2-16: Completed Email System dialog box
  • 64. 64 "Chapter 2—Using functions common to all ITSM applications BMC Remedy Service Desk: Incident Management 7.0 3 Indicate the recipient by selecting one of the following options: ! Current Contact—When you open the Email System form, if there is a current contact assigned to the record, the contact’s name with contact information appears in the table and is the default recipient. ! Current Assignee—To select the current assignee, click Select Current Assignee. The current assignee’s name with contact information appears in the table. 4 To select another recipient, perform the following steps: a Complete the fields in the People Search Criteria area. b Click Search. c When the search finishes, select the recipient’s name in the search results table. If you need help determining the correct name in the list, you can see more information about an individual by selecting their name from the list, then clicking View. This opens the People form, which contains detailed information about the recipient. 5 Complete the email information fields. See the list that follows for a description of the fields. ! Internet Email—This displays the recipient’s email address. When you select the email recipient, as described in steps 3 and 4, the internet email address updates from the people record. ! Email Subject Line—By default, the subject line contains the incident ID number, to which you can append text or over-type. ! Email Message Body—You type the message text here. A series of buttons, to the right of the Email Message Body field, lets you automatically insert text from the record into the message text; these buttons let you insert the following values: ! Status ! Summary ! Details ! Resolution
  • 65. Working with reports ! 65 User’s Guide Note: If one or more of these buttons appear disabled, it means the corresponding field in the record contains no information. ! Email Attachment—You can attach a file to the email message (you are limited to just one attachment). To do this, right-click inside the Email Attachment table, then click Add. The Add Attachment dialog box appears. Navigate to, and then select, the file you want to attach. Click Open. Details of the attached file appear in the table. 6 Click Send Email Now. Working with reports Incident Management provides a variety of predefined reports to give you quick and easy access to information the application. You use the Report console to generate these reports. If the predefined reports return more information than you need, you can manage the scope of the report using qualifications. For information about using qualifications, see “Using qualifications to generate a report” on page 67. Important: If you use Crystal Reports software to modify the prepared reports supplied with Incident Management, Customer Support can provide only limited assistance if you have a reporting problem. In addition, there is no guarantee that problems resulting from these modifications can be solved. The standard reports included with Incident Management are designed to be used without modification. Generating a report Use this procedure to generate a standard report without using qualifications (for information about generating reports with qualifications, see “Using qualifications to generate a report” on page 67). " To generate a report 1 From the navigation pane in the Incident Management console, choose General Functions > Reports. The Report console appears.
  • 66. 66 "Chapter 2—Using functions common to all ITSM applications BMC Remedy Service Desk: Incident Management 7.0 Figure 2-17: Report console 2 From the Report Name list, select the report you want to generate. 3 If you select a report that requires a date range, the date range field appears. Select a start date and end date for the report. Report Description Incidents by Activity Time This report lists all open incidents and the amount of time since the reported date. Open Incident Volume by Assignee This bar chart displays the number of open incidents for each assignee. Resolved and Closed Incident Volume by Assignee This bar chart displays the number of resolved and closed incidents for each assignee. Group Assignment to Incidents This report lists incidents and their assigned support groups for a specified date range. Change Induced Incidents This report lists incidents that were caused by changes. Note: This report is available only if Change Management is installed.
  • 67. Working with reports ! 67 User’s Guide 4 From the Destination list, select one of the following output destinations: ! Screen—Your report appears in a separate dialog box. ! Printer—The report is sent to the printer you specified in the Print Setup dialog box. ! File—The report is saved to the path and file you specify. 5 Click Run Report. Using qualifications to generate a report You can manage the scope of a report by adding qualifications to the criteria used by the report engine to generate the report content. You can tell the report to search only certain specified fields for particular values, or build advanced qualifications using field names, keywords, and operators. By saving the qualifications, you can rerun the qualified report without having to re-specify the qualifications. The following procedure describes how to create basic report qualifications from the Define Report Qualification area of the Report console. To create a report using advanced qualifications, see “Using advanced qualifications to generate a report” on page 69. " To use qualifications to generate a report 1 From the navigation pane in the Incident Management console, choose General Functions > Reports. The Report console appears.
  • 68. 68 "Chapter 2—Using functions common to all ITSM applications BMC Remedy Service Desk: Incident Management 7.0 Figure 2-18: Report console 2 From the Report Name list, select the name of the report you want to generate. 3 In the Define Report Qualification area, create your qualifications from the lists. For example, to create the qualification “Cost Center = 001” select “Cost Center” from the list in the left column, select “=” from the operand list (middle column), then type “001” in the right column. You can use all five rows in the area to define qualifications. 4 To save the qualification, click Save Qualification. You are prompted to name the qualification. Note: By saving the qualification, you can rerun this report without defining the qualification again. See “Generating a report using saved qualifications” on page 70. 5 In the Qualification Name field, enter a name for your qualification, and click OK. A message appears stating that your qualification is saved. 6 Click OK.
  • 69. Working with reports ! 69 User’s Guide The Report console reappears. 7 From the Destination list, select one of the following output destinations: ! Screen—Your report appears in a separate dialog box. ! Printer—The report is sent to the printer you specified in the Print Setup dialog box. ! File—The report is saved to the path and file you specify. 8 Click Run Report. Using advanced qualifications to generate a report The following procedure describes how to generate a report using advanced qualifications. " To generate a report using advanced qualifications 1 From the navigation pane in the Incident Management console, choose General Functions > Reports. The Report console appears. 2 From the Report Name list, select the name of the report you want to generate. 3 Click Advanced Qualification. The Advanced Qualification Builder dialog box appears. Figure 2-19: Advanced Qualification Builder dialog box 4 Using the buttons in the qualification builder, construct your qualification. 5 Click Save. The Report console reappears.
  • 70. 70 "Chapter 2—Using functions common to all ITSM applications BMC Remedy Service Desk: Incident Management 7.0 Note: By saving the qualification, you can rerun this report without defining the qualification again. See “Generating a report using saved qualifications” on page 70. 6 From the Destination list, select one of the following output destinations: ! Screen—Your report appears in a separate dialog box. ! Printer—The report is sent to the printer you specified in the Print Setup dialog box. ! File—The report is saved to the path and file you specify. 7 Click Run Report. Generating a report using saved qualifications You can generate a report using qualifications that you created and saved previously. " To generate a report using a saved qualification 1 From the navigation pane in the Incident Management console, choose General Functions > Reports. The Report console appears. 2 Click Select Saved Qualification. The Saved Qualifications dialog box appears. Figure 2-20: Saved Qualifications dialog box 3 Select the qualification from the table, and click Return Selected. The Report console reappears.
  • 71. Working with reports ! 71 User’s Guide 4 From the Destination list, select one of the following output destinations: ! Screen—Your report appears in a separate dialog box. ! Printer—The report is sent to the printer you specified in the Print Setup dialog box. ! File—The report is saved to the path and file you specify. 5 Click Run Report.
  • 72. 72 "Chapter 2—Using functions common to all ITSM applications BMC Remedy Service Desk: Incident Management 7.0
  • 73. Working with the Requester console ! 73 Chapter 3Working with the Requester console The Requester console serves as the front end for the BMC Remedy Change Management and BMC Remedy Incident Management applications. It provides an easy, user-friendly interface that allows users to quickly submit requests for change or incidents to IT through the two back-end applications. The following topics are provided: ! Requester role (page 74) ! Service Request Management users (page 74) ! Understanding the Requester console (page 76) ! Working with service requests (page 80) ! Working with service requests as the Request Master (page 91) ! Service Request form (page 98) ! Working with the Solution database (page 101) ! Viewing broadcast messages (page 102)
  • 74. 74 "Chapter 3—Working with the Requester console BMC Remedy Service Desk: Incident Management 7.0 Requester role Requesters are usually employees who need assistance from the IT support staff. The requester is typically an employee in the organization who must have a change implemented or an incident resolved. Any member of your organization can be a requester. However, the user might not be an employee. Non-employees can also be requesters, since non-registered users can also submit a service request. Traditionally, after a requester made a telephone call to a central help desk, a support staff member logged the request. The BMC Remedy Incident Management and BMC Remedy Change Management applications provide user self-provisioning. Using the Requester console, requesters can submit, track, and (in some cases) resolve their own requests, and, as a result, improve the overall efficiency. Out of the box, the Change Management and Incident Management applications are preconfigured to work with the Requester console. However, the Requester console is not enabled if your organization turns off this option. The Requester console is the primary interface from where requesters can create and view their requests. From the Requester console, you can create a request and submit it to the back-end application, view previously created requests, and respond to a survey form after the request has been resolved. Service Request Management users There are currently three types of user permissions for accessing the Requester console to submit service requests: ! Request Master—This user is responsible for troubleshooting service requests. The request master can view all the requests submitted by other users and open the Service Request form directly to view the details of a record. This user is more of an administrator, than a support user. ! Registered User—This user has a record in the People form, and the user’s AR login information is in the Login/Access Details tab of the People form or in the AR System User form. ! Unknown User—All other users are considered to be unknown users even if the user has a record in the People form. If a user’s login information does not exist in the People record, then the user is considered a unknown user.