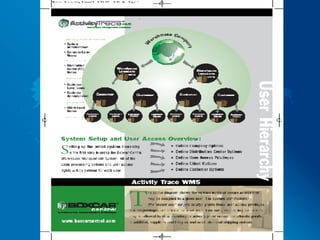
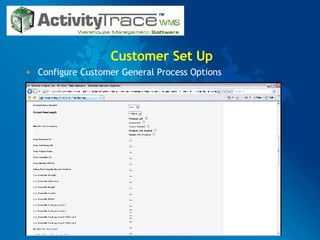
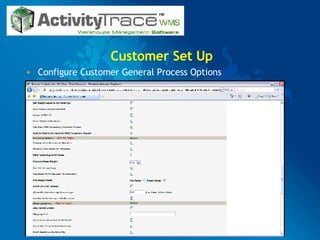
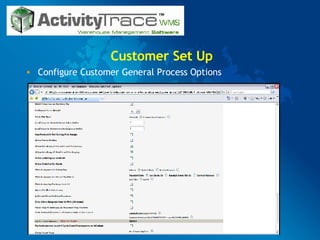
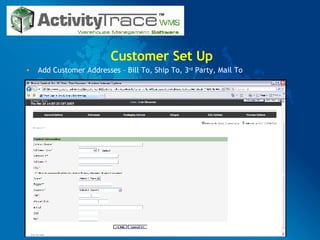
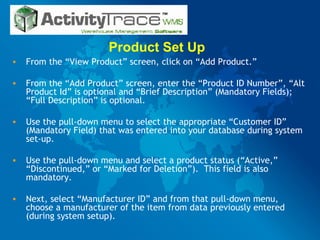
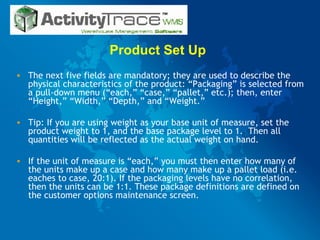
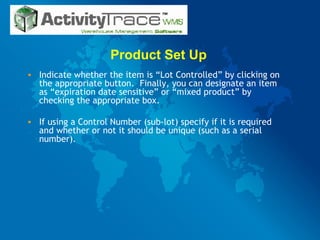
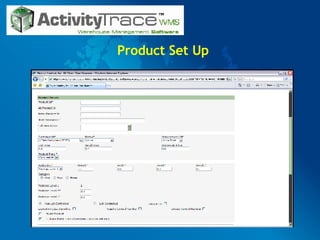
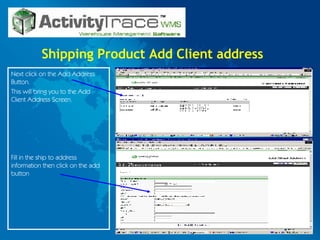
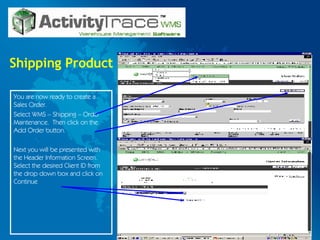
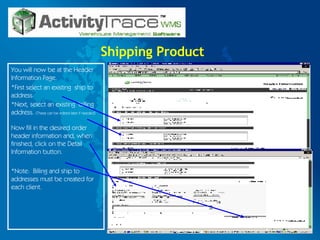
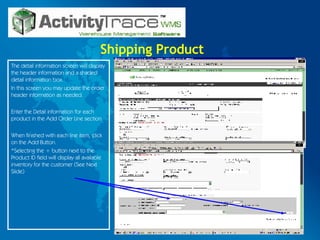
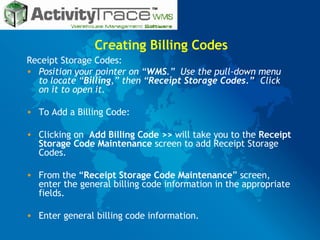
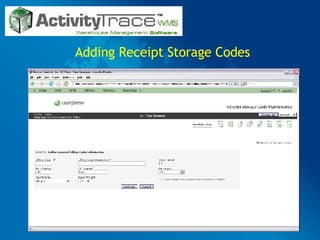
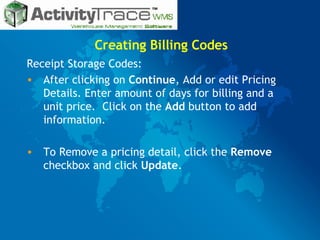
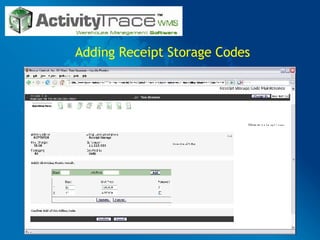
The document is a 3-day training agenda for implementing a warehouse management system called Boxcar Central. Day 1 covers an overview of the system, setting up distribution centers and customers. Day 2 reviews purchase orders and sales orders, and day 3 covers billing, reporting and other modules.
50. Receiving Product - Creating a PO In order to receive a product, a PO must be created. To create a PO, select WMS – Receiving – PO Maintenance. Then click on the Add PO button. Next you will be presented with the PO Header Information Screen. Select and fill in the desired fields (fields annotated with an * denote required fields), then click on the Detail Information Button
51. Receiving Product You will now be at the Detail Information Page. Enter the Detail information for each product on the incoming PO in the Add Purchase Order Line section. When finished with each line item, click on the Add Button.
52. Receiving Product When finished entering in the detail information for the PO click on the PO Review button in the lower right hand corner of the screen. You will now be in the PO Review Screen. Click on cancel to edit the detail information or Confirm PO if the detail information is correct.
53. Receiving Product When the PO is confirmed, the system will direct you to the View Purchase Orders Screen and display the newly created PO information. Next click on the Receive button to receive the PO
54. Receiving Product Enter the quantity and other applicable detail information for each line item received in the PO. Once completed, select the Confirm Button
55. Receiving Product Next, review the receipt information, and if correct check the Confirm Line boxes for each line item. Then…… Click on the Confirm Button
56. Receiving Product Selecting the confirmation button directs you to the Receive Order Confirmation Screen, and the next step which is to put away the received product. Select the Confirm Put button.
57. Receiving Product Put Away You are now ready to put away the received items. Upon selecting the Confirm Put button, the system will direct you to the Putaway Detail Screen. The detail information on this screen displays the assigned put away Bin Id, quantity and user. Each of these fields can be overridden or edited. The drop down box on the user ID field allows for the assignment of different users for each put line item if desired.
58.
59. Receiving Product In this case we selected Bin Id “abc” as an available bin and entered abc into the Bin Id window. We confirmed the put away by clicking on the “process” button in the lower left hand corner of the screen. This directed us to the next screen in the Putaway Detail process. Here put away information is reviewed and if needed, the “undo” button selected for any/all line items that require editing. If no further editing is required, the receipt process is complete. Click on the PO Id Number…..
60. Receiving Product … You will be directed back to the PO Screen. The final step in the receiving process is to close the PO…Do this by changing the status from In-Progress to Closed and selecting the Update Header Information Button.
65. Shipping Product Client Set Up Before shipping products, clients must be set up in the system. To set up a Client click on Setup and Client. Then click on the Add Client Tab. You will now be in the Add Client Screen. Enter the client information and click on the Add button to add the client into the system.
66. Shipping Product Add Client address After the Client is set up, addresses for the Client must be added. To add a Client address go back into the Client set up screen and click on the appropriate Client name. Next click on the view address button
67. Shipping Product Add Client address Next click on the Add Address Button. This will bring you to the Add Client Address Screen. Fill in the ship to address information then click on the add button
68. Shipping Product You are now ready to create a Sales Order. Select WMS – Shipping – Order Maintenance. Then click on the Add Order button. Next you will be presented with the Header Information Screen. Select the desired Client ID from the drop down box and click on Continue
69. Shipping Product You will now be at the Header Information Page. *First select an existing ship to address *Next, select an existing billing address. (These can be edited later if needed) Now fill in the desired order header information and, when finished, click on the Detail Information button. *Note: Billing and ship to addresses must be created for each client.
70. Shipping Product The detail information screen will display the header information and a shaded detail information box. In this screen you may update the order header information as needed. Enter the Detail information for each product in the Add Order Line section. When finished with each line item, click on the Add Button. *Selecting the + button next to the Product ID field will display all available inventory for the customer (See Next Slide)
71. Shipping Product Here the + button was selected and all available inventory for the customer is displayed. Select the appropriate UM, Quantity and add optional shipper information. Then click on the Add and Return to Order Button If + is not selected, Enter in the product ID, quantity and all other applicable product information and click on the Add button.
72. Shipping Product When finished adding line items to the order, verify the order line detail information is correct, update and edit as needed by overwriting any “window” information and clicking on the Update Order Lines button. When the finished adding and editing/updating order lines click on the Release Order button to release the order for picking.
73. Shipping Product Once the order is released, you will be directed to the View Orders screen, and are now ready to view and confirm the assigned Pick Select the Confirm Pick button
74. Shipping Product You are now ready to pick the ordered items. Upon selecting the Confirm pick button, the system will direct you to the Picking Detail Screen. The detail information on this screen displays the assigned pick Bin Id, quantity and assigned user. Each of these fields can be overridden or edited. The drop down box on the user ID field allows for the assignment of different users for each pick line item if desired.
75. Shipping Product Once the line items have been picked, the Pick assignments must be confirmed. To do this, check the confirm box for each line item – or – check the header confirm box at the top of the detail section to select all pick assignments. * When a “manual” bin location is assigned as the pick bin, this indicates that no other locations are available for that particular product ID. To process the pick, an available bin must be overwritten into the Bin Id window.
76. Shipping Product Next confirm the picks by clicking on the “process” button in the lower left hand corner of the screen. The next screen is the Pickng Detail Screen. Here pick information is reviewed and if needed, the “undo” box selected for any/all line items that require editing. If no further editing is required, the pick process is complete and no further action is required.
77. Shipping Product Once the order and picking processes are complete, you are ready to ship and close out the Sales Order. -OR- add a BOL and ship the order. TO SHIP AND CLOSE: First Click on the Order Id. Then in the Order Header, select “shipped” from the drop-down box under the Order Status heading. Finally click on the update button to update and finalize the order status to “Shipped”.
94. Cancels billing information Cancel Saves billing information Save A billing code, to count locations and bill according to number of locations Location Location A billing code to count SKUs and bill according to the number of SKUs in the warehouse SKU SKU ▼ Drop down menu to select Packaging Base Weight Units Base Weight The way the billing code is traced. ▼ Drop down menu Counted By Choose a packaging level by which to bill. Packaging Standard Anniversary Code General ledger number. GL Number The minimum charge for this code during a billing cycle. Minimum Charge The price per billing type occurrence. Unit Price Brief description that will be printed on the invoice. Billing Code Description* Unique identifier that represents the billing code. Billing Code ID* ▼ Drop down menu to select DC if there are more than one Change DC Anniversary Code Maintenance
99. Cancels billing code information Cancel Saves billing code information Save Adds a custom code used during this billing cycle. Miscellaneous Miscellaneous Code ▼ Drop down menu to select Packaging Base Weight Units Base Weight The way the billing code is traced. ▼ Drop down menu Counted By Choose a packaging level by which to bill. Packaging Check this box to show billing detail on the customer invoice. Show Detail The way the billing code is traced. ▼ Drop down menu Activity Trace Code Transaction Code General ledger number. GL Number The minimum charge for this code during a billing cycle. Minimum Charge The price per billing type occurrence. Unit Price Brief description that will be printed on the invoice. Billing Code Description* Unique identifier that represents the billing code. Billing Code ID* ▼ Drop down menu to select DC if there are more than one Change DC Handling Code Maintenance