HTML Forms
An HTMLform is used to collect user input. The user input is most often sent to a server for processing.
Example
First name:
john
Last name:
doe
Submit
The <form> Element
The HTML <form> element is used to create an HTML form for user input:
<form>
.
form elements
.
</form>
The <form> element is a container for different types of input elements, such as: text fields, checkboxes, radio buttons, submit buttons, etc.
All the different form elements are covered in this chapter: HTML Form Elements.
The <input> Element
The HTML <input> element is the most used form element.
An <input> element can be displayed in many ways, depending on the type attribute.
Here are some examples:
Type Description
<input type="text"> Displays a single-line text input field
<input type="radio"> Displays a radio button (for selecting one of many choices)
<input type="checkbox"> Displays a checkbox (for selecting zero or more of many choices)
<input type="submit"> Displays a submit button (for submitting the form)
<input type="button"> Displays a clickable button
All the different input types are covered in this chapter: HTML Input Types.
Text Fields
The <input type="text"> defines a single-line input field for text input.
Example
A form with input fields for text:
<form>
<label for="fname">First name:</label><br>
<input type="text" id="fname" name="fname"><br>
<label for="lname">Last name:</label><br>
<input type="text" id="lname" name="lname">
</form>
This is how the HTML code above will be displayed in a browser:
窗体顶端
First name:
Last name:
窗体底端
Note: The form itself is not visible. Also note that the default width of an input field is 20 characters.
The <label> Element
Notice the use of the <label> element in the example above.
The <label> tag defines a label for many form elements.
The <label> element is useful for screen-reader users, because the screen-reader will read out loud the label when the user focus on the input element.
The <label> element also help users who have difficulty clicking on very small regions (such as radio buttons or checkboxes) - because when the user clicks the text within the <label> element, it toggles the radio button/checkbox.
The for attribute of the <label> tag should be equal to the id attribute of the <input> element to bind them together.
2.
Radio Buttons
The <inputtype="radio"> defines a radio button.
Radio buttons let a user select ONE of a limited number of choices.
Example
A form with radio buttons:
<p>Choose your favorite Web language:</p>
<form>
<input type="radio" id="html" name="fav_language" value="HTML">
<label for="html">HTML</label><br>
<input type="radio" id="css" name="fav_language" value="CSS">
<label for="css">CSS</label><br>
<input type="radio" id="javascript" name="fav_language" value="JavaScript">
<label for="javascript">JavaScript</label>
</form>
This is how the HTML code above will be displayed in a browser:
Choose your favorite Web language:
HTML
CSS
JavaScript
Checkboxes
The <input type="checkbox"> defines a checkbox.
Checkboxes let a user select ZERO or MORE options of a limited number of choices.
Example
A form with checkboxes:
<form>
<input type="checkbox" id="vehicle1" name="vehicle1" value="Bike">
<label for="vehicle1"> I have a bike</label><br>
<input type="checkbox" id="vehicle2" name="vehicle2" value="Car">
<label for="vehicle2"> I have a car</label><br>
<input type="checkbox" id="vehicle3" name="vehicle3" value="Boat">
<label for="vehicle3"> I have a boat</label>
</form>
Try it Yourself »
This is how the HTML code above will be displayed in a browser:
I have a bike
I have a car
I have a boat
The Submit Button
The <input type="submit"> defines a button for submitting the form data to a form-handler.
The form-handler is typically a file on the server with a script for processing input data.
The form-handler is specified in the form's action attribute.
Example
A form with a submit button:
<form action="/action_page.php">
<label for="fname">First name:</label><br>
<input type="text" id="fname" name="fname" value="John"><br>
<label for="lname">Last name:</label><br>
<input type="text" id="lname" name="lname" value="Doe"><br><br>
<input type="submit" value="Submit">
</form>
Try it Yourself »
This is how the HTML code above will be displayed in a browser:
窗体顶端
First name:
Last name:
窗体底端
The Name Attribute for <input>
Notice that each input field must have a name attribute to be submitted.
If the name attribute is omitted, the value of the input field will not be sent at all.
3.
Example
This example willnot submit the value of the "First name" input field:
<form action="/action_page.php">
<label for="fname">First name:</label><br>
<input type="text" id="fname" value="John"><br><br>
<input type="submit" value="Submit">
</form>
Try it Yourself »
HTML Form Attributes
Previous
❮ Next ❯
This chapter describes the different attributes for the HTML <form> element.
The Action Attribute
The action attribute defines the action to be performed when the form is submitted.
Usually, the form data is sent to a file on the server when the user clicks on the submit button.
In the example below, the form data is sent to a file called "action_page.php". This file contains a
server-side script that handles the form data:
Example
On submit, send form data to "action_page.php":
<form action="/action_page.php">
<label for="fname">First name:</label><br>
<input type="text" id="fname" name="fname" value="John"><br>
<label for="lname">Last name:</label><br>
<input type="text" id="lname" name="lname" value="Doe"><br><br>
<input type="submit" value="Submit">
</form>
Try it Yourself »
Tip: If the action attribute is omitted, the action is set to the current page.
The Target Attribute
The target attribute specifies where to display the response that is received after submitting the
form.
The target attribute can have one of the following values:
Value Description
_blank The response is displayed in a new window or tab
_self The response is displayed in the current window
_parent The response is displayed in the parent frame
_top The response is displayed in the full body of the window
framename The response is displayed in a named iframe
4.
The default valueis _self which means that the response will open in the current window.
Example
Here, the submitted result will open in a new browser tab:
<form action="/action_page.php" target="_blank">
Try it Yourself »
The Method Attribute
The method attribute specifies the HTTP method to be used when submitting the form data.
The form-data can be sent as URL variables (with method="get") or as HTTP post transaction
(with method="post").
The default HTTP method when submitting form data is GET.
Example
This example uses the GET method when submitting the form data:
<form action="/action_page.php" method="get">
Try it Yourself »
Example
This example uses the POST method when submitting the form data:
<form action="/action_page.php" method="post">
Try it Yourself »
Notes on GET:
Appends the form data to the URL, in name/value pairs
NEVER use GET to send sensitive data! (the submitted form data is visible in the URL!)
The length of a URL is limited (2048 characters)
Useful for form submissions where a user wants to bookmark the result
GET is good for non-secure data, like query strings in Google
Notes on POST:
Appends the form data inside the body of the HTTP request (the submitted form data is not
shown in the URL)
POST has no size limitations, and can be used to send large amounts of data.
Form submissions with POST cannot be bookmarked
Tip: Always use POST if the form data contains sensitive or personal information!
ADVERTISEMENT
5.
The Autocomplete Attribute
Theautocomplete attribute specifies whether a form should have autocomplete on or off.
When autocomplete is on, the browser automatically complete values based on values that the user
has entered before.
Example
A form with autocomplete on:
<form action="/action_page.php" autocomplete="on">
Try it Yourself »
The Novalidate Attribute
The novalidate attribute is a boolean attribute.
When present, it specifies that the form-data (input) should not be validated when submitted.
Example
A form with a novalidate attribute:
<form action="/action_page.php" novalidate>
Try it Yourself »
HTML Exercises
窗体顶端
Test Yourself With Exercises
Exercise:
Add a submit button, and specify that the form should go to "/action_page.php".
<form ="/action_page.php">
Name: <input type="text" name="name">
<>
</form>
Submit Answer »
Start the Exercise
窗体底端
6.
List of All<form> Attributes
Attribute Description
accept-charset Specifies the character encodings used for form submission
action Specifies where to send the form-data when a form is submitted
autocomplete Specifies whether a form should have autocomplete on or off
enctype Specifies how the form-data should be encoded when submitting it to the server (only for method="post")
method Specifies the HTTP method to use when sending form-data
name Specifies the name of the form
novalidate Specifies that the form should not be validated when submitted
rel Specifies the relationship between a linked resource and the current document
target Specifies where to display the response that is received after submitting the form
HTML Form Elements
Previous
❮ Next ❯
This chapter describes all the different HTML form elements.
The HTML <form> Elements
The HTML <form> element can contain one or more of the following form elements:
<input>
<label>
<select>
<textarea>
<button>
<fieldset>
<legend>
<datalist>
<output>
<option>
<optgroup>
The <input> Element
One of the most used form element is the <input> element.
The <input> element can be displayed in several ways, depending on the type attribute.
Example
<label for="fname">First name:</label>
<input type="text" id="fname" name="fname">
Try it Yourself »
All the different values of the type attribute are covered in the next chapter: HTML Input Types.
7.
The <label> Element
The<label> element defines a label for several form elements.
The <label> element is useful for screen-reader users, because the screen-reader will read out loud
the label when the user focus on the input element.
The <label> element also help users who have difficulty clicking on very small regions (such as radio
buttons or checkboxes) - because when the user clicks the text within the <label> element, it
toggles the radio button/checkbox.
The for attribute of the <label> tag should be equal to the id attribute of the <input> element to
bind them together.
The <select> Element
The <select> element defines a drop-down list:
Example
<label for="cars">Choose a car:</label>
<select id="cars" name="cars">
<option value="volvo">Volvo</option>
<option value="saab">Saab</option>
<option value="fiat">Fiat</option>
<option value="audi">Audi</option>
</select>
Try it Yourself »
The <option> elements defines an option that can be selected.
By default, the first item in the drop-down list is selected.
To define a pre-selected option, add the selected attribute to the option:
Example
<option value="fiat" selected>Fiat</option>
Try it Yourself »
Visible Values:
Use the size attribute to specify the number of visible values:
Example
<label for="cars">Choose a car:</label>
<select id="cars" name="cars" size="3">
<option value="volvo">Volvo</option>
<option value="saab">Saab</option>
<option value="fiat">Fiat</option>
<option value="audi">Audi</option>
</select>
Try it Yourself »
Allow Multiple Selections:
Use the multiple attribute to allow the user to select more than one value:
8.
Example
<label for="cars">Choose acar:</label>
<select id="cars" name="cars" size="4" multiple>
<option value="volvo">Volvo</option>
<option value="saab">Saab</option>
<option value="fiat">Fiat</option>
<option value="audi">Audi</option>
</select>
Try it Yourself »
The <textarea> Element
The <textarea> element defines a multi-line input field (a text area):
Example
<textarea name="message" rows="10" cols="30">
The cat was playing in the garden.
</textarea>
Try it Yourself »
The rows attribute specifies the visible number of lines in a text area.
The cols attribute specifies the visible width of a text area.
This is how the HTML code above will be displayed in a browser:
You can also define the size of the text area by using CSS:
Example
<textarea name="message" style="width:200px; height:600px;">
The cat was playing in the garden.
</textarea>
Try it Yourself »
ADVERTISEMENT
The <button> Element
The <button> element defines a clickable button:
Example
<button type="button" onclick="alert('Hello World!')">Click Me!</button>
Try it Yourself »
This is how the HTML code above will be displayed in a browser:
9.
Click Me!
Note: Alwaysspecify the type attribute for the button element. Different browsers may use different default
types for the button element.
The <fieldset> and <legend> Elements
The <fieldset> element is used to group related data in a form.
The <legend> element defines a caption for the <fieldset> element.
Example
<form action="/action_page.php">
<fieldset>
<legend>Personalia:</legend>
<label for="fname">First name:</label><br>
<input type="text" id="fname" name="fname" value="John"><br>
<label for="lname">Last name:</label><br>
<input type="text" id="lname" name="lname" value="Doe"><br><br>
<input type="submit" value="Submit">
</fieldset>
</form>
Try it Yourself »
This is how the HTML code above will be displayed in a browser:
窗体顶端
Personalia:First name:
Last name:
窗体底端
The <datalist> Element
The <datalist> element specifies a list of pre-defined options for an <input> element.
Users will see a drop-down list of the pre-defined options as they input data.
The list attribute of the <input> element, must refer to the id attribute of
the <datalist> element.
Example
<form action="/action_page.php">
<input list="browsers">
<datalist id="browsers">
<option value="Internet Explorer">
<option value="Firefox">
<option value="Chrome">
<option value="Opera">
<option value="Safari">
</datalist>
</form>
Try it Yourself »
10.
The <output> Element
The<output> element represents the result of a calculation (like one performed by a script).
Example
Perform a calculation and show the result in an <output> element:
<form action="/action_page.php"
oninput="x.value=parseInt(a.value)+parseInt(b.value)">
0
<input type="range" id="a" name="a" value="50">
100 +
<input type="number" id="b" name="b" value="50">
=
<output name="x" for="a b"></output>
<br><br>
<input type="submit">
</form>
Try it Yourself »
HTML Exercises
窗体顶端
Test Yourself With Exercises
Exercise:
In the form below, add an empty drop down list with the name "cars".
<form action="/action_page.php">
<>
</>
</form>
Submit Answer »
Start the Exercise
窗体底端
HTML Form Elements
Tag Description
<form> Defines an HTML form for user input
<input> Defines an input control
<textarea> Defines a multiline input control (text area)
<label> Defines a label for an <input> element
<fieldset> Groups related elements in a form
<legend> Defines a caption for a <fieldset> element
11.
<select> Defines adrop-down list
<optgroup> Defines a group of related options in a drop-down list
<option> Defines an option in a drop-down list
<button> Defines a clickable button
<datalist> Specifies a list of pre-defined options for input controls
<output> Defines the result of a calculation
For a complete list of all available HTML tags, visit our HTML Tag Reference.
HTML Input Types
Previous
❮ Next ❯
This chapter describes the different types for the HTML <input> element.
HTML Input Types
Here are the different input types you can use in HTML:
<input type="button">
<input type="checkbox">
<input type="color">
<input type="date">
<input type="datetime-local">
<input type="email">
<input type="file">
<input type="hidden">
<input type="image">
<input type="month">
<input type="number">
<input type="password">
<input type="radio">
<input type="range">
<input type="reset">
<input type="search">
<input type="submit">
<input type="tel">
<input type="text">
<input type="time">
<input type="url">
<input type="week">
Tip: The default value of the type attribute is "text".
Input Type Text
<input type="text"> defines a single-line text input field:
Example
<form>
<label for="fname">First name:</label><br>
<input type="text" id="fname" name="fname"><br>
12.
<label for="lname">Last name:</label><br>
<inputtype="text" id="lname" name="lname">
</form>
Try it Yourself »
This is how the HTML code above will be displayed in a browser:
First name:
Last name:
Input Type Password
<input type="password"> defines a password field:
Example
<form>
<label for="username">Username:</label><br>
<input type="text" id="username" name="username"><br>
<label for="pwd">Password:</label><br>
<input type="password" id="pwd" name="pwd">
</form>
Try it Yourself »
This is how the HTML code above will be displayed in a browser:
Username:
Password:
The characters in a password field are masked (shown as asterisks or circles).
ADVERTISEMENT
ADVERTISEMENT
Input Type Submit
<input type="submit"> defines a button for submitting form data to a form-handler.
The form-handler is typically a server page with a script for processing input data.
The form-handler is specified in the form's action attribute:
Example
<form action="/action_page.php">
<label for="fname">First name:</label><br>
<input type="text" id="fname" name="fname" value="John"><br>
<label for="lname">Last name:</label><br>
<input type="text" id="lname" name="lname" value="Doe"><br><br>
<input type="submit" value="Submit">
</form>
13.
Try it Yourself»
This is how the HTML code above will be displayed in a browser:
窗体顶端
First name:
Last name:
窗体底端
If you omit the submit button's value attribute, the button will get a default text:
Example
<form action="/action_page.php">
<label for="fname">First name:</label><br>
<input type="text" id="fname" name="fname" value="John"><br>
<label for="lname">Last name:</label><br>
<input type="text" id="lname" name="lname" value="Doe"><br><br>
<input type="submit">
</form>
Try it Yourself »
Input Type Reset
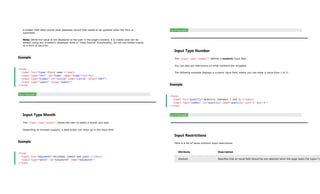
<input type="reset"> defines a reset button that will reset all form values to their default values:
Example
<form action="/action_page.php">
<label for="fname">First name:</label><br>
<input type="text" id="fname" name="fname" value="John"><br>
<label for="lname">Last name:</label><br>
<input type="text" id="lname" name="lname" value="Doe"><br><br>
<input type="submit" value="Submit">
<input type="reset">
</form>
Try it Yourself »
This is how the HTML code above will be displayed in a browser:
窗体顶端
First name:
Last name:
窗体底端
If you change the input values and then click the "Reset" button, the form-data will be reset to the default values.
Input Type Radio
<input type="radio"> defines a radio button.
Radio buttons let a user select ONLY ONE of a limited number of choices:
Example
14.
<p>Choose your favoriteWeb language:</p>
<form>
<input type="radio" id="html" name="fav_language" value="HTML">
<label for="html">HTML</label><br>
<input type="radio" id="css" name="fav_language" value="CSS">
<label for="css">CSS</label><br>
<input type="radio" id="javascript" name="fav_language" value="JavaScript">
<label for="javascript">JavaScript</label>
</form>
Try it Yourself »
This is how the HTML code above will be displayed in a browser:
HTML
CSS
JavaScript
Input Type Checkbox
<input type="checkbox"> defines a checkbox.
Checkboxes let a user select ZERO or MORE options of a limited number of choices.
Example
<form>
<input type="checkbox" id="vehicle1" name="vehicle1" value="Bike">
<label for="vehicle1"> I have a bike</label><br>
<input type="checkbox" id="vehicle2" name="vehicle2" value="Car">
<label for="vehicle2"> I have a car</label><br>
<input type="checkbox" id="vehicle3" name="vehicle3" value="Boat">
<label for="vehicle3"> I have a boat</label>
</form>
Try it Yourself »
This is how the HTML code above will be displayed in a browser:
I have a bike
I have a car
I have a boat
Input Type Button
<input type="button"> defines a button:
Example
<input type="button" onclick="alert('Hello World!')" value="Click Me!">
Try it Yourself »
This is how the HTML code above will be displayed in a browser:
Input Type Color
15.
The <input type="color">is used for input fields that should contain a color.
Depending on browser support, a color picker can show up in the input field.
Example
<form>
<label for="favcolor">Select your favorite color:</label>
<input type="color" id="favcolor" name="favcolor">
</form>
Try it Yourself »
Input Type Date
The <input type="date"> is used for input fields that should contain a date.
Depending on browser support, a date picker can show up in the input field.
Example
<form>
<label for="birthday">Birthday:</label>
<input type="date" id="birthday" name="birthday">
</form>
Try it Yourself »
You can also use the min and max attributes to add restrictions to dates:
Example
<form>
<label for="datemax">Enter a date before 1980-01-01:</label>
<input type="date" id="datemax" name="datemax" max="1979-12-31"><br><br>
<label for="datemin">Enter a date after 2000-01-01:</label>
<input type="date" id="datemin" name="datemin" min="2000-01-02">
</form>
Try it Yourself »
Input Type Datetime-local
The <input type="datetime-local"> specifies a date and time input field, with no time zone.
Depending on browser support, a date picker can show up in the input field.
Example
<form>
<label for="birthdaytime">Birthday (date and time):</label>
<input type="datetime-local" id="birthdaytime" name="birthdaytime">
</form>
Try it Yourself »
16.
Input Type Email
The<input type="email"> is used for input fields that should contain an e-mail address.
Depending on browser support, the e-mail address can be automatically validated when submitted.
Some smartphones recognize the email type, and add ".com" to the keyboard to match email input.
Example
<form>
<label for="email">Enter your email:</label>
<input type="email" id="email" name="email">
</form>
Try it Yourself »
Input Type Image
The <input type="image"> defines an image as a submit button.
The path to the image is specified in the src attribute.
Example
<form>
<input type="image" src="img_submit.gif" alt="Submit" width="48" height="48">
</form>
Try it Yourself »
Input Type File
The <input type="file"> defines a file-select field and a "Browse" button for file uploads.
Example
<form>
<label for="myfile">Select a file:</label>
<input type="file" id="myfile" name="myfile">
</form>
Try it Yourself »
Input Type Hidden
The <input type="hidden"> defines a hidden input field (not visible to a user).
A hidden field lets web developers include data that cannot be seen or modified by users when a form
is submitted.
17.
A hidden fieldoften stores what database record that needs to be updated when the form is
submitted.
Note: While the value is not displayed to the user in the page's content, it is visible (and can be
edited) using any browser's developer tools or "View Source" functionality. Do not use hidden inputs
as a form of security!
Example
<form>
<label for="fname">First name:</label>
<input type="text" id="fname" name="fname"><br><br>
<input type="hidden" id="custId" name="custId" value="3487">
<input type="submit" value="Submit">
</form>
Try it Yourself »
Input Type Month
The <input type="month"> allows the user to select a month and year.
Depending on browser support, a date picker can show up in the input field.
Example
<form>
<label for="bdaymonth">Birthday (month and year):</label>
<input type="month" id="bdaymonth" name="bdaymonth">
</form>
Try it Yourself »
Input Type Number
The <input type="number"> defines a numeric input field.
You can also set restrictions on what numbers are accepted.
The following example displays a numeric input field, where you can enter a value from 1 to 5:
Example
<form>
<label for="quantity">Quantity (between 1 and 5):</label>
<input type="number" id="quantity" name="quantity" min="1" max="5">
</form>
Try it Yourself »
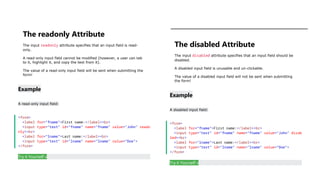
Input Restrictions
Here is a list of some common input restrictions:
Attribute Description
checked Specifies that an input field should be pre-selected when the page loads (for type="ch
18.
disabled Specifies thatan input field should be disabled
max Specifies the maximum value for an input field
maxlength Specifies the maximum number of character for an input field
min Specifies the minimum value for an input field
pattern Specifies a regular expression to check the input value against
readonly Specifies that an input field is read only (cannot be changed)
required Specifies that an input field is required (must be filled out)
size Specifies the width (in characters) of an input field
step Specifies the legal number intervals for an input field
value Specifies the default value for an input field
You will learn more about input restrictions in the next chapter.
The following example displays a numeric input field, where you can enter a value from 0 to 100, in
steps of 10. The default value is 30:
Example
<form>
<label for="quantity">Quantity:</label>
<input type="number" id="quantity" name="quantity" min="0" max="100" step="10" value="30">
</form>
Try it Yourself »
Input Type Range
The <input type="range"> defines a control for entering a number whose exact value is not
important (like a slider control). Default range is 0 to 100. However, you can set restrictions on what
numbers are accepted with the min, max, and step attributes:
Example
<form>
<label for="vol">Volume (between 0 and 50):</label>
<input type="range" id="vol" name="vol" min="0" max="50">
</form>
Try it Yourself »
Input Type Search
The <input type="search"> is used for search fields (a search field behaves like a regular text
field).
Example
<form>
<label for="gsearch">Search Google:</label>
<input type="search" id="gsearch" name="gsearch">
</form>
19.
Try it Yourself»
Input Type Tel
The <input type="tel"> is used for input fields that should contain a telephone number.
Example
<form>
<label for="phone">Enter your phone number:</label>
<input type="tel" id="phone" name="phone" pattern="[0-9]{3}-[0-9]{2}-[0-9]{3}">
</form>
Try it Yourself »
Input Type Time
The <input type="time"> allows the user to select a time (no time zone).
Depending on browser support, a time picker can show up in the input field.
Example
<form>
<label for="appt">Select a time:</label>
<input type="time" id="appt" name="appt">
</form>
Try it Yourself »
Input Type Url
The <input type="url"> is used for input fields that should contain a URL address.
Depending on browser support, the url field can be automatically validated when submitted.
Some smartphones recognize the url type, and adds ".com" to the keyboard to match url input.
Example
<form>
<label for="homepage">Add your homepage:</label>
<input type="url" id="homepage" name="homepage">
</form>
Try it Yourself »
Input Type Week
The <input type="week"> allows the user to select a week and year.
Depending on browser support, a date picker can show up in the input field.
20.
Example
<form>
<label for="week">Select aweek:</label>
<input type="week" id="week" name="week">
</form>
Try it Yourself »
窗体底端
HTML Input Type Attribute
Tag Description
<input type=""> Specifies the input type to display
Previous
❮ Next ❯
HTML Input Attributes
Previous
❮ Next ❯
This chapter describes the different attributes for the
HTML <input> element.
The value Attribute
The input value attribute specifies an initial value for an input field:
Example
Input fields with initial (default) values:
<form>
<label for="fname">First name:</label><br>
<input type="text" id="fname" name="fname" value="John"><br>
<label for="lname">Last name:</label><br>
<input type="text" id="lname" name="lname" value="Doe">
</form>
Try it Yourself »
21.
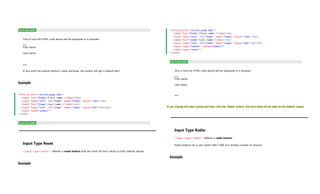
The readonly Attribute
Theinput readonly attribute specifies that an input field is read-
only.
A read-only input field cannot be modified (however, a user can tab
to it, highlight it, and copy the text from it).
The value of a read-only input field will be sent when submitting the
form!
Example
A read-only input field:
<form>
<label for="fname">First name:</label><br>
<input type="text" id="fname" name="fname" value="John" reado
nly><br>
<label for="lname">Last name:</label><br>
<input type="text" id="lname" name="lname" value="Doe">
</form>
Try it Yourself »
The disabled Attribute
The input disabled attribute specifies that an input field should be
disabled.
A disabled input field is unusable and un-clickable.
The value of a disabled input field will not be sent when submitting
the form!
Example
A disabled input field:
<form>
<label for="fname">First name:</label><br>
<input type="text" id="fname" name="fname" value="John" disab
led><br>
<label for="lname">Last name:</label><br>
<input type="text" id="lname" name="lname" value="Doe">
</form>
Try it Yourself »
22.
ADVERTISEMENT
The size Attribute
Theinput size attribute specifies the visible width, in characters, of
an input field.
The default value for size is 20.
Note: The size attribute works with the following input types: text,
search, tel, url, email, and password.
Example
Set a width for an input field:
<form>
<label for="fname">First name:</label><br>
<input type="text" id="fname" name="fname" size="50"><br>
<label for="pin">PIN:</label><br>
<input type="text" id="pin" name="pin" size="4">
</form>
Try it Yourself »
The maxlength Attribute
The input maxlength attribute specifies the maximum number of
characters allowed in an input field.
Note: When a maxlength is set, the input field will not accept more
than the specified number of characters. However, this attribute
does not provide any feedback. So, if you want to alert the user, you
must write JavaScript code.
Example
Set a maximum length for an input field:
<form>
<label for="fname">First name:</label><br>
<input type="text" id="fname" name="fname" size="50"><br>
23.
<label for="pin">PIN:</label><br>
<input type="text"id="pin" name="pin" maxlength="4" siz
e="4">
</form>
Try it Yourself »
The min and max Attributes
The input min and max attributes specify the minimum and maximum
values for an input field.
The min and max attributes work with the following input types:
number, range, date, datetime-local, month, time and week.
Tip: Use the max and min attributes together to create a range of
legal values.
Example
Set a max date, a min date, and a range of legal values:
<form>
<label for="datemax">Enter a date before 1980-01-01:</label>
<input type="date" id="datemax" name="datemax" max="1979-12-
31"><br><br>
<label for="datemin">Enter a date after 2000-01-01:</label>
<input type="date" id="datemin" name="datemin" min="2000-01-
02"><br><br>
<label for="quantity">Quantity (between 1 and 5):</label>
<input type="number" id="quantity" name="quantity" min="1" ma
x="5">
</form>
Try it Yourself »
The multiple Attribute
The input multiple attribute specifies that the user is allowed to
enter more than one value in an input field.
The multiple attribute works with the following input types: email,
and file.
24.
Example
A file uploadfield that accepts multiple values:
<form>
<label for="files">Select files:</label>
<input type="file" id="files" name="files" multiple>
</form>
Try it Yourself »
The pattern Attribute
The input pattern attribute specifies a regular expression that the
input field's value is checked against, when the form is submitted.
The pattern attribute works with the following input types: text,
date, search, url, tel, email, and password.
Tip: Use the global title attribute to describe the pattern to help the
user.
Tip: Learn more about regular expressions in our JavaScript tutorial.
Example
An input field that can contain only three letters (no numbers or special
characters):
<form>
<label for="country_code">Country code:</label>
<input type="text" id="country_code" name="country_code"
pattern="[A-Za-z]{3}" title="Three letter country code">
</form>
Try it Yourself »
The placeholder Attribute
The input placeholder attribute specifies a short hint that describes
the expected value of an input field (a sample value or a short
description of the expected format).
The short hint is displayed in the input field before the user enters a
value.
25.
The placeholder attributeworks with the following input types:
text, search, url, tel, email, and password.
Example
An input field with a placeholder text:
<form>
<label for="phone">Enter a phone number:</label>
<input type="tel" id="phone" name="phone"
placeholder="123-45-678"
pattern="[0-9]{3}-[0-9]{2}-[0-9]{3}">
</form>
Try it Yourself »
The required Attribute
The input required attribute specifies that an input field must be
filled out before submitting the form.
The required attribute works with the following input types: text,
search, url, tel, email, password, date pickers, number, checkbox,
radio, and file.
Example
A required input field:
<form>
<label for="username">Username:</label>
<input type="text" id="username" name="username" required>
</form>
Try it Yourself »
The step Attribute
The input step attribute specifies the legal number intervals for an
input field.
Example: if step="3", legal numbers could be -3, 0, 3, 6, etc.
26.
Tip: This attributecan be used together with the max and min
attributes to create a range of legal values.
The step attribute works with the following input types: number,
range, date, datetime-local, month, time and week.
Example
An input field with a specified legal number intervals:
<form>
<label for="points">Points:</label>
<input type="number" id="points" name="points" step="3">
</form>
Try it Yourself »
Note: Input restrictions are not foolproof, and JavaScript provides many
ways to add illegal input. To safely restrict input, it must also be checked by
the receiver (the server)!
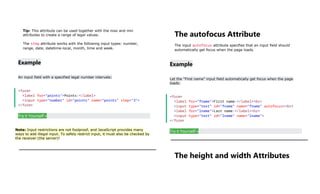
The autofocus Attribute
The input autofocus attribute specifies that an input field should
automatically get focus when the page loads.
Example
Let the "First name" input field automatically get focus when the page
loads:
<form>
<label for="fname">First name:</label><br>
<input type="text" id="fname" name="fname" autofocus><br>
<label for="lname">Last name:</label><br>
<input type="text" id="lname" name="lname">
</form>
Try it Yourself »
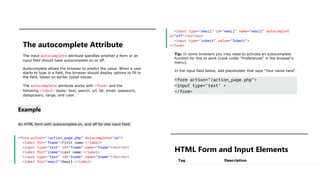
The height and width Attributes
27.
The input heightand width attributes specify the height and width
of an <input type="image"> element.
Tip: Always specify both the height and width attributes for images. If height
and width are set, the space required for the image is reserved when the
page is loaded. Without these attributes, the browser does not know the size
of the image, and cannot reserve the appropriate space to it. The effect will
be that the page layout will change during loading (while the images load).
Example
Define an image as the submit button, with height and width attributes:
<form>
<label for="fname">First name:</label>
<input type="text" id="fname" name="fname"><br><br>
<label for="lname">Last name:</label>
<input type="text" id="lname" name="lname"><br><br>
<input type="image" src="img_submit.gif" alt="Submit" widt
h="48" height="48">
</form>
Try it Yourself »
The list Attribute
The input list attribute refers to a <datalist> element that
contains pre-defined options for an <input> element.
Example
An <input> element with pre-defined values in a <datalist>:
<form>
<input list="browsers">
<datalist id="browsers">
<option value="Internet Explorer">
<option value="Firefox">
<option value="Chrome">
<option value="Opera">
<option value="Safari">
</datalist>
</form>
Try it Yourself »
28.
The autocomplete Attribute
Theinput autocomplete attribute specifies whether a form or an
input field should have autocomplete on or off.
Autocomplete allows the browser to predict the value. When a user
starts to type in a field, the browser should display options to fill in
the field, based on earlier typed values.
The autocomplete attribute works with <form> and the
following <input> types: text, search, url, tel, email, password,
datepickers, range, and color.
Example
An HTML form with autocomplete on, and off for one input field:
<form action="/action_page.php" autocomplete="on">
<label for="fname">First name:</label>
<input type="text" id="fname" name="fname"><br><br>
<label for="lname">Last name:</label>
<input type="text" id="lname" name="lname"><br><br>
<label for="email">Email:</label>
<input type="email" id="email" name="email" autocomplet
e="off"><br><br>
<input type="submit" value="Submit">
</form>
Tip: In some browsers you may need to activate an autocomplete
function for this to work (Look under "Preferences" in the browser's
menu).
In the input field below, add placeholder that says "Your name here".
<form action="/action_page.php">
<input type="text" >
</form>
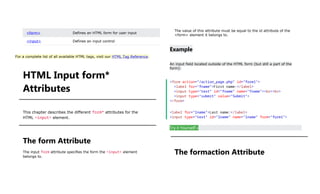
HTML Form and Input Elements
Tag Description
29.
<form> Defines anHTML form for user input
<input> Defines an input control
For a complete list of all available HTML tags, visit our HTML Tag Reference.
HTML Input form*
Attributes
This chapter describes the different form* attributes for the
HTML <input> element.
The form Attribute
The input form attribute specifies the form the <input> element
belongs to.
The value of this attribute must be equal to the id attribute of the
<form> element it belongs to.
Example
An input field located outside of the HTML form (but still a part of the
form):
<form action="/action_page.php" id="form1">
<label for="fname">First name:</label>
<input type="text" id="fname" name="fname"><br><br>
<input type="submit" value="Submit">
</form>
<label for="lname">Last name:</label>
<input type="text" id="lname" name="lname" form="form1">
Try it Yourself »
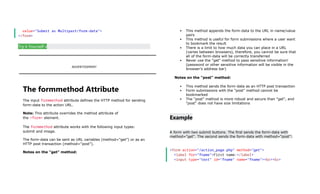
The formaction Attribute
30.
The input formactionattribute specifies the URL of the file that will
process the input when the form is submitted.
Note: This attribute overrides the action attribute of
the <form> element.
The formaction attribute works with the following input types:
submit and image.
Example
An HTML form with two submit buttons, with different actions:
<form action="/action_page.php">
<label for="fname">First name:</label>
<input type="text" id="fname" name="fname"><br><br>
<label for="lname">Last name:</label>
<input type="text" id="lname" name="lname"><br><br>
<input type="submit" value="Submit">
<input type="submit" formaction="/action_page2.php" valu
e="Submit as Admin">
</form>
Try it Yourself »
The formenctype Attribute
The input formenctype attribute specifies how the form-data should
be encoded when submitted (only for forms with method="post").
Note: This attribute overrides the enctype attribute of
the <form> element.
The formenctype attribute works with the following input types:
submit and image.
Example
A form with two submit buttons. The first sends the form-data with default
encoding, the second sends the form-data encoded as "multipart/form-
data":
<form action="/action_page_binary.asp" method="post">
<label for="fname">First name:</label>
<input type="text" id="fname" name="fname"><br><br>
<input type="submit" value="Submit">
<input type="submit" formenctype="multipart/form-data"
31.
value="Submit as Multipart/form-data">
</form>
Tryit Yourself »
ADVERTISEMENT
The formmethod Attribute
The input formmethod attribute defines the HTTP method for sending
form-data to the action URL.
Note: This attribute overrides the method attribute of
the <form> element.
The formmethod attribute works with the following input types:
submit and image.
The form-data can be sent as URL variables (method="get") or as an
HTTP post transaction (method="post").
Notes on the "get" method:
This method appends the form-data to the URL in name/value
pairs
This method is useful for form submissions where a user want
to bookmark the result
There is a limit to how much data you can place in a URL
(varies between browsers), therefore, you cannot be sure that
all of the form-data will be correctly transferred
Never use the "get" method to pass sensitive information!
(password or other sensitive information will be visible in the
browser's address bar)
Notes on the "post" method:
This method sends the form-data as an HTTP post transaction
Form submissions with the "post" method cannot be
bookmarked
The "post" method is more robust and secure than "get", and
"post" does not have size limitations
Example
A form with two submit buttons. The first sends the form-data with
method="get". The second sends the form-data with method="post":
<form action="/action_page.php" method="get">
<label for="fname">First name:</label>
<input type="text" id="fname" name="fname"><br><br>
32.
<label for="lname">Last name:</label>
<inputtype="text" id="lname" name="lname"><br><br>
<input type="submit" value="Submit using GET">
<input type="submit" formmethod="post" value="Submit using
POST">
</form>
Try it Yourself »
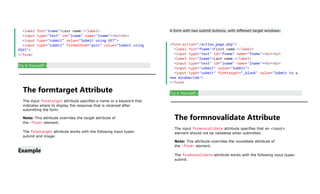
The formtarget Attribute
The input formtarget attribute specifies a name or a keyword that
indicates where to display the response that is received after
submitting the form.
Note: This attribute overrides the target attribute of
the <form> element.
The formtarget attribute works with the following input types:
submit and image.
Example
A form with two submit buttons, with different target windows:
<form action="/action_page.php">
<label for="fname">First name:</label>
<input type="text" id="fname" name="fname"><br><br>
<label for="lname">Last name:</label>
<input type="text" id="lname" name="lname"><br><br>
<input type="submit" value="Submit">
<input type="submit" formtarget="_blank" value="Submit to a
new window/tab">
</form>
Try it Yourself »
The formnovalidate Attribute
The input formnovalidate attribute specifies that an <input>
element should not be validated when submitted.
Note: This attribute overrides the novalidate attribute of
the <form> element.
The formnovalidate attribute works with the following input types:
submit.
33.
Example
A form withtwo submit buttons (with and without validation):
<form action="/action_page.php">
<label for="email">Enter your email:</label>
<input type="email" id="email" name="email"><br><br>
<input type="submit" value="Submit">
<input type="submit" formnovalidate="formnovalidate"
value="Submit without validation">
</form>
Try it Yourself »
The novalidate Attribute
The novalidate attribute is a <form> attribute.
When present, novalidate specifies that all of the form-data should
not be validated when submitted.
Example
Specify that no form-data should be validated on submit:
<form action="/action_page.php" novalidate>
<label for="email">Enter your email:</label>
<input type="email" id="email" name="email"><br><br>
<input type="submit" value="Submit">
</form>
Try it Yourself »
HTML Form and Input Elements
Tag Description
<form> Defines an HTML form for user input
<input> Defines an input control
For a complete list of all available HTML tags, visit our HTML Tag Reference.


![Try it Yourself »
Input Type Tel
The <input type="tel"> is used for input fields that should contain a telephone number.
Example
<form>
<label for="phone">Enter your phone number:</label>
<input type="tel" id="phone" name="phone" pattern="[0-9]{3}-[0-9]{2}-[0-9]{3}">
</form>
Try it Yourself »
Input Type Time
The <input type="time"> allows the user to select a time (no time zone).
Depending on browser support, a time picker can show up in the input field.
Example
<form>
<label for="appt">Select a time:</label>
<input type="time" id="appt" name="appt">
</form>
Try it Yourself »
Input Type Url
The <input type="url"> is used for input fields that should contain a URL address.
Depending on browser support, the url field can be automatically validated when submitted.
Some smartphones recognize the url type, and adds ".com" to the keyboard to match url input.
Example
<form>
<label for="homepage">Add your homepage:</label>
<input type="url" id="homepage" name="homepage">
</form>
Try it Yourself »
Input Type Week
The <input type="week"> allows the user to select a week and year.
Depending on browser support, a date picker can show up in the input field.](https://image.slidesharecdn.com/htmlforms02-251019084513-74099b75/85/HTML-Forms02-Tags-examples-HTML-guides-docx-19-320.jpg)


![Example
A file upload field that accepts multiple values:
<form>
<label for="files">Select files:</label>
<input type="file" id="files" name="files" multiple>
</form>
Try it Yourself »
The pattern Attribute
The input pattern attribute specifies a regular expression that the
input field's value is checked against, when the form is submitted.
The pattern attribute works with the following input types: text,
date, search, url, tel, email, and password.
Tip: Use the global title attribute to describe the pattern to help the
user.
Tip: Learn more about regular expressions in our JavaScript tutorial.
Example
An input field that can contain only three letters (no numbers or special
characters):
<form>
<label for="country_code">Country code:</label>
<input type="text" id="country_code" name="country_code"
pattern="[A-Za-z]{3}" title="Three letter country code">
</form>
Try it Yourself »
The placeholder Attribute
The input placeholder attribute specifies a short hint that describes
the expected value of an input field (a sample value or a short
description of the expected format).
The short hint is displayed in the input field before the user enters a
value.](https://image.slidesharecdn.com/htmlforms02-251019084513-74099b75/85/HTML-Forms02-Tags-examples-HTML-guides-docx-24-320.jpg)
![The placeholder attribute works with the following input types:
text, search, url, tel, email, and password.
Example
An input field with a placeholder text:
<form>
<label for="phone">Enter a phone number:</label>
<input type="tel" id="phone" name="phone"
placeholder="123-45-678"
pattern="[0-9]{3}-[0-9]{2}-[0-9]{3}">
</form>
Try it Yourself »
The required Attribute
The input required attribute specifies that an input field must be
filled out before submitting the form.
The required attribute works with the following input types: text,
search, url, tel, email, password, date pickers, number, checkbox,
radio, and file.
Example
A required input field:
<form>
<label for="username">Username:</label>
<input type="text" id="username" name="username" required>
</form>
Try it Yourself »
The step Attribute
The input step attribute specifies the legal number intervals for an
input field.
Example: if step="3", legal numbers could be -3, 0, 3, 6, etc.](https://image.slidesharecdn.com/htmlforms02-251019084513-74099b75/85/HTML-Forms02-Tags-examples-HTML-guides-docx-25-320.jpg)