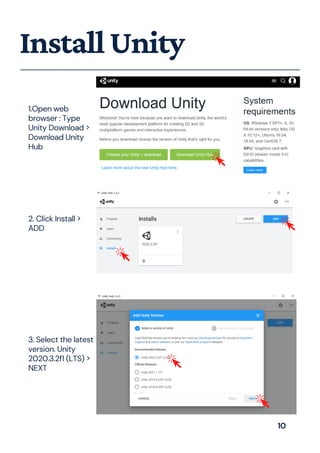
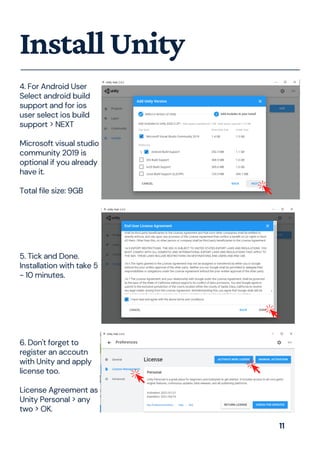
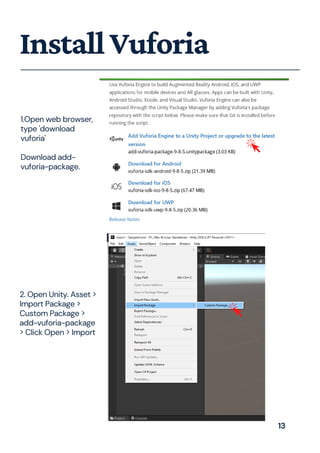
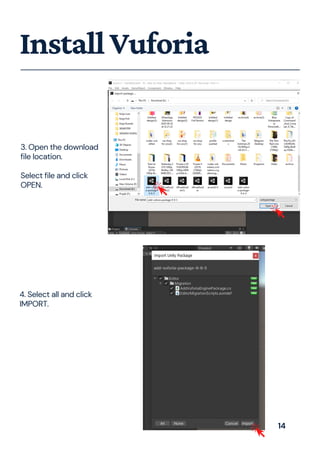
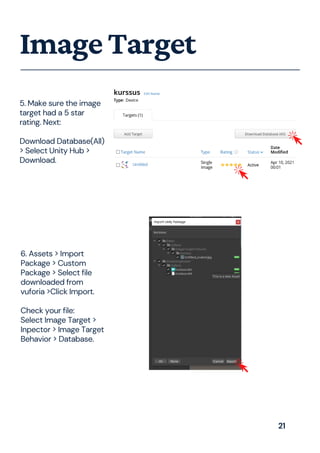
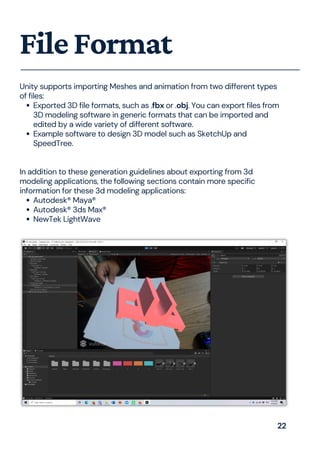
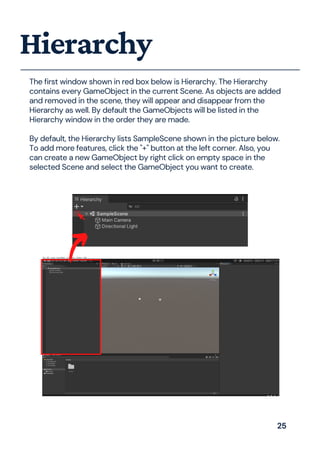
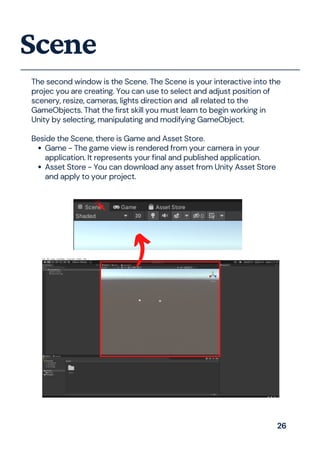
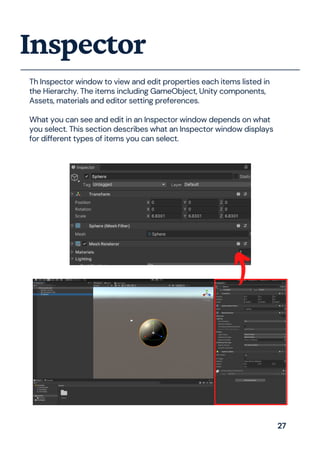
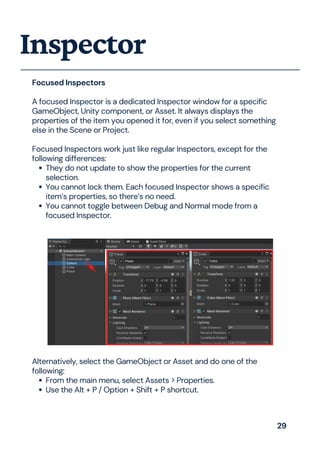
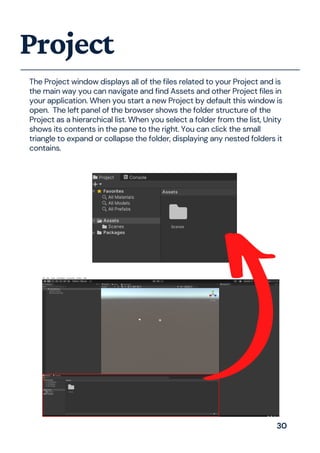
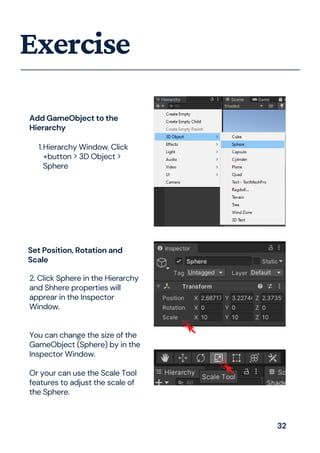
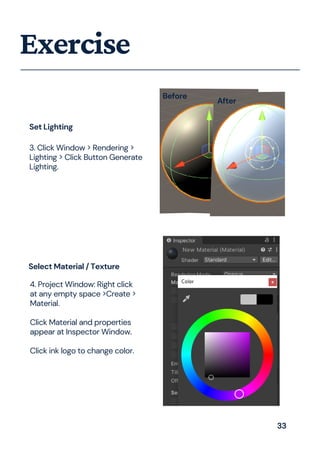
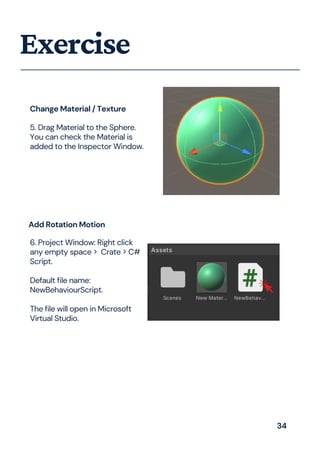
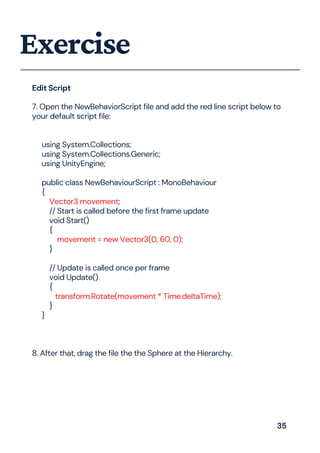
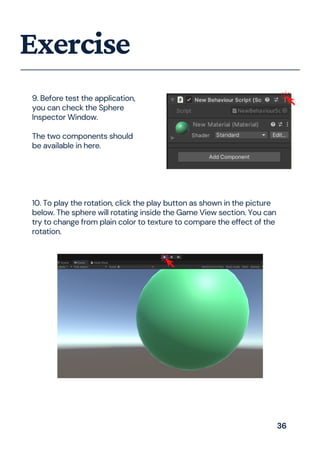
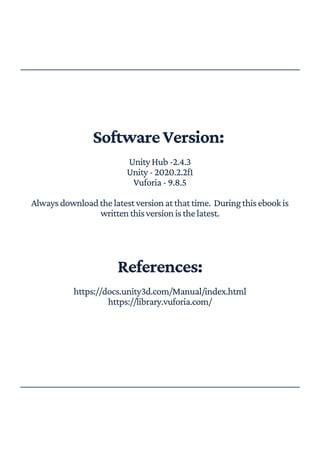
HOW TO START YOUR
FIRST AUGMENTED
REALITY APPLICATION
AHMAD SAPUAN BIN HASAN
AHMAD SYARIFUDDIN BIN CHE ABD AZIZ
POLITEKNIKKUCHINGSARAWAK
MINISTRYOFHIGHEREDUCATION
KM22,JALANMATANG,
93050KUCHING,SARAWAK.
PhoneNo.:(082)845596/7/8
FaxNo.:(082)845023
E-mail :poliku.info@poliku.edu.my
Website :http://www.poliku.edu.my/
Copyright©2021PoliteknikKuchingSarawak
eISBN978-967-2953-13-5
Allrightsreserved.Nopartsofthispublicationmaybecopied,storedinformorbyanymeans,
electronic,mechanical,photocopyingandrecordingorotherwiseorbyanymeansfor
reproducedwithoutthepriorpermissionof PoliteknikKuchingSarawak.
NationalLibraryofMalaysia Cataloguing-in-PublicationData
AhmadSapuanHasan
HOWTOSTARTYOURFIRSTAUGMENTEDREALITYAPPLICATION/AHMADSAPUANBIN
HASAN,AHMADSYARIFUDDINBINCHEABDAZIZ.
Modeofaccess:InterneteISBN978-967-2953-13-5
1.Augmentedreality.
2.Mobileapps.
3.Governmentpublications--Malaysia.
4.Electronicbooks.
I.AhmadSyarifuddinCheAbdAziz. II.Title.006.8
Publishedby:
PoliteknikKuchingSarawak
MinistryOfHigherEducation
P
R
E
F
A
C
E
AHMAD SAPUAN BIN HASAN
Assalamulaikum and good day to everyone,
It is my intention to write a book that could teach
about an alien knowledge such as the Augmented
Reality (AR) in the most easy and simple tone. I had no
idea how difficult it was to convey a simple message.
This book is the result of my years of experience as a
lecturer and app developer. I do not expect to make
money from this book, but the journey of guiding
people in their learning and making their process less
stressful always makes me happy and content.
This book aims to guide readers through the process
of developing their own AR application, beginning
with key terms in AR, related hardware, software used,
and the user interface. To ensure that it is simple to
implement, the simplest AR development software is
introduced, and step-by-step instructions with images
are shown. A few exercises are included at the end of
this book to help readers practise their skills.
I sincerely hope that you will gain a lot from this book.
Remember that knowing without sharing is boring.
H O W T O S T A R T Y O U R F I R S T A U G M E N T E D R E A L I T Y A P P L I C A T I O N
sapuan@poliku.edu.my
I
N
T
R
O
D
U
C
T
I
O
N
I. INTRODUCTION
The main objective of this eBook is guide readers
how to create AR and VR based application for
android. The guidelines provided will be simple and
easy to understand. This eBook explains the
installation step for Unity and Vuforia. Unity is a
leading platform to create augmented reality and
virtual reality application. Vuforia is a mobile
augmented reality software development kit that
supports the development of augmented reality
applications. Both unity and Vuforia is free to install.
It is reported that the global market growth for VR
and AR reach us$71bil by 2025, this figure shows the
huge potential waiting for people out there. With the
pandemic going all over the world, the importance of
VR and AR would continue and surely have a long-
lasting place. The use of AR technology makes it
possible for users to interact with the real world in real
time. The perceptive power of humans is also
improved by AR technology. The AR technology is
useful because it facilitates the ability for everyone to
have instantaneous and around-the-clock access to
the data they need. The vast application of them
whether in gaming, education and most recently
official meetings brings endless possibilities and
advancement in Covid-19 condition.
H O W T O S T A R T Y O U R F I R S T A U G M E N T E D R E A L I T Y A P P L I C A T I O N
I
N
T
R
O
D
U
C
T
I
O
N
Industry 4.0 benefits greatly from the use of virtual
reality (VR). In the industrial settings, manufacturing
units begin to implement artificial intelligence, strong
connectivity data intelligence operating systems, and
process simulation, then these provide several
possibilities for the creation of innovative solutions.
Such alteration will be used to fine-tune the
production capacity, and to fulfil the customer's
needs. Amid IR 4.0 era, online learning is becoming
the norm. The method of teaching and learning have
evolved significantly. In terms of education, by
exposing and teaching students the application or
making them learn how to develop VR and AR related
app, the knowledge void caused by the absence of
physical learning could be filled, thus making sure
their advancement in learning and acquiring
knowledge are not affected. All of these exposures to
student, would tremendously be an added value for
the mainstream education.
H O W T O S T A R T Y O U R F I R S T A U G M E N T E D R E A L I T Y A P P L I C A T I O N
T
A
B
L
E
O
F
C
O
N
T
E
N
T
I. AR AND VR
Augmented Reality
Virtual Reality
2
6
II. UNITY AND VUFORIA
Introduction
Install Unity
Install Vuforia
Image Target
File Format
9
10
13
19
22
III. UNITY WINDOW
Unity Hub
Hierarchy
Scene
Inspector
Project
24
25
26
27
30
IV. SELF PRACTICE
Exercise 32
H O W T O S T A R T Y O U R F I R S T A U G M E N T E D R E A L I T Y A P P L I C A T I O N
Part1:
Introductionto
ARandVR
AugmentedReality
Augmented Reality is a technology that superimposes Computer
generated images on the users view of the real world thus providing a
composite view.
Definition
To add
something to
the real world
Augmented Augment
Hand held device
Head's up device
Augmented Reality can be separated into two:
Device
Figure 1: The flow process of augmented reality
Picture 1: Example device for head's up AR
2
AugmentedReality
Picture 2: Example device for hand held AR
The phone needs to have some features to run an AR application.
Those feature is:
Smartphone Requirement
Camera
GPS (Global Positioning Sensor)
Accelerometer
Compass Sensor
CPU, GPU, RAM
3
Marker based augmented reality experiences require a static
image also referred to as a trigger photo that a person can scan
using their mobile device via an augmented reality app. The mobile
scan will trigger the additional content (video, animation, 3D or
other) prepared in advance to appear on top of the marker
Marker based Augmented Reality:
AugmentedReality
Type of Augmented Reality
Markerless augmented reality (AR) refers to a software application
that doesn't require prior knowledge of a user's environment to
overlay virtual 3D content into a scene and hold it to a fixed point
in space
Markerless Augmented Reality:
Projection Augmented Reality, sometimes also referred to as
“Spatial Augmented Reality,” is a method of delivering digital
information to users within a stationary context. Target objects and
users can move around in the environment, but the zone in which
AR experiences take place is limited to the fields of view of both
the fixed projector and supporting camera for tracking.
Projection Based Augmented Reality:
4
Superimposition-based augmented reality uses object recognition.
The augmented image replaces the original image either partially or
fully. This type of AR is commonly used in the medical field to
superimpose an X-ray onto a patient's body. It can also be used to
enhance a historical tour
Superimposition Based Augmented Reality:
AugmentedReality
Type of Augmented Reality
Picture 3: Various type of AR application
5
The computer-generated simulation of a three-dimensional image or
environment that can be interacted with in a seemingly real or physical
way by a person using special electronic equipment, such as a helmet
with a screen inside or gloves fitted with sensors
VirtualReality
Definition
Picture 4: Different type of VR Headset
6
VirtualReality
Main Sensors
Magnetometer
Measure the
mangetic feild
Accelerometer
Measure
changes in x, y,
z axis of the
phone
Gyroscope
Measure very
small changes
in smartphone
position
The only difference between
Augmented Reality and Virtual
Reality is a camera lens. The
Augmented reality required camera
lens, but the virtual reality do not
required camera lens.
7
Part2:
Introductionto
UnityandVuforia
Introduction
Unity
Unity Leading platform for Creating 3D, 2D, VR & AR Experiences For Any
Industry.
Website: https://unity.com/
Unity Store
Assets and publish them to the store. There are various types of Assets in
the store ranging from textures, animations and models to entire Project
examples, tutorials and Editor extensions.
Website: https://store.unity.com/
Vuforia
Vuforia Engine is a software development kit (SDK) for creating
Augmented Reality apps.
Website: https://developer.vuforia.com/
9
InstallUnity
1.Open web
browser : Type
Unity Download >
Download Unity
Hub
2. Click Install >
ADD
3. Select the latest
version. Unity
2020.3.2f1 (LTS) >
NEXT
10
4. For Android User
Select android build
support and for ios
user select ios build
support > NEXT
Microsoft visual studio
community 2019 is
optional if you already
have it.
Total file size: 9GB
InstallUnity
5. Tick and Done.
Installation with take 5
- 10 minutes.
6. Don't forget to
register an accoutn
with Unity and apply
license too.
License Agreement as
Unity Personal > any
two > OK.
11
7. If the error appear
"Unity Package
Manager Error" when
try to open project file,
What you need to do
is turn OFF Firewall.
By go to Setting >
Update & Security >
Windows Security >
Windows & Network
Protection > Window
Defender Firewall >
TURN OFF
InstallUnity
12
1.Open web browser,
type 'download
vuforia'
Download add-
vuforia-package.
InstallVuforia
2. Open Unity. Asset >
Import Package >
Custom Package >
add-vuforia-package
> Click Open > Import
13
3. Open the download
file location.
Select file and click
OPEN.
InstallVuforia
4. Select all and click
IMPORT.
14
5. When import
process finish, you
can check here.
GameObject > Vuforia
Engine
InstallVuforia
** Other method to import package by double click the unity
package and click import. This shortcut import package only
applicable if only one file unity project open at the same time.
15
InstallVuforia+
1. Google search >
Type Download unity
archive > Unity 2020.x >
Unity 2020.2.2 > Click
Unity Hub
Choose Application >
Open Link
Download in progress.
2. After completed
installation. Download
Git Client and install.
https://git-scm.com
3. Then, Download Git
Large File Storage and
install.
https://git-lfs.github.com/
16
InstallVuforia+
4. Google search > Type
Unity Asset Store >
Search for assets >
Type - Vuforia Core >
Enter.
Before this, Login your
Unity ID. The ID must be
the same account with
Unity Hub.
5. Start a new project
by using version
2020.2.2f1 > 3D > Create
6. Find Vuforia Core
Samples (FREE) > Click
Open in Unity.
While Open in Unity >
click Download.
17
InstallVuforia+
8. Repeat the step from
step 2 until 5 from topic
Install Vuforia.
The process resolving
package will take time.
Make sure you internet
connection is ready.
7. Start a new project
AGAIN by using version
2020.2.2f1 > 3D > Create
18
ImageTarget
Image must be in one of the supported formats: PNG or JPEG.
Image must either be grayscale or RGB-24 bit. This means that 32-bit
images with an alpha channel (RGB + Alpha) are not allowed.
Image size does not exceed 2 MB.
For image convertor you may use this site (use file format PNG24 ):
http://www.picturetopeople.org/image_utilities/image_converter.html
1.Go to Vuforia > Sign In
> Click Develop >
License Manager > Get
Development Key
3. The file downloaded
from image converter
site should be rename >
5.png
2. Upload file and select
output format: PNG24 -
24 Bits PNG
19
ImageTarget
4. After convert image
target upload to:
Target Manager > Add
Target > Add.
Type: Single Image
File Type: png or jpeg
Witdh: 5 - 8
Name: 1 word (only
alphabet, can mix with
small and capital letter)
20
ImageTarget
5. Make sure the image
target had a 5 star
rating. Next:
Download Database(All)
> Select Unity Hub >
Download.
6. Assets > Import
Package > Custom
Package > Select file
downloaded from
vuforia >Click Import.
Check your file:
Select Image Target >
Inpector > Image Target
Behavior > Database.
21
Exported 3D file formats, such as .fbx or .obj. You can export files from
3D modeling software in generic formats that can be imported and
edited by a wide variety of different software.
Example software to design 3D model such as SketchUp and
SpeedTree.
Autodesk® Maya®
Autodesk® 3ds Max®
NewTek LightWave
Unity supports importing Meshes and animation from two different types
of files:
In addition to these generation guidelines about exporting from 3d
modeling applications, the following sections contain more specific
information for these 3d modeling applications:
FileFormat
22
Part3:
UnityWindow
Explanation
Click New
Select 3D
Project Title
Select location to install project file
Click, Create
If you have multiple version of Unity, you will need the Unity Hub to
centralize lists of your project, unity document, community and installer
version available. Also, you can import existing project by clicking add
button.
To start a new project:
UnityHub
24
The first window shown in red box below is Hierarchy. The Hierarchy
contains every GameObject in the current Scene. As objects are added
and removed in the scene, they will appear and disappear from the
Hierarchy as well. By default the GameObjects will be listed in the
Hierarchy window in the order they are made.
By default, the Hierarchy lists SampleScene shown in the picture below.
To add more features, click the "+" button at the left corner. Also, you
can create a new GameObject by right click on empty space in the
selected Scene and select the GameObject you want to create.
Hierarchy
25
Game - The game view is rendered from your camera in your
application. It represents your final and published application.
Asset Store - You can download any asset from Unity Asset Store
and apply to your project.
The second window is the Scene. The Scene is your interactive into the
projec you are creating. You can use to select and adjust position of
scenery, resize, cameras, lights direction and all related to the
GameObjects. That the first skill you must learn to begin working in
Unity by selecting, manipulating and modifying GameObject.
Beside the Scene, there is Game and Asset Store.
Scene
26
Th Inspector window to view and edit properties each items listed in
the Hierarchy. The items including GameObject, Unity components,
Assets, materials and editor setting preferences.
What you can see and edit in an Inspector window depends on what
you select. This section describes what an Inspector window displays
for different types of items you can select.
Inspector
27
Locking The Inspector
Normally, the Inspector shows the properties of the currently selected
GameObject, script, or Asset. But sometimes, it’s useful to keep one
item in the Inspector while you work with other items. In that case, you
can lock an Inspector window to a specific item.
To lock an Inspector window to an item, click the lock icon in the
Inspector window. The lock icon changes to show that the Inspector is
now locked to the selection.
Inspector
The Inspector lock button in in its unlocked (top) and locked (bottom)
states
This is useful when you’re editing one item’s properties frequently. For
example, if you’re fine-tuning a Camera’s position, you can lock an
Inspector window to the Camera, and open a second Inspector window
(More Items (⋮) menu: Add Tab > Inspector) to continue displaying the
properties of the current selection.
28
They do not update to show the properties for the current
selection.
You cannot lock them. Each focused Inspector shows a specific
item’s properties, so there’s no need.
You cannot toggle between Debug and Normal mode from a
focused Inspector.
Focused Inspectors
A focused Inspector is a dedicated Inspector window for a specific
GameObject, Unity component, or Asset. It always displays the
properties of the item you opened it for, even if you select something
else in the Scene or Project.
Focused Inspectors work just like regular Inspectors, except for the
following differences:
Inspector
From the main menu, select Assets > Properties.
Use the Alt + P / Option + Shift + P shortcut.
Alternatively, select the GameObject or Asset and do one of the
following:
29
The Project window displays all of the files related to your Project and is
the main way you can navigate and find Assets and other Project files in
your application. When you start a new Project by default this window is
open. The left panel of the browser shows the folder structure of the
Project as a hierarchical list. When you select a folder from the list, Unity
shows its contents in the pane to the right. You can click the small
triangle to expand or collapse the folder, displaying any nested folders it
contains.
Project
30
Part4:
SelfPractice
Exercise
Add GameObject to the
Hierarchy
Hierarchy Window. Click
+button > 3D Object >
Sphere
1.
2. Click Sphere in the Hierarchy
and Shhere properties will
apprear in the Inspector
Window.
You can change the size of the
GameObject (Sphere) by in the
Inspector Window.
Or your can use the Scale Tool
features to adjust the scale of
the Sphere.
Set Position, Rotation and
Scale
32
Exercise
Set Lighting
3. Click Window > Rendering >
Lighting > Click Button Generate
Lighting.
4. Project Window: Right click
at any empty space >Create >
Material.
Click Material and properties
appear at Inspector Window.
Click ink logo to change color.
Select Material / Texture
Before
After
33
Exercise
5. Drag Material to the Sphere.
You can check the Material is
added to the Inspector Window.
6. Project Window: Right click
any empty space > Crate > C#
Script.
Default file name:
NewBehaviourScript.
The file will open in Microsoft
Virtual Studio.
Add Rotation Motion
Change Material / Texture
34
Exercise
7. Open the NewBehaviorScript file and add the red line script below to
your default script file:
using System.Collections;
using System.Collections.Generic;
using UnityEngine;
public class NewBehaviourScript : MonoBehaviour
{
Vector3 movement;
// Start is called before the first frame update
void Start()
{
movement = new Vector3(0, 60, 0);
}
// Update is called once per frame
void Update()
{
transform.Rotate(movement * Time.deltaTime);
}
}
8. After that, drag the file the the Sphere at the Hierarchy.
Edit Script
35
Exercise
9. Before test the application,
you can check the Sphere
Inspector Window.
The two components should
be available in here.
10. To play the rotation, click the play button as shown in the picture
below. The sphere will rotating inside the Game View section. You can
try to change from plain color to texture to compare the effect of the
rotation.
36
SoftwareVersion:
UnityHub-2.4.3
Unity-2020.2.2f1
Vuforia-9.8.5
Alwaysdownloadthelatestversionatthattime. Duringthisebookis
writtenthisversionisthelatest.
References:
https://docs.unity3d.com/Manual/index.html
https://library.vuforia.com/
With 9 years of experience in teaching, plus
his involvement in developing more than 40
apps projects in Playstore and App store, this
book is one of his masterpieces. It is safe to
say that he walks the talks even if it’s funny.
Why should you read this book? Well from
the author’s POV, this book will give the
readers the easiest and practical way of
learning augmented reality app.
Ahmad Sapuan Bin Hasan
This guy is a mixed and matched. If you a
need a good listener and “maybe” a doer, this
is your guy. Always being considered as not
being serious enough, he considers being too
serious could leads to unnecessary stress.
Ahmad Syarifuddin Bin Che Abd Aziz
Published by:
Politeknik Kuching Sarawak
Ministry Of Higher Education
About the Author

How to start your first augmented reality application.pdf

  • 1.
    HOW TO STARTYOUR FIRST AUGMENTED REALITY APPLICATION AHMAD SAPUAN BIN HASAN AHMAD SYARIFUDDIN BIN CHE ABD AZIZ
  • 2.
    POLITEKNIKKUCHINGSARAWAK MINISTRYOFHIGHEREDUCATION KM22,JALANMATANG, 93050KUCHING,SARAWAK. PhoneNo.:(082)845596/7/8 FaxNo.:(082)845023 E-mail :poliku.info@poliku.edu.my Website :http://www.poliku.edu.my/ Copyright©2021PoliteknikKuchingSarawak eISBN978-967-2953-13-5 Allrightsreserved.Nopartsofthispublicationmaybecopied,storedinformorbyanymeans, electronic,mechanical,photocopyingandrecordingorotherwiseorbyanymeansfor reproducedwithoutthepriorpermissionofPoliteknikKuchingSarawak. NationalLibraryofMalaysia Cataloguing-in-PublicationData AhmadSapuanHasan HOWTOSTARTYOURFIRSTAUGMENTEDREALITYAPPLICATION/AHMADSAPUANBIN HASAN,AHMADSYARIFUDDINBINCHEABDAZIZ. Modeofaccess:InterneteISBN978-967-2953-13-5 1.Augmentedreality. 2.Mobileapps. 3.Governmentpublications--Malaysia. 4.Electronicbooks. I.AhmadSyarifuddinCheAbdAziz. II.Title.006.8 Publishedby: PoliteknikKuchingSarawak MinistryOfHigherEducation
  • 3.
    P R E F A C E AHMAD SAPUAN BINHASAN Assalamulaikum and good day to everyone, It is my intention to write a book that could teach about an alien knowledge such as the Augmented Reality (AR) in the most easy and simple tone. I had no idea how difficult it was to convey a simple message. This book is the result of my years of experience as a lecturer and app developer. I do not expect to make money from this book, but the journey of guiding people in their learning and making their process less stressful always makes me happy and content. This book aims to guide readers through the process of developing their own AR application, beginning with key terms in AR, related hardware, software used, and the user interface. To ensure that it is simple to implement, the simplest AR development software is introduced, and step-by-step instructions with images are shown. A few exercises are included at the end of this book to help readers practise their skills. I sincerely hope that you will gain a lot from this book. Remember that knowing without sharing is boring. H O W T O S T A R T Y O U R F I R S T A U G M E N T E D R E A L I T Y A P P L I C A T I O N sapuan@poliku.edu.my
  • 4.
    I N T R O D U C T I O N I. INTRODUCTION The mainobjective of this eBook is guide readers how to create AR and VR based application for android. The guidelines provided will be simple and easy to understand. This eBook explains the installation step for Unity and Vuforia. Unity is a leading platform to create augmented reality and virtual reality application. Vuforia is a mobile augmented reality software development kit that supports the development of augmented reality applications. Both unity and Vuforia is free to install. It is reported that the global market growth for VR and AR reach us$71bil by 2025, this figure shows the huge potential waiting for people out there. With the pandemic going all over the world, the importance of VR and AR would continue and surely have a long- lasting place. The use of AR technology makes it possible for users to interact with the real world in real time. The perceptive power of humans is also improved by AR technology. The AR technology is useful because it facilitates the ability for everyone to have instantaneous and around-the-clock access to the data they need. The vast application of them whether in gaming, education and most recently official meetings brings endless possibilities and advancement in Covid-19 condition. H O W T O S T A R T Y O U R F I R S T A U G M E N T E D R E A L I T Y A P P L I C A T I O N
  • 5.
    I N T R O D U C T I O N Industry 4.0 benefitsgreatly from the use of virtual reality (VR). In the industrial settings, manufacturing units begin to implement artificial intelligence, strong connectivity data intelligence operating systems, and process simulation, then these provide several possibilities for the creation of innovative solutions. Such alteration will be used to fine-tune the production capacity, and to fulfil the customer's needs. Amid IR 4.0 era, online learning is becoming the norm. The method of teaching and learning have evolved significantly. In terms of education, by exposing and teaching students the application or making them learn how to develop VR and AR related app, the knowledge void caused by the absence of physical learning could be filled, thus making sure their advancement in learning and acquiring knowledge are not affected. All of these exposures to student, would tremendously be an added value for the mainstream education. H O W T O S T A R T Y O U R F I R S T A U G M E N T E D R E A L I T Y A P P L I C A T I O N
  • 6.
    T A B L E O F C O N T E N T I. AR ANDVR Augmented Reality Virtual Reality 2 6 II. UNITY AND VUFORIA Introduction Install Unity Install Vuforia Image Target File Format 9 10 13 19 22 III. UNITY WINDOW Unity Hub Hierarchy Scene Inspector Project 24 25 26 27 30 IV. SELF PRACTICE Exercise 32 H O W T O S T A R T Y O U R F I R S T A U G M E N T E D R E A L I T Y A P P L I C A T I O N
  • 7.
  • 8.
    AugmentedReality Augmented Reality isa technology that superimposes Computer generated images on the users view of the real world thus providing a composite view. Definition To add something to the real world Augmented Augment Hand held device Head's up device Augmented Reality can be separated into two: Device Figure 1: The flow process of augmented reality Picture 1: Example device for head's up AR 2
  • 9.
    AugmentedReality Picture 2: Exampledevice for hand held AR The phone needs to have some features to run an AR application. Those feature is: Smartphone Requirement Camera GPS (Global Positioning Sensor) Accelerometer Compass Sensor CPU, GPU, RAM 3
  • 10.
    Marker based augmentedreality experiences require a static image also referred to as a trigger photo that a person can scan using their mobile device via an augmented reality app. The mobile scan will trigger the additional content (video, animation, 3D or other) prepared in advance to appear on top of the marker Marker based Augmented Reality: AugmentedReality Type of Augmented Reality Markerless augmented reality (AR) refers to a software application that doesn't require prior knowledge of a user's environment to overlay virtual 3D content into a scene and hold it to a fixed point in space Markerless Augmented Reality: Projection Augmented Reality, sometimes also referred to as “Spatial Augmented Reality,” is a method of delivering digital information to users within a stationary context. Target objects and users can move around in the environment, but the zone in which AR experiences take place is limited to the fields of view of both the fixed projector and supporting camera for tracking. Projection Based Augmented Reality: 4
  • 11.
    Superimposition-based augmented realityuses object recognition. The augmented image replaces the original image either partially or fully. This type of AR is commonly used in the medical field to superimpose an X-ray onto a patient's body. It can also be used to enhance a historical tour Superimposition Based Augmented Reality: AugmentedReality Type of Augmented Reality Picture 3: Various type of AR application 5
  • 12.
    The computer-generated simulationof a three-dimensional image or environment that can be interacted with in a seemingly real or physical way by a person using special electronic equipment, such as a helmet with a screen inside or gloves fitted with sensors VirtualReality Definition Picture 4: Different type of VR Headset 6
  • 13.
    VirtualReality Main Sensors Magnetometer Measure the mangeticfeild Accelerometer Measure changes in x, y, z axis of the phone Gyroscope Measure very small changes in smartphone position The only difference between Augmented Reality and Virtual Reality is a camera lens. The Augmented reality required camera lens, but the virtual reality do not required camera lens. 7
  • 14.
  • 15.
    Introduction Unity Unity Leading platformfor Creating 3D, 2D, VR & AR Experiences For Any Industry. Website: https://unity.com/ Unity Store Assets and publish them to the store. There are various types of Assets in the store ranging from textures, animations and models to entire Project examples, tutorials and Editor extensions. Website: https://store.unity.com/ Vuforia Vuforia Engine is a software development kit (SDK) for creating Augmented Reality apps. Website: https://developer.vuforia.com/ 9
  • 16.
    InstallUnity 1.Open web browser :Type Unity Download > Download Unity Hub 2. Click Install > ADD 3. Select the latest version. Unity 2020.3.2f1 (LTS) > NEXT 10
  • 17.
    4. For AndroidUser Select android build support and for ios user select ios build support > NEXT Microsoft visual studio community 2019 is optional if you already have it. Total file size: 9GB InstallUnity 5. Tick and Done. Installation with take 5 - 10 minutes. 6. Don't forget to register an accoutn with Unity and apply license too. License Agreement as Unity Personal > any two > OK. 11
  • 18.
    7. If theerror appear "Unity Package Manager Error" when try to open project file, What you need to do is turn OFF Firewall. By go to Setting > Update & Security > Windows Security > Windows & Network Protection > Window Defender Firewall > TURN OFF InstallUnity 12
  • 19.
    1.Open web browser, type'download vuforia' Download add- vuforia-package. InstallVuforia 2. Open Unity. Asset > Import Package > Custom Package > add-vuforia-package > Click Open > Import 13
  • 20.
    3. Open thedownload file location. Select file and click OPEN. InstallVuforia 4. Select all and click IMPORT. 14
  • 21.
    5. When import processfinish, you can check here. GameObject > Vuforia Engine InstallVuforia ** Other method to import package by double click the unity package and click import. This shortcut import package only applicable if only one file unity project open at the same time. 15
  • 22.
    InstallVuforia+ 1. Google search> Type Download unity archive > Unity 2020.x > Unity 2020.2.2 > Click Unity Hub Choose Application > Open Link Download in progress. 2. After completed installation. Download Git Client and install. https://git-scm.com 3. Then, Download Git Large File Storage and install. https://git-lfs.github.com/ 16
  • 23.
    InstallVuforia+ 4. Google search> Type Unity Asset Store > Search for assets > Type - Vuforia Core > Enter. Before this, Login your Unity ID. The ID must be the same account with Unity Hub. 5. Start a new project by using version 2020.2.2f1 > 3D > Create 6. Find Vuforia Core Samples (FREE) > Click Open in Unity. While Open in Unity > click Download. 17
  • 24.
    InstallVuforia+ 8. Repeat thestep from step 2 until 5 from topic Install Vuforia. The process resolving package will take time. Make sure you internet connection is ready. 7. Start a new project AGAIN by using version 2020.2.2f1 > 3D > Create 18
  • 25.
    ImageTarget Image must bein one of the supported formats: PNG or JPEG. Image must either be grayscale or RGB-24 bit. This means that 32-bit images with an alpha channel (RGB + Alpha) are not allowed. Image size does not exceed 2 MB. For image convertor you may use this site (use file format PNG24 ): http://www.picturetopeople.org/image_utilities/image_converter.html 1.Go to Vuforia > Sign In > Click Develop > License Manager > Get Development Key 3. The file downloaded from image converter site should be rename > 5.png 2. Upload file and select output format: PNG24 - 24 Bits PNG 19
  • 26.
    ImageTarget 4. After convertimage target upload to: Target Manager > Add Target > Add. Type: Single Image File Type: png or jpeg Witdh: 5 - 8 Name: 1 word (only alphabet, can mix with small and capital letter) 20
  • 27.
    ImageTarget 5. Make surethe image target had a 5 star rating. Next: Download Database(All) > Select Unity Hub > Download. 6. Assets > Import Package > Custom Package > Select file downloaded from vuforia >Click Import. Check your file: Select Image Target > Inpector > Image Target Behavior > Database. 21
  • 28.
    Exported 3D fileformats, such as .fbx or .obj. You can export files from 3D modeling software in generic formats that can be imported and edited by a wide variety of different software. Example software to design 3D model such as SketchUp and SpeedTree. Autodesk® Maya® Autodesk® 3ds Max® NewTek LightWave Unity supports importing Meshes and animation from two different types of files: In addition to these generation guidelines about exporting from 3d modeling applications, the following sections contain more specific information for these 3d modeling applications: FileFormat 22
  • 29.
  • 30.
    Click New Select 3D ProjectTitle Select location to install project file Click, Create If you have multiple version of Unity, you will need the Unity Hub to centralize lists of your project, unity document, community and installer version available. Also, you can import existing project by clicking add button. To start a new project: UnityHub 24
  • 31.
    The first windowshown in red box below is Hierarchy. The Hierarchy contains every GameObject in the current Scene. As objects are added and removed in the scene, they will appear and disappear from the Hierarchy as well. By default the GameObjects will be listed in the Hierarchy window in the order they are made. By default, the Hierarchy lists SampleScene shown in the picture below. To add more features, click the "+" button at the left corner. Also, you can create a new GameObject by right click on empty space in the selected Scene and select the GameObject you want to create. Hierarchy 25
  • 32.
    Game - Thegame view is rendered from your camera in your application. It represents your final and published application. Asset Store - You can download any asset from Unity Asset Store and apply to your project. The second window is the Scene. The Scene is your interactive into the projec you are creating. You can use to select and adjust position of scenery, resize, cameras, lights direction and all related to the GameObjects. That the first skill you must learn to begin working in Unity by selecting, manipulating and modifying GameObject. Beside the Scene, there is Game and Asset Store. Scene 26
  • 33.
    Th Inspector windowto view and edit properties each items listed in the Hierarchy. The items including GameObject, Unity components, Assets, materials and editor setting preferences. What you can see and edit in an Inspector window depends on what you select. This section describes what an Inspector window displays for different types of items you can select. Inspector 27
  • 34.
    Locking The Inspector Normally,the Inspector shows the properties of the currently selected GameObject, script, or Asset. But sometimes, it’s useful to keep one item in the Inspector while you work with other items. In that case, you can lock an Inspector window to a specific item. To lock an Inspector window to an item, click the lock icon in the Inspector window. The lock icon changes to show that the Inspector is now locked to the selection. Inspector The Inspector lock button in in its unlocked (top) and locked (bottom) states This is useful when you’re editing one item’s properties frequently. For example, if you’re fine-tuning a Camera’s position, you can lock an Inspector window to the Camera, and open a second Inspector window (More Items (⋮) menu: Add Tab > Inspector) to continue displaying the properties of the current selection. 28
  • 35.
    They do notupdate to show the properties for the current selection. You cannot lock them. Each focused Inspector shows a specific item’s properties, so there’s no need. You cannot toggle between Debug and Normal mode from a focused Inspector. Focused Inspectors A focused Inspector is a dedicated Inspector window for a specific GameObject, Unity component, or Asset. It always displays the properties of the item you opened it for, even if you select something else in the Scene or Project. Focused Inspectors work just like regular Inspectors, except for the following differences: Inspector From the main menu, select Assets > Properties. Use the Alt + P / Option + Shift + P shortcut. Alternatively, select the GameObject or Asset and do one of the following: 29
  • 36.
    The Project windowdisplays all of the files related to your Project and is the main way you can navigate and find Assets and other Project files in your application. When you start a new Project by default this window is open. The left panel of the browser shows the folder structure of the Project as a hierarchical list. When you select a folder from the list, Unity shows its contents in the pane to the right. You can click the small triangle to expand or collapse the folder, displaying any nested folders it contains. Project 30
  • 37.
  • 38.
    Exercise Add GameObject tothe Hierarchy Hierarchy Window. Click +button > 3D Object > Sphere 1. 2. Click Sphere in the Hierarchy and Shhere properties will apprear in the Inspector Window. You can change the size of the GameObject (Sphere) by in the Inspector Window. Or your can use the Scale Tool features to adjust the scale of the Sphere. Set Position, Rotation and Scale 32
  • 39.
    Exercise Set Lighting 3. ClickWindow > Rendering > Lighting > Click Button Generate Lighting. 4. Project Window: Right click at any empty space >Create > Material. Click Material and properties appear at Inspector Window. Click ink logo to change color. Select Material / Texture Before After 33
  • 40.
    Exercise 5. Drag Materialto the Sphere. You can check the Material is added to the Inspector Window. 6. Project Window: Right click any empty space > Crate > C# Script. Default file name: NewBehaviourScript. The file will open in Microsoft Virtual Studio. Add Rotation Motion Change Material / Texture 34
  • 41.
    Exercise 7. Open theNewBehaviorScript file and add the red line script below to your default script file: using System.Collections; using System.Collections.Generic; using UnityEngine; public class NewBehaviourScript : MonoBehaviour { Vector3 movement; // Start is called before the first frame update void Start() { movement = new Vector3(0, 60, 0); } // Update is called once per frame void Update() { transform.Rotate(movement * Time.deltaTime); } } 8. After that, drag the file the the Sphere at the Hierarchy. Edit Script 35
  • 42.
    Exercise 9. Before testthe application, you can check the Sphere Inspector Window. The two components should be available in here. 10. To play the rotation, click the play button as shown in the picture below. The sphere will rotating inside the Game View section. You can try to change from plain color to texture to compare the effect of the rotation. 36
  • 43.
  • 44.
    With 9 yearsof experience in teaching, plus his involvement in developing more than 40 apps projects in Playstore and App store, this book is one of his masterpieces. It is safe to say that he walks the talks even if it’s funny. Why should you read this book? Well from the author’s POV, this book will give the readers the easiest and practical way of learning augmented reality app. Ahmad Sapuan Bin Hasan This guy is a mixed and matched. If you a need a good listener and “maybe” a doer, this is your guy. Always being considered as not being serious enough, he considers being too serious could leads to unnecessary stress. Ahmad Syarifuddin Bin Che Abd Aziz Published by: Politeknik Kuching Sarawak Ministry Of Higher Education About the Author