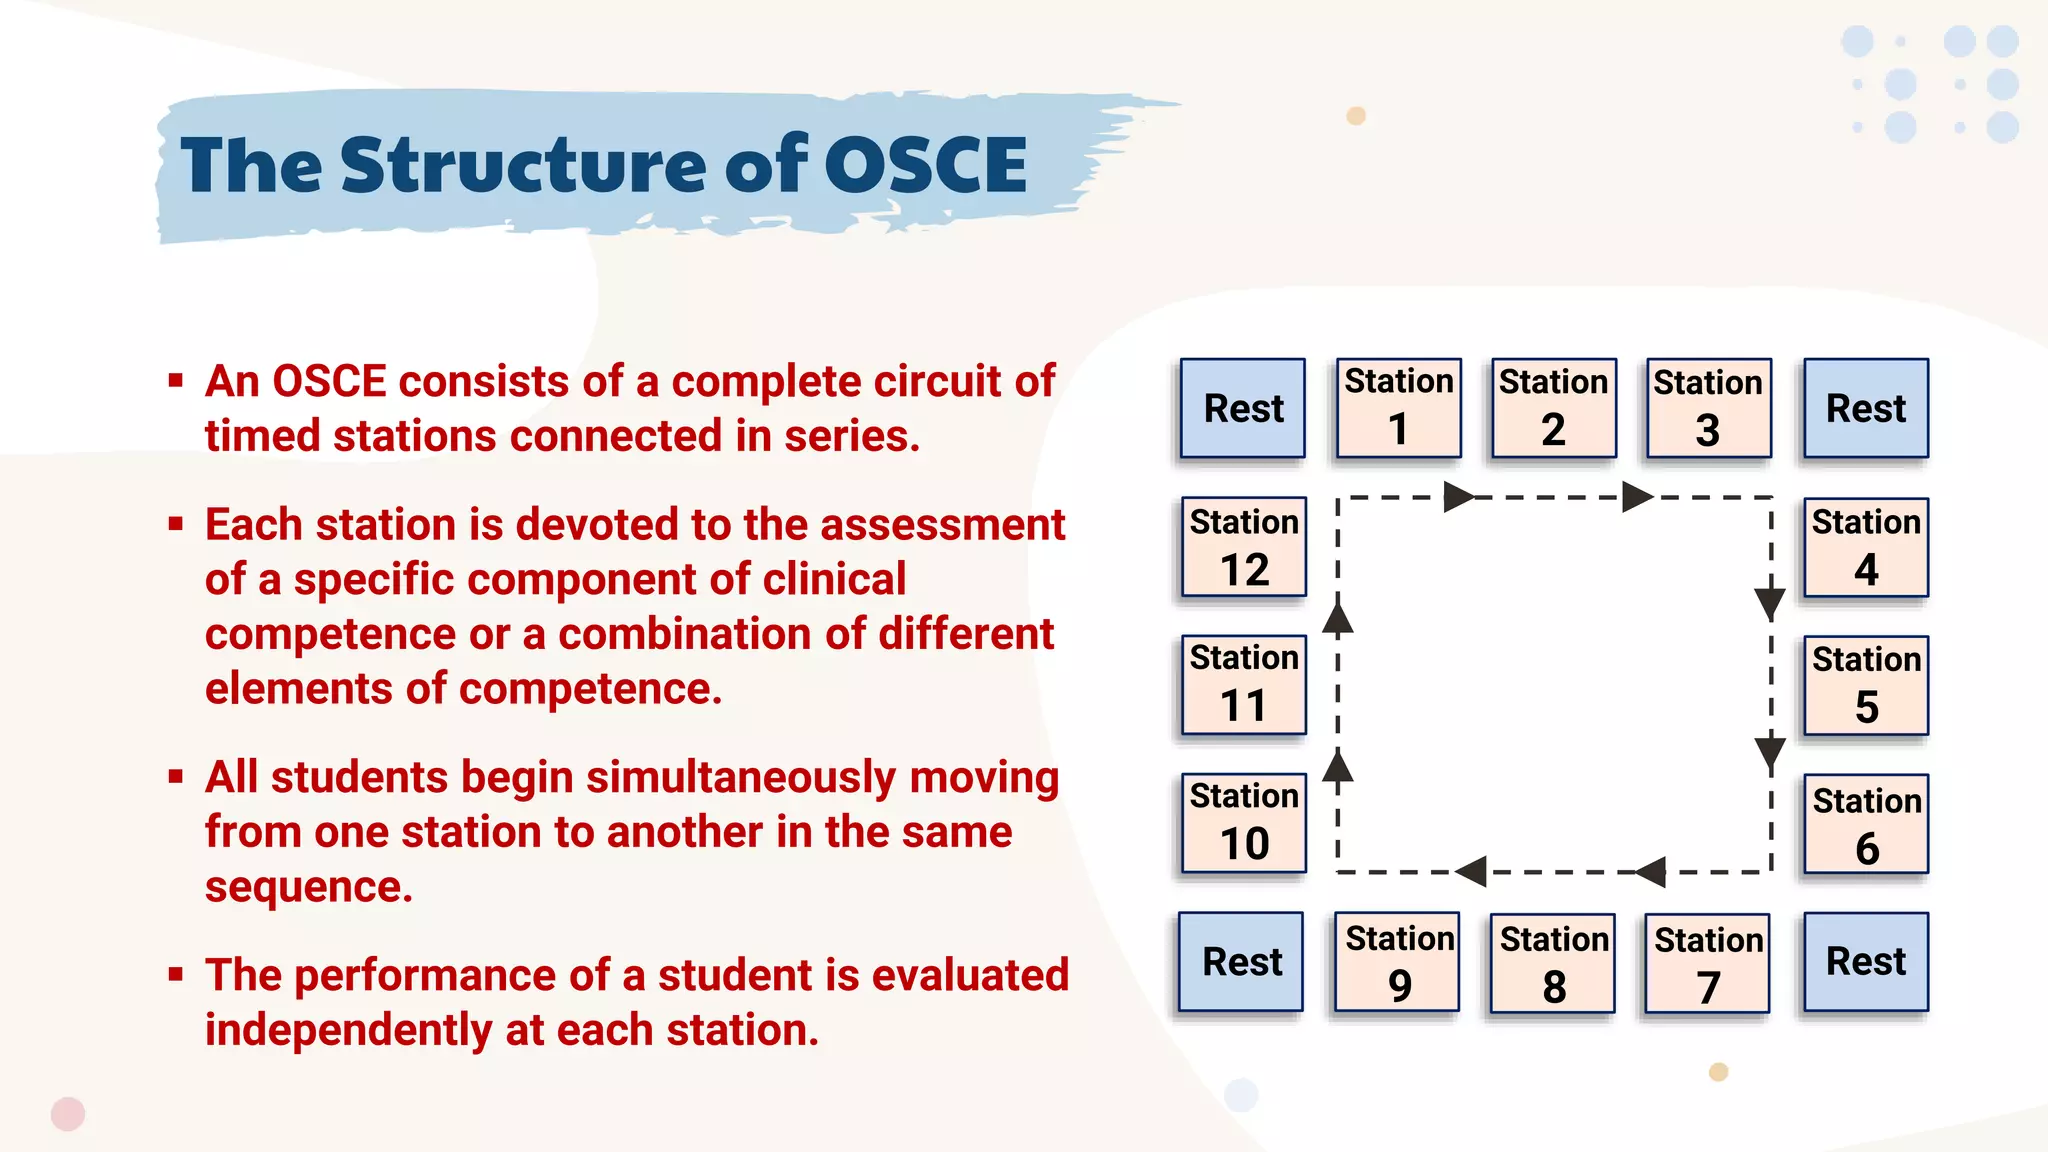
2. Lecture objectives
At the end of this lecture, the
audience must know:
Definition of OSCE
OSCE Structure
OSCE Format
OSCE Process
How to approach to OSCE Stations
3. E
Examination
S
Structured
the content of the examination
is planned carefully in advance.
C
Clinical
it is an assessment of
performance of clinical skills,
not a test of knowledge.
O
Objective
subjective bias is removed as
far as possible.
Definition of OSCE
The OSCE is an approach to the assessment
of clinical competence in a structured way
with attention being paid to the objectivity
of the examination.
4. To be satisfied that the trainee has achieved the
intended and expected outcomes of learning, he
has to be put to the test (examination).
Traditional formats of clinical examination have
been criticized that they are subjective in nature,
and unable to evaluate clinical competencies in a
VALID and RELIABLE manner.
The OSCE has been introduced by some medical
schools as a more objective, valid and reliable
measure of clinical performance.
It is a well-established, performance-based test
that allows for the standardized assessment of
clinical skills.
Why OSCE ?
5. An OSCE consists of a complete circuit of
timed stations connected in series.
Each station is devoted to the assessment
of a specific component of clinical
competence or a combination of different
elements of competence.
All students begin simultaneously moving
from one station to another in the same
sequence.
The performance of a student is evaluated
independently at each station.
The Structure of OSCE
Rest Rest
Rest Rest
Station
1
Station
2
Station
3
Station
4
Station
5
Station
6
Station
9
Station
8
Station
7
Station
12
Station
11
Station
10
6. The total number of stations is
variable. Generally, this may vary
from 10-25.
The time allotted per station is in
accordance with the competency
being assessed in a particular station
(5-20 minutes).
The majority of stations involve:
– Examiners
– Examiners’ checklists
– Candidates’ instructions
– Standardized or simulated patients
The Examination Stations
7. Most stations will require an
examiner, especially when clinical
skills are intended to be assessed.
The examiner observes and
assesses the candidate at each
station using a predetermined
standardized checklist.
The examiners will not interact
with the candidates except in the
following circumstances:
The Examiner
8. Most stations will require an
examiner, especially when clinical
skills are intended to be assessed.
The examiner observes and
assesses the candidate at each
station using a predetermined
standardized checklist.
The examiners will not interact
with the candidates except in the
following circumstances:
The Examiner
– When the candidate has misunderstood
the station instructions.
– In a physical examination scenario, the
examiner may remind the candidate to
explain what he is doing and describe his
findings.
– To provide pertinent findings once the
candidate has initiated specific
examination maneuvers.
– If there is a concern about the safety of the
patient.
– He may ask the candidate one or more oral
questions during a scenario (this will be
indicated on the candidate instructions).
9. The examiners have a standard
printed marking sheet (checklist)
for each station.
The checklist is a rating scale that
is constructed of items that the
candidate should carry out at the
station.
The checklists are standardized to
reduce examiner’s bias and make
the assessment more objective
rather than subjective.
The Checklist
10. The instructions provide the information to
candidates before entering an OSCE station.
It includes the patient’s name, gender, and
age, as well as their presenting complaint.
It also includes the ‘clinical task’ that must
be performed, and the time allotted for the
task.
It is posted beside the door to the station
room. It also available in the station room.
The candidate can also use the notebook to
highlight his task and jot down any tips that
might assist him in his designated task.
The Candidate Instructions
Sura Aziz is a 63-year-old woman who visits the
emergency ward because of severe headache
and nausea.
In the next 10 minutes, take a focused history
and address her concerns.
11. A standardized or simulated patient (SP) is a
person trained to portray real patients.
He follows a certain script to play with a
candidate during the encounter.
The script is written in detail, including the
patient’s general look, clothes, gestures,
emotions, and all negative and positive
answers.
The candidate should treat each SP as a real
patient.
The Standardized Patient
12. Almost, any skill or competency in
medical education can be assessed in
an OSCE exercise.
However, they are organized into five
different categories.
1. History-Taking Stations
2. Physical Examination Stations
3. Communication Skills Stations
4. Emergency Stations
5. Procedural Skills Stations
The OSCE Format
13. History-taking station often consists of an
SP with the examiner.
These stations involve a brief description
of the patient’s presenting complaint.
The examiner is observing and listening
always, and the candidate does not need
to communicate with him.
An organized approach to history-taking
is recommended.
At the end of the station, the candidate
will often be asked to summarize, discuss
differential diagnoses and initial
management.
History-Taking Stations
14. The emphasis must be on focused
history-taking and only relevant systems
should be tackled to avoid time-wasting.
In these stations, in addition to assessing
the candidate’s data gathering approach,
his medical knowledge and
communication skills are also assessed.
It would have some difficulty dealing with
a patient or an ethical issue to be
assessed too.
Stations that involve a patient less than
10 years old, the candidate may be
interacting with the parent.
History-Taking Stations
15. These stations mostly use SPs to assess a
candidate’s physical examination skills.
Often, candidates should pursue the relevant
parts of the examination, based on the patient’s
problems (focused examination).
Before starting the physical examination, the
candidate should explain what he will do to the
patient and take the necessary permission before
proceeding.
The candidate must explain everything he is
doing and describe all normal and abnormal
findings to the examiner.
Sometimes, the examiner may be directed to
provide the candidate with information (e.g.,
clinical findings or results) when the candidate
has initiated a specific maneuver.
Physical Examination Stations
Often, the candidate would be provided with the
necessary equipment that is needed to perform
a specific task.
If the candidate feels that there is a piece of
equipment missing, he must tell the examiner
what equipment he wants and why.
16. An example of physical examination
station case scenario and checklist.
17. An example of physical examination
station case scenario and checklist.
18. Communication skills are central to OSCEs and
are likely to be tested in almost all stations
involving a patient.
Examples of what a communication station
might include:
– Exploring the patient concerns.
– Obtaining consent for a procedure or
treatment.
– Breaking bad news.
– Disclosing a medical error.
– Dealing with a difficult or angry patient.
– Patient education or counseling.
Communication Skills Stations
19. This is an important station to assess a candidate’s
ability to manage acutely ill patients safely and
effectively.
The candidate may be asked to undertake all the
steps to managing a critically unwell patient came to
the emergency room, or he may be asked to perform
only about certain parts of the process.
Simulation mannequins might be used in such
stations.
Regarding investigations, the candidate should start
with basic investigations. Then, he can proceed to
more invasive tests.
The candidate must make sure he can justify the
tests he orders and explain how the investigation will
aid his management plan.
Emergency Stations
20. Emergency Stations
The candidate should be able to interpret the
results of basic investigations and some specialist
tests and how these results will influence his
differential diagnosis.
If the candidate does not get the diagnosis straight
away, he should not be panic.
It is better to focus on common and important
differentials rather than rare diagnoses.
If the candidate is completely unsure of what is
happening, it is better to admit it: the examiner
might guide him back on track.
Finally, the management plan should aim to
stabilize the patient and control his symptoms, but
a candidate may also need to initiate definitive
treatment.
21. You are called to see the patient; Wasan
Hadi, a 35-year-old female who presents
with shortness of breath and chest pain for
2 hours.
You have 10 minutes to do the following:
– Obtain a brief relevant history.
– Perform a focused physical examination.
– Discuss the most important
investigations.
– Discuss the most probable diagnosis
based on findings provided.
– Explain the different options for
management to the patient.
Example of an Emergency Station
22. Procedure stations are designed to assess the
candidate’s technical skills required to execute
a range of important diagnostic or therapeutic
procedures.
The candidate is given a technical task relevant
to clinical practice to perform while the
examiner observes and rates his performance.
SPs, instruments, mannequins, or anatomical
models may be made use of to carry out the
tasks at these stations.
If the candidate is performing the procedure on
a mannequin, he must still talk to the SP as
though he is performing it on real patient.
Procedural Skills Stations
23. Occasionally, a combination of the above formats
is common, such as a history-taking and a physical
examination station, or a history-taking and a
communication station.
Additionally, few other modified formats fall into
one of the aforementioned five main types, such
as:
– Consult over the phone with a patient, a
caregiver, or another physician.
– Patient write-ups, such as admission, discharge,
progress, follow-up, pre/post-operative notes,
prescription, referral letters, etc.
– Interpretation of diagnostic materials, such as
laboratory reports, ECG recordings, X-ray/CT
scan images, etc.
Important Notes An example of interpretation of diagnostic
materials station:
24. The OSCE testing area consists of
many examination rooms.
The rooms are equipped with
cameras.
Almost, all OSCEs share similar
procedures.
On the examination day, the
candidate will go through the
following steps in sequence:
OSCE Process and Procedures
1. Registration
2. Orientation
3. Escorting to examination position
4. Station instruction time
5. The encounter
6. Post-encounter period
7. Repeat steps 4 to 6
8. End of examination
25. The candidate need to show his
examination invitation card and
identification.
He will be reminded about the
examination rules.
He will be checked for things that are
allowed and not allowed.
He will receive the examination
envelope, which contains an
identification badge, a clipboard, blank
papers for taking notes, and a pen, etc.
1. Registration
26. 2. Orientation
Examination format, procedures, and
policies would be reviewed.
The candidate will be introduced to
his team and team leader.
He will be instructed about his starting
station and how to proceed.
His questions will be answered (and
not allowed beyond this step).
An orientation video might be shown.
27. The candidate would be escorted to his starting
station.
He would stop by the assigned room door until a
buzzer announces the start of the examination.
3. Escorting to
examination position
4. Station instruction time
This is 1-2 minutes to read the instructions about
the station situation and required tasks.
The candidate must read them carefully.
At the next buzzer, he should enter the
examination room.
28. This is a 5-20 minute
encounter.
Often, the interactive station
has an examiner who assesses
how the candidate performs
the required tasks.
The candidate has to start the
encounter and then stop at the
next buzzer.
5. The encounter
29. 6. Post-encounter period
Some stations end with 1-2 minutes
assigned to oral questions asked by the
examiner.
The questions are relate directly to the
encounter.
During this period, the candidate is not
allowed to talk to the patient but only the
examiner.
Some stations alternate with a period of
written questions pertinent to the scenario.
At the next long buzzer, the first station
ended and the next station has started.
So, the candidate has to proceed to the
next station quickly.
30. 7. Repeat steps 4 - 6
Steps 4 to 6 would be repeated until the
candidate has been in all the stations.
Some OSCEs will offer 1-4 short rest
stations.
8. End of examination
When the examination is over, the
candidate will be escorted back to the
dismissal area for signing out.
The candidate will be asked to handle
back all that he had received on signing in.
31. During an OSCE, candidates are
expected to perform a variety of clinical
tasks in a simulated setting.
It is impossible to cover all the possible
conditions that could appear in OSCEs.
This lecture will provide the candidates
key skills to improve their general
technique so that they can better adapt
to the more frequent encounters.
Approach to OSCE Stations
32. The following generic points could apply to
almost every clinical encounter, whatever
their format:
General Approach
1. Carefully read and follow the instructions
provided outside each station.
2. Do not be tempted to do more than what the
station instructions require.
3. Feel free to take notes during the encounter.
4. Be relax, take a deep breath, smile, knock the
door and enter the examination room with
confidence.
5. Quickly survey the room for the patient,
equipment, and materials provided.
6. Stick to time, but do not appear rushed.
7. Be calm and appear warm and confident to the
patient.
33. General Approach
8. Greet the patient and introduce yourself, shake
hands, smile, even joke if it seems appropriate.
9. Explain your task to the patient.
10. Use clear language and avoid medical jargon.
11. Notify the examiner of any problem.
12. Explore the patient’s perspective or Agenda.
13. Throughout the medical encounter, maintain
an attentive behavior by using the SOLER
method.
14. Minimize distractions, including writing down
notes extensively.
15. Give the patient the time to answer in his own
words, then facilitate and clarify.
16. Avoid asking the examiner for assistance or
guidance.
34. General Approach
17. If the instructions are not clear, you could
ask the examiner for clarification regarding
the requested task or question.
18. The examiner is listening always; you do not
need to communicate with him.
19. Maintain an organized way of thinking and
approach to the presented clinical problem.
20. If you do not finish by the first bell, simply tell
the examiner what else needs to be said or
done, or tell the examiner indirectly by telling
the patient.
21. Lastly, forget the station, especially if it went
badly, and focus on the next station.
35. Communication Station Approach
1. Introduce yourself to the patient by name
and position.
2. Confirm the patient’s name. Remember the
patient’s name and use it.
3. Sit when the patient is sitting and remain at
the same eye level as your patient.
4. Avoid being too close but not too far either.
5. Show empathy and support to the patient.
6. Ensure the patient’s comfort and privacy.
7. Explain and ask permission for your task.
8. Encourage the patient to speak: by asking
open rather than closed questions and by
prompting him on.
9. Respect the patient’s need for autonomy.
36. Communication Station Approach
10. Elicit and respond to the patient’s
perspective and any ‘Hidden Agenda’.
11. Explore and acknowledge the patient’s
emotional state and validate these
emotions.
12. Remain non-judgmental and acknowledge
and respond to the patient’s ‘cues’.
13. Use simple and appropriate language and
short sentences.
14. Listen carefully and use verbal and non-
verbal cues to show that you are listening.
15. Avoid interrupting the patient’s answers.
16. Use non-verbal communication skills
effectively, maintaining appropriate voice
tone, good eye contact, and adjusting your
body posture.
37. Communication Station Approach
17. Speak calmly and do not raise your voice.
18. Avoid dismissive or threatening body language.
19. Use physical contact if this feels natural to the
patient.
20. Provide honest and accurate information.
21. Avoid giving false reassurance.
22. Repeat and clarify.
23. Check that you have understood the patient’s
problem(s).
24. Check patient’s understanding at regular
intervals.
25. Explore possible solutions, and agree on a
mutually satisfactory course of action.
26. Give the patient time to think about, and weigh
up, the information you have given him.
38. Communication Station Approach
27. Offer praise if appropriate.
28. Use signposting appropriately.
29. Acknowledge any gaps in the patient’s
knowledge and offer to discuss these areas
with seniors.
30. Provide the patient with an information leaflet
and website addresses for further references.
31. Invite questions and ask the patient to write
down any questions to answer later.
32. Provide your contact details in case further
questions arise.
33. Summarize the consultation and check the
patient’s understanding.
34. Arrange follow-up if needed.
35. Thank the patient.
39. An example of communication station case
scenario and checklist
40. An example of communication station case
scenario and checklist
41. The candidate gets 1-2 minutes outside the
station to read the instructions for a candidate on
the door before entering. It is essential to get
yourself organized in these 2 minutes:
History-taking Station Approach
1. Knock the door before entering the examination
room.
2. Approach the patient while smiling and relaxed.
3. Greet the patient.
4. Introduce yourself confidently, softly, friendly,
comfortably.
5. Mention your position.
6. Identify the patient in a questionable tone.
7. Shake hands, if possible.
8. Ask the patient about how he would like to be
addressed.
42. History-taking Station Approach
9. Ask the patient to sit down (pointing where)–if he
is not already sitting or lying on a stretcher.
10. Ensure the patient is sitting comfortably,
alongside and not behind a desk.
11. Sit approximately one meter away from the
patient and in a narrow-angle.
12. Confirm the reason for the interview.
13. Begin with broad questions and then focus your
inquiries.
14. Use non-verbal encouragement and pauses and
give the patient time to answer.
15. Do not interrupt the patient’s answers off with
another question.
16. Avoid asking questions too quickly or interrogate
the patient.
17. Repeat your question in different terms if
necessary.
43. History-Taking Station Approach
18. Show empathy.
19. Take a focused history based on the
presenting problem.
20. Address the patient’s ideas about his
condition, and explore his concerns and
expectations.
21. If you have time:
– Summarize back to the patient.
– Ask if the patient has any questions or
anything else that he would like to tell
you.
22. Thank the patient.
At the end of the station, provide the
examiner with a summary of the
patient’s history, including:
– Name and age of the patient.
– Chief complaint.
– Relevant medical history
(positives and negatives).
– Suggest likely diagnoses and
discuss further investigations and
management.
44. Physical Examination Station Approach
1. Knock the door and enter the examination room.
2. Quickly screen the room: where is the patient,
your chair, stretcher, and tools.
3. Tools in the room are more likely meant to be
used.
4. Approach the patient while smiling and relaxed.
5. Greet the patient, introduce yourself, and
mention your position.
6. Identify the patient.
7. Wash your hands before beginning the physical
examination.
8. Explain to the patient what you are going to do
and ask his permission.
9. Tell the patient when you are going to begin the
examination.
45. Physical Examination Station Approach
10. Throughout the examination, you have to explain every
step to the patient before you start.
11. Tell the patient: “I’m going to explain what I’m doing to
my colleague there (the examiner), okay?”.
12. Stand in a way that avoids obstructing the examiner's
point of view as much as possible.
13. Do a focused examination based on the patient’s
complaint or what you are asked to do.
14. Always use the patient’s gowns and drapes
appropriately to maintain patient modesty and comfort,
but never examine through the gown.
15. Ask permission before removing clothing and uncover
only the needed areas and cover it back when you
finish.
16. Then, invite the patient to get dressed.
46. Physical Examination Station
Approach
17. Help the patient on and off the examination bed.
18. Show consideration for pain; ask the patient ‘is
there any pain now and where’ to keep the
painful area the last to be examined.
19. Do not repeat painful maneuvers and apologize
to the patient.
20. While performing the examination, tell the
examiner your findings (without looking at him).
21. Try to use any given equipment if appropriate.
22. If you remember something that you should
have done earlier, then go back and do it.
23. When appropriate, tell the patient your initial
impression and your plan for the diagnostic
work-up.
24. Educate the patient in short explanatory periods
about the findings.
25. Negotiate with the patient an agreed-upon plan
of action.
26. Arrange a follow-up meeting.
27. When appropriate, ask for, and answer any
additional questions.
28. Thank the patient and the examiner politely.
47. Procedure Station Approach
Generally, with any procedure, preparation of the
patient (or the clinical mannequin), the
environment, and the equipment has to be
considered.
Ask for consent to carry out the procedure.
Explain the procedure, including why it is
being done and the risk of any
complications.
Ensure there are no contraindications to the
procedure.
Be organized and methodical in approach.
Appropriately position and expose the
patient (or the clinical mannequin) to access
the relevant site for the procedure.
Ensure the patient’s privacy and dignity are
maintained.
Answer the patient’s questions.
Always, explain what you are doing to the
examiner (step by step).
Before the procedure
1. The patient
Appear confident and introduce yourself to the
patient.
Verify the patient’s identity.
Take a very brief history from the patient if
appropriate.
Demonstrate good communication skills.
Be empathetic and kind.
48. Procedure Station Approach
Wash hands carefully.
Wear appropriate personal
protective equipment.
Ensure adequate privacy and
lighting.
Ensure the cleanliness of the
procedure theater.
Ensure you have an assistant who
can help you, or who you can call
on for help when things go wrong.
2. The environment
Read instructions carefully, understand
the task from the scenario that is given.
Ensure you have all the equipment
needed to perform the procedure.
Lay the equipment out in an easily
accessible manner and place it in the
order you are going to use it.
Where drugs are involved, check the
prescription, dose, and timing, and
expiry date.
3. The equipment
49. Procedure Station Approach
After the procedure
After the procedure, clean up and
discard any rubbish.
Safe disposal of sharps and clinical
waste.
Ensure the patient is comfortable.
Give feedback to the patient and the
examiner.
Thank the patient and the examiner
politely.
51. Finally, Practice.. Practice.. Practice..
OSCE is usually considered a difficult part of
medical school and board examinations.
Careful preparation will hopefully improve the
likelihood of a successful outcome.
Candidates need to practice repeatedly with
fellow students for adequate performance and
the best outcome.
The performance will improve if such practice
examination is observed by a trained physician
who is then able to provide immediate
feedback.
Such practice should be intensified a few
weeks before the examination date.
52.
53. Validity Vs. Reliability
Validity and Reliability are considered the two most important
characteristics of a well-designed assessment procedure.
Validity refers to the degree to which a method
assesses what it claims or intends to assess.
Reliability refers to the extent to which an
assessment method measures consistently the
performance of the student, producing the same
outcomes, with consistent standards over time
and between different learners and examiners.
54. The Patient’s Agenda
Generally, there are 3 issues in patient’s mind, which
are the real reasons that they have come to see a
doctor (called the ICE triad):
1. Ideas:
These are what a patient thinks and feels about his health
problem, its causes, its effects, and its management.
2. Concerns:
These are worries and fears about the problem, its
implications, and its effects on the patient’s personal,
family, and occupational life.
3. Expectations:
These are the information, the involvement, and the care
that a patient expects, hopes, or wishes for.
55. SOLER Method
SOLER method is a non-verbal
techniques sending a message that the
doctor is ready to listen and he is
interested in the patient’s words.
SOLER stands for:
–Sit squarely in relation to the patient.
–Open posture.
–Lean forward towards the patient.
–Eye contact.
–Relax posture.