How to Make Delightful Dangle Earrings DIY Jewelry Making Tutorial
•Download as PPTX, PDF•
2 likes•640 views

Learn to make these gorgeous and Delightful Dangle Earrings! All you need is some copper wires, glass beads, and a pair of earwires!!!

Recommended
More Related Content
What's hot
What's hot (20)
Viewers also liked
Viewers also liked (17)
Similar to How to Make Delightful Dangle Earrings DIY Jewelry Making Tutorial
Similar to How to Make Delightful Dangle Earrings DIY Jewelry Making Tutorial (20)
Recently uploaded
Recently uploaded (20)
How to Make Delightful Dangle Earrings DIY Jewelry Making Tutorial
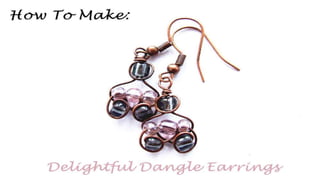
- 1. How To Make: Delightful Dangle Earrings
- 2. Materials: 12 Inches of 20 Gauge Copper Wire cut into 2 even pieces, 12 Glass Beads – Size 2-3 mm, Pair of Earwires
- 3. Tools: Round Nose Pliers, Wire Cutters
- 4. Step 1: Insert 1 Glass Bead onto the wire and create a loop with the bead inside it
- 5. Step 2: Insert second bead, then wrap wire around it. Repeat this step with third bead
- 6. Step 3: Bend wires as shown in the photo
- 7. Step 4: Insert another bead, then wrap wire around it. Repeat the steps with fifth bead
- 8. Step 5: Shape wires as shown in the photo, then insert glass bead onto both wires
- 9. Step 6: Wrap wire around the bead then around the second wire. Trim if you need to and smooth the edge
- 10. Step 7: Create final loop, wrap wire around the bottom of the loop then trim it and smooth the edge
- 11. Step 8: Repeat all steps to create second earring, then attach earwires. Your earrings are ready to wear!