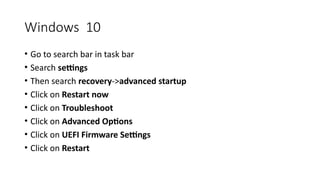
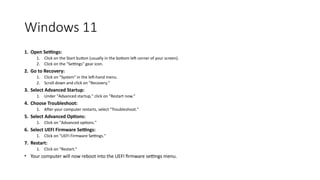
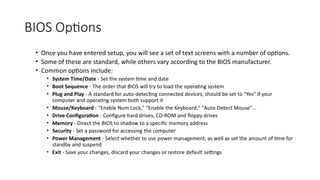
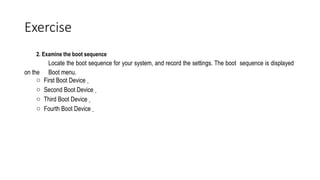
Lab 02
Agenda
• BIOS
• How to access BIOS
• Examine the BIOS Settings
• Change the Boot Device Priority/ Changing Boot Sequence
• Setting BIOS Security
• Installation of Application Software
• Hard Disk Partitioning
BIOS
• Basic Input Output System
• BIOS is a Firmware Permanent Software on a chip, the first software
run by computer when booted up.
• Test and initialize processor, RAM, Video Card, Adapters, disk drives
etc.
• BIOS is stored in ROM chip
• Settings are stored in CMOS (Complementary metal-oxide
semiconductor) such as computer passwords, time, and date.
CMOS
• Semiconductor Memory
• To operate correctly the computer needs to remember:
• the current date and time
• the number of disk drives installed as well as how they are configured
• the type and speed of the CPU
• the amount of memory installed and many other settings
• This information is stored in the CMOS
• When the power is turned off, the CMOS battery retains the CMOS
memory
CMOS
• When the computer is booted BIOS check the information stored in
the CMOS chip
• If the CMOS battery has failed, the information will be lost
• Boot sequence
• System Time
• If the CMOS battery does fail, you may receive the message
"System Configuration Lost" as the computer is booting
How BIOS works?
• When you turn on the computer, BIOS instructions are initiated. These instructions make it
check the RAM and the Processor (for faults) on your computer.
• It enumerates the RAM by checking each compartment to see if all of them are working.
• After checking out RAM and Processor, it checks for other devices attached to the computer
• It detects all the peripherals, including the keyboard and mouse and then checks for the
boot options
• Boot options are checked in the sequence configured in your BIOS: Boot from CD-ROM, Boot
From Hard Drive, etc.
• It checks for bootstraps on the devices in the order you or the machine vendor configured
the BIOS.
• It passes controls of the computer to the operating system by loading the essential parts of
the OS into the random-access memory (RAM) reserved for the OS
How to Access BIOS?
• Just as computers vary in size, type, and operating system, so does
the BIOS that they use.
• In order to view BIOS it must first be determined how to access it.
• To enter the BIOS Setup, you must press a certain key or combination
of keys during the initial startup sequence.
• Most systems use "Esc," "Del," "F1," "F2," "Ctrl-Esc" or "Ctrl-Alt-Esc"
to enter setup.
Steps: windows 8
• Open the Charms Bar by pressing Windows Key-C or by swiping in from the right edge of your
screen
• Click on Settings
• Click on Change PC Settings
• Click Recovery and Startup
• Click Recovery
• Click Reboot under the Advanced Startup heading
• Scroll to the bottom and click on Advanced Startup, then Restart Now
• Click on Troubleshoot
• Click on Advanced Options
• Click on UEFI Firmware Settings
• Click on Restart
Windows 10
• Go to search bar in task bar
• Search settings
• Then search recovery->advanced startup
• Click on Restart now
• Click on Troubleshoot
• Click on Advanced Options
• Click on UEFI Firmware Settings
• Click on Restart
Windows 11
1. Open Settings:
1. Click on the Start button (usually in the bottom left corner of your screen).
2. Click on the "Settings" gear icon.
2. Go to Recovery:
1. Click on "System" in the left-hand menu.
2. Scroll down and click on "Recovery."
3. Select Advanced Startup:
1. Under "Advanced startup," click on "Restart now."
4. Choose Troubleshoot:
1. After your computer restarts, select "Troubleshoot."
5. Select Advanced Options:
1. Click on "Advanced options."
6. Select UEFI Firmware Settings:
1. Click on "UEFI Firmware Settings."
7. Restart:
1. Click on "Restart."
• Your computer will now reboot into the UEFI firmware settings menu.
BIOS Options
• Once you have entered setup, you will see a set of text screens with a number of options.
• Some of these are standard, while others vary according to the BIOS manufacturer.
• Common options include:
• System Time/Date - Set the system time and date
• Boot Sequence - The order that BIOS will try to load the operating system
• Plug and Play - A standard for auto-detecting connected devices; should be set to "Yes" if your
computer and operating system both support it
• Mouse/Keyboard - "Enable Num Lock," "Enable the Keyboard," "Auto-Detect Mouse"...
• Drive Configuration - Configure hard drives, CD-ROM and floppy drives
• Memory - Direct the BIOS to shadow to a specific memory address
• Security - Set a password for accessing the computer
• Power Management - Select whether to use power management, as well as set the amount of time for
standby and suspend
• Exit - Save your changes, discard your changes or restore default settings
Let’s Practice
Exercise
1. Verify the BIOS Manufacturer and Version ID
1.1. What is the name of the manufacturer of the BIOS, iflisted?
1.2. What is the Version ID, iflisted?
1.3. Find the system time and date settings in your particular BIOS. Time zone settings are not stored in CMOS; these are
configured in the hardware itself. What is the date and time?
2. Verify the Navigation Keys
2.1. Most BIOS programs will have a legend to indicate which keys you use to navigate the BIOS. What are the navigation
keys you use to navigate?
2.2. Practice using the navigation keys for your particular BIOS, to explore the different menu screens and change the
values. Be very careful when making changes to setup. Incorrect settings may keep your computer from booting.
Exercise
2. Examine the boot sequence
Locate the boot sequence for your system, and record the settings. The boot sequence is displayed
on the Boot menu.
o First Boot Device
o Second Boot Device
o Third Boot Device
o Fourth Boot Device
Setting BIOS Security
• BIOS password Admin password : is the first protection layer of
your computer.
• Restrict changes in setup
• System Password Primary password
• Required when the system is powered on
• You can set up a password with 8 characters long in BIOS
Enable/Disable USB Port
• System Configuration
• USB Configuration
Exercise
• Use Google to research the meaning of each beep code.
Beeps Problem Noted
No beep
Long continuous
beep tone
One long, two short
beeps
Steady, short beeps
Steady, long beeps
Exercise
• Use Google to research the meaning of each beep code.
Beeps Problem Noted
No beep
Power supply bad, system not plugged in, or power not turned on. If
everything
seems to be functioning correctly there may be a problem with the
speaker itself.
Long continuous beep
tone Memory failure
One long, two short
beeps Video card failure
Steady, short beeps Power supply may be bad
Steady, long beeps Power supply bad
Installation of Application Software
• Installation from
• CD/USB
• Web
• Windows Store
• The installation file will be saved to your computer in .exe format.
• Double Click the file and follow steps
Install Any free application from Windows
Store 
How to Uninstall a Software?
• Press Start Button
• Search “Uninstall a Program”

How to access BIOS and CMOS, Change the Boot Device Priority/ Changing Boot Sequence

  • 1.
  • 2.
    Agenda • BIOS • Howto access BIOS • Examine the BIOS Settings • Change the Boot Device Priority/ Changing Boot Sequence • Setting BIOS Security • Installation of Application Software • Hard Disk Partitioning
  • 3.
    BIOS • Basic InputOutput System • BIOS is a Firmware Permanent Software on a chip, the first software run by computer when booted up. • Test and initialize processor, RAM, Video Card, Adapters, disk drives etc. • BIOS is stored in ROM chip • Settings are stored in CMOS (Complementary metal-oxide semiconductor) such as computer passwords, time, and date.
  • 4.
    CMOS • Semiconductor Memory •To operate correctly the computer needs to remember: • the current date and time • the number of disk drives installed as well as how they are configured • the type and speed of the CPU • the amount of memory installed and many other settings • This information is stored in the CMOS • When the power is turned off, the CMOS battery retains the CMOS memory
  • 5.
    CMOS • When thecomputer is booted BIOS check the information stored in the CMOS chip • If the CMOS battery has failed, the information will be lost • Boot sequence • System Time • If the CMOS battery does fail, you may receive the message "System Configuration Lost" as the computer is booting
  • 6.
    How BIOS works? •When you turn on the computer, BIOS instructions are initiated. These instructions make it check the RAM and the Processor (for faults) on your computer. • It enumerates the RAM by checking each compartment to see if all of them are working. • After checking out RAM and Processor, it checks for other devices attached to the computer • It detects all the peripherals, including the keyboard and mouse and then checks for the boot options • Boot options are checked in the sequence configured in your BIOS: Boot from CD-ROM, Boot From Hard Drive, etc. • It checks for bootstraps on the devices in the order you or the machine vendor configured the BIOS. • It passes controls of the computer to the operating system by loading the essential parts of the OS into the random-access memory (RAM) reserved for the OS
  • 7.
    How to AccessBIOS? • Just as computers vary in size, type, and operating system, so does the BIOS that they use. • In order to view BIOS it must first be determined how to access it. • To enter the BIOS Setup, you must press a certain key or combination of keys during the initial startup sequence. • Most systems use "Esc," "Del," "F1," "F2," "Ctrl-Esc" or "Ctrl-Alt-Esc" to enter setup.
  • 8.
    Steps: windows 8 •Open the Charms Bar by pressing Windows Key-C or by swiping in from the right edge of your screen • Click on Settings • Click on Change PC Settings • Click Recovery and Startup • Click Recovery • Click Reboot under the Advanced Startup heading • Scroll to the bottom and click on Advanced Startup, then Restart Now • Click on Troubleshoot • Click on Advanced Options • Click on UEFI Firmware Settings • Click on Restart
  • 9.
    Windows 10 • Goto search bar in task bar • Search settings • Then search recovery->advanced startup • Click on Restart now • Click on Troubleshoot • Click on Advanced Options • Click on UEFI Firmware Settings • Click on Restart
  • 10.
    Windows 11 1. OpenSettings: 1. Click on the Start button (usually in the bottom left corner of your screen). 2. Click on the "Settings" gear icon. 2. Go to Recovery: 1. Click on "System" in the left-hand menu. 2. Scroll down and click on "Recovery." 3. Select Advanced Startup: 1. Under "Advanced startup," click on "Restart now." 4. Choose Troubleshoot: 1. After your computer restarts, select "Troubleshoot." 5. Select Advanced Options: 1. Click on "Advanced options." 6. Select UEFI Firmware Settings: 1. Click on "UEFI Firmware Settings." 7. Restart: 1. Click on "Restart." • Your computer will now reboot into the UEFI firmware settings menu.
  • 11.
    BIOS Options • Onceyou have entered setup, you will see a set of text screens with a number of options. • Some of these are standard, while others vary according to the BIOS manufacturer. • Common options include: • System Time/Date - Set the system time and date • Boot Sequence - The order that BIOS will try to load the operating system • Plug and Play - A standard for auto-detecting connected devices; should be set to "Yes" if your computer and operating system both support it • Mouse/Keyboard - "Enable Num Lock," "Enable the Keyboard," "Auto-Detect Mouse"... • Drive Configuration - Configure hard drives, CD-ROM and floppy drives • Memory - Direct the BIOS to shadow to a specific memory address • Security - Set a password for accessing the computer • Power Management - Select whether to use power management, as well as set the amount of time for standby and suspend • Exit - Save your changes, discard your changes or restore default settings
  • 12.
  • 13.
    Exercise 1. Verify theBIOS Manufacturer and Version ID 1.1. What is the name of the manufacturer of the BIOS, iflisted? 1.2. What is the Version ID, iflisted? 1.3. Find the system time and date settings in your particular BIOS. Time zone settings are not stored in CMOS; these are configured in the hardware itself. What is the date and time? 2. Verify the Navigation Keys 2.1. Most BIOS programs will have a legend to indicate which keys you use to navigate the BIOS. What are the navigation keys you use to navigate? 2.2. Practice using the navigation keys for your particular BIOS, to explore the different menu screens and change the values. Be very careful when making changes to setup. Incorrect settings may keep your computer from booting.
  • 14.
    Exercise 2. Examine theboot sequence Locate the boot sequence for your system, and record the settings. The boot sequence is displayed on the Boot menu. o First Boot Device o Second Boot Device o Third Boot Device o Fourth Boot Device
  • 15.
    Setting BIOS Security •BIOS password Admin password : is the first protection layer of your computer. • Restrict changes in setup • System Password Primary password • Required when the system is powered on • You can set up a password with 8 characters long in BIOS
  • 16.
    Enable/Disable USB Port •System Configuration • USB Configuration
  • 17.
    Exercise • Use Googleto research the meaning of each beep code. Beeps Problem Noted No beep Long continuous beep tone One long, two short beeps Steady, short beeps Steady, long beeps
  • 18.
    Exercise • Use Googleto research the meaning of each beep code. Beeps Problem Noted No beep Power supply bad, system not plugged in, or power not turned on. If everything seems to be functioning correctly there may be a problem with the speaker itself. Long continuous beep tone Memory failure One long, two short beeps Video card failure Steady, short beeps Power supply may be bad Steady, long beeps Power supply bad
  • 19.
    Installation of ApplicationSoftware • Installation from • CD/USB • Web • Windows Store • The installation file will be saved to your computer in .exe format. • Double Click the file and follow steps
  • 20.
    Install Any freeapplication from Windows Store 
  • 21.
    How to Uninstalla Software? • Press Start Button • Search “Uninstall a Program”

Editor's Notes

  • #6 Boot strap=boot loader