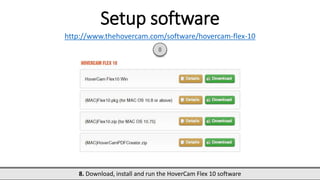
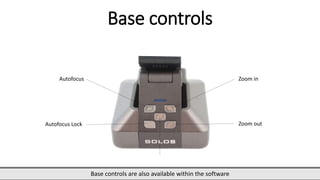
HoverCam Solo 8
A user manual by johan.kristoffersson@gmail.com
Start computer
Manual
Turn on and log in to your computer
Unfold document camera
1. Grab the base 2. Twist the arm upwards 3. Unfold the camera part
1 2 3
Insert USB cable
4. Insert USB cable into camera base 5. Insert other end into computer USB port 6. Check that base front lamp glows blue
4 5 6
Install drivers
7. Wait for drivers to install on your computer
7
If nothing happens, try any of the following
1. Disconnect USB, then reconnect after 5 seconds
2. Try a different USB port on your computer.
3. Remove other USB devices and reconnect the camera
4. Restart your computer
Setup software
http://www.thehovercam.com/software/hovercam-flex-10
8. Download, install and run the HoverCam Flex 10 software
8
Software startup
9. Place an object or document underneath the camera. Main menu at bottom of screen.
9
Base controls
Base controls are also available within the software
Zoom in
Zoom outAutofocus Lock
Autofocus
Side controls
Light settings is useful in dim environments
Scan size (A3, A4)
Light settings
Camera head
Camera head is able to rotate up, down, left and right
8 MP camera
Microphone
Software menu
This is the bottom menu seen on previous page
No Snapshot
Double click to preview last snapshot or video
Split Screen
Snapshots appear on left side, live video to the right
Slingshot
Mini window. Click ”Drag to insert as file”, drag video photo to clipboard
Snapshot
Take a photo. Photos are hidden behind the left screen tab icon
Record
Record every action or only Hovercam video
Multi Scan
Set time interval and number of pictures, save as PDF
Freeze
Freeze video
View
Rotating and mirroring
Webcam, second display and full screen view
Zoom
Zoom in and out
Focus
AF = Autofocus AF-L = Autofocus Lock selective = Select focus
Control
Adjust brightness, contrast and saturation
Cropping
Crop one or two parts of your video, then take a snapshot
Settings
Set camera resolution, microphone, recording quality, video format and media
storage folder
Annotate
Click ”Annotate” tab to the right. Save annotations with snapshot or video recording
Annotation features
• Doodle pencil
• Lines and arrows
• Transparent and filled rectangles
• Circles
• Text
• Adjustable thickness, size and color
Post-processing snapshots
9. Take a snapshot and double click the previous ”No Snapshot” (now image) button
Stack
Select and group together images or documents
Unstack
Select and separate grouped files
Slingshot
Delete selected files
Create PDF
Select one or multiple images and save as PDF
OCR
Convert text in images to selectable PDF text in a couple of minutes
Usable for searching, annotating and text-to-speech
Export
Copy one selected file into JPG, PNG, BMP or TIFF format
Save it to another location on your computer
Email
Send files through mail
Compatible with Microsoft Outlook
Print
Select and print files

HoverCam Solo 8

  • 1.
    HoverCam Solo 8 Auser manual by johan.kristoffersson@gmail.com
  • 2.
    Start computer Manual Turn onand log in to your computer
  • 3.
    Unfold document camera 1.Grab the base 2. Twist the arm upwards 3. Unfold the camera part 1 2 3
  • 4.
    Insert USB cable 4.Insert USB cable into camera base 5. Insert other end into computer USB port 6. Check that base front lamp glows blue 4 5 6
  • 5.
    Install drivers 7. Waitfor drivers to install on your computer 7 If nothing happens, try any of the following 1. Disconnect USB, then reconnect after 5 seconds 2. Try a different USB port on your computer. 3. Remove other USB devices and reconnect the camera 4. Restart your computer
  • 6.
  • 7.
    Software startup 9. Placean object or document underneath the camera. Main menu at bottom of screen. 9
  • 8.
    Base controls Base controlsare also available within the software Zoom in Zoom outAutofocus Lock Autofocus
  • 9.
    Side controls Light settingsis useful in dim environments Scan size (A3, A4) Light settings
  • 10.
    Camera head Camera headis able to rotate up, down, left and right 8 MP camera Microphone
  • 11.
    Software menu This isthe bottom menu seen on previous page No Snapshot Double click to preview last snapshot or video Split Screen Snapshots appear on left side, live video to the right Slingshot Mini window. Click ”Drag to insert as file”, drag video photo to clipboard Snapshot Take a photo. Photos are hidden behind the left screen tab icon Record Record every action or only Hovercam video Multi Scan Set time interval and number of pictures, save as PDF Freeze Freeze video View Rotating and mirroring Webcam, second display and full screen view Zoom Zoom in and out Focus AF = Autofocus AF-L = Autofocus Lock selective = Select focus Control Adjust brightness, contrast and saturation Cropping Crop one or two parts of your video, then take a snapshot Settings Set camera resolution, microphone, recording quality, video format and media storage folder
  • 12.
    Annotate Click ”Annotate” tabto the right. Save annotations with snapshot or video recording Annotation features • Doodle pencil • Lines and arrows • Transparent and filled rectangles • Circles • Text • Adjustable thickness, size and color
  • 13.
    Post-processing snapshots 9. Takea snapshot and double click the previous ”No Snapshot” (now image) button Stack Select and group together images or documents Unstack Select and separate grouped files Slingshot Delete selected files Create PDF Select one or multiple images and save as PDF OCR Convert text in images to selectable PDF text in a couple of minutes Usable for searching, annotating and text-to-speech Export Copy one selected file into JPG, PNG, BMP or TIFF format Save it to another location on your computer Email Send files through mail Compatible with Microsoft Outlook Print Select and print files