
Recommended
More Related Content
Viewers also liked
Viewers also liked (18)
Similar to Gras One Click Tutorial
Similar to Gras One Click Tutorial (20)
Recently uploaded
Recently uploaded (20)
Gras One Click Tutorial
- 1. Global Rent-A-Scope Tutorial For Our StarPals Astronomers Easy to use “how-to” with the robotic telescope to take an astro-picture! Don’t forget to submit them to the StarPals site!!
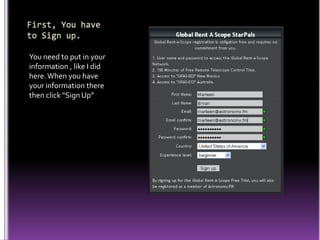
- 2. First, You have to Sign up. You need to put in your information , like I did here. When you have your information there then click “Sign Up”
- 3. Second, Access the Telescope page. You will see YOUR user name and Password. The Click on the yellow words “Global Rent-a-Scope Information Center.
- 4. Third- You get to the Telescope Page Look under “Northern Hemisphere: and find the G 3 Telescope. I have pointed to it with the purple arrows here. If it says “available” as you see here, then you can click the word “available” to get started.
- 5. Fourth- You need to login again This box will be on they screen. Put in your “User Name” and “Password” that you originally used to sign in on the first page.
- 6. Fifth- It will look similar to this Now you have added your information
- 7. Sixth- This is the next window you will see You NOW will click on the bat that says “ONE CLICK COLOR”
- 8. Seventh- Observatory is “loading” This requires a short wait.
- 9. Eighth- The “One Click” Page Opens This is what the “ONE CLICK” page looks like
- 10. Ninth- Click “Check Weather” By clicking the Check Weather you will be able to see the New Mexico All-Sky Camera like this. You are looking at the night sky in Mexico now!!
- 11. Tenth- Click on the Word “ONE CLICK IMAGE” This page will let you scroll down to see which image you will choose to take a picture of…..
- 12. Scroll Down on “ONE CLICK IMAGE” page This is what you will see as you scroll down. These are the different things you can choose to take a picture of. Choose the one you like best and click on the “submit” box to the right of your image. I picked Pleiades.
- 13. Twelfth-You will see This ---first. You will now go and click on the Green “SYSTEM STATUS” word.
- 14. Thirteenth- You will see this page come on your computer screen You and now relax and wait for the telescope to do it’s slewing. Eventually you will see words and flashing words on this page
- 15. Fourteenth- Run has started The little box there says your project has started. You can click the “X” on that box and it will close. Then….
- 16. 15. Back to System Status Page You can watch what is happening with the telescope from here. It will tell you when it is imaging under “activity”
- 17. 16. Scroll down on System Status Page By scrolling down you will be able to see what is happening with your image in more detail.
- 18. 17. On Status Page… Under “Imager” on the Status Page you can see how long it takes to expose the camera to the sky.
- 19. 18. Scroll back to bottom of System Status page… This will tell you when you can “preview” or see you image. I have pointed to it with purple arrow here.
- 20. 19. Click on “IMAGE PREVIEW” You can see your picture when you click on Image Preview.
- 21. 20. Preview Image This is preview of my image M45 which is beautiful star cluster. These bright blue stars have dust and nebulosity surrounding them.
- 22. 21. Final Picture Your final picture will be emailed to you. Go to your email that you used to register and in about three or four minutes your picture will be there!! Congratulations!! Now don’t forget to go to the StarPals page to submit it! http://www.starpals.org/