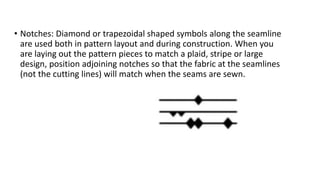
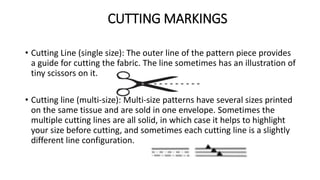
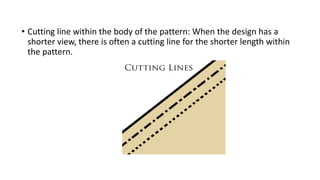
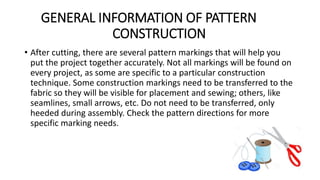
GPM 201
MARKINGS THE PATTERN
INTRODUCTION TO PATTERN CONSTRUCTION
MARKING THE PATTERN
• Introduction:
Commercial patterns are printed with a universal system of symbols and
lines designed to help you put the pattern pieces together quickly, easily and
successfully. Every marking is there for a specific reason. Learning what they
mean will make your cutting and sewing go more accurately. Not every
marking is on every pattern because some are specific to a certain style or
construction technique. Layout and cutting markings don’t need to be
transferred to the fabric. Construction markings, on the other hand, are very
helpful during the sewing process and transferring them to the fabric is a
good idea.
GENERAL INFORMATION
• Every pattern piece has general information printed in the center. Each
piece is numbered and the number indicates the order in which the pieces
are sewn together. For example: Skirt Front 1 is joined to Skirt Back 2.
Other helpful information includes:
• Pattern brand and style number
• View letter (if there is more than one view)
• Size
• Name of the piece (skirt front, sleeve, pleat underlay, etc.) and its number
• Cutting information (cut one on fold, cut two, etc.)
• Lining/interfacing information (if applicable)
PRE LAYOUT MARKINGS
• Pattern adjustments lines: Two parallel lines that Indicate where
you can lengthen or shorten a Pattern piece to maintain the
original shaping. This Should be done before layout.
• Waistline Marking: A short solid line that indicates the natural
waistline of the wearer. During tissue-fitting, if the waistline is
not in the same position as the pattern marking, adjustment
may be needed on the Pattern Adjustment Lines.
LAYOUT MARKINGS
• Grainline:This heavy, solid line with arrows at both ends is usually in the
center of the pattern, although it can appear anywhere within the pattern
piece. Use it to ensure the pattern is positioned along the straight grain of
the fabric, so that the garment or project hangs properly. Unless otherwise
indicated, parallel to the fabric selvage.
• Place on fold bracket: This solid line with arrows that point to the pattern
piece edge, indicates that the piece should be positioned along the fabric
fold. This usually applies to garments that do not have a center front or
center back seam.
• Notches: Diamond or trapezoidal shaped symbols along the seamline
are used both in pattern layout and during construction. When you
are laying out the pattern pieces to match a plaid, stripe or large
design, position adjoining notches so that the fabric at the seamlines
(not the cutting lines) will match when the seams are sewn.
CUTTING MARKINGS
• Cutting Line (single size): The outer line of the pattern piece provides
a guide for cutting the fabric. The line sometimes has an illustration of
tiny scissors on it.
• Cutting line (multi-size): Multi-size patterns have several sizes printed
on the same tissue and are sold in one envelope. Sometimes the
multiple cutting lines are all solid, in which case it helps to highlight
your size before cutting, and sometimes each cutting line is a slightly
different line configuration.
• Cutting line within the body of the pattern: When the design has a
shorter view, there is often a cutting line for the shorter length within
the pattern.
GENERAL INFORMATION OF PATTERN
CONSTRUCTION
• After cutting, there are several pattern markings that will help you
put the project together accurately. Not all markings will be found on
every project, as some are specific to a particular construction
technique. Some construction markings need to be transferred to the
fabric so they will be visible for placement and sewing; others, like
seamlines, small arrows, etc. Do not need to be transferred, only
heeded during assembly. Check the pattern directions for more
specific marking needs.
CONSTRUCTION MARKINGS
• Seamline: This broken line, usually 5/8” (or desired seam allowance)
from the cutting line indicates where to join the pieces. Many
patterns, especially multi-size ones, do not have seamlines drawn on
the patterns.
• Small Arrows : Are on some seamlines to indicate stitching direction.
For example, on a side seamline the arrow would point toward the
hem.
• Notches: These diamond or trape zoid shaped symbols were used to
layout pieces when pattern matching is an issue but they are also
used to help position adjoining project pieces for seaming.
• Dots (sometimes squares and triangles): These indicate special
construction (clipping, gathering, stay stitching) or precise matching
needs. They are usually found near the seamline and in dart
markings.
Dart: Broken lines and dots indicate exact stitching location and make
it easy to match up the two sides for stitching.
• Buttons and Buttonholes: A solid line with dash marks at each end is
used to mark buttonholes and large x’s mark button locations.
• Hemline: The hemline is a solid line near the lower edge (often 3”
above the cutting line) and it indicates where to fold the hem so the
garment is the length indicated on the pattern envelope. The hemline
is not always drawn in, but the depth may be written along the lower
edge cutting line.
• Zipper Placement: An illustration of zipper teeth indicates where to
insert the zipper.
• Pleat Symbols: Two vertical lines with an arrow between them
indicate how wide to fold the pleat and in which direction.
CONSTRUCTION AND DETAIL PLACEMENT
LINES
• Solid or broken lines: within the body of the pattern piece indicate
construction details and placements.
• Foldline: without brackets: indicates where the fabric will fold, such as
in the center of the waistband.
• Roll Line: shows where the fabric will crease to make a soft fold, as
along a lapel.
• Center Front or Center Back lines: show where the garment will fall
on the center of the body.
• Placement Lines: show where to place details such as patch pockets,
flaps, casings, and decorative trim.
BIBLIOGRAPHY
• http://www.sewing.org/html/guidelines.html
• https://www.thesprucecrafts.com/transfer-pattern-markings-types-
tools-used-2978447
• www.sewing.org

Gpm201 marking pattern

  • 1.
  • 2.
    INTRODUCTION TO PATTERNCONSTRUCTION MARKING THE PATTERN • Introduction: Commercial patterns are printed with a universal system of symbols and lines designed to help you put the pattern pieces together quickly, easily and successfully. Every marking is there for a specific reason. Learning what they mean will make your cutting and sewing go more accurately. Not every marking is on every pattern because some are specific to a certain style or construction technique. Layout and cutting markings don’t need to be transferred to the fabric. Construction markings, on the other hand, are very helpful during the sewing process and transferring them to the fabric is a good idea.
  • 3.
    GENERAL INFORMATION • Everypattern piece has general information printed in the center. Each piece is numbered and the number indicates the order in which the pieces are sewn together. For example: Skirt Front 1 is joined to Skirt Back 2. Other helpful information includes: • Pattern brand and style number • View letter (if there is more than one view) • Size • Name of the piece (skirt front, sleeve, pleat underlay, etc.) and its number • Cutting information (cut one on fold, cut two, etc.) • Lining/interfacing information (if applicable)
  • 4.
    PRE LAYOUT MARKINGS •Pattern adjustments lines: Two parallel lines that Indicate where you can lengthen or shorten a Pattern piece to maintain the original shaping. This Should be done before layout. • Waistline Marking: A short solid line that indicates the natural waistline of the wearer. During tissue-fitting, if the waistline is not in the same position as the pattern marking, adjustment may be needed on the Pattern Adjustment Lines.
  • 5.
    LAYOUT MARKINGS • Grainline:Thisheavy, solid line with arrows at both ends is usually in the center of the pattern, although it can appear anywhere within the pattern piece. Use it to ensure the pattern is positioned along the straight grain of the fabric, so that the garment or project hangs properly. Unless otherwise indicated, parallel to the fabric selvage. • Place on fold bracket: This solid line with arrows that point to the pattern piece edge, indicates that the piece should be positioned along the fabric fold. This usually applies to garments that do not have a center front or center back seam.
  • 6.
    • Notches: Diamondor trapezoidal shaped symbols along the seamline are used both in pattern layout and during construction. When you are laying out the pattern pieces to match a plaid, stripe or large design, position adjoining notches so that the fabric at the seamlines (not the cutting lines) will match when the seams are sewn.
  • 7.
    CUTTING MARKINGS • CuttingLine (single size): The outer line of the pattern piece provides a guide for cutting the fabric. The line sometimes has an illustration of tiny scissors on it. • Cutting line (multi-size): Multi-size patterns have several sizes printed on the same tissue and are sold in one envelope. Sometimes the multiple cutting lines are all solid, in which case it helps to highlight your size before cutting, and sometimes each cutting line is a slightly different line configuration.
  • 8.
    • Cutting linewithin the body of the pattern: When the design has a shorter view, there is often a cutting line for the shorter length within the pattern.
  • 9.
    GENERAL INFORMATION OFPATTERN CONSTRUCTION • After cutting, there are several pattern markings that will help you put the project together accurately. Not all markings will be found on every project, as some are specific to a particular construction technique. Some construction markings need to be transferred to the fabric so they will be visible for placement and sewing; others, like seamlines, small arrows, etc. Do not need to be transferred, only heeded during assembly. Check the pattern directions for more specific marking needs.
  • 10.
    CONSTRUCTION MARKINGS • Seamline:This broken line, usually 5/8” (or desired seam allowance) from the cutting line indicates where to join the pieces. Many patterns, especially multi-size ones, do not have seamlines drawn on the patterns. • Small Arrows : Are on some seamlines to indicate stitching direction. For example, on a side seamline the arrow would point toward the hem. • Notches: These diamond or trape zoid shaped symbols were used to layout pieces when pattern matching is an issue but they are also used to help position adjoining project pieces for seaming.
  • 11.
    • Dots (sometimessquares and triangles): These indicate special construction (clipping, gathering, stay stitching) or precise matching needs. They are usually found near the seamline and in dart markings. Dart: Broken lines and dots indicate exact stitching location and make it easy to match up the two sides for stitching. • Buttons and Buttonholes: A solid line with dash marks at each end is used to mark buttonholes and large x’s mark button locations.
  • 12.
    • Hemline: Thehemline is a solid line near the lower edge (often 3” above the cutting line) and it indicates where to fold the hem so the garment is the length indicated on the pattern envelope. The hemline is not always drawn in, but the depth may be written along the lower edge cutting line. • Zipper Placement: An illustration of zipper teeth indicates where to insert the zipper. • Pleat Symbols: Two vertical lines with an arrow between them indicate how wide to fold the pleat and in which direction.
  • 13.
    CONSTRUCTION AND DETAILPLACEMENT LINES • Solid or broken lines: within the body of the pattern piece indicate construction details and placements. • Foldline: without brackets: indicates where the fabric will fold, such as in the center of the waistband. • Roll Line: shows where the fabric will crease to make a soft fold, as along a lapel. • Center Front or Center Back lines: show where the garment will fall on the center of the body. • Placement Lines: show where to place details such as patch pockets, flaps, casings, and decorative trim.
  • 14.