


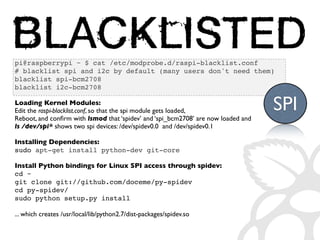


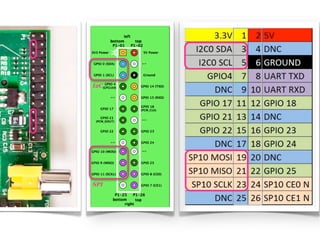


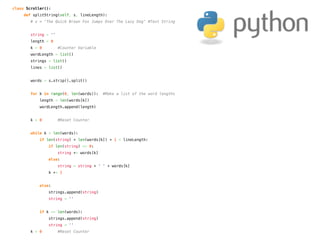


![IN =[0000 0001][1CNL ----][---- ----]
(8+channel) 4
OUT=[---- ----][---- -XXX][XXXX XXXX] (10bit)
((r[1] 3) 8) + r[2]](https://image.slidesharecdn.com/gettingstartedwithraspberrypi-130419214234-phpapp02/85/Getting-Started-with-Raspberry-Pi-DCC-2013-1-62-320.jpg)
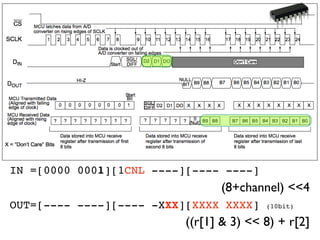
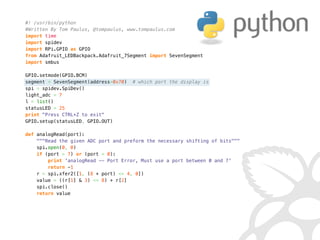
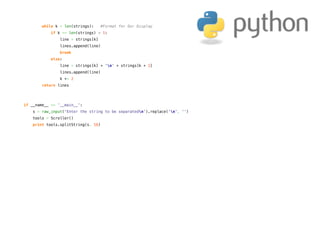
![IN =[0000 0001][1CNL ----][---- ----]
(8+channel) 4
OUT=[---- ----][---- -XXX][XXXX XXXX]
r[0] ((r[1] 3) 8) + r[2]
r = spi.xfer2( [1, (8+chnnl)4, 0] )
return ((r[1] 3) 8) + r[2]](https://image.slidesharecdn.com/gettingstartedwithraspberrypi-130419214234-phpapp02/85/Getting-Started-with-Raspberry-Pi-DCC-2013-1-63-320.jpg)
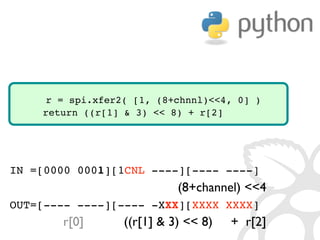
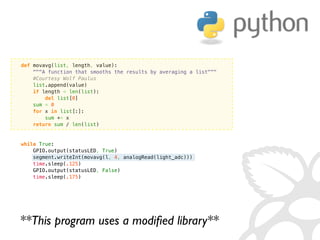
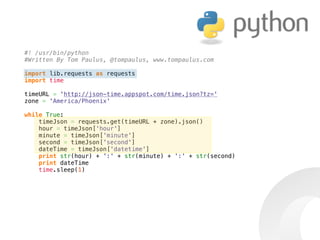
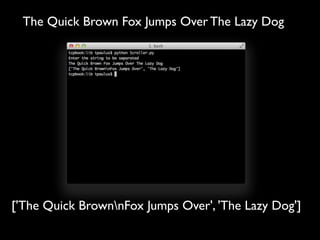
![#! /usr/bin/python
#Written By Tom Paulus, @tompaulus, www.tompaulus.com
import time
import spidev
import RPi.GPIO as GPIO
spi = spidev.SpiDev()
light_adc = 7
statusLED = 25
GPIO.setmode(GPIO.BCM)
GPIO.setup(statusLED, GPIO.OUT)
print Press CTRL+Z to exit
def analogRead(port):
Read the given ADC port and preform the necessary shifting of bits
spi.open(0, 0)
if (port 7) or (port 0):
print 'analogRead -- Port Error, Must use a port between 0 and 7'
return -1
r = spi.xfer2([1, (8 + port) 4, 0])
value = ((r[1] 3) 8) + r[2]
spi.close()
return value
while True:
GPIO.output(statusLED, True)
print analogRead(light_adc)
time.sleep(.125)
GPIO.output(statusLED, False)
time.sleep(.175)](https://image.slidesharecdn.com/gettingstartedwithraspberrypi-130419214234-phpapp02/85/Getting-Started-with-Raspberry-Pi-DCC-2013-1-64-320.jpg)


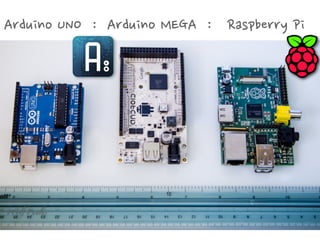
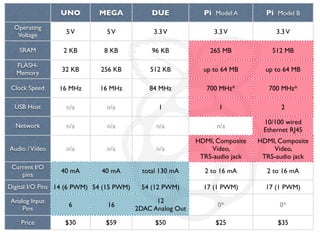
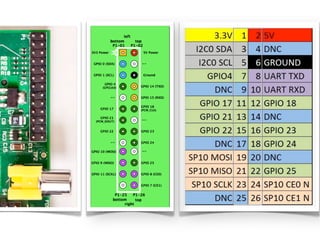
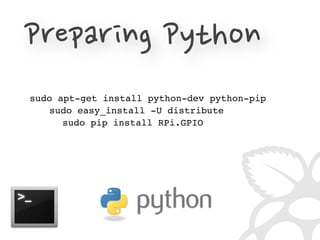
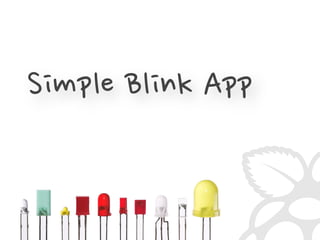
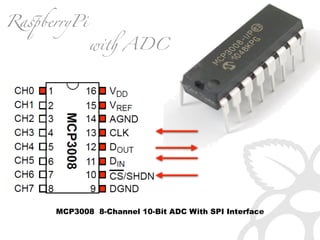
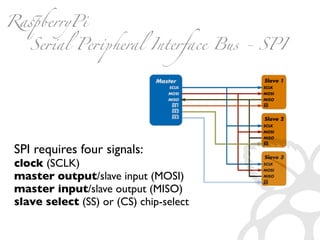
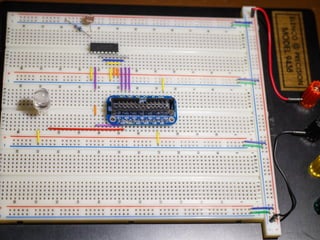
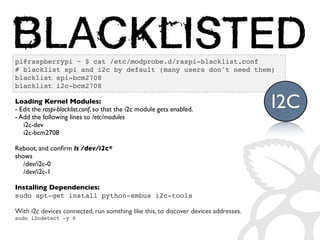
The document provides a comprehensive guide on setting up and using a Raspberry Pi, detailing its specifications, initial setup instructions, and introductory projects. It covers different model features, how to create an image on an SD card, and includes basic Python scripts for GPIO and analog input usage. Additionally, it discusses the I2C and SPI protocols, with examples for interfacing with hardware components.


![[2012 CodeEngn Conference 06] pwn3r - Secuinside 2012 CTF 예선 문제풀이](https://cdn.slidesharecdn.com/ss_thumbnails/20126thcodeengnpwn3rsecuinside2012ctf-130525233500-phpapp02-thumbnail.jpg?width=640&height=640&fit=bounds)


![Java on arm theory, applications, and workloads [dev5048]](https://cdn.slidesharecdn.com/ss_thumbnails/javaonarm-theoryapplicationsandworkloadsdev5048-181028011435-thumbnail.jpg?width=640&height=640&fit=bounds)