2. Production Portfolio: controlled
assessment (30%)
This is the final piece of coursework you will do for media
studies and it is worth 30% of your overall mark. It’s very
important that you do as well as you possibly can so you
can get the best possible mark!
This is your chance to be creative and make your very own
media product!
3. All deadlines for each section of the
coursework is clearly marked on the
blue slides throughout this PowerPoint
4. Codes of behaviour
• No one leaves their seat without permission
• All work to be completed in the lesson.
Anyone who does not complete the tasks set
will do it in detention
• Anyone found not following the rules or using
the computer for ANYTHING other than class
work will be banned from using the computer
for the remainder of the lesson and for one
lesson after
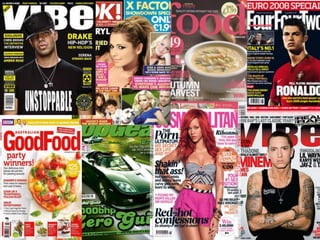
5. Your brief (print)
An extract from a new magazine aimed at a specific audience, to
include the front cover, contents page and a double-page
spread article, using some original photography.
6. Production Portfolio will
consist of the following:
• the Production Log
• the Production itself
• the Evaluation
•the Appendix – to include a range of additional
material appropriate to the product, such as: rejected
photographs and graphics, photos of props/locations,
surveys and graphs for market research, and mock-ups
of magazines or advertisements.
7. The production log
This is a record of how many hours it has taken
you to complete this project. Remember, it is a
controlled assessment and you are entitled to 30
hours.
You must complete the production log at the
end of each lesson
8. The production log can be found on Frog as shown below. You should save it
to your computer and update it every lesson
1. 2.
3.
4.
9. Let’s get started!
Before you go on to make your
final product, it is vital that you
do thorough research so that
you can make your product
look as professional as possible.
The aim is to produce a final
piece that looks as good as
industry standard.
10. Research stage
On the tracking spreadsheet there are targets
that you have to meet by certain dates. This is
to ensure that you stay on track and produce
enough work to get you lots of marks. I will
mark you off on the spreadsheet once you
have completed all the necessary stages. This
is so that we can keep track of your progress.
The initial planning stages have to be
completed by the 24th January
11. By now you will have chosen what genre of
magazine you would like to make and already
done some research into how magazines
attract their target audience through things
like
• Brand image
• Content
• Images
• Layouts
12. Now you need to be sure exactly what the
conventions of your chosen magazine genre are
so that you can make one to the same standard.
In order to do this, you must closely analyse 2 front
covers, 2 content pages and 2 double page
spreads of magazines of the same genre. This can
either be done on PowerPoint, or NEATLY by
hand.
Extension: analyse 2 more magazines (front cover,
content, double page spread).
13. You have 3 lessons to do this.
Break down:
Lesson 1. Analyse 2 front covers
Lesson 2. Analyse 2 content pages
Lesson 3. Analyse 2 double page spreads
Log your progress for each lesson in your
production log
14. AND FOR VIDEO GAMES:
You must closely analyse 3 covers (front and
back) and 3 adverts for the same video games.
This can either be done on PowerPoint, or
NEATLY by hand.
Extension: analyse 2 more video game covers
and adverts.
15. You have 3 lessons to do this.
Break down:
Lesson 1. Analyse 2 covers (front and back)
Lesson 2. Analyse 2 covers (front and back)
Lesson 3. Analyse 2 magazine adverts (ideally
ones which advertise games of the same
genre you plan to do)
Log your progress for each lesson in your
production log
16. Things to consider when analysing a magazine
cover
Everything is carefully designed to attract a specific target audience.
Think about every thing you can see on the cover and ask yourself why
it has been put there. Such as;
• Colours used
• Main image (including what person is wearing, how they are posing,
whether they are looking directly at the audience)
• Language used
• Styles of fonts used
• Design of the title
• Position of the title
• What is offered to the reader
• The layout of the text
• Where the price is
• Where the barcode is
17. Big, bold Q on a
red background.
This is instantly
recognisable as
a brand name
There is a clear
colour scheme
on this front
cover. The pink
reflects the
female singer
in the main
image
The image is big
and bold which
will attract the
audience’s
attention. Also,
the image is
unusual as she is
bleeding. This
shows that she is
an alternative
artist and will
attract people
who like
alternative music
Graffiti-like
font. There
is variation
in the font
and makes
it stand out
Use of alliteration
to make the
audience want to
read inside the
magazine
Note: to get top
marks you will
need to be more
detailed than this
18. Things to consider when analysing a contents
page
• Is there anything else included other than a list of
articles/features? Such as; quotes, images, subheadings,
page numbers.
• Is there a particular order that the articles or features go
in? Where does the main article appear?
• How is the star on the front cover advertised on the
content page?
• How are the other stories/features on the front cover
advertised on the content page?
• What other images are used and how are they laid out?
19. Note: to get top
marks you will
need to be more
detailed than this
20. Things to consider when analysing a double
page spread
• How much space does the main image take up?
• What is the pose?
• How many columns are there?
• Are there any other images?
• Is there clever language used in the title?
• How big is the title?
• Are quotes used in the article? And do they stand
out?
• How does the article start?
• How is the double page spread laid out?
21. Note: to get top
marks you will
need to be more
detailed than this
22. You have 3 lessons to do this
To be completed by the 13th
January 2014
Record your progress in your
production log
23. All new magazine companies would conduct
extensive market research before the final
designs were drawn up and the product was
made. This is to ensure that the magazine
appeal to the largest number of people
possible!
One way of doing this is by conducting a survey.
24. In Word, design a survey/questionnaire in order to find out
what people want from your chosen genre of magazine.
These can be given to classmates, friends and family. The
results should be analysed and will influence your final
design.
Example market research question:
4. What would catch your eye on the front cover of a
magazine?
a. Bold writing [ ]
b. One main picture [ ]
c. Attractive mast head [ ]
d. Different fonts [ ]
e. Lots of different pictures [ ]
f. Distinctive colour scheme [ ]
25. Other questions you might want to
consider:
• How much will people pay for a magazine?
• What main features do people want to read?
- This needs to be specific to your genre e.g.
Interviews with film stars, pop stars, chefs,
celebrities
• What colour schemes do people like?
***Also, try out initial ideas for names that you
have for your magazine! See which one is the
most appealing...***
26. Once you have done this, you need to enter the data into Excel
and create graphs which illustrate your findings
Enter you data as shown in
the diagram. Once you
have done this. Highlight
both the options and the
number of people
Then go to Insert
– Pie (or column if
you prefer) and
select 2-D Pie
A colour coded pie chart
will then be created
displaying your results
27. Research summary
The next stage is to write a 250-400 word research summary
on your findings from your analysis of magazines and your
market research.
Both these stages should influence your final designs.
Things to consider in your research summary:
• What were the most popular answers in your survey and
why?
• What makes the magazines you have researched stand out?
• What are the features that you will include in your own
magazine and why?
28. Video and Magazine briefs
Break down of tasks:
Lesson 1. Create a survey on Microsoft word. Begin
to ask your peers to complete the survey (only if
they have finished their questionnaire) and then
take the survey home to ask friends and family
Lesson 2. Use the data you have collected to make
graphs so that you can easily analyse the data
and begin research summary if you have time
Lesson 3. Complete research summary
29. You have 3 lessons to do this
section.
To be completed by the 20th
January 2014
Record your progress in your
production log
30. Now it’s time to start your final designs!
Design 2 mock-ups for your front cover, content page and double page
spread, complete with annotations stating why you have chosen to design it
in this way.
Consider carefully how each one will be laid out. At this stage, layout is more
important than content!
Here is an example of a GCSE student’s mock up of her pages.
31.
32. Break down of tasks
Magazine
• Lesson 1: Mock up of 2 front covers
• Lesson 2: Mock up of content page and
double page spread
Video game
• Lesson 1: Mock up of 2 game covers
• Lesson 2: Mock up of 2 adverts
33. In your mock-ups...
Experiment with;
• Different layouts
• Different fonts
• Different colour schemes
And then ask your classmates for feedback to
help you inform you final decision.
34. You have 2 lessons to draw up your
mock-ups
This will be completed by the 24th
January
Record your progress in your
production log
35. Now plan your photo shoot!
• Who or what are you going to photograph?
• what camera angles/ shots are you going to
use?
• Where are you going to take your photos?
• Are you going to use any props or costumes?
• How are you going to make the photos look
interesting and appealing?
36. A useful video: ‘how to think like a
photographer’
http://www.bbc.co.uk/education/clips/z62sb9q
37. Once you have finished your photo shoot select
the ones that you are going to use.
Do not discard the rest- they can go in the
appendix, along with your final choices, as
evidence of your creative journey.
Also, state in your appendix
why you chose some images
over others.
38. You have 1 lesson to plan your photo shoot and
1 lesson to take photographs (Wednesday 28th
Jan). If you want to take your photos outside of
school hours that is also fine. Just make sure you
save all your photos and that you have them for
the next lesson.
This needs to be completed by 29th January
2014
Record your progress in your production log
39. You have one lesson to carefully select which
photos you are going to use for each product
you are making and plan how they will be laid
out (Friday 30th January 2014).
Extension: explain why you have chosen specific
ones and why you have chosen not to include
other.
Record your progress in your production log
40. Now it’s time to put your creation together!
Here is an example of an
A* music magazine front
cover
43. There are Photoshop templates available on Frog to help you layout your
work. After all, you must makes sure everything fits. Especially on a double
page spread, you don’t want things to be lost in the middle where the
page folds!
1. 2.
3.
4. 5.
6.
44. Helpful tools in Photoshop: the magnetic lasso tool
This allows you to draw around an image really
accurately- the line automatically snaps to the outline
for your image this is really handy for cutting out parts
of your image
45. Helpful tools for Photoshop: Fonts
Here is a link to a website which offers 50 free
font types that you can use.
Remember, play around with colour and styles.
http://www.noupe.com/fonts/50-free-fonts-for-
professional-designs.html
46. Helpful tools in Photoshop: changing colours
This is useful if you want to make the colours of
certain body parts/ clothing a different or
vibrant colour. A step by step guide on how to
do this is here
http://www.htmlgoodies.com/tutorials/web_gr
aphics/article.php/3908261
47. Helpful tools in Photoshop: turning your images
into polaroid pictures
This is useful for making your content page look
interesting or adding some more images on your
front cover or double page spread. Also to
border additional photos on the back of your
game cover.
A guide on how to do this is here
http://www.hongkiat.com/blog/create-a-
polaroid-effect-of-your-photo/
48. Helpful Photoshop tools: creating different
lighting effects
This is useful for making images look funky.
Perfect for video game covers or magazine front
covers.
http://www.adobetutorialz.com/articles/309706
70/1/use-lighting-effects-to-make-beautiful-
artwork-photoshop-cs5
49. All designs need to be finished by Friday the
21stth March 2014
Record your progress in your production log.
50. Now it’s time to evaluate your work!
You must write between 500 and 800 words for
you evaluation. You should include include
pictures, screen shots, scanned images to show
your journey and decision making.
51. • You must include how your research has influenced
your final products.
• You must demonstrate your understanding of the
conventions of your chosen product (use the image of
your final products to show your understanding).
• You must mention any artistic decisions you have made
and why you made them (add in images here to
illustrate your answer)
• You must mention how you have tried to appeal to
your target audience. Do you think you did a good job?
• You can include images and any other piece of
information which shows your journey
52. You have 2 lessons to finish the evaluation. Your
deadline is Monday the 31st March
Make sure you have recorded everything in your
production log