Download as PDF, PPTX


![Single for loop
• for(int i=1;i<=4;i++) {
• TB_State[i][1] = TB_State[i][1]+1;
• }
!
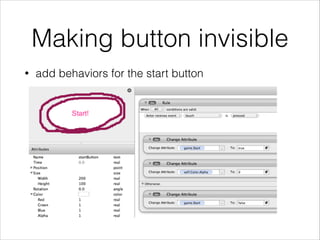
• add attributes
• idxI
• idxJ
• use those indices for our for loop
• here, a single for loop is presented
• idxI is used](https://image.slidesharecdn.com/gamesaladall-140404012516-phpapp01/85/Game-Salad-Study-93-320.jpg)


Here are the basic steps to create and use a table in GameSalad: 1. In the home screen, click "Tables" and then click the "+" button to create a new table. 2. Name the table and configure the number of rows and columns. Determine the data type for each column (integer, string, etc). 3. Populate the table by entering values into each cell. You can edit the table later on to add, remove or change values as needed. 4. Create an actor that will display table values. Add behaviors to the actor to retrieve a random or specific item from the table and display it. 5. Test the table by running the scene preview. The actor should


![[update] Introductory Parts of the Book "Dive into Deep Learning"](https://cdn.slidesharecdn.com/ss_thumbnails/d2lq1introbasicssimplemodels-190415080926-thumbnail.jpg?width=640&height=640&fit=bounds)


