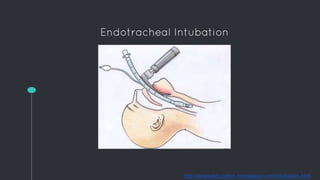
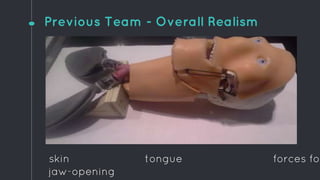
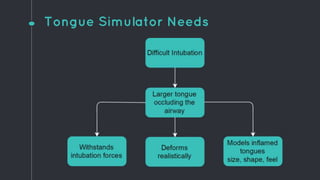
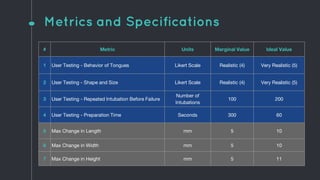
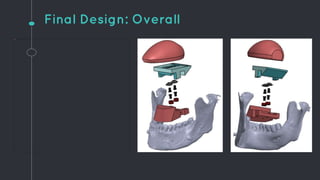
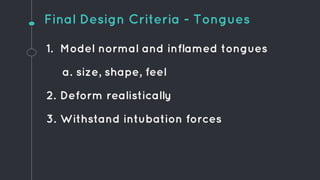
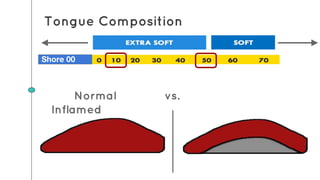
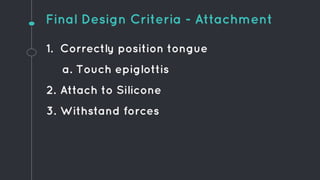
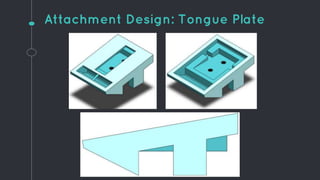
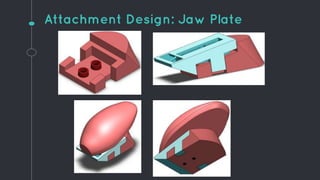
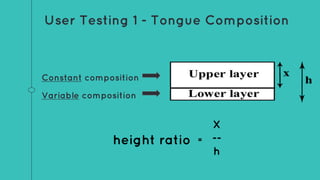
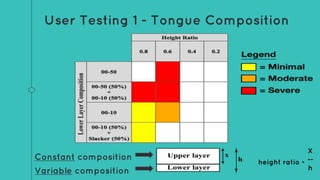
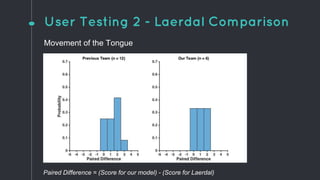
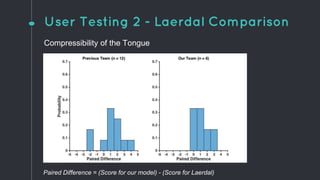
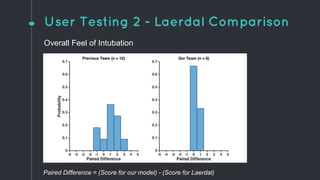
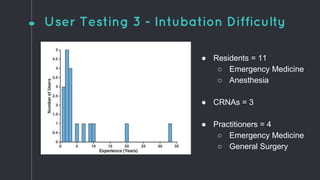
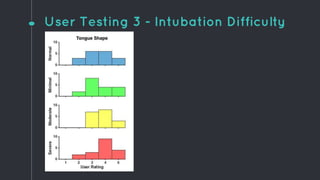
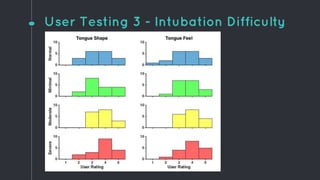
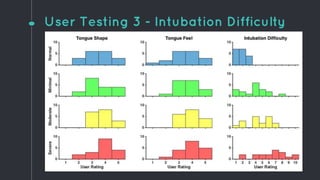
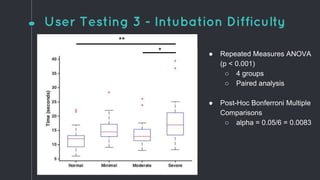
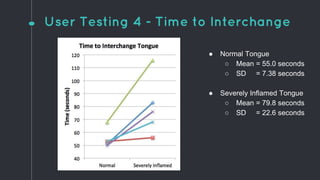
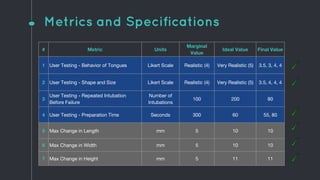
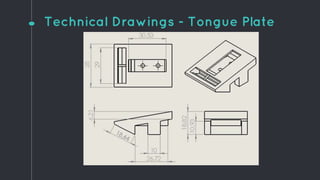
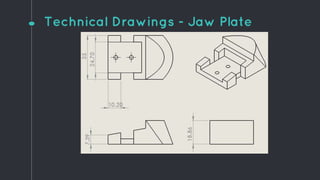
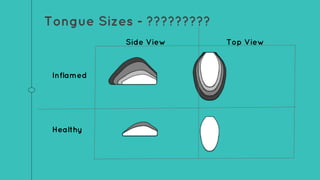
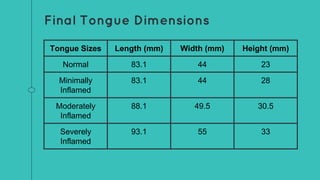
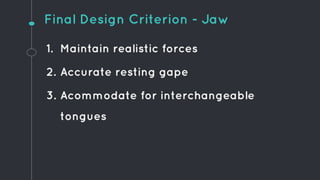
3. Previous Team - Overall Realism
skin tongue forces for
jaw-opening
4. Inflamed Tongues (Angioedema)
Bramante, R. M., and M. Rand. "Angioedema." New England Journal of Medicine 365.2 (2011). Print.
Cohn, J.R., McDaniel, C., Richards, N., Au, C., Baram, M., Airway Obstruction Secondary to Angiotensin Converting Enzyme Inhibitor (ACEI)
Induced Angioedema. Thomas Jefferson University and Hospitals, 2012.
6. Metrics and Specifications
# Metric Units Marginal Value Ideal Value
1 User Testing - Behavior of Tongues Likert Scale Realistic (4) Very Realistic (5)
2 User Testing - Shape and Size Likert Scale Realistic (4) Very Realistic (5)
3 User Testing - Repeated Intubation Before Failure
Number of
Intubations
100 200
4 User Testing - Preparation Time Seconds 300 60
5 Max Change in Length mm 5 10
6 Max Change in Width mm 5 10
7 Max Change in Height mm 5 11
30. User Testing 4 - Time to Interchange
Students and shop guys (n = 5)
31. User Testing 4 - Time to Interchange
● Normal Tongue
○ Mean = 55.0 seconds
○ SD = 7.38 seconds
● Severely Inflamed Tongue
○ Mean = 79.8 seconds
○ SD = 22.6 seconds
32. Metrics and Specifications
# Metric Units
Marginal
Value
Ideal Value Final Value
1 User Testing - Behavior of Tongues Likert Scale Realistic (4) Very Realistic (5) 3.5, 3, 4, 4
2 User Testing - Shape and Size Likert Scale Realistic (4) Very Realistic (5) 3.5, 4, 4, 4
3
User Testing - Repeated Intubation
Before Failure
Number of
Intubations
100 200 80
4 User Testing - Preparation Time Seconds 300 60 55, 80
5 Max Change in Length mm 5 10 10
6 Max Change in Width mm 5 10 10
7 Max Change in Height mm 5 11 11
33. Future Works
Cover entire face with continuous skin
Create obstructions in the airway itself
Standardize frenulum and tongue positioning
34. ANY QUESTIONS?
Special thanks to:
Professor Gatchell, Dr. Jared Novack, Joe Luciani,
Steven Houg, and NorthShore Sim Labs
39. 1. Maintain realistic forces
2. Accurate resting gape
3. Acommodate for interchangeable
tongues
Final Design Criterion - Jaw
Editor's Notes
Hello everybody, my name is Ara Bablouzian and these are my teammates Aakash Gupta and Tushar Kesavadas.
Together we make team 10, and we have BUILT a dynamic adult airway management trainer to better prepare
medical professionals for difficult airway and endotracheal intubation scenarios.
Endotracheal intubation is a procedure performed on a patient to restore control over a compromised airway.
First the head is tilted into the sniffing position to help align the airway.
A laryngoscope is then used to push the tongue down, visualize the epiglottis, and insert a tube down the trachea.
Simulation-based intubation training is used extensively, but these simulators lack the ability to modulate intubation difficulty without compromising overall realism.
We received the simulator shown here from the previous 390 team that worked on this project.
They focused on increasing realism over the current NorthShore simulator, specifically in regards to tongue and skin feel.
They also accurately modeled the motion and force required to open the jaw using O-rings.
We continued their work, but added features to modulate intubation difficulty.
Now, our method for making intubation more difficult was to model larger, inflamed tongues.
As you can see in the picture, tongue inflammation can be quite severe in some cases and makes intubating extremely difficult if not impossible.
Last quarter we broke the needs of our tongue down into the following categories:
-First off, we need the tongue to be DURABLE.
-Obviously, it must withstand the forces applied during intubation and needs to survive for multiple training sessions.
-The tongue must also be REALISTIC in regards to the behavioral deformation and color.
-Finally, it must model the size, shape, and feel of INFLAMED TONGUES.
Here is the final specifications table for our simulator.
The blue section refers to the values obtained through user testing while the grey section refers to dimensions of the inflamed tongues.
Tushar will now discuss the design and its components.
Shown here again is the final part with an exploded view and the given lower jaw for context
Our tongue has 3 main design criterion to fill, as Ara discussed a few slides back.
The tongue must model normal and inflamed tongues in size, shape, and feel.
The tongue must also appear and behave realistically, as well as withstand the forces of intubation over several intubation practice sessions.
In terms of getting realistic size and shape for normal and inflamed tongues, since we are 3D printing tongue molds, any shape and size can be obtained.
For our final design, we’ve come down to four tongues - normal tongues, minimally inflamed, moderately inflamed, and severely inflamed tongues
In terms of getting realistic feel for the tongues and as well as realistic deformation, we used the silicone ecoflex which comes in a variety of hardnesses
The normal tongue is made our of a homogenous mixture of ecoflex and slacker, which is just an additive that gives the tongue a tacky feel/
But for inflamed tongues, we know that as tissue get inflamed it not only becomes bigger, but it also gets harder
So the inflamed are made out of two layers
Design Criteria
tongue needs to reach epiglottis
Tongue needs to arch over teeth
distribution of forces (when hanging vs when intubating → shear, rotational)
We’re using laerdal airway
we want to
The first part of our final attachment design is the tongue plate
In terms of correctly positioning the tongue, we designed the tongue plate with an incline.
So you can see that the top of the tongue plate is angled, which allows the back of the tongue to roll down the epiglottis
This piece needs to attach to our silicone tongues, and we know that silicone only binds to silicone.
So if you look at the isometric view, you’ll see three holes.
The top slot is for the lingual frenulum, and the bottom two holes is for the base of tongue
These holes lead into the hollow interior of the tongue plateWe filled this interior with silicone glue, and while the glue was wet we placed our tongue on top of the tongue plate
In terms of withstanding the forces of intubation as well as forces at rest, that leads us to the second part of attachment design which is the Jaw plate.
The Jaw plate was designed to be complementary to the tongue plate
To withstand the forces at rest we used button snaps.
Shown here again is the final part with an exploded view and the given lower jaw for context
Casey mentioned earlier in the presentation some qualities of inflamed tongues:
They get harder in the interior of the tongue as they swell
They retain a tacky exterior despite this
The goal is to present users with several tongue mock ups for each inflammation severity. In order to build these tongues there are three parameters that need to be determined...
For this user testing, we decided to construct these two layer blocks that gave us control over both parameters.
We can change the ratio between the heights of the two layers as well as the composition of the lower layer.
The upper layer is constant and is the tacky exterior material because we know inflamed tongues retain this tacky exterior.
This matrix set up shows 16 of these blocks with both height ratio and composition varied between their maximum and minimum values.
The lower layer composition ranges from the hardest material (00-50) and the softest material (00-10 + Slacker)
The height ratio varies from 0.8 to 0.2
We constructed this set up (SHOW MATRIX)
3 Point scale to assess each block
Dr. Novack was asked to grade these blocks for each type of tongue severity (minimal, moderate, severe)
The results are summarized in this figure. Only the blocks for each severity that were rated a 3 are shown here.
The takeaways from this round of user testing are:
0.4 and 0.2 height ratios are unrealistic for all inflammation
We have identified 6 realistic compositions
Combining with the sizes and shapes Ara presented, we want to build a total of 6 inflamed tongues with the compositions and height ratios shown here. These 6 tongues will be used for user testing.
Intubate Laerdal
Intubate DAAMT with normal tongue
Answer questionnaire + give oral feedback
Forces to open Jaw
Anterior/Posterior movement of Jaw
Opening of the jaw
Resting gape
Movement of the tongue
Compressibility of the tongue
Opening of the glottis
Movement of the epiglottis
Overall feel of intubation
Feel of skin
Intubate 1 of 4 tongues (randomized)
Record intubation time
Answer questionnaire + give oral feedback
Repeat for remaining tongues
Shown how to interchange tongue
Practice on each tongue with supervision
Assemble/disassemble each tongue
Repeat for both tongues (randomized order)
The specifications table is shown here with the final values obtained through user testing, listed in the last column.
The first two metrics refer to the behavior, shape, and size of the tongue and are very important to the success of our project.
The four final values are for the increasing levels of inflammation, from left to right.
As Aakash mentioned, our moderate and severe levels of inflammation performed well and met our marginal specifications.
The normal and minimal values were close to spec, but not quite to the level we expected.
In regard to durability, our simulator has survived 80 intubations thus far with no significant signs.
Our 4th round of user testing yielded a total tongue swap time of a minute to a minute and a half, which is slightly over our ideal value.
However, we’re confident with more practice our users could get under that one minute.
As Tushar discussed, the inflamed tongues were modeled in SolidWorks and thus we can attain any desired size or contour.
Future work could be done on the simulator to improve the overall realism and feel of intubation.
A continuous piece of skin over the simulator’s face would certainly make it appear more realistic, but could prove difficult with our attachment mechanism.
Another way to modulate intubation difficulty would be to introduce obstructions in the airway itself, making it more difficult to feed the endotracheal tube down through the glottis.
Finally, a standard way to build frenulums and use them to attach and position the tongue to the tongue plate needs to be developed.
Shown here are the side and top views of the resulting tongue models. The top tongues are inflamed and the bottom tongues are healthy, while the white to gray shading represents the transition from normal to severely inflamed. Measurements of the simulator’s oral cavity and feedback from our client bounded the maximum tongue dimensions. The two largest tongues are intended to open and protrude out of the mouth. Length and width were proportionally changed at each cross-section. Height was added based on the percentage change at the maximum profile, since we know that the tongue inflames more in the back than in the front. We will continually iterate these models with feedback from Dr. Novack to achieve proper tongue curvature. (Severe tongue is 75% wider, 37.5% longer, and 174% thicker)
The results are summarized in this figure. Only the blocks for each severity that were rated a 3 are shown here.
The takeaways from this round of user testing are:
0.4 and 0.2 height ratios are unrealistic for all inflammation
We have identified 6 realistic compositions
Combining with the sizes and shapes Ara presented, we want to build a total of 6 inflamed tongues with the compositions and height ratios shown here. These 6 tongues will be used for user testing.
Design Criteria
tongue needs to reach epiglottis
Tongue needs to arch over teeth
distribution of forces (when hanging vs when intubating → shear, rotational)
We’re using laerdal airway
we want to