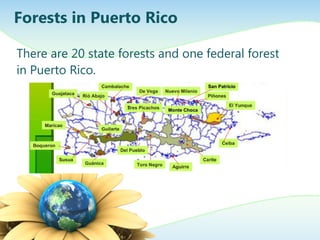
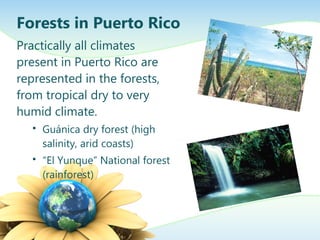
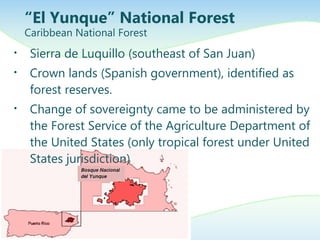
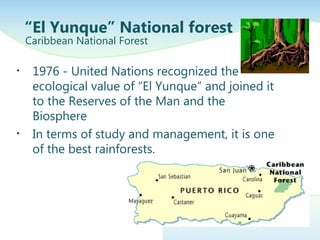
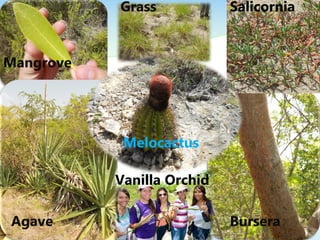
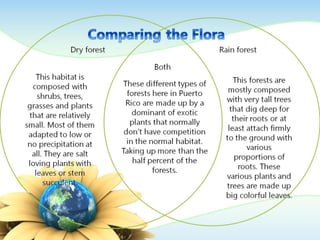
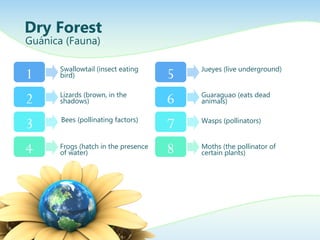
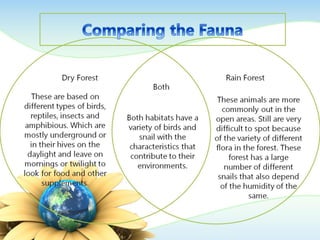
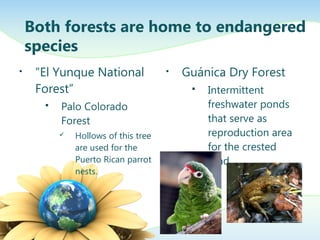
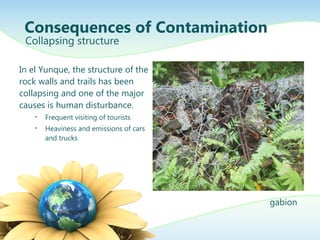
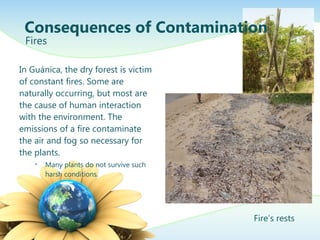
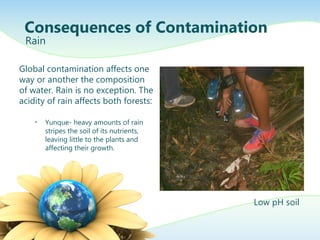
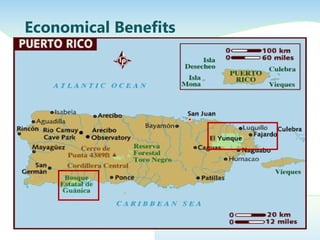
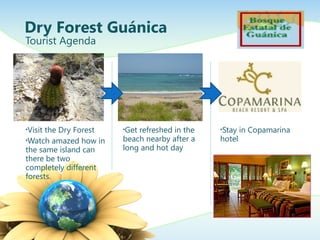
Hoi An Ancient Town, Vietnam (čśĺ ćĺŽĺ¤éŽ).ppsx
Â
Final presentation (rain and dry forest)
1. Forest variations in the limits of an
island
Rain and Dry Forests in Puerto Rico
By:
Paola Caballero
Alejandra M. De JesĂşs
Valerie Flores
Jessica RodrĂguez
2. IntroductionâŚ
What is a forest?
ď§ Forests are ecosystems.
ď§ An ecosystem consists of all the living things in a
particular area, along with all the nonliving
components of the environment with which living
things interact (soil, water, temperature, atmospheric
gases, light).
3. ⢠Conserve soil and prevent erosion (wearing away
of the land by wind and water)
⢠Habitat for our biodiversity.
ď§ Are representations of our flora and fauna,
custodians of these.
⢠Provide wood
products.
Introduction
Importance of forests
4. ⢠Provide a healthy
environment for passive
outdoor recreation.
⢠Its incredible diversity of
species allows Education
and Research experiences.
Introduction
Importance of forests
5. There are 20 state forests and one federal forest
in Puerto Rico.
Forests in Puerto Rico
6. Practically all climates
present in Puerto Rico are
represented in the forests,
from tropical dry to very
humid climate.
ď§ GuĂĄnica dry forest (high
salinity, arid coasts)
ď§ âEl Yunqueâ National forest
(rainforest)
Forests in Puerto Rico
7. ⢠Sierra de Luquillo (southeast of San Juan)
⢠Crown lands (Spanish government), identified as
forest reserves.
⢠Change of sovereignty came to be administered by
the Forest Service of the Agriculture Department of
the United States (only tropical forest under United
States jurisdiction)
âEl Yunqueâ National Forest
Caribbean National Forest
8. ⢠1976 - United Nations recognized the
ecological value of âEl Yunqueâ and joined it
to the Reserves of the Man and the
Biosphere
⢠In terms of study and management, it is one
of the best rainforests.
âEl Yunqueâ National forest
Caribbean National Forest
9. ⢠1981 â United Nations
recognized the
ecological value of the
forest and appointed
him as the second
International Biosphere
Reserve in Puerto Rico
⢠Worldâs best preserved
tropical forest and less
disturbed by humans.
GuĂĄnica Dry Forest Southwest coast of Puerto
Rico
10. â˘El Yunque
⢠500 inches of rain in a
year in the highest
peaks.
⢠Daily temperatures are
25.5 ËC.
â˘GuĂĄnica Dry Forest
⢠The annual
precipitation is
between 25 to 30
inches.
⢠Temperatures ranging
between 75ËF in cold
months and 95ËF in
hot months.
Precipitation and Temperature
11. Rain Forest
El Yunque (Flora)
1
2
3
4
Cassia decian (deep roots
with breaking effects)
Yagrumos (sexual
reproduction, thereâs various
types)
Pino caribea (fast growing)
Bamboo (tall grass, dies fast)
5
6
7
8
RĂĄbano (plague, exotic
becomes dominant)
Guava (co-evolution, relation
with abayarde)
Jacana (eatable fruit, tall and
long leaves)
Mosses (stacked to the
ground, lots of surface)
16. Here is the description of the chart.
You may change or delete this text
as you wish.
This chart is compatible with
PowerPoint 97 to 2007.
Here is a placeholder for more text
and description of the chart.
Changing this text will not interfere
with the formatting of this
template.
Bar Graph Page Layout
A Second Line of text may go here
18. Dry Forest
GuĂĄnica (Fauna)
1
2
3
4
Swallowtail (insect eating
bird)
Lizards (brown, in the
shadows)
Bees (pollinating factors)
Frogs (hatch in the presence
of water)
5
6
7
8
Jueyes (live underground)
Guaraguao (eats dead
animals)
Wasps (pollinators)
Moths (the pollinator of
certain plants)
19.
20.
21. ⢠âEl Yunque National
Forestâ
ď§ Palo Colorado
Forest
ďź Hollows of this tree
are used for the
Puerto Rican parrot
nests.
⢠Guånica Dry Forest
ď§ Intermittent
freshwater ponds
that serve as
reproduction area
for the crested
toad
Both forests are home to endangered
species
22. In el Yunque, the structure of the
rock walls and trails has been
collapsing and one of the major
causes is human disturbance.
⢠Frequent visiting of tourists
⢠Heaviness and emissions of cars
and trucks
Consequences of Contamination
Collapsing structure
gabion
23. In GuĂĄnica, the dry forest is victim
of constant fires. Some are
naturally occurring, but most are
the cause of human interaction
with the environment. The
emissions of a fire contaminate
the air and fog so necessary for
the plants.
⢠Many plants do not survive such
harsh conditions.
Consequences of Contamination
Fires
Fireâs rests
24. Global contamination affects one
way or another the composition
of water. Rain is no exception. The
acidity of rain affects both forests:
⢠Yunque- heavy amounts of rain
stripes the soil of its nutrients,
leaving little to the plants and
affecting their growth.
Consequences of Contamination
Rain
Low pH soil
25. Global contamination affects one
way or another the composition
of water. Rain is no exception. The
acidity of rain affects both forests:
⢠Guanica- rain erodes limestone,
forming small to big cavities on
the surface of the limestone.
Consequences of Contamination
Rain
27. El Yunque
Tourist Agenda
â˘Visit El Yunque.
â˘Climb to the top
and/or go to the
waterfalls
â˘Get something to eat
after a long day of
sightseeing and
walking in the
Luquilloâs kiosks.
â˘Stay in a hotel, rest
and go to the beach
28. Dry Forest GuĂĄnica
Tourist Agenda
â˘Visit the Dry Forest
â˘Watch amazed how in
the same island can
there be two
completely different
forests.
â˘Get refreshed in the
beach nearby after a
long and hot day
â˘Stay in Copamarina
hotel
29. âIf you cut down a
forest, it doesn't
matter how many
sawmills you have
if there are no more
trees.â
~ Susan George
âIf you cut down a
forest, it doesn't
matter how many
sawmills you have
if there are no
more trees.â
~ Susan George
Editor's Notes
Atraer turistas (tres pies de matas de secas) Gastan chavos en guaguas y aguasâŚse van pa la playa o algo Gobierno has money Terreno dificil de construir y sacarle provecho No puede sacarle provecho construyendo casas o manteniendo y tampoco pueden sembrar por las condiciones extremas del suelo, lo convierten en un parque. Diagrama de cositas cerca de cada bosque (beneficios economicos)
The Forest (Intermediate) Â To reproduce the background effects on this slide, do the following: On the Design tab, in the bottom right corner of the Background group, click the arrow to launch the Format Background dialog box. In the Format Background dialog box, click Fill in the left pane, under Fill in the right pane select Picture or Texture Fill . Then under Insert From click File. In the left pane of the Insert Picture dialog box, click the drive or library that contains the picture. In the right pane of the dialog box, click the picture ( Forest Path ) that you want and then click Insert . Close the Format Background dialog box. Â To reproduce the video effects on this slide, do the following: On the Home tab, in the Slides group, click Layout , and then click Blank . On the Insert tab, in the Media group, click Video , and then click Video from File . In the left pane of the Insert Video dialog box, click the drive or library that contains the video. In the right pane of the dialog box, click the first video that you want and then click Insert . Under Video Tools , on the Format tab in the Size group, click the arrow at the bottom right corner to launch the Format Video dialog box. Select Size in the left pane. Under Scale in the right pane, clear the Lock aspect ratio box, then under Size and Rotate in the right pane, set Height to 1.77â and Width to 2.36â . Also in the Format Video dialog box, select Position in the left pane. Under Position in the right pane, do the following: In the Horizontal box, enter 0.3â From Top Left Corner . In the Vertical box, enter 0.75â From Top Left Corner . Also in the Format Video dialog box, select Border Color in the left pane, and then in the Border Color pane select Solid Line . Click the arrow to the right of Color and under Theme Colors select White, Background 1 (first row, first option). Also in the Format Video dialog box, select Border Style in the left pane, under Border Style in the right pane, in the Width box, enter 0.75â . Also in the Format Video dialog box, select Shadow in the left pane, under Shadow in the right pane do the following: Click the arrow to the right of Color , and under Theme Colors select Black, Text 1 (first row, second option). In the Transparency box, enter 0% . In the Size box, enter 100% . In the Blur box, enter 16 pt . In the Angle box, enter 45 degrees . In the Distance box, enter 6 pt . Close the Format Video dialog box. On the Insert tab, in the Media group, click Video , and then click Video from File . In the left pane of the Insert Video dialog box, click the drive or library that contains the video. In the right pane of the dialog box, click the second video that you want and then click Insert . Under Video Tools , on the Format tab in the Size group, click the arrow at the bottom right corner to launch the Format Video dialog box. Select Size in the left pane. Under Scale in the right pane, clear the Lock aspect ratio box, then under Size and Rotate in the right pane, set Height to 1.77â and Width to 2.36â . Also in the Format Video dialog box, select Position in the left pane, and then in the Position pane, do the following: In the Horizontal box, enter 0.3â From Top Left Corner . In the Vertical box, enter 2.87â From Top Left Corner . Also in the Format Video dialog box, select Border Color in the left pane, and then in the Border Color pane select Solid Line . Click the arrow to the right of Color and under Theme Colors select White, Background 1 (first row, first option). Also in the Format Video dialog box, select Border Style in the left pane. Under Border Style in the right pane, set Width to 0.75â . Also in the Format Video dialog box, select Shadow in the left pane. In the right pane, under Shadow , do the following: Click the arrow to the right of Color and under Theme Colors select Black, Text 1 (first row, second option). In the Transparency box, enter 0% . In the Size box, enter 100% . In the Blur box, enter 16 pt . In the Angle box, enter 45 degrees . In the Distance box, enter 6 pt . Close the Format Video dialog box. On the Insert tab, in the Media group, click Video , and then click Video from File . In the left pane of the Insert Video dialog box, click the drive or library that contains the video. In the right pane of the dialog box, click the third video that you want and then click Insert . Under Video Tools , on the Format tab in the Size group, click the arrow at the bottom right corner to launch the Format Video dialog box. Select Size in the left pane. Under Scale in the right pane, clear the Lock aspect ratio box, then under Size and Rotate in the right pane, set Height to 1.77â and Width to 2.36â . Also in the Format Video dialog box, select Position in the left pane. Under Position in the right pane, do the following: In the Horizontal box, enter 0.3â From Top Left Corner . In the Vertical box, enter 4.99â From Top Left Corner . Also in the Format Video dialog box, select Border Color in the left pane, and then in the Border Color pane, select Solid Line . Click the arrow to the right of Color and under Theme Colors select White, Background 1 (first row, first option). Also in the Format Video dialog box, select Border Style in the left pane. In the right pane, under Border Style , set Width to 0.75â . Also in the Format Video dialog box, select Shadow in the left pane. Under Shadow the right pane, do the following: Click the arrow to the right of Color , and under Theme Colors select Black, Text 1 (first row, second option). In the Transparency box, enter 0% . In the Size box, enter 100% . In the Blur box, enter 16 pt . In the Angle box, enter 45 degrees . In the Distance box, enter 6 pt . Close the Format Video dialog box. Press and hold CTRL and select all three videos. On the Animations tab, in the Timing group , click the arrow to the right of Start and select With Previous . Â To reproduce the text on this slide, do the following: On the Insert tab, in the Illustrations group, click the arrow under Shapes , and then under Rectangles , select Rectangle (first row, first option). On the slide, drag to draw a rectangle. Under Drawing Tools , on the Format tab , in the Size group, click the arrow at the bottom right corner to launch the Format Shape dialog box. Select Size in the left pane. In the right pane, under Size , do the following: In the Height box, enter 6.96â . In the Width box, enter 6.72â . Also in the Format Shape dialog box, select Position in the left pane, under Position in the right pane do the following: In the Horizontal box, enter 3â From Top Left Corner . In the Vertical box, enter 0.27â From Top Left Corner . Also in the Format Shape dialog box, select Fill in the left pane, under Fill in the right pane, select Solid fill and then do the following: Click the arrow to the right of Color . Under Theme Colors , select White, Background 1 (first row, first option). In the Transparency box, enter 20% . Also in the Format Shape dialog box, select Line Color in the left pane. Under Line Color in the right pane, select Solid line and then do the following: Click the arrow to the right of Color . Under Theme Colors , select White, Background 1 (first row, first option). Also in the Format Shape dialog box, select Line Style in the left pane. Under Line Style in the right pane, set Width to 1.5 pt . Close Format Shape dialog box. On the Insert tab, in the Text group, click Text Box , and then on the slide drag to draw your text box. Type text in the text box, and then select the text. On the Home tab, in the Font group, select Brush Script Std from the Font list, and then select 54 pt from the Font Size list. With the text box selected, under Drawing Tools , on the Format tab, in the Size group, click the arrow at the bottom right corner to launch the Format Shape dialog box. Select Size in the left pane, under Size and Rotate in the right pane, set Height to 5.55â and Width to 6.04â . Select Position in the left pane, and under Position on the right pane, set Horizontal to 3.46â and Vertical to 0.97â . On the Insert tab, in the Text group, click Text Box , and then on the slide drag to draw your text box. Type â~ Susan Georgeâ in the text box. On the Home tab, in the Font group, select Calibri from the Font list, and then select 18 pt from the Font Size list. In the Format Shape dialog box select Size in the left pane. Under Size and Rotate in the right pane, set Height to 0.4â and Width to 2.5â . Select Position in the left pane, and under Position on the right pane, set Horizontal to 6.86â and Vertical to 6.42â. Close the Format Shape dialog box.