Downloaded 92 times


![Tutorial 6: Using the Work Calendar 53
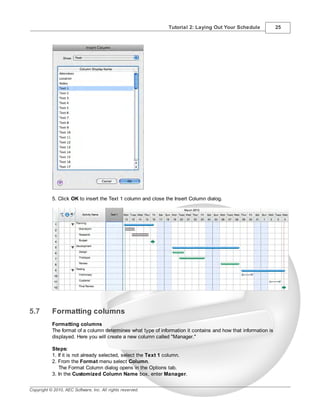
1. In FastTrack Schedule, go to the Help menu, select Tutorials, and choose Tutorial Practice Files
from the submenu.
2. Select the FastTrack Schedule file Tutor6.
Important:
If you cannot locate the Tutorial folder on your computer, go to Find and search for "Tutor6". If this
produces no results, check with your System Administrator to make sure the Tutorial folder was
included when FastTrack Schedule was installed on your computer.
9.2 Defining a Work Calendar
Defining a Work Calendar
In Fast Track Schedule there are three types of work calendars: project, activity and resource. You
assign just one calendar to the project, but any activity can be assigned a separate calendar and every
resource has its own work calendar. Each of these calendars is edited in the Work Calendar dialog and
each of these calendars is completely customizable.
Work calendars allow you to define typical work days and exceptional days for the project, each
resource and any activity.
Work Calendars helps you accurately track the amount of time available for work on activities. Once
Work Calendars have been defined, you can utilize them in several ways:
- To display the work schedule in the Schedule View timeline by hiding and/or shading non-work times.
- To help you schedule activities during work times only.
- To calculate durations in work units.
There are four key elements of the Work Calendar: Base Work Days, the [selected] Calendar, Typical
Days, and Specific Days.
This Does this:
element:
Base Work Determines how durations of work days are calculated. This is
Day only used in calculations. You set this number in the Project
Copyright © 2010, AEC Software, Inc. All rights reserved.](https://image.slidesharecdn.com/fts10tutorials-110112144018-phpapp02/85/FastTrack-Schedule-10-Tutorials-53-320.jpg)
![54 FastTrack Schedule 10 Tutorials
tab of the Document Preferences dialog.
[Selected] Determines the calendar you assign to a project, activity or
Calendar resource and from which you may build a custom calendar.
Choose from: Standard - 8 hour work days Monday -Friday, 24
Hours - 24 hour work days seven days a week, Night Shift - a
40 hour work week from 11 PM - 8 AM, and any custom
calendars you have created.
Typical Allows you to set up a work schedule in which each day of the
Week Day week might have different hours, for instance, a Monday might
differ from other days.
Exceptions Defines the specific days of the year that deviate from the base
work day or typical days. Each specific day can have its own
set of hours or no hours. For example, you might want to define
holidays as specific days. Specific days are listed in the
Exceptions table and can be given a descriptive name.
If you choose to calculate durations in 24-Hour Calendar units, the Work Calendar is no longer being
used in the schedule.
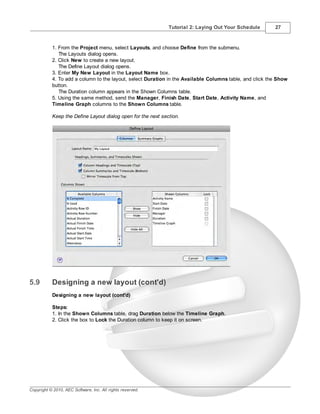
In these steps, you will create a new work calendar, define March 16, 2012 as a non-work day, and set
this new calendar as the Project Work Calendar.
Steps:
1. From the Project menu, select Work Calendars.
The Work Calendars dialog opens.
2. Click the New button.
3. In the New Work Calendar dialog, be sure Standard (Project Calendar) is selected in the Copy
Calendar option, and enter"Product Titan Launch".
Copyright © 2010, AEC Software, Inc. All rights reserved.](https://image.slidesharecdn.com/fts10tutorials-110112144018-phpapp02/85/FastTrack-Schedule-10-Tutorials-54-320.jpg)


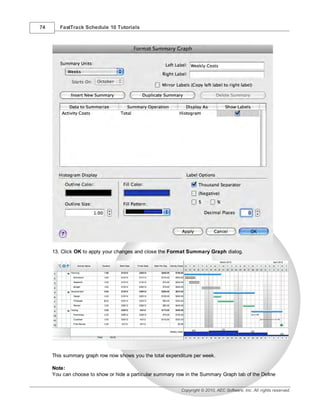


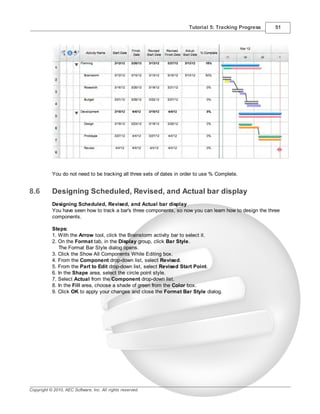
This tutorial covers the basics of using FastTrack Schedule, including creating activities, drawing bars, typing dates, drawing milestones, dragging bars, changing the schedule date range, typing to change dates, printing the schedule, and printing the schedule in Calendar View. It introduces key elements of the FastTrack Schedule environment like the timeline, columns, rows, and timescale areas.


