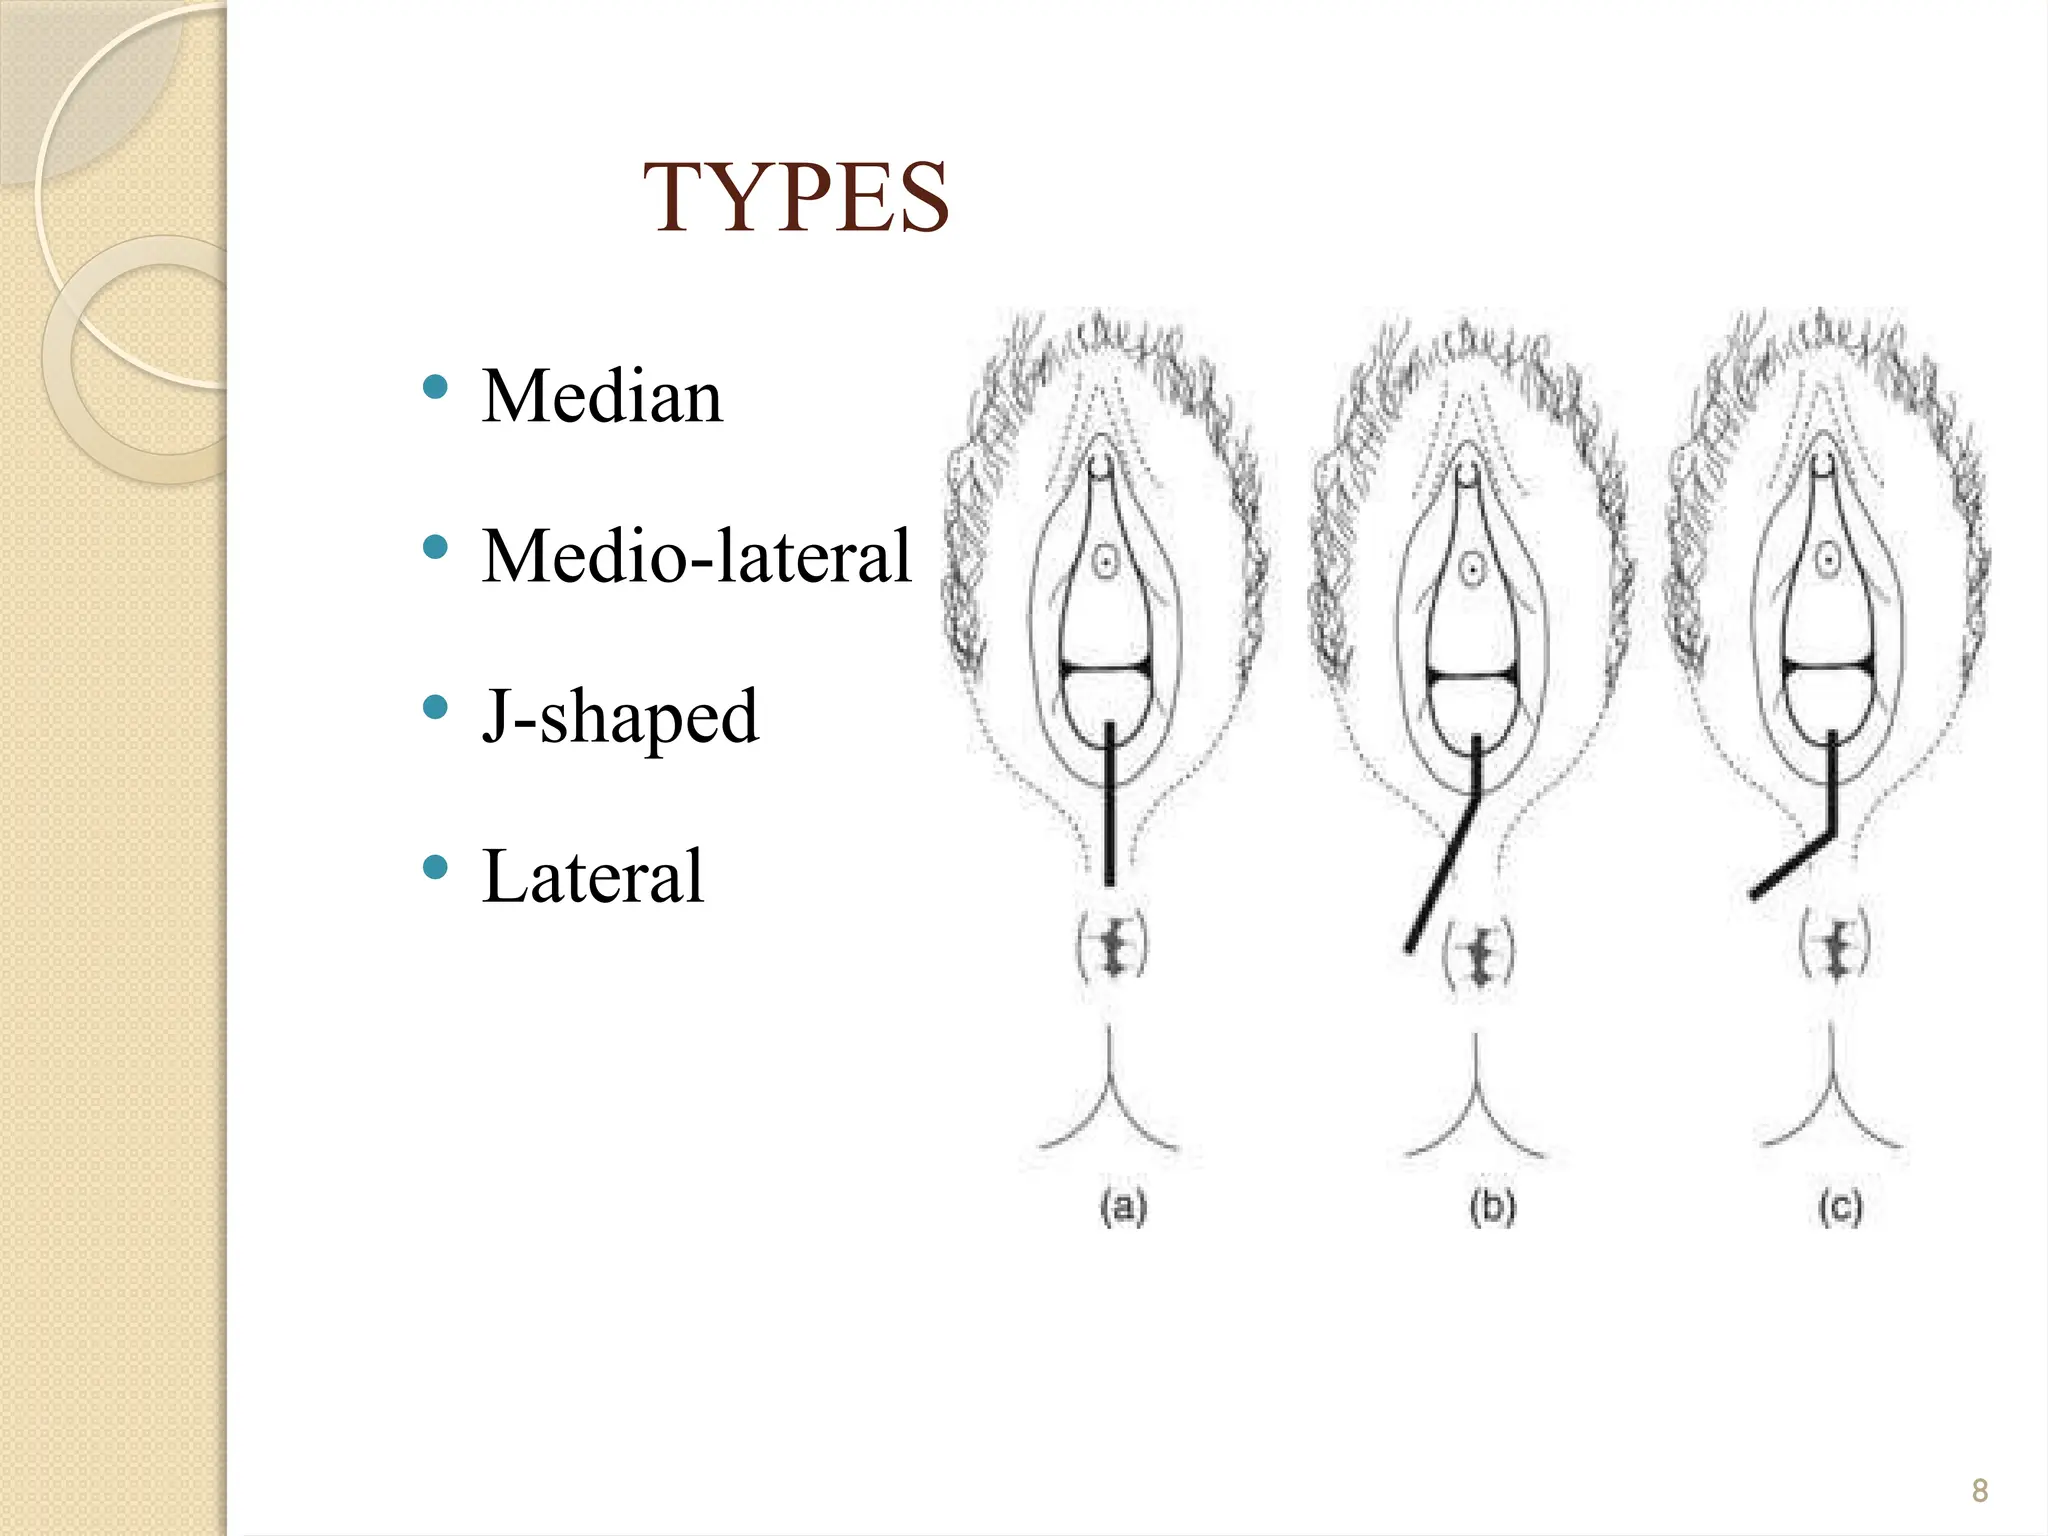
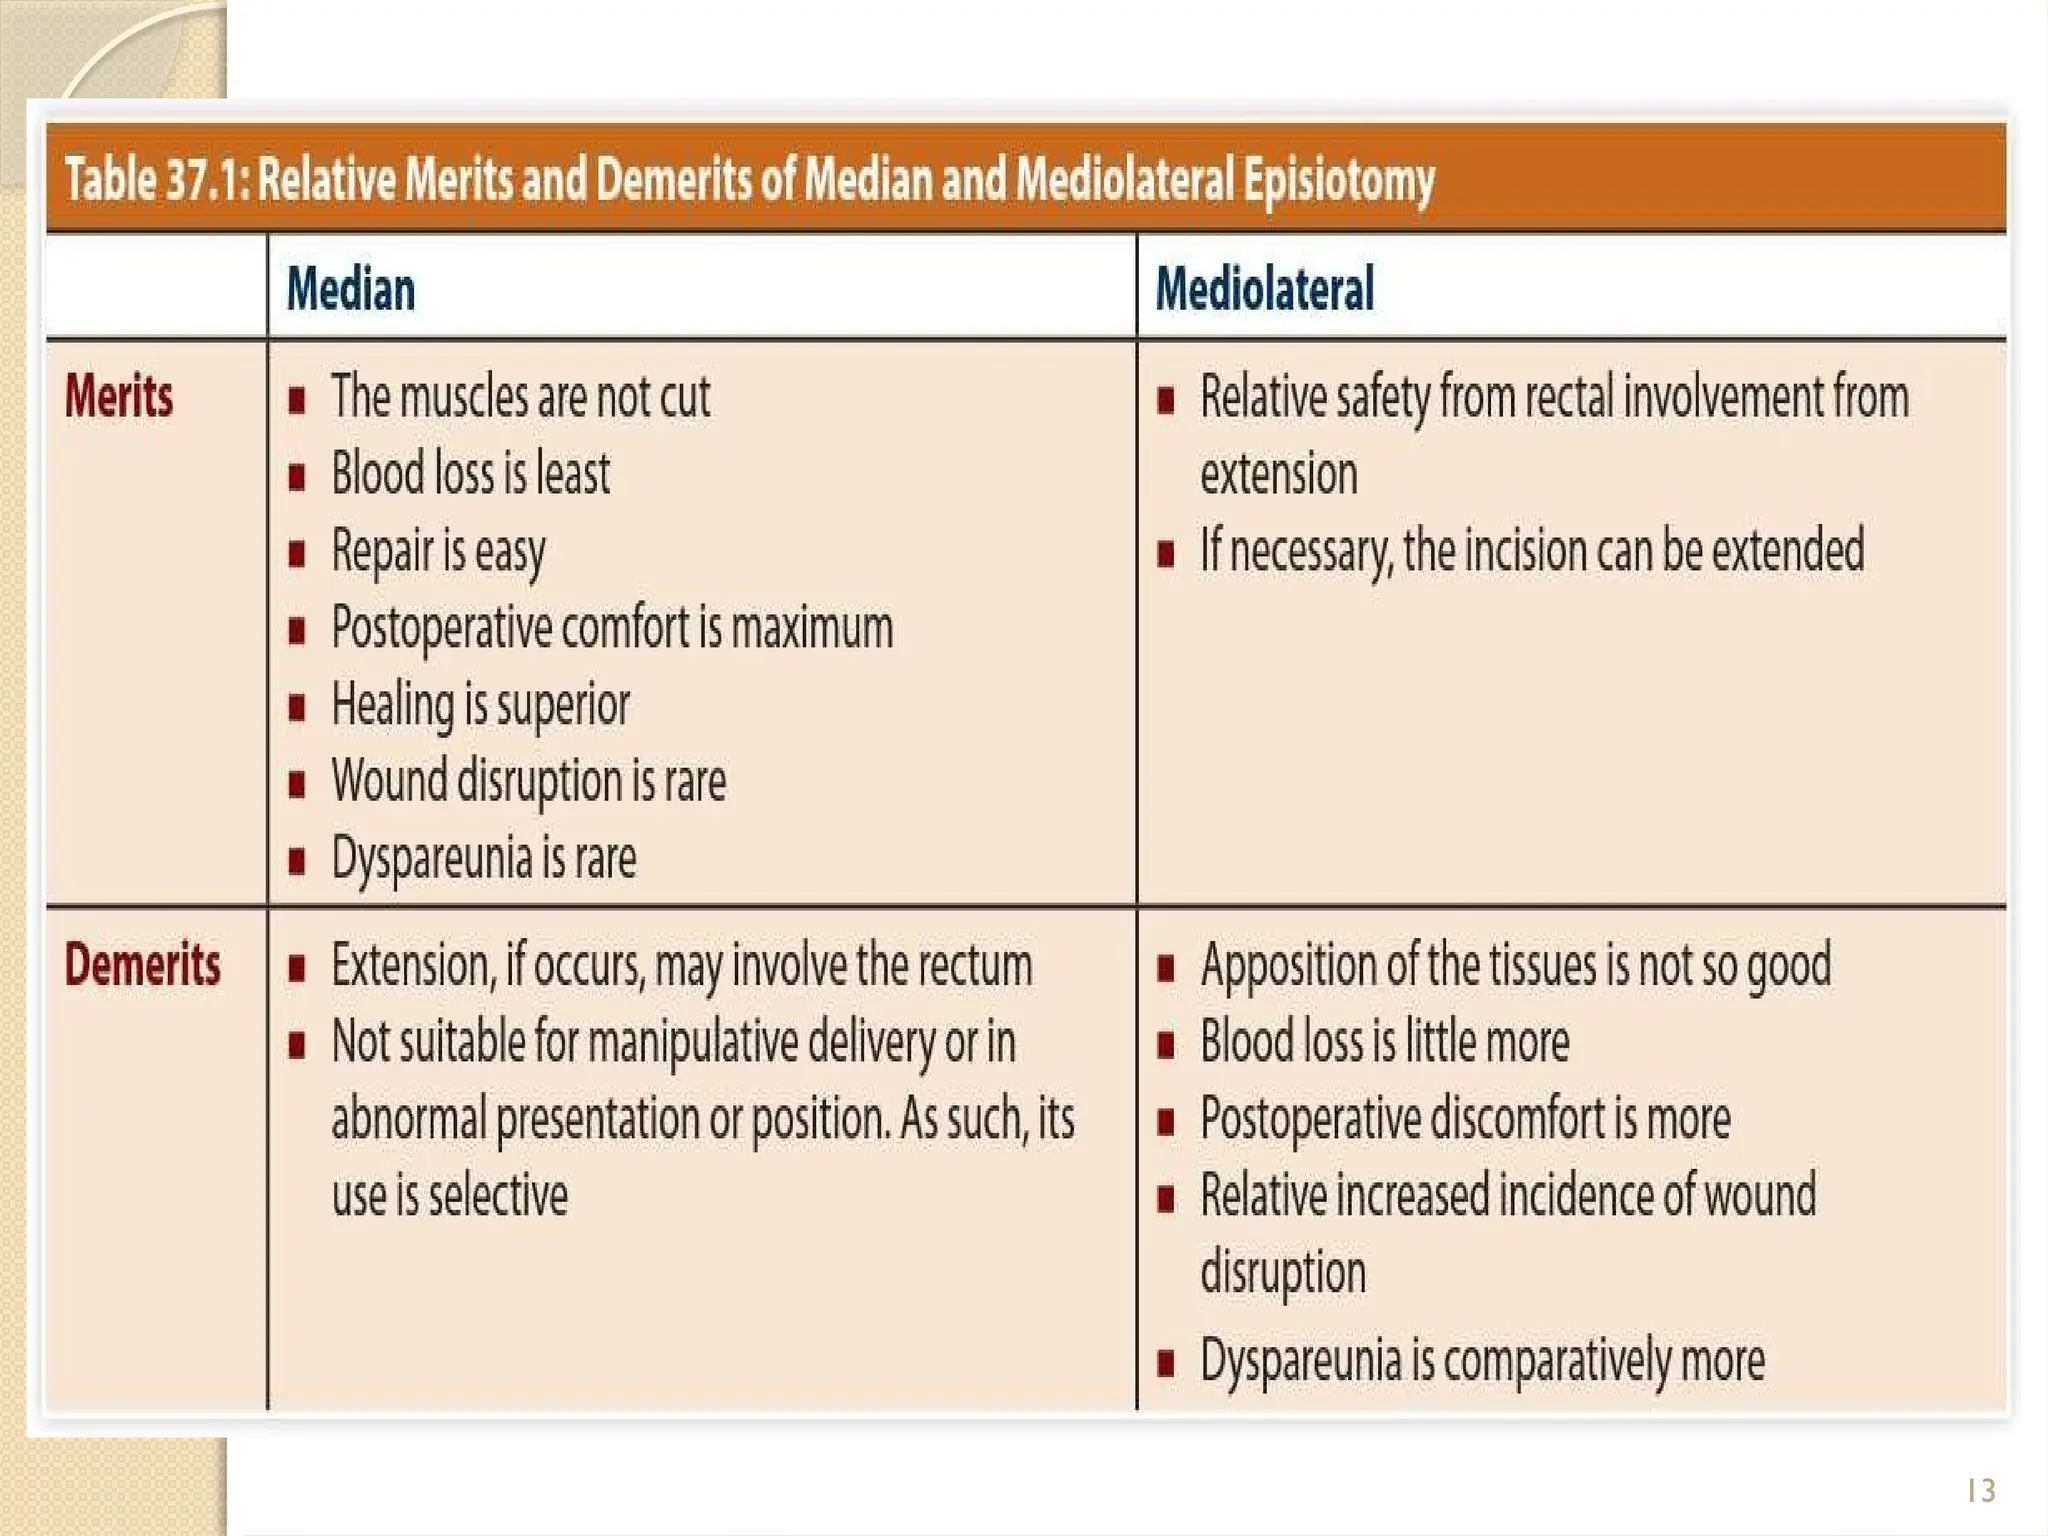
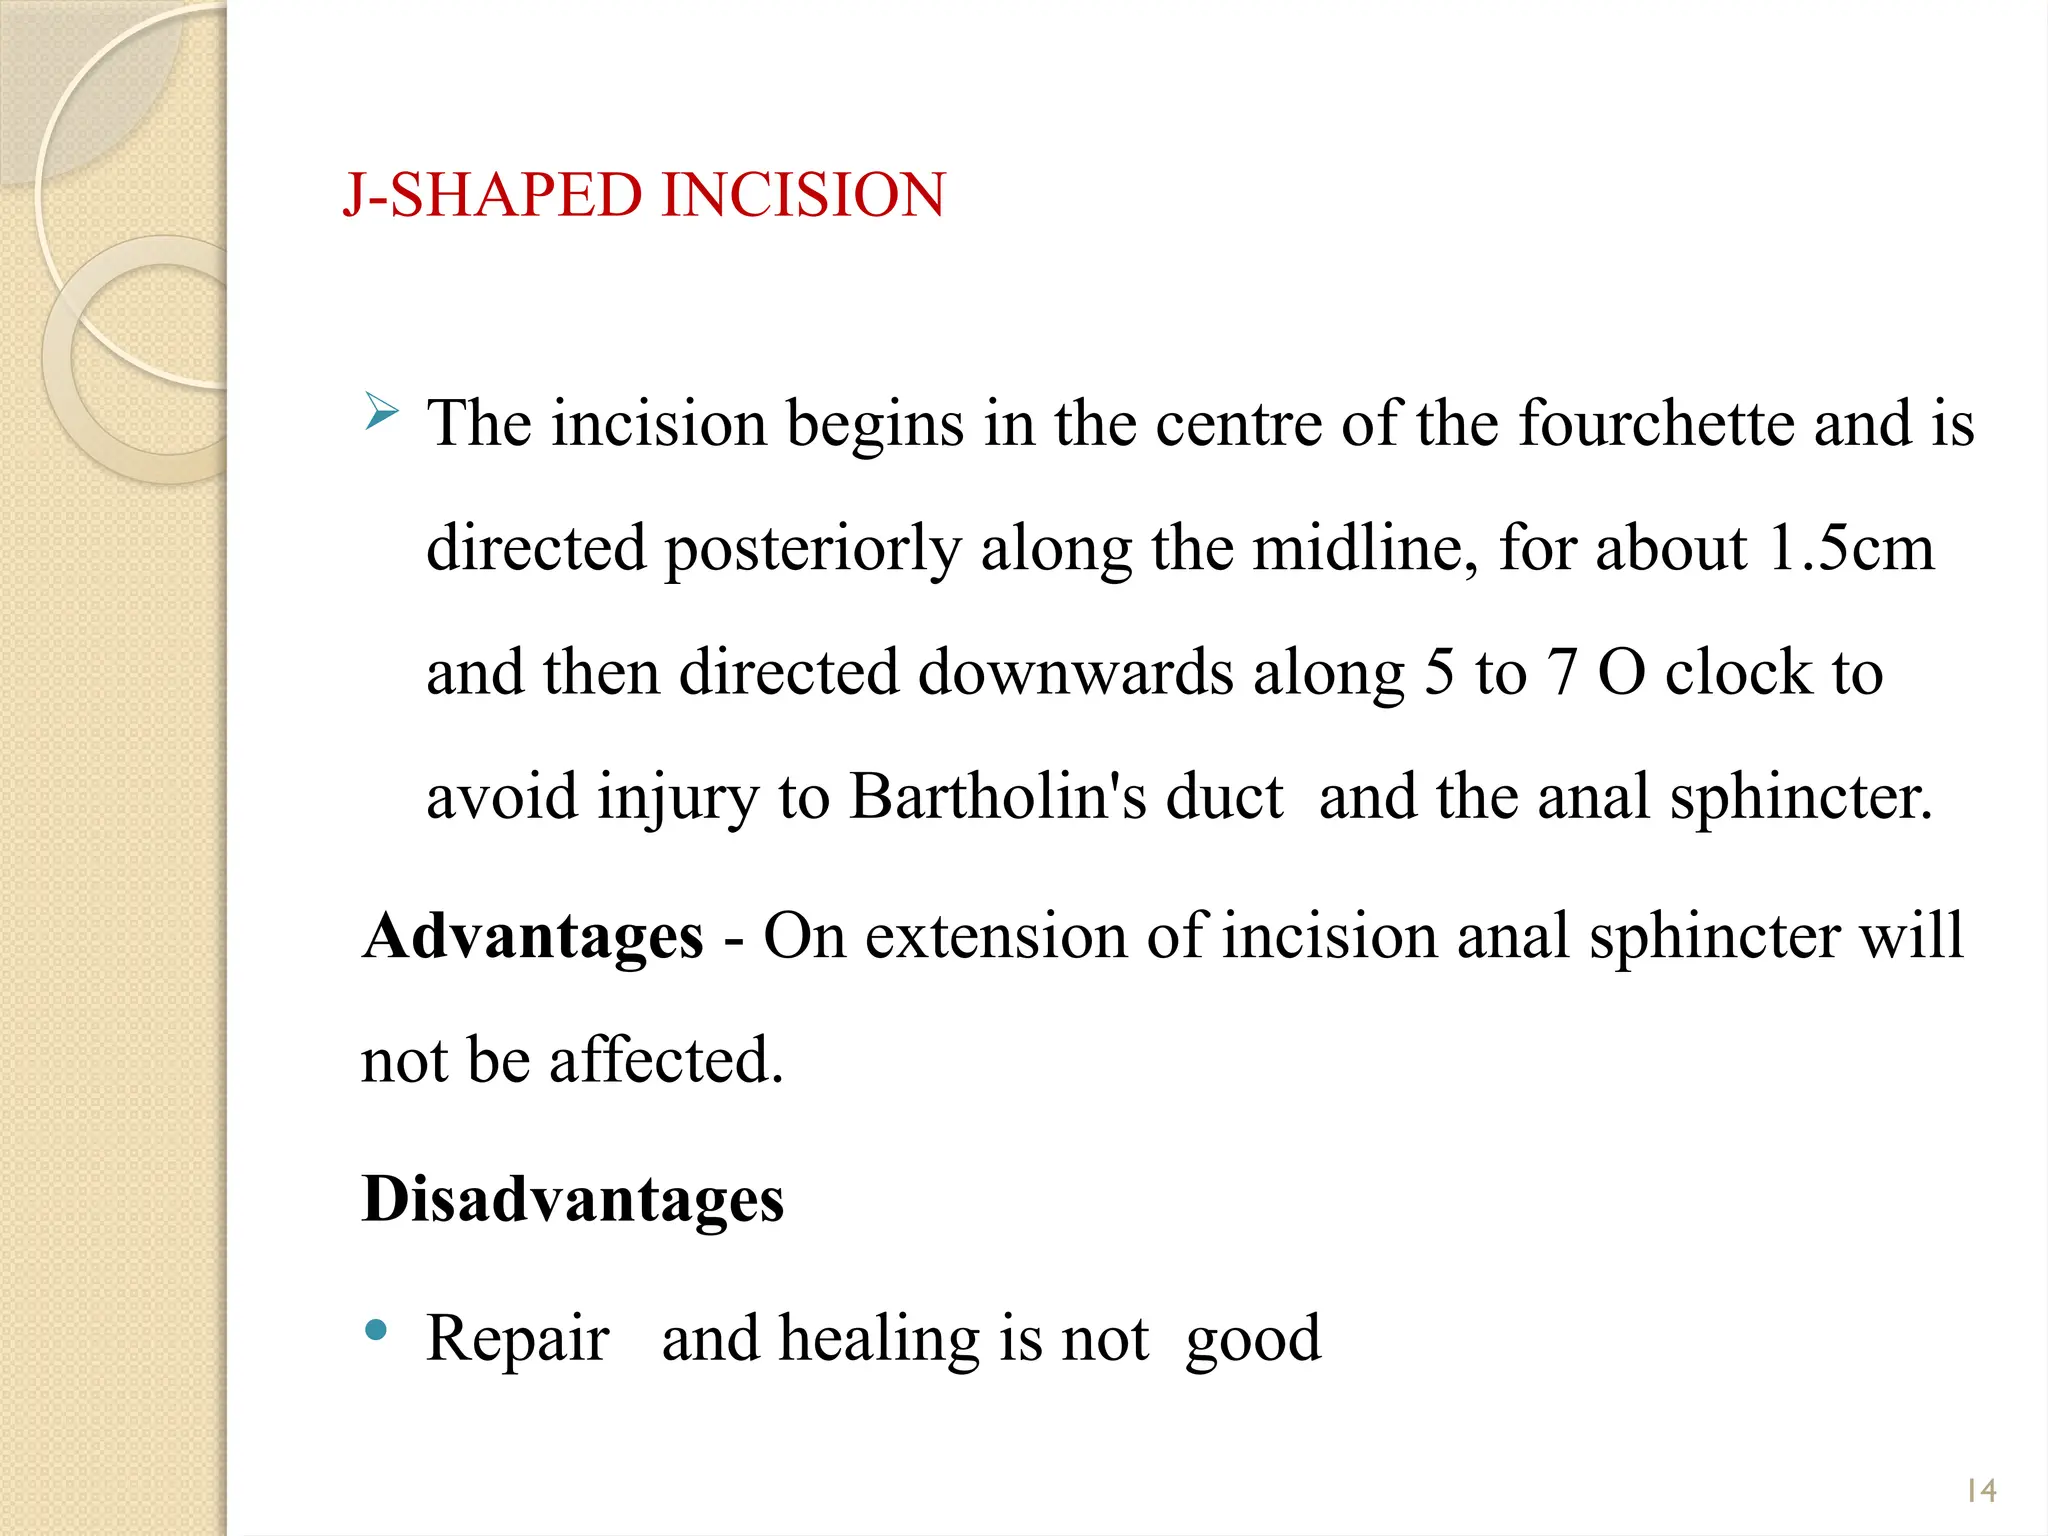
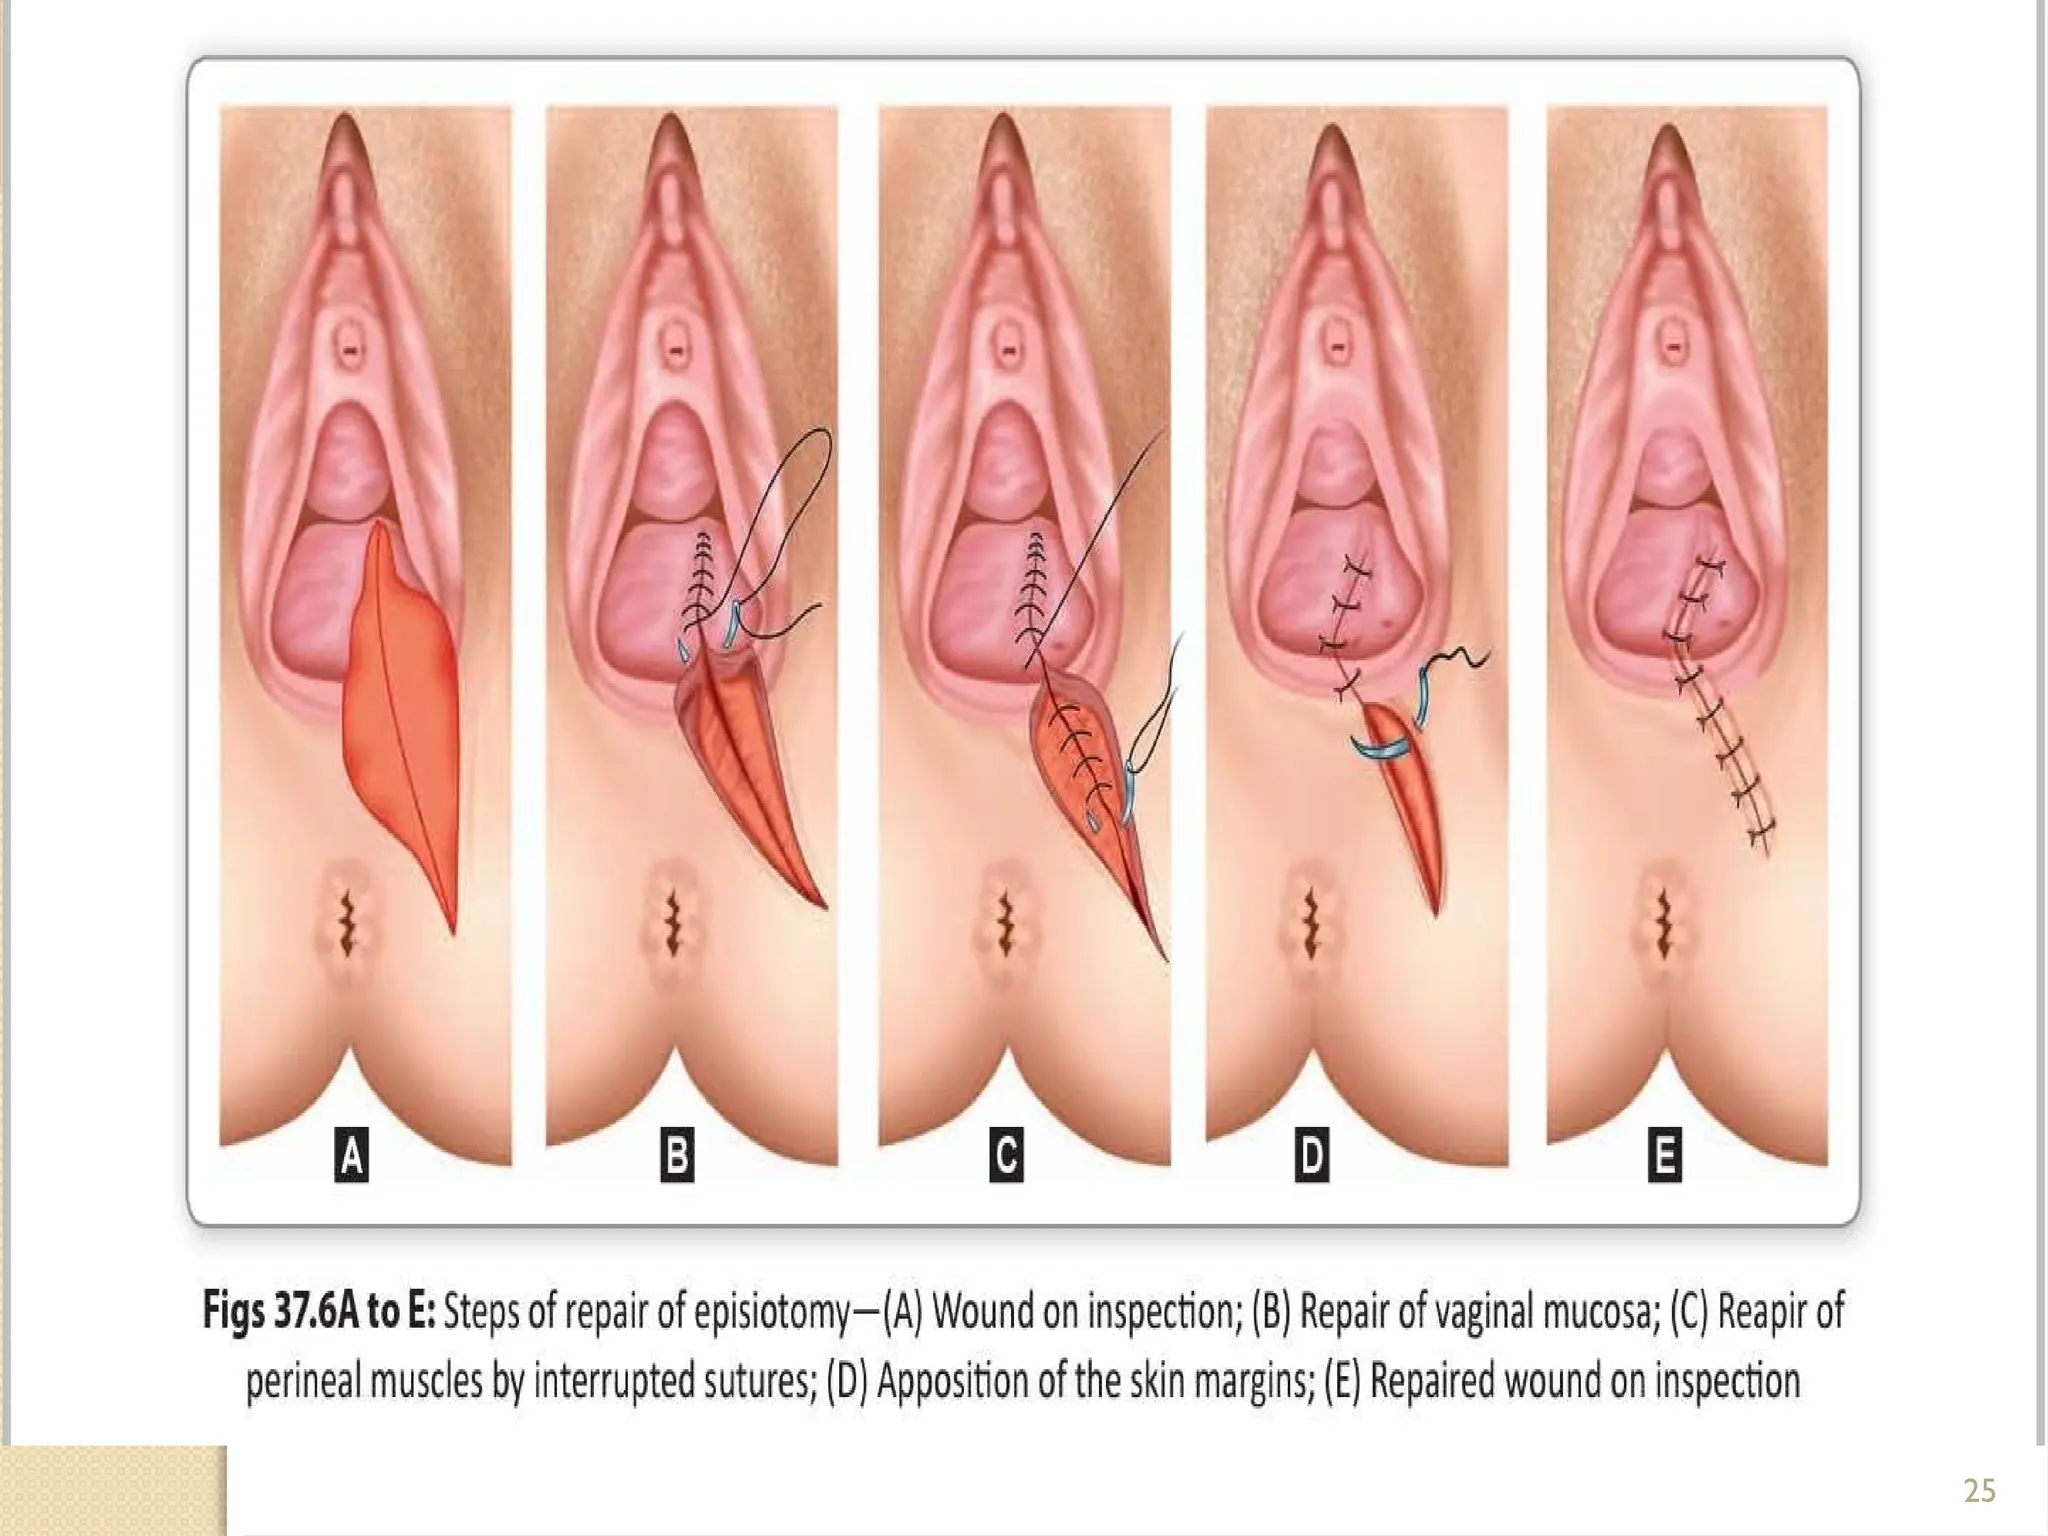
1
EPISIOTOMY AND TEAR
2
OUTLINES OF THE PRESENTATION
 Introduction to Episiotomy and tear
 Indications of episiotomy
 Types of episiotomy and tear
 Complications of episiotomy
3
SESSION OBJECTIVES
 At the end of the session you are expected to:-
 Define what Episiotomy and Tear means
 Identify the indications of Episiotomy
 Discuss the types of Episiotomy and tear
 Describe the complications of Episiotomy and
tear
4
INTRODUCTION
 Episiotomy is surgically planned incision on the perineum and
the posterior vaginal wall during the second stage of labour
The Purpose of Episiotomy is:-
 To enlarge the vaginal introitus so as to facilitate easy and safe
delivery of the fetus-spontaneous or manipulative.
 To minimise overstretching and rupture of the perineal muscles
and fascia; to reduce the stress and strain on the fetal head.
 To shorten the course of 2nd
stage of labour as in case of pre-
eclampsia, Fetal distress, premature baby.
5
INDICATIONS
 In elastic perineum;- Causing arrested or delay in
decent of the presenting part as in elderly
primigravida.
 Anticipating perineal tear;-
 This is widely indicated specially in
primigravidae almost as an elective procedure.
 Face to pubis or face delivery, big baby, narrow
pubis arch.
6
Cont…
 Operative delivery;- forceps delivery, ventouse delivery.
 Previous perineal surgery;- pelvic floor repair, perineal
reconstructive surgery
COMMON INDICATIONS
 Threatened perineal injury in primigravida.
 Rigid perineum.
 Forceps, Breech, Occipito-posterior or face delivery.
7
ADVANTAGES
Maternal-
 A clear and controlled incision is easy to repair and
heals better than a lacerated wound that might occur.
 Reduction in the duration of second stage.
 Reduction of trauma to the pelvic floor muscles.
Fetal-
 It minimises intracranial injuries specially in
premature babies or after-coming head of breech.
8
TYPES
 Median
 Medio-lateral
 J-shaped
 Lateral
9
10
Cont…
MEDIO-LATERAL;
 The incision is made downwards and out-wards from
the midpoint of the fourchette either to the right or left
 It is diagonally in a straight line which runs about 2.5cm
away from anus.
Advantages;-
 The muscles are not cut.
 Blood loss is least.
 Repair is easy.
11
Cont….
 Post operative comfort is superior
 Healing is superior.
 Wound disruption is rare
Disadvantages;
 Extension, if occurs may involve the rectum.
 Not suitable for manipulative delivery or in abdominal
presentation.
12
MEDIAN
 The incision commences from the centre of the fourchette
and extends posteriorly along the midline for about 2.5cm.
Advantages;-
 Relative from rectal involvement from extension.
Disadvantages;-
 Apposition of the tissues is not so good.
 Blood loss is little more.
 Post operative discomfort is more.
 Relative increased incidence of wound disruption
13
14
J-SHAPED INCISION
 The incision begins in the centre of the fourchette and is
directed posteriorly along the midline, for about 1.5cm
and then directed downwards along 5 to 7 O clock to
avoid injury to Bartholin's duct and the anal sphincter.
Advantages - On extension of incision anal sphincter will
not be affected.
Disadvantages
 Repair and healing is not good
15
LATERAL
 The incision starts from about 1cm away from the centre
of the fourchette and extends laterally.
 It has got many drawbacks including chance of injury to
the Bartholin’s duct.
 It’s not recommended
16
TIMING OF EPISIOTOMY
 Bulging thinned perineum during contraction.
 Just prior to crowning
 During forceps delivery, it is made after the
application of blades.
 If done early, the blood loss will be more.
 If done late, it fails to prevent the invisible
lacerations of the perineal body
17
STEPS OF MEDIO-LATERAL
EPISIOTOMY
There are 3-steps of medio-lateral episiotomy
STEP-I (Preliminaries)
STEP-II (Incision)
STEP-III (Repair)
18
Cont….
STEP-I (Preliminaries)
 The perineum is thoroughly swabbed with antiseptic lotion and draped
properly.
 The perineum, in the line of proposed incision is infiltrated with 10ml of
1% solution of lignocaine.
STEP-II (Incision)
 Two fingers are placed in the vagina between the presenting part and the
posterior vaginal wall.
 The incision is made by a curved or straight blunt pointed sharp scissors,
one blade of which is placed inside, in between the fingers and posterior
vaginal wall and other on the skin.
19
Cont….
 The incision should be made at the height of uterine
contraction when an adequate idea of the extent of
incision can be better judged from the stretched perineum.
 Deliberated cut should be made starting from the centre
of the fourchette extending laterally either to the right or
to the left.
 It is directed diagonally in straight line which runs about
2.5cm away from the anus.
20
Cont…
STRUCTURES TO CUT ARE:-
 Posterior vaginal wall.
 Superficial and deep transverse perineal muscle
(bulbospongiosus and part of levator ani).
 Fascia covering those muscles
 Transverse perineal branches of pudendal vessels and
nerves.
 Subcutaneous tissue and skin
21
Cont…
STEP-III (Repair)
 Time of repair- The repair is done soon after expulsion of placenta.
 If repair is done prior to that, disruption of the wound is inevitable, if
subsequent manual removal or exploration of the genital tract is
needed.
 Oozing during this period should be controlled by pressure with a
sterile gauze swab and bleeding by the artery forceps.
 Early repair prevents sepsis and eliminates the patients prolonged
apprehension of stitches
22
Cont….
 The patient is placed in lithotomy position. A good light source
from behind is needed.
 The perineum including the wound area is cleansed with antiseptic
solution.
 Blood clots are removed from the vagina and the wound area.
 The patient is draped properly and repair should be done
under strict aseptic precautions.
 If the repair field is obscured by oozing of blood from above, a
vaginal pack may be inserted and is placed high up.
 Do not forget to remove the pack after the repair is completed.
23
Steps of repair of episiotomy
 Wound on inspection.
 Repair of vaginal mucosa and perineal muscles
by interrupted sutures.
 Apposition of the skin margins.
 Repaired wound on inspection
24
The repair is to done in the following order
1. Vaginal mucosa and submucosal tissues.
2. Perioneal muscles.
3. Skin and subcutaneous tissues.
The vaginal mucosa is sutured first. The first suture is placed at or just
above the apex of the tear.
Thereafter, the vaginal wall are apposed by interrupted sutures with
polyglycolic acid suture or No O chromic catgut, from above
downwards till the fourchette is reached.
The suture should include the deep tissues to obliterate the dead space.
A continuous suture may cause puckering and shortening of the
posterior vaginal wall.
25
26
POST OPERATIVE CARE
 Comfort Of dressing
 Ambulate
 Removal of stitches
27
TREATMENT
 Systemic antibiotic (IV)
 Facilitate drainage of pus
 Local dressing with antiseptic powder or
ointment
 MgSO4 compression or application of
infrared heat to the area to reduce edema and
pain
28
COMPLICATIONS
IMMEDIATE - Extension of the incision
- Vulvar haematoma
- Infection/Wound dehiscence:
a. Throbbing pain on perineum
b. Rise in temperature
c. The wound area looks moist, red and
swollen
d. Offensive discharge
REMOTE - Dyspareunia
- Chance of perineal lacerations, Rectovaginal fistula
29
PERINEAL TEARS
 A vaginal tear (perineal laceration) is an injury to the tissue
around the vagina and anus that can happen during childbirth.
 It is a tear in the tissue (skin and muscle) around the vagina and
perineum.
 The perineum is the space between vaginal opening and the anus
 Vaginal tears can occur during childbirth, most often at the
vaginal opening as the baby's head passes through, especially if
the baby descends quickly.
 Tears can involve the perineal skin extend to the muscles and the
anal sphincter and anus.
30
Cont…
There are four different grades of vaginal tears. The
severity of the tear determines the grade.
 First-degree tear: The least severe of tears, this
small injury involves just the first layer of skin
around vagina and perineal area. It usually doesn’t
require stitches.
 Second-degree tear: This second level of tearing is
the most common. The tear is slightly bigger,
extending deeper through your skin into the
underlying muscles of your vagina and perineum.
This tear requires stitches.
31
Cont….
Third-degree tear: A third-degree tear extends from vagina
to anus.
 Involves injury to the skin and muscles of perineal area,
as well as damage to anal sphincter muscles.
Fourth-degree tear: This is the least common type of tear
during childbirth.
 Extending from vagina, through perineal area and anal
sphincter muscles and into rectum. This injury is the most
severe type
32
Cont…..
 1st-degree tears are where the fourchette and
vaginal mucosa are damaged and the underlying
muscles are exposed, but not torn.
 2nd-degree tears are to the posterior vaginal walls
and perennial muscles, but the anal sphincter is
intact.
 3rd-degree tears extend to the anal sphincter that
is torn, but the rectal mucosa is intact.
 4th-degree tears are where the anal canal is
opened, and the tear may spread to the rectum.
33
Cont….
Factors that increases the chances of tearing include:
 If it’s first delivery.
 The baby was face up instead of face down during
delivery.
 Use of forceps or a vacuum during delivery.
 A large baby (more than 8 pounds).
 Prolonged second stage of labor (pushing stage).
34
Cont….
 Vaginal tears can be uncomfortable and painful,
but most small vaginal tears heal within two
weeks.
 It’s common to feel discomfort for a month or
two if the tear was larger.
 Third- and fourth-degree tears come with more
complications due to the severity of the injury
35
Cont….
Most common complications of vaginal tears
include:
 Infection.
 Bleeding.
 Painful intercourse
 Faecal incontinence (leaking poop).
 Ongoing pain and soreness
36
Treatment of a vaginal tear depends on the severity of the
injury
 First-degree tear, probably won’t need stitches.
 Second-, third- or fourth-degree tear needs to be repaired
 Most tears repaired in the delivery room.
 However, larger tears may require transfer to an operating room
where the lighting is better and the surgeon has access to
different equipment.
 This is especially the case if there’s a lot of bleeding.
37
Care of Vaginal Tear at home
 Avoid constipation by drinking plenty of water and
using a stool softener.
 Take a sitz bath.
 Avoid exercises or uncomfortable movements that
aggravate perineal area. This could include squats or
walking down steps.
 Pain medication. Apply ice packs or wear special
sanitary pads that contain a cold pack inside.
38
DESTRUCTIVE OPERATIONS
39
Outlines
 Introduction
 Definition and types
 Indication and Prerequisites
 Complications
40
Definition
 The destructive operations are designed to
diminish the bulk of the fetus so as to facilitate
easy delivery through the birth canal
41
Types
 Craniotomy
 Eviceration
 Decapitation
 Cleidotomy
42
CRANIOTOMY
Definition
 It is an operation to make a perforation on the
fetal head to evacuate the contents followed by
extraction of the fetus
43
Indications
 Cephalic presentation producing obstructed
labour with dead fetus
 Hydrocephalus even in a living fetus
 Interlocking head of twins
44
Conditions to be fulfilled
 The cervix must be fully dilated
 Baby must be dead
Contraindication
 When the pelvis is severely contracted
 Rupture of uterus where laparotomy is essential
45
Procedures
Preliminaries
 General anaesthesia
 Lithotomy position
 Surgical asepsis
 Empty the bladder
 Vaginal examination
46
Cont….
Step 1
 Introduce two fingers into the vagina (index and middle)
 Do incision through the suture line or dependent part
Sites of perforation
 Vertex - On the parietal bone either side of the
sagittal suture
 Face -Through the orbit or hard palate
 Brow -Through the frontal bone
47
Cont…
Step 2
 Introduce the Oldham’s perforator or Sharp
pointed Mayo scissors with the blades closed
Step 3
 By rotating movements perforate the skull
Step 4
 Evacuate the brain matter with the fingers
48
Cont….
Step 5
 Extract the fetus either by using a cranioclast or by two
giant volsella
Step 6
 Exert traction
Step 7
 Explore the utero-vaginal canal after the delivery of the
placenta
49
DECAPITATION
Definition
 It is a destructive operation whereby the fetal
head is severed from the trunk and the delivery
is completed with the extraction of the trunk and
that of the decapitated head per vaginam
50
Indication
 Neglected shoulder presentation with dead fetus
where neck is easily accessible
 Interlocking head of twins
51
PROCEDURE
Step 1
 Bring down a hand and tie a roller gauze on the fetal
wrist and give traction towards the side away from the
fetal head
Step 2
 Two fingers of the left hand are introduced with palmar
surface downwards and the finger tips to be placed on
the superior surface of the neck
52
Cont….
Step 3
 The decapitation hook with knife is introduced flushed
under the guidance of the finger placed into the vagina
the knob pointing towards the fetal head
 The hook is pushed above the neck and rotated to 90
degree so as to place the knife firmly against the neck
 The internal fingers are placed on the under surface of
the neck to guard the tip of the hook
53
Cont….
Step 4
 By upward and downward movements of the hook with knife ,the
vertebral column is severed (evident by sudden loss of resistance)
 The rest of the soft tissue left behind may be severed by the same
instrument or by embryotomy scissors
 The decapitation hook is pushed up and rotated to 90 degree and
then to taken out under the guidance of the internal fingers
 The decapited head is pushed up and the trunk is delivered by
traction on the prolapsed arm
54
Cont…
Step 5
 Delivery of the decapited head
 By hooking the index finger into the mouth
 By using crochet after fixing it with lower jaw
 By holding the severed neck with giant vulsellum and delivery of the
head as that of aftercoming head in breech
 Using forceps or following perforation after fixing the head with forceps
blades
Step 6
 Routine exploration of the utero-vaginal canal to exclude rupture of the uterus
or any other injury
55
Cont…
Decapitation using blond- heidler thimble and
wires saw:-
 The neck is severed by the wire saw after
passing the wire loop around the fetal neck
56
EVISCERATION
Definition
 The operation consists in removal of thoracic
and abdominal contents piecemeal through an
opening on the thoracic or abdominal cavity at
the most accessible site
57
Indication
 Neglected shoulder presentation with dead fetus
 Fetal malformations ,such as fetal ascites or
hugely distended bladder or monsters
58
CLEIDOTOMY
Definition
 The operation consist of reduction in the bulk of the shoulder
girdle by division of one or both the clavicles
Indications
 Dead fetus with shoulder dystocia
Procedure
 The clavicles are divided by the embryotomy scissors or long
straight scissors introduced under the guidance of left two
fingers placed inside the vagina
59
POST OPERATIVE CARE
 Exploration of the utero-vaginal canal
 Self retaining catheter
 Dextrose saline drip
 Blood transfusion
 Ampicillin 500mg at 6 hours interval
60
COMPLICATION
 Injury to the utero-vaginal canal
 Post partum haemorrhage
 Shock
 Puerperal sepsis
 Subinvolution
 Injury to the adjacent viscera
 Prolonged ill health
61
Reading assignment
 Fistula Wound healing
 Abdominal muscles
62
THANK YOU

EPIZIOTOMY AND TEAR.power point presentationptx

  • 1.
  • 2.
    2 OUTLINES OF THEPRESENTATION  Introduction to Episiotomy and tear  Indications of episiotomy  Types of episiotomy and tear  Complications of episiotomy
  • 3.
    3 SESSION OBJECTIVES  Atthe end of the session you are expected to:-  Define what Episiotomy and Tear means  Identify the indications of Episiotomy  Discuss the types of Episiotomy and tear  Describe the complications of Episiotomy and tear
  • 4.
    4 INTRODUCTION  Episiotomy issurgically planned incision on the perineum and the posterior vaginal wall during the second stage of labour The Purpose of Episiotomy is:-  To enlarge the vaginal introitus so as to facilitate easy and safe delivery of the fetus-spontaneous or manipulative.  To minimise overstretching and rupture of the perineal muscles and fascia; to reduce the stress and strain on the fetal head.  To shorten the course of 2nd stage of labour as in case of pre- eclampsia, Fetal distress, premature baby.
  • 5.
    5 INDICATIONS  In elasticperineum;- Causing arrested or delay in decent of the presenting part as in elderly primigravida.  Anticipating perineal tear;-  This is widely indicated specially in primigravidae almost as an elective procedure.  Face to pubis or face delivery, big baby, narrow pubis arch.
  • 6.
    6 Cont…  Operative delivery;-forceps delivery, ventouse delivery.  Previous perineal surgery;- pelvic floor repair, perineal reconstructive surgery COMMON INDICATIONS  Threatened perineal injury in primigravida.  Rigid perineum.  Forceps, Breech, Occipito-posterior or face delivery.
  • 7.
    7 ADVANTAGES Maternal-  A clearand controlled incision is easy to repair and heals better than a lacerated wound that might occur.  Reduction in the duration of second stage.  Reduction of trauma to the pelvic floor muscles. Fetal-  It minimises intracranial injuries specially in premature babies or after-coming head of breech.
  • 8.
  • 9.
  • 10.
    10 Cont… MEDIO-LATERAL;  The incisionis made downwards and out-wards from the midpoint of the fourchette either to the right or left  It is diagonally in a straight line which runs about 2.5cm away from anus. Advantages;-  The muscles are not cut.  Blood loss is least.  Repair is easy.
  • 11.
    11 Cont….  Post operativecomfort is superior  Healing is superior.  Wound disruption is rare Disadvantages;  Extension, if occurs may involve the rectum.  Not suitable for manipulative delivery or in abdominal presentation.
  • 12.
    12 MEDIAN  The incisioncommences from the centre of the fourchette and extends posteriorly along the midline for about 2.5cm. Advantages;-  Relative from rectal involvement from extension. Disadvantages;-  Apposition of the tissues is not so good.  Blood loss is little more.  Post operative discomfort is more.  Relative increased incidence of wound disruption
  • 13.
  • 14.
    14 J-SHAPED INCISION  Theincision begins in the centre of the fourchette and is directed posteriorly along the midline, for about 1.5cm and then directed downwards along 5 to 7 O clock to avoid injury to Bartholin's duct and the anal sphincter. Advantages - On extension of incision anal sphincter will not be affected. Disadvantages  Repair and healing is not good
  • 15.
    15 LATERAL  The incisionstarts from about 1cm away from the centre of the fourchette and extends laterally.  It has got many drawbacks including chance of injury to the Bartholin’s duct.  It’s not recommended
  • 16.
    16 TIMING OF EPISIOTOMY Bulging thinned perineum during contraction.  Just prior to crowning  During forceps delivery, it is made after the application of blades.  If done early, the blood loss will be more.  If done late, it fails to prevent the invisible lacerations of the perineal body
  • 17.
    17 STEPS OF MEDIO-LATERAL EPISIOTOMY Thereare 3-steps of medio-lateral episiotomy STEP-I (Preliminaries) STEP-II (Incision) STEP-III (Repair)
  • 18.
    18 Cont…. STEP-I (Preliminaries)  Theperineum is thoroughly swabbed with antiseptic lotion and draped properly.  The perineum, in the line of proposed incision is infiltrated with 10ml of 1% solution of lignocaine. STEP-II (Incision)  Two fingers are placed in the vagina between the presenting part and the posterior vaginal wall.  The incision is made by a curved or straight blunt pointed sharp scissors, one blade of which is placed inside, in between the fingers and posterior vaginal wall and other on the skin.
  • 19.
    19 Cont….  The incisionshould be made at the height of uterine contraction when an adequate idea of the extent of incision can be better judged from the stretched perineum.  Deliberated cut should be made starting from the centre of the fourchette extending laterally either to the right or to the left.  It is directed diagonally in straight line which runs about 2.5cm away from the anus.
  • 20.
    20 Cont… STRUCTURES TO CUTARE:-  Posterior vaginal wall.  Superficial and deep transverse perineal muscle (bulbospongiosus and part of levator ani).  Fascia covering those muscles  Transverse perineal branches of pudendal vessels and nerves.  Subcutaneous tissue and skin
  • 21.
    21 Cont… STEP-III (Repair)  Timeof repair- The repair is done soon after expulsion of placenta.  If repair is done prior to that, disruption of the wound is inevitable, if subsequent manual removal or exploration of the genital tract is needed.  Oozing during this period should be controlled by pressure with a sterile gauze swab and bleeding by the artery forceps.  Early repair prevents sepsis and eliminates the patients prolonged apprehension of stitches
  • 22.
    22 Cont….  The patientis placed in lithotomy position. A good light source from behind is needed.  The perineum including the wound area is cleansed with antiseptic solution.  Blood clots are removed from the vagina and the wound area.  The patient is draped properly and repair should be done under strict aseptic precautions.  If the repair field is obscured by oozing of blood from above, a vaginal pack may be inserted and is placed high up.  Do not forget to remove the pack after the repair is completed.
  • 23.
    23 Steps of repairof episiotomy  Wound on inspection.  Repair of vaginal mucosa and perineal muscles by interrupted sutures.  Apposition of the skin margins.  Repaired wound on inspection
  • 24.
    24 The repair isto done in the following order 1. Vaginal mucosa and submucosal tissues. 2. Perioneal muscles. 3. Skin and subcutaneous tissues. The vaginal mucosa is sutured first. The first suture is placed at or just above the apex of the tear. Thereafter, the vaginal wall are apposed by interrupted sutures with polyglycolic acid suture or No O chromic catgut, from above downwards till the fourchette is reached. The suture should include the deep tissues to obliterate the dead space. A continuous suture may cause puckering and shortening of the posterior vaginal wall.
  • 25.
  • 26.
    26 POST OPERATIVE CARE Comfort Of dressing  Ambulate  Removal of stitches
  • 27.
    27 TREATMENT  Systemic antibiotic(IV)  Facilitate drainage of pus  Local dressing with antiseptic powder or ointment  MgSO4 compression or application of infrared heat to the area to reduce edema and pain
  • 28.
    28 COMPLICATIONS IMMEDIATE - Extensionof the incision - Vulvar haematoma - Infection/Wound dehiscence: a. Throbbing pain on perineum b. Rise in temperature c. The wound area looks moist, red and swollen d. Offensive discharge REMOTE - Dyspareunia - Chance of perineal lacerations, Rectovaginal fistula
  • 29.
    29 PERINEAL TEARS  Avaginal tear (perineal laceration) is an injury to the tissue around the vagina and anus that can happen during childbirth.  It is a tear in the tissue (skin and muscle) around the vagina and perineum.  The perineum is the space between vaginal opening and the anus  Vaginal tears can occur during childbirth, most often at the vaginal opening as the baby's head passes through, especially if the baby descends quickly.  Tears can involve the perineal skin extend to the muscles and the anal sphincter and anus.
  • 30.
    30 Cont… There are fourdifferent grades of vaginal tears. The severity of the tear determines the grade.  First-degree tear: The least severe of tears, this small injury involves just the first layer of skin around vagina and perineal area. It usually doesn’t require stitches.  Second-degree tear: This second level of tearing is the most common. The tear is slightly bigger, extending deeper through your skin into the underlying muscles of your vagina and perineum. This tear requires stitches.
  • 31.
    31 Cont…. Third-degree tear: Athird-degree tear extends from vagina to anus.  Involves injury to the skin and muscles of perineal area, as well as damage to anal sphincter muscles. Fourth-degree tear: This is the least common type of tear during childbirth.  Extending from vagina, through perineal area and anal sphincter muscles and into rectum. This injury is the most severe type
  • 32.
    32 Cont…..  1st-degree tearsare where the fourchette and vaginal mucosa are damaged and the underlying muscles are exposed, but not torn.  2nd-degree tears are to the posterior vaginal walls and perennial muscles, but the anal sphincter is intact.  3rd-degree tears extend to the anal sphincter that is torn, but the rectal mucosa is intact.  4th-degree tears are where the anal canal is opened, and the tear may spread to the rectum.
  • 33.
    33 Cont…. Factors that increasesthe chances of tearing include:  If it’s first delivery.  The baby was face up instead of face down during delivery.  Use of forceps or a vacuum during delivery.  A large baby (more than 8 pounds).  Prolonged second stage of labor (pushing stage).
  • 34.
    34 Cont….  Vaginal tearscan be uncomfortable and painful, but most small vaginal tears heal within two weeks.  It’s common to feel discomfort for a month or two if the tear was larger.  Third- and fourth-degree tears come with more complications due to the severity of the injury
  • 35.
    35 Cont…. Most common complicationsof vaginal tears include:  Infection.  Bleeding.  Painful intercourse  Faecal incontinence (leaking poop).  Ongoing pain and soreness
  • 36.
    36 Treatment of avaginal tear depends on the severity of the injury  First-degree tear, probably won’t need stitches.  Second-, third- or fourth-degree tear needs to be repaired  Most tears repaired in the delivery room.  However, larger tears may require transfer to an operating room where the lighting is better and the surgeon has access to different equipment.  This is especially the case if there’s a lot of bleeding.
  • 37.
    37 Care of VaginalTear at home  Avoid constipation by drinking plenty of water and using a stool softener.  Take a sitz bath.  Avoid exercises or uncomfortable movements that aggravate perineal area. This could include squats or walking down steps.  Pain medication. Apply ice packs or wear special sanitary pads that contain a cold pack inside.
  • 38.
  • 39.
    39 Outlines  Introduction  Definitionand types  Indication and Prerequisites  Complications
  • 40.
    40 Definition  The destructiveoperations are designed to diminish the bulk of the fetus so as to facilitate easy delivery through the birth canal
  • 41.
  • 42.
    42 CRANIOTOMY Definition  It isan operation to make a perforation on the fetal head to evacuate the contents followed by extraction of the fetus
  • 43.
    43 Indications  Cephalic presentationproducing obstructed labour with dead fetus  Hydrocephalus even in a living fetus  Interlocking head of twins
  • 44.
    44 Conditions to befulfilled  The cervix must be fully dilated  Baby must be dead Contraindication  When the pelvis is severely contracted  Rupture of uterus where laparotomy is essential
  • 45.
    45 Procedures Preliminaries  General anaesthesia Lithotomy position  Surgical asepsis  Empty the bladder  Vaginal examination
  • 46.
    46 Cont…. Step 1  Introducetwo fingers into the vagina (index and middle)  Do incision through the suture line or dependent part Sites of perforation  Vertex - On the parietal bone either side of the sagittal suture  Face -Through the orbit or hard palate  Brow -Through the frontal bone
  • 47.
    47 Cont… Step 2  Introducethe Oldham’s perforator or Sharp pointed Mayo scissors with the blades closed Step 3  By rotating movements perforate the skull Step 4  Evacuate the brain matter with the fingers
  • 48.
    48 Cont…. Step 5  Extractthe fetus either by using a cranioclast or by two giant volsella Step 6  Exert traction Step 7  Explore the utero-vaginal canal after the delivery of the placenta
  • 49.
    49 DECAPITATION Definition  It isa destructive operation whereby the fetal head is severed from the trunk and the delivery is completed with the extraction of the trunk and that of the decapitated head per vaginam
  • 50.
    50 Indication  Neglected shoulderpresentation with dead fetus where neck is easily accessible  Interlocking head of twins
  • 51.
    51 PROCEDURE Step 1  Bringdown a hand and tie a roller gauze on the fetal wrist and give traction towards the side away from the fetal head Step 2  Two fingers of the left hand are introduced with palmar surface downwards and the finger tips to be placed on the superior surface of the neck
  • 52.
    52 Cont…. Step 3  Thedecapitation hook with knife is introduced flushed under the guidance of the finger placed into the vagina the knob pointing towards the fetal head  The hook is pushed above the neck and rotated to 90 degree so as to place the knife firmly against the neck  The internal fingers are placed on the under surface of the neck to guard the tip of the hook
  • 53.
    53 Cont…. Step 4  Byupward and downward movements of the hook with knife ,the vertebral column is severed (evident by sudden loss of resistance)  The rest of the soft tissue left behind may be severed by the same instrument or by embryotomy scissors  The decapitation hook is pushed up and rotated to 90 degree and then to taken out under the guidance of the internal fingers  The decapited head is pushed up and the trunk is delivered by traction on the prolapsed arm
  • 54.
    54 Cont… Step 5  Deliveryof the decapited head  By hooking the index finger into the mouth  By using crochet after fixing it with lower jaw  By holding the severed neck with giant vulsellum and delivery of the head as that of aftercoming head in breech  Using forceps or following perforation after fixing the head with forceps blades Step 6  Routine exploration of the utero-vaginal canal to exclude rupture of the uterus or any other injury
  • 55.
    55 Cont… Decapitation using blond-heidler thimble and wires saw:-  The neck is severed by the wire saw after passing the wire loop around the fetal neck
  • 56.
    56 EVISCERATION Definition  The operationconsists in removal of thoracic and abdominal contents piecemeal through an opening on the thoracic or abdominal cavity at the most accessible site
  • 57.
    57 Indication  Neglected shoulderpresentation with dead fetus  Fetal malformations ,such as fetal ascites or hugely distended bladder or monsters
  • 58.
    58 CLEIDOTOMY Definition  The operationconsist of reduction in the bulk of the shoulder girdle by division of one or both the clavicles Indications  Dead fetus with shoulder dystocia Procedure  The clavicles are divided by the embryotomy scissors or long straight scissors introduced under the guidance of left two fingers placed inside the vagina
  • 59.
    59 POST OPERATIVE CARE Exploration of the utero-vaginal canal  Self retaining catheter  Dextrose saline drip  Blood transfusion  Ampicillin 500mg at 6 hours interval
  • 60.
    60 COMPLICATION  Injury tothe utero-vaginal canal  Post partum haemorrhage  Shock  Puerperal sepsis  Subinvolution  Injury to the adjacent viscera  Prolonged ill health
  • 61.
    61 Reading assignment  FistulaWound healing  Abdominal muscles
  • 62.