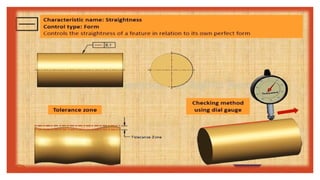
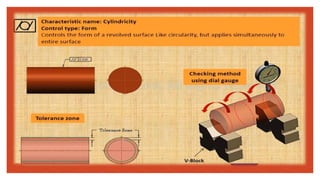
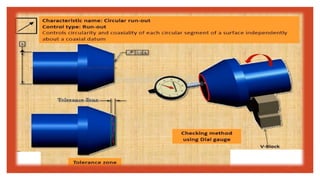
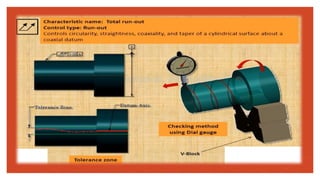
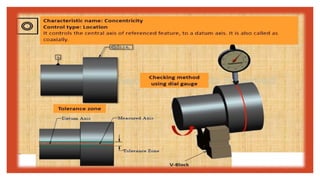
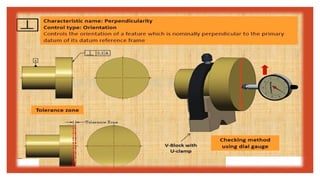
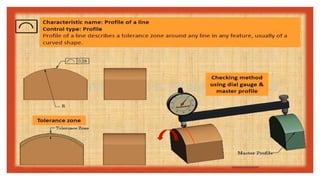
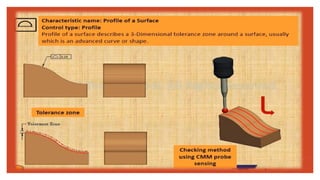
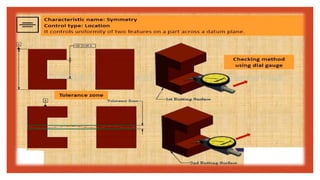
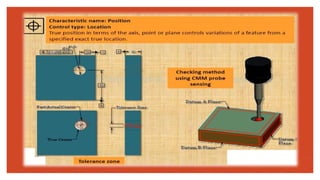
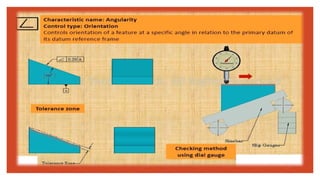
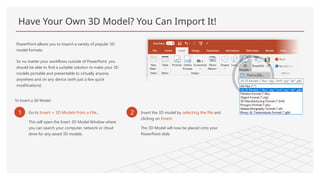
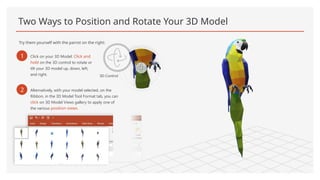
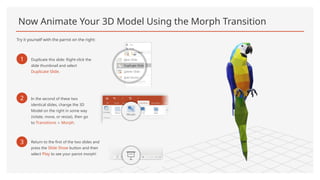
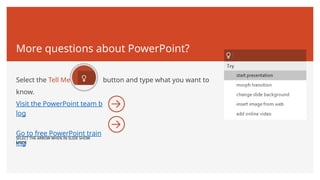
Engineering
Symbol
ANGULARITY
When the angle between the specified lines or planes is not 90°, you measure the angularity, which specifies the
accuracy of the angle to the datum (reference plane or line). The unit of angularity measurement is not the angle
(degree), but the millimeter.
Have Your Own 3D Model? You Can Import It!
PowerPoint allows you to import a variety of popular 3D
model formats.
So no matter your workflows outside of PowerPoint, you
should be able to find a suitable solution to make your 3D
models portable and presentable to virtually anyone,
anywhere and on any device (with just a few quick
modifications)
To Insert a 3D Model:
1 Go to Insert > 3D Models from a File…
This will open the Insert 3D Model Window where
you can search your computer, network or cloud
drive for any saved 3D models.
2 Insert the 3D model by selecting the file and
clicking on Insert.
The 3D Model will now be placed onto your
PowerPoint slide
Two Ways to Position and Rotate Your 3D Model
Try them yourself with the parrot on the right:
1 Click on your 3D Model: Click and
hold on the 3D control to rotate or
tilt your 3D model up, down, left,
and right. 3D Control
2 Alternatively, with your model selected, on the
Ribbon, in the 3D Model Tool Format tab, you can
click on 3D Model Views gallery to apply one of
the various position views.
Pan and Zoom
To resize or crop your 3D model within a frame, you can use the pan and zoom tool.
1 Select your 3D model > 3D Models
Format > Pan & Zoom
Note: the Pan & Zoom tool acts like an
on/off (toggle) switch. Once pressed,
you’ll see a gray box around the Pan &
Zoom button to indicate the feature is
activated. Press the button again to
deactivate the Pan & Zoom feature.
2 With the Pan & Zoom button enabled, now
move, rotate, and resize your 3D model.
3 When you are finished editing, click
the Pan & Zoom button again to
exit Pan and Zoom mode.
Now Animate Your 3D Model Using the Morph Transition
Try it yourself with the parrot on the right:
1 Duplicate this slide: Right-click the
slide thumbnail and select
Duplicate Slide.
2 In the second of these two
identical slides, change the 3D
Model on the right in some way
(rotate, move, or resize), then go
to Transitions > Morph.
3 Return to the first of the two slides and
press the Slide Show button and then
select Play to see your parrot morph!
Animate Your 3D Model Using the Animations Tab
Try it yourself with the parrot on the right:
1 Select the 3D Model on the right, then go to Animations > Turntable
Hint: Effect Options gives you even more options for Turntable.
2 Explore the other new animations designed specifically for 3D models:
Arrive, Swing, Jump & Turn, and Leave.
3 Click Add Animation to combine the new 3D animations with other
classic 2D animations, such as Fade, Grow/Shrink, or one of the many
Motion Path animations to test and see what is possible.
More questions about PowerPoint?
Select the Tell Me button and type what you want to
know.
SELECT THE ARROW WHEN IN SLIDE SHOW
MODE
Visit the PowerPoint team b
log
Go to free PowerPoint train
ing

Engineering Symbol DETAIL information with examples.pptx

  • 1.
  • 22.
    ANGULARITY When the anglebetween the specified lines or planes is not 90°, you measure the angularity, which specifies the accuracy of the angle to the datum (reference plane or line). The unit of angularity measurement is not the angle (degree), but the millimeter.
  • 23.
    Have Your Own3D Model? You Can Import It! PowerPoint allows you to import a variety of popular 3D model formats. So no matter your workflows outside of PowerPoint, you should be able to find a suitable solution to make your 3D models portable and presentable to virtually anyone, anywhere and on any device (with just a few quick modifications) To Insert a 3D Model: 1 Go to Insert > 3D Models from a File… This will open the Insert 3D Model Window where you can search your computer, network or cloud drive for any saved 3D models. 2 Insert the 3D model by selecting the file and clicking on Insert. The 3D Model will now be placed onto your PowerPoint slide
  • 24.
    Two Ways toPosition and Rotate Your 3D Model Try them yourself with the parrot on the right: 1 Click on your 3D Model: Click and hold on the 3D control to rotate or tilt your 3D model up, down, left, and right. 3D Control 2 Alternatively, with your model selected, on the Ribbon, in the 3D Model Tool Format tab, you can click on 3D Model Views gallery to apply one of the various position views.
  • 25.
    Pan and Zoom Toresize or crop your 3D model within a frame, you can use the pan and zoom tool. 1 Select your 3D model > 3D Models Format > Pan & Zoom Note: the Pan & Zoom tool acts like an on/off (toggle) switch. Once pressed, you’ll see a gray box around the Pan & Zoom button to indicate the feature is activated. Press the button again to deactivate the Pan & Zoom feature. 2 With the Pan & Zoom button enabled, now move, rotate, and resize your 3D model. 3 When you are finished editing, click the Pan & Zoom button again to exit Pan and Zoom mode.
  • 26.
    Now Animate Your3D Model Using the Morph Transition Try it yourself with the parrot on the right: 1 Duplicate this slide: Right-click the slide thumbnail and select Duplicate Slide. 2 In the second of these two identical slides, change the 3D Model on the right in some way (rotate, move, or resize), then go to Transitions > Morph. 3 Return to the first of the two slides and press the Slide Show button and then select Play to see your parrot morph!
  • 27.
    Animate Your 3DModel Using the Animations Tab Try it yourself with the parrot on the right: 1 Select the 3D Model on the right, then go to Animations > Turntable Hint: Effect Options gives you even more options for Turntable. 2 Explore the other new animations designed specifically for 3D models: Arrive, Swing, Jump & Turn, and Leave. 3 Click Add Animation to combine the new 3D animations with other classic 2D animations, such as Fade, Grow/Shrink, or one of the many Motion Path animations to test and see what is possible.
  • 28.
    More questions aboutPowerPoint? Select the Tell Me button and type what you want to know. SELECT THE ARROW WHEN IN SLIDE SHOW MODE Visit the PowerPoint team b log Go to free PowerPoint train ing