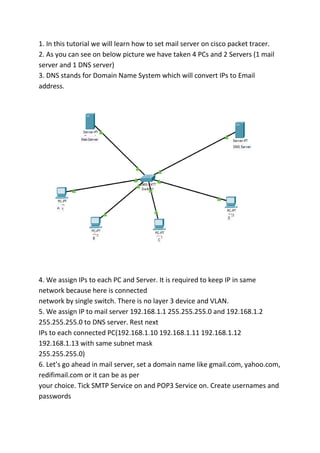
1. In this tutorial we will learn how to set mail server on cisco packet tracer.
2. As you can see on below picture we have taken 4 PCs and 2 Servers (1 mail
server and 1 DNS server)
3. DNS stands for Domain Name System which will convert IPs to Email
address.
4. We assign IPs to each PC and Server. It is required to keep IP in same
network because here is connected
network by single switch. There is no layer 3 device and VLAN.
5. We assign IP to mail server 192.168.1.1 255.255.255.0 and 192.168.1.2
255.255.255.0 to DNS server. Rest next
IPs to each connected PC(192.168.1.10 192.168.1.11 192.168.1.12
192.168.1.13 with same subnet mask
255.255.255.0)
6. Let’s go ahead in mail server, set a domain name like gmail.com, yahoo.com,
redifimail.com or it can be as per
your choice. Tick SMTP Service on and POP3 Service on. Create usernames and
passwords
7. Then we move to DNS server and select DNS service, tick the DNS service on.
We provide same domain name
and IP which we put on mail server. After that click on add.
8. Now we can login on PC Mail application with usernames and passwords
which have been created on mail server
9. Your mail account is ready to send and receive mails, like I type from Wouter
mail account Hi to Lucky. Let’s see
Lucky received mail or not.
This below picture illustrate that B has received his E-mail From A
If you have any query feel free to ask me. Comment me on comment box
for any concern.
Email server design(h.m merajul_hasan)

Email server design(h.m merajul_hasan)

  • 2.
    1. In thistutorial we will learn how to set mail server on cisco packet tracer. 2. As you can see on below picture we have taken 4 PCs and 2 Servers (1 mail server and 1 DNS server) 3. DNS stands for Domain Name System which will convert IPs to Email address. 4. We assign IPs to each PC and Server. It is required to keep IP in same network because here is connected network by single switch. There is no layer 3 device and VLAN. 5. We assign IP to mail server 192.168.1.1 255.255.255.0 and 192.168.1.2 255.255.255.0 to DNS server. Rest next IPs to each connected PC(192.168.1.10 192.168.1.11 192.168.1.12 192.168.1.13 with same subnet mask 255.255.255.0) 6. Let’s go ahead in mail server, set a domain name like gmail.com, yahoo.com, redifimail.com or it can be as per your choice. Tick SMTP Service on and POP3 Service on. Create usernames and passwords
  • 3.
    7. Then wemove to DNS server and select DNS service, tick the DNS service on. We provide same domain name and IP which we put on mail server. After that click on add.
  • 4.
    8. Now wecan login on PC Mail application with usernames and passwords which have been created on mail server
  • 5.
    9. Your mailaccount is ready to send and receive mails, like I type from Wouter mail account Hi to Lucky. Let’s see Lucky received mail or not.
  • 7.
    This below pictureillustrate that B has received his E-mail From A If you have any query feel free to ask me. Comment me on comment box for any concern.