Download to read offline

![Agenda
● What is a framework (Django MVT)
● Installing Django and start our first project
● Application
● Model
● Admin [Superuser] Panel
● Customize Admin Panel
● URL and View Configuration
● Intro to Templates Language](https://image.slidesharecdn.com/f5cffe82-36d6-4f2b-9cab-85fe8e3d1318-160215135937/85/Django-2-320.jpg)


![Model object handling
1- import your model classes from your application
from app_name.models import Model_name1, Model_name2
Model_name1.objects.all( ) #select all
Model_name1.objects.all( )[2:5] #select all from:to range
Model_name1.objects.create(field=value, field=value) #insert
another two-steps way to create object:
obj = Model_name1(field=value , field=value)
obj.save( )
Model_name1.objects.get(field=value) # select where field = value
Model_name1.objects.filter(field=value)#select all where field=value
Note to use the timezone: from django.utils import timezone
To run and use the shell: python manage.py shell](https://image.slidesharecdn.com/f5cffe82-36d6-4f2b-9cab-85fe8e3d1318-160215135937/85/Django-15-320.jpg)


![Customizing the Admin panel …
To customize a model in admin panel we create a class where we override the
admin properties.
1- separate a model form elements into different sections
- create a class that inherits admin.ModelAdmin
- override fieldsets variable which equals:
fieldsets = (
[‘section_Label’ , {‘fields’: [‘field1’, ‘field2’]}],
[None , {‘fields’: [‘field1’, ‘field2’, ‘field3’]}]
)
- finally register your customized class by passing it as a second parameter
to admin.site.register(Model, CustomModel)](https://image.slidesharecdn.com/f5cffe82-36d6-4f2b-9cab-85fe8e3d1318-160215135937/85/Django-21-320.jpg)
![Customizing the Admin panel …
2- Inline class
To include the form of the model that has a foreign key within the form of the
model that has the PK
- create a class that inherits from admin.StackedInline to represent the
model that has the foreignkey.
- override properties extra = number and model = ModelName
- in the class that has the PK override the property
inlines = [inlineClassName]](https://image.slidesharecdn.com/f5cffe82-36d6-4f2b-9cab-85fe8e3d1318-160215135937/85/Django-22-320.jpg)

![Customizing the Admin panel …
4- Search and Filter
in the Custom model class we override the two variables
list_filter = [‘field’,’field’]
search_fields = [‘field’, ‘field’]](https://image.slidesharecdn.com/f5cffe82-36d6-4f2b-9cab-85fe8e3d1318-160215135937/85/Django-24-320.jpg)

![Customizing the Admin panel …
Since the Django looks at the framework templates we want to tell Django to
look at our project Templates.
in setting.py at TEMPLATES we modify the DIRS as follow:
‘DIRS’ =[os.path.join(BASE_DIR, ‘templates’)]
and an important thing is Since we override the framework admin app
So our app must defined before the admin app in settings.py to overlay our
changes over Django base.](https://image.slidesharecdn.com/f5cffe82-36d6-4f2b-9cab-85fe8e3d1318-160215135937/85/Django-26-320.jpg)
![URL Configuration and Views
View in Django are the Controllers, They can:
- Access the database
- Perform tasks and make calculations
- Take http request and return http response
URL.py maps the url patterns to certian views the URLs are maintained
through regular expressions
We use the main url.py config file to include the in-apps urls files So,
in the project/project/url.py
urlpatterns = [url(r‘^AppName/’), include(‘AppName.urls’)]
and then create a urls.py file inside our app and override urlspatterns as
follow for example:
urlpatterns = [url(r’^$’, views.index, name=’index’)]](https://image.slidesharecdn.com/f5cffe82-36d6-4f2b-9cab-85fe8e3d1318-160215135937/85/Django-27-320.jpg)

![Advanced URL and Views
Creating view that get passed parameter
in App urls.py :
url(r'^(?P<student_id>[0-9]+)/$', views.name, name='name'),
url(r'^(?P<student_id>[0-9]+)/age$', views.age, name='age')
in views.py
def name(request, student_id):
return HttpResponse(' This is the name view of student %s' %student_id)
def age(request, student_id):
return HttpResponse(' Age View of Student %s' %student_id)](https://image.slidesharecdn.com/f5cffe82-36d6-4f2b-9cab-85fe8e3d1318-160215135937/85/Django-29-320.jpg)


![Edit Django Form
In urls.py we define the views:
url(r'^student/(?P<student_id>[0-9]+)/edit/$', views.student_edit),](https://image.slidesharecdn.com/f5cffe82-36d6-4f2b-9cab-85fe8e3d1318-160215135937/85/Django-50-320.jpg)

![delete Action Django Form
in urls.py
url(r'^student/(?P<student_id>[0-9]+)/del/$ ', views.student_delete ),
in views.py
def student_delete(request, student_id):
obj = Student.objects.get(id = student_id)
obj.delete()
return HttpResponseRedirect('/opensource')](https://image.slidesharecdn.com/f5cffe82-36d6-4f2b-9cab-85fe8e3d1318-160215135937/85/Django-52-320.jpg)


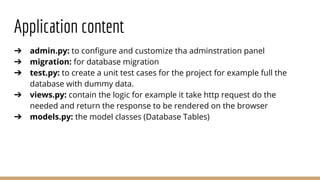
1. The document provides an overview of Django, an open-source web framework. It discusses Django's MVT architecture, installing Django, creating projects and apps, models, views, templates, and customizing the admin interface. 2. Key aspects covered include using models to define the database structure, views to contain logic and handle requests/responses, templates to separate design from code, and the admin interface to manage data. 3. The document demonstrates how to configure URLs and associate them with views, build templates that use variables and logic, and customize the admin panel through model registration and custom classes.