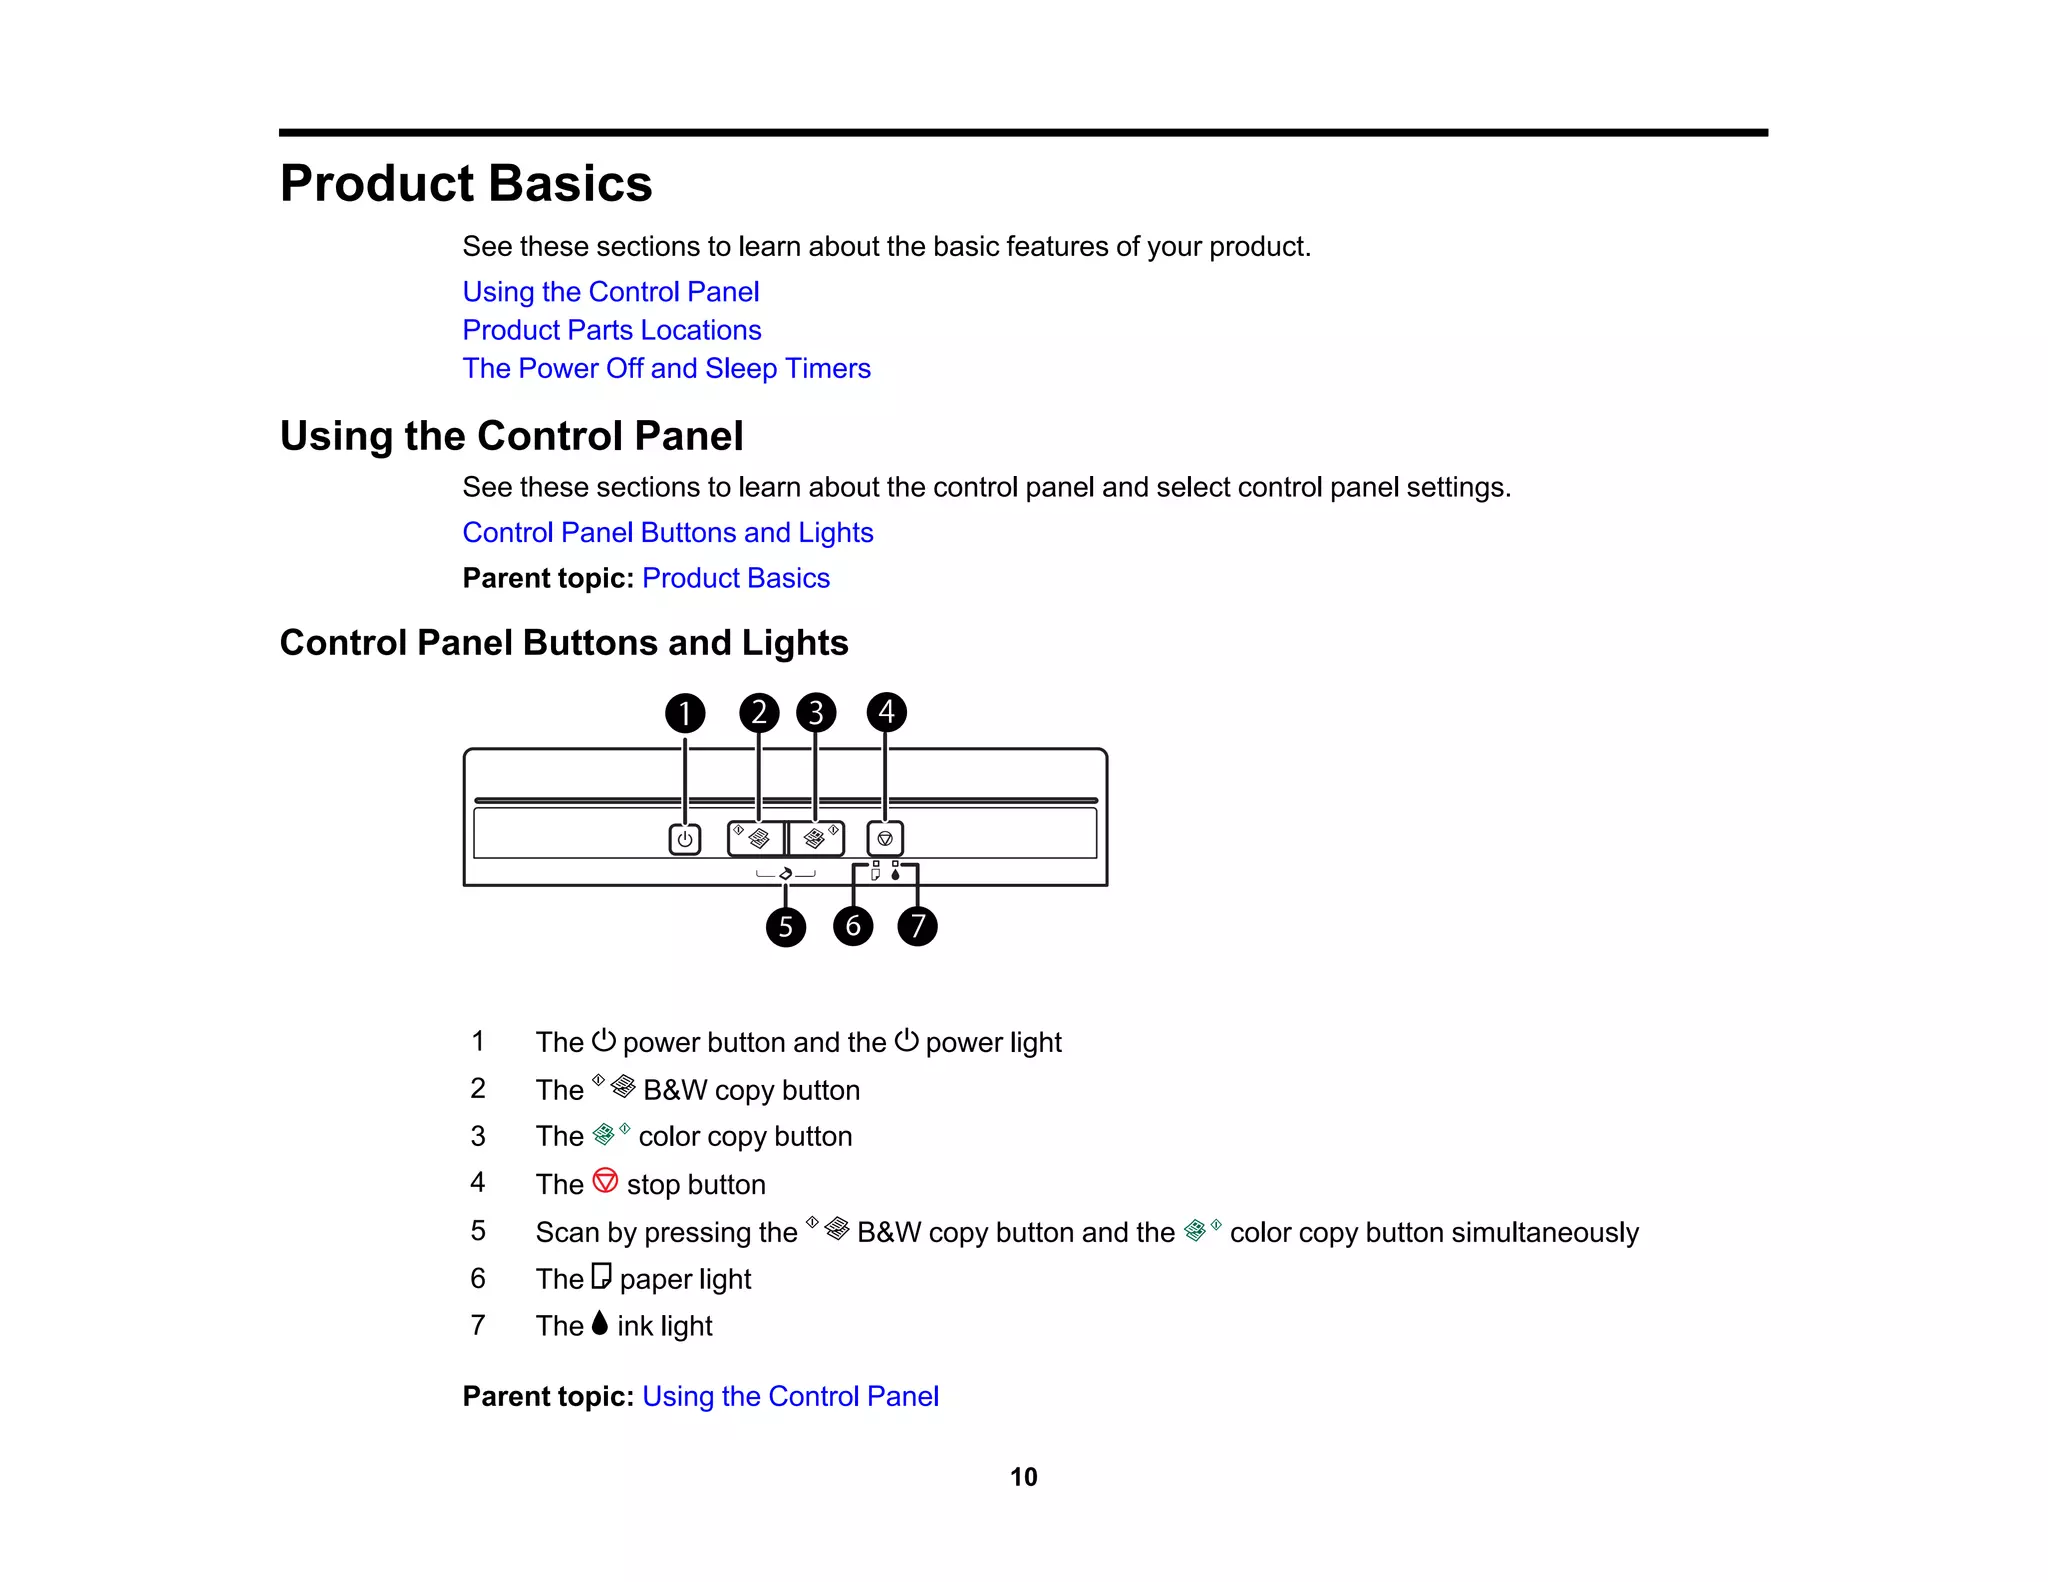
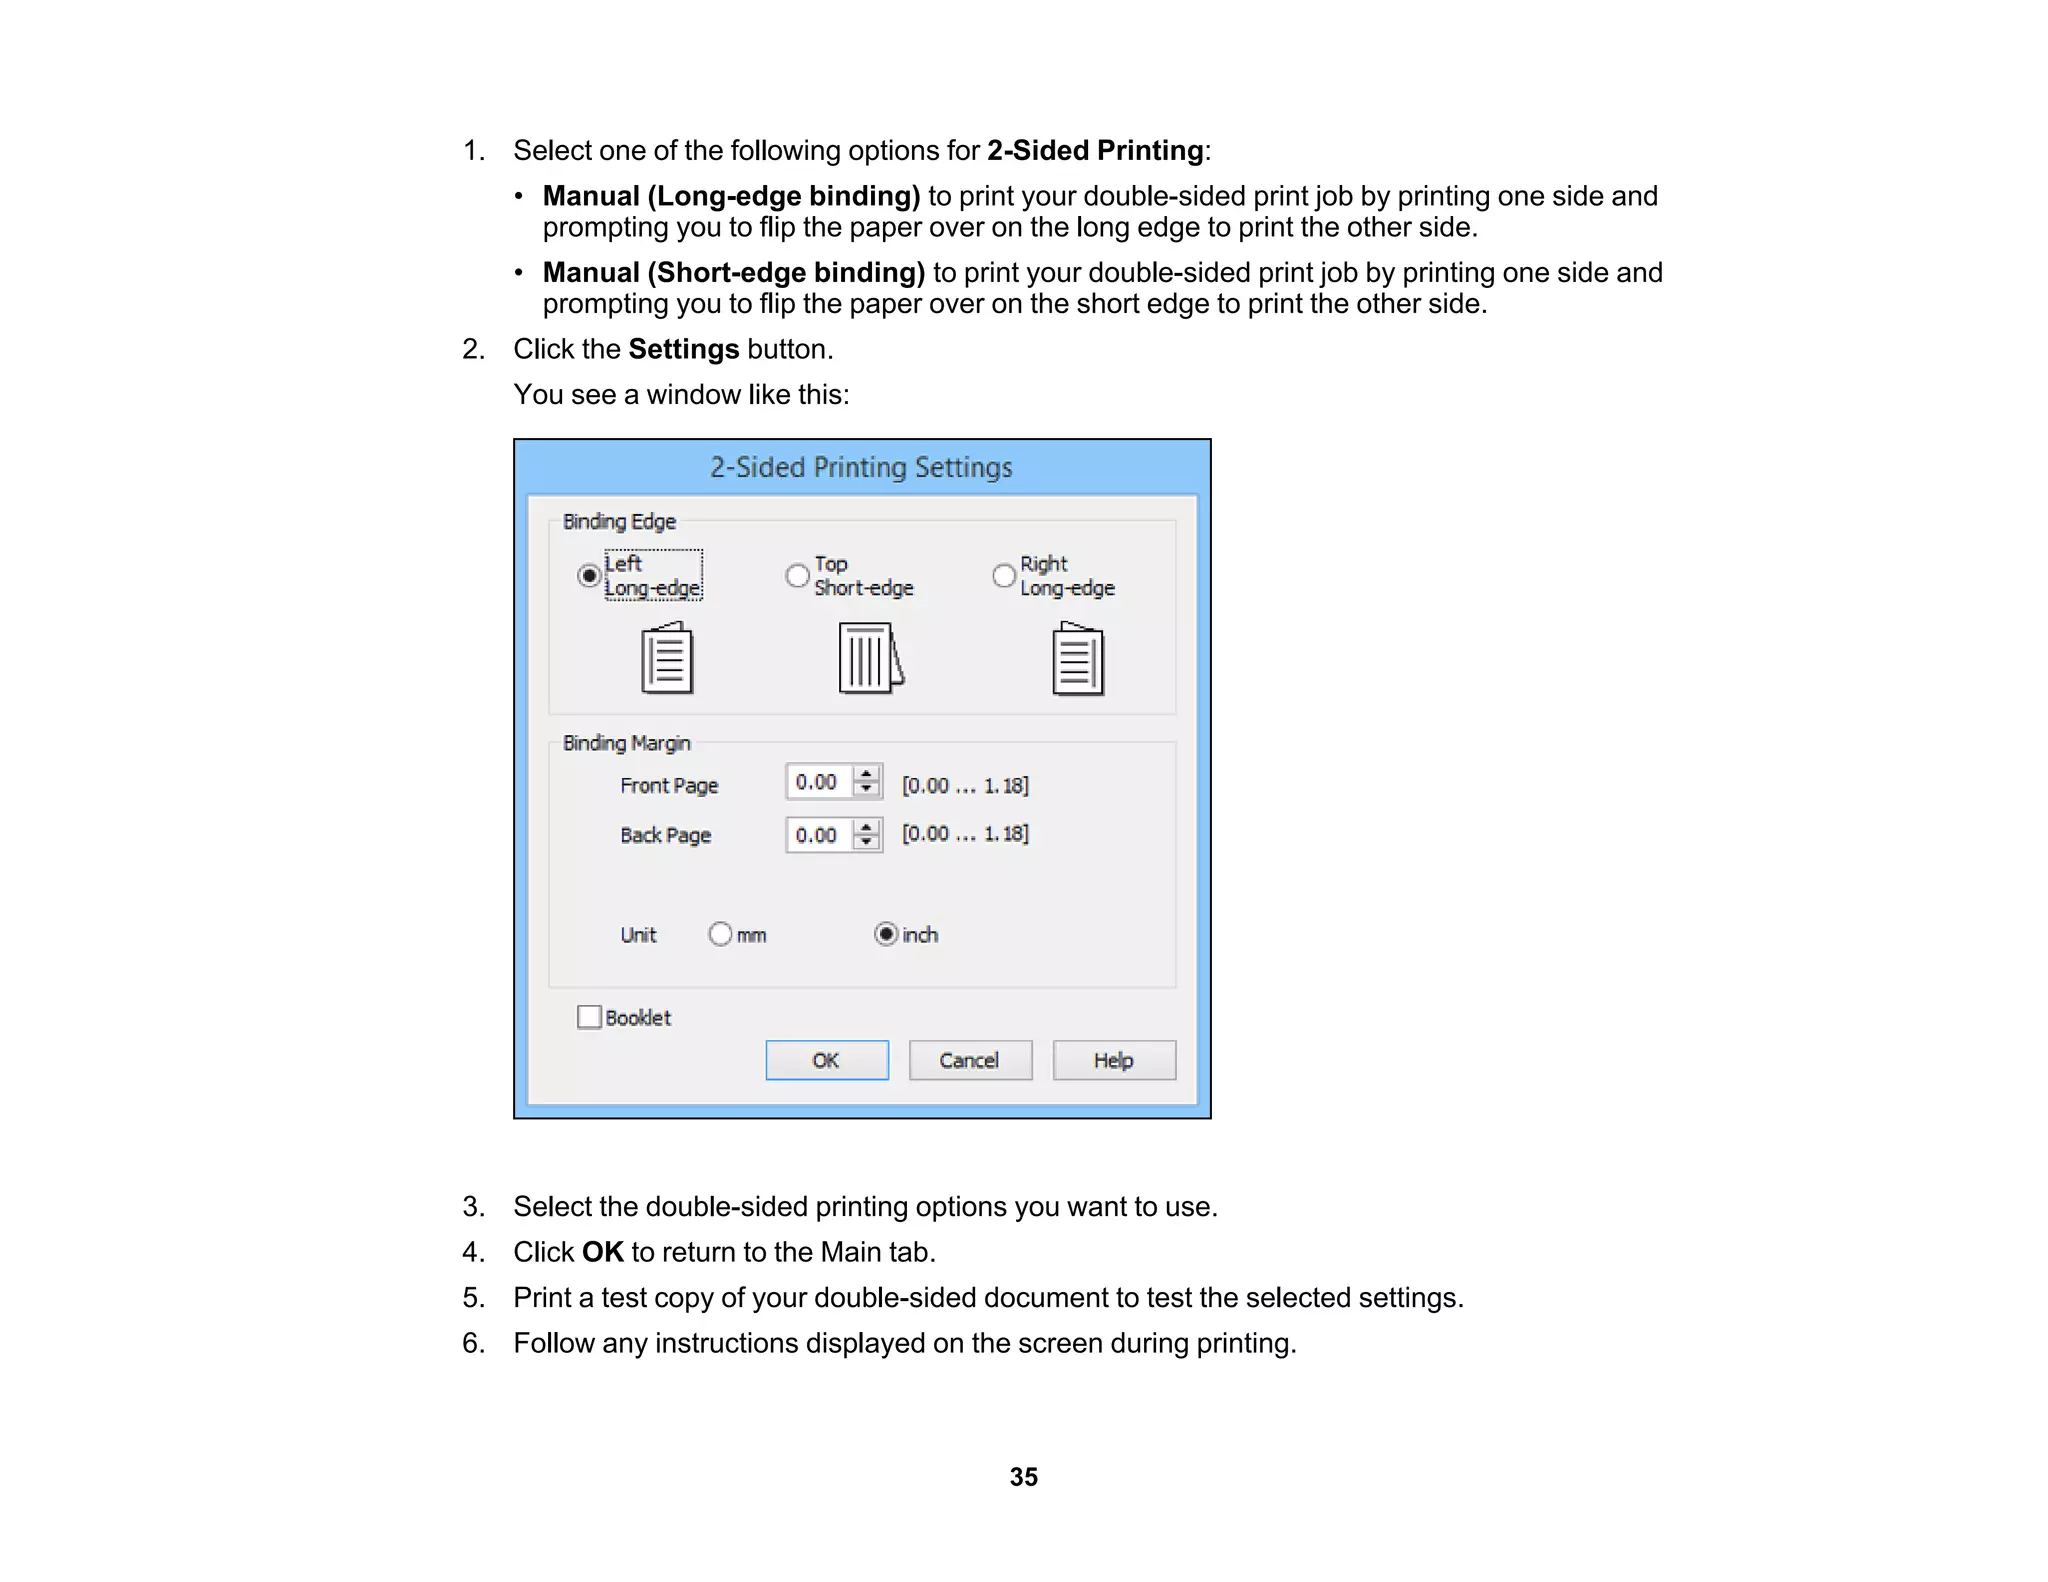
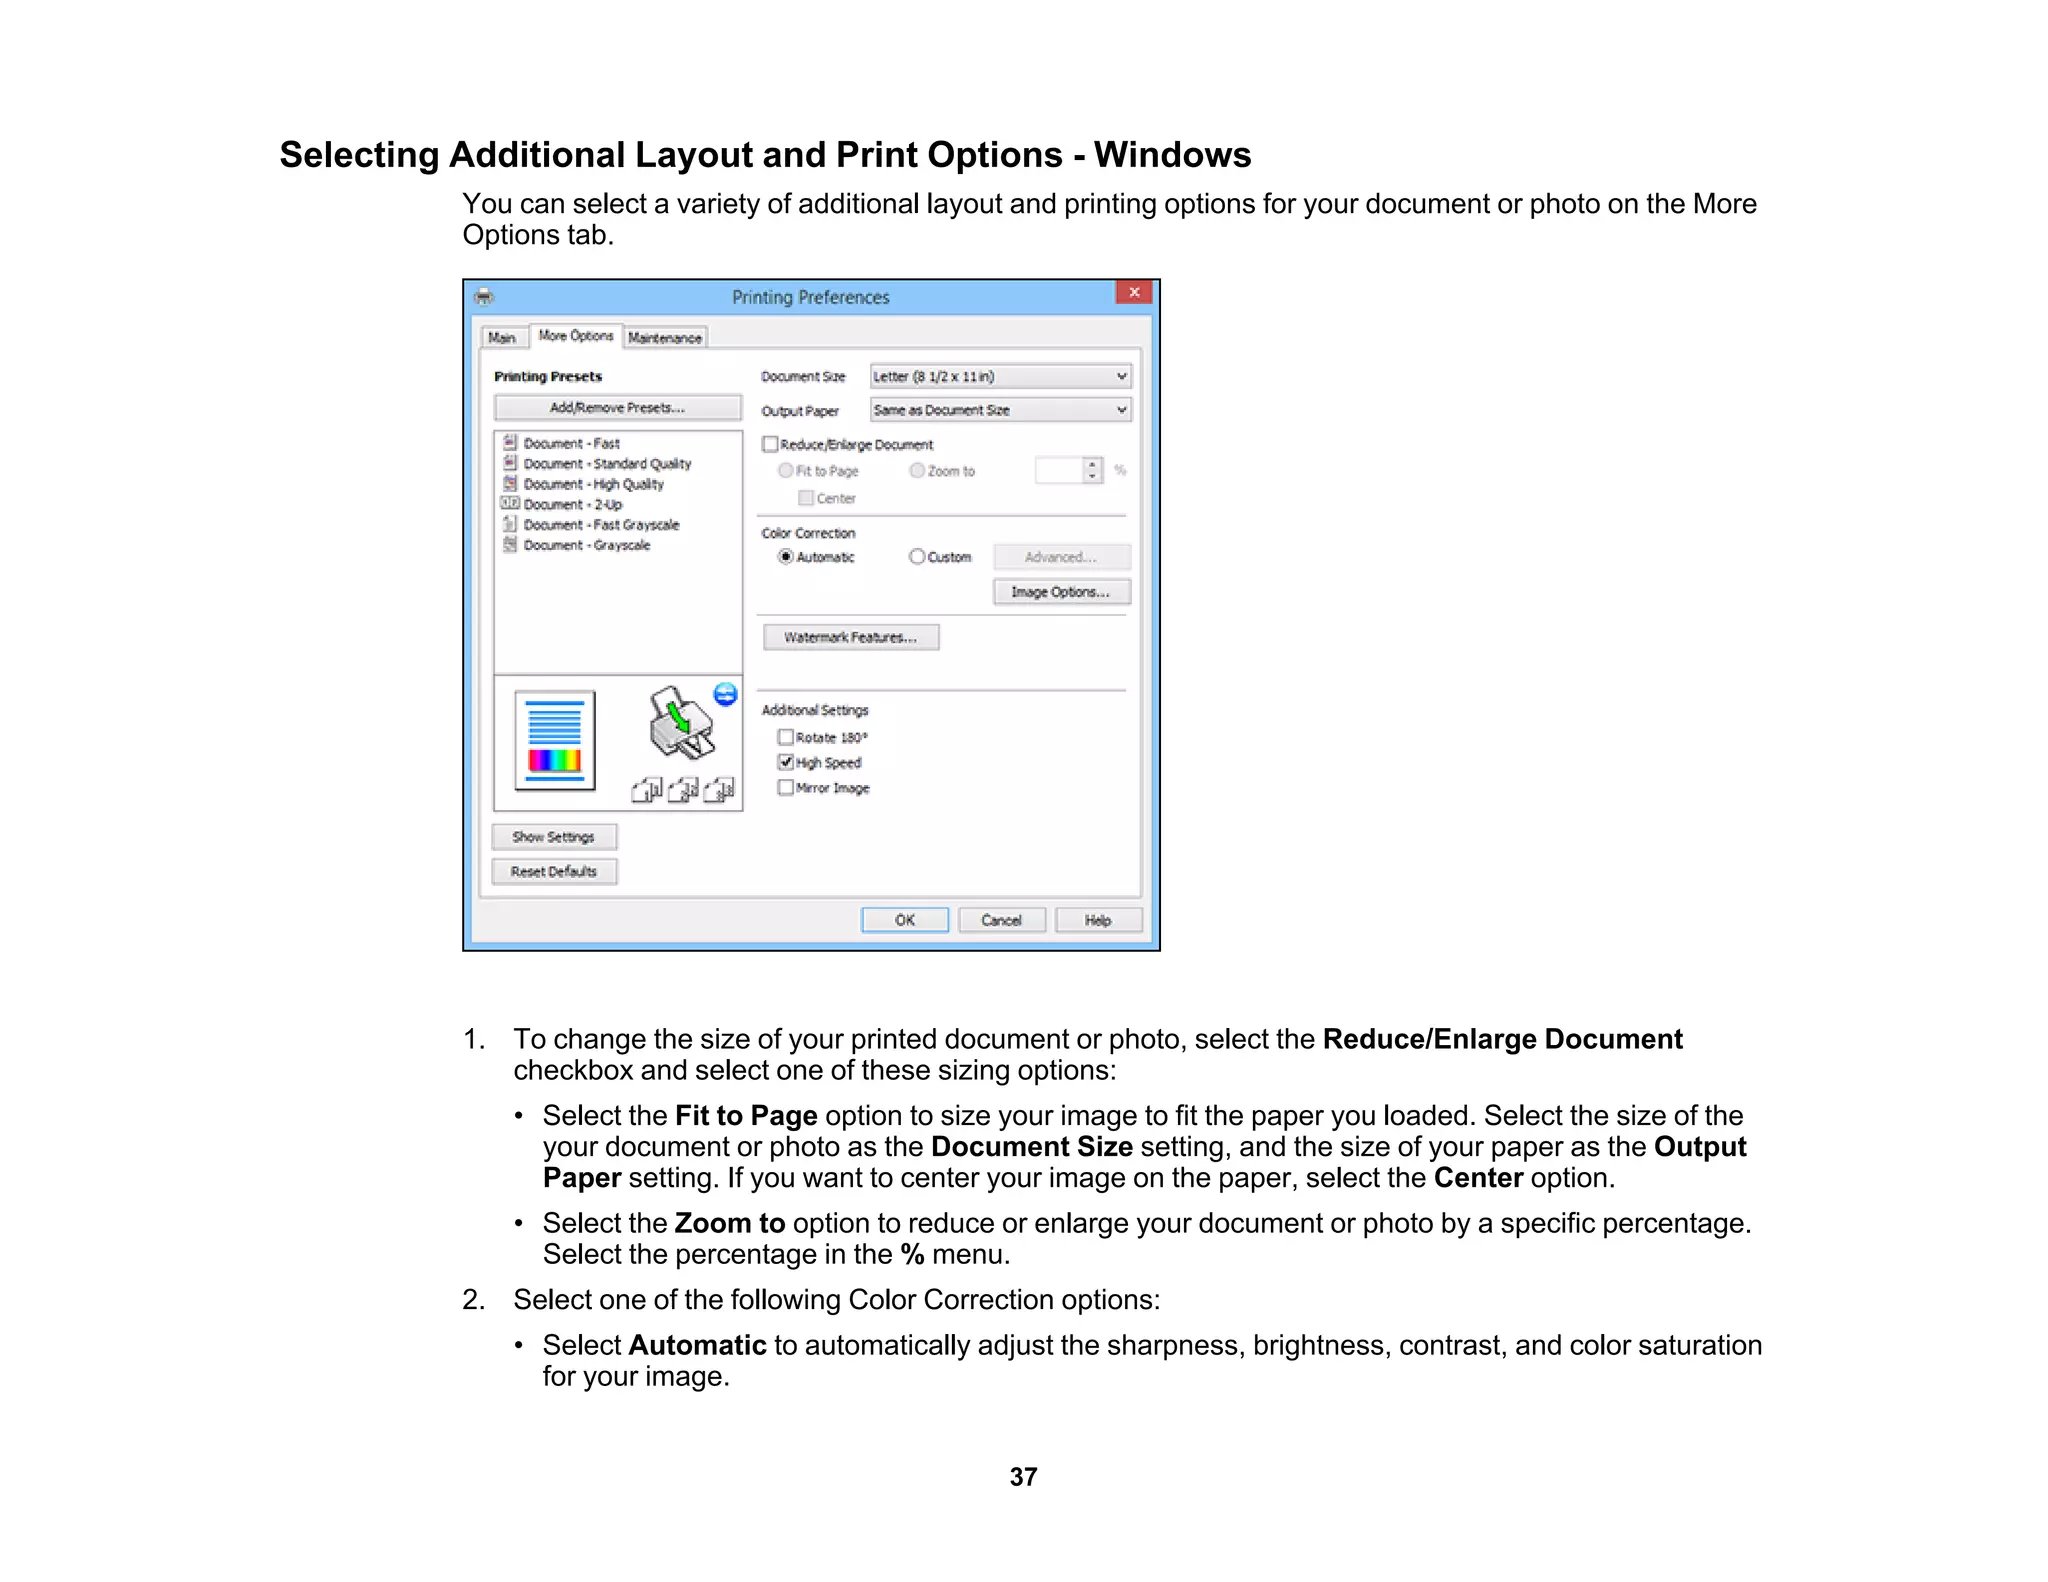
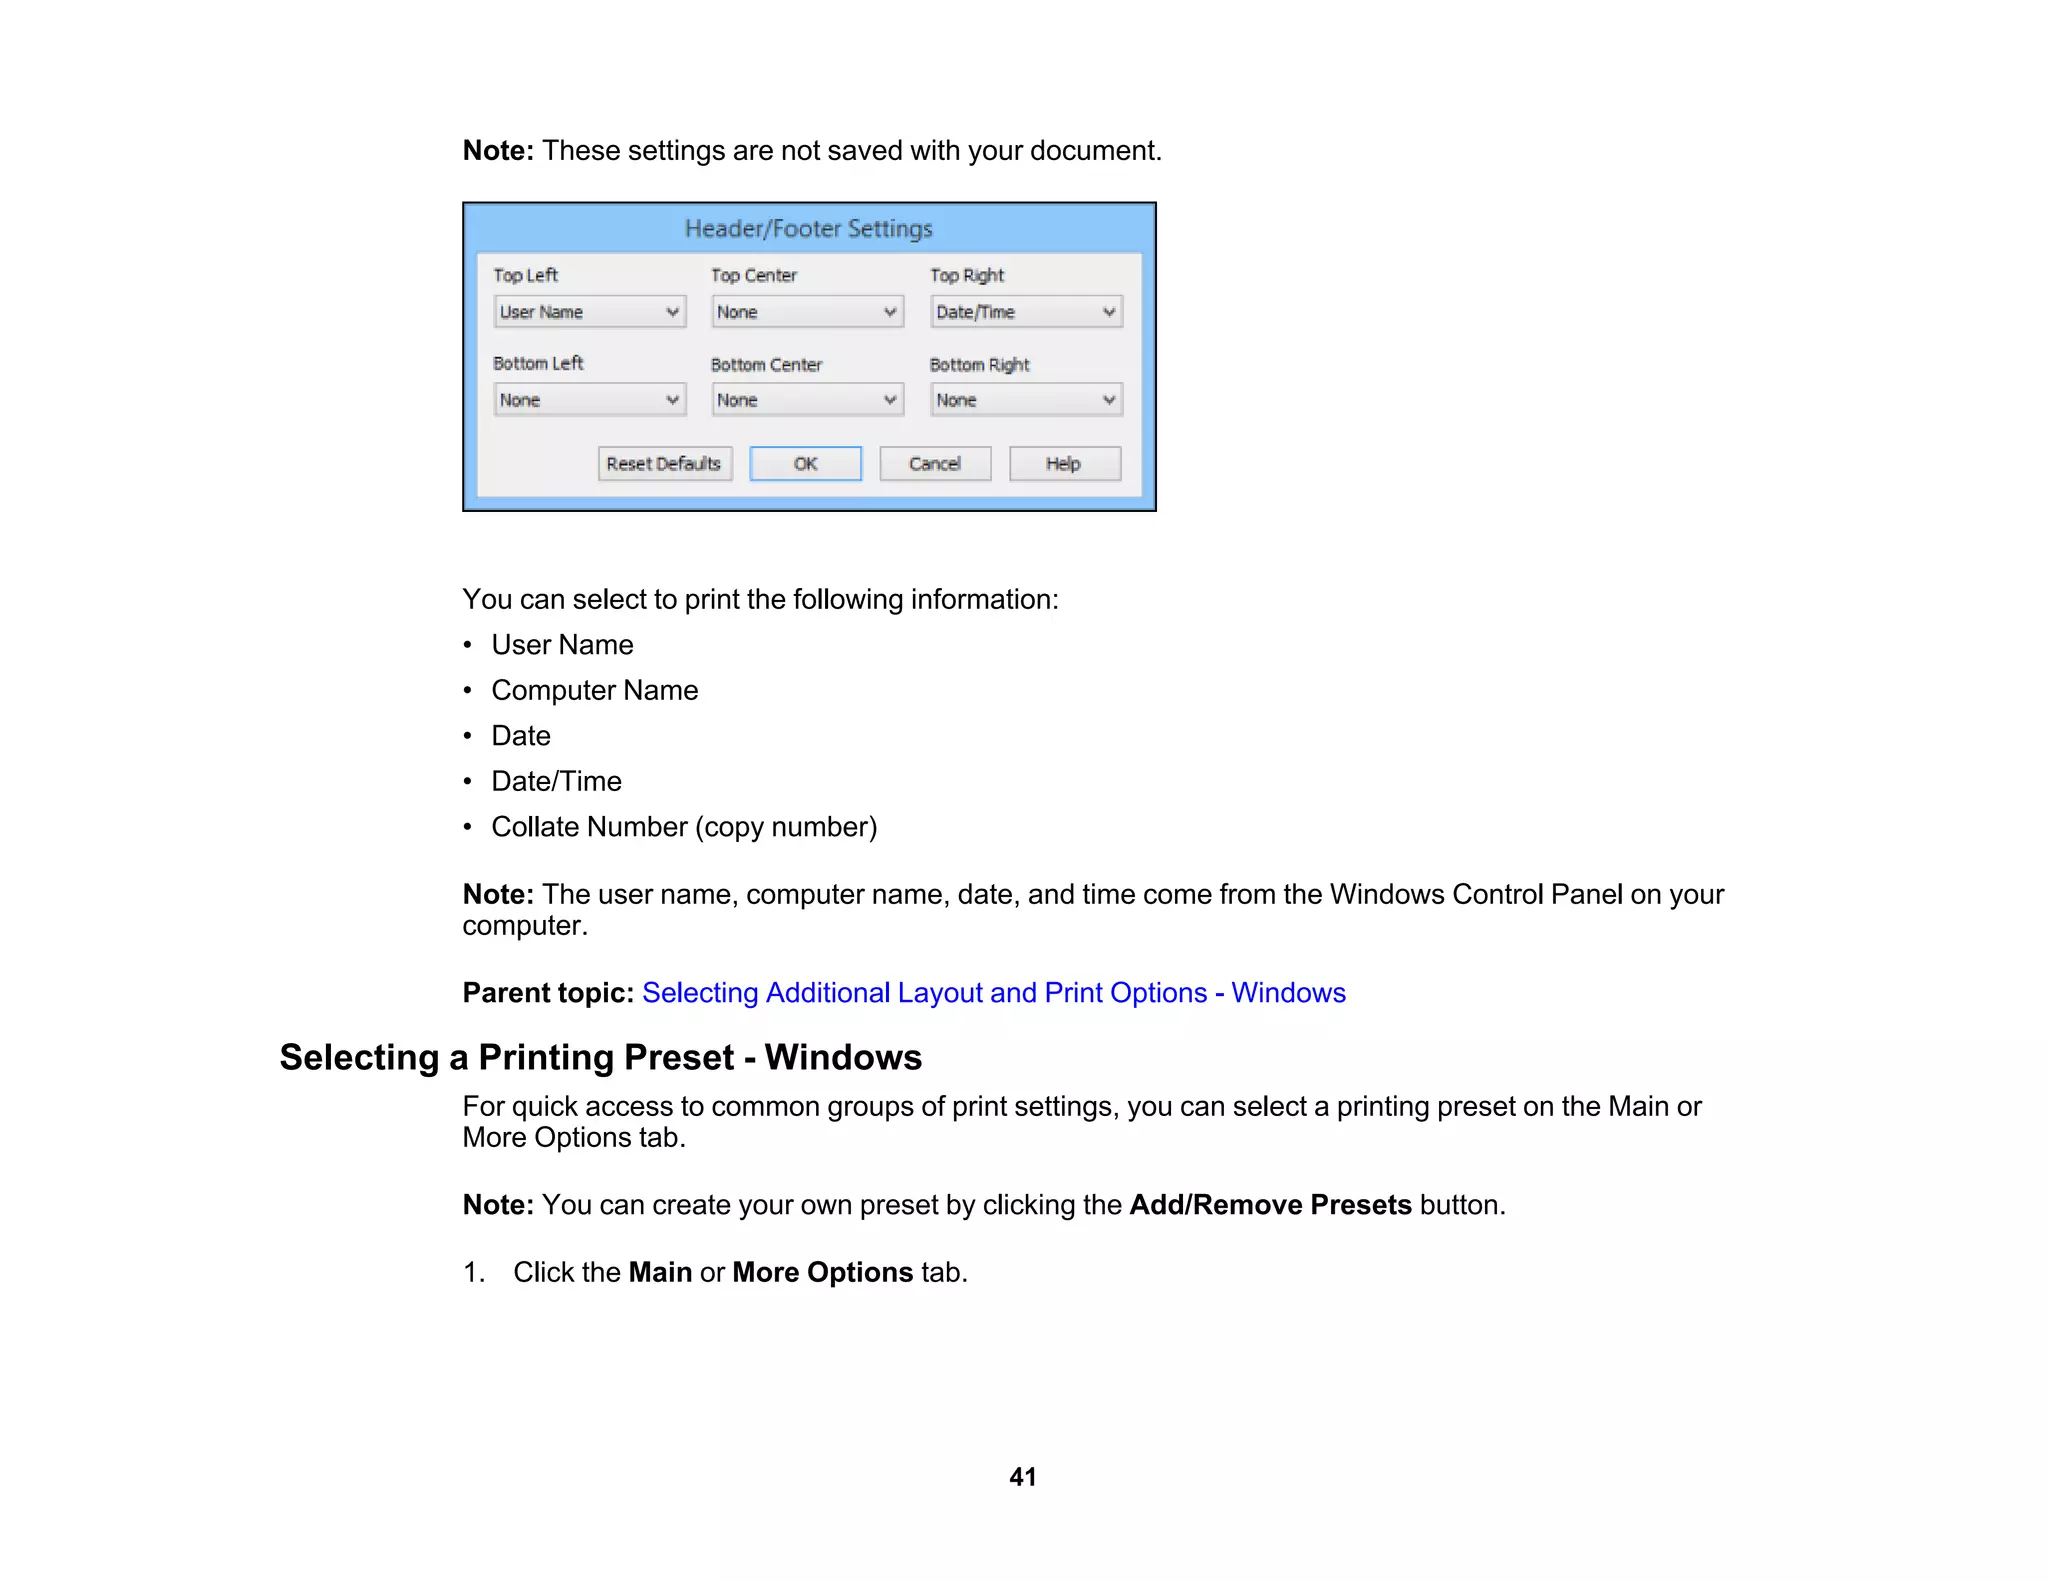
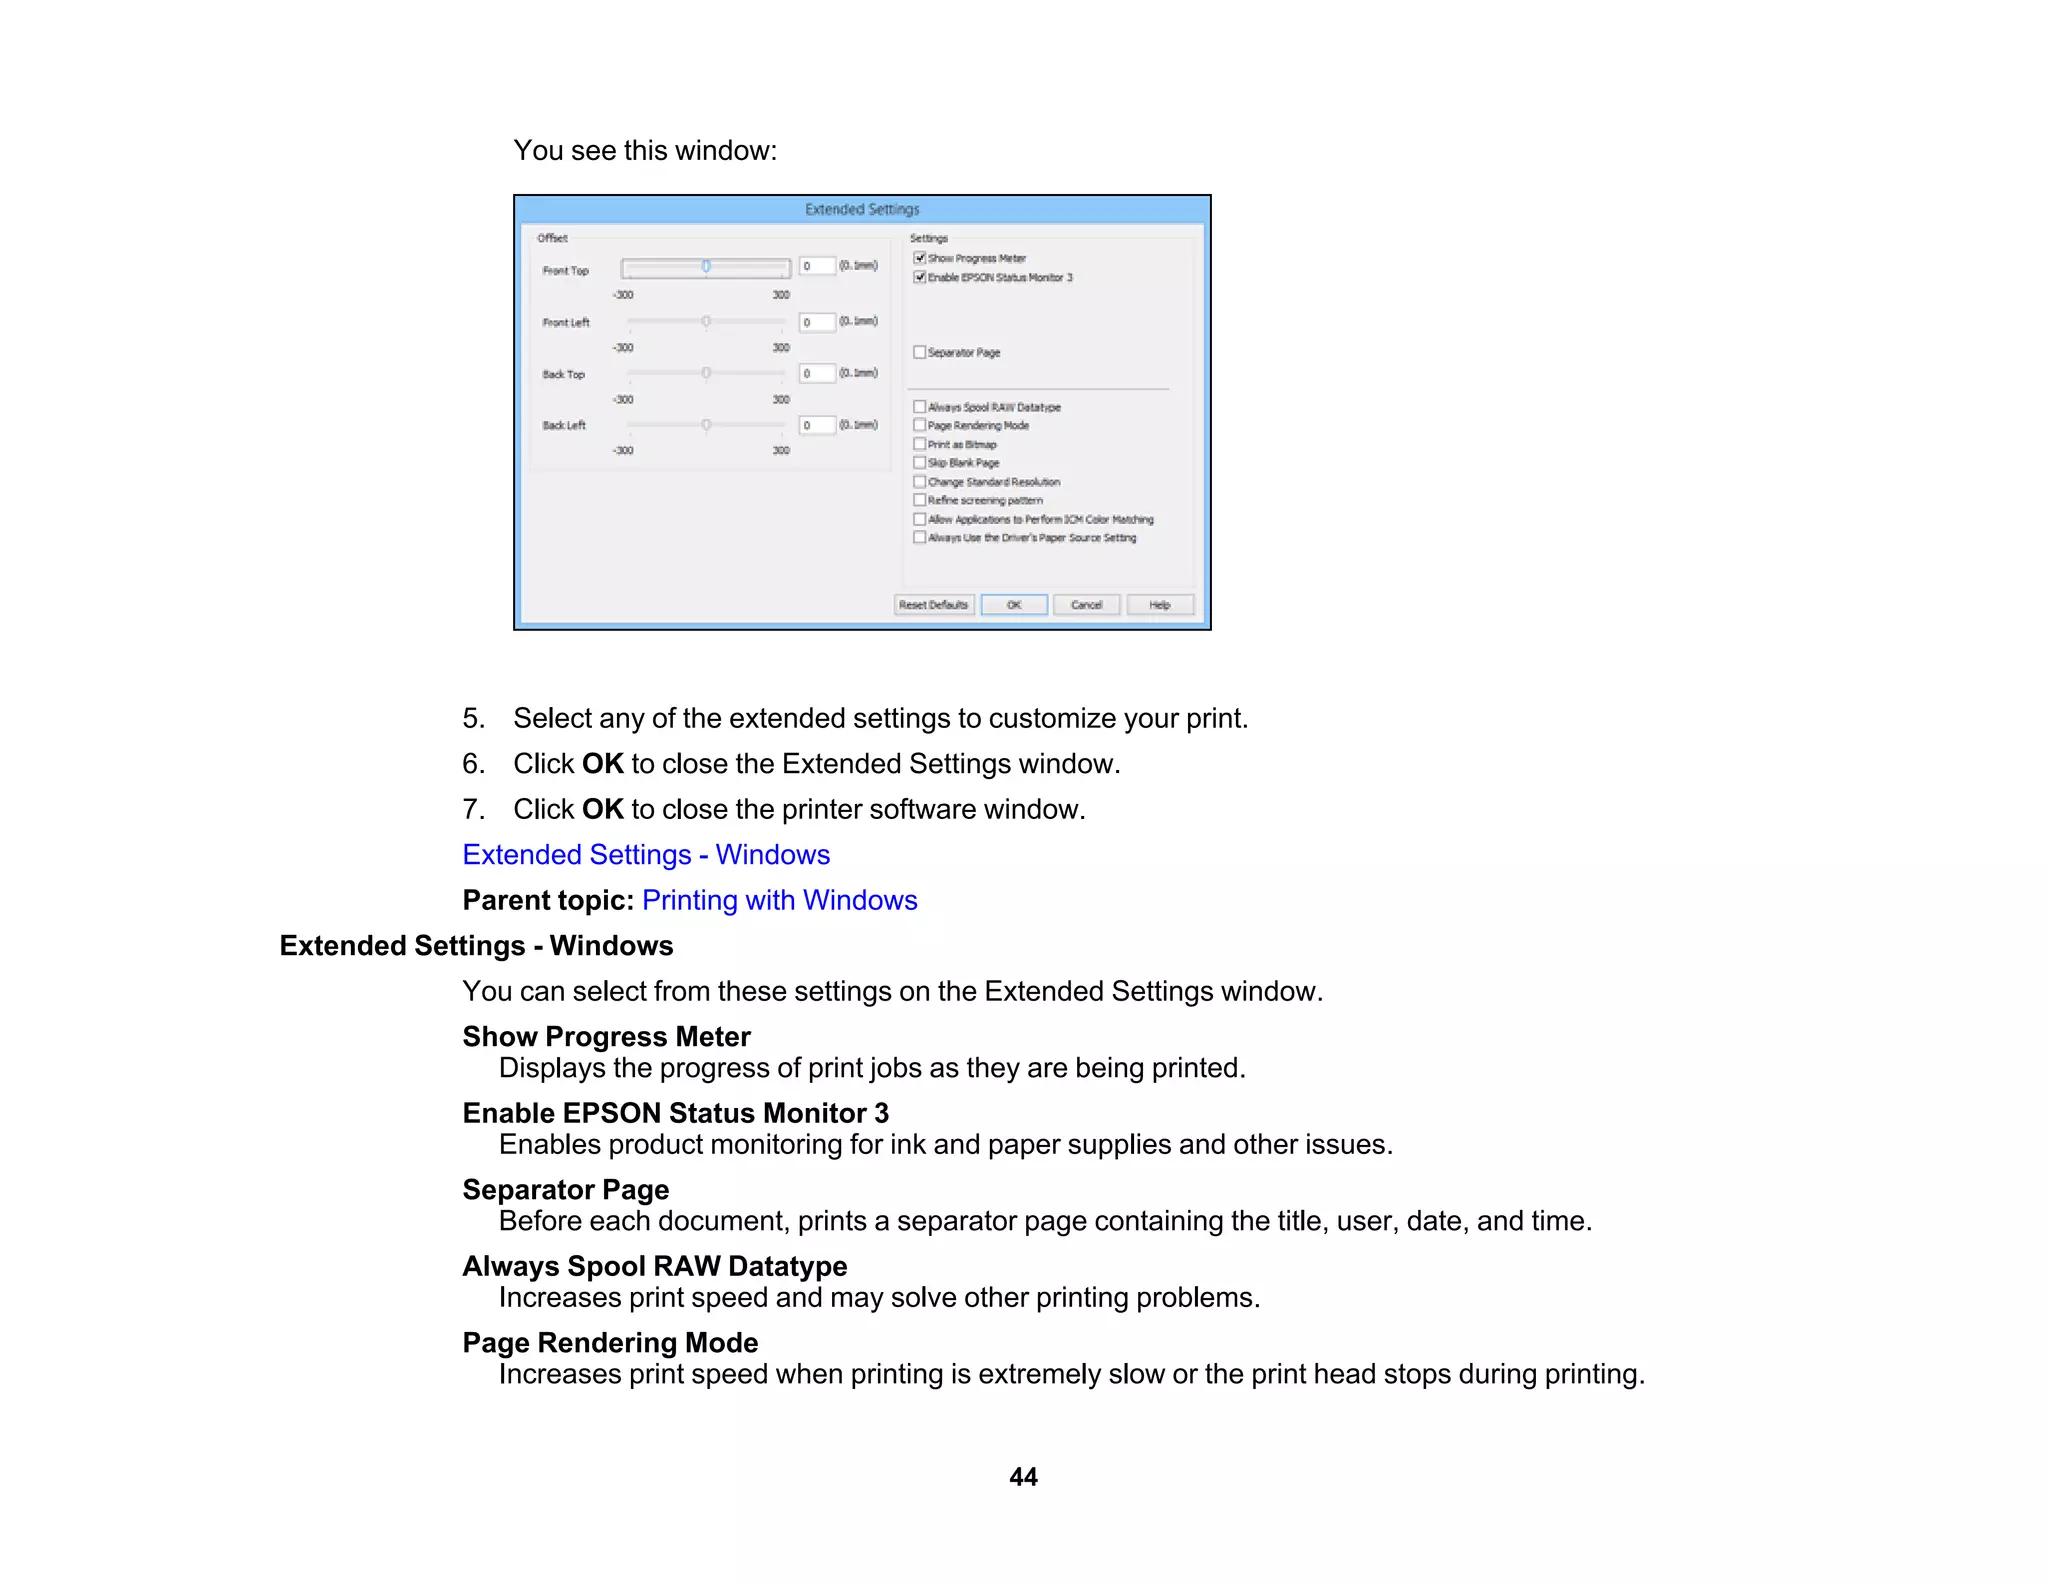
This document provides instructions for using the basic functions of an Epson L220 printer, including:
1) An overview of the control panel buttons and locations of main parts.
2) Instructions for loading various types of paper like documents, photos, and envelopes.
3) Directions for copying, printing from Windows or Mac computers, and scanning. Tips are included for settings like print quality, layout, and color adjustment.
4) Guidance on selecting scan modes for different needs and adjusting scan settings for options like area, size, and image quality.


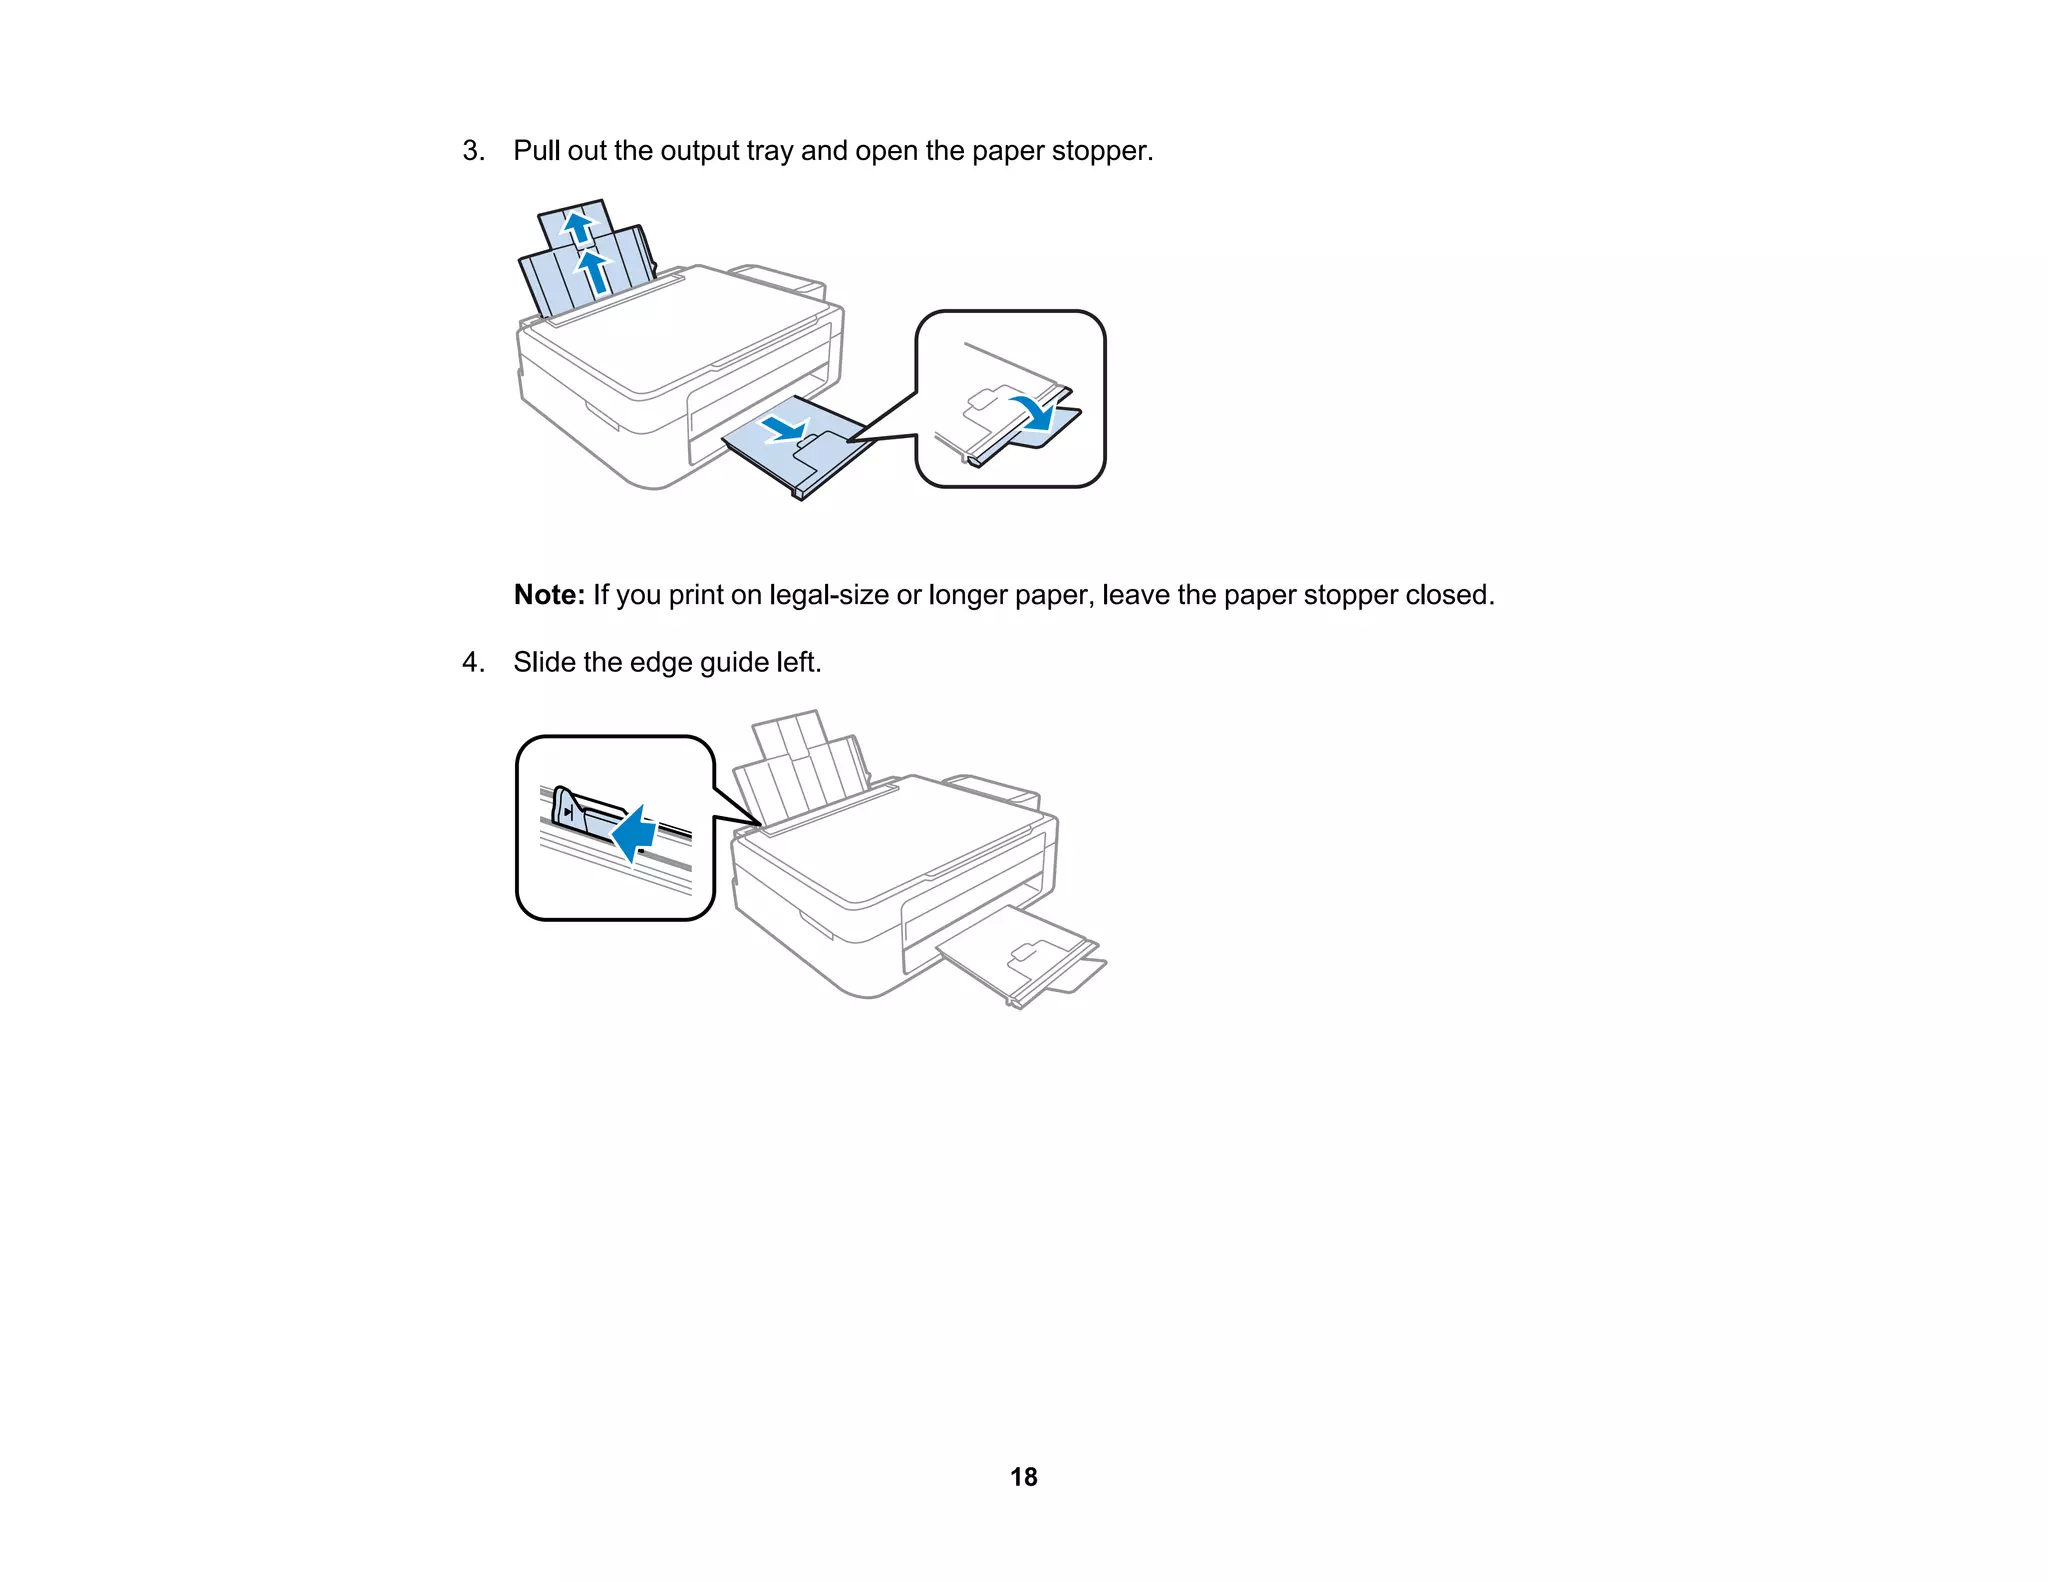
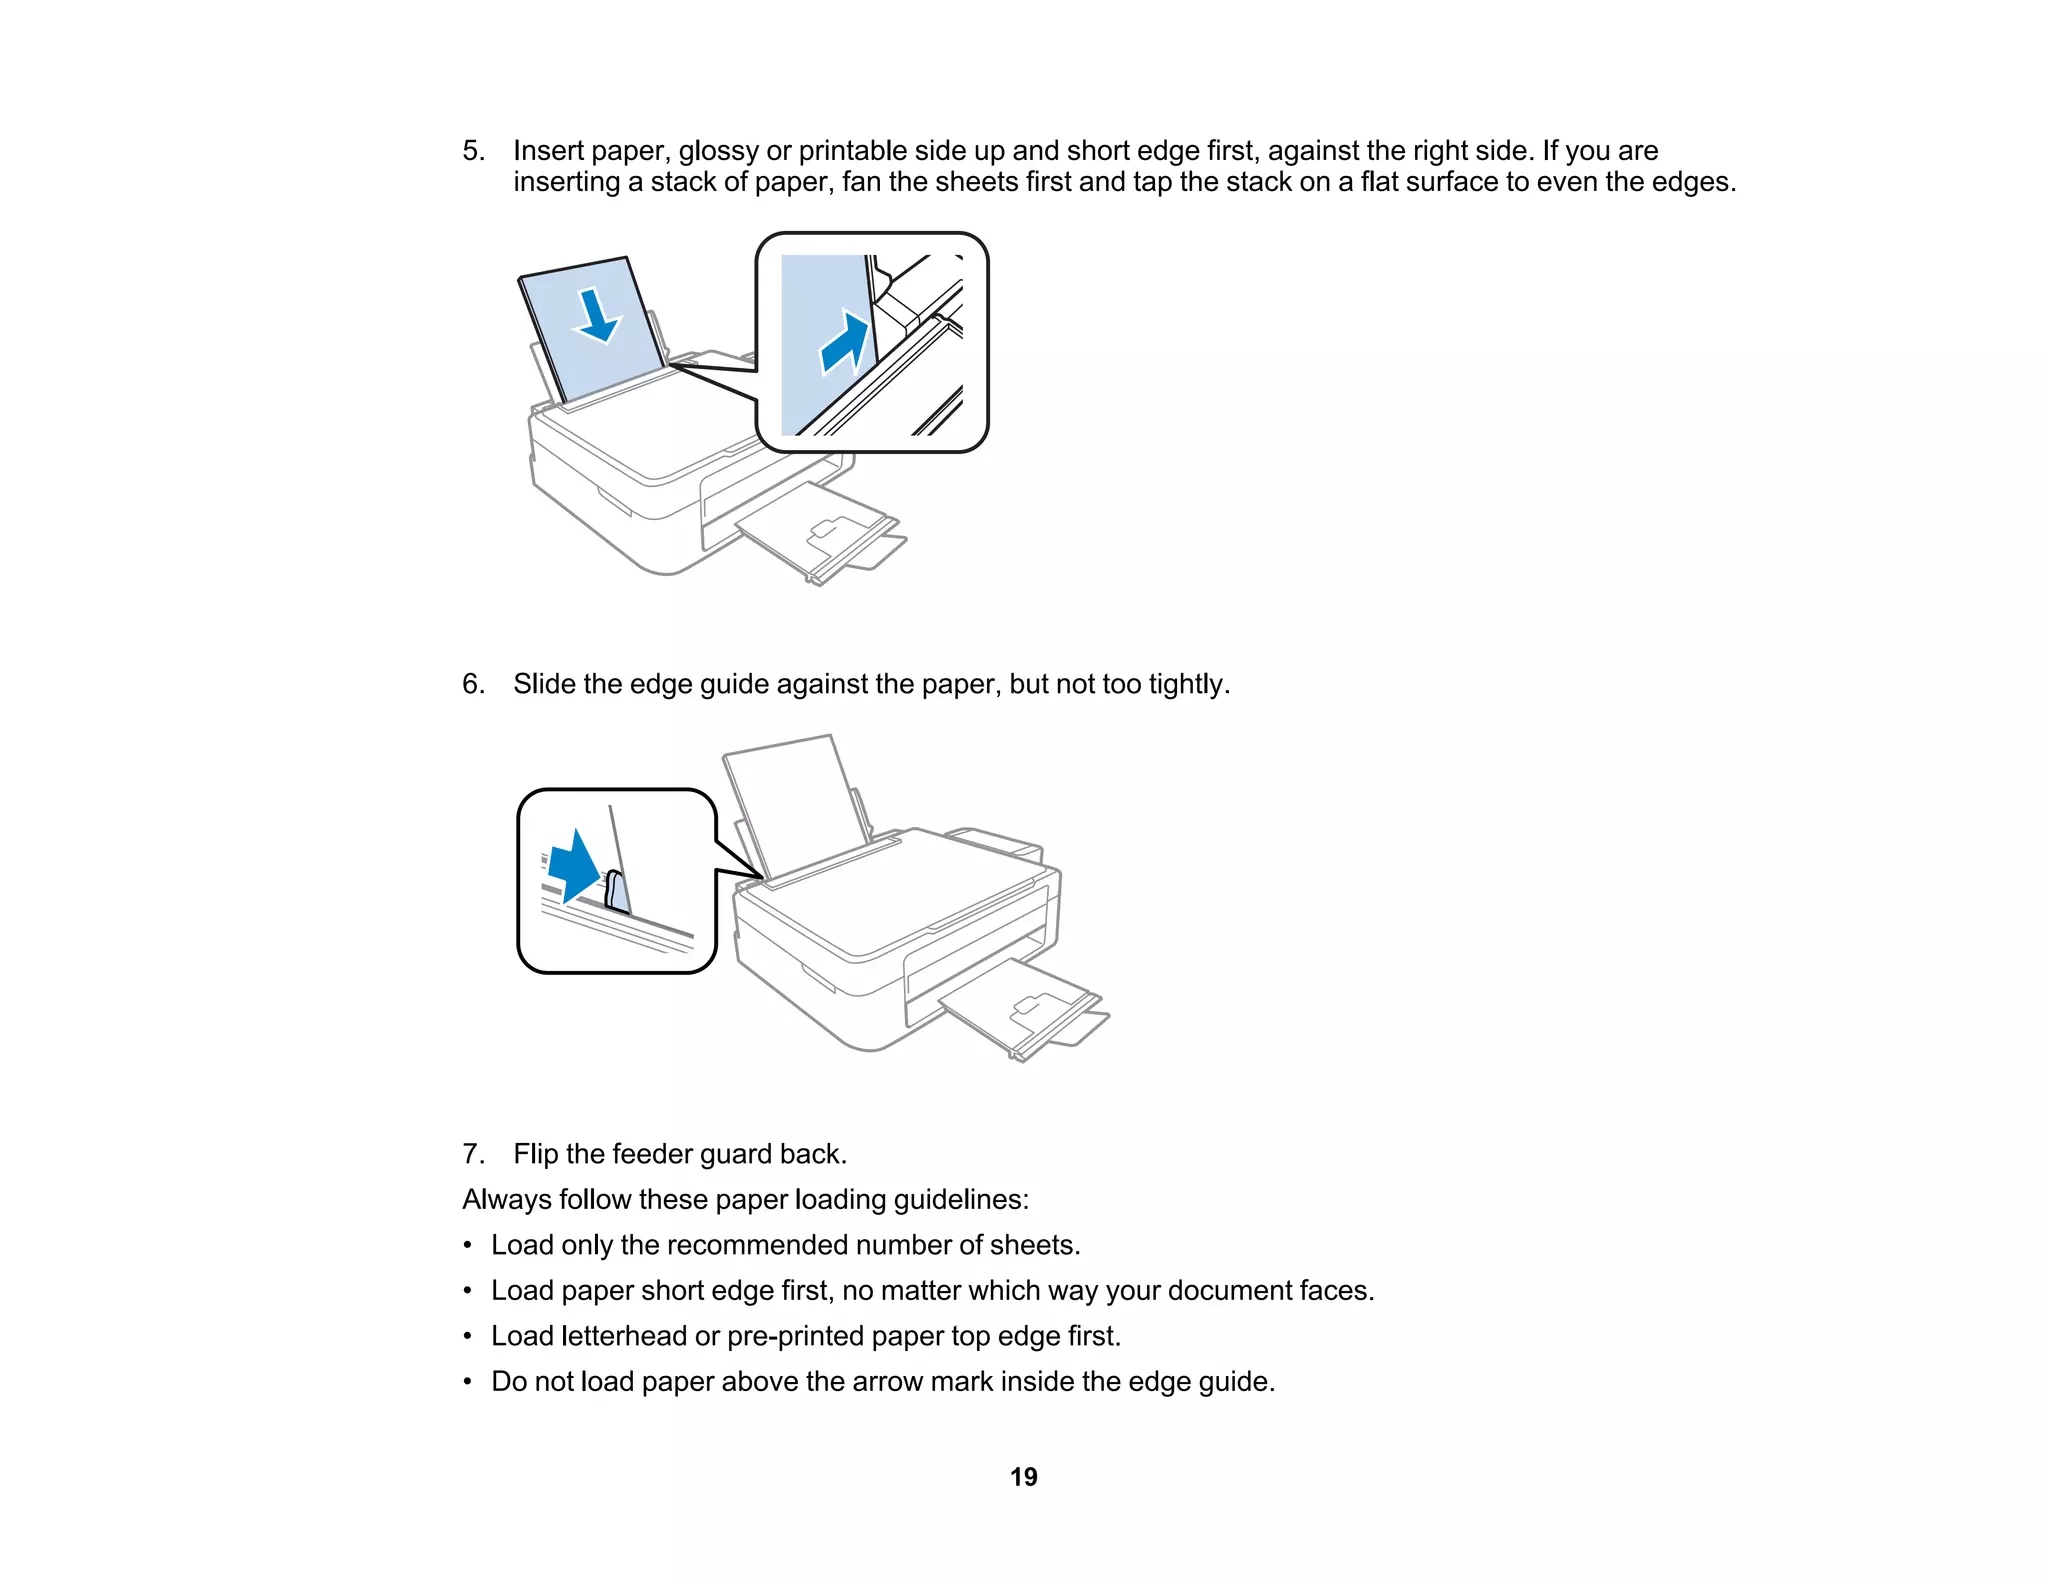

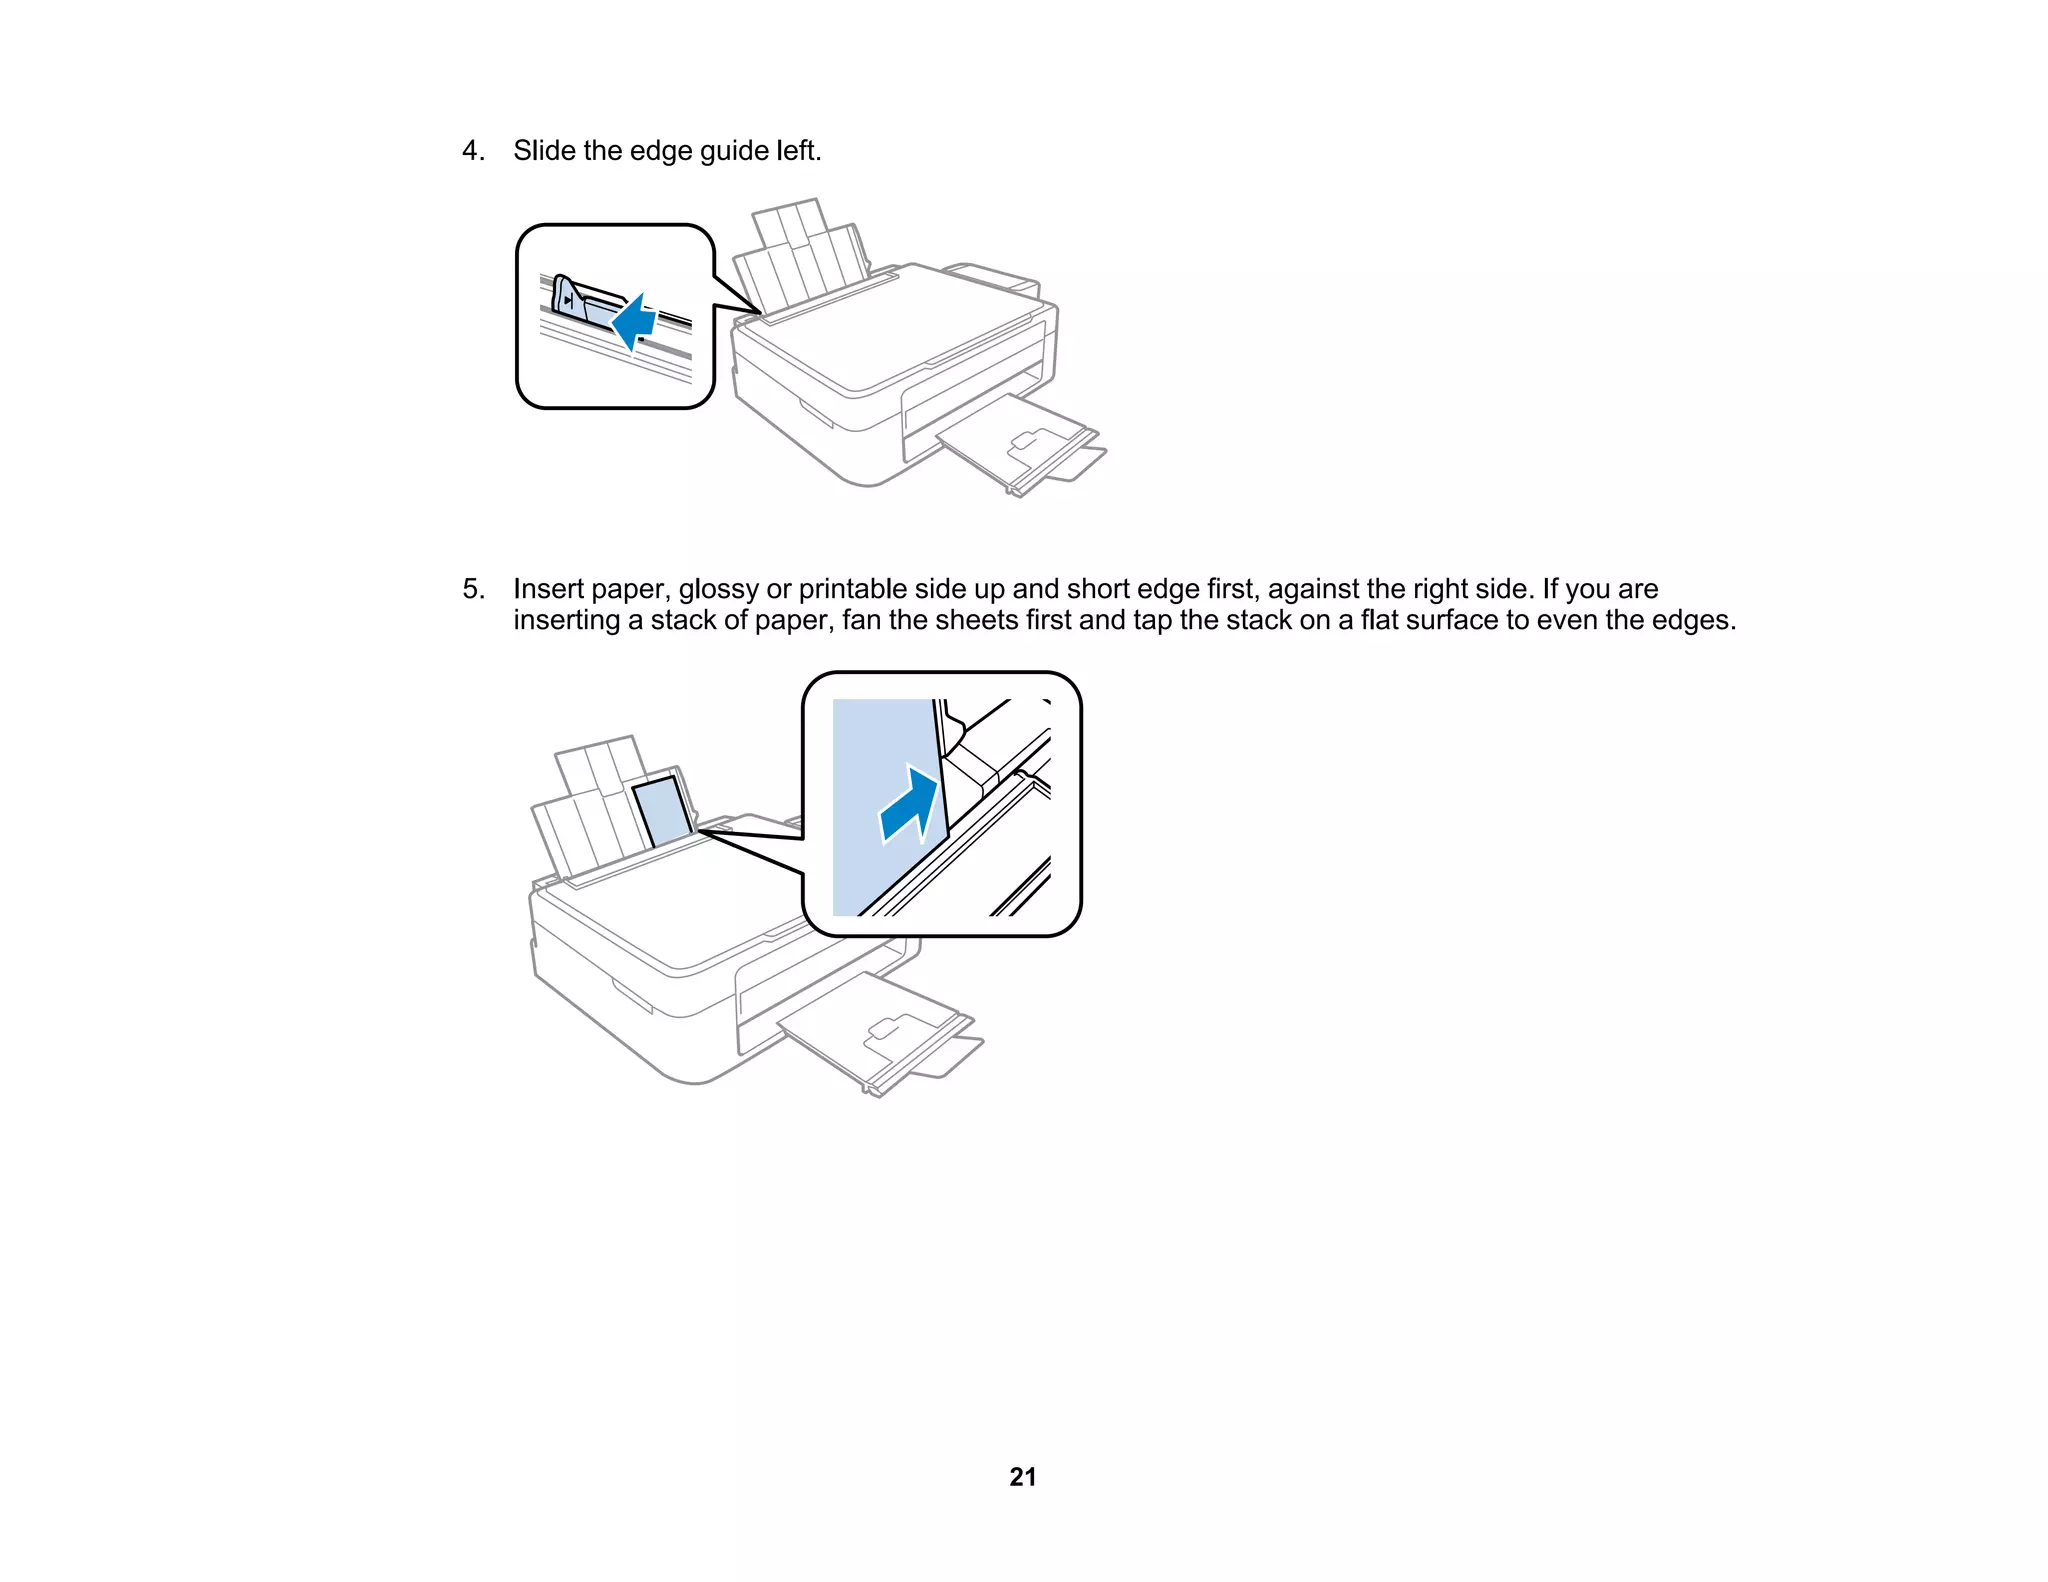
![6. Slide the edge guide against the paper, but not too tightly.
7. Flip the feeder guard back.
Always follow these paper loading guidelines:
• Load only the recommended number of sheets.
• Load paper short edge first, no matter which way your photo faces.
• Do not load paper above the arrow mark inside the edge guide.
• Check the paper package for any additional loading instructions.
Parent topic: Loading Paper
Related references
Paper Loading Capacity
Loading Envelopes
You can print on plain paper envelopes in this size: No. 10 (4.1 × 9.5 inches [105 × 241 mm]).
22](https://image.slidesharecdn.com/cpd42421-221227130859-4ede9eba/75/cpd42421-pdf-22-2048.jpg)


![Always follow these envelope loading guidelines:
• If you have trouble loading a stack of envelopes, press each envelope flat before loading it or load one
envelope at a time.
• Do not load envelopes above the arrow mark inside the edge guide.
• Do not load envelopes that are curled, folded, or too thin, or that have plastic windows.
Parent topic: Loading Paper
Related references
Paper Specifications
Paper Loading Capacity
Paper type Load up to this many sheets
Plain paper - Letter (8.5 × 11 inches [216 × 279 mm]) or A4 Approx. 100 sheets*
(8.3 × 11.7 inches [210 × 297 mm]) **
Epson Bright White Paper ** 40 sheets
Epson Presentation Paper Matte
Epson High Quality Ink Jet Paper
Epson Premium Presentation Paper Matte 10 sheets
Epson Premium Photo Paper Glossy 10 sheets
Plain paper - Legal (8.5 × 14 inches [216 × 356 mm]) 1 sheet
User defined paper size of any type
Envelopes 5
* Based on paper weight of 17 lb (64 g/m2
) to 24 lb (90 g/m2
). Do not load paper above the arrow mark
inside the edge guide.
** For manual two-sided printing, load up to 15 sheets.
Parent topic: Loading Paper
25](https://image.slidesharecdn.com/cpd42421-221227130859-4ede9eba/75/cpd42421-pdf-25-2048.jpg)
![Available Epson Papers
You can purchase genuine Epson ink and paper from an Epson authorized reseller. To find the nearest
reseller, visit global.latin.epson.com or call your nearest Epson sales office (website available in Spanish
and Portuguese only).
Paper Type Size Part number Sheet count
Epson Bright White Paper Letter (8.5 × 11 inches S041586 500
[216 × 279 mm])
Epson High Quality Ink Jet Paper Letter (8.5 × 11 inches S041111 100
[216 × 279 mm])
Epson Premium Photo Paper Glossy 4 × 6 inches S041808 40
(102 × 152 mm)
S041727 100
5 × 7 inches S041464 20
(127 × 178 mm)
Letter (8.5 × 11 inches S042183 25
[216 × 279 mm])
S041667 50
Epson Presentation Paper Matte Letter (8.5 × 11 inches S041062 100
[216 × 279 mm])
Epson Premium Presentation Paper Letter (8.5 × 11 inches S041257 50
Matte [216 × 279 mm])
S042180 100
Note: Paper/media availability varies by country.
Parent topic: Loading Paper
Paper or Media Type Settings
For this paper Select this paper Type or Media Type setting
Plain paper Plain Paper/Bright White Paper
Epson High Quality Ink Jet Paper
Epson Bright White Paper
Epson Presentation Paper Matte
26](https://image.slidesharecdn.com/cpd42421-221227130859-4ede9eba/75/cpd42421-pdf-26-2048.jpg)

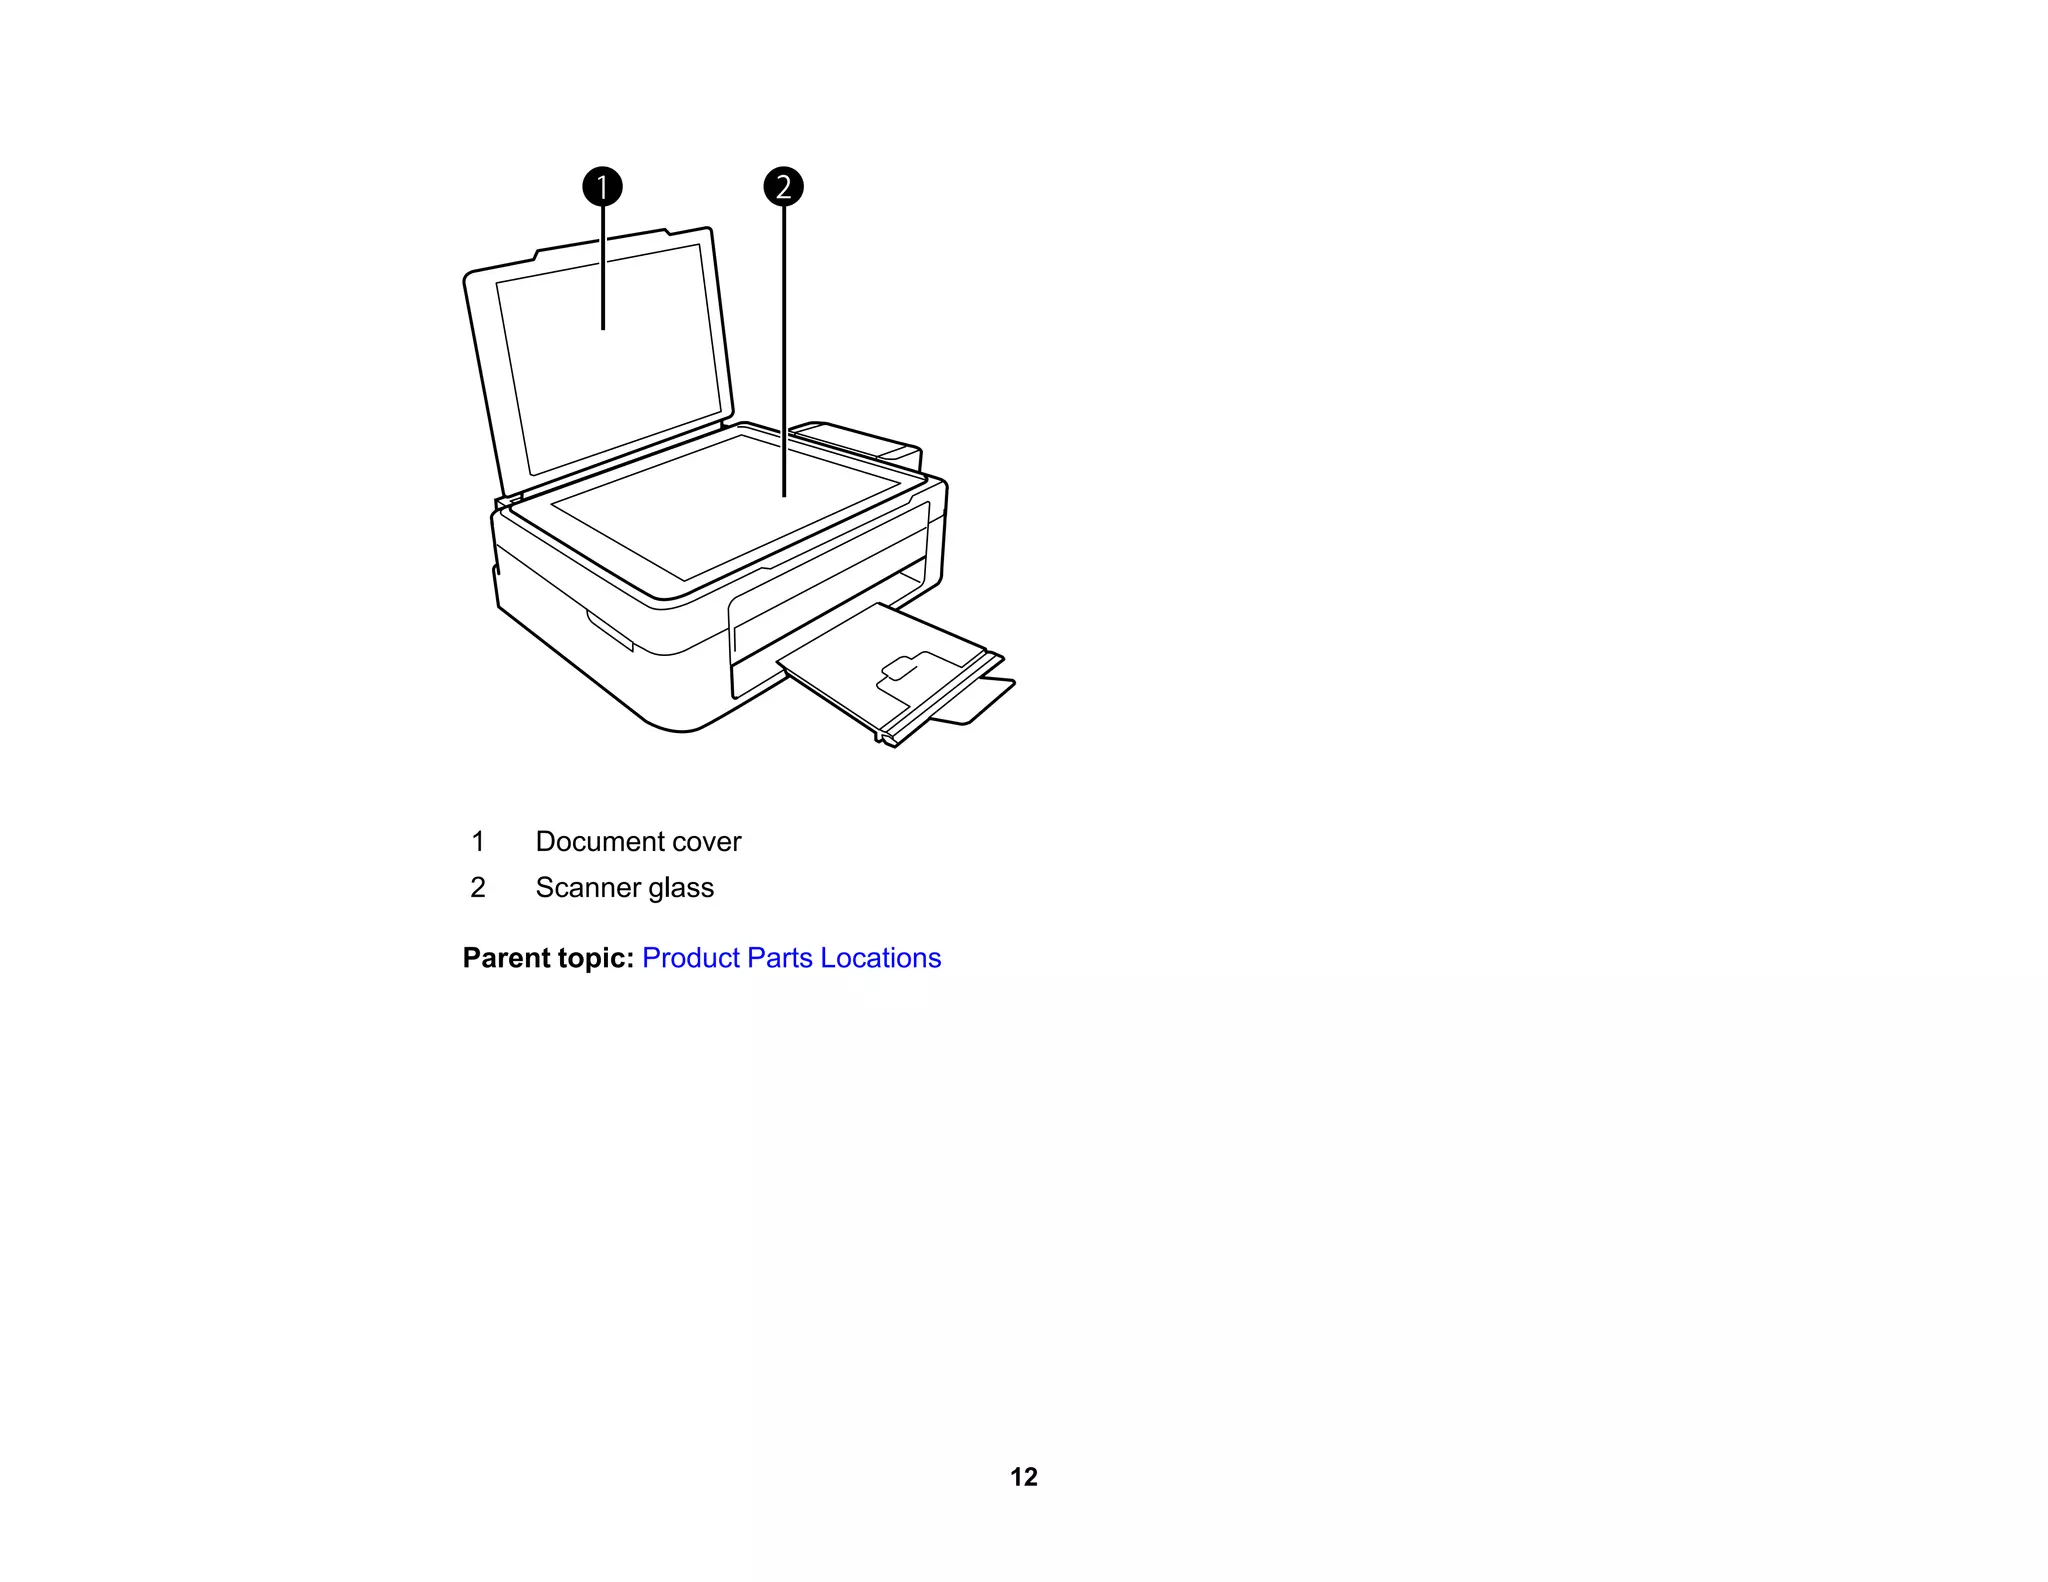
![Placing Originals on the Product
Follow the instructions here to place your original documents or photos on the product.
Caution: Do not place anything on top of your product or use its cover as a writing surface to avoid
damaging it.
Placing Originals on the Scanner Glass
Placing Originals on the Scanner Glass
You can place originals up to this size on the scanner glass: Letter (8.5 × 11 inches [216 × 279 mm]) or
A4 (8.3 × 11.7 inches [210 × 297 mm]).
1. Open the document cover.
2. Place your original facedown on the scanner glass with the top facing into the corner. Slide the
original to the edges of the indicated corner.
Note: You can place multiple originals on the scanner glass. Just make sure they are at least
0.8 inch (20 mm) away from each other.
Note: The edges of your original may be cropped by 0.06 inch (1.5 mm) from the edge of the
scanner glass. If you are scanning in Full Auto mode or using thumbnail preview in another mode in
28](https://image.slidesharecdn.com/cpd42421-221227130859-4ede9eba/75/cpd42421-pdf-28-2048.jpg)


![Product Makes Noise, But Nothing Copies
If your product makes a noise, but nothing copies, try these solutions:
• Run a nozzle check to see if any of the print head nozzles are clogged. Then clean the print head, if
necessary.
• If the nozzle check page does not print, but the product's power is on, make sure your product
software is installed correctly.
• Make sure your product is level (not tilted).
Parent topic: Solving Copying Problems
Related concepts
Print Head Cleaning
Print Head Nozzle Check
Copies are Cut Off
Depending on your product, the default paper size for copies is either A4 (8.3 × 11.7 inches
[210 × 297 mm]) or Letter (8.5 × 11 inches [216 × 279 mm]).
• To change the default paper size to A4 (8.3 × 11.7 inches [210 × 297 mm]), make sure the product is
turned off, then hold down the color copy button and press the power button to turn the product
on. When the product turns on, release both buttons.
• To change the default paper size to Letter (8.5 × 11 inches [216 × 279 mm]), make sure the product is
turned off, then hold down the B&W copy button and press the power button to turn the product
on. When the product turns on, release both buttons.
Parent topic: Solving Copying Problems
Product Makes Noise When It Sits for a While
Your product is performing routine maintenance. This is normal.
Parent topic: Solving Copying Problems
Solving Paper Problems
Check these sections if you have problems using paper with your product.
Paper Feeding Problems
Paper Jam Problems
Paper Ejection Problems
142](https://image.slidesharecdn.com/cpd42421-221227130859-4ede9eba/75/cpd42421-pdf-142-2048.jpg)


![• OS X 10.8.x
• OS X 10.7.x
• OS X 10.6.8
Note: Visit Epson's support website at global.latin.epson.com/Soporte for the latest in compatibility and
drivers for your product (website available in Spanish and Portuguese only).
Parent topic: Technical Specifications
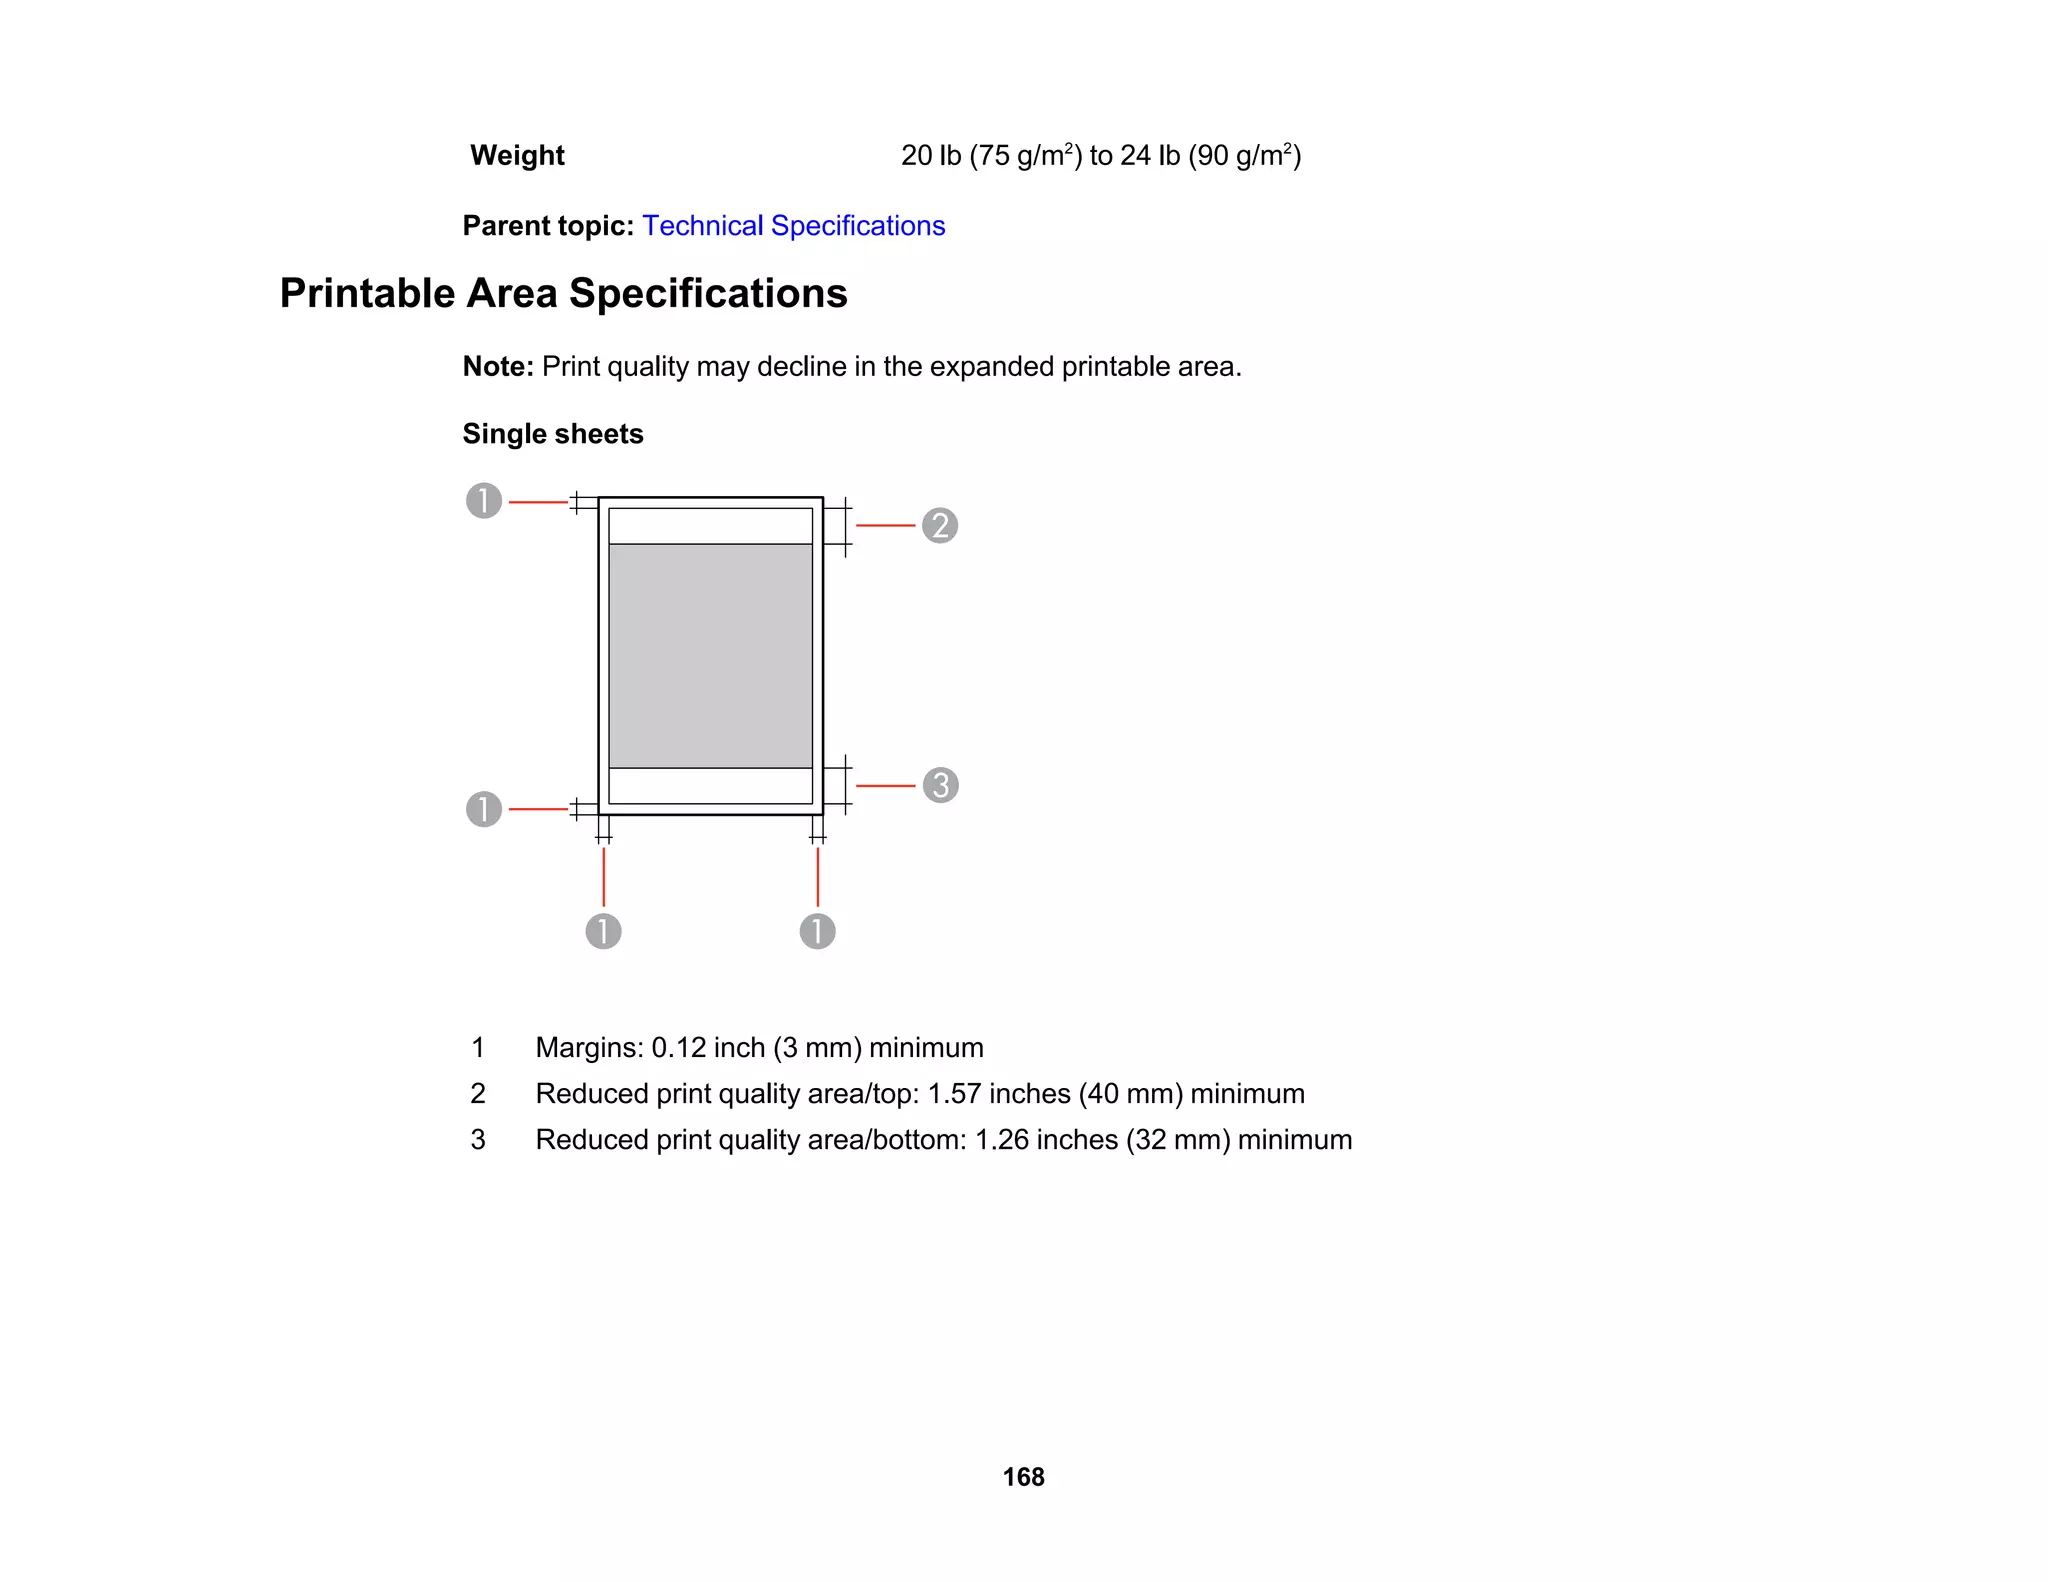
Paper Specifications
Note: Since the quality of any particular brand or type of paper may be changed by the manufacturer at
any time, Epson cannot guarantee the quality of any non-Epson brand or type of paper. Always test a
sample of paper stock before purchasing large quantities or printing large jobs.
Single-sheets
Size A4 (8.3 × 11.7 inches [210 × 297 mm])
A6 (4.1 × 5.8 inches [105 × 148 mm])
Letter (8.5 × 11 inches [216 × 279 mm])
Legal (8.5 × 14 inches [216 × 356 mm])
4 × 6 inches (102 × 152 mm)
5 × 7 inches (127 × 178 mm)
8 × 10 inches (203 × 254 mm)
3.5 × 5 inches (89 × 127 mm)
16:9 wide (4 × 7.1 inches [102 × 181 mm])
Half Letter (5.5 × 8.5 inches [140 × 216 mm])
Paper types Plain paper and paper distributed by Epson
Weight 17 lb (64 g/m2
) to 24 lb (90 g/m2
)
Envelopes
Size No. 10 (4.1 × 9.5 inches [105 × 241 mm])
167](https://image.slidesharecdn.com/cpd42421-221227130859-4ede9eba/75/cpd42421-pdf-167-2048.jpg)