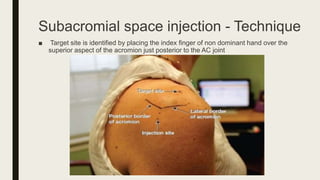
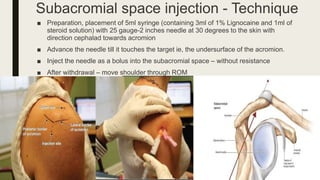
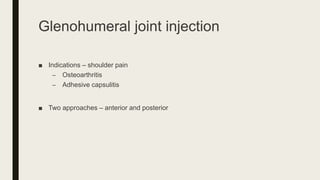
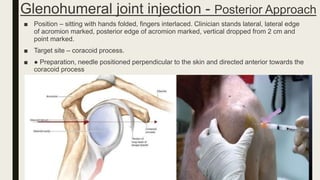
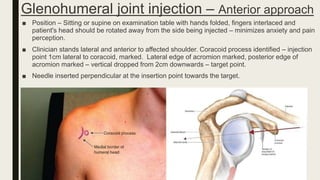
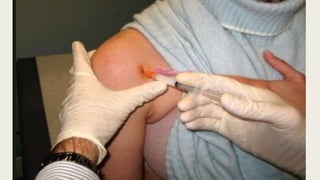
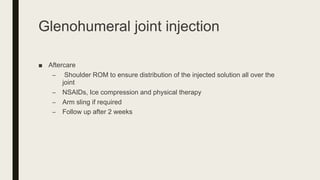
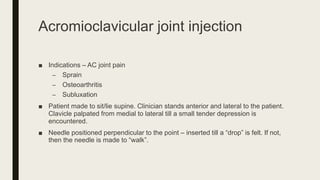
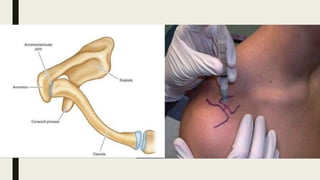
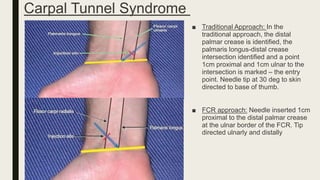
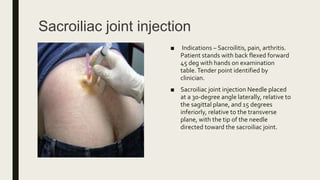
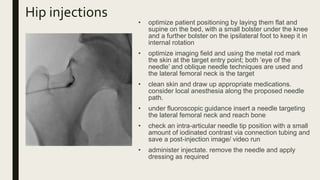
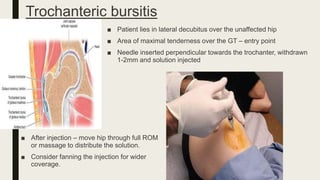
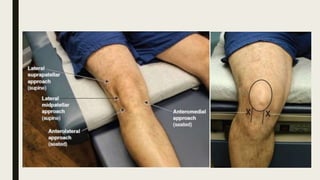
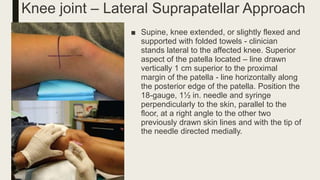
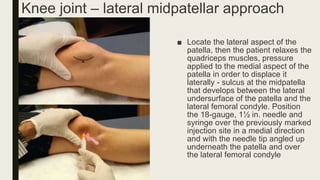
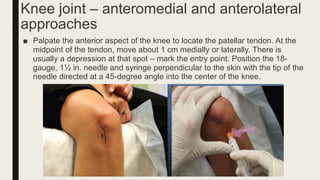
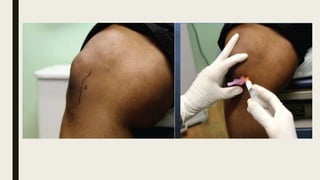
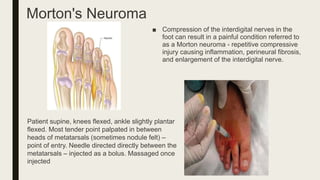
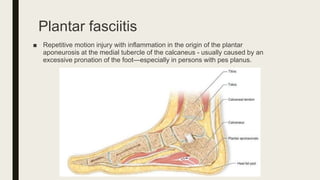
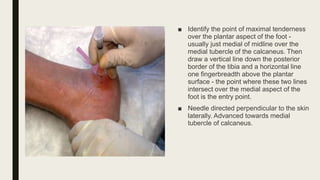
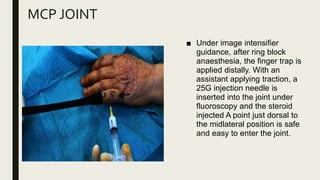
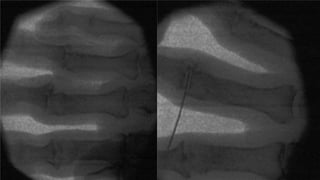
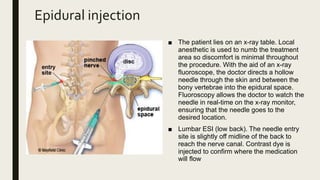
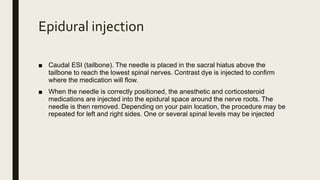
CORTICOSTEROID
INJECTIONTECHNIQUES IN
ORTHOPAEDICS
PRESENTERS: DR. ANMOL MITTAL, DR. SAI PAVAN
CHAIRPERSON: DR. S.K. SAIDAPUR
INTRODUCTION
■ Mainstay of treatment in many cases of acute or chronic joint or soft tissue pain
conditions
■ Mechanism of action
– Local – Decreases inflammation in synovial tissues – reduces edema and
inflammatory cells in joints.
– Systemic – Dose related – decrease in inflammatory markers such as CRP
and ESR
Commonly used depot corticosteroids
■ Choice of depot corticosteroid varies in terms of
– Availability
– Versatility
– Pharmacokinetics
– Cost-effectiveness
Commonly used injectable corticosteroids
Dosage
1. Large: Knee, Shoulder,Ankle and epidural
2. Medium: Elbow and Wrist
3. Small: MCP, facet, acromioclvicular joint
Contraindications
USES
■ Intra-articular
– Acute knee pain in Osteoarthritis
– Rheumatoid Arthritis
– Juvenile RA
– Crystal deposition diseases – Gout and pseudogout
– SLE
– Acute traumatic arthritis
– Psoriatic arthritis
– Ankylosing Spondylitis
– Arthritis associated with inflammatory GI disorders
– Post – arthroscopic pain relief and rehabilitation
– Adhesive capsulitis
USES
■ Extra-articular
– Elbow epicondylitis
– Shoulder bursitis
– Greater trochanteric bursitis
– De Quervain's Tenosynovitis
– Pes anserine bursitis
– Carpal tunnel syndrome
– Finger tenosynovitis
– Tarsal tunnel syndrome
– Backache – epidural injection, nerve root blocks
Side effects
■ Local
– Post-injection flare: Marked pain at the site of injection/joint – needle
puncture/chemical synovitis due to crystals – treated with analgesics, ice
packs
– Facial flushing – common in women – onset within a few hours of injection
– Skin/fat atrophy – common with less soluble agents
– Joint sepsis - rare
Side effects
■ Systemic: influenced by the agent used, dose, frequency and number of joints
injected. Generally milder.
– Osteoporosis
– Corticosteroid induced myopathy
– HPA axis suppression
– Worsening glucose intolerance
PREREQUISITES
■ Sterile gloves
■ Bactericidal skin preparation – Spirit and Povidone-Iodine
■ Syringes – 5mL
■ 18 gauge and 21 gauge needle
■ Corticosteroid preparation and 1% lidocaine or 0.5% bupivacaine
■ Sterile adhesive bandage
SHOULDER JOINT
■ Subacromial space injection
■ Glenohumeral joint injection
■ Acromioclavicular joint injection
Subacromial space injection
■ Indications – Shoulder pain
– rotator cuff sprain
– Impingement syndrome
– Rotator cuff tendinitis
■ Position – Sitting on the examination table, patient's hands folded on lap with
fingers interlaced. Clinician stands lateral, finds the lateral and posterior edge of
the acromion and marks it, after which a vertical is dropped 2cm below the
posterolateral corner and marked.
Subacromial space injection - Technique
■ Target site is identified by placing the index finger of non dominant hand over the
superior aspect of the acromion just posterior to the AC joint
Subacromial space injection - Technique
■ Preparation, placement of 5ml syringe (containing 3ml of 1% Lignocaine and 1ml of
steroid solution) with 25 gauge-2 inches needle at 30 degrees to the skin with
direction cephalad towards acromion
■ Advance the needle till it touches the target ie, the undersurface of the acromion.
■ Inject the needle as a bolus into the subacromial space – without resistance
■ After withdrawal – move shoulder through ROM
Glenohumeral joint injection
■ Indications – shoulder pain
– Osteoarthritis
– Adhesive capsulitis
■ Two approaches – anterior and posterior
Glenohumeral joint injection - Posterior Approach
■ Position – sitting with hands folded, fingers interlaced. Clinician stands lateral, lateral edge
of acromion marked, posterior edge of acromion marked, vertical dropped from 2 cm and
point marked.
■ Target site – coracoid process.
■ ● Preparation, needle positioned perpendicular to the skin and directed anterior towards the
coracoid process
Glenohumeral joint injection – Anterior approach
■ Position – Sitting or supine on examination table with hands folded, fingers interlaced and
patient's head should be rotated away from the side being injected – minimizes anxiety and pain
perception.
■ Clinician stands lateral and anterior to affected shoulder. Coracoid process identified – injection
point 1cm lateral to coracoid, marked. Lateral edge of acromion marked, posterior edge of
acromion marked – vertical dropped from 2cm downwards – target point.
■ Needle inserted perpendicular at the insertion point towards the target.
Glenohumeral joint injection
■ Aftercare
– Shoulder ROM to ensure distribution of the injected solution all over the
joint
– NSAIDs, Ice compression and physical therapy
– Arm sling if required
– Follow up after 2 weeks
Acromioclavicular joint injection
■ Indications – AC joint pain
– Sprain
– Osteoarthritis
– Subluxation
■ Patient made to sit/lie supine. Clinician stands anterior and lateral to the patient.
Clavicle palpated from medial to lateral till a small tender depression is
encountered.
■ Needle positioned perpendicular to the point – inserted till a “drop” is felt. If not,
then the needle is made to “walk”.
Tennis Elbow – Lateral Epicondylitis
■ Supine with head of bed elevated 30
deg.
■ Affected elbow slightly flexed.
■ Wrist in neutral to slightly pronated
position with elbow supported with
towels and patient's head turned away
■ Preparation, needle (5ml syringe containing 1mL of
lignocaine + 1mL of steroid solution) placed
perpendicular to the entry point – directed medially
towards lateral epicondyle.
■ Needle advanced to the bone of the lateral
epicondyle and then withdrawn 1-2mm
■ “Pinch” technique then performed followed by
injection of the solution.
■ Aftercare
– Immediately after injection – Elbow ROM
– Use of elastic compression bandage
– Avoid excessive elbow and wrist movement
– Follow up after 2 weeks
Trigger Finger – Stenosing tenosynovitis
■ Tendinosis of the flexor tendons of the digits with nodule formation.
■ Supine, wrist in neutral and fully supinated.
■ Mark the tender nodule and 1cm distal to it – entry point.
■ Needle positioned 45 deg to skin, directed proximally, advanced till the needle tip meets the nodule.
■ Move finger through ROM to ensure distribution.
■ Avoid excessive handgrip activities
De Quervain's Tenosynovitis
■ Stenosing tenosynovitis of the first dorsal compartment of the
radial side of the wrist – APL, EPB
■ Tender point identified in between APL and EPB – entry point
■ Needle inserted at tender point, positioned proximally 45
degrees – advanced towards the convergence of the tendons
and injected
 Ensure no excessive wrist flexion or
pronation by preferably using wrist thumb
spica splint.
Carpal Tunnel Syndrome
■ Traditional Approach: In the
traditional approach, the distal
palmar crease is identified, the
palmaris longus-distal crease
intersection identified and a point
1cm proximal and 1cm ulnar to the
intersection is marked – the entry
point. Needle tip at 30 deg to skin
directed to base of thumb.
■ FCR approach: Needle inserted 1cm
proximal to the distal palmar crease
at the ulnar border of the FCR. Tip
directed ulnarly and distally
Sacroiliac joint injection
■ Indications – Sacroilitis, pain, arthritis.
Patient stands with back flexed forward
45 deg with hands on examination
table.Tender point identified by
clinician.
■ Sacroiliac joint injection Needle placed
at a 30-degree angle laterally, relative to
the sagittal plane, and 15 degrees
inferiorly, relative to the transverse
plane, with the tip of the needle
directed toward the sacroiliac joint.
Hip injections
• optimize patient positioning by laying them flat and
supine on the bed, with a small bolster under the knee
and a further bolster on the ipsilateral foot to keep it in
internal rotation
• optimize imaging field and using the metal rod mark
the skin at the target entry point; both ‘eye of the
needle’ and oblique needle techniques are used and
the lateral femoral neck is the target
• clean skin and draw up appropriate medications.
consider local anesthesia along the proposed needle
path.
• under fluoroscopic guidance insert a needle targeting
the lateral femoral neck and reach bone
• check an intra-articular needle tip position with a small
amount of iodinated contrast via connection tubing and
save a post-injection image/ video run
• administer injectate. remove the needle and apply
dressing as required
Trochanteric bursitis
■ Patient lies in lateral decubitus over the unaffected hip
■ Area of maximal tenderness over the GT – entry point
■ Needle inserted perpendicular towards the trochanter, withdrawn
1-2mm and solution injected
■ After injection – move hip through full ROM
or massage to distribute the solution.
■ Consider fanning the injection for wider
coverage.
Knee joint injections
■ Indications:
– Knee pain
– Sprain
– osteoarthritis (primary, secondary, post-traumatic)
■ Four approaches commonly used
– the extended-knee lateral suprapatellar
– extended- knee lateral midpatellar
– flexed-knee anteromedial
– flexed-knee anterolateral portals.
Knee joint – Lateral Suprapatellar Approach
■ Supine, knee extended, or slightly flexed and
supported with folded towels - clinician
stands lateral to the affected knee. Superior
aspect of the patella located – line drawn
vertically 1 cm superior to the proximal
margin of the patella - line horizontally along
the posterior edge of the patella. Position the
18-gauge, 1½ in. needle and syringe
perpendicularly to the skin, parallel to the
floor, at a right angle to the other two
previously drawn skin lines and with the tip of
the needle directed medially.
Knee joint – lateral midpatellar approach
■ Locate the lateral aspect of the
patella, then the patient relaxes the
quadriceps muscles, pressure
applied to the medial aspect of the
patella in order to displace it
laterally - sulcus at the midpatella
that develops between the lateral
undersurface of the patella and the
lateral femoral condyle. Position
the 18-gauge, 1½ in. needle and
syringe over the previously marked
injection site in a medial direction
and with the needle tip angled up
underneath the patella and over
the lateral femoral condyle
Knee joint – anteromedial and anterolateral
approaches
■ Palpate the anterior aspect of the knee to locate the patellar tendon. At the
midpoint of the tendon, move about 1 cm medially or laterally. There is
usually a depression at that spot – mark the entry point. Position the 18-
gauge, 1½ in. needle and syringe perpendicular to the skin with the tip of the
needle directed at a 45-degree angle into the center of the knee.
Morton's Neuroma
■ Compression of the interdigital nerves in the
foot can result in a painful condition referred to
as a Morton neuroma - repetitive compressive
injury causing inflammation, perineural fibrosis,
and enlargement of the interdigital nerve.
Patient supine, knees flexed, ankle slightly plantar
flexed. Most tender point palpated in between
heads of metatarsals (sometimes nodule felt) –
point of entry. Needle directed directly between the
metatarsals – injected as a bolus. Massaged once
injected
Plantar fasciitis
■ Repetitive motion injury with inflammation in the origin of the plantar
aponeurosis at the medial tubercle of the calcaneus - usually caused by an
excessive pronation of the foot—especially in persons with pes planus.
■ Identify the point of maximal tenderness
over the plantar aspect of the foot -
usually just medial of midline over the
medial tubercle of the calcaneus. Then
draw a vertical line down the posterior
border of the tibia and a horizontal line
one fingerbreadth above the plantar
surface - the point where these two lines
intersect over the medial aspect of the
foot is the entry point.
■ Needle directed perpendicular to the skin
laterally. Advanced towards medial
tubercle of calcaneus.
MCP JOINT
■ Under image intensifier
guidance, after ring block
anaesthesia, the finger trap is
applied distally. With an
assistant applying traction, a
25G injection needle is
inserted into the joint under
fluoroscopy and the steroid
injected A point just dorsal to
the midlateral position is safe
and easy to enter the joint.
Selective Nerve Root Block (SNRB)
■ Patient positioning- prone on a radiolucent table,
with C-arm fluoroscope on the side opposite to the
affected limb, and the surgeon positioned on the
affected side, anteroposterior (AP) and lateral
views obtained with the C-arm, to obtain a clear
view of the spinous processes, disc spaces, and
pedicle at the level determined clinicoradiologically.
Markings are made over the spinous process in the
midline (AP view). Disc spaces in AP and lateral
view and pedicle in the AP and lateral view. Local
infiltration with 2% xylocaine done in the superficial
and muscular planes at and around the entry
point. Long spinal needle 23G directed at 45°,
introduced from the entry point marked before,
aiming at upper part of neural foramen beneath the
pedicle, under fluoroscopic control in the triangle of
safety.
■ Perineurosheathogram is seen after dye injection.
Christmas tree appearance is seen at the sacral level.
The drug is then injected.
Epidural injection
■ The patient lies on an x-ray table. Local
anesthetic is used to numb the treatment
area so discomfort is minimal throughout
the procedure. With the aid of an x-ray
fluoroscope, the doctor directs a hollow
needle through the skin and between the
bony vertebrae into the epidural space.
Fluoroscopy allows the doctor to watch the
needle in real-time on the x-ray monitor,
ensuring that the needle goes to the
desired location.
■ Lumbar ESI (low back). The needle entry
site is slightly off midline of the back to
reach the nerve canal. Contrast dye is
injected to confirm where the medication
will flow
Epidural injection
■ Caudal ESI (tailbone). The needle is placed in the sacral hiatus above the
tailbone to reach the lowest spinal nerves. Contrast dye is injected to confirm
where the medication will flow.
■ When the needle is correctly positioned, the anesthetic and corticosteroid
medications are injected into the epidural space around the nerve roots. The
needle is then removed. Depending on your pain location, the procedure may be
repeated for left and right sides. One or several spinal levels may be injected
THANK-YOU!

Corticosteroid injection techniques in orthopaedics

  • 1.
    CORTICOSTEROID INJECTIONTECHNIQUES IN ORTHOPAEDICS PRESENTERS: DR.ANMOL MITTAL, DR. SAI PAVAN CHAIRPERSON: DR. S.K. SAIDAPUR
  • 2.
    INTRODUCTION ■ Mainstay oftreatment in many cases of acute or chronic joint or soft tissue pain conditions ■ Mechanism of action – Local – Decreases inflammation in synovial tissues – reduces edema and inflammatory cells in joints. – Systemic – Dose related – decrease in inflammatory markers such as CRP and ESR
  • 3.
    Commonly used depotcorticosteroids ■ Choice of depot corticosteroid varies in terms of – Availability – Versatility – Pharmacokinetics – Cost-effectiveness
  • 4.
    Commonly used injectablecorticosteroids
  • 5.
    Dosage 1. Large: Knee,Shoulder,Ankle and epidural 2. Medium: Elbow and Wrist 3. Small: MCP, facet, acromioclvicular joint
  • 6.
  • 7.
    USES ■ Intra-articular – Acuteknee pain in Osteoarthritis – Rheumatoid Arthritis – Juvenile RA – Crystal deposition diseases – Gout and pseudogout – SLE – Acute traumatic arthritis – Psoriatic arthritis – Ankylosing Spondylitis – Arthritis associated with inflammatory GI disorders – Post – arthroscopic pain relief and rehabilitation – Adhesive capsulitis
  • 8.
    USES ■ Extra-articular – Elbowepicondylitis – Shoulder bursitis – Greater trochanteric bursitis – De Quervain's Tenosynovitis – Pes anserine bursitis – Carpal tunnel syndrome – Finger tenosynovitis – Tarsal tunnel syndrome – Backache – epidural injection, nerve root blocks
  • 9.
    Side effects ■ Local –Post-injection flare: Marked pain at the site of injection/joint – needle puncture/chemical synovitis due to crystals – treated with analgesics, ice packs – Facial flushing – common in women – onset within a few hours of injection – Skin/fat atrophy – common with less soluble agents – Joint sepsis - rare
  • 10.
    Side effects ■ Systemic:influenced by the agent used, dose, frequency and number of joints injected. Generally milder. – Osteoporosis – Corticosteroid induced myopathy – HPA axis suppression – Worsening glucose intolerance
  • 11.
    PREREQUISITES ■ Sterile gloves ■Bactericidal skin preparation – Spirit and Povidone-Iodine ■ Syringes – 5mL ■ 18 gauge and 21 gauge needle ■ Corticosteroid preparation and 1% lidocaine or 0.5% bupivacaine ■ Sterile adhesive bandage
  • 12.
    SHOULDER JOINT ■ Subacromialspace injection ■ Glenohumeral joint injection ■ Acromioclavicular joint injection
  • 13.
    Subacromial space injection ■Indications – Shoulder pain – rotator cuff sprain – Impingement syndrome – Rotator cuff tendinitis ■ Position – Sitting on the examination table, patient's hands folded on lap with fingers interlaced. Clinician stands lateral, finds the lateral and posterior edge of the acromion and marks it, after which a vertical is dropped 2cm below the posterolateral corner and marked.
  • 14.
    Subacromial space injection- Technique ■ Target site is identified by placing the index finger of non dominant hand over the superior aspect of the acromion just posterior to the AC joint
  • 15.
    Subacromial space injection- Technique ■ Preparation, placement of 5ml syringe (containing 3ml of 1% Lignocaine and 1ml of steroid solution) with 25 gauge-2 inches needle at 30 degrees to the skin with direction cephalad towards acromion ■ Advance the needle till it touches the target ie, the undersurface of the acromion. ■ Inject the needle as a bolus into the subacromial space – without resistance ■ After withdrawal – move shoulder through ROM
  • 16.
    Glenohumeral joint injection ■Indications – shoulder pain – Osteoarthritis – Adhesive capsulitis ■ Two approaches – anterior and posterior
  • 17.
    Glenohumeral joint injection- Posterior Approach ■ Position – sitting with hands folded, fingers interlaced. Clinician stands lateral, lateral edge of acromion marked, posterior edge of acromion marked, vertical dropped from 2 cm and point marked. ■ Target site – coracoid process. ■ ● Preparation, needle positioned perpendicular to the skin and directed anterior towards the coracoid process
  • 18.
    Glenohumeral joint injection– Anterior approach ■ Position – Sitting or supine on examination table with hands folded, fingers interlaced and patient's head should be rotated away from the side being injected – minimizes anxiety and pain perception. ■ Clinician stands lateral and anterior to affected shoulder. Coracoid process identified – injection point 1cm lateral to coracoid, marked. Lateral edge of acromion marked, posterior edge of acromion marked – vertical dropped from 2cm downwards – target point. ■ Needle inserted perpendicular at the insertion point towards the target.
  • 20.
    Glenohumeral joint injection ■Aftercare – Shoulder ROM to ensure distribution of the injected solution all over the joint – NSAIDs, Ice compression and physical therapy – Arm sling if required – Follow up after 2 weeks
  • 21.
    Acromioclavicular joint injection ■Indications – AC joint pain – Sprain – Osteoarthritis – Subluxation ■ Patient made to sit/lie supine. Clinician stands anterior and lateral to the patient. Clavicle palpated from medial to lateral till a small tender depression is encountered. ■ Needle positioned perpendicular to the point – inserted till a “drop” is felt. If not, then the needle is made to “walk”.
  • 23.
    Tennis Elbow –Lateral Epicondylitis ■ Supine with head of bed elevated 30 deg. ■ Affected elbow slightly flexed. ■ Wrist in neutral to slightly pronated position with elbow supported with towels and patient's head turned away
  • 24.
    ■ Preparation, needle(5ml syringe containing 1mL of lignocaine + 1mL of steroid solution) placed perpendicular to the entry point – directed medially towards lateral epicondyle. ■ Needle advanced to the bone of the lateral epicondyle and then withdrawn 1-2mm ■ “Pinch” technique then performed followed by injection of the solution. ■ Aftercare – Immediately after injection – Elbow ROM – Use of elastic compression bandage – Avoid excessive elbow and wrist movement – Follow up after 2 weeks
  • 25.
    Trigger Finger –Stenosing tenosynovitis ■ Tendinosis of the flexor tendons of the digits with nodule formation. ■ Supine, wrist in neutral and fully supinated. ■ Mark the tender nodule and 1cm distal to it – entry point. ■ Needle positioned 45 deg to skin, directed proximally, advanced till the needle tip meets the nodule. ■ Move finger through ROM to ensure distribution. ■ Avoid excessive handgrip activities
  • 26.
    De Quervain's Tenosynovitis ■Stenosing tenosynovitis of the first dorsal compartment of the radial side of the wrist – APL, EPB ■ Tender point identified in between APL and EPB – entry point ■ Needle inserted at tender point, positioned proximally 45 degrees – advanced towards the convergence of the tendons and injected  Ensure no excessive wrist flexion or pronation by preferably using wrist thumb spica splint.
  • 27.
    Carpal Tunnel Syndrome ■Traditional Approach: In the traditional approach, the distal palmar crease is identified, the palmaris longus-distal crease intersection identified and a point 1cm proximal and 1cm ulnar to the intersection is marked – the entry point. Needle tip at 30 deg to skin directed to base of thumb. ■ FCR approach: Needle inserted 1cm proximal to the distal palmar crease at the ulnar border of the FCR. Tip directed ulnarly and distally
  • 28.
    Sacroiliac joint injection ■Indications – Sacroilitis, pain, arthritis. Patient stands with back flexed forward 45 deg with hands on examination table.Tender point identified by clinician. ■ Sacroiliac joint injection Needle placed at a 30-degree angle laterally, relative to the sagittal plane, and 15 degrees inferiorly, relative to the transverse plane, with the tip of the needle directed toward the sacroiliac joint.
  • 29.
    Hip injections • optimizepatient positioning by laying them flat and supine on the bed, with a small bolster under the knee and a further bolster on the ipsilateral foot to keep it in internal rotation • optimize imaging field and using the metal rod mark the skin at the target entry point; both ‘eye of the needle’ and oblique needle techniques are used and the lateral femoral neck is the target • clean skin and draw up appropriate medications. consider local anesthesia along the proposed needle path. • under fluoroscopic guidance insert a needle targeting the lateral femoral neck and reach bone • check an intra-articular needle tip position with a small amount of iodinated contrast via connection tubing and save a post-injection image/ video run • administer injectate. remove the needle and apply dressing as required
  • 30.
    Trochanteric bursitis ■ Patientlies in lateral decubitus over the unaffected hip ■ Area of maximal tenderness over the GT – entry point ■ Needle inserted perpendicular towards the trochanter, withdrawn 1-2mm and solution injected ■ After injection – move hip through full ROM or massage to distribute the solution. ■ Consider fanning the injection for wider coverage.
  • 31.
    Knee joint injections ■Indications: – Knee pain – Sprain – osteoarthritis (primary, secondary, post-traumatic) ■ Four approaches commonly used – the extended-knee lateral suprapatellar – extended- knee lateral midpatellar – flexed-knee anteromedial – flexed-knee anterolateral portals.
  • 33.
    Knee joint –Lateral Suprapatellar Approach ■ Supine, knee extended, or slightly flexed and supported with folded towels - clinician stands lateral to the affected knee. Superior aspect of the patella located – line drawn vertically 1 cm superior to the proximal margin of the patella - line horizontally along the posterior edge of the patella. Position the 18-gauge, 1½ in. needle and syringe perpendicularly to the skin, parallel to the floor, at a right angle to the other two previously drawn skin lines and with the tip of the needle directed medially.
  • 34.
    Knee joint –lateral midpatellar approach ■ Locate the lateral aspect of the patella, then the patient relaxes the quadriceps muscles, pressure applied to the medial aspect of the patella in order to displace it laterally - sulcus at the midpatella that develops between the lateral undersurface of the patella and the lateral femoral condyle. Position the 18-gauge, 1½ in. needle and syringe over the previously marked injection site in a medial direction and with the needle tip angled up underneath the patella and over the lateral femoral condyle
  • 35.
    Knee joint –anteromedial and anterolateral approaches ■ Palpate the anterior aspect of the knee to locate the patellar tendon. At the midpoint of the tendon, move about 1 cm medially or laterally. There is usually a depression at that spot – mark the entry point. Position the 18- gauge, 1½ in. needle and syringe perpendicular to the skin with the tip of the needle directed at a 45-degree angle into the center of the knee.
  • 37.
    Morton's Neuroma ■ Compressionof the interdigital nerves in the foot can result in a painful condition referred to as a Morton neuroma - repetitive compressive injury causing inflammation, perineural fibrosis, and enlargement of the interdigital nerve. Patient supine, knees flexed, ankle slightly plantar flexed. Most tender point palpated in between heads of metatarsals (sometimes nodule felt) – point of entry. Needle directed directly between the metatarsals – injected as a bolus. Massaged once injected
  • 38.
    Plantar fasciitis ■ Repetitivemotion injury with inflammation in the origin of the plantar aponeurosis at the medial tubercle of the calcaneus - usually caused by an excessive pronation of the foot—especially in persons with pes planus.
  • 39.
    ■ Identify thepoint of maximal tenderness over the plantar aspect of the foot - usually just medial of midline over the medial tubercle of the calcaneus. Then draw a vertical line down the posterior border of the tibia and a horizontal line one fingerbreadth above the plantar surface - the point where these two lines intersect over the medial aspect of the foot is the entry point. ■ Needle directed perpendicular to the skin laterally. Advanced towards medial tubercle of calcaneus.
  • 40.
    MCP JOINT ■ Underimage intensifier guidance, after ring block anaesthesia, the finger trap is applied distally. With an assistant applying traction, a 25G injection needle is inserted into the joint under fluoroscopy and the steroid injected A point just dorsal to the midlateral position is safe and easy to enter the joint.
  • 42.
    Selective Nerve RootBlock (SNRB) ■ Patient positioning- prone on a radiolucent table, with C-arm fluoroscope on the side opposite to the affected limb, and the surgeon positioned on the affected side, anteroposterior (AP) and lateral views obtained with the C-arm, to obtain a clear view of the spinous processes, disc spaces, and pedicle at the level determined clinicoradiologically. Markings are made over the spinous process in the midline (AP view). Disc spaces in AP and lateral view and pedicle in the AP and lateral view. Local infiltration with 2% xylocaine done in the superficial and muscular planes at and around the entry point. Long spinal needle 23G directed at 45°, introduced from the entry point marked before, aiming at upper part of neural foramen beneath the pedicle, under fluoroscopic control in the triangle of safety.
  • 43.
    ■ Perineurosheathogram isseen after dye injection. Christmas tree appearance is seen at the sacral level. The drug is then injected.
  • 44.
    Epidural injection ■ Thepatient lies on an x-ray table. Local anesthetic is used to numb the treatment area so discomfort is minimal throughout the procedure. With the aid of an x-ray fluoroscope, the doctor directs a hollow needle through the skin and between the bony vertebrae into the epidural space. Fluoroscopy allows the doctor to watch the needle in real-time on the x-ray monitor, ensuring that the needle goes to the desired location. ■ Lumbar ESI (low back). The needle entry site is slightly off midline of the back to reach the nerve canal. Contrast dye is injected to confirm where the medication will flow
  • 45.
    Epidural injection ■ CaudalESI (tailbone). The needle is placed in the sacral hiatus above the tailbone to reach the lowest spinal nerves. Contrast dye is injected to confirm where the medication will flow. ■ When the needle is correctly positioned, the anesthetic and corticosteroid medications are injected into the epidural space around the nerve roots. The needle is then removed. Depending on your pain location, the procedure may be repeated for left and right sides. One or several spinal levels may be injected
  • 46.