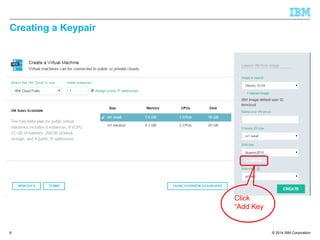
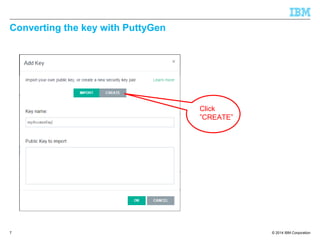
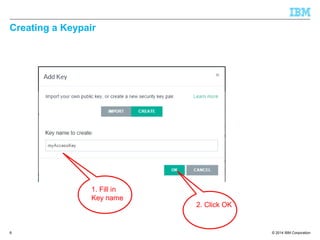
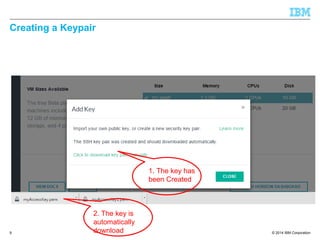
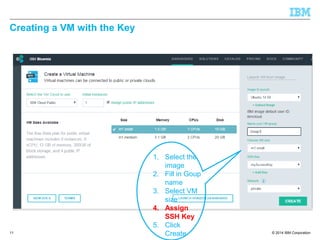
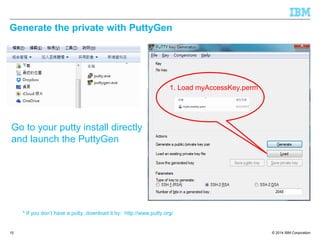
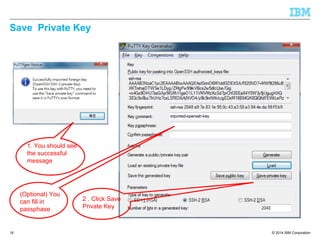
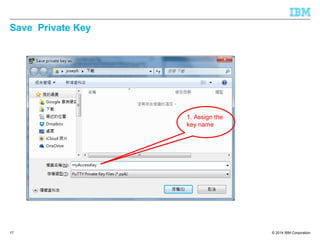
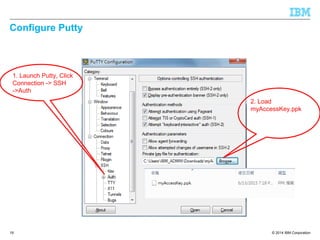
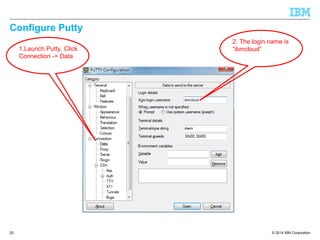
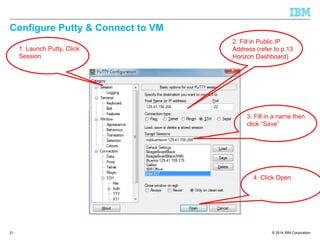
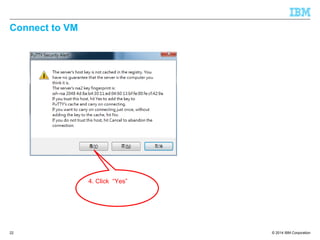
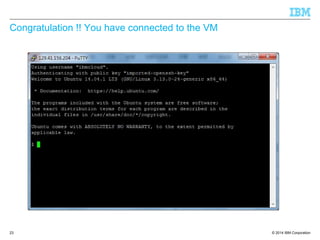
© 2014 IBM Corporation
Connect to
Bluemix VM with Putty
Joseph Chang
Senior IT Specialist
IBM Cloud Group
Document number
© 2014 IBM Corporation
Reference:
https://github.com/davidheijkamp/docs/wiki/Howto:-Creating-and-using-
OpenStack---SSH-keypairs-on-Windows
2
Take me to Bluemix
Click Here
© 2014 IBM Corporation
Sign up or Log in in to Bluemix
3
Sign up if you
are new to
Bluemix
© 2014 IBM Corporation
Launch Dashboard
4
Click on
VIRTUAL
MACHINE
© 2014 IBM Corporation
Creating a Key
5
© 2014 IBM Corporation
Creating a Keypair
6
Click
“Add Key
© 2014 IBM Corporation
Converting the key with PuttyGen
7
Click
”CREATE”
© 2014 IBM Corporation
Creating a Keypair
8
1. Fill in
Key name
2. Click OK
© 2014 IBM Corporation
Creating a Keypair
9
1. The key has
been Created
2. The key is
automatically
download
© 2014 IBM Corporation
Creating a VM with the Key
10
© 2014 IBM Corporation
Creating a VM with the Key
11
1. Select the
image
2. Fill in Goup
name
3. Select VM
size
4. Assign
SSH Key
5. Click
Create
© 2014 IBM Corporation
View the VM Configuration
12
The VM has
been Created
© 2014 IBM Corporation
View the VM with Openstack Horizon Dashboard
13
1. Refer to p6. There is a button
name “Launch Horizon Dashboard.
You can get more information
about you VM from this dashboard
2. Take note
for the Public
IP
© 2014 IBM Corporation
Import the Key to Putty
14
© 2014 IBM Corporation
Generate the private with PuttyGen
15
Go to your putty install directly
and launch the PuttyGen
* If you don’t have a putty, download it by: http://www.putty.org/
1. Load myAccessKey.perm
© 2014 IBM Corporation
Save Private Key
16
1. You should see
the successful
message
2 . Click Save
Private Key
(Optional) You
can fill in
passphase
© 2014 IBM Corporation
Save Private Key
17
1. Assign the
key name
© 2014 IBM Corporation
Configure Putty
18
© 2014 IBM Corporation
Configure Putty
19
1. Launch Putty, Click
Connection -> SSH
->Auth
2. Load
myAccessKey.ppk
© 2014 IBM Corporation
Configure Putty
20
1.Launch Putty, Click
Connection -> Data
2. The login name is
“ibmcloud”
© 2014 IBM Corporation
Configure Putty & Connect to VM
21
1. Launch Putty, Click
Session
2. Fill in Public IP
Address (refer to p.13
Horizon Dashboard)
3. Fill in a name then
click “Save”
4. Click Open
© 2014 IBM Corporation
Connect to VM
22
4. Click “Yes”
© 2014 IBM Corporation
Congratulation !! You have connected to the VM
23
© 2014 IBM Corporation
Thank you
24
Take me to Bluemix
Click Here

Connect to blumix vm with putty

  • 1.
    © 2014 IBMCorporation Connect to Bluemix VM with Putty Joseph Chang Senior IT Specialist IBM Cloud Group Document number
  • 2.
    © 2014 IBMCorporation Reference: https://github.com/davidheijkamp/docs/wiki/Howto:-Creating-and-using- OpenStack---SSH-keypairs-on-Windows 2 Take me to Bluemix Click Here
  • 3.
    © 2014 IBMCorporation Sign up or Log in in to Bluemix 3 Sign up if you are new to Bluemix
  • 4.
    © 2014 IBMCorporation Launch Dashboard 4 Click on VIRTUAL MACHINE
  • 5.
    © 2014 IBMCorporation Creating a Key 5
  • 6.
    © 2014 IBMCorporation Creating a Keypair 6 Click “Add Key
  • 7.
    © 2014 IBMCorporation Converting the key with PuttyGen 7 Click ”CREATE”
  • 8.
    © 2014 IBMCorporation Creating a Keypair 8 1. Fill in Key name 2. Click OK
  • 9.
    © 2014 IBMCorporation Creating a Keypair 9 1. The key has been Created 2. The key is automatically download
  • 10.
    © 2014 IBMCorporation Creating a VM with the Key 10
  • 11.
    © 2014 IBMCorporation Creating a VM with the Key 11 1. Select the image 2. Fill in Goup name 3. Select VM size 4. Assign SSH Key 5. Click Create
  • 12.
    © 2014 IBMCorporation View the VM Configuration 12 The VM has been Created
  • 13.
    © 2014 IBMCorporation View the VM with Openstack Horizon Dashboard 13 1. Refer to p6. There is a button name “Launch Horizon Dashboard. You can get more information about you VM from this dashboard 2. Take note for the Public IP
  • 14.
    © 2014 IBMCorporation Import the Key to Putty 14
  • 15.
    © 2014 IBMCorporation Generate the private with PuttyGen 15 Go to your putty install directly and launch the PuttyGen * If you don’t have a putty, download it by: http://www.putty.org/ 1. Load myAccessKey.perm
  • 16.
    © 2014 IBMCorporation Save Private Key 16 1. You should see the successful message 2 . Click Save Private Key (Optional) You can fill in passphase
  • 17.
    © 2014 IBMCorporation Save Private Key 17 1. Assign the key name
  • 18.
    © 2014 IBMCorporation Configure Putty 18
  • 19.
    © 2014 IBMCorporation Configure Putty 19 1. Launch Putty, Click Connection -> SSH ->Auth 2. Load myAccessKey.ppk
  • 20.
    © 2014 IBMCorporation Configure Putty 20 1.Launch Putty, Click Connection -> Data 2. The login name is “ibmcloud”
  • 21.
    © 2014 IBMCorporation Configure Putty & Connect to VM 21 1. Launch Putty, Click Session 2. Fill in Public IP Address (refer to p.13 Horizon Dashboard) 3. Fill in a name then click “Save” 4. Click Open
  • 22.
    © 2014 IBMCorporation Connect to VM 22 4. Click “Yes”
  • 23.
    © 2014 IBMCorporation Congratulation !! You have connected to the VM 23
  • 24.
    © 2014 IBMCorporation Thank you 24 Take me to Bluemix Click Here