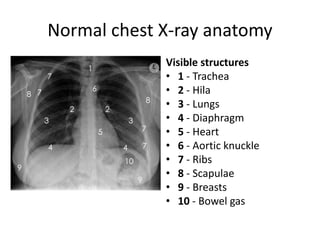
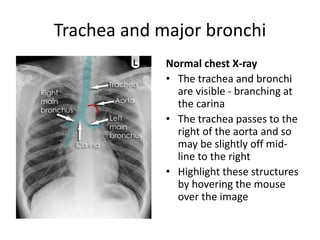
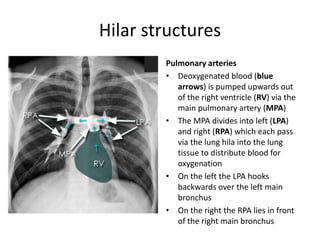
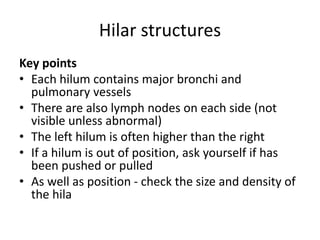
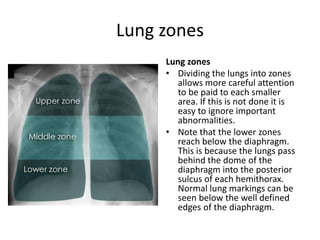
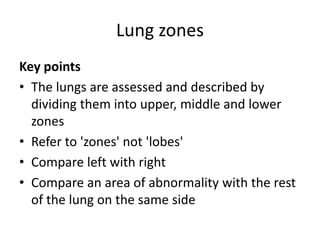
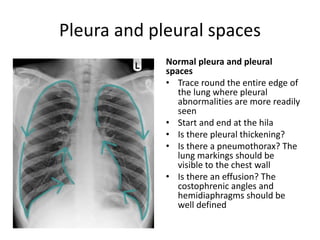
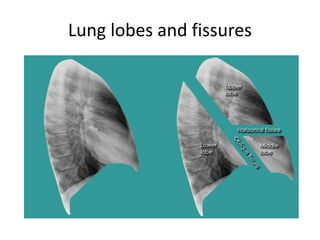
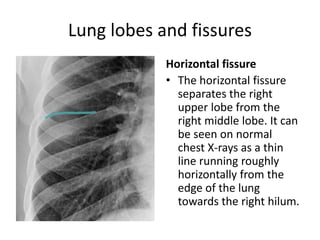
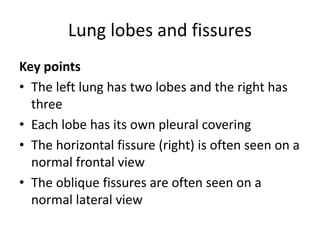
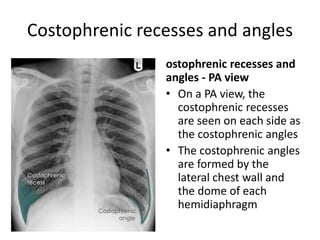
Chest X-Ray Anatomy
Normal chest X-ray anatomy
Visible structures
• 1 - Trachea
• 2 - Hila
• 3 - Lungs
• 4 - Diaphragm
• 5 - Heart
• 6 - Aortic knuckle
• 7 - Ribs
• 8 - Scapulae
• 9 - Breasts
• 10 - Bowel gas
Normal chest X-ray anatomy
Key points
• Some anatomical structures in the chest
should be assessed on every chest X-ray
• Each of these anatomical structures should be
viewed using a systematic approach
• There are also important structures that are
obscured or become visible only when
abnormal
Trachea and major bronchi
Normal chest X-ray
• The trachea and bronchi
are visible - branching at
the carina
• The trachea passes to the
right of the aorta and so
may be slightly off mid-
line to the right
• Highlight these structures
by hovering the mouse
over the image
Trachea and major bronchi
Key points
• The large airways contain air and are therefore
less dense (blacker) than surrounding tissue
• The trachea should be central
Hilar structures
Normal hilar position
• By convention the hilar
points are the angle formed
by the descending upper
lobe veins, as they cross
behind the lower lobe
arteries
• Not every normal patient
has a very clear hilar point
on both sides, but if they
are present then they can
be useful in determining the
position of the hila
Hilar structures
Pulmonary arteries
• Deoxygenated blood (blue
arrows) is pumped upwards out
of the right ventricle (RV) via the
main pulmonary artery (MPA)
• The MPA divides into left (LPA)
and right (RPA) which each pass
via the lung hila into the lung
tissue to distribute blood for
oxygenation
• On the left the LPA hooks
backwards over the left main
bronchus
• On the right the RPA lies in front
of the right main bronchus
Hilar structures
Key points
• Each hilum contains major bronchi and
pulmonary vessels
• There are also lymph nodes on each side (not
visible unless abnormal)
• The left hilum is often higher than the right
• If a hilum is out of position, ask yourself if has
been pushed or pulled
• As well as position - check the size and density of
the hila
Lung zones
Lung zones
• Dividing the lungs into zones
allows more careful attention
to be paid to each smaller
area. If this is not done it is
easy to ignore important
abnormalities.
• Note that the lower zones
reach below the diaphragm.
This is because the lungs pass
behind the dome of the
diaphragm into the posterior
sulcus of each hemithorax.
Normal lung markings can be
seen below the well defined
edges of the diaphragm.
Lung zones
Key points
• The lungs are assessed and described by
dividing them into upper, middle and lower
zones
• Refer to 'zones' not 'lobes'
• Compare left with right
• Compare an area of abnormality with the rest
of the lung on the same side
Pleura and pleural spaces
Normal pleura and pleural
spaces
• Trace round the entire edge of
the lung where pleural
abnormalities are more readily
seen
• Start and end at the hila
• Is there pleural thickening?
• Is there a pneumothorax? The
lung markings should be
visible to the chest wall
• Is there an effusion? The
costophrenic angles and
hemidiaphragms should be
well defined
Pleura and pleural spaces
Key points
• The pleura and pleural spaces are only visible
when abnormal
• Lung markings should reach the thoracic wall
Lung lobes and fissures
Horizontal fissure
• The horizontal fissure
separates the right
upper lobe from the
right middle lobe. It can
be seen on normal
chest X-rays as a thin
line running roughly
horizontally from the
edge of the lung
towards the right hilum.
Lung lobes and fissures
Oblique fissures
• The oblique fissures
overlie each other on a
lateral view and are not
always seen in entirety.
If seen at all, the lower
end is usually seen most
clearly, as on this X-ray.
Lung lobes and fissures
Accessory fissures
• The most common accessory fissure you
will see on a chest X-ray is an azygos
fissure. This occurs in approximately 1-2%
of individuals.
• The azygos vein usually runs horizontally
along the right side of the mediastinum. It
hooks forwards over the right main
bronchus, draining the azygos system into
the superior vena cava.
• If there is an azygos fissure, the vein
appears to run within the lung, but is
actually surrounded by both parietal and
visceral pleura. The azygos fissure
therefore consists of four layers of pleura,
two parietal layers and two visceral layers,
which wrap around the vein giving the
appearance of a tadpole.
Lung lobes and fissures
Key points
• The left lung has two lobes and the right has
three
• Each lobe has its own pleural covering
• The horizontal fissure (right) is often seen on a
normal frontal view
• The oblique fissures are often seen on a
normal lateral view
Costophrenic recesses and angles
ostophrenic recesses and
angles - PA view
• On a PA view, the
costophrenic recesses
are seen on each side as
the costophrenic angles
• The costophrenic angles
are formed by the
lateral chest wall and
the dome of each
hemidiaphragm
Costophrenic recesses and angles
Costophrenic recesses
and angles - lateral view
• On a lateral view the
costophrenic recesses
are seen in the region
of the anterior and
posterior costophrenic
angles formed by the
chest wall and the
dome of each
hemidiaphragm.
Costophrenic recesses and angles
Key points
• The costophrenic angles are limited views of
the costophrenic recess
• On a frontal view the costophrenic angles
should be sharp
Diaphragm
Hemidiaphragms
• The right hemidiaphragm is slightly
higher than the left
• The liver is located immediately
inferior to the diaphragm on the
right
• The stomach bubble can be seen
below the left hemidiaphragm
• If you look closely you can see lung
markings below the diaphragm on
both sides
• Medially the hemidiaphragms form
an angle with the heart - the
cardiophrenic angles (asterisks)
• On both sides the contour of the
hemidiaphragm should be seen
passing medially as far as the spine
Diaphragm
Hemidiaphragms - lateral
view
• The left and right
hemidiaphragms are
almost superimposed
on a lateral view.
Anteriorly the left
hemidiaphragm blends
with the heart and
becomes indistinct.
Diaphragm
Key points
• The hemidiaphragms are domed structures
• Each hemidiaphragm should be well defined
• The left hemidiaphragm should be visible
behind the heart
• The hemidiaphragm contours do not
represent the lowest part of the lungs
Heart size and contours
Cardiothoracic ratio (CTR)
• Cardiac size is measured by
drawing vertical parallel lines
down the most lateral points on
each side of the heart, and
measuring between them.
• Thoracic width is measured by
drawing vertical parallel lines
down the inner aspect of the
widest points of the rib cage, and
measuring between them.
• The cardio-thoracic ratio can then
be calculated.
• Here the CTR is approximately 15
: 33 (cm) and is therefore within
the normal limit of 50%.
Heart size and contours
Key points
• The heart size is assessed as the
cardiothoracic ratio (CTR)
• A CTR of >50% is abnormal - PA view only
• The left hemidiaphragm should be visible
behind the heart
• The hemidiaphragm contours do not
represent the lowest part of the lungs
Heart size and contours
Normal cardiac contours
• The left heart contour
(red line) consists of the
left lateral border of the
Left Ventricle (LV). The
right heart contour is
the right lateral border
of the Right Atrium
(RA).
Mediastinal contours
Normal aortic knuckle
• The aortic knuckle (red line)
represents the left lateral edge
of the aorta as it arches
backwards over the left main
bronchus, and pulmonary
vessels. The contour of the
descending thoracic aorta
(yellow line) can be seen in
continuation from the aortic
knuckle.
• Displacement or loss of
definition of these lines can
indicate disease, such as
aneurysm or adjacent lung
consolidation.
Mediastinal contours
Aorto-pulmonary window
• The aorto-pulmonary window lies
between the arch of the aorta
and the pulmonary arteries. This
is a potential space in the
mediastinum where abnormal
enlargement of lymph nodes can
be seen on a chest X-ray.
• In this chest X-ray, which is
entirely normal, the curved arrow
points towards the aorto-
pulmonary window between the
Aortic Knuckle (AK) and the Left
Pulmonary Artery (LPA).
• (AA) = Ascending Aorta
• (DA) = Descending Aorta
Mediastinal contours
Right para-tracheal stripe
• From the level of the clavicles to
the azygos vein the right edge of
the trachea is seen as a thin white
stripe. This appearance is created
by air of low density (blacker) lying
either side of the comparatively
dense (whiter) tracheal wall. If this
stripe is thickened (normally less
than 3mm) this may represent
pathology such as a paratracheal
mass or enlarged lymph node.
• The left side of the trachea is not
so well defined because of the
position of the aortic arch and
great vessels.
Mediastinal contours
Key points
• The mediastinum consists of potential spaces
used to describe the location of disease
processes
• The middle mediastinum contains the heart
• Important diseases change the appearance of
the aortic knuckle, the aorto-pulmonary
window and the right para-tracheal stripe
Soft tissues
Breast asymmetry
• Here the breasts are
asymmetric. The underlying
lung markings (white boxes)
appear denser on the left than
the right. This should not be
mistaken for underlying lung
disease.
• Breast asymmetry is very
common, even to the extent
that no breast tissue is visible
on one side. It should not be
assumed that the patient has
had a mastectomy, unless this
is known from the history.
Soft tissues
Nipple markings
• The nipples are clearly seen
on this chest X-ray, but care
is needed whenever there is
a chance that the markings
may represent underlying
lung nodules. If there is any
doubt then a repeat chest
X-ray should be performed,
with metallic markers used
to indicate the position of
the nipples.
Soft tissues
Pseudo-blunting of the costophrenic
angle
• At first glance the left
costophrenic angle appears blunt.
This is because the patient was in
a rotated position when the X-ray
was taken. This has resulted in a
greater thickness of breast
overlying the costophrenic angle
on the left, compared to the
right.
• If you are not careful you may be
misled into thinking there is a
pleural effusion or other
pathology causing costophrenic
angle blunting.
Soft tissues
Soft tissue fat
• This close-up demonstrates
a normal fat plane between
layers of muscle. Fat is less
dense than muscle and so
appears blacker.
• Note that the edge of fat is
smooth. Irregular areas of
black within the soft tissues
may represent air tracking
in the subcutaneous layers
(surgical emphesyma).
Soft tissues
Key points
• Assess the soft tissues on every chest X-ray
• Thick soft tissue may obscure underlying
structures
• Black within soft tissue may represent gas
Bones
Clavicles, spinous processes and
ribs
• The spinous processes of the
vertebrae (posterior
structures) should lie midway
between the medial ends of
the clavicles (anterior
structures).
• If the spinous processes are
not central, then the patient is
rotated - positioned obliquely
to the X-ray beam.
• The anterior and posterior
ends of the 5th rib are also
shown.
Bones
Clavicle, scapula, and humerus
• The clavicle, scapula and humerus
are often clearly seen on a chest X-
ray. Occasionally you will see
evidence of important disease such
as metastases in these bones.
Key
• 1 - Clavicle
• 2 - Acromioclavicular joint
• 3 - Acromion process of scapula
• 4 - Body of scapula
• 5 - Glenoid fossa of scapula
• 6 - Head of left humerus
• 7 - Glenohumeral joint
• 8 - Coracoid process of scapula
Bones
Ribs
• The ribs play a role in assessing the adequacy
of inspiration taken by the patient. The
anterior end of approximately 5-7 ribs should
be visible above the diaphragm in the mid-
clavicular line. Less than this indicates an
incomplete breath in, and more than 7 ribs
or flattening of the diaphragm, suggests lung
hyper-expansion.
• On this normal X-ray the anterior end of the
7th rib (asterisk) intersects the diaphragm at
the mid-clavicular line.
• This chest X-ray also demonstrates the
subcostal grooves (red highlights) on the
underside of the ribs. These grooves contain
the neurovascular bundles that accompany
each rib. To avoid damaging the nerves or
vessels, the superior edge of a rib is used as
the landmark for needle insertion during
procedures such as chest drain insertion.
• Note: The spine can be seen through the
heart, indicating adequate X-ray penetration.
Bones
Key points
• Assess the bones on every chest X-ray
• Check for abnormalities of single bones and
for diffuse bone disease
• The bones are helpful in assessing the quality
of the chest X-ray
Tutorial conclusion
Key points
• Some anatomical structures in the chest
should be assessed on every chest X-ray
• Each of these anatomical structures should be
viewed using a systematic approach
• There are also important structures that are
obscured or become visible only when
abnormal
Reference
Chest X-ray Anatomy
https://www.radiologymasterclass.co.uk/tutorials/chest/chest_h
ome_anatomy/chest_anatomy_start

Chest X-Ray Anatomy.

  • 1.
  • 2.
    Normal chest X-rayanatomy Visible structures • 1 - Trachea • 2 - Hila • 3 - Lungs • 4 - Diaphragm • 5 - Heart • 6 - Aortic knuckle • 7 - Ribs • 8 - Scapulae • 9 - Breasts • 10 - Bowel gas
  • 3.
    Normal chest X-rayanatomy Key points • Some anatomical structures in the chest should be assessed on every chest X-ray • Each of these anatomical structures should be viewed using a systematic approach • There are also important structures that are obscured or become visible only when abnormal
  • 4.
    Trachea and majorbronchi Normal chest X-ray • The trachea and bronchi are visible - branching at the carina • The trachea passes to the right of the aorta and so may be slightly off mid- line to the right • Highlight these structures by hovering the mouse over the image
  • 5.
    Trachea and majorbronchi Key points • The large airways contain air and are therefore less dense (blacker) than surrounding tissue • The trachea should be central
  • 6.
    Hilar structures Normal hilarposition • By convention the hilar points are the angle formed by the descending upper lobe veins, as they cross behind the lower lobe arteries • Not every normal patient has a very clear hilar point on both sides, but if they are present then they can be useful in determining the position of the hila
  • 7.
    Hilar structures Pulmonary arteries •Deoxygenated blood (blue arrows) is pumped upwards out of the right ventricle (RV) via the main pulmonary artery (MPA) • The MPA divides into left (LPA) and right (RPA) which each pass via the lung hila into the lung tissue to distribute blood for oxygenation • On the left the LPA hooks backwards over the left main bronchus • On the right the RPA lies in front of the right main bronchus
  • 8.
    Hilar structures Key points •Each hilum contains major bronchi and pulmonary vessels • There are also lymph nodes on each side (not visible unless abnormal) • The left hilum is often higher than the right • If a hilum is out of position, ask yourself if has been pushed or pulled • As well as position - check the size and density of the hila
  • 9.
    Lung zones Lung zones •Dividing the lungs into zones allows more careful attention to be paid to each smaller area. If this is not done it is easy to ignore important abnormalities. • Note that the lower zones reach below the diaphragm. This is because the lungs pass behind the dome of the diaphragm into the posterior sulcus of each hemithorax. Normal lung markings can be seen below the well defined edges of the diaphragm.
  • 10.
    Lung zones Key points •The lungs are assessed and described by dividing them into upper, middle and lower zones • Refer to 'zones' not 'lobes' • Compare left with right • Compare an area of abnormality with the rest of the lung on the same side
  • 11.
    Pleura and pleuralspaces Normal pleura and pleural spaces • Trace round the entire edge of the lung where pleural abnormalities are more readily seen • Start and end at the hila • Is there pleural thickening? • Is there a pneumothorax? The lung markings should be visible to the chest wall • Is there an effusion? The costophrenic angles and hemidiaphragms should be well defined
  • 12.
    Pleura and pleuralspaces Key points • The pleura and pleural spaces are only visible when abnormal • Lung markings should reach the thoracic wall
  • 13.
  • 14.
    Lung lobes andfissures Horizontal fissure • The horizontal fissure separates the right upper lobe from the right middle lobe. It can be seen on normal chest X-rays as a thin line running roughly horizontally from the edge of the lung towards the right hilum.
  • 15.
    Lung lobes andfissures Oblique fissures • The oblique fissures overlie each other on a lateral view and are not always seen in entirety. If seen at all, the lower end is usually seen most clearly, as on this X-ray.
  • 16.
    Lung lobes andfissures Accessory fissures • The most common accessory fissure you will see on a chest X-ray is an azygos fissure. This occurs in approximately 1-2% of individuals. • The azygos vein usually runs horizontally along the right side of the mediastinum. It hooks forwards over the right main bronchus, draining the azygos system into the superior vena cava. • If there is an azygos fissure, the vein appears to run within the lung, but is actually surrounded by both parietal and visceral pleura. The azygos fissure therefore consists of four layers of pleura, two parietal layers and two visceral layers, which wrap around the vein giving the appearance of a tadpole.
  • 17.
    Lung lobes andfissures Key points • The left lung has two lobes and the right has three • Each lobe has its own pleural covering • The horizontal fissure (right) is often seen on a normal frontal view • The oblique fissures are often seen on a normal lateral view
  • 18.
    Costophrenic recesses andangles ostophrenic recesses and angles - PA view • On a PA view, the costophrenic recesses are seen on each side as the costophrenic angles • The costophrenic angles are formed by the lateral chest wall and the dome of each hemidiaphragm
  • 19.
    Costophrenic recesses andangles Costophrenic recesses and angles - lateral view • On a lateral view the costophrenic recesses are seen in the region of the anterior and posterior costophrenic angles formed by the chest wall and the dome of each hemidiaphragm.
  • 20.
    Costophrenic recesses andangles Key points • The costophrenic angles are limited views of the costophrenic recess • On a frontal view the costophrenic angles should be sharp
  • 21.
    Diaphragm Hemidiaphragms • The righthemidiaphragm is slightly higher than the left • The liver is located immediately inferior to the diaphragm on the right • The stomach bubble can be seen below the left hemidiaphragm • If you look closely you can see lung markings below the diaphragm on both sides • Medially the hemidiaphragms form an angle with the heart - the cardiophrenic angles (asterisks) • On both sides the contour of the hemidiaphragm should be seen passing medially as far as the spine
  • 22.
    Diaphragm Hemidiaphragms - lateral view •The left and right hemidiaphragms are almost superimposed on a lateral view. Anteriorly the left hemidiaphragm blends with the heart and becomes indistinct.
  • 23.
    Diaphragm Key points • Thehemidiaphragms are domed structures • Each hemidiaphragm should be well defined • The left hemidiaphragm should be visible behind the heart • The hemidiaphragm contours do not represent the lowest part of the lungs
  • 24.
    Heart size andcontours Cardiothoracic ratio (CTR) • Cardiac size is measured by drawing vertical parallel lines down the most lateral points on each side of the heart, and measuring between them. • Thoracic width is measured by drawing vertical parallel lines down the inner aspect of the widest points of the rib cage, and measuring between them. • The cardio-thoracic ratio can then be calculated. • Here the CTR is approximately 15 : 33 (cm) and is therefore within the normal limit of 50%.
  • 25.
    Heart size andcontours Key points • The heart size is assessed as the cardiothoracic ratio (CTR) • A CTR of >50% is abnormal - PA view only • The left hemidiaphragm should be visible behind the heart • The hemidiaphragm contours do not represent the lowest part of the lungs
  • 26.
    Heart size andcontours Normal cardiac contours • The left heart contour (red line) consists of the left lateral border of the Left Ventricle (LV). The right heart contour is the right lateral border of the Right Atrium (RA).
  • 27.
    Mediastinal contours Normal aorticknuckle • The aortic knuckle (red line) represents the left lateral edge of the aorta as it arches backwards over the left main bronchus, and pulmonary vessels. The contour of the descending thoracic aorta (yellow line) can be seen in continuation from the aortic knuckle. • Displacement or loss of definition of these lines can indicate disease, such as aneurysm or adjacent lung consolidation.
  • 28.
    Mediastinal contours Aorto-pulmonary window •The aorto-pulmonary window lies between the arch of the aorta and the pulmonary arteries. This is a potential space in the mediastinum where abnormal enlargement of lymph nodes can be seen on a chest X-ray. • In this chest X-ray, which is entirely normal, the curved arrow points towards the aorto- pulmonary window between the Aortic Knuckle (AK) and the Left Pulmonary Artery (LPA). • (AA) = Ascending Aorta • (DA) = Descending Aorta
  • 29.
    Mediastinal contours Right para-trachealstripe • From the level of the clavicles to the azygos vein the right edge of the trachea is seen as a thin white stripe. This appearance is created by air of low density (blacker) lying either side of the comparatively dense (whiter) tracheal wall. If this stripe is thickened (normally less than 3mm) this may represent pathology such as a paratracheal mass or enlarged lymph node. • The left side of the trachea is not so well defined because of the position of the aortic arch and great vessels.
  • 30.
    Mediastinal contours Key points •The mediastinum consists of potential spaces used to describe the location of disease processes • The middle mediastinum contains the heart • Important diseases change the appearance of the aortic knuckle, the aorto-pulmonary window and the right para-tracheal stripe
  • 31.
    Soft tissues Breast asymmetry •Here the breasts are asymmetric. The underlying lung markings (white boxes) appear denser on the left than the right. This should not be mistaken for underlying lung disease. • Breast asymmetry is very common, even to the extent that no breast tissue is visible on one side. It should not be assumed that the patient has had a mastectomy, unless this is known from the history.
  • 32.
    Soft tissues Nipple markings •The nipples are clearly seen on this chest X-ray, but care is needed whenever there is a chance that the markings may represent underlying lung nodules. If there is any doubt then a repeat chest X-ray should be performed, with metallic markers used to indicate the position of the nipples.
  • 33.
    Soft tissues Pseudo-blunting ofthe costophrenic angle • At first glance the left costophrenic angle appears blunt. This is because the patient was in a rotated position when the X-ray was taken. This has resulted in a greater thickness of breast overlying the costophrenic angle on the left, compared to the right. • If you are not careful you may be misled into thinking there is a pleural effusion or other pathology causing costophrenic angle blunting.
  • 34.
    Soft tissues Soft tissuefat • This close-up demonstrates a normal fat plane between layers of muscle. Fat is less dense than muscle and so appears blacker. • Note that the edge of fat is smooth. Irregular areas of black within the soft tissues may represent air tracking in the subcutaneous layers (surgical emphesyma).
  • 35.
    Soft tissues Key points •Assess the soft tissues on every chest X-ray • Thick soft tissue may obscure underlying structures • Black within soft tissue may represent gas
  • 36.
    Bones Clavicles, spinous processesand ribs • The spinous processes of the vertebrae (posterior structures) should lie midway between the medial ends of the clavicles (anterior structures). • If the spinous processes are not central, then the patient is rotated - positioned obliquely to the X-ray beam. • The anterior and posterior ends of the 5th rib are also shown.
  • 37.
    Bones Clavicle, scapula, andhumerus • The clavicle, scapula and humerus are often clearly seen on a chest X- ray. Occasionally you will see evidence of important disease such as metastases in these bones. Key • 1 - Clavicle • 2 - Acromioclavicular joint • 3 - Acromion process of scapula • 4 - Body of scapula • 5 - Glenoid fossa of scapula • 6 - Head of left humerus • 7 - Glenohumeral joint • 8 - Coracoid process of scapula
  • 38.
    Bones Ribs • The ribsplay a role in assessing the adequacy of inspiration taken by the patient. The anterior end of approximately 5-7 ribs should be visible above the diaphragm in the mid- clavicular line. Less than this indicates an incomplete breath in, and more than 7 ribs or flattening of the diaphragm, suggests lung hyper-expansion. • On this normal X-ray the anterior end of the 7th rib (asterisk) intersects the diaphragm at the mid-clavicular line. • This chest X-ray also demonstrates the subcostal grooves (red highlights) on the underside of the ribs. These grooves contain the neurovascular bundles that accompany each rib. To avoid damaging the nerves or vessels, the superior edge of a rib is used as the landmark for needle insertion during procedures such as chest drain insertion. • Note: The spine can be seen through the heart, indicating adequate X-ray penetration.
  • 39.
    Bones Key points • Assessthe bones on every chest X-ray • Check for abnormalities of single bones and for diffuse bone disease • The bones are helpful in assessing the quality of the chest X-ray
  • 40.
    Tutorial conclusion Key points •Some anatomical structures in the chest should be assessed on every chest X-ray • Each of these anatomical structures should be viewed using a systematic approach • There are also important structures that are obscured or become visible only when abnormal
  • 41.