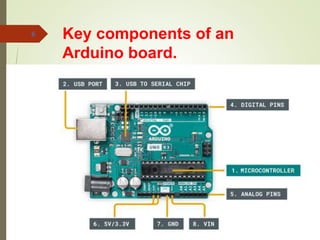
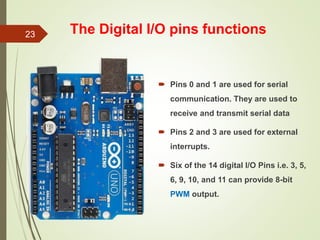
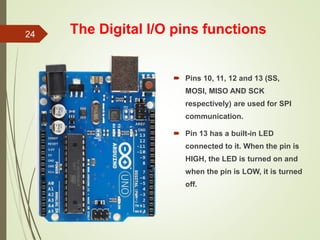
SlideShare a Scribd company logo
CNET 315
Microprocessor & Assembly
Language
Phiros Mansur Nalakath
Course Coordinator
College of Computer Science & Information Technology,
Jazan University, KSA
1
Chapter - 5
Arduino Microcontroller
Systems
2
What is Arduino?
3
 Arduino is an open-source prototyping platform in
electronics based on easy-to-use hardware and
software.
 Arduino is a microcontroller based prototyping board
which can be used in developing digital devices that
can read inputs like finger on a button, touch on a
screen, light on a sensor etc.
 Turning it in to output like switching on an LED,
rotating a motor, playing songs through a speaker etc.
Introduction to Arduino
Board
 The Arduino board can be programmed to do
anything by simply programming the
microcontroller on board using a set of instructions
 Arduino board consists of a USB plug to
communicate with the computer
 A bunch of connection sockets that can be wired to
external devices like motors, LEDs etc.
 Arduino aims to introduce the world of electronics
to people who have small to no experience in
electronics like hobbyists, designers, artists etc.
4
Introduction to Arduino
Board
 Arduino boards are generally based on
microcontrollers from Atmel Corporation like 8,
16 or 32 bit AVR architecture based
microcontrollers.
 The important feature of the Arduino boards is
the standard connectors.
 Using these connectors, we can connect the
Arduino board to other devices like LEDs or add-
on modules called Shields.
5
Key components of an
Arduino board.
6
Key components of an
Arduino board
 1. Microcontroller - this is the brain of an Arduino, and is
the component that we load programs into. Think of it as a
tiny computer, designed to execute only a specific number
of things.
 2. USB port - used to connect your Arduino board to a
computer.
 3. USB to Serial chip - the USB to Serial is an important
component, as it helps translating data that comes from e.g.
a computer to the on-board microcontroller. This is what
makes it possible to program the Arduino board from your
computer.
7
Key components of an
Arduino board
 4. Digital pins - pins that use digital logic (0,1 or
LOW/HIGH). Commonly used for switches and to turn
on/off an LED.
 5. Analog pins - pins that can read analog values in a 10
bit resolution (0-1023).
 6. 5V / 3.3V pins- these pins are used to power external
components.
 7. GND - also known as ground.
 8. VIN - stands for Voltage in, where you can connect
external power supplies.
8
Depending on the Arduino board, you will find many more
components. The items listed above are generally found on any
Arduino board
Basic Operation
 Most Arduino boards are designed to have a single program
running on the microcontroller.
 The program can be designed to perform one single action,
such as blinking an LED.
 It can also be designed to execute hundreds of actions in a
cycle.
 The scope varies from one program to another.
 The program that is loaded to the microcontroller will start
execution as soon as it is powered.
9
Basic operation of an
Arduino
10
Circuit Basics
 Circuits consist of at least one active electronic component, and
a conductive material, such as wires, so that current can pass
through.
 When working with an Arduino, you will in most cases build a
circuit for your project.
 A simple example of a circuit, is an LED circuit.
11
An LED circuit with an Arduino
 A wire is connected from a pin on the Arduino, to an LED via a
resistor (to protect the LED from high current), and finally to
the ground pin (GND).
 When the pin is set to a HIGH state, the microcontroller on
the Arduino board will allow an electric current to flow through
the circuit, which turns on the LED.
 When the pin is set to a LOW state, the LED will turn off, as
an electric current is not flowing through the circuit.
12
Electronic Signals
 All communication between electronic
components are facilitated by electronic
signals.
 There are two main types of electronic
signals:
 Analog & Digital.
13
Sensors & Actuators
 When working with Arduino, it is important to
understand sensors and actuators, and the difference
between them.
 What Is a Sensor?
 A sensor, in simple terms, is used to sense its environment,
meaning it records a physical parameter, for example
temperature, and converts it into an electronic signal.
 Sensors can also take the form of just a simple button:
when a state changes (we pressed a button), the electronic
signal is switched from low to high (0 to 1).
14
What Is an Actuator?
An actuator, in simple terms, is used to actuate or change a
physical state. Some examples are:
 A light (such as an LED).
 A motor.
 A switch.
Actuators converts electric signals into e.g. radiant energy
(light) or mechanical energy (movement).
15
Input & Output
 Sensors and actuators, are typically referred to
as inputs and outputs.
 In programs, it is common to construct conditionals
that checks the state of a sensor, and decides
whether it should actuate something.
 A basic example of this is a button and an LED.
 We can write a conditional that checks if a button is
pressed, turn on the LED, and turn it off if the button
is not pressed.
16
Serial Communication
Protocols
 Serial communication protocols uses the digital signals to
send data.
 The most common are UART, SPI & I2C.
 UART(Universal Asynchronous Receiver/Transmitter) protocol
is used to send data between a computer and Arduino board.
 SPI : Serial Peripheral interface.
 I2C : Inter-Integrated Circuit
 The SPI and I2C protocols are used for communication
between both internal and external components.
 The communication is handled by something called a serial
bus, which is attached to a specific pin on the Arduino.
17
Memory
 The "standard" Arduino typically has two memories:
SRAM and Flash memory.
 The SRAM (Static Random-Access Memory) is used to
store the value of a variable.
 When powered off, this memory resets.
 The Flash memory is primarily used to store the main
program, or the instructions for the microcontroller.
 This memory is not erased when powered off so that the
instructions for the microcontroller are executed as soon
as the board is powered
18
Embedded Sensors
 Many new Arduino boards come equipped
with embedded sensors.
 For example, the Nano 33 BLE Sense has 7 embedded
sensors, but is only 45x18mm (the size of a thumb).
 These are all connected via the I2C protocol as mentioned
above, and has a unique address.
 Using the I2C protocol, we can connect several sensors on the
same pin, and retrieve the data accurately.
 Each device has an address that we need to specify in the
program, which we use when making data requests.
19
Arduino UNO
 Arduino UNO is a basic and inexpensive Arduino board
and is the most popular of all the Arduino boards
 Arduino UNO is considered to be the best prototyping
board for beginners in electronics and coding.
20
Arduino UNO
 Microcontroller used in UNO is ATmega328P, which
is an 8-bit microcontroller based on the AVR
architecture.
 UNO has 14 digital input – output (I/O) pins which
can be used as either input or output by connecting
them with different external devices and
components.
 Out of these 14 pins, 6 pins are capable of producing
PWM signal.
 All the digital pins operate at 5V and can output a
current of 20mA.
21
22
Pins and functions of Arduino
The Digital I/O pins functions
 Pins 0 and 1 are used for serial
communication. They are used to
receive and transmit serial data
 Pins 2 and 3 are used for external
interrupts.
 Six of the 14 digital I/O Pins i.e. 3, 5,
6, 9, 10, and 11 can provide 8-bit
PWM output.
23
The Digital I/O pins functions
 Pins 10, 11, 12 and 13 (SS,
MOSI, MISO AND SCK
respectively) are used for SPI
communication.
 Pin 13 has a built-in LED
connected to it. When the pin is
HIGH, the LED is turned on and
when the pin is LOW, it is turned
off.
24
References
 https://docs.arduino.cc/learn/starting-guide/getting-started-
arduino#overview
 https://docs.arduino.cc/learn/starting-guide/getting-started-
arduino#arduino-hardware-1
 https://docs.arduino.cc/learn/starting-guide/getting-started-
arduino#main-parts
 https://www.arduino.cc/reference/en/
 https://docs.arduino.cc/learn/starting-guide/getting-started-
arduino#a-typical-workflow
 https://docs.arduino.cc/learn/starting-guide/getting-started-
arduino#general
25
The End
26

More Related Content

Similar to Chapter 5 Arduino Microcontroller Systems .pptx

Arduino Family
Arduino FamilyArduino Family
Arduino Family
mahalakshmimalini
 
Arduino Uno Pin Description
Arduino Uno Pin DescriptionArduino Uno Pin Description
Arduino Uno Pin Description
Niket Chandrawanshi
 
Introduction to arduino
Introduction to arduinoIntroduction to arduino
Introduction to arduino
Jawaher Abdulwahab Fadhil
 
Robotics and Embedded Systems
Robotics and Embedded SystemsRobotics and Embedded Systems
Robotics and Embedded Systems
Ankan Naskar
 
Report on arduino
Report on arduinoReport on arduino
Report on arduino
Ravi Phadtare
 
Animatronic hand controller
Animatronic hand controllerAnimatronic hand controller
Animatronic hand controller
Sabrina Chowdhury
 
Internet of Things Unit 3 notes-Design and Development and Arduino.pptx
Internet of Things Unit 3 notes-Design and Development and Arduino.pptxInternet of Things Unit 3 notes-Design and Development and Arduino.pptx
Internet of Things Unit 3 notes-Design and Development and Arduino.pptx
Dinola2
 
Lecture 7
Lecture 7Lecture 7
Lecture 7
vishal choudhary
 
raushan
raushanraushan
IoT Basics with few Embedded System Connections for sensors
IoT Basics with few Embedded System Connections for sensorsIoT Basics with few Embedded System Connections for sensors
IoT Basics with few Embedded System Connections for sensors
saritasapkal
 
The IoT Academy IoT training Arduino Part 1 basics
The IoT Academy IoT training Arduino Part 1 basicsThe IoT Academy IoT training Arduino Part 1 basics
The IoT Academy IoT training Arduino Part 1 basics
The IOT Academy
 
Unit 2-IoT.ppt Introduction to Elements of IOT
Unit 2-IoT.ppt  Introduction to Elements of IOTUnit 2-IoT.ppt  Introduction to Elements of IOT
Unit 2-IoT.ppt Introduction to Elements of IOT
poojashinde511268
 
Robotics Session day 1
Robotics Session day 1Robotics Session day 1
Robotics Session day 1
Afzal Ahmad
 
Intro arduino
Intro arduinoIntro arduino
Intro arduino
MaLcom MooNwalker
 
Office automation system using arduino
Office automation system using arduinoOffice automation system using arduino
Office automation system using arduino
Ashfaqul Haque John
 
Embedded system application
Embedded system applicationEmbedded system application
Embedded system application
Dhruwank Vankawala
 
ARDUINO OVERVIEW HARDWARE SOFTWARE AND INSTALLATION.pptx
ARDUINO OVERVIEW HARDWARE  SOFTWARE AND INSTALLATION.pptxARDUINO OVERVIEW HARDWARE  SOFTWARE AND INSTALLATION.pptx
ARDUINO OVERVIEW HARDWARE SOFTWARE AND INSTALLATION.pptx
menchc1207
 
Basics of open source embedded development board (
Basics of open source embedded development board (Basics of open source embedded development board (
Basics of open source embedded development board (
Dhruwank Vankawala
 
Basics of open source embedded development board (
Basics of open source embedded development board (Basics of open source embedded development board (
Basics of open source embedded development board (
Dhruwank Vankawala
 
Our arduino project
Our arduino projectOur arduino project
Our arduino project
PATRICIABRITO77
 

Similar to Chapter 5 Arduino Microcontroller Systems .pptx (20)

Arduino Family
Arduino FamilyArduino Family
Arduino Family
 
Arduino Uno Pin Description
Arduino Uno Pin DescriptionArduino Uno Pin Description
Arduino Uno Pin Description
 
Introduction to arduino
Introduction to arduinoIntroduction to arduino
Introduction to arduino
 
Robotics and Embedded Systems
Robotics and Embedded SystemsRobotics and Embedded Systems
Robotics and Embedded Systems
 
Report on arduino
Report on arduinoReport on arduino
Report on arduino
 
Animatronic hand controller
Animatronic hand controllerAnimatronic hand controller
Animatronic hand controller
 
Internet of Things Unit 3 notes-Design and Development and Arduino.pptx
Internet of Things Unit 3 notes-Design and Development and Arduino.pptxInternet of Things Unit 3 notes-Design and Development and Arduino.pptx
Internet of Things Unit 3 notes-Design and Development and Arduino.pptx
 
Lecture 7
Lecture 7Lecture 7
Lecture 7
 
raushan
raushanraushan
raushan
 
IoT Basics with few Embedded System Connections for sensors
IoT Basics with few Embedded System Connections for sensorsIoT Basics with few Embedded System Connections for sensors
IoT Basics with few Embedded System Connections for sensors
 
The IoT Academy IoT training Arduino Part 1 basics
The IoT Academy IoT training Arduino Part 1 basicsThe IoT Academy IoT training Arduino Part 1 basics
The IoT Academy IoT training Arduino Part 1 basics
 
Unit 2-IoT.ppt Introduction to Elements of IOT
Unit 2-IoT.ppt  Introduction to Elements of IOTUnit 2-IoT.ppt  Introduction to Elements of IOT
Unit 2-IoT.ppt Introduction to Elements of IOT
 
Robotics Session day 1
Robotics Session day 1Robotics Session day 1
Robotics Session day 1
 
Intro arduino
Intro arduinoIntro arduino
Intro arduino
 
Office automation system using arduino
Office automation system using arduinoOffice automation system using arduino
Office automation system using arduino
 
Embedded system application
Embedded system applicationEmbedded system application
Embedded system application
 
ARDUINO OVERVIEW HARDWARE SOFTWARE AND INSTALLATION.pptx
ARDUINO OVERVIEW HARDWARE  SOFTWARE AND INSTALLATION.pptxARDUINO OVERVIEW HARDWARE  SOFTWARE AND INSTALLATION.pptx
ARDUINO OVERVIEW HARDWARE SOFTWARE AND INSTALLATION.pptx
 
Basics of open source embedded development board (
Basics of open source embedded development board (Basics of open source embedded development board (
Basics of open source embedded development board (
 
Basics of open source embedded development board (
Basics of open source embedded development board (Basics of open source embedded development board (
Basics of open source embedded development board (
 
Our arduino project
Our arduino projectOur arduino project
Our arduino project
 

Recently uploaded

UNIT IV-VISUAL STYLE AND MOBILE INTERFACES.pptx
UNIT IV-VISUAL STYLE AND MOBILE INTERFACES.pptxUNIT IV-VISUAL STYLE AND MOBILE INTERFACES.pptx
UNIT IV-VISUAL STYLE AND MOBILE INTERFACES.pptx
GOWSIKRAJA PALANISAMY
 
AHMED TALAAT ARCHITECTURE PORTFOLIO .pdf
AHMED TALAAT ARCHITECTURE PORTFOLIO .pdfAHMED TALAAT ARCHITECTURE PORTFOLIO .pdf
AHMED TALAAT ARCHITECTURE PORTFOLIO .pdf
talaatahm
 
CocaCola_Brand_equity_package_2012__.pdf
CocaCola_Brand_equity_package_2012__.pdfCocaCola_Brand_equity_package_2012__.pdf
CocaCola_Brand_equity_package_2012__.pdf
PabloMartelLpez
 
PDF SubmissionDigital Marketing Institute in Noida
PDF SubmissionDigital Marketing Institute in NoidaPDF SubmissionDigital Marketing Institute in Noida
PDF SubmissionDigital Marketing Institute in Noida
PoojaSaini954651
 
UNIT V ACTIONS AND COMMANDS, FORMS AND CONTROLS.pptx
UNIT V ACTIONS AND COMMANDS, FORMS AND CONTROLS.pptxUNIT V ACTIONS AND COMMANDS, FORMS AND CONTROLS.pptx
UNIT V ACTIONS AND COMMANDS, FORMS AND CONTROLS.pptx
GOWSIKRAJA PALANISAMY
 
定制美国西雅图城市大学毕业证学历证书原版一模一样
定制美国西雅图城市大学毕业证学历证书原版一模一样定制美国西雅图城市大学毕业证学历证书原版一模一样
定制美国西雅图城市大学毕业证学历证书原版一模一样
qo1as76n
 
Storytelling For The Web: Integrate Storytelling in your Design Process
Storytelling For The Web: Integrate Storytelling in your Design ProcessStorytelling For The Web: Integrate Storytelling in your Design Process
Storytelling For The Web: Integrate Storytelling in your Design Process
Chiara Aliotta
 
一比一原版(BU毕业证)波士顿大学毕业证如何办理
一比一原版(BU毕业证)波士顿大学毕业证如何办理一比一原版(BU毕业证)波士顿大学毕业证如何办理
一比一原版(BU毕业证)波士顿大学毕业证如何办理
peuce
 
Divertidamente SLIDE.pptxufururururuhrurid8dj
Divertidamente SLIDE.pptxufururururuhrurid8djDivertidamente SLIDE.pptxufururururuhrurid8dj
Divertidamente SLIDE.pptxufururururuhrurid8dj
lunaemel03
 
Game Concept Presentation for Ukrainian Mythology Based Game With Designs
Game Concept Presentation for Ukrainian Mythology Based Game With DesignsGame Concept Presentation for Ukrainian Mythology Based Game With Designs
Game Concept Presentation for Ukrainian Mythology Based Game With Designs
184804
 
一比一原版(LSBU毕业证书)伦敦南岸大学毕业证如何办理
一比一原版(LSBU毕业证书)伦敦南岸大学毕业证如何办理一比一原版(LSBU毕业证书)伦敦南岸大学毕业证如何办理
一比一原版(LSBU毕业证书)伦敦南岸大学毕业证如何办理
k7nm6tk
 
SECURING BUILDING PERMIT CITY OF CALOOCAN.pdf
SECURING BUILDING PERMIT CITY OF CALOOCAN.pdfSECURING BUILDING PERMIT CITY OF CALOOCAN.pdf
SECURING BUILDING PERMIT CITY OF CALOOCAN.pdf
eloprejohn333
 
Connect Conference 2022: Passive House - Economic and Environmental Solution...
Connect Conference 2022: Passive House -  Economic and Environmental Solution...Connect Conference 2022: Passive House -  Economic and Environmental Solution...
Connect Conference 2022: Passive House - Economic and Environmental Solution...
TE Studio
 
International Upcycling Research Network advisory board meeting 4
International Upcycling Research Network advisory board meeting 4International Upcycling Research Network advisory board meeting 4
International Upcycling Research Network advisory board meeting 4
Kyungeun Sung
 
一比一原版(UW毕业证)西雅图华盛顿大学毕业证如何办理
一比一原版(UW毕业证)西雅图华盛顿大学毕业证如何办理一比一原版(UW毕业证)西雅图华盛顿大学毕业证如何办理
一比一原版(UW毕业证)西雅图华盛顿大学毕业证如何办理
kecekev
 
Practical eLearning Makeovers for Everyone
Practical eLearning Makeovers for EveryonePractical eLearning Makeovers for Everyone
Practical eLearning Makeovers for Everyone
Bianca Woods
 
Virtual Tour Application Powerpoint for museum of edinburgh
Virtual Tour Application Powerpoint for museum of edinburghVirtual Tour Application Powerpoint for museum of edinburgh
Virtual Tour Application Powerpoint for museum of edinburgh
millarj46
 
ARENA - Young adults in the workplace (Knight Moves).pdf
ARENA - Young adults in the workplace (Knight Moves).pdfARENA - Young adults in the workplace (Knight Moves).pdf
ARENA - Young adults in the workplace (Knight Moves).pdf
Knight Moves
 
Timeless Principles of Good Design
Timeless Principles of Good DesignTimeless Principles of Good Design
Timeless Principles of Good Design
Carolina de Bartolo
 
EASY TUTORIAL OF HOW TO USE CAPCUT BY: FEBLESS HERNANE
EASY TUTORIAL OF HOW TO USE CAPCUT BY: FEBLESS HERNANEEASY TUTORIAL OF HOW TO USE CAPCUT BY: FEBLESS HERNANE
EASY TUTORIAL OF HOW TO USE CAPCUT BY: FEBLESS HERNANE
Febless Hernane
 

Recently uploaded (20)

UNIT IV-VISUAL STYLE AND MOBILE INTERFACES.pptx
UNIT IV-VISUAL STYLE AND MOBILE INTERFACES.pptxUNIT IV-VISUAL STYLE AND MOBILE INTERFACES.pptx
UNIT IV-VISUAL STYLE AND MOBILE INTERFACES.pptx
 
AHMED TALAAT ARCHITECTURE PORTFOLIO .pdf
AHMED TALAAT ARCHITECTURE PORTFOLIO .pdfAHMED TALAAT ARCHITECTURE PORTFOLIO .pdf
AHMED TALAAT ARCHITECTURE PORTFOLIO .pdf
 
CocaCola_Brand_equity_package_2012__.pdf
CocaCola_Brand_equity_package_2012__.pdfCocaCola_Brand_equity_package_2012__.pdf
CocaCola_Brand_equity_package_2012__.pdf
 
PDF SubmissionDigital Marketing Institute in Noida
PDF SubmissionDigital Marketing Institute in NoidaPDF SubmissionDigital Marketing Institute in Noida
PDF SubmissionDigital Marketing Institute in Noida
 
UNIT V ACTIONS AND COMMANDS, FORMS AND CONTROLS.pptx
UNIT V ACTIONS AND COMMANDS, FORMS AND CONTROLS.pptxUNIT V ACTIONS AND COMMANDS, FORMS AND CONTROLS.pptx
UNIT V ACTIONS AND COMMANDS, FORMS AND CONTROLS.pptx
 
定制美国西雅图城市大学毕业证学历证书原版一模一样
定制美国西雅图城市大学毕业证学历证书原版一模一样定制美国西雅图城市大学毕业证学历证书原版一模一样
定制美国西雅图城市大学毕业证学历证书原版一模一样
 
Storytelling For The Web: Integrate Storytelling in your Design Process
Storytelling For The Web: Integrate Storytelling in your Design ProcessStorytelling For The Web: Integrate Storytelling in your Design Process
Storytelling For The Web: Integrate Storytelling in your Design Process
 
一比一原版(BU毕业证)波士顿大学毕业证如何办理
一比一原版(BU毕业证)波士顿大学毕业证如何办理一比一原版(BU毕业证)波士顿大学毕业证如何办理
一比一原版(BU毕业证)波士顿大学毕业证如何办理
 
Divertidamente SLIDE.pptxufururururuhrurid8dj
Divertidamente SLIDE.pptxufururururuhrurid8djDivertidamente SLIDE.pptxufururururuhrurid8dj
Divertidamente SLIDE.pptxufururururuhrurid8dj
 
Game Concept Presentation for Ukrainian Mythology Based Game With Designs
Game Concept Presentation for Ukrainian Mythology Based Game With DesignsGame Concept Presentation for Ukrainian Mythology Based Game With Designs
Game Concept Presentation for Ukrainian Mythology Based Game With Designs
 
一比一原版(LSBU毕业证书)伦敦南岸大学毕业证如何办理
一比一原版(LSBU毕业证书)伦敦南岸大学毕业证如何办理一比一原版(LSBU毕业证书)伦敦南岸大学毕业证如何办理
一比一原版(LSBU毕业证书)伦敦南岸大学毕业证如何办理
 
SECURING BUILDING PERMIT CITY OF CALOOCAN.pdf
SECURING BUILDING PERMIT CITY OF CALOOCAN.pdfSECURING BUILDING PERMIT CITY OF CALOOCAN.pdf
SECURING BUILDING PERMIT CITY OF CALOOCAN.pdf
 
Connect Conference 2022: Passive House - Economic and Environmental Solution...
Connect Conference 2022: Passive House -  Economic and Environmental Solution...Connect Conference 2022: Passive House -  Economic and Environmental Solution...
Connect Conference 2022: Passive House - Economic and Environmental Solution...
 
International Upcycling Research Network advisory board meeting 4
International Upcycling Research Network advisory board meeting 4International Upcycling Research Network advisory board meeting 4
International Upcycling Research Network advisory board meeting 4
 
一比一原版(UW毕业证)西雅图华盛顿大学毕业证如何办理
一比一原版(UW毕业证)西雅图华盛顿大学毕业证如何办理一比一原版(UW毕业证)西雅图华盛顿大学毕业证如何办理
一比一原版(UW毕业证)西雅图华盛顿大学毕业证如何办理
 
Practical eLearning Makeovers for Everyone
Practical eLearning Makeovers for EveryonePractical eLearning Makeovers for Everyone
Practical eLearning Makeovers for Everyone
 
Virtual Tour Application Powerpoint for museum of edinburgh
Virtual Tour Application Powerpoint for museum of edinburghVirtual Tour Application Powerpoint for museum of edinburgh
Virtual Tour Application Powerpoint for museum of edinburgh
 
ARENA - Young adults in the workplace (Knight Moves).pdf
ARENA - Young adults in the workplace (Knight Moves).pdfARENA - Young adults in the workplace (Knight Moves).pdf
ARENA - Young adults in the workplace (Knight Moves).pdf
 
Timeless Principles of Good Design
Timeless Principles of Good DesignTimeless Principles of Good Design
Timeless Principles of Good Design
 
EASY TUTORIAL OF HOW TO USE CAPCUT BY: FEBLESS HERNANE
EASY TUTORIAL OF HOW TO USE CAPCUT BY: FEBLESS HERNANEEASY TUTORIAL OF HOW TO USE CAPCUT BY: FEBLESS HERNANE
EASY TUTORIAL OF HOW TO USE CAPCUT BY: FEBLESS HERNANE
 

Chapter 5 Arduino Microcontroller Systems .pptx

  • 1. CNET 315 Microprocessor & Assembly Language Phiros Mansur Nalakath Course Coordinator College of Computer Science & Information Technology, Jazan University, KSA 1
  • 2. Chapter - 5 Arduino Microcontroller Systems 2
  • 3. What is Arduino? 3  Arduino is an open-source prototyping platform in electronics based on easy-to-use hardware and software.  Arduino is a microcontroller based prototyping board which can be used in developing digital devices that can read inputs like finger on a button, touch on a screen, light on a sensor etc.  Turning it in to output like switching on an LED, rotating a motor, playing songs through a speaker etc.
  • 4. Introduction to Arduino Board  The Arduino board can be programmed to do anything by simply programming the microcontroller on board using a set of instructions  Arduino board consists of a USB plug to communicate with the computer  A bunch of connection sockets that can be wired to external devices like motors, LEDs etc.  Arduino aims to introduce the world of electronics to people who have small to no experience in electronics like hobbyists, designers, artists etc. 4
  • 5. Introduction to Arduino Board  Arduino boards are generally based on microcontrollers from Atmel Corporation like 8, 16 or 32 bit AVR architecture based microcontrollers.  The important feature of the Arduino boards is the standard connectors.  Using these connectors, we can connect the Arduino board to other devices like LEDs or add- on modules called Shields. 5
  • 6. Key components of an Arduino board. 6
  • 7. Key components of an Arduino board  1. Microcontroller - this is the brain of an Arduino, and is the component that we load programs into. Think of it as a tiny computer, designed to execute only a specific number of things.  2. USB port - used to connect your Arduino board to a computer.  3. USB to Serial chip - the USB to Serial is an important component, as it helps translating data that comes from e.g. a computer to the on-board microcontroller. This is what makes it possible to program the Arduino board from your computer. 7
  • 8. Key components of an Arduino board  4. Digital pins - pins that use digital logic (0,1 or LOW/HIGH). Commonly used for switches and to turn on/off an LED.  5. Analog pins - pins that can read analog values in a 10 bit resolution (0-1023).  6. 5V / 3.3V pins- these pins are used to power external components.  7. GND - also known as ground.  8. VIN - stands for Voltage in, where you can connect external power supplies. 8 Depending on the Arduino board, you will find many more components. The items listed above are generally found on any Arduino board
  • 9. Basic Operation  Most Arduino boards are designed to have a single program running on the microcontroller.  The program can be designed to perform one single action, such as blinking an LED.  It can also be designed to execute hundreds of actions in a cycle.  The scope varies from one program to another.  The program that is loaded to the microcontroller will start execution as soon as it is powered. 9
  • 10. Basic operation of an Arduino 10
  • 11. Circuit Basics  Circuits consist of at least one active electronic component, and a conductive material, such as wires, so that current can pass through.  When working with an Arduino, you will in most cases build a circuit for your project.  A simple example of a circuit, is an LED circuit. 11
  • 12. An LED circuit with an Arduino  A wire is connected from a pin on the Arduino, to an LED via a resistor (to protect the LED from high current), and finally to the ground pin (GND).  When the pin is set to a HIGH state, the microcontroller on the Arduino board will allow an electric current to flow through the circuit, which turns on the LED.  When the pin is set to a LOW state, the LED will turn off, as an electric current is not flowing through the circuit. 12
  • 13. Electronic Signals  All communication between electronic components are facilitated by electronic signals.  There are two main types of electronic signals:  Analog & Digital. 13
  • 14. Sensors & Actuators  When working with Arduino, it is important to understand sensors and actuators, and the difference between them.  What Is a Sensor?  A sensor, in simple terms, is used to sense its environment, meaning it records a physical parameter, for example temperature, and converts it into an electronic signal.  Sensors can also take the form of just a simple button: when a state changes (we pressed a button), the electronic signal is switched from low to high (0 to 1). 14
  • 15. What Is an Actuator? An actuator, in simple terms, is used to actuate or change a physical state. Some examples are:  A light (such as an LED).  A motor.  A switch. Actuators converts electric signals into e.g. radiant energy (light) or mechanical energy (movement). 15
  • 16. Input & Output  Sensors and actuators, are typically referred to as inputs and outputs.  In programs, it is common to construct conditionals that checks the state of a sensor, and decides whether it should actuate something.  A basic example of this is a button and an LED.  We can write a conditional that checks if a button is pressed, turn on the LED, and turn it off if the button is not pressed. 16
  • 17. Serial Communication Protocols  Serial communication protocols uses the digital signals to send data.  The most common are UART, SPI & I2C.  UART(Universal Asynchronous Receiver/Transmitter) protocol is used to send data between a computer and Arduino board.  SPI : Serial Peripheral interface.  I2C : Inter-Integrated Circuit  The SPI and I2C protocols are used for communication between both internal and external components.  The communication is handled by something called a serial bus, which is attached to a specific pin on the Arduino. 17
  • 18. Memory  The "standard" Arduino typically has two memories: SRAM and Flash memory.  The SRAM (Static Random-Access Memory) is used to store the value of a variable.  When powered off, this memory resets.  The Flash memory is primarily used to store the main program, or the instructions for the microcontroller.  This memory is not erased when powered off so that the instructions for the microcontroller are executed as soon as the board is powered 18
  • 19. Embedded Sensors  Many new Arduino boards come equipped with embedded sensors.  For example, the Nano 33 BLE Sense has 7 embedded sensors, but is only 45x18mm (the size of a thumb).  These are all connected via the I2C protocol as mentioned above, and has a unique address.  Using the I2C protocol, we can connect several sensors on the same pin, and retrieve the data accurately.  Each device has an address that we need to specify in the program, which we use when making data requests. 19
  • 20. Arduino UNO  Arduino UNO is a basic and inexpensive Arduino board and is the most popular of all the Arduino boards  Arduino UNO is considered to be the best prototyping board for beginners in electronics and coding. 20
  • 21. Arduino UNO  Microcontroller used in UNO is ATmega328P, which is an 8-bit microcontroller based on the AVR architecture.  UNO has 14 digital input – output (I/O) pins which can be used as either input or output by connecting them with different external devices and components.  Out of these 14 pins, 6 pins are capable of producing PWM signal.  All the digital pins operate at 5V and can output a current of 20mA. 21
  • 22. 22 Pins and functions of Arduino
  • 23. The Digital I/O pins functions  Pins 0 and 1 are used for serial communication. They are used to receive and transmit serial data  Pins 2 and 3 are used for external interrupts.  Six of the 14 digital I/O Pins i.e. 3, 5, 6, 9, 10, and 11 can provide 8-bit PWM output. 23
  • 24. The Digital I/O pins functions  Pins 10, 11, 12 and 13 (SS, MOSI, MISO AND SCK respectively) are used for SPI communication.  Pin 13 has a built-in LED connected to it. When the pin is HIGH, the LED is turned on and when the pin is LOW, it is turned off. 24
  • 25. References  https://docs.arduino.cc/learn/starting-guide/getting-started- arduino#overview  https://docs.arduino.cc/learn/starting-guide/getting-started- arduino#arduino-hardware-1  https://docs.arduino.cc/learn/starting-guide/getting-started- arduino#main-parts  https://www.arduino.cc/reference/en/  https://docs.arduino.cc/learn/starting-guide/getting-started- arduino#a-typical-workflow  https://docs.arduino.cc/learn/starting-guide/getting-started- arduino#general 25