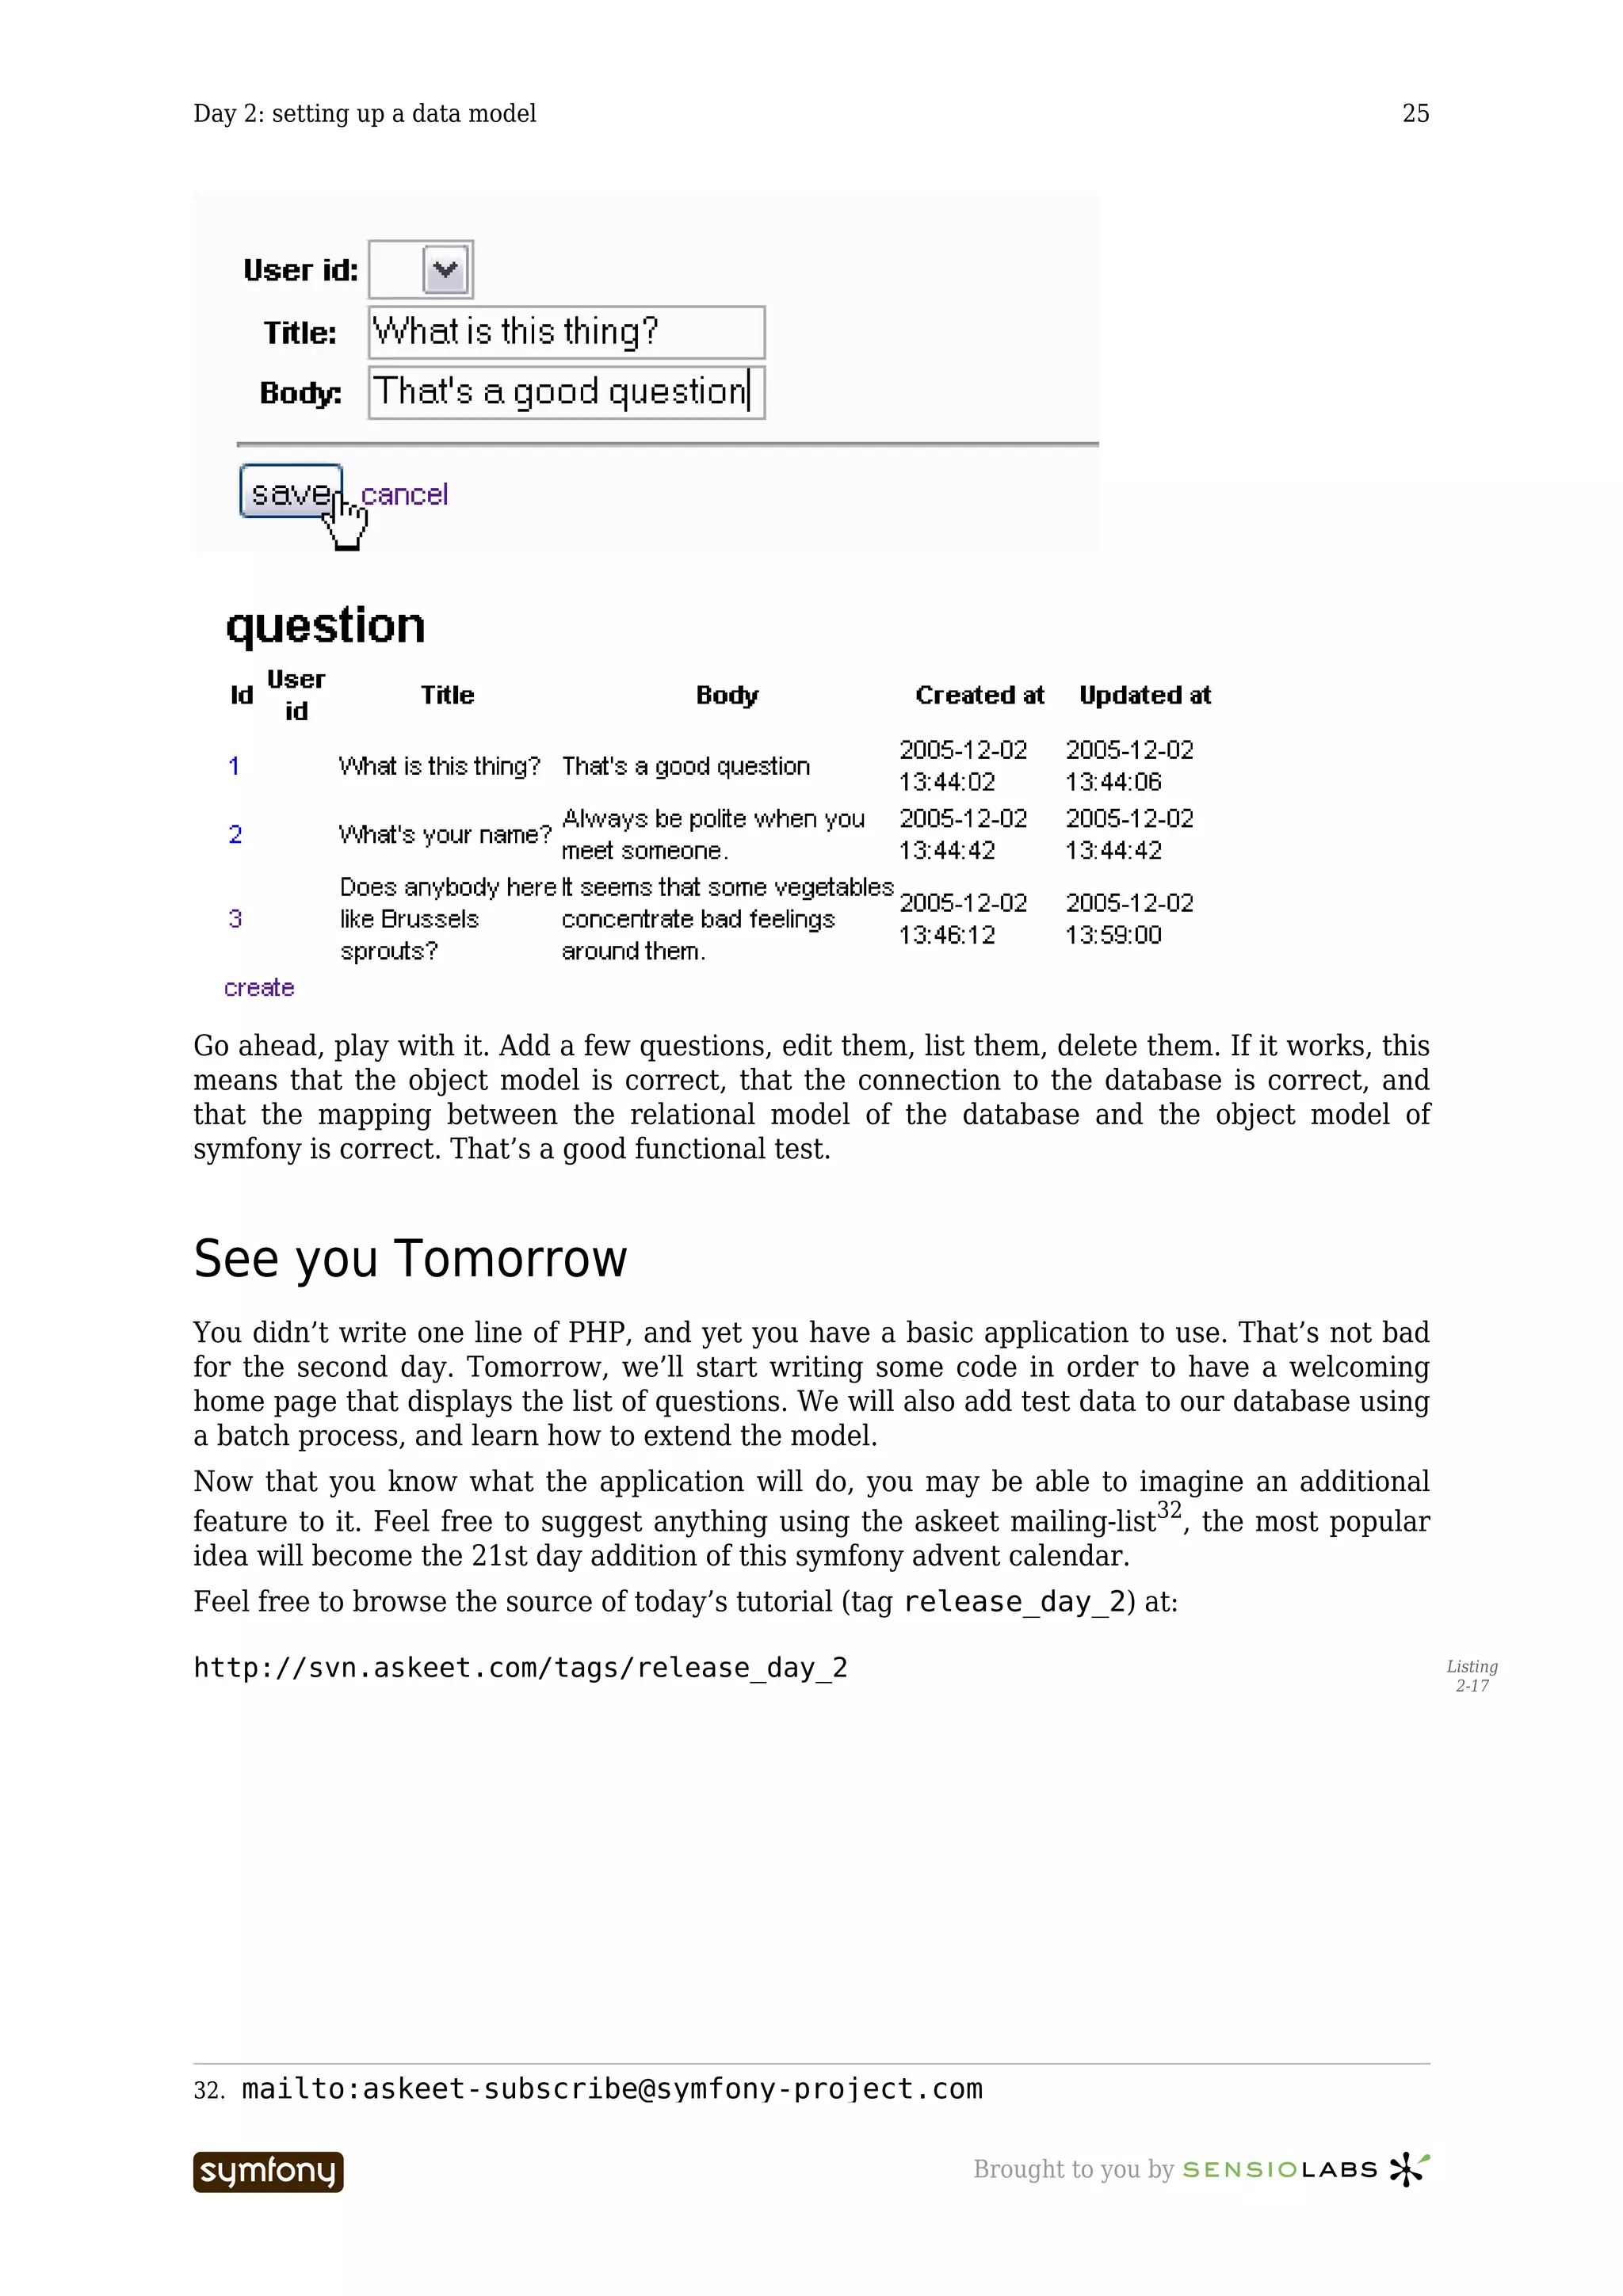
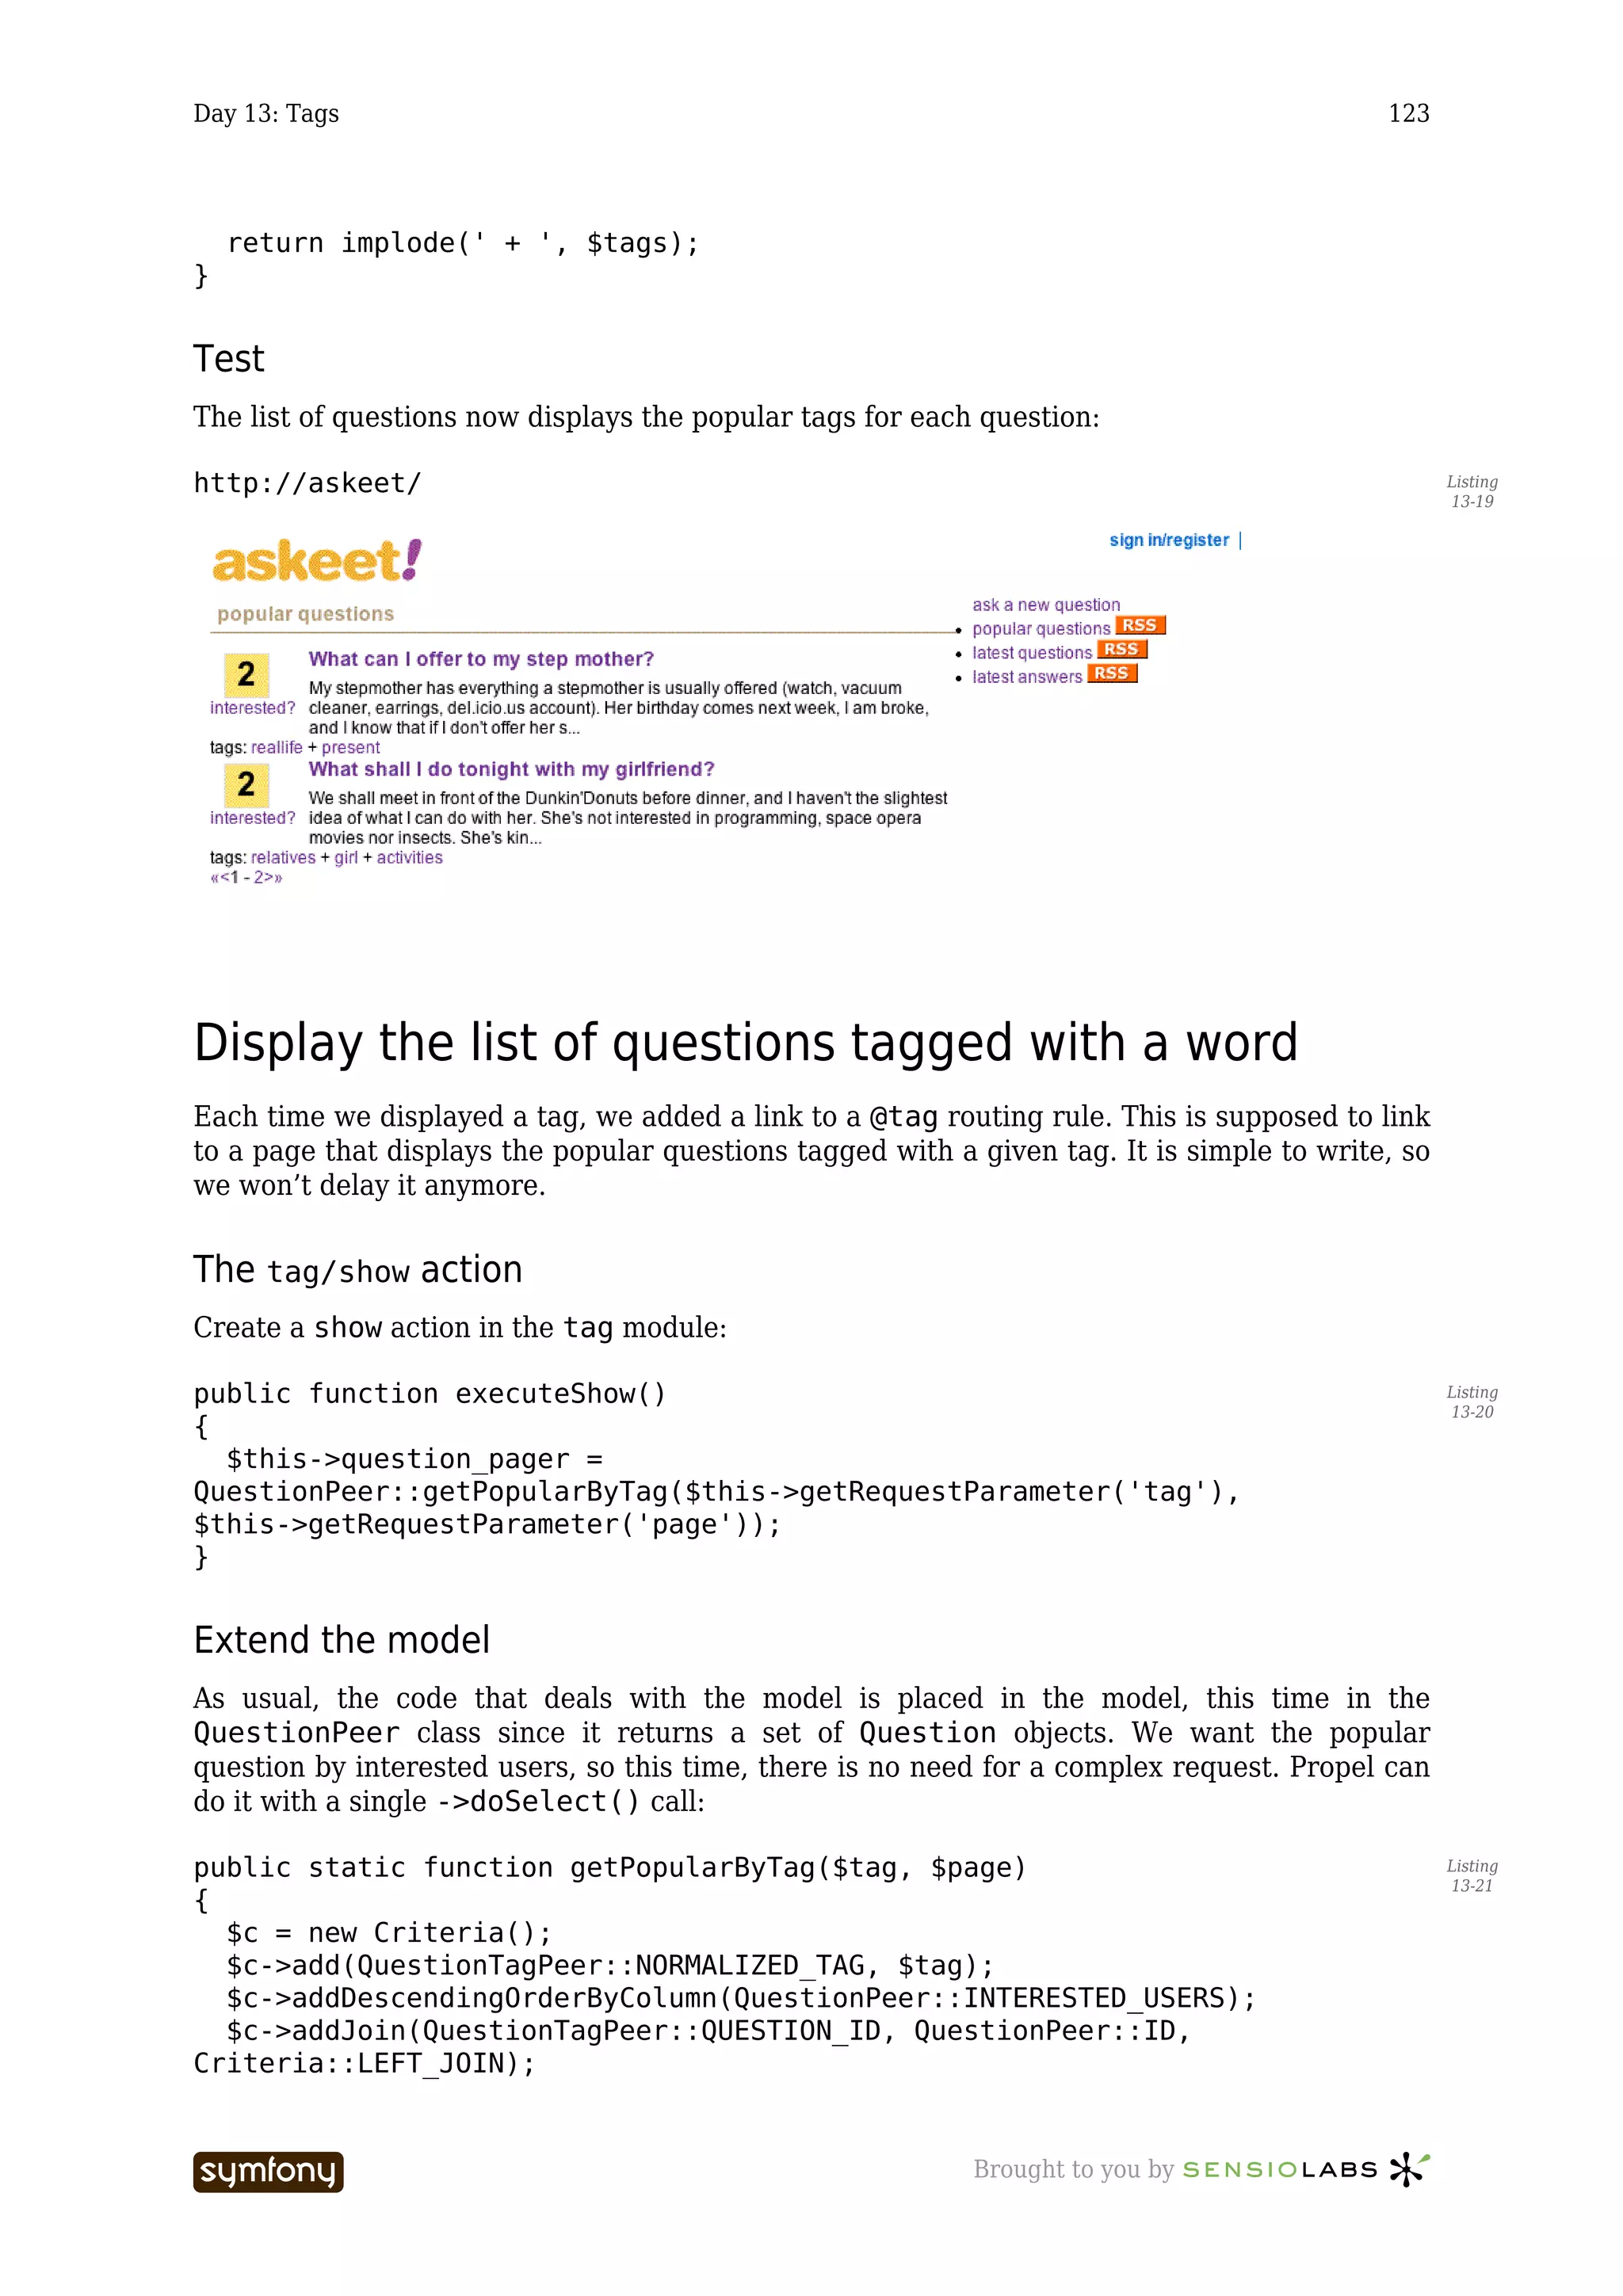
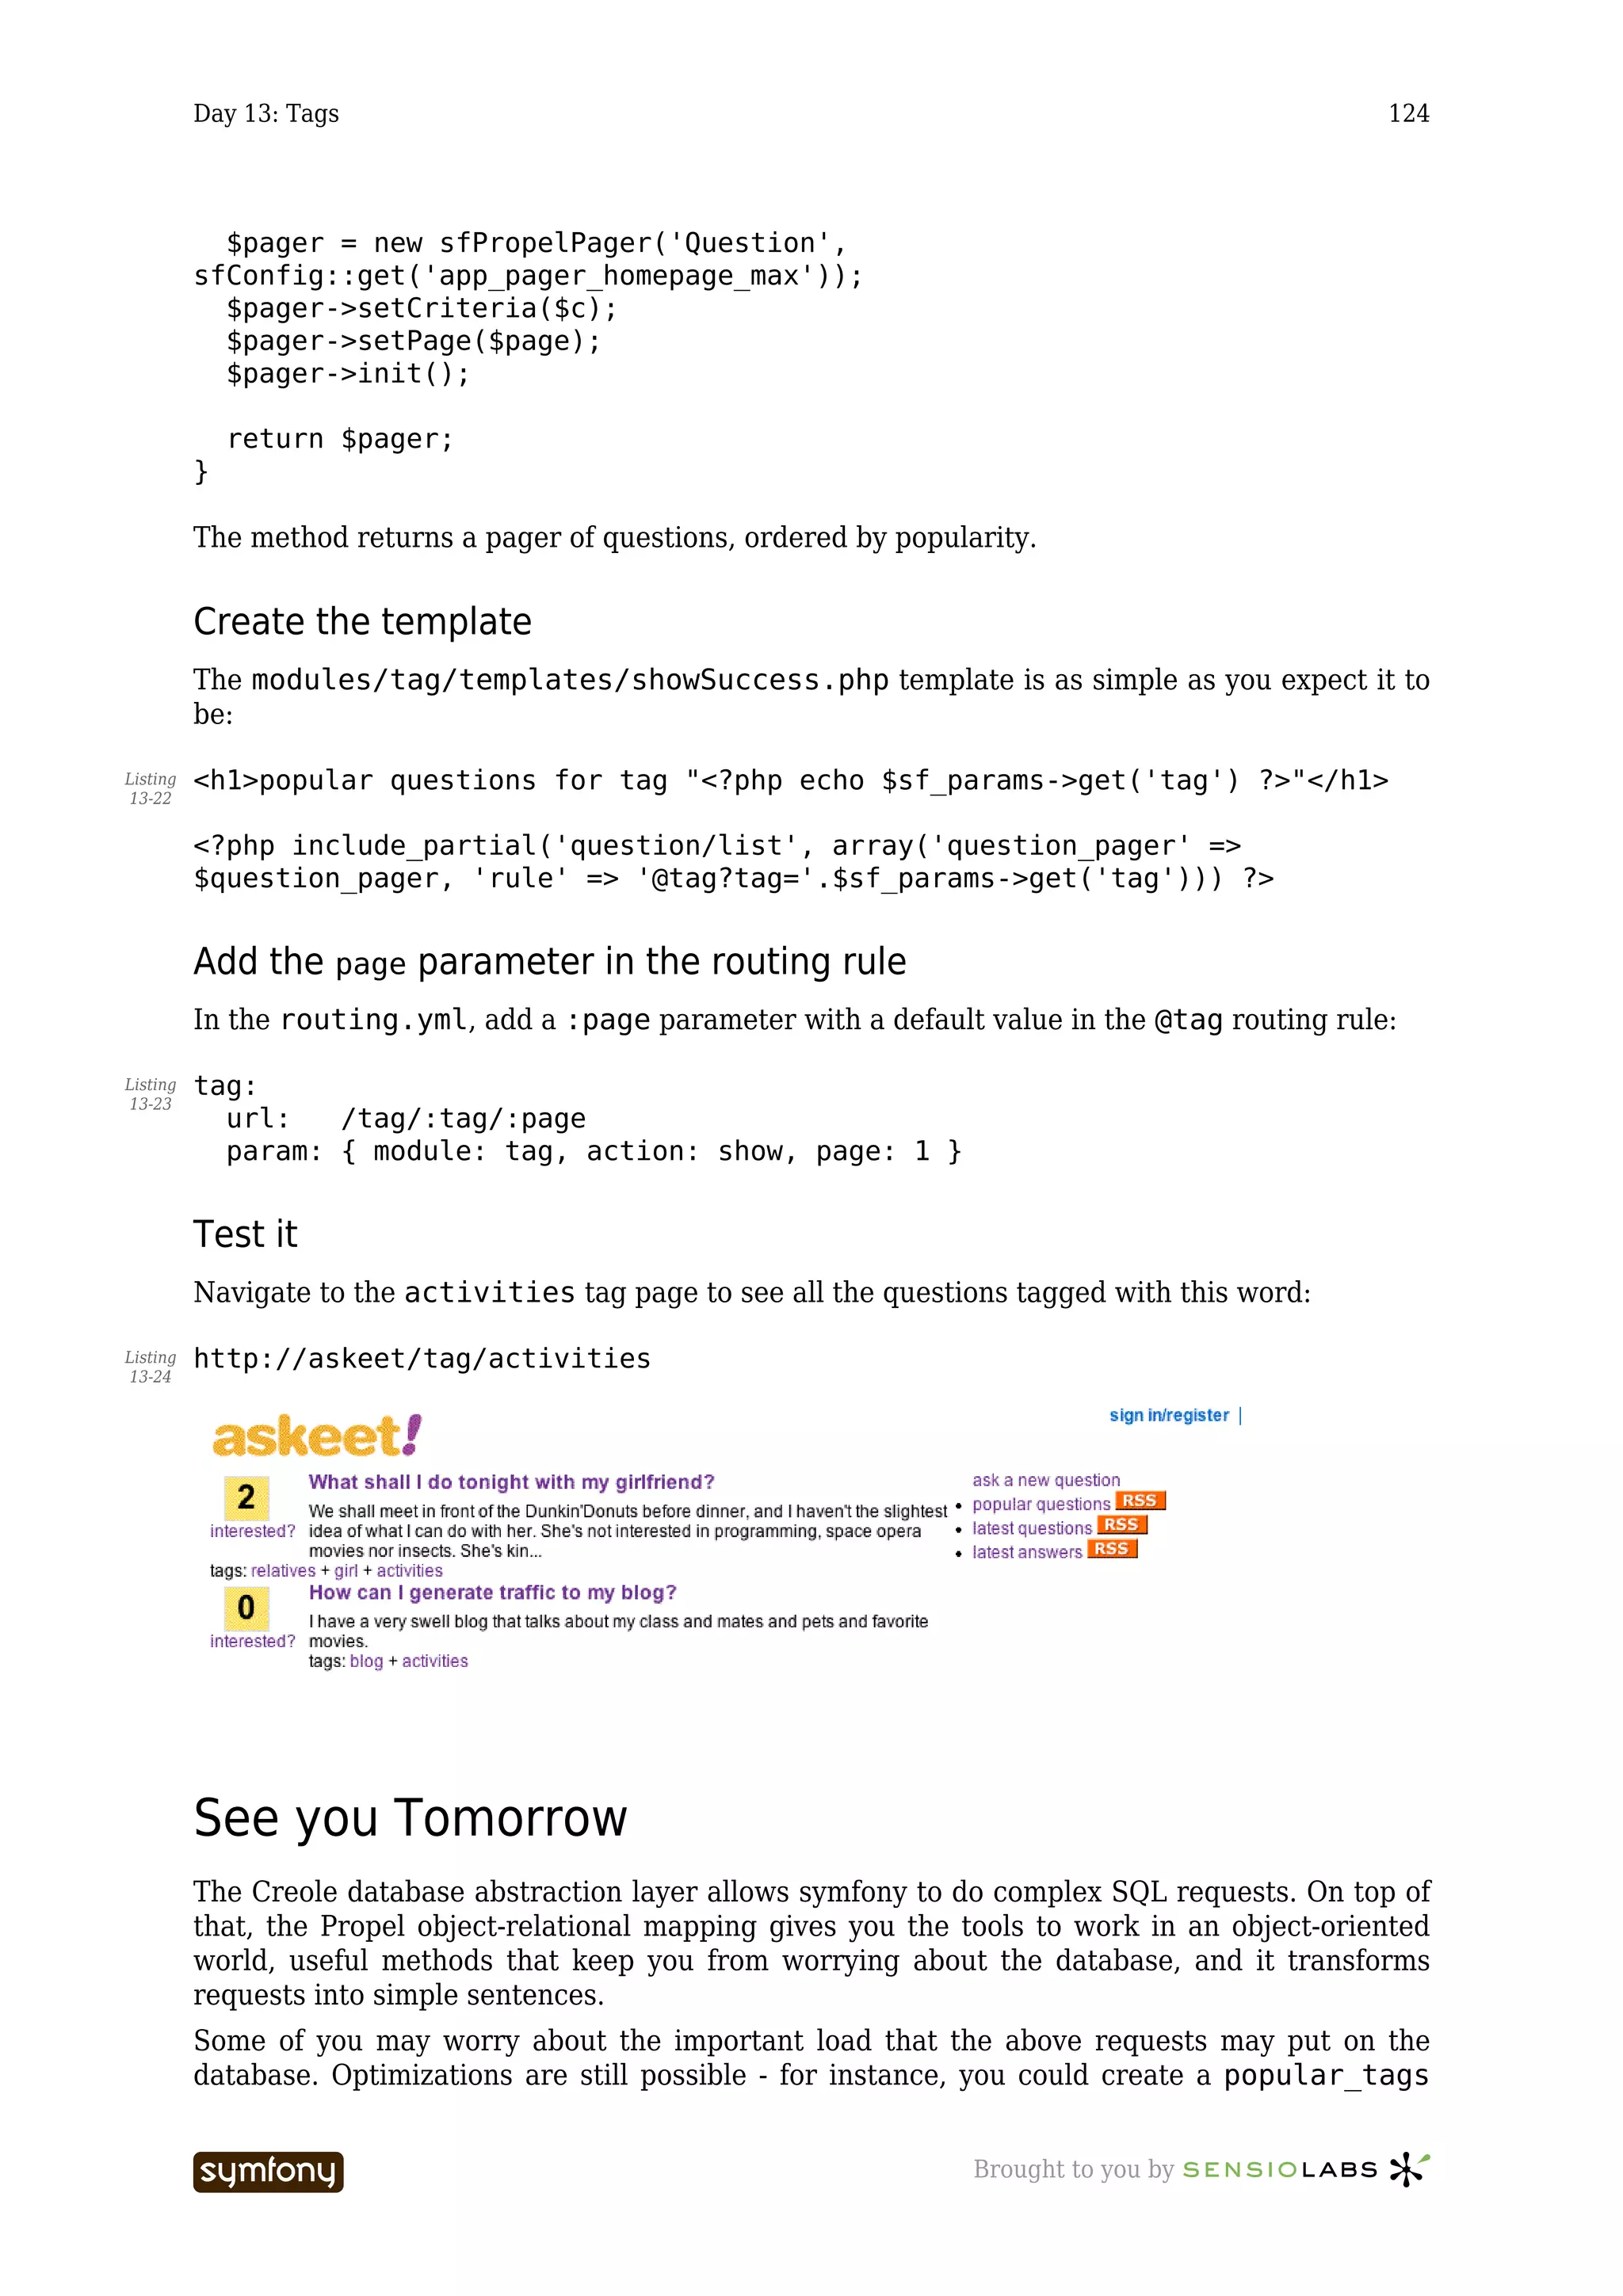
This document provides an overview of the Askeet tutorial, which teaches how to build a question and answer application using the Symfony framework over the course of 23 days. It covers topics like setting up the project, creating a data model, implementing the MVC architecture, adding forms and validation, security features, internationalization, and transferring the application to a production server.


![Day 3: dive into the MVC architecture 28
We created two stylesheets (main.css and layout.css). Copy them into your askeet/
web/css/ directory and edit your frontend/config/view.yml to change the
autoloaded stylesheets:
Listing stylesheets: [main, layout]
3-3
This layout is still lightweight for the moment, it will be rebuilt later (in about a week). The
important things in this template are the <head> part, which is mostly generated, and the
sf_content variable, which contains the result of the actions.
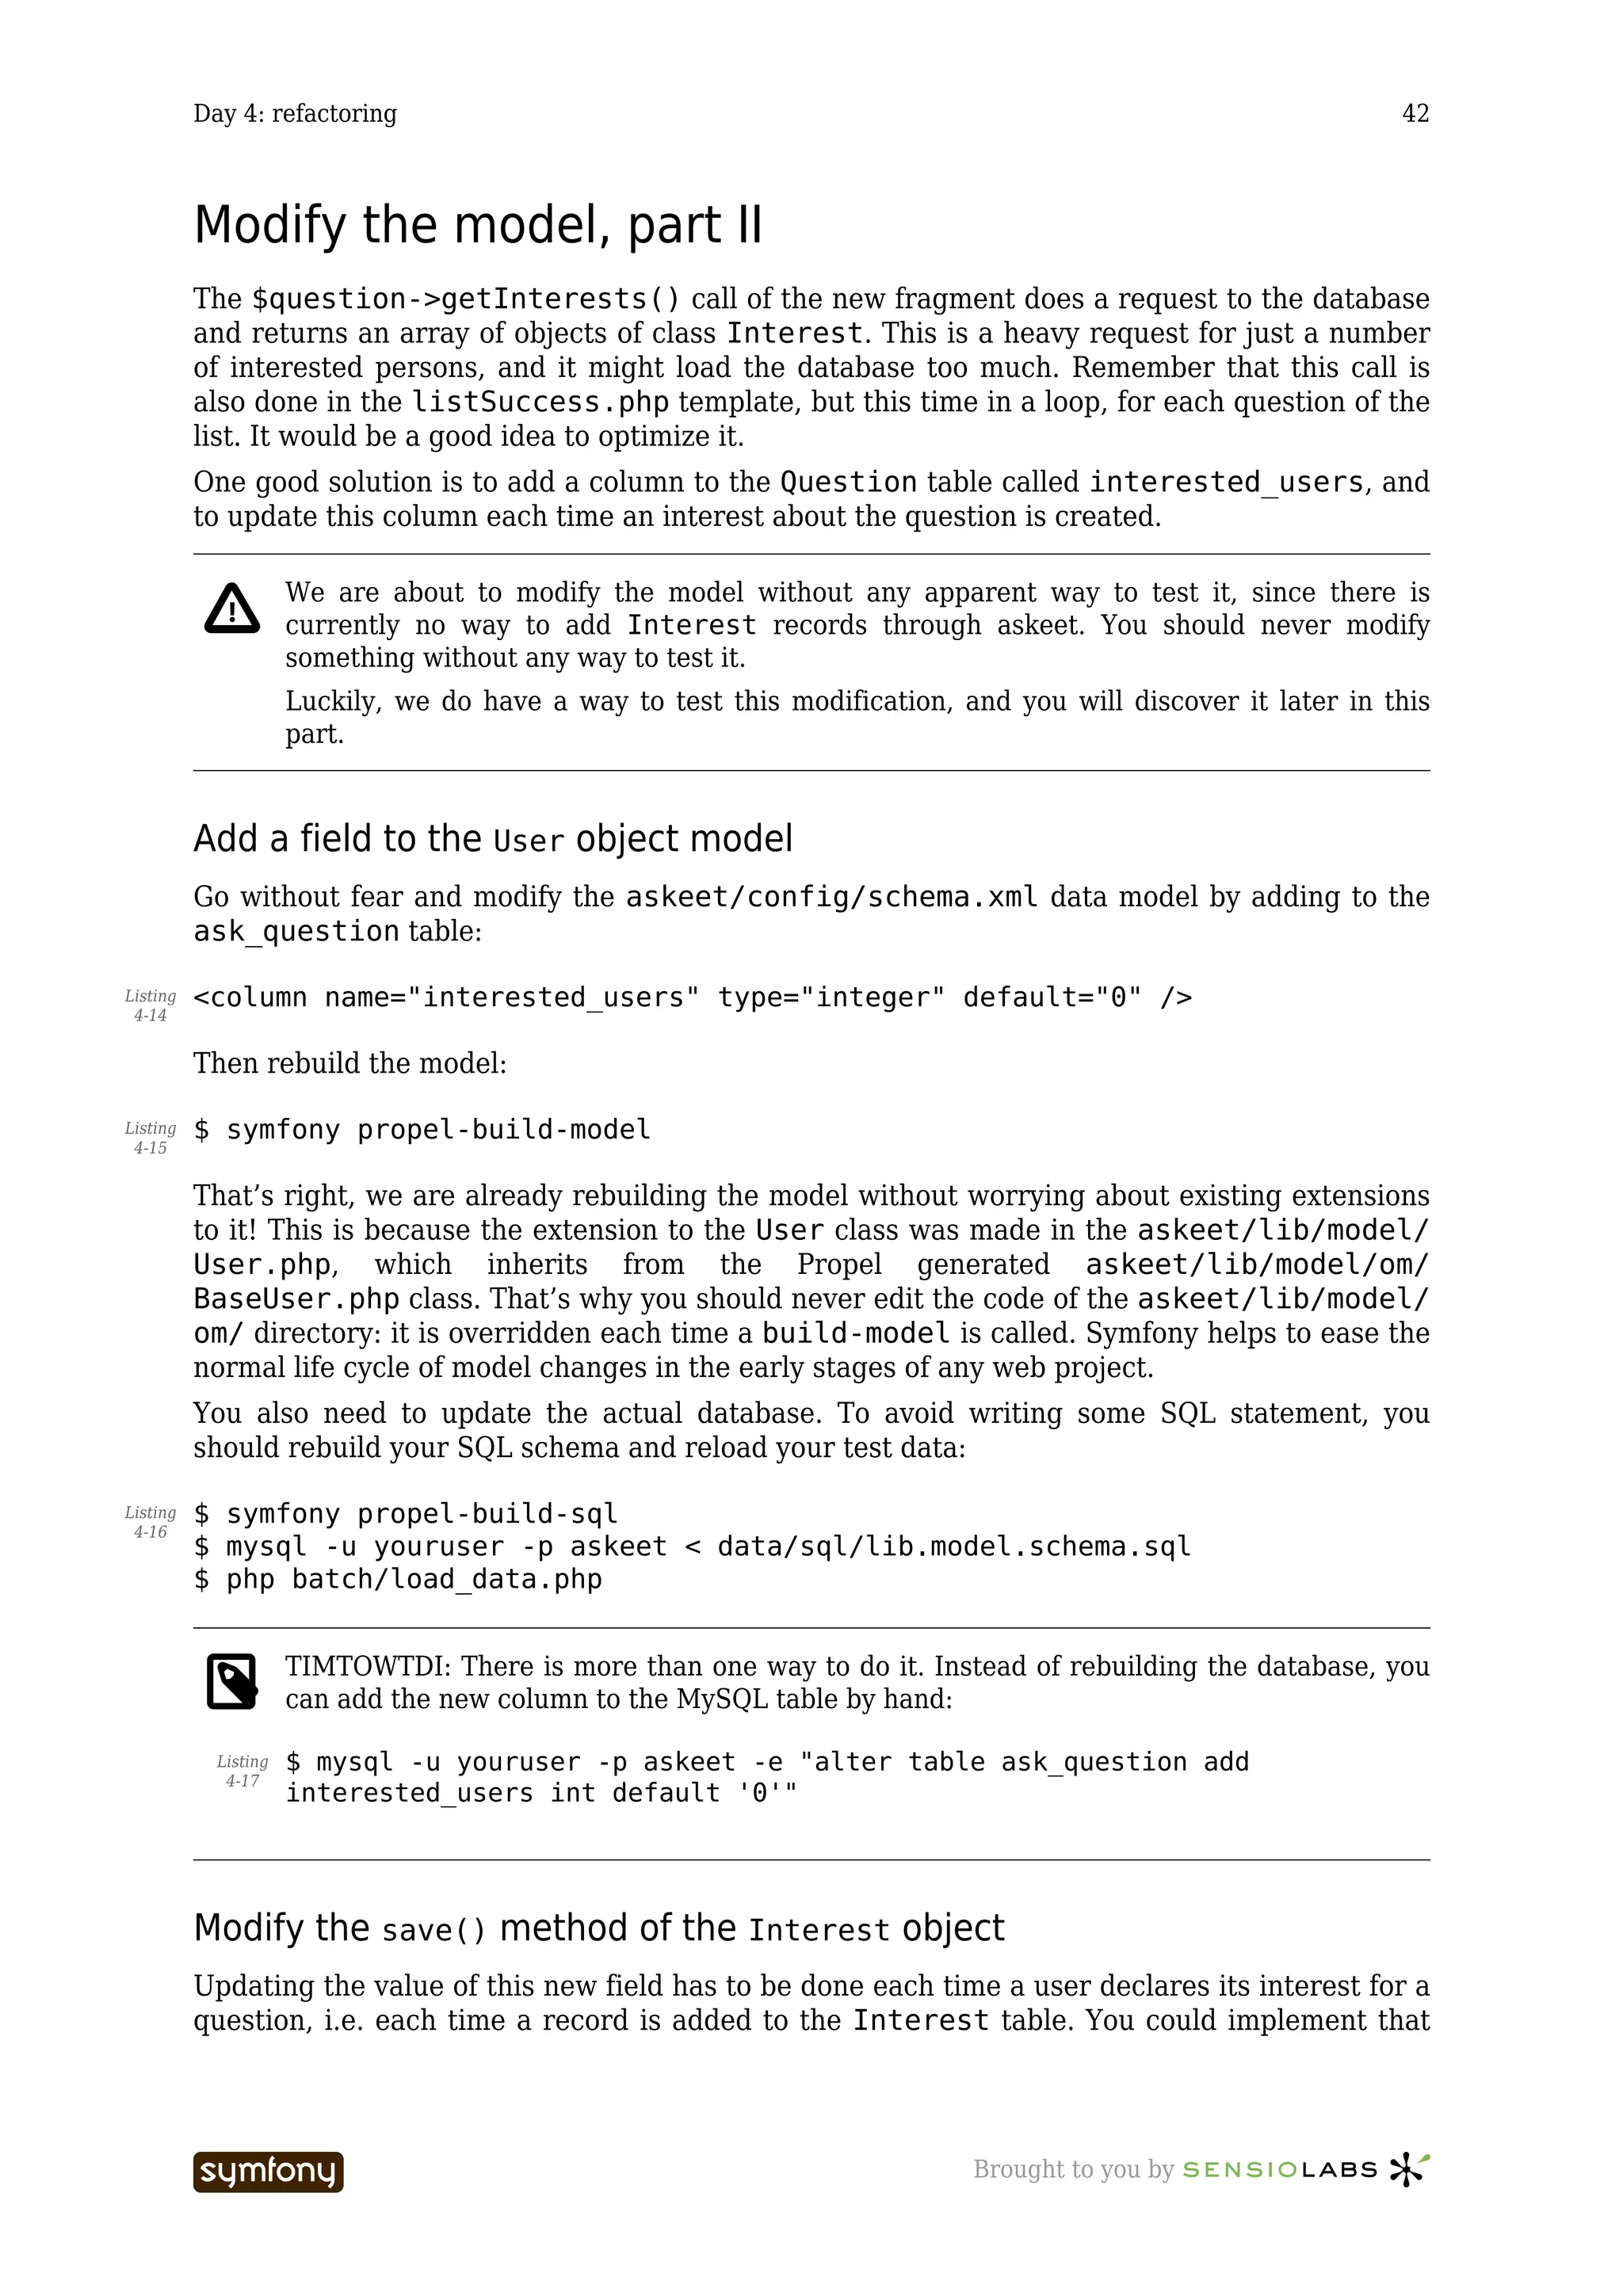
Check that the modifications display correctly by requesting the home page - this time in the
development environment:
Listing http://askeet/frontend_dev.php/
3-4
A few words about environments
If you wonder what the difference between http://askeet/frontend_dev.php/ and
http://askeet/ is, you should probably have a look at the configuration chapter39 of the
symfony book. For now, you just need to know that they point to the same application, but in
different environments. An environment is a unique configuration, where some features of the
framework can be activated or deactivated as required.
In this case, the /frontend_dev.php/ URL points to the development environment,
where the whole configuration is parsed at each request, the HTML cache is deactivated, and
the debug tools are all available (including a semi-transparent toolbar located at the top right
corner of the window). The / URL - equivalent to /index.php/ - points to the production
environment, where the configuration is “compiled” and the debug tools deactivated to
speed up the delivery of pages.
These two PHP scripts - frontend_dev.php and index.php - are called front controllers,
and all the requests to the application are handled by them. You can find them in the
askeet/web/ directory. As a matter of fact, the index.php file should be named
frontend_prod.php, but as frontend is the first application that you created, symfony
deduced that you probably wanted it to be the default application and renamed it to
index.php, so that you can see your application in the production environment by just
requesting /. If you want to learn more about the front controllers and the Controller layer of
the MVC model in general, refer to the controller chapter40 in the symfony book.
38. http://svn.askeet.com/tags/release_day_3/web/css/
39.http://www.symfony-project.com/book/1_0/05-Configuring-Symfony
40.http://www.symfony-project.com/book/1_0/06-Inside-the-Controller-
Layer
----------------- Brought to you by](https://image.slidesharecdn.com/cfakepathaskeet-1-0-en-100531180741-phpapp02/75/C-fake-path-askeet-1-0-en-28-2048.jpg)
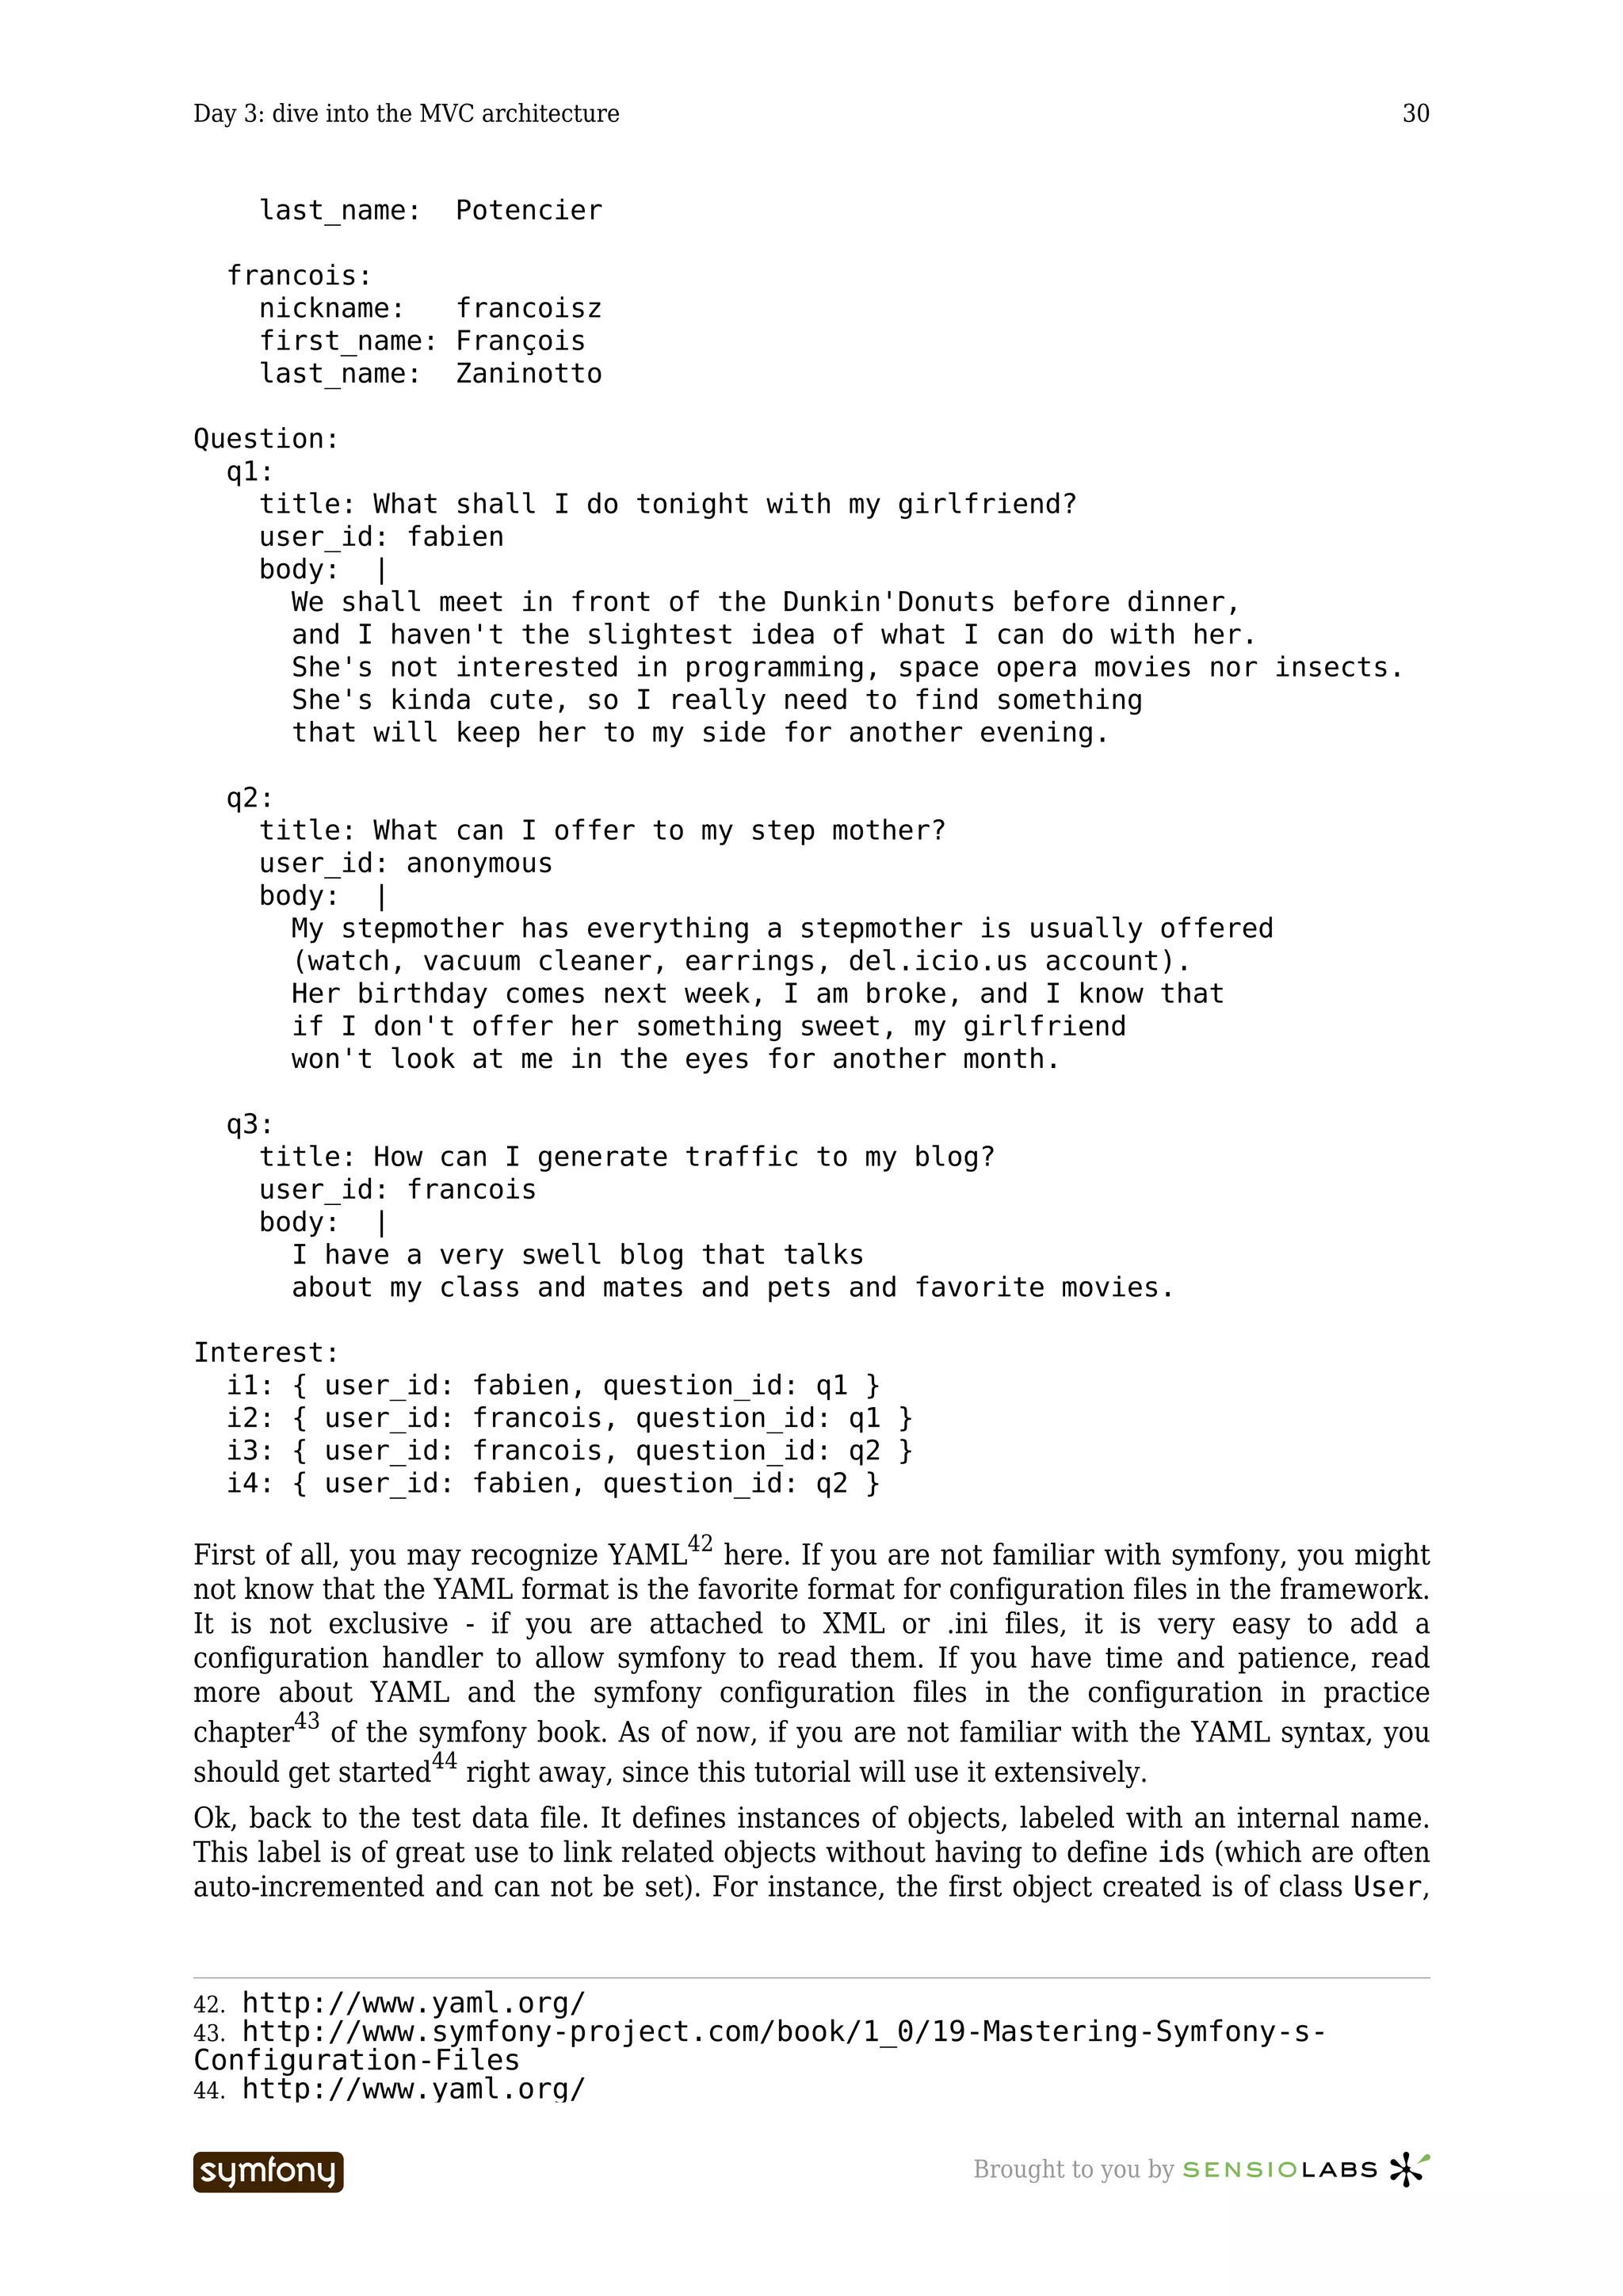


![Day 6: security and form validation 60
Day 6
security and form validation
Previously on symfony
During the fifth day75, you got used to manipulating templates and actions; forms and pagers
have no secrets for you anymore. But after building the login form, you probably expected us
to show you how to restrict access to non-authorised users for a specific set of functionalities.
That’s what we are going to do today, together with some form validation. As we will extend
the application with custom classes, you should be comfortable with the concepts exposed in
the custom extension chapter76 of the symfony book.
Login form validation
Validation file
The login form has a nickname and a password field. But what will happen if a user submits
incorrect data? To be able to handle this case, create a login.yml file in the /frontend/
modules/user/validate directory (login is the name of the action to validate). Add the
following content:
Listing methods:
6-1
post: [nickname, password]
names:
nickname:
required: true
required_msg: your nickname is required
validators: nicknameValidator
password:
required: true
required_msg: your password is required
nicknameValidator:
class: sfStringValidator
param:
75. 5.txt
76. http://www.symfony-project.com/book/1_0/07-Inside-the-View-Layer
----------------- Brought to you by](https://image.slidesharecdn.com/cfakepathaskeet-1-0-en-100531180741-phpapp02/75/C-fake-path-askeet-1-0-en-60-2048.jpg)
![Day 6: security and form validation 62
<div class="form-row">
<?php echo form_error('password') ?>
<label for="password">password:</label>
<?php echo input_password_tag('password') ?>
</div>
The form_error() helper will output the error message defined in the login.yml if an
error is declared in the field given as a parameter.
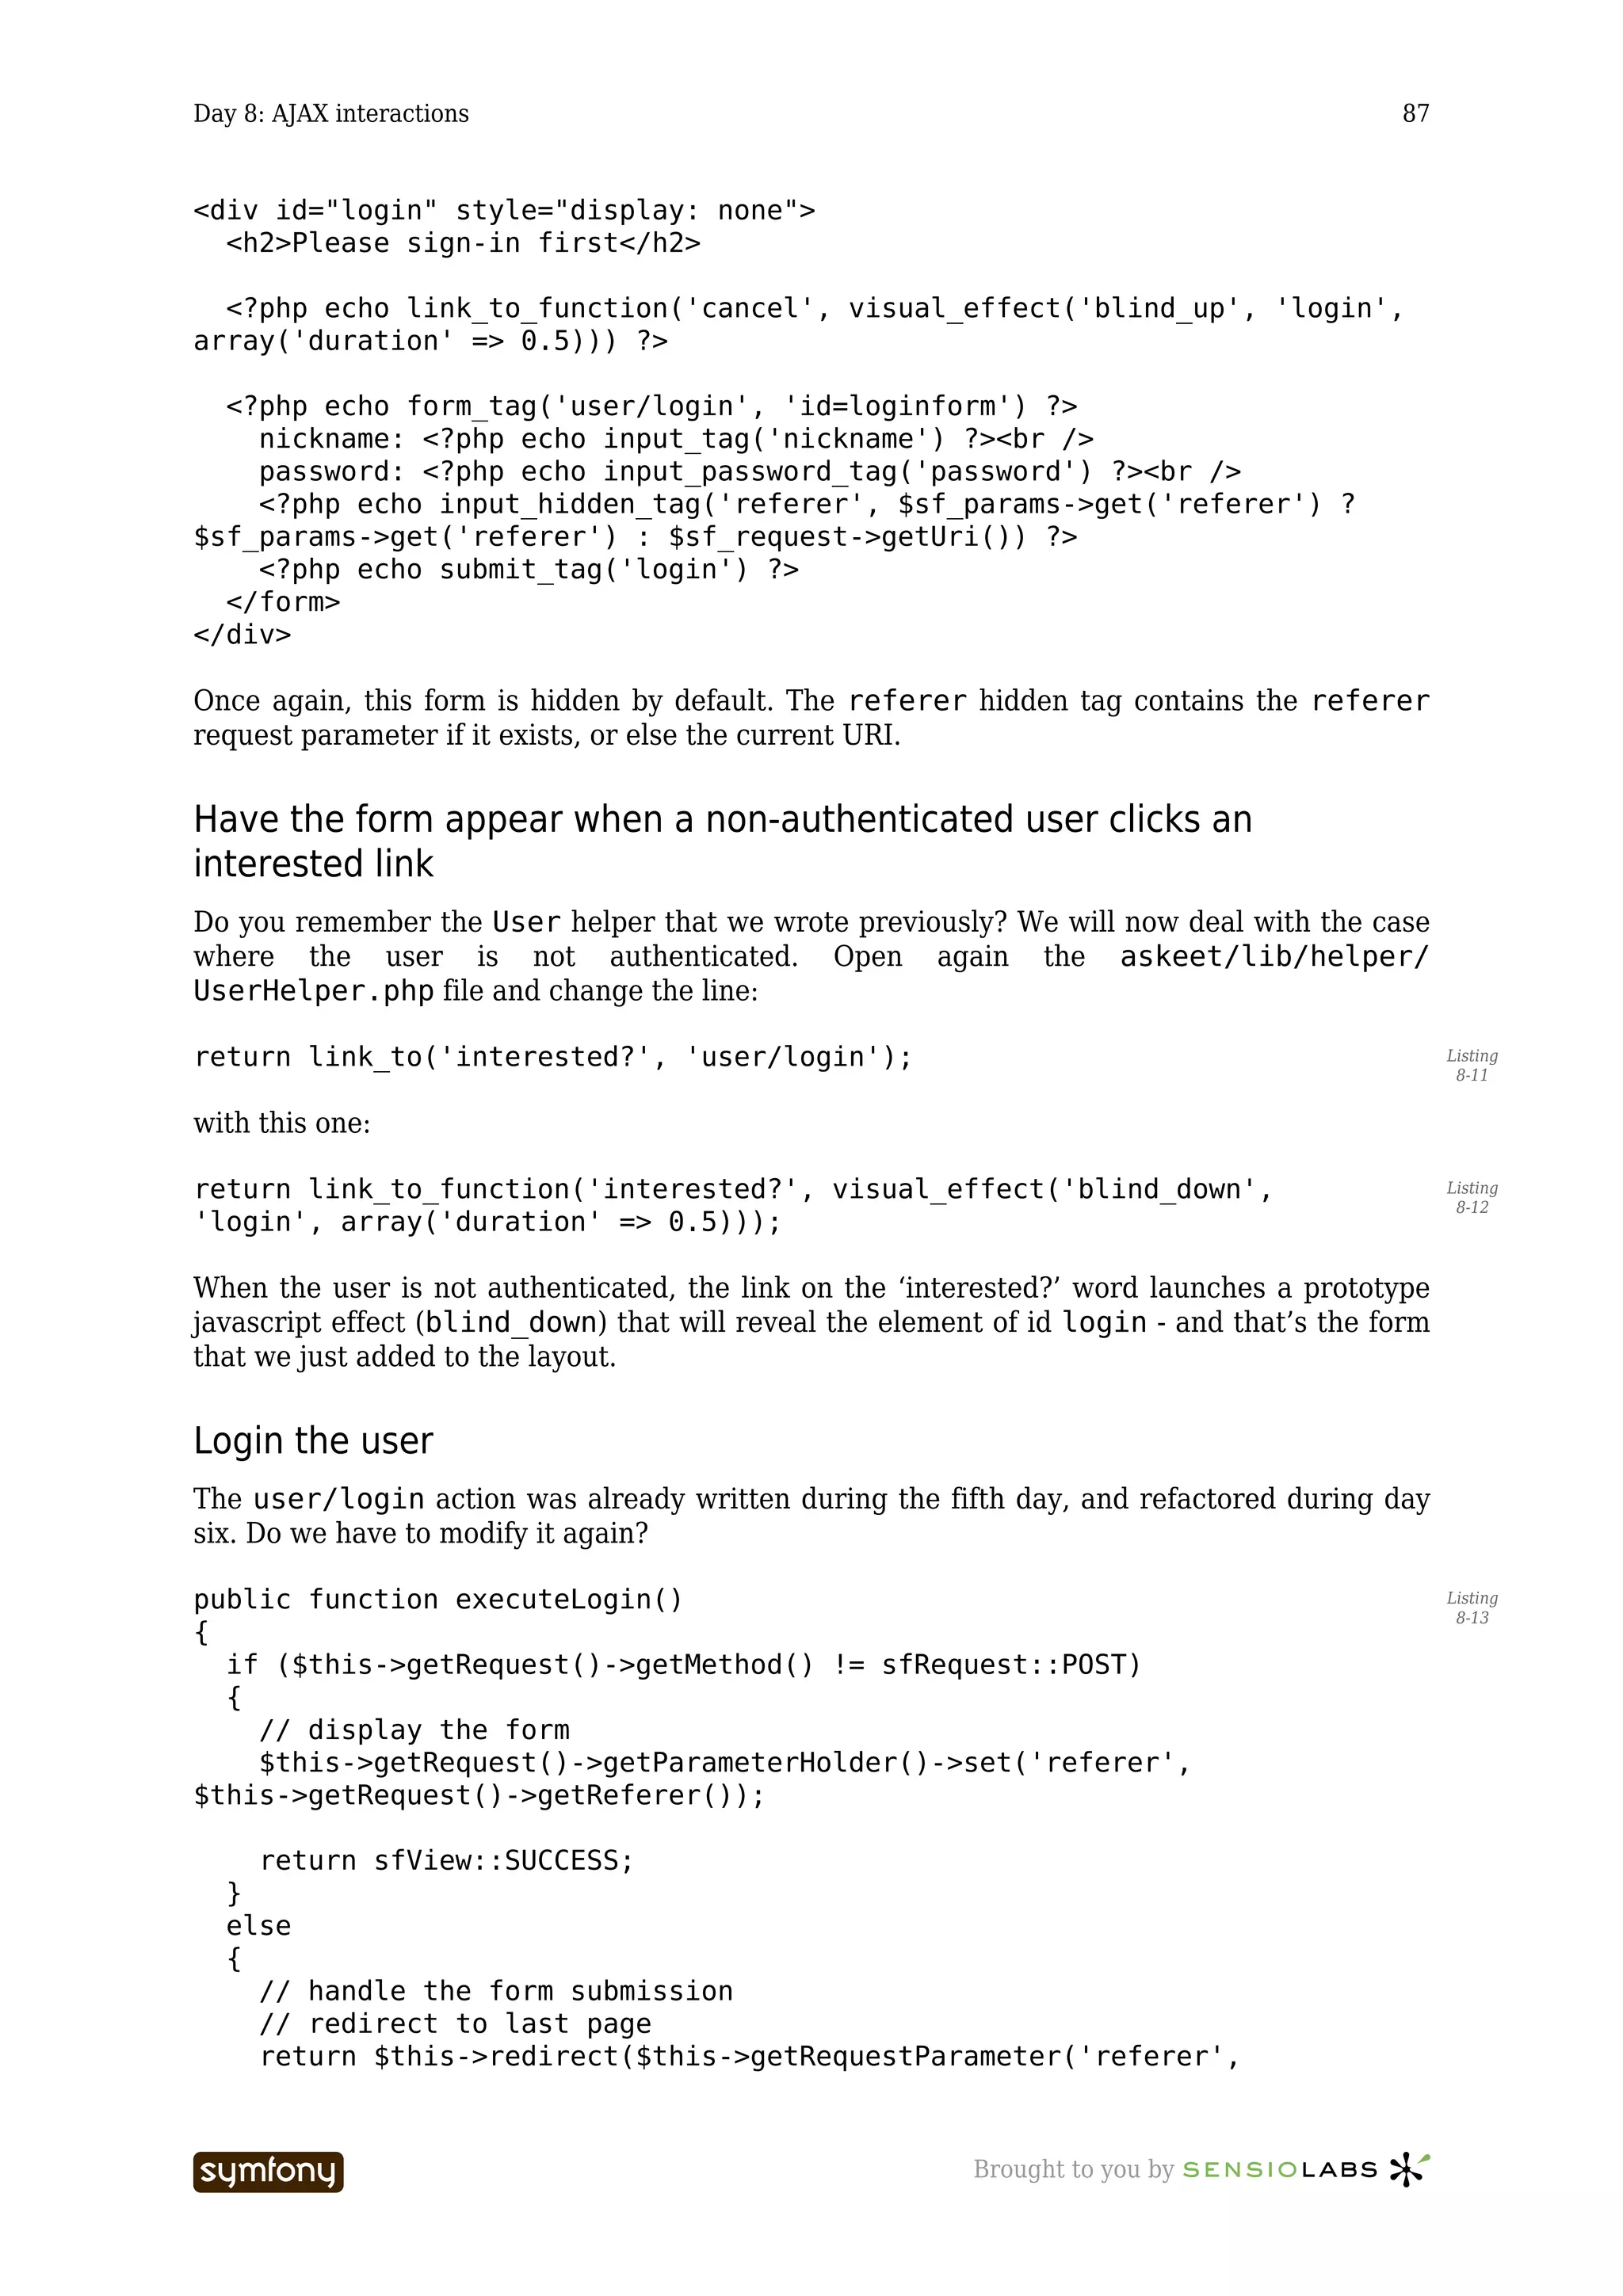
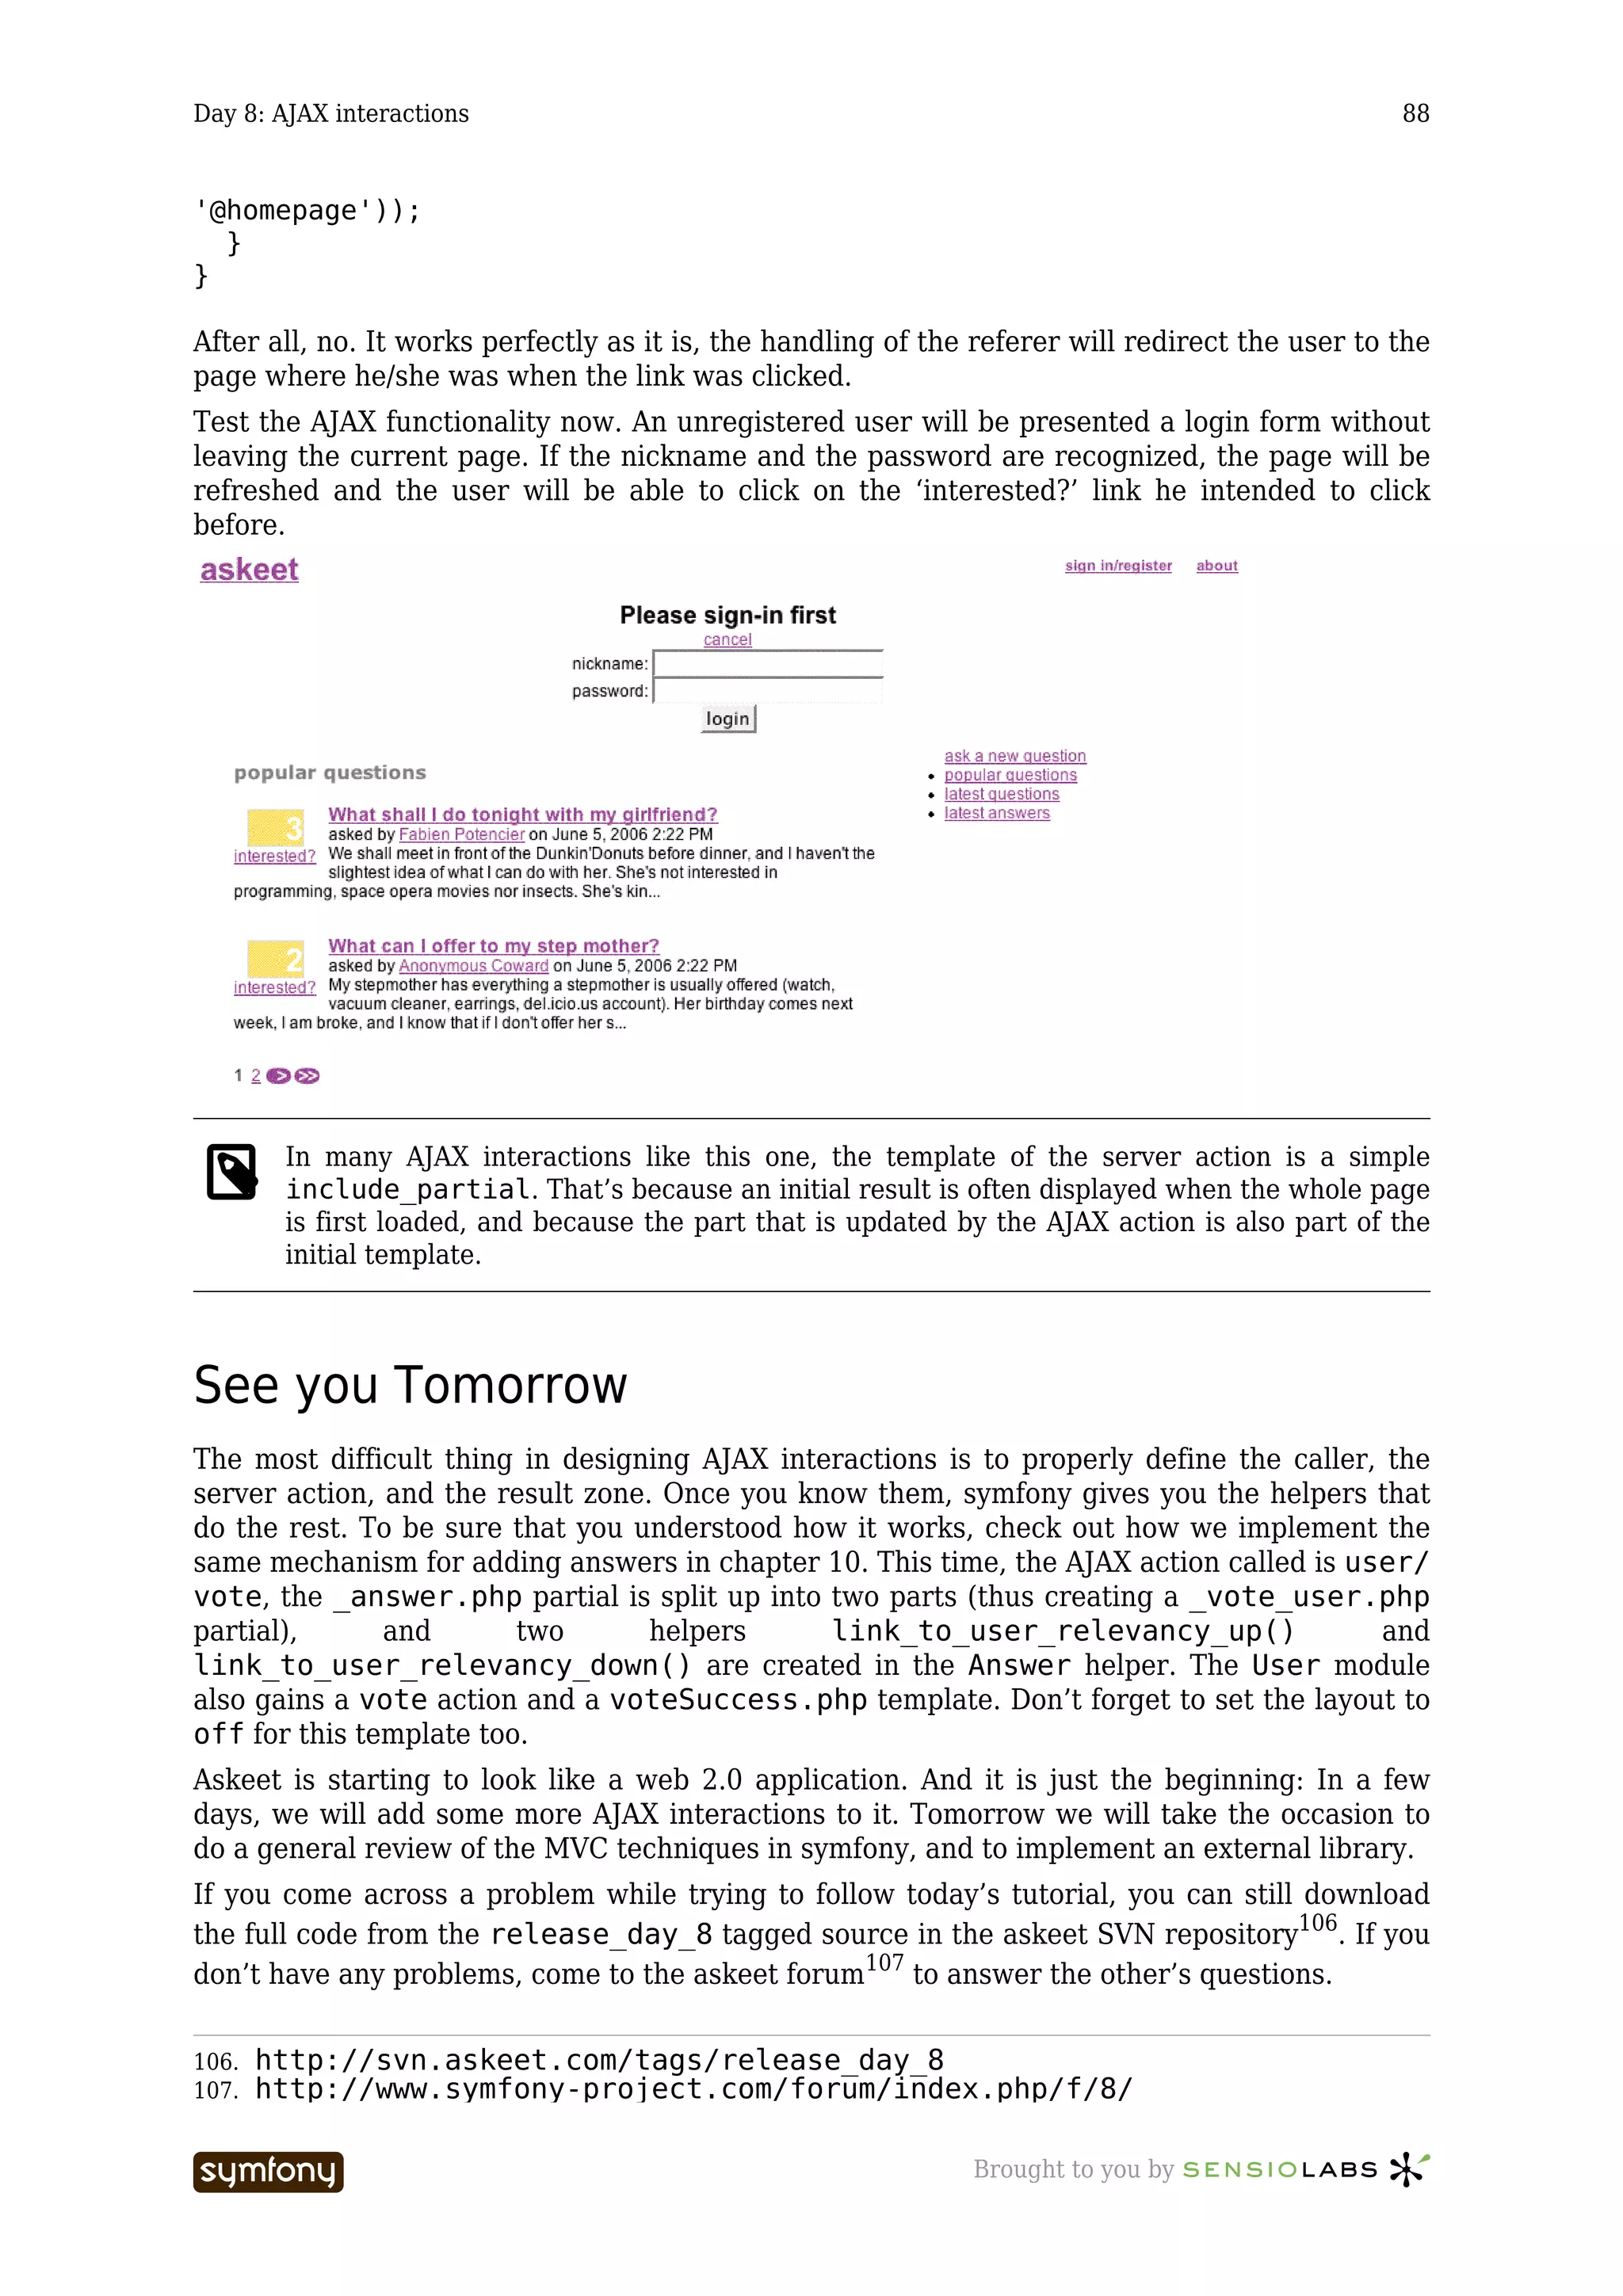
It is time to test the form validation by trying to enter a nickname of less than 5 characters, or
by omitting one the two fields. The error messages magically display above the concerned
fields:
The password is now compulsory, but there is no password in the database! That doesn’t
matter, as soon as you enter any password, the login will be successful. That’s not a very
secure process, is it?
Style errors
If you tested the form and got an error, you probably noticed that your errors are not styled
the same way as the ones of the capture above. That’s because we defined the styling of the
.form_error class (in web/main.css), which is the default class of the form errors
generated by the form_error() helper:
Listing .form_error
6-5
{
padding-left: 85px;
color: #d8732f;
}
Authenticate a user
Custom validator
Do you remember yesterday’s check about the existence of an entered nickname in the login
action? Well, that sounds like a form validation. This code should be taken out from the action
and included into a custom validator. You think it is complicated? It really isn’t. Edit the
login.yml validation file as follows:
Listing ...
6-6
names:
nickname:
required: true
required_msg: your nickname is required
validators: [nicknameValidator, userValidator]
----------------- Brought to you by](https://image.slidesharecdn.com/cfakepathaskeet-1-0-en-100531180741-phpapp02/75/C-fake-path-askeet-1-0-en-62-2048.jpg)
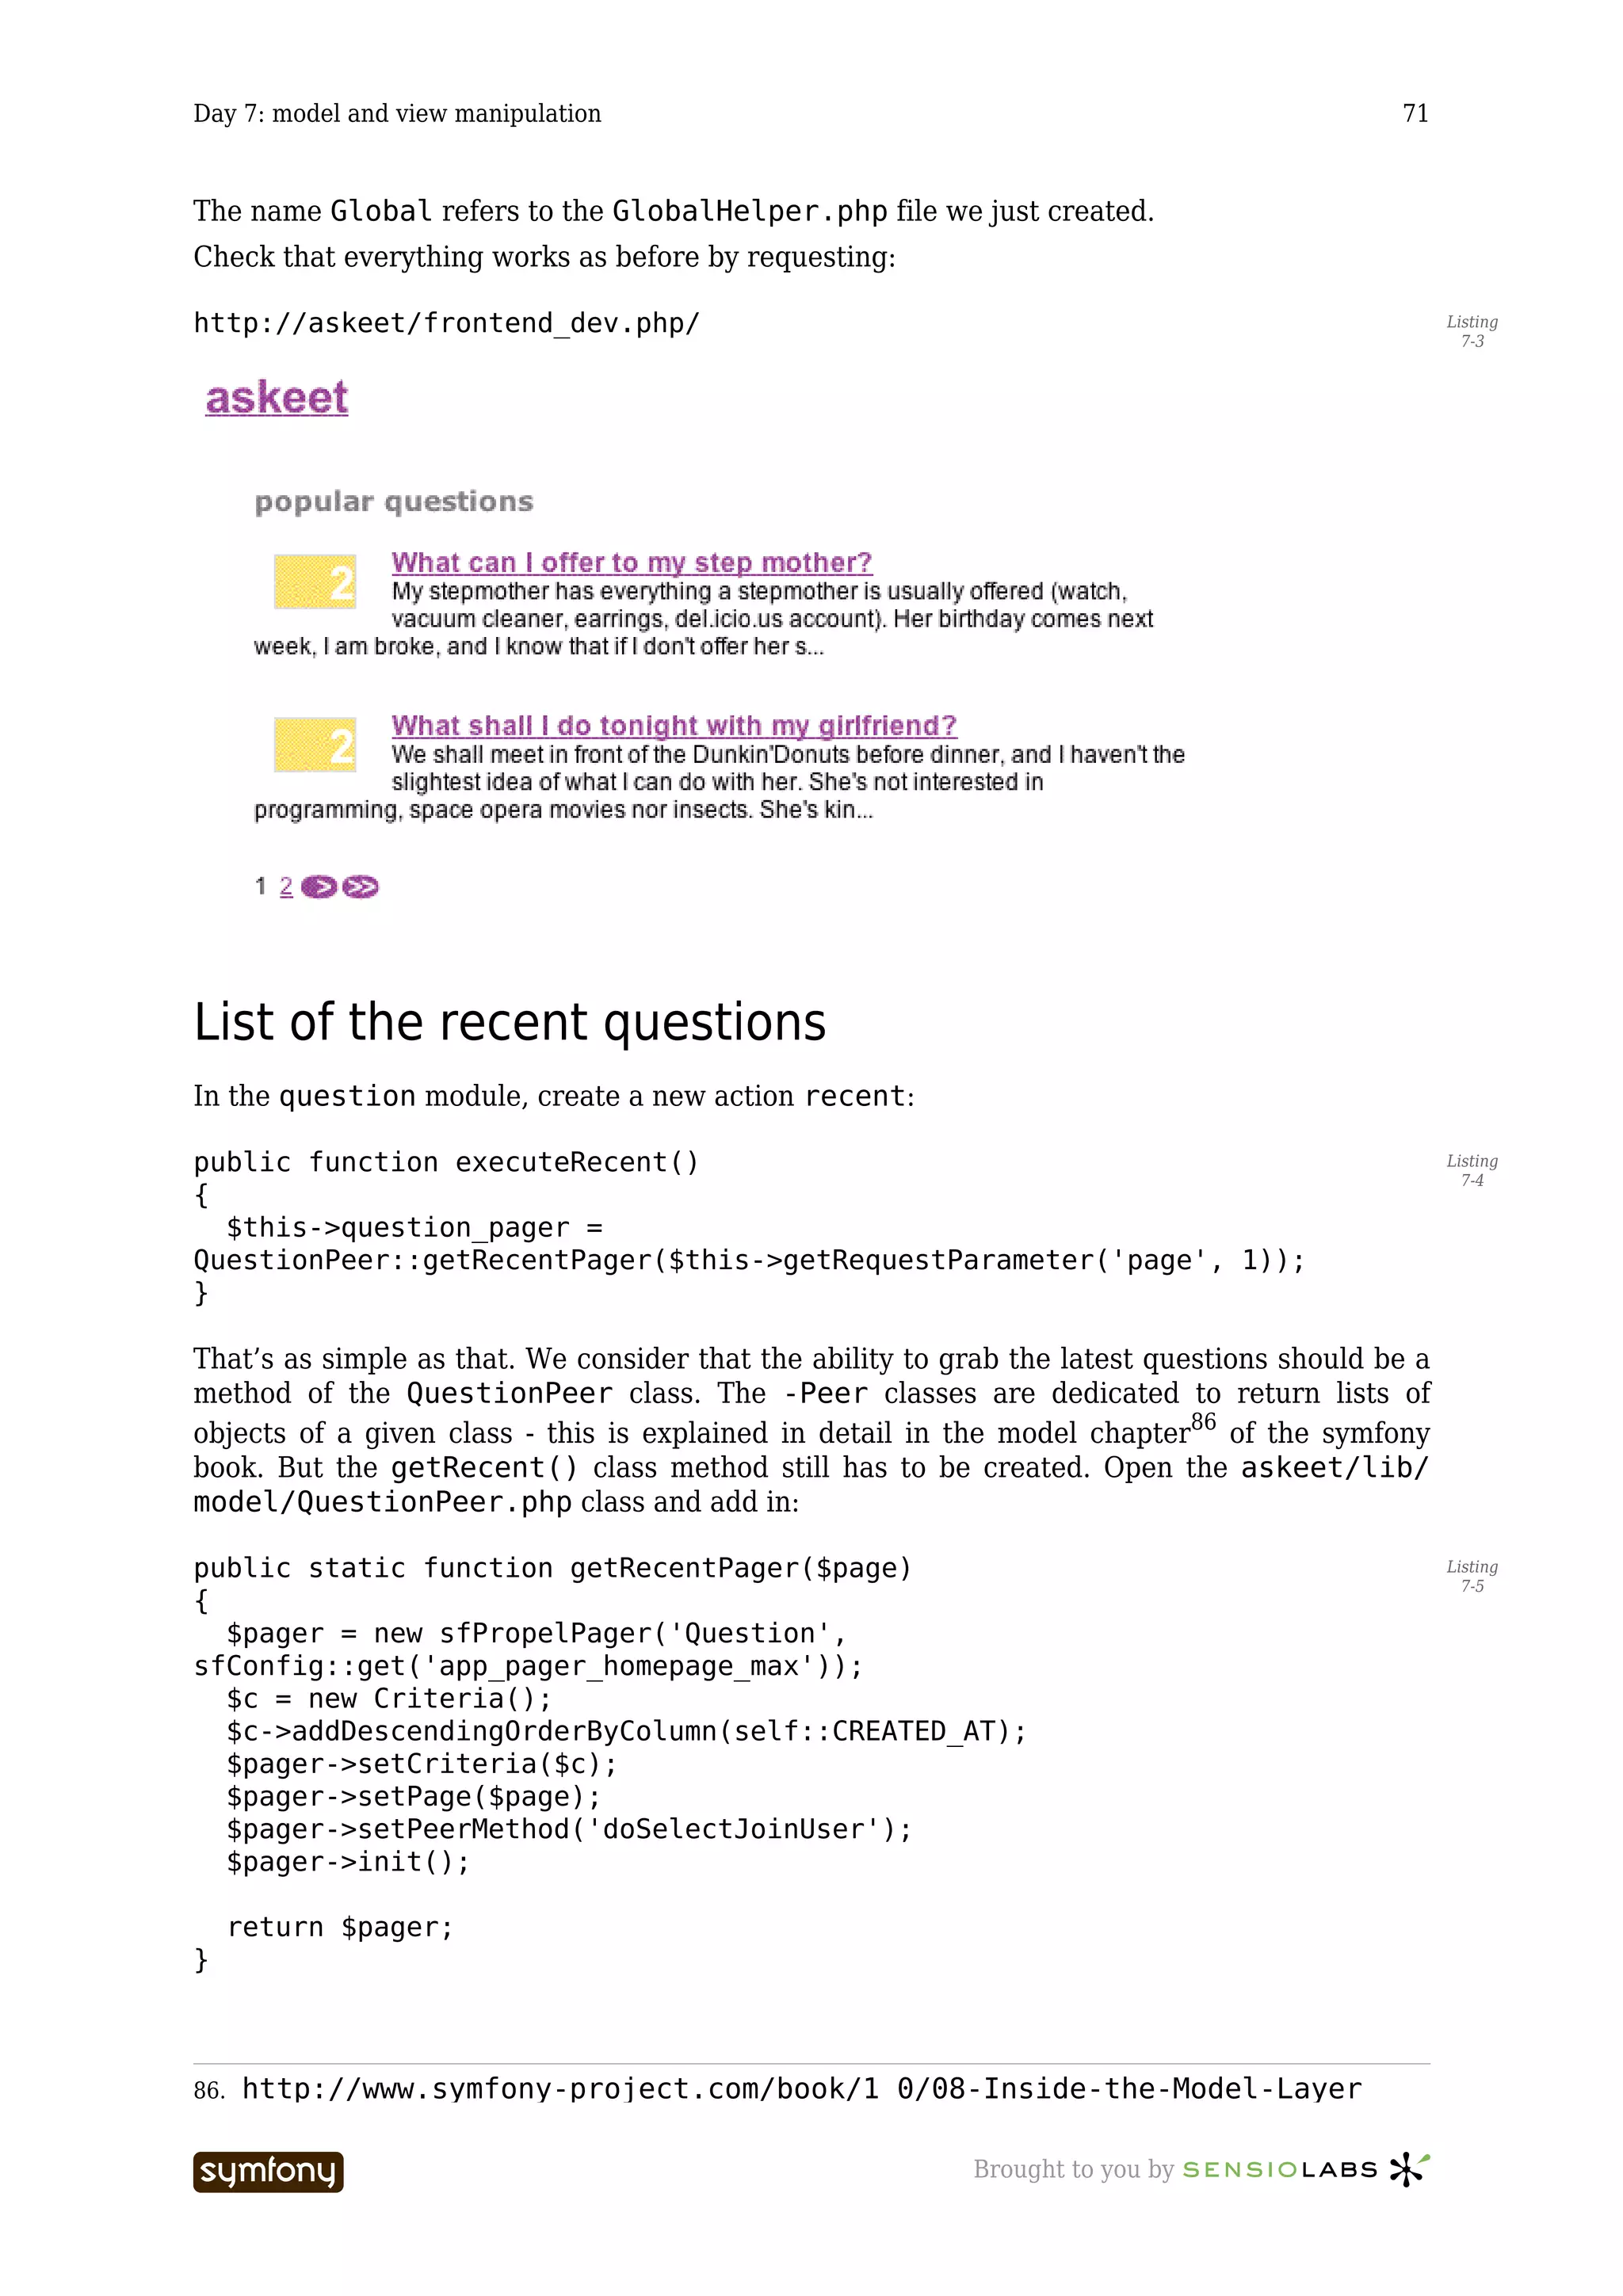
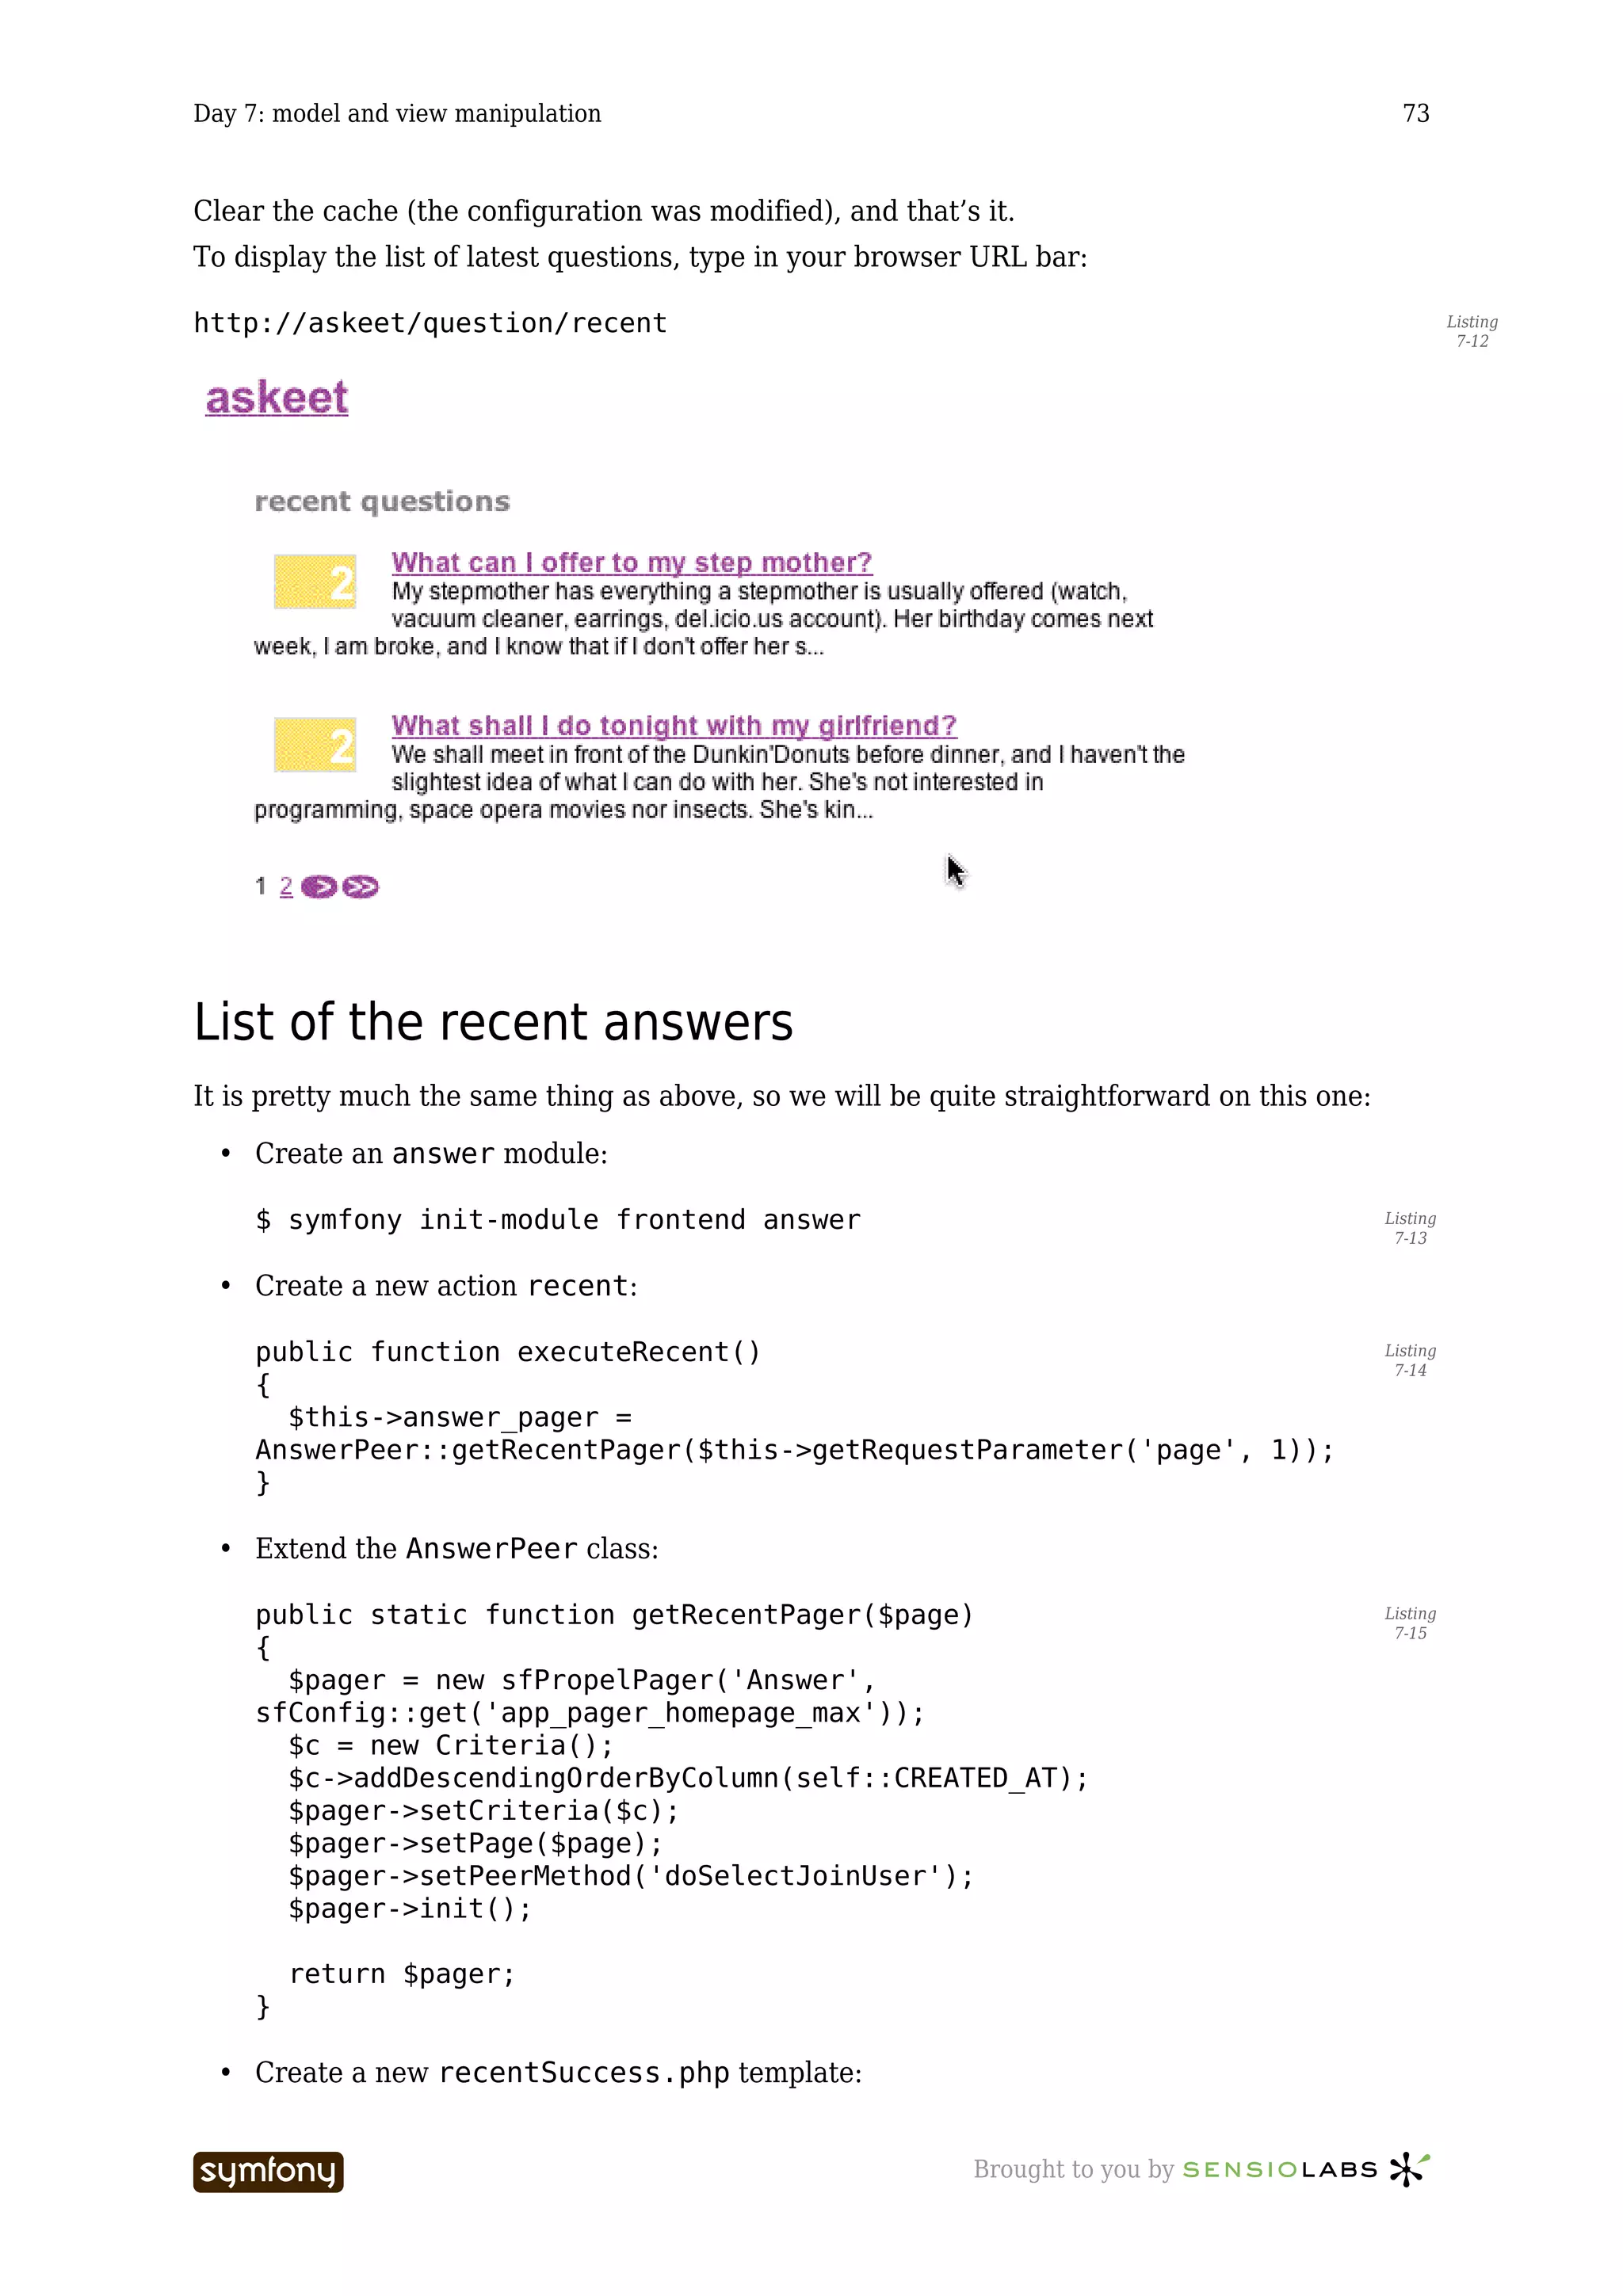
![Day 7: model and view manipulation 70
}
// Pages one by one
$links = array();
foreach ($pager->getLinks() as $page)
{
$links[] = link_to_unless($page == $pager->getPage(), $page,
$uri.$page);
}
$navigation .= join(' ', $links);
// Next and last page
if ($pager->getPage() != $pager->getCurrentMaxLink())
{
$navigation .= ' '.link_to(image_tag('next.gif',
'align=absmiddle'), $uri.$pager->getNextPage());
$navigation .= link_to(image_tag('last.gif', 'align=absmiddle'),
$uri.$pager->getLastPage());
}
}
return $navigation;
}
The pagination navigation helper improves the code we previously wrote: it can use any
routing rule, doesn’t display the ‘previous’ links for the first page nor the ‘next’ links for the
last page. We also added four new images (first.gif, previous.gif, next.gif and
last.gif) to make the links look prettier. Grab them from the askeet SVN repository85. You
will probaby reuse this helper in the future for your own projects.
To use this helper in the question/templates/_list.php fragment, call the helper
function as follows:
Listing <?php use_helper('Text', 'Global') ?>
7-2
<?php foreach($question_pager->getResults() as $question): ?>
<div class="question">
<div class="interested_block">
<?php include_partial('interested_user', array('question' =>
$question)) ?>
</div>
<h2><?php echo link_to($question->getTitle(), 'question/
show?stripped_title='.$question->getStrippedTitle()) ?></h2>
<div class="question_body">
<?php echo truncate_text($question->getBody(), 200) ?>
</div>
</div>
<?php endforeach; ?>
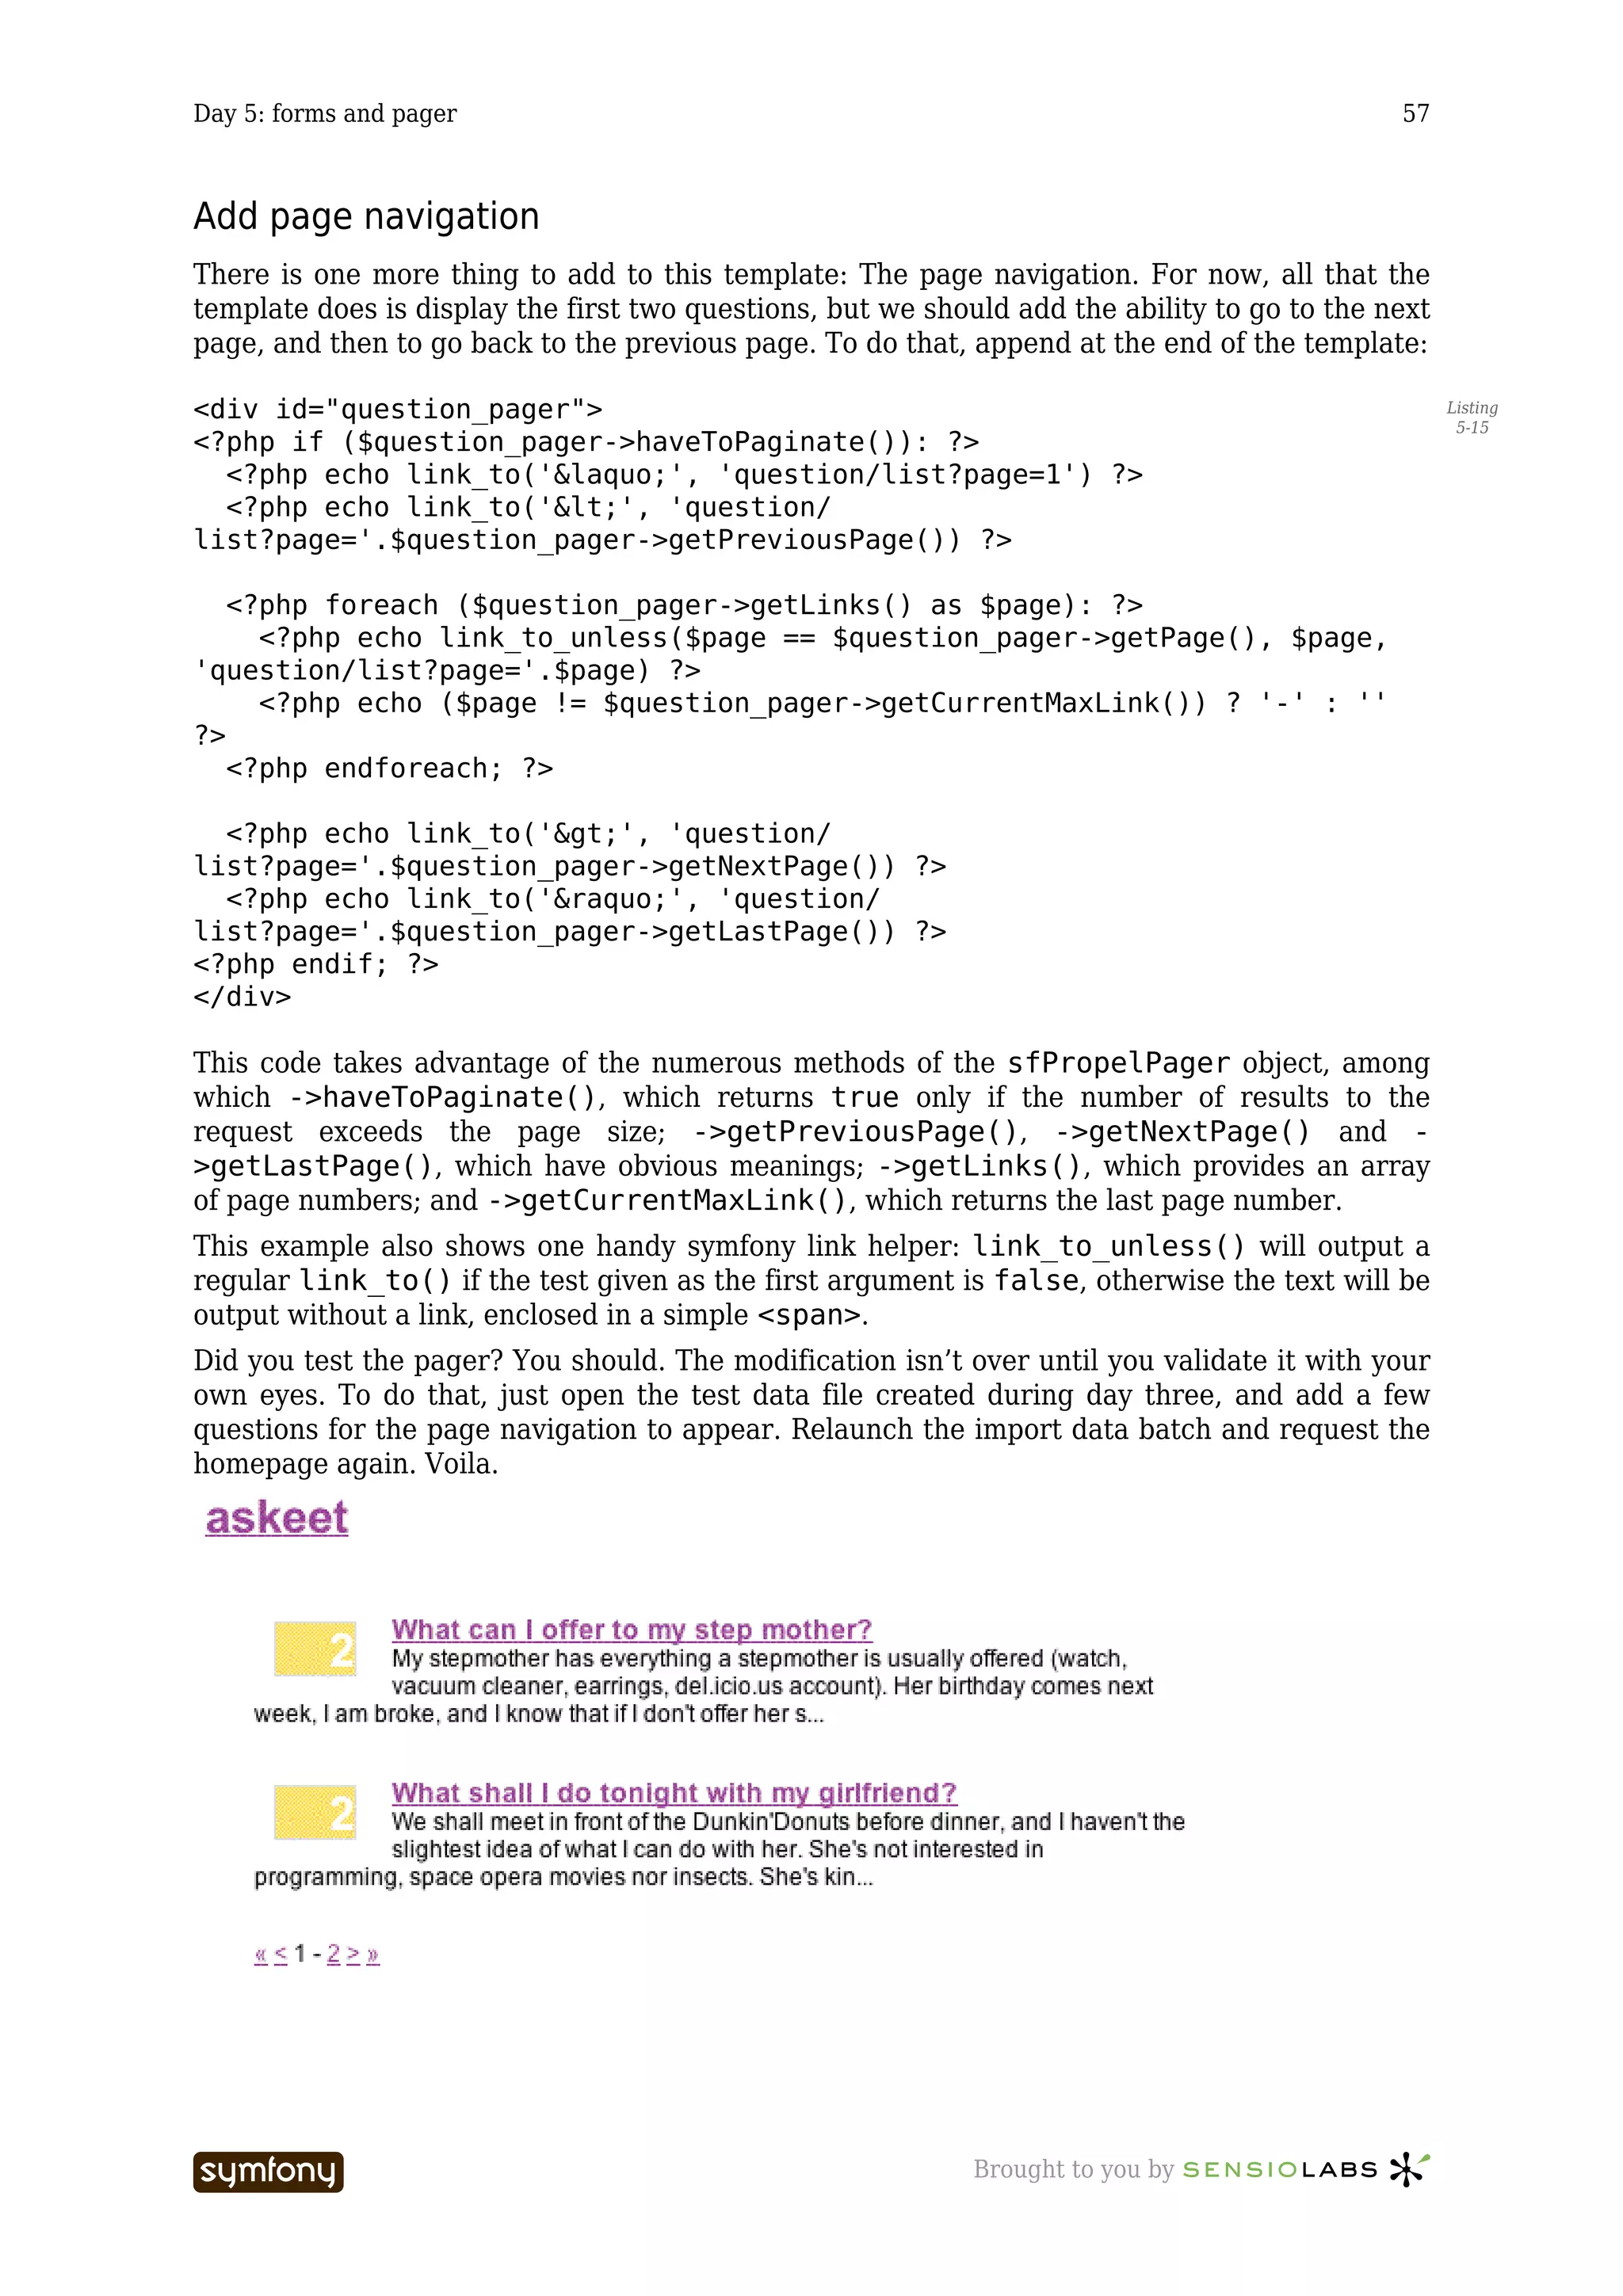
<div id="question_pager">
<?php echo pager_navigation($question_pager, 'question/list') ?>
</div>
85. http://svn.askeet.com/tags/release_day_7/web/images/
----------------- Brought to you by](https://image.slidesharecdn.com/cfakepathaskeet-1-0-en-100531180741-phpapp02/75/C-fake-path-askeet-1-0-en-70-2048.jpg)
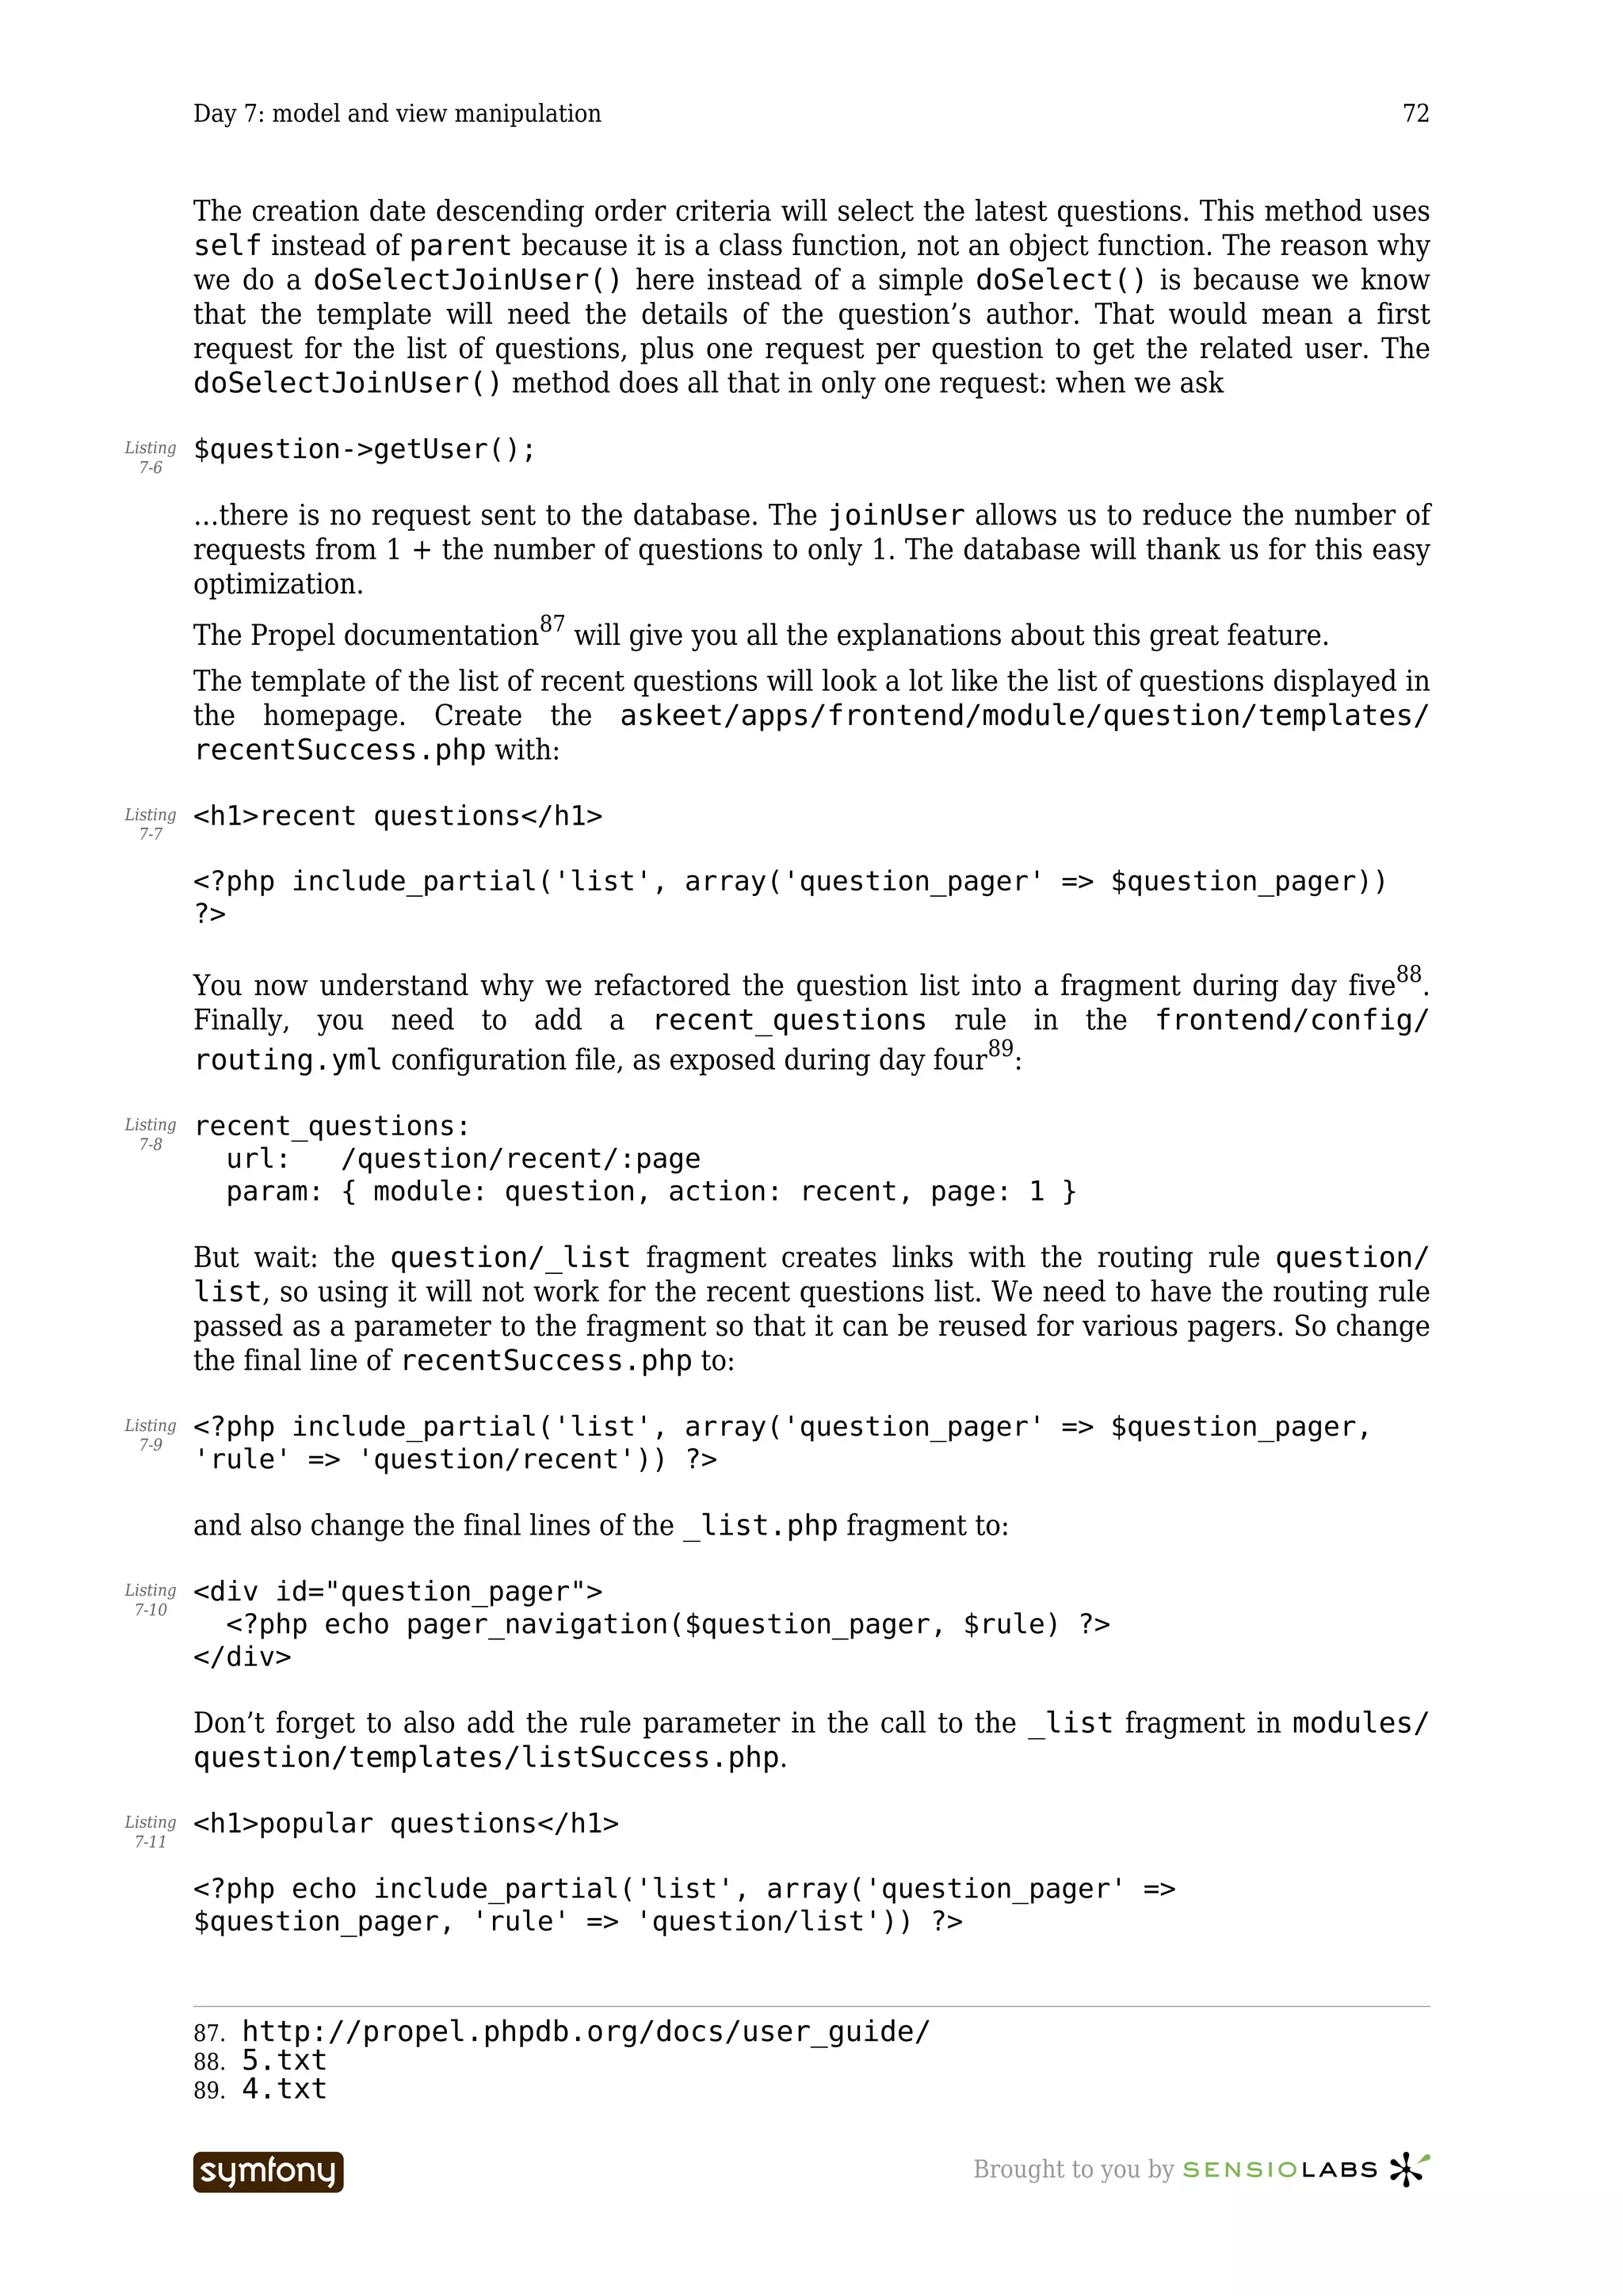
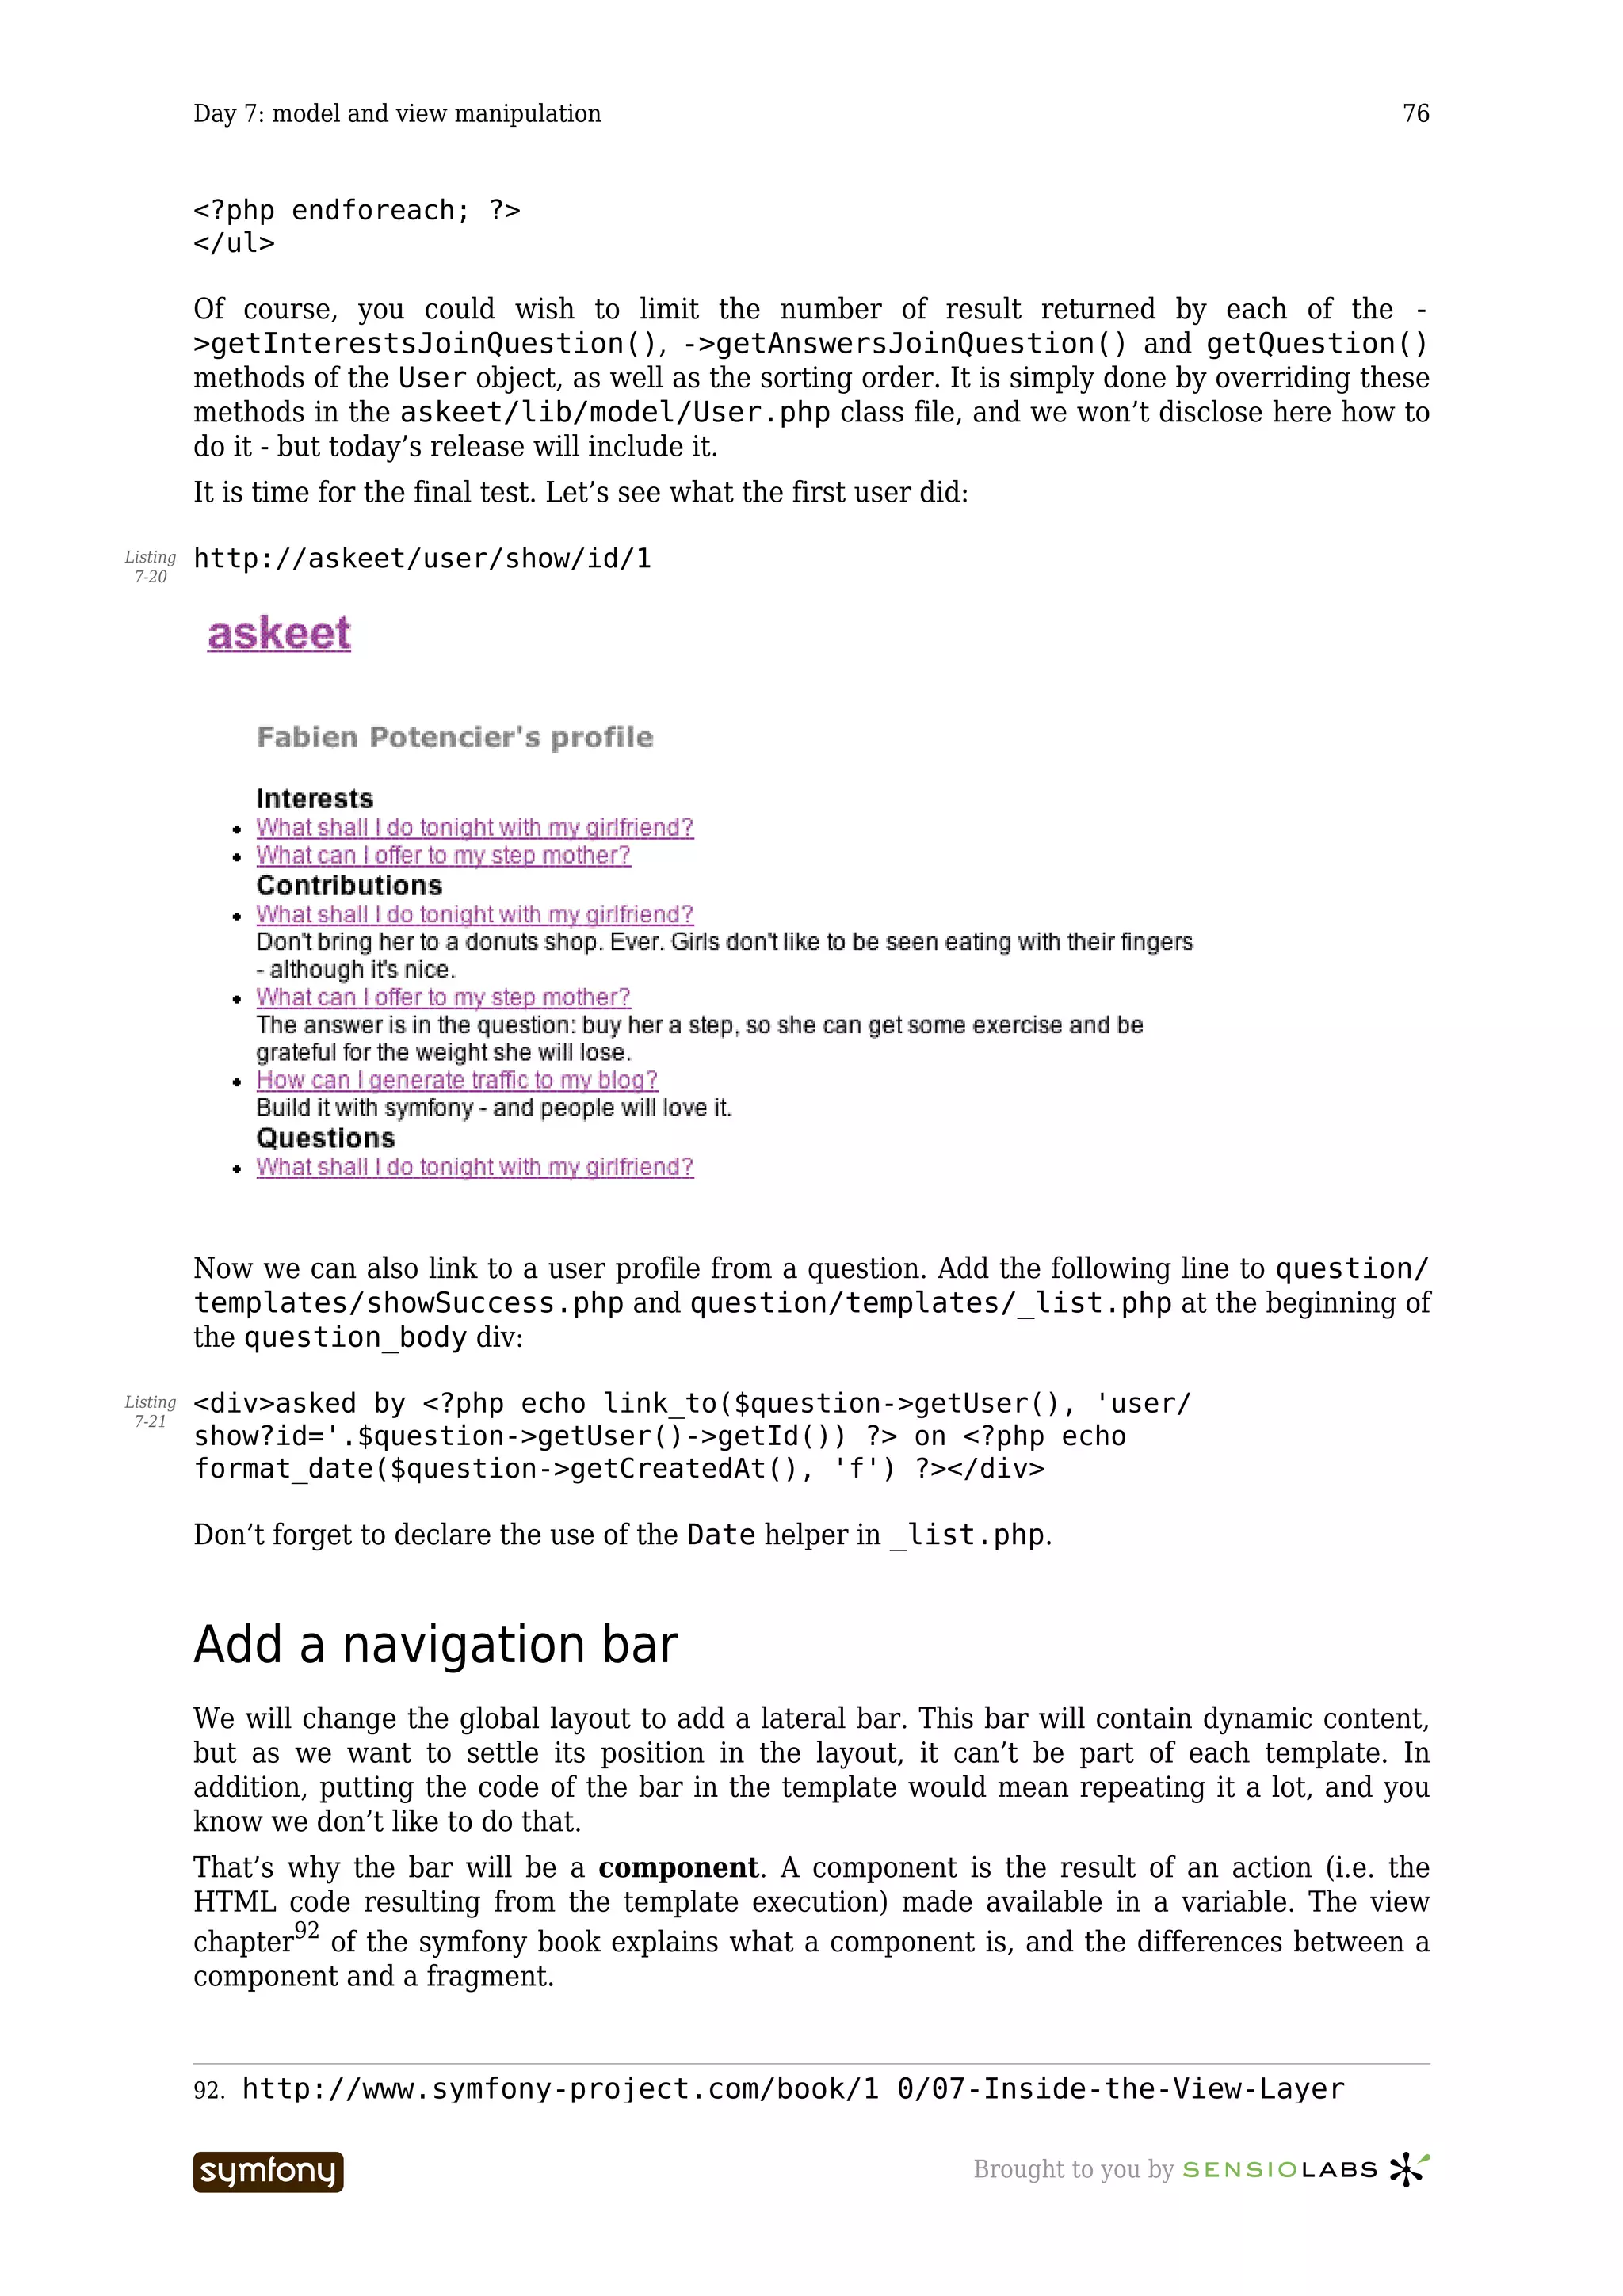
![Day 7: model and view manipulation 77
Add the component in the layout
Open the global layout (askeet/apps/frontend/templates/layout.php). Do you
remember this part of code:
<div id="content_bar"> Listing
7-22
<!-- Nothing for the moment -->
<div class="verticalalign"></div>
</div>
Replace the comment by
<?php include_component_slot('sidebar') ?> Listing
7-23
And that’s it.
Define what action goes into the component
We decided to use something a little more powerful than a simple component: a component
slot. It is a component whose action can be modified according to the caller action - allowing
contextual content. It’s the view configuration (written in a view.yml file) that defines which
action corresponds to a component slot:
default: Listing
7-24
components:
sidebar: [sidebar, default]
In this example, the component slot named sidebar is declared to be the result of the
default action of the sidebar module.
The view configuration can be defined for the whole application (in the askeet/apps/
frontend/config/ directory) or specifically for a module (in a askeet/apps/frontend/
modules/mymodule/config/ directory). For our case, we will define it for the whole
application, and override it when necessary to provide context-specific links in the sidebar.
So open the askeet/apps/frontend/config/view.yml and add in the component slot
configuration shown above. You will find more information about the view configuration in
the related chapter93 of the symfony book.
Write the sidebar/default action and template
First, we will let symfony initialize the new sidebar module:
$ symfony init-module frontend sidebar Listing
7-25
Next, we need to write a default component. In the askeet/apps/frontend/modules/
sidebar/actions/ directory, rename actions.class.php into
components.class.php, and change its content by:
<?php Listing
7-26
class sidebarComponents extends sfComponents
{
public function executeDefault()
{
93. http://www.symfony-project.com/book/1_0/07-Inside-the-View-Layer
----------------- Brought to you by](https://image.slidesharecdn.com/cfakepathaskeet-1-0-en-100531180741-phpapp02/75/C-fake-path-askeet-1-0-en-77-2048.jpg)
![Day 7: model and view manipulation 79
default: Listing
7-30
http_metas:
content-type: text/html; charset=utf-8
metas:
title: symfony project
robots: index, follow
description: symfony project
keywords: symfony, project
language: en
stylesheets: [main, layout]
javascripts: []
has_layout: on
layout: layout
components:
sidebar: [sidebar, default]
The metas section contains a configuration for the meta tags of the whole site. The title
key also defines the title that is displayed in the title bar of the browser window. This title is
very important, because it is the first thing that a user sees of the site if it is found by a
search index. It is therefore necessary to change it to something more adapted to the askeet
site:
metas: Listing
7-31
title: askeet! ask questions, find answers
robots: index, follow
description: askeet!, a symfony project built in 24 hours
keywords: symfony, project, askeet, php5, question, answer
language: en
Refresh the current page. If you don’t see any change, that’s because you are in the
production environment, and you should clear the cache first, to get the proper window title:
In addition to providing a default title for your project pages, symfony creates a default
robots.txt and favicon.ico in the web root directory (askeet/web/). Don’t forget to
change them also!
Note: You might need to change the title for each page of your site. You can do that by
defining a custom view.yml configuration for each module, but that would only let you
give static titles. Alternatively, you can use a dynamic value from an action with the -
>setTitle() method, as described in the view configuration chapter94:
[php] Listing
7-32
$this->getResponse()->setTitle($title);
94. http://www.symfony-project.com/book/1_0/07-Inside-the-View-Layer
----------------- Brought to you by](https://image.slidesharecdn.com/cfakepathaskeet-1-0-en-100531180741-phpapp02/75/C-fake-path-askeet-1-0-en-79-2048.jpg)

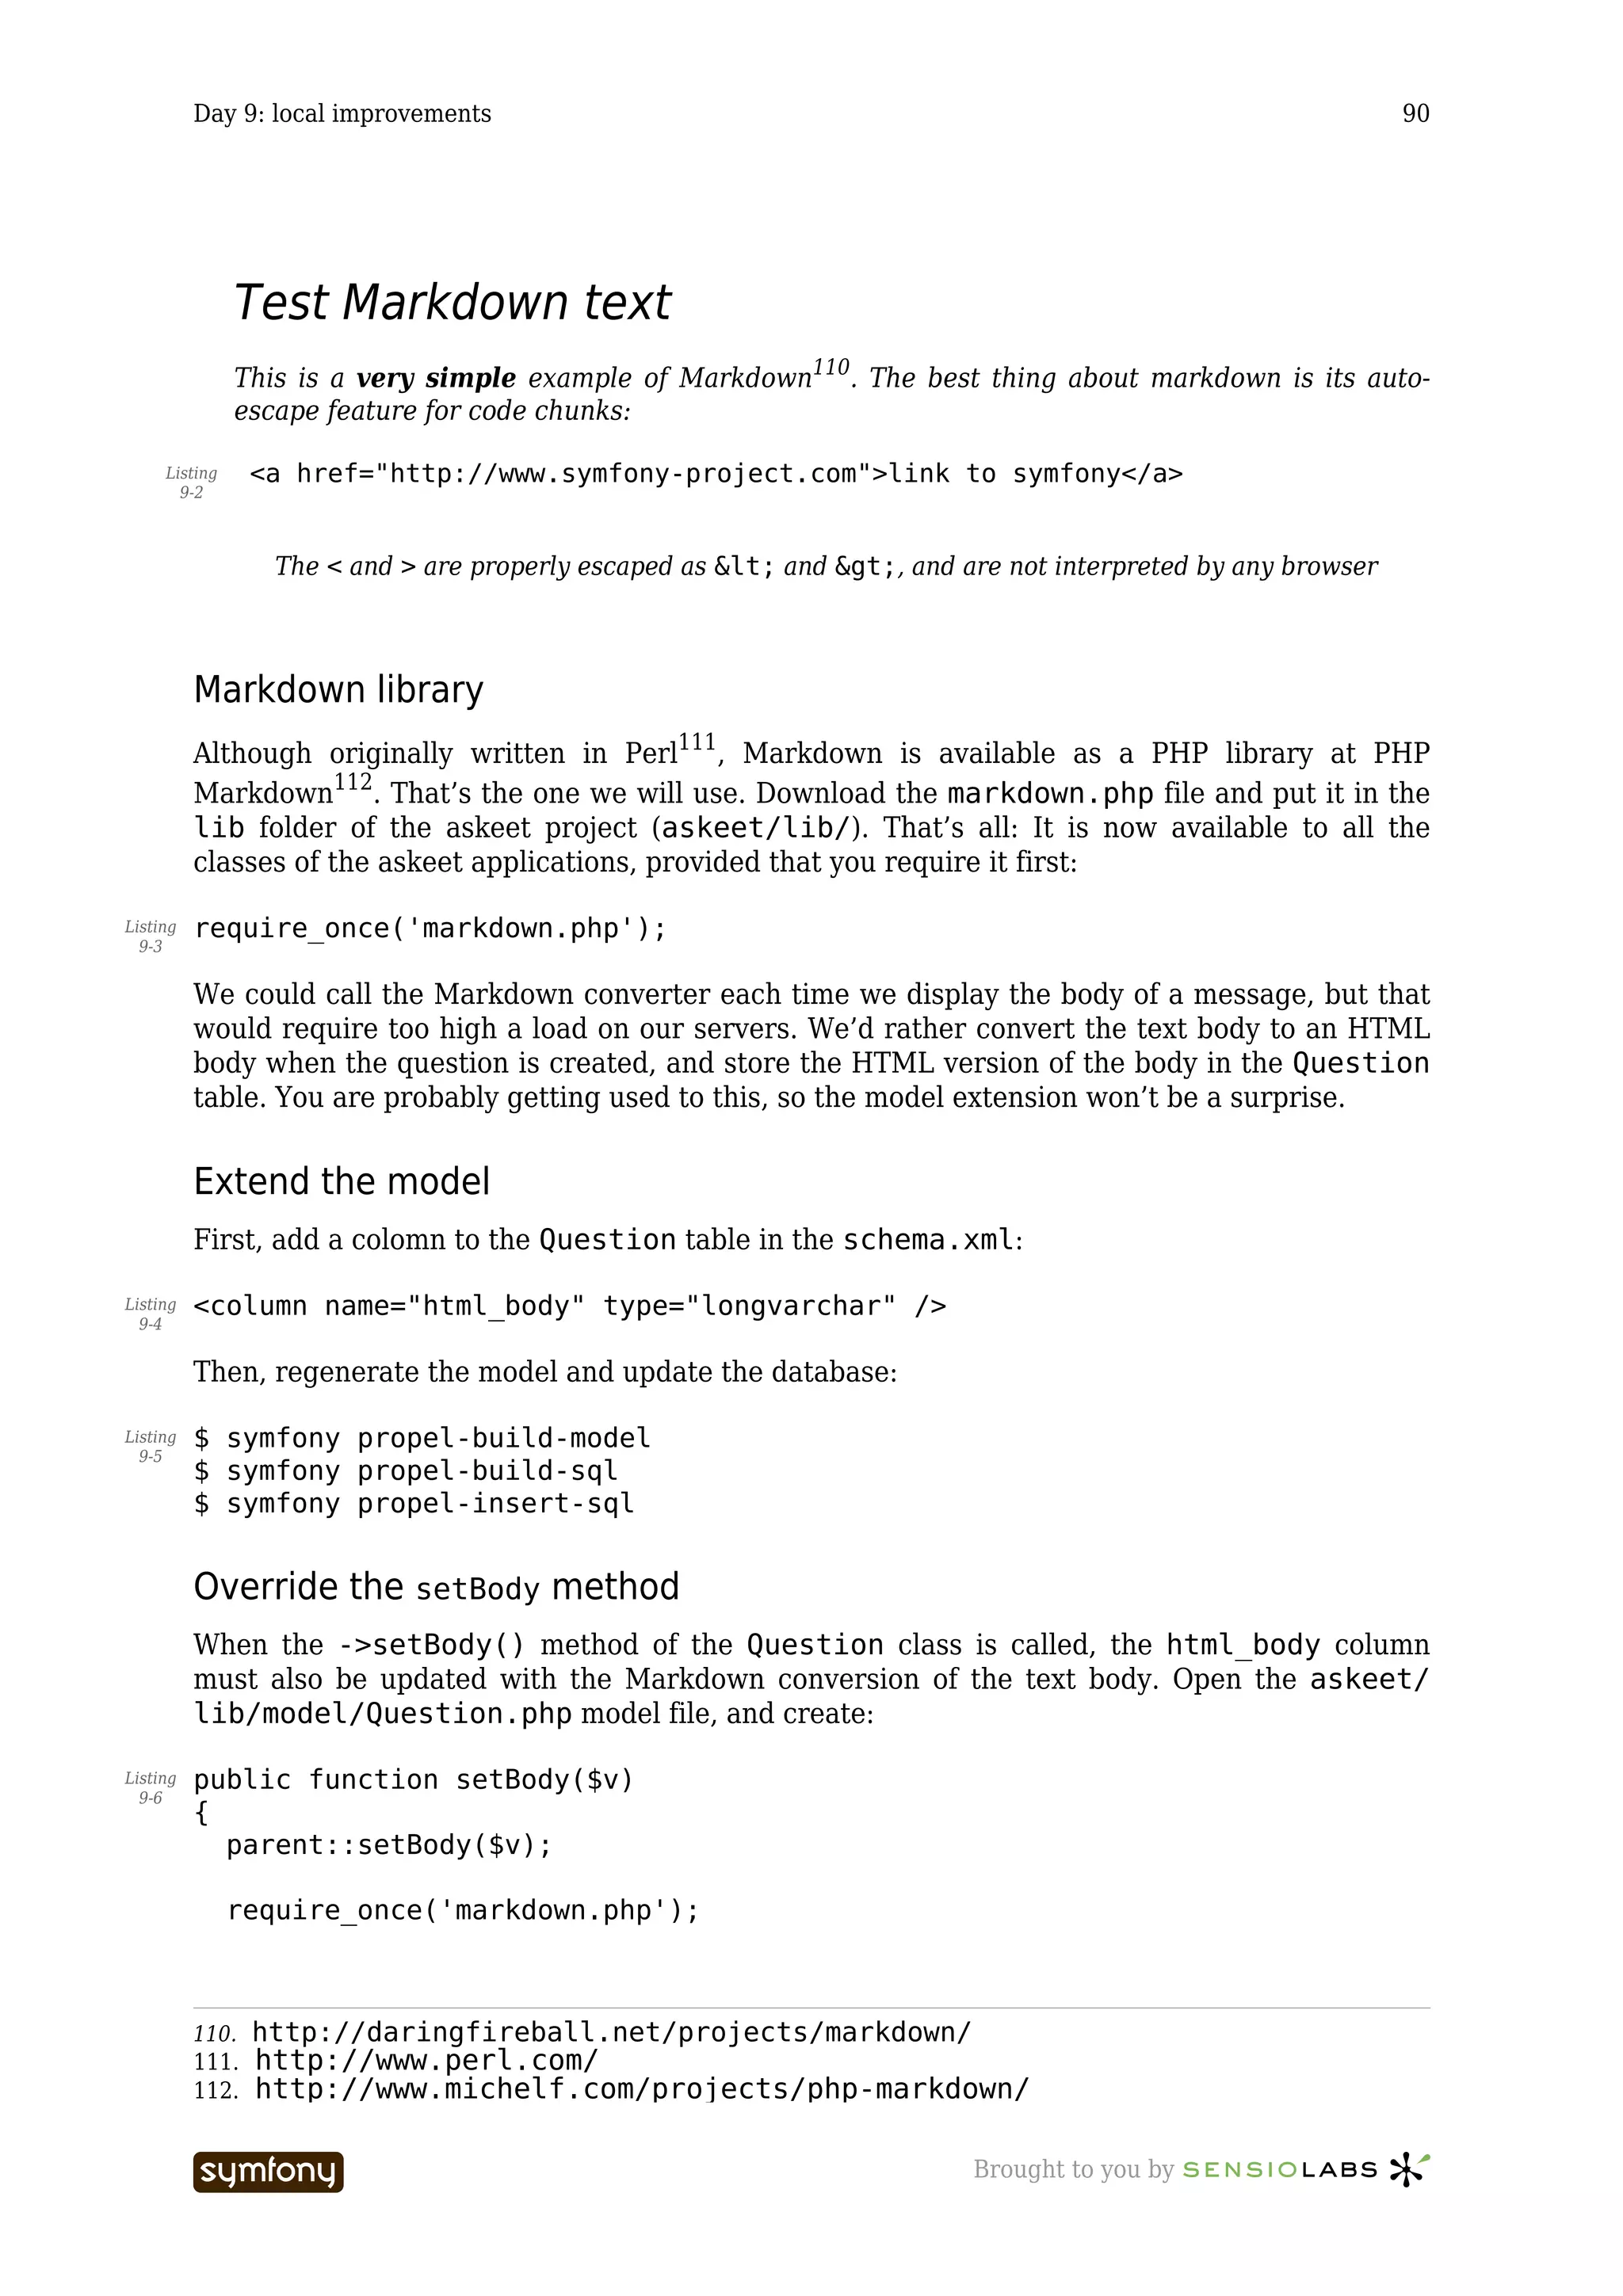
![Day 9: local improvements 89
Day 9
local improvements
Previously on symfony
During day eight108, we added AJAX interactions to askeet without pain. The application is
now quite usable, but could use a lot of little improvements. Rich text should be allowed in
the questions body, and primary keys should not appear in the URIs. All that is not difficult to
put in place with symfony: today will be a good occasion to practice what you already learned,
and to check that you know how to manipulate all the layers of the MVC architecture.
Allow rich text formatting on questions and answers
Markdown
The question and answer bodies only accept plain text for now. To allow basic formatting -
bold, italic, hyperlinks, images, etc. - we will use an external library rather than reinvent the
wheel.
If you have taken a look at the symfony documentation in text format, you probably know that
we are big Markdown109 fans. Markdown is a text-to-HTML conversion tool, and a syntax for
text formatting. The great advantage of Markdown over, for instance, Wiki or forum syntax, is
that a plain text markdown file is still very readable:
Test Markdown text Listing
9-1
------------------
This is a **very simple** example of [Markdown][1].
The best thing about markdown is its _auto-escape_ feature for code chunks:
<a href="http://www.symfony-project.com">link to symfony</a>
>The `<` and `>` are properly escaped as `<` and `>`,
>and are not interpreted by any browser
[1]: http://daringfireball.net/projects/markdown/ "Markdown"
This Markdown renders as follow:
108. 8.txt
109. http://daringfireball.net/projects/markdown/
----------------- Brought to you by](https://image.slidesharecdn.com/cfakepathaskeet-1-0-en-100531180741-phpapp02/75/C-fake-path-askeet-1-0-en-89-2048.jpg)

account).
Her birthday comes next week, I am broke, and I know that
if I don't offer her something *sweet*, my girlfriend
won't look at me in the eyes for another month.
You can now repopulate the database:
$ php batch/load_data.php Listing
9-8
Modify the templates
The showSuccess.php template of the question module can be sightly modified:
... Listing
9-9
<div class="question_body">
<?php echo $question->getHtmlBody() ?>
</div>
...
The list template fragment (_list.php) also shows the body, but in a truncated version:
<div class="question_body"> Listing
9-10
<?php echo truncate_text(strip_tags($question->getHtmlBody()), 200) ?>
</div>
----------------- Brought to you by](https://image.slidesharecdn.com/cfakepathaskeet-1-0-en-100531180741-phpapp02/75/C-fake-path-askeet-1-0-en-91-2048.jpg)
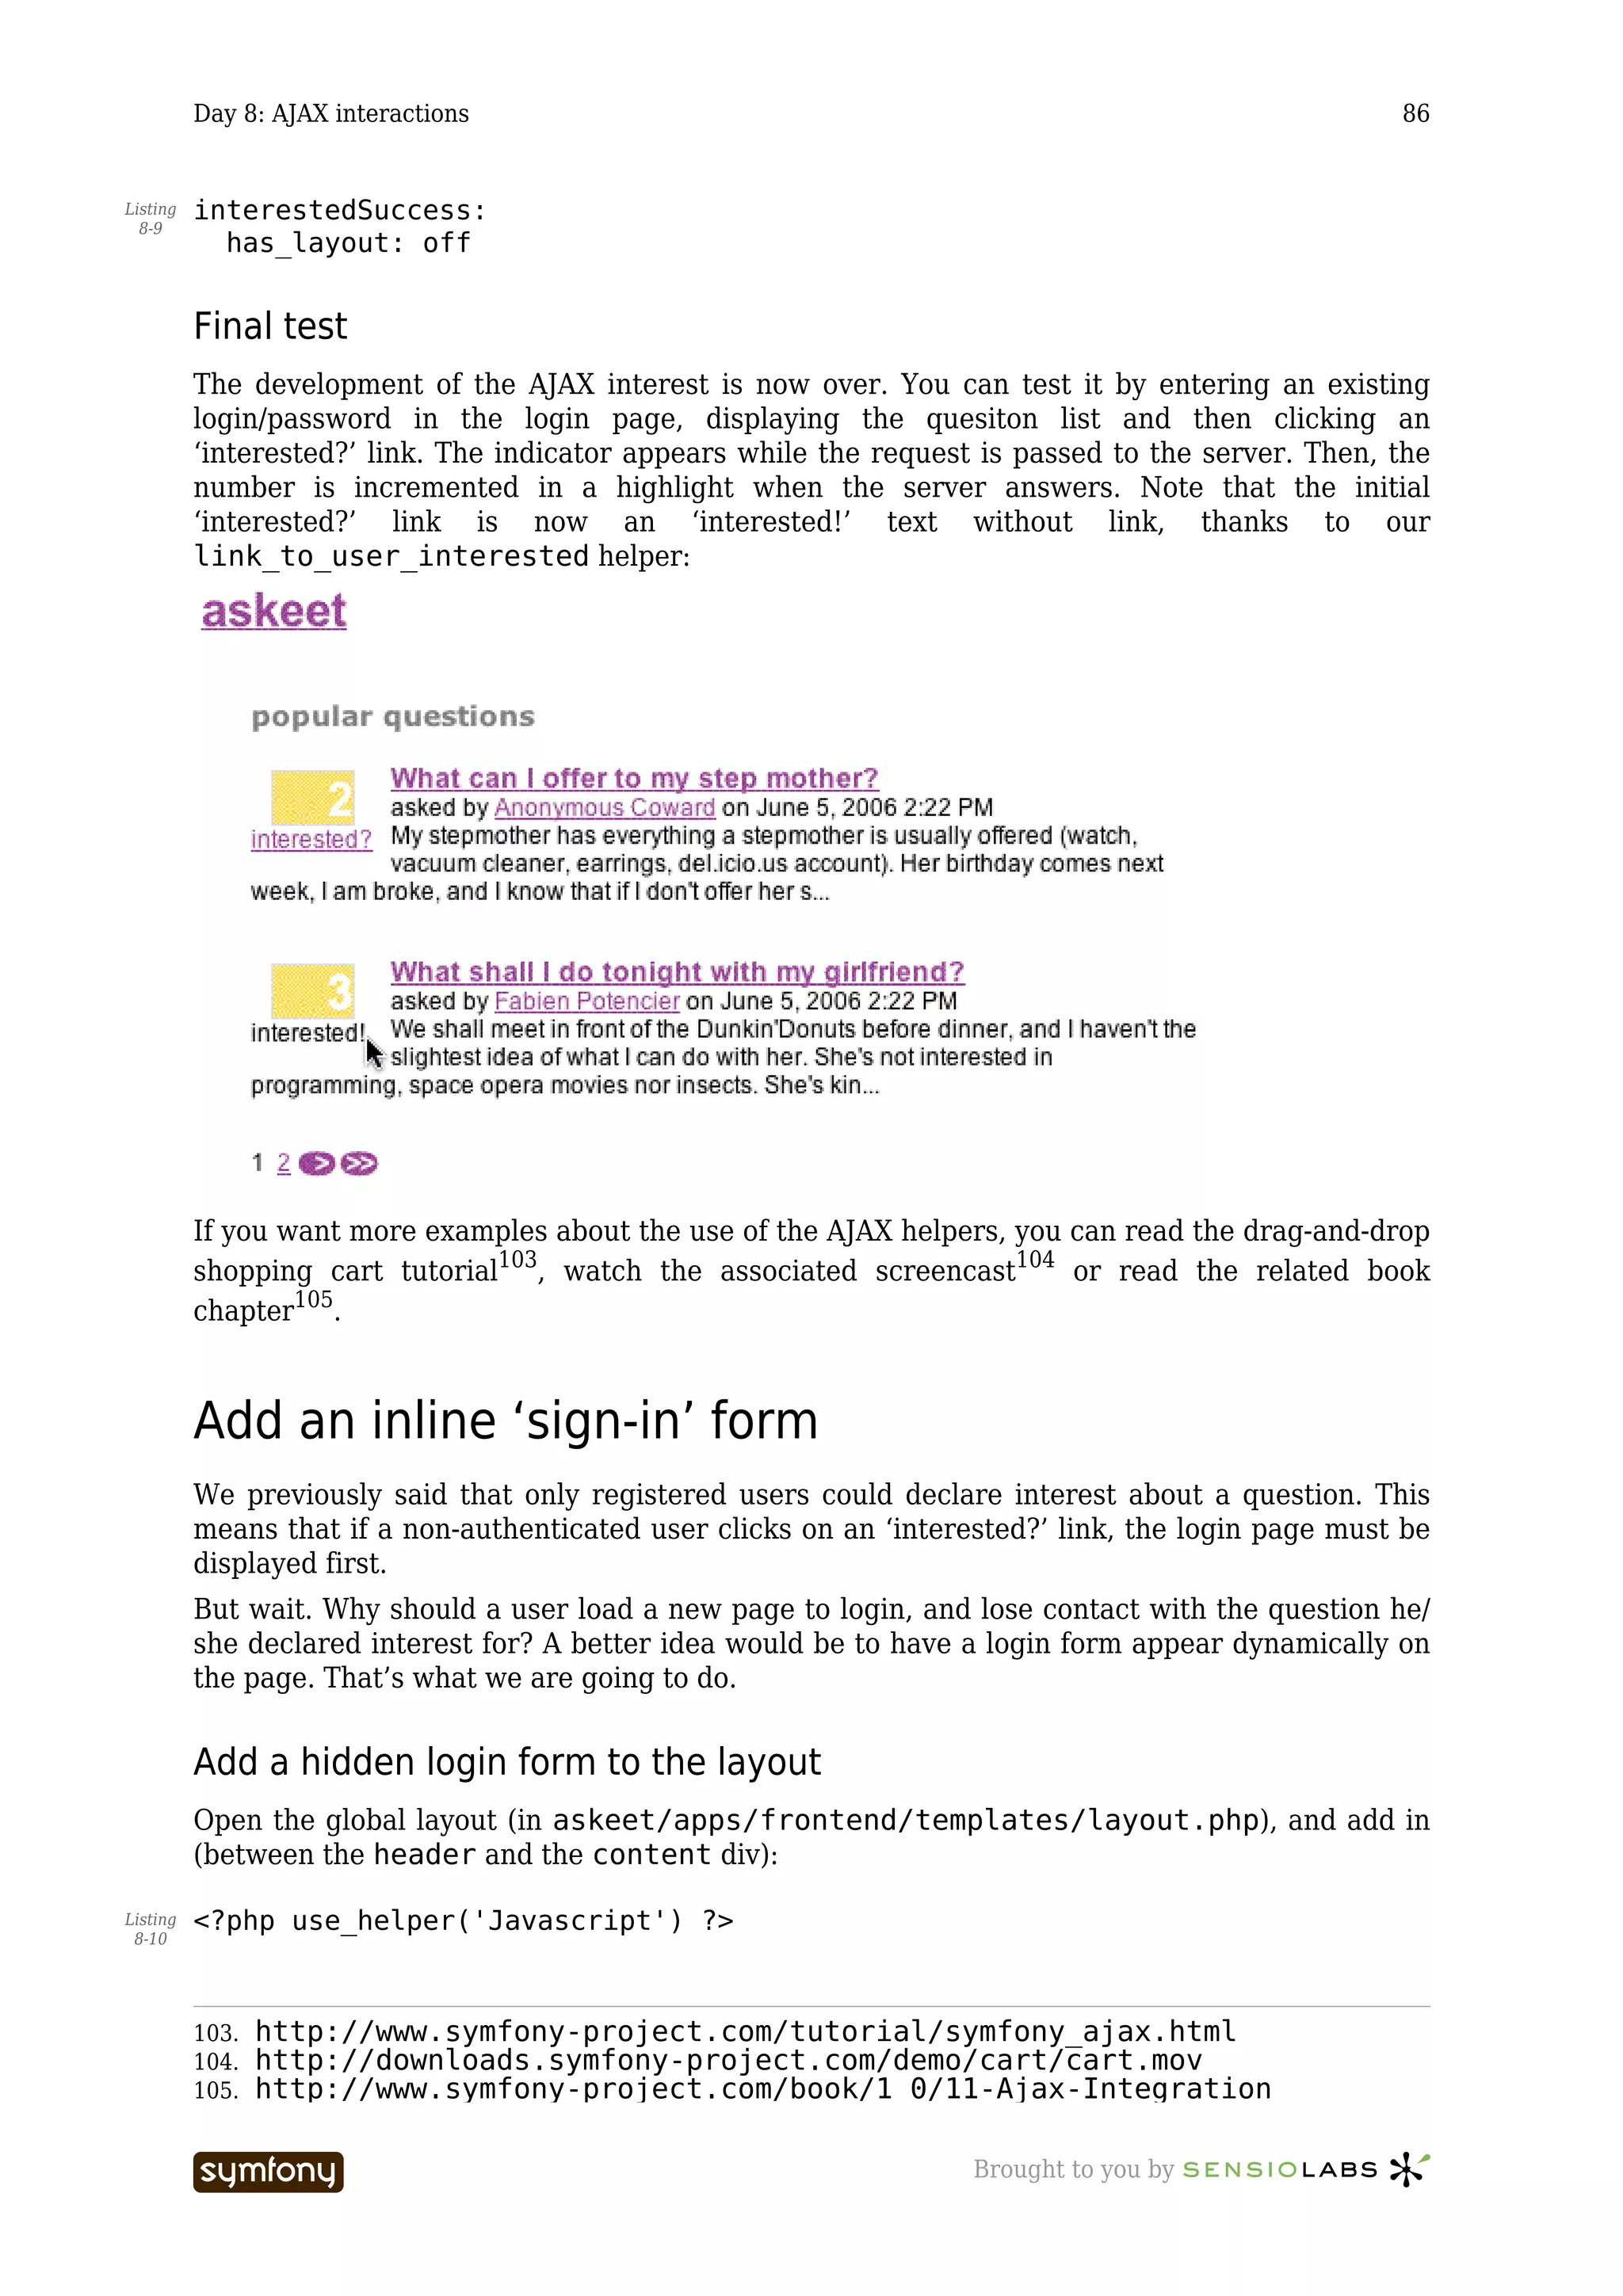
![Day 10: Alter data with Ajax forms 98
The previous entry is not lost in case of a failed form validation. That is the least you can
expect of a user-friendly application.
But, in order to achieve that, you need a form validation file.
Form validation
Create a validate/ directory in the question module, and add in a add.yml validation
file:
Listing methods:
10-5
post: [title, body]
names:
title:
required: Yes
required_msg: You must give a title to your question
body:
required: Yes
required_msg: You must provide a brief context for your question
validators: bodyValidator
bodyValidator:
class: sfStringValidator
param:
min: 10
min_error: Please, give some more details
If you need more information about form validation, go back to day six117 or read the form
validation chapter118 of the symfony book.
Handle the form submission
Now edit again the question/add action to handle the form submission:
Listing public function executeAdd()
10-6
{
if ($this->getRequest()->getMethod() == sfRequest::POST)
{
// create question
117. 6.txt
118. http://www.symfony-project.com/book/1_0/10-Forms
----------------- Brought to you by](https://image.slidesharecdn.com/cfakepathaskeet-1-0-en-100531180741-phpapp02/75/C-fake-path-askeet-1-0-en-98-2048.jpg)


account).
Her birthday comes next week, I am broke, and I know that
if I don't offer her something *sweet*, my girlfriend
won't look at me in the eyes for another month.</description>
<link>http://askeet/frontend_dev.php/question/
what-can-i-offer-to-my-step-mother</link>
<guid>11</guid>
<pubDate>Sat, 10 Dec 2005 09:44:11 +0100</pubDate>
</item>
<item>
<title>What shall I do tonight with my girlfriend?</title>
<description>We shall meet in front of the __Dunkin'Donuts__ before
dinner,
and I haven't the slightest idea of what I can do with her.
She's not interested in _programming_, _space opera movies_ nor _insects_.
She's kinda cute, so I __really__ need to find something
that will keep her to my side for another evening.</description>
<link>http://askeet/frontend_dev.php/question/
----------------- Brought to you by](https://image.slidesharecdn.com/cfakepathaskeet-1-0-en-100531180741-phpapp02/75/C-fake-path-askeet-1-0-en-106-2048.jpg)

![Day 12: Emails 110
This form has to be accessible from the login forms, so add in each of them (in layout.php
and in loginSuccess.php):
Listing <?php echo link_to('Forgot your password?', '@user_require_password') ?>
12-3
Add the password request rule in the application routing.yml:
Listing user_require_password:
12-4
url: /password_request
param: { module: user, action: passwordRequest }
Form validation
First, we will set the validation rules for the form submission. Create a
passwordRequest.yml file in the modules/user/validate/ directory:
Listing methods:
12-5
post: [email]
names:
email:
required: Yes
required_msg: You must provide an email
validators: emailValidator
emailValidator:
class: sfEmailValidator
param:
email_error: 'You didn''t enter a valid email address (for example:
name@domain.com). Please try again.'
Next, have the passwordRequest form being displayed again with the error messages if an
error is detected by adding to the askeet/apps/frontend/modules/user/actions/
actions.class.php:
Listing public function handleErrorPasswordRequest()
12-6
{
return sfView::SUCCESS;
}
Handling the request
As described during day six129, we will use the same action to handle the form submission, so
modify it to:
Listing public function executePasswordRequest()
12-7
{
if ($this->getRequest()->getMethod() != sfRequest::POST)
{
// display the form
return sfView::SUCCESS;
}
// handle the form submission
$c = new Criteria();
129. 6.txt
----------------- Brought to you by](https://image.slidesharecdn.com/cfakepathaskeet-1-0-en-100531180741-phpapp02/75/C-fake-path-askeet-1-0-en-110-2048.jpg)

![Day 13: Tags 117
Rebuild the object model:
$ symfony propel-build-model Listing
13-2
Custom class
Add a new Tag.class.php in the askeet/lib/ directory with the following methods:
<?php Listing
13-3
class Tag
{
public static function normalize($tag)
{
$n_tag = strtolower($tag);
// remove all unwanted chars
$n_tag = preg_replace('/[^a-zA-Z0-9]/', '', $n_tag);
return trim($n_tag);
}
public static function splitPhrase($phrase)
{
$tags = array();
$phrase = trim($phrase);
$words = preg_split('/(")/', $phrase, -1, PREG_SPLIT_NO_EMPTY |
PREG_SPLIT_DELIM_CAPTURE);
$delim = 0;
foreach ($words as $key => $word)
{
if ($word == '"')
{
$delim++;
continue;
}
if (($delim % 2 == 1) && $words[$key - 1] == '"')
{
$tags[] = trim($word);
}
else
{
$tags = array_merge($tags, preg_split('/s+/', trim($word), -1,
PREG_SPLIT_NO_EMPTY));
}
}
return $tags;
}
}
?>
The first method returns a normalized tag, the second one takes a phrase as argument and
returns an array of tags. These two methods will be of great use when manipulating tags.
----------------- Brought to you by](https://image.slidesharecdn.com/cfakepathaskeet-1-0-en-100531180741-phpapp02/75/C-fake-path-askeet-1-0-en-117-2048.jpg)
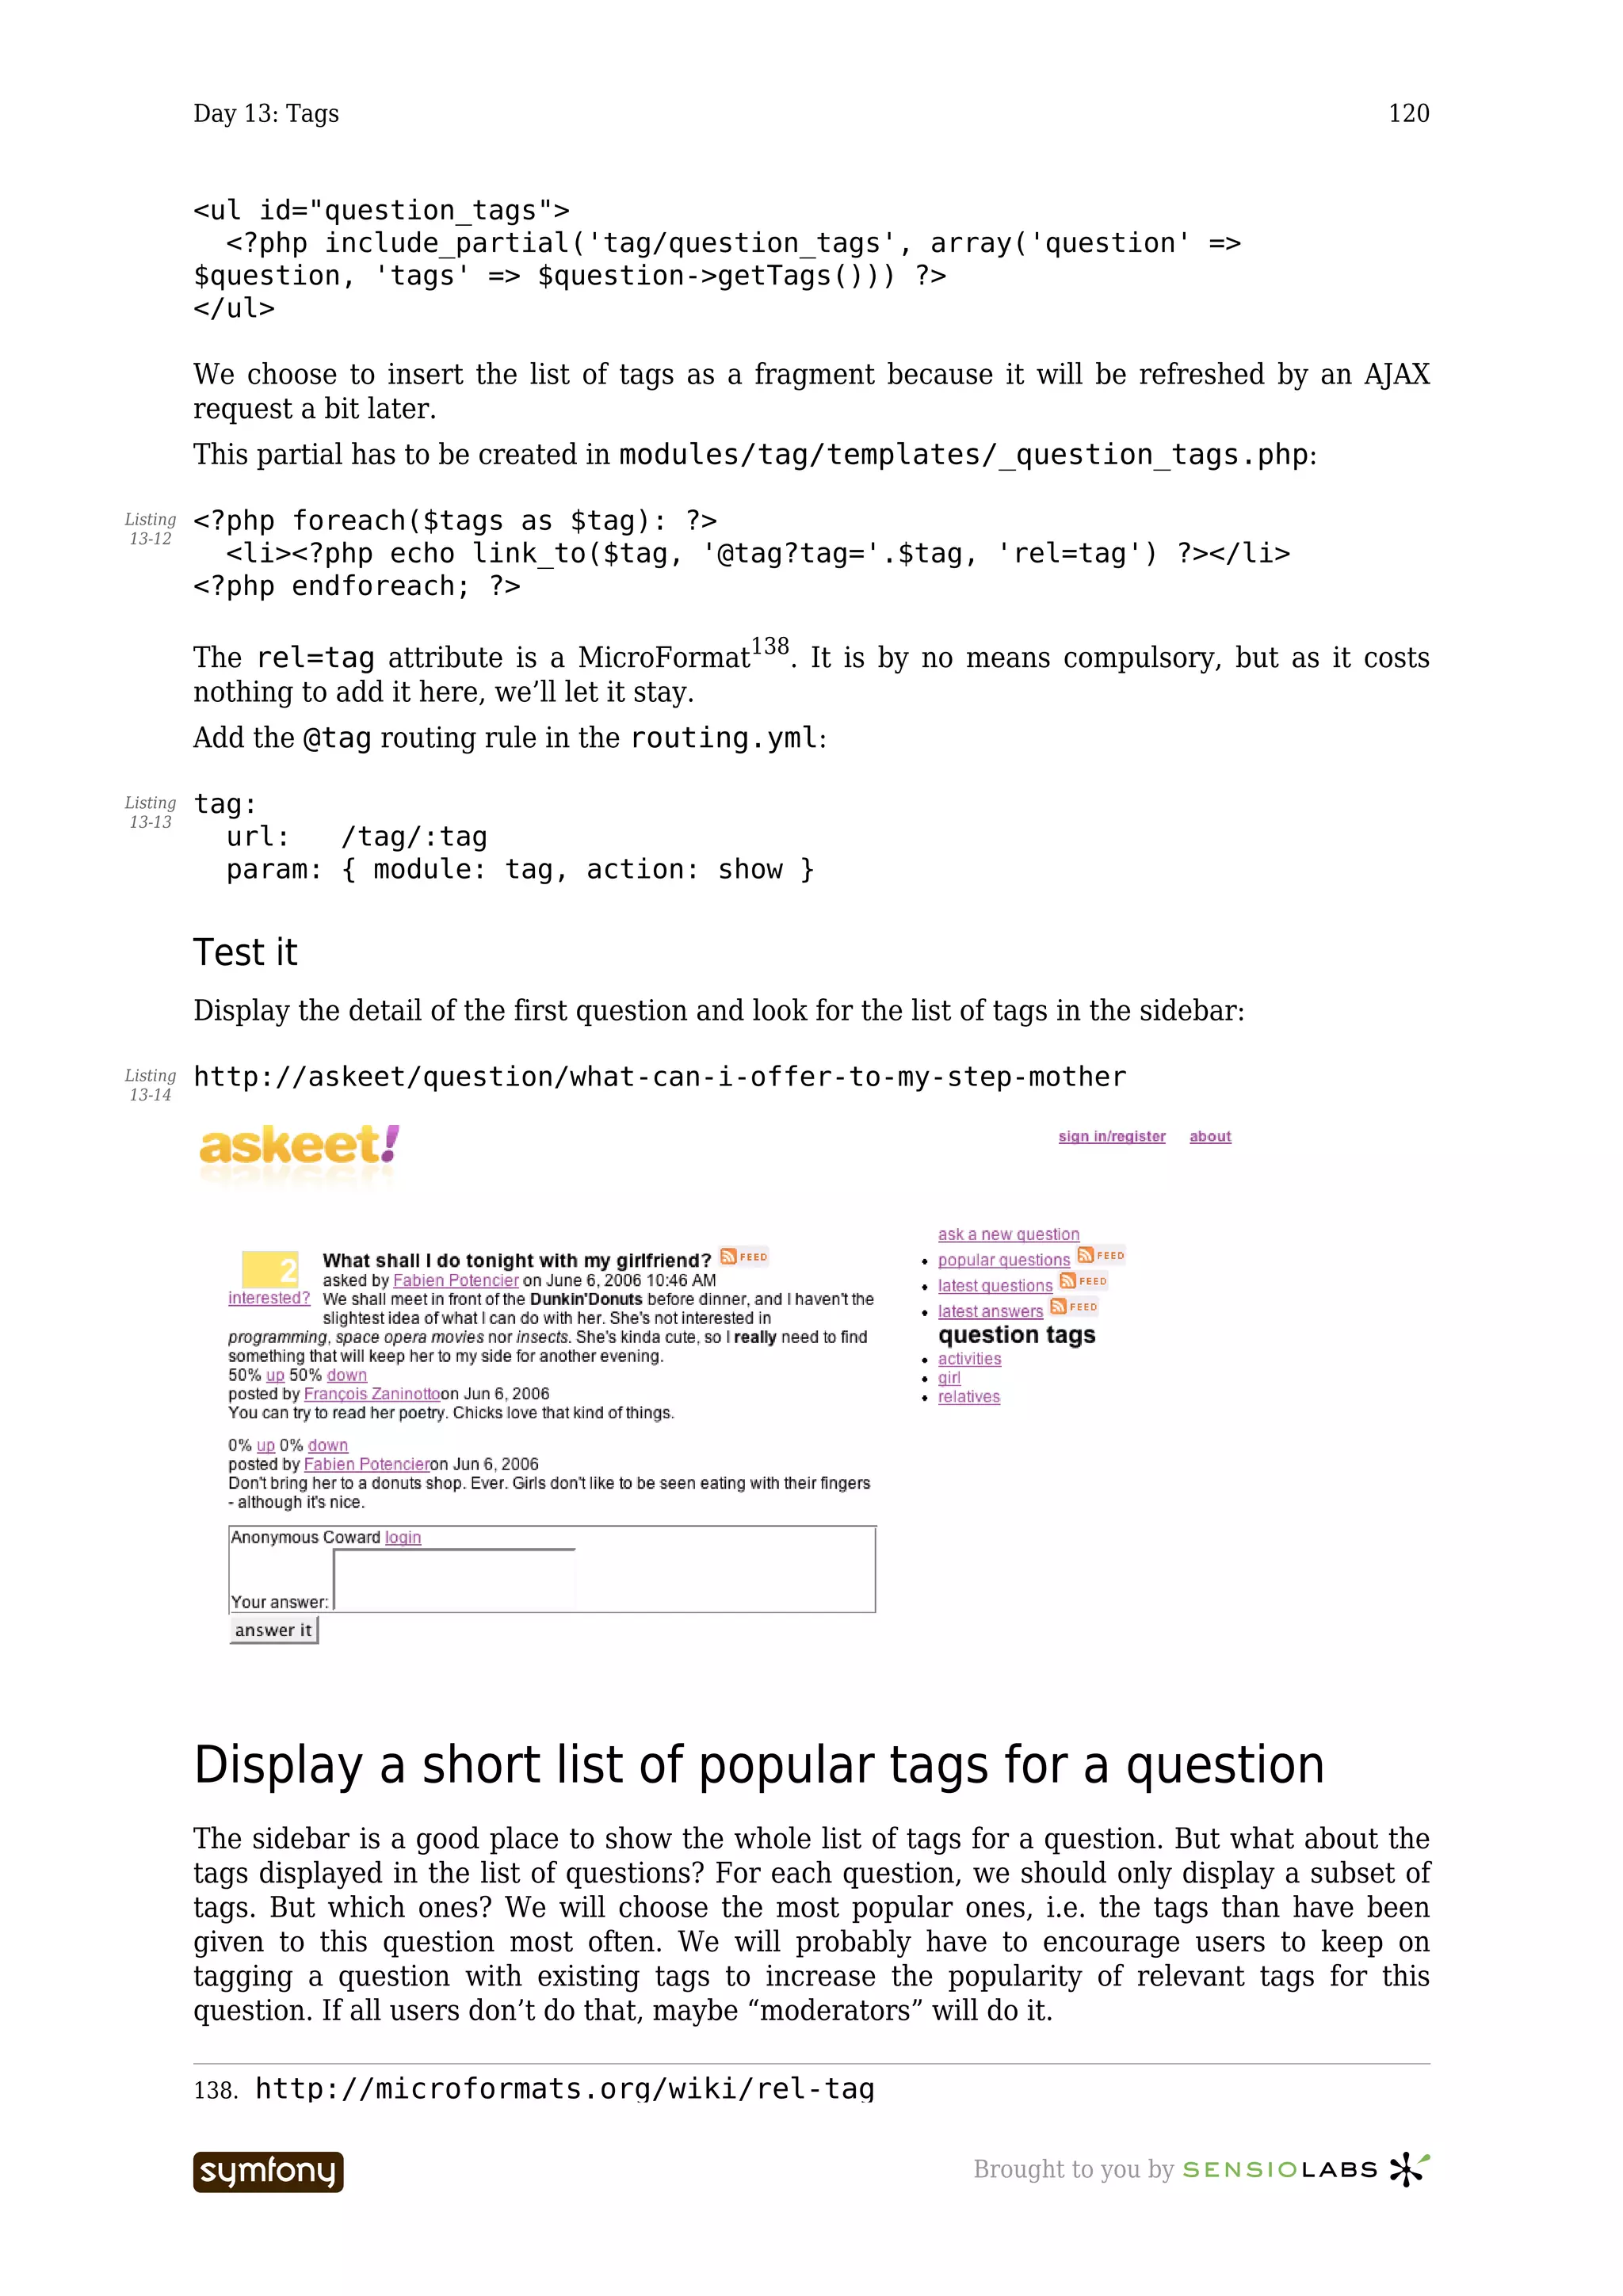
![Day 13: Tags 119
avoid double tags (two identical tags should only appear once in the result). The new method
has to return a tag array:
public function getTags() Listing
13-8
{
$c = new Criteria();
$c->clearSelectColumns();
$c->addSelectColumn(QuestionTagPeer::NORMALIZED_TAG);
$c->add(QuestionTagPeer::QUESTION_ID, $this->getId());
$c->setDistinct();
$c->addAscendingOrderByColumn(QuestionTagPeer::NORMALIZED_TAG);
$tags = array();
$rs = QuestionTagPeer::doSelectRS($c);
while ($rs->next())
{
$tags[] = $rs->getString(1);
}
return $tags;
}
This time, as we need only one column (the normalized_tag), there is no point to ask
Propel to return an array of Tag objects populated from the database (this process, by the
way, is called hydrating). So we do a simple query that we parse into an array, which is much
faster.
Modify the view
The question detail page should now display the list of tags for a given question. We will use
the sidebar for that. As it has been built as a component slot during the seventh day137, we
can set a specific component for this bar in the question module only.
So in askeet/apps/frontend/modules/question/config/view.yml, add the following
configuration:
showSuccess: Listing
13-9
components:
sidebar: [sidebar, question]
This component of the sidebar module is not yet created, but it is quite simple (in modules/
sidebar/actions/components.class.php):
public function executeQuestion() Listing
13-10
{
$this->question =
QuestionPeer::getQuestionFromTitle($this->getRequestParameter('stripped_title'));
}
The longest part to write is the fragment (modules/sidebar/templates/
_question.php):
<?php include_partial('sidebar/default') ?> Listing
13-11
<h2>question tags</h2>
137. 7.txt
----------------- Brought to you by](https://image.slidesharecdn.com/cfakepathaskeet-1-0-en-100531180741-phpapp02/75/C-fake-path-askeet-1-0-en-119-2048.jpg)
![Day 13: Tags 121
Extend the model
Anyway, this means that we have to add a ->getPopularTags() method to our Question
object. But this time, the request to the database is not simple. Using Propel to do it would
multiply the number of requests and take way too much time. Symfony allows you to use the
power of SQL when it is the best solution, so we will just need a Creole connection to the
database and execute a regular SQL query.
This query should be something like:
SELECT normalized_tag AS tag, COUNT(normalized_tag) AS count Listing
13-15
FROM question_tag
WHERE question_id = $id
GROUP BY normalized_tag
ORDER BY count DESC
LIMIT $max
However, using the actual column and table names creates a dependency to the database and
bypasses the data abstraction layer. If, in the future, you decide to rename a column or a
table, this raw SQL query will not work anymore. That’s why the symfony version of the
request doesn’t use the current names but the abstracted ones instead. It is slightly harder to
read, but it is much easier to maintain.
public function getPopularTags($max = 5) Listing
13-16
{
$tags = array();
$con = Propel::getConnection();
$query = '
SELECT %s AS tag, COUNT(%s) AS count
FROM %s
WHERE %s = ?
GROUP BY %s
ORDER BY count DESC
';
$query = sprintf($query,
QuestionTagPeer::NORMALIZED_TAG,
QuestionTagPeer::NORMALIZED_TAG,
QuestionTagPeer::TABLE_NAME,
QuestionTagPeer::QUESTION_ID,
QuestionTagPeer::NORMALIZED_TAG
);
$stmt = $con->prepareStatement($query);
$stmt->setInt(1, $this->getId());
$stmt->setLimit($max);
$rs = $stmt->executeQuery();
while ($rs->next())
{
$tags[$rs->getString('tag')] = $rs->getInt('count');
}
return $tags;
}
First, a connection to the database is opened in $con. The SQL query is built by replacing %s
tokens in a string by the column and table names that come from the abstraction layer. A
----------------- Brought to you by](https://image.slidesharecdn.com/cfakepathaskeet-1-0-en-100531180741-phpapp02/75/C-fake-path-askeet-1-0-en-121-2048.jpg)
![Day 13: Tags 122
Statement object containing the query and a ResultSet object containing the result of the
query are created. These are Creole objects, and their use is described in detail in the Creole
documentation139. The ->setInt() method of the Statement object replaces the first ? in
the SQL query by the question id. The $max argument is used to limit the number of results
returned with the ->setLimit() method.
The method returns an associative array of normalized tags and popularity, ordered by
descending popularity, with only one request to the database.
Modify the view
Now we can add the list of tags for a question, which is formatted in a _list.php fragment
in the modules/question/templates/ directory:
Listing <?php use_helper('Text', 'Date', 'Global', 'Question') ?>
13-17
<?php foreach($question_pager->getResults() as $question): ?>
<div class="question">
<div class="interested_block" id="block_<?php echo $question->getId()
?>">
<?php include_partial('question/interested_user', array('question'
=> $question)) ?>
</div>
<h2><?php echo link_to($question->getTitle(),
'@question?stripped_title='.$question->getStrippedTitle()) ?></h2>
<div class="question_body">
<div>asked by <?php echo link_to($question->getUser(),
'@user_profile?nickname='.$question->getUser()->getNickname()) ?> on <?php
echo format_date($question->getCreatedAt(), 'f') ?></div>
<?php echo truncate_text(strip_tags($question->getHtmlBody()), 200)
?>
</div>
tags: <?php echo tags_for_question($question) ?>
</div>
<?php endforeach; ?>
<div id="question_pager">
<?php echo pager_navigation($question_pager, $rule) ?>
</div>
Because we want to separate the tags by a + sign, and to avoid too much code in the template
to deal with the limits, we write a tags_for_question() helper function in a new lib/
helper/QuestionHelper.php helper library:
Listing function tags_for_question($question, $max = 5)
13-18
{
$tags = array();
foreach ($question->getPopularTags($max) as $tag => $count)
{
$tags[] = link_to($tag, '@tag?tag='.$tag);
}
139. http://creole.phpdb.org/trac/wiki/Documentation/CreoleGuide
----------------- Brought to you by](https://image.slidesharecdn.com/cfakepathaskeet-1-0-en-100531180741-phpapp02/75/C-fake-path-askeet-1-0-en-122-2048.jpg)
![Day 14: Tags, part II 128
{
$tags[] = $rs->getString('tag');
}
return $tags;
}
Now that the action has determined the list of tags, we only need to shape them in the
autocompleteSuccess.php template:
Listing <ul>
14-5
<?php foreach ($tags as $tag): ?>
<li><?php echo $tag ?></li>
<?php endforeach; ?>
</ul>
Add a new routing.yml route (and use it instead of the module/action in the
input_auto_complete_tag() call of the _question.php partial):
Listing tag_autocomplete:
14-6
url: /tag_autocomplete
param: { module: tag, action: autocomplete }
And configure your view.yml:
Listing autocompleteSuccess:
14-7
has_layout: off
components: []
Go ahead, you can try it: After registering with an existing account (for instance: fabpot/
symfony), display a question and notice the new field in the sidebar. Type in the first letters of
a tag already given by this user (for instance: relatives) and watch the div which appears
below the field, suggesting the appropriate entry.
Remote form
When the form is submitted, there is no need to refresh the full page: Only the list of tags and
the form to add a tag have to be refreshed. That’s the purpose of the form_remote_tag()
helper, which specifies the action to be called when the form is submitted (tag/add), and the
zone of the page to be updated by the result of this action (the element identified
‘question_tags’). This has already been explained during the eighth day144, with the AJAX
form to add a question.
Let’s create the executeAdd() method in the tag actions:
144. 8.txt
----------------- Brought to you by](https://image.slidesharecdn.com/cfakepathaskeet-1-0-en-100531180741-phpapp02/75/C-fake-path-askeet-1-0-en-128-2048.jpg)
![Day 14: Tags, part II 129
public function executeAdd() Listing
14-8
{
$this->question =
QuestionPeer::retrieveByPk($this->getRequestParameter('question_id'));
$this->forward404Unless($this->question);
$userId = $this->getUser()->getSubscriberId();
$phrase = $this->getRequestParameter('tag');
$this->question->addTagsForUser($phrase, $userId);
$this->tags = $this->question->getTags();
}
And the addTagsForUser in the Question class:
public function addTagsForUser($phrase, $userId) Listing
14-9
{
// split phrase into individual tags
$tags = Tag::splitPhrase($phrase);
// add tags
foreach ($tags as $tag)
{
$questionTag = new QuestionTag();
$questionTag->setQuestionId($this->getId());
$questionTag->setUserId($userId);
$questionTag->setTag($tag);
$questionTag->save();
}
}
The addSuccess.php template will determine the code that will replace the update zone.
As usual with AJAX actions, it contains a simple include_partial():
<?php include_partial('tag/question_tags', array('question' => $question, Listing
14-10
'tags' => $tags)) ?>
Add a new routing.yml route:
tag_add: Listing
14-11
url: /tag_add
param: { module: tag, action: add }
And configure your view.yml:
addSuccess: Listing
14-12
has_layout: off
components: []
Test it
Try it on: Login to the site, display a question detail, enter a new tag and submit. The whole
list updates, and the new tag inserts were it should in the alphabetical order.
----------------- Brought to you by](https://image.slidesharecdn.com/cfakepathaskeet-1-0-en-100531180741-phpapp02/75/C-fake-path-askeet-1-0-en-129-2048.jpg)
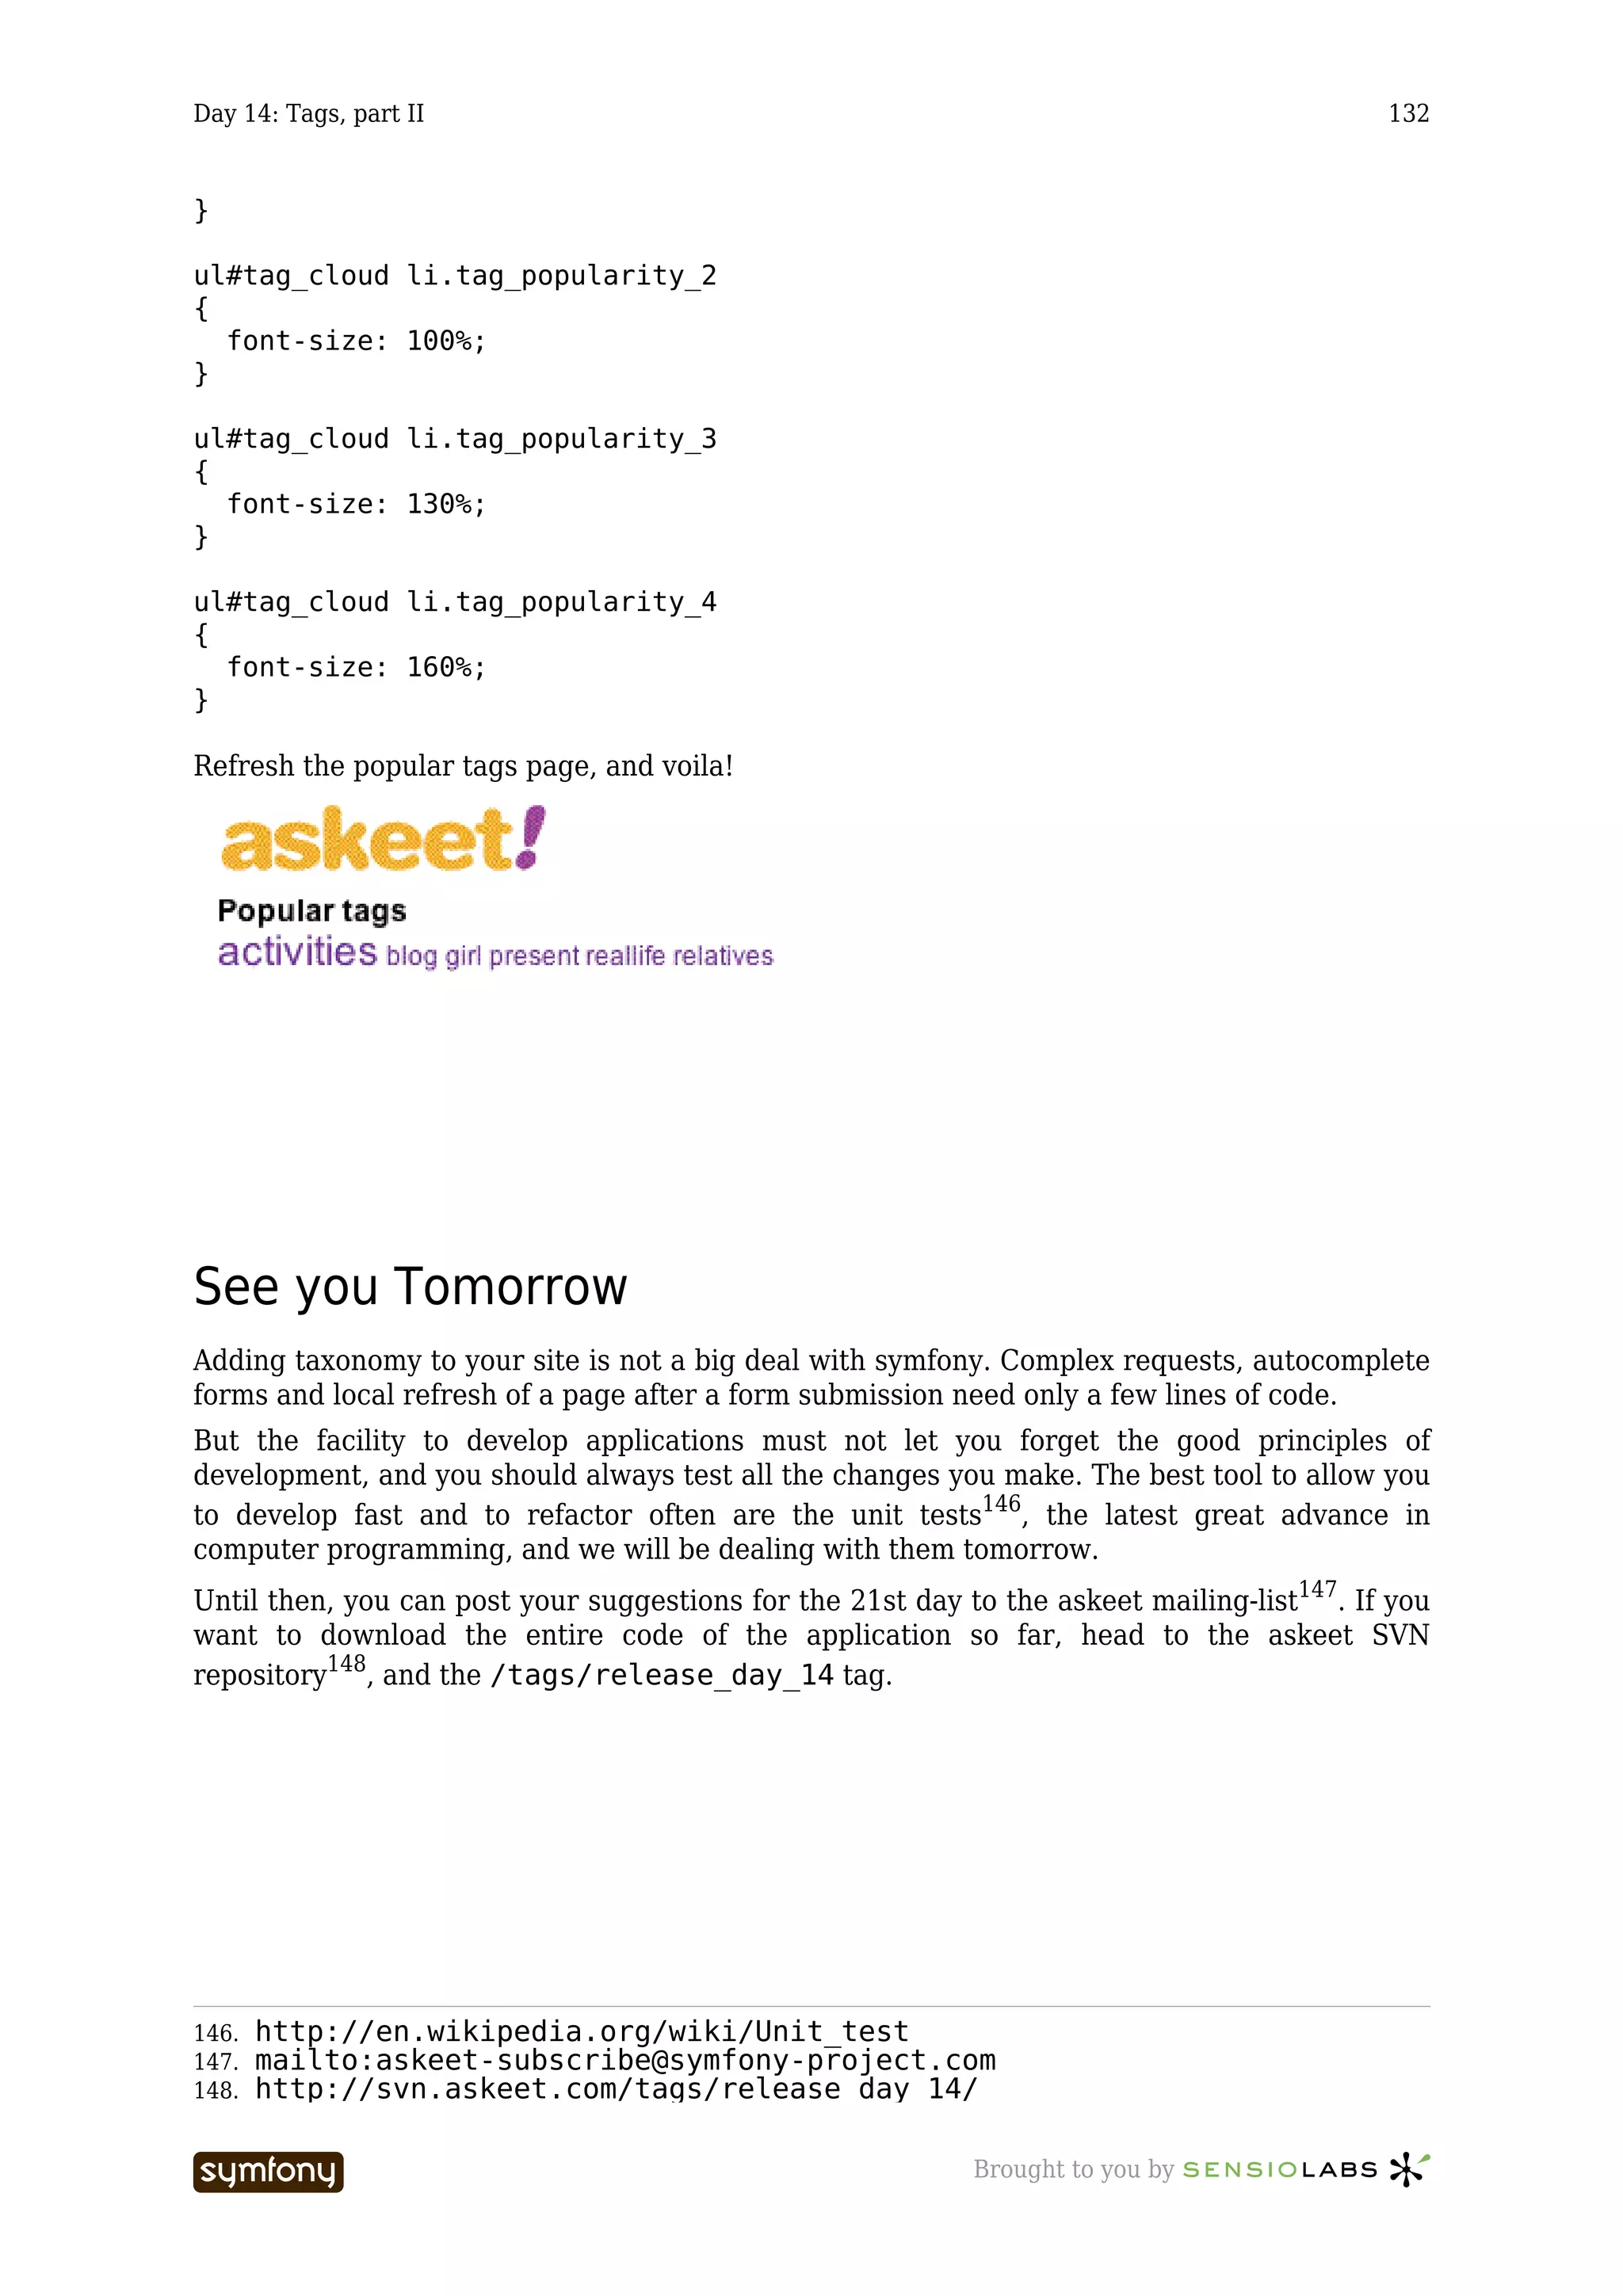
![Day 14: Tags, part II 130
Display the tag bubble
Folksonomy allows to rate a tag with a popularity. But the amount of tags make a list of tags
difficult to read. The most satisfying solution, visually speaking, is to increase the size of a tag
word according to its popularity, so that the most popular tags - the ones that are given most
by users - appear immediately. Check the del.icio.us popular tags page145 to understand what
a tag bubble is.
80% of the visits to a website concern less than 20% of its content, that’s a rule that many
website verify every day, and askeet will probably be no different. So if askeet proposes a list
of tags, it will have to be arranged by popularity as well, to limit the perturbation of the most
unpopular tags (‘grandma’, ‘chocolate’) and to increase the visibility of the most popular ones
(‘php’, ‘real life’, ‘useful’).
Extend the QuestionTagPeer class
The provider of the list of popular tags cannot be another class than QuestionTagPeer.
Extend it with a new method, in which we will experiment an alternative way of writing SQL
queries:
Listing public static function getPopularTags($max = 5)
14-13
{
$tags = array();
$con = Propel::getConnection();
$query = '
SELECT '.QuestionTagPeer::NORMALIZED_TAG.' AS tag,
COUNT('.QuestionTagPeer::NORMALIZED_TAG.') AS count
FROM '.QuestionTagPeer::TABLE_NAME.'
GROUP BY '.QuestionTagPeer::NORMALIZED_TAG.'
ORDER BY count DESC';
$stmt = $con->prepareStatement($query);
$stmt->setLimit($max);
$rs = $stmt->executeQuery();
$max_popularity = 0;
while ($rs->next())
{
if (!$max_popularity)
{
$max_popularity = $rs->getInt('count');
}
$tags[$rs->getString('tag')] = floor(($rs->getInt('count') /
$max_popularity * 3) + 1);
}
ksort($tags);
return $tags;
}
We limit the number of popularity degrees to 4, because otherwise the tag cloud would
become unreadable. The result of the method is an associative array of tag names and
popularity. We are ready to display it.
145. http://del.icio.us/tag/
----------------- Brought to you by](https://image.slidesharecdn.com/cfakepathaskeet-1-0-en-100531180741-phpapp02/75/C-fake-path-askeet-1-0-en-130-2048.jpg)
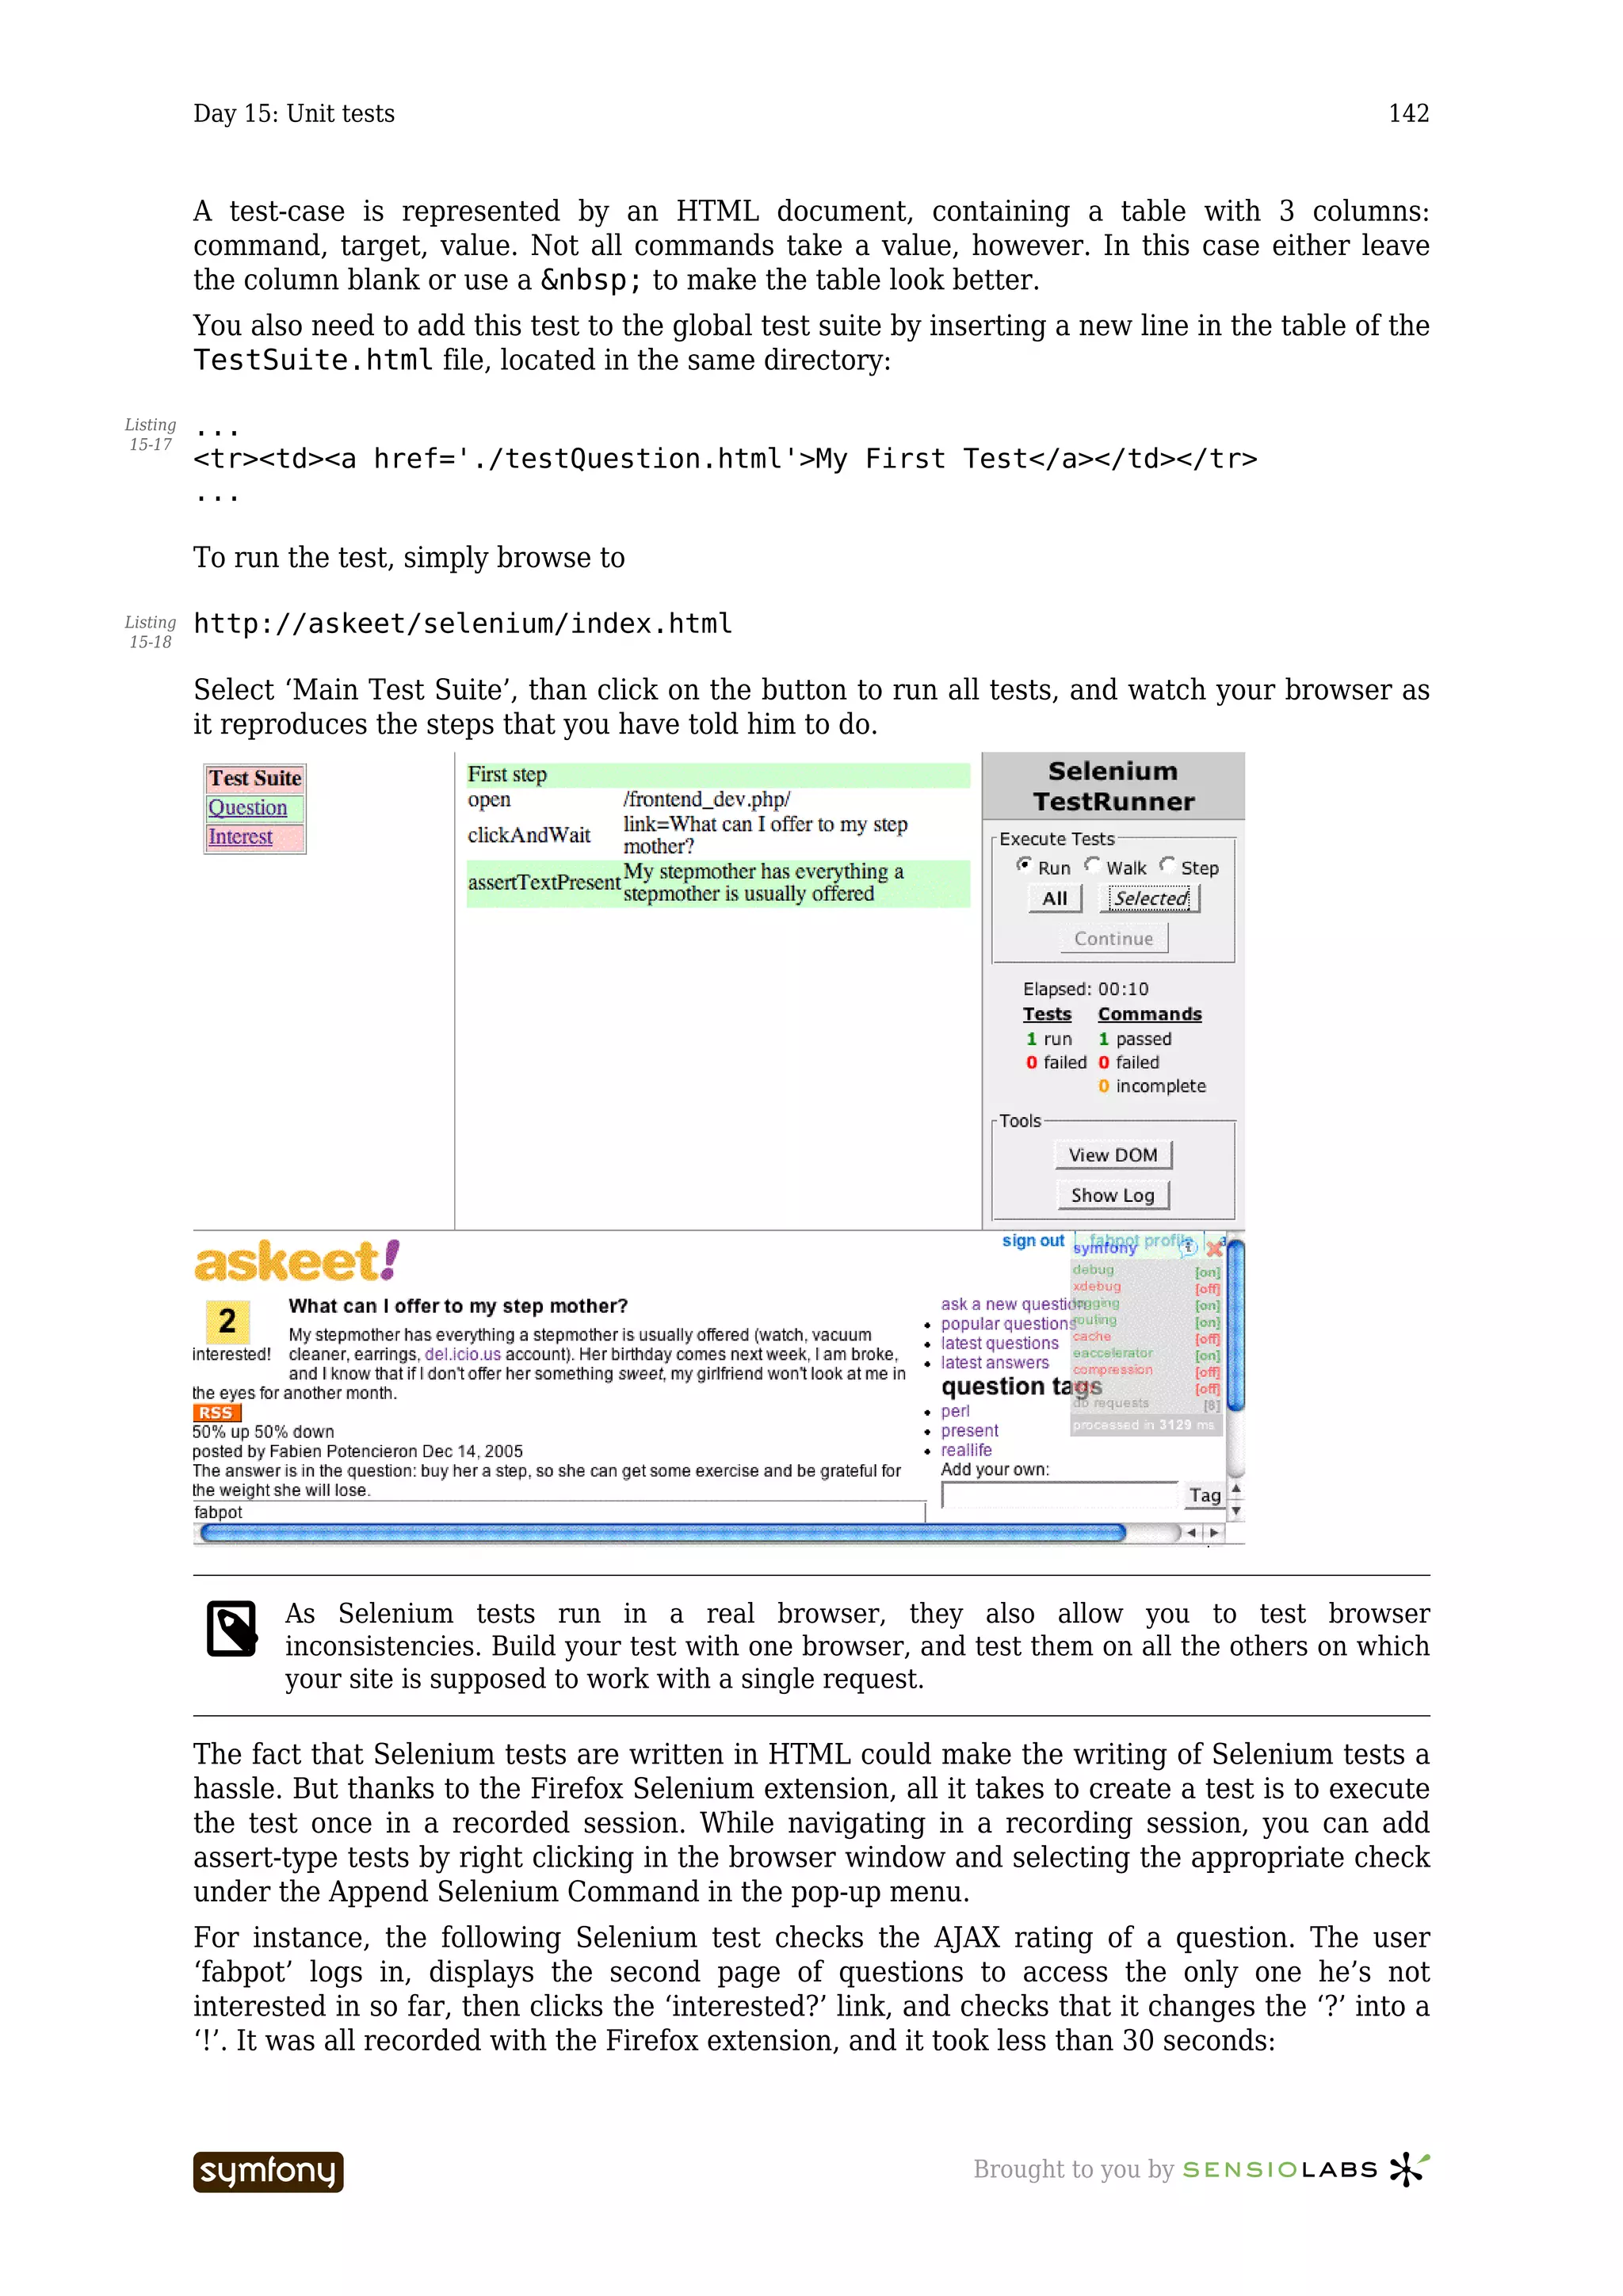
![Day 15: Unit tests 135
?>
The UnitTestCase class is the core class of the Simple Test unit tests. The setUp() method
is run just before each test method, and tearDown() is run just after each test method. The
actual test methods start with the word ‘test’. To check if a piece of code is behaving as you
expect, you use an assertion, which is a method call that verifies that something is true. In
Simple Test, assertions start by assert. In this example, one unit test is implemented, and it
looks for the word ‘user’ in the default page of the module. This autogenerated file is a stub
for you to start.
As a matter of fact, every time you call a symfony init-module, symfony creates a skeleton
like this one in the test/[appname]/ directory to store the unit tests related to the created
module. The trouble is that as soon as you modify the default template, the stub tests don’t
pass anymore (they check the default title of the page, which is ‘module $modulename’). So
for now, we will erase these files and work on our own test cases.
Add a unit test
During day 13155, we created a Tag.class.php file with two functions dedicated to tag
manipulation. We will add a few unit tests for our Tag library.
Create a TagTest.php file (all the test case files must end with Test for Simple Test to find
them):
<?php Listing
15-5
require_once('Tag.class.php');
class TagTest extends UnitTestCase
{
public function test_normalize()
{
$tests = array(
'FOO' => 'foo',
' foo' => 'foo',
'foo ' => 'foo',
' foo ' => 'foo',
'foo-bar' => 'foobar',
);
foreach ($tests as $tag => $normalized_tag)
{
$this->assertEqual($normalized_tag, Tag::normalize($tag));
}
}
}
?>
The first test case that we will implement concerns the Tag::normalize() method. Unit
tests are supposed to test one case at a time, so we decompose the expected result of the text
method into elementary cases. We know that the Tag::normalize() method is supposed to
return a lower-case version of its argument, without any spaces - either before or after the
argument - and without any special character. The five test cases defined in the $test array
are enough to test that.
155. 13.txt
----------------- Brought to you by](https://image.slidesharecdn.com/cfakepathaskeet-1-0-en-100531180741-phpapp02/75/C-fake-path-askeet-1-0-en-135-2048.jpg)
![Day 15: Unit tests 137
One last recommendation: keep your unit tests as simple as the ones described here. An
application built with a test driven methodology ends up with roughly as much test code as
actual code, so you don’t want to spend time debugging your tests cases…
When a test fails
We will now add the tests to check the second method of the Tag object, which splits a string
made of several tags into an array of tags. Add the following method to the TagTest class:
public function test_splitPhrase() Listing
15-8
{
$tests = array(
'foo' => array('foo'),
'foo bar' => array('foo', 'bar'),
' foo bar ' => array('foo', 'bar'),
'"foo bar" askeet' => array('foo bar', 'askeet'),
"'foo bar' askeet" => array('foo bar', 'askeet'),
);
foreach ($tests as $tag => $tags)
{
$this->assertEqual($tags, Tag::splitPhrase($tag));
}
}
As a good practice, we recommend to name the test files out of the class they are supposed
to test, and the test cases out of the methods they are supposed to test. Your test/
directory will soon contain a lot of files, and finding a test might prove difficult in the long
run if you don’t.
If you try to run the tests again, they fail:
$ symfony test-functional frontend Listing
15-9
Test suite in (test/frontend)
1) Equal expectation fails as key list [0, 1] does not match key list [0,
1, 2] at line [35]
in test_splitPhrase
in TagTest
in /home/production/askeet/test/functional/frontend/TagTest.php
FAILURES!!!
Test cases run: 1/1, Passes: 9, Failures: 1, Exceptions: 0
All right, one of the test cases of test_splitPhrase fails. To find which one it is, you will
need to remove them one at at time to see when the test passes. This time, it’s the last one,
when we test the handling of simple quotes. The current Tag::splitPhrase() method
doesn’t translate this string properly. As part of your homework, you will have to correct it for
tomorrow.
This illustrates the fact that if you pile up too much elementary test cases in an array, a
failure is harder to locate. Always prefer to split long test cases into methods, since Simple
Test mentions the name of the method where a test failed.
----------------- Brought to you by](https://image.slidesharecdn.com/cfakepathaskeet-1-0-en-100531180741-phpapp02/75/C-fake-path-askeet-1-0-en-137-2048.jpg)
![Day 15: Unit tests 143
<html> Listing
15-19
<head><title>New Test</title></head>
<body>
<table cellpadding="1" cellspacing="1" border="1">
<thead>
<tr><td rowspan="1" colspan="3">New Test</td></tr>
</thead><tbody>
<tr>
<td>open</td>
<td>/frontend_dev.php/</td>
<td></td>
</tr>
<tr>
<td>clickAndWait</td>
<td>link=sign in/register</td>
<td></td>
</tr>
<tr>
<td>type</td>
<td>//div/input[@value="" and @id="nickname" and @name="nickname"]</td>
<td>fabpot</td>
</tr>
<tr>
<td>type</td>
<td>//div/input[@value="" and @id="password" and @name="password"]</td>
<td>symfony</td>
</tr>
<tr>
<td>clickAndWait</td>
<td>//input[@type='submit' and @value='sign in']</td>
<td></td>
</tr>
<tr>
<td>clickAndWait</td>
<td>link=2</td>
<td></td>
</tr>
<tr>
<td>click</td>
<td>link=interested?</td>
<td></td>
</tr>
<tr>
<td>pause</td>
<td>3000</td>
<td></td>
</tr>
<tr>
<td>verifyTextPresent</td>
<td>interested!</td>
<td></td>
</tr>
<tr>
<td>clickAndWait</td>
<td>link=sign out</td>
<td></td>
</tr>
----------------- Brought to you by](https://image.slidesharecdn.com/cfakepathaskeet-1-0-en-100531180741-phpapp02/75/C-fake-path-askeet-1-0-en-143-2048.jpg)


![Day 17: API 150
The new class method UserPeer::getAutenticatedUser() can now be used in the
myLoginValidator.class.php (we’ll leave that to you) and in the new api/index web
service:
Listing <?php
17-4
class apiActions extends sfActions
{
public function preExecute()
{
sfConfig::set('sf_web_debug', false);
}
public function executeIndex()
{
$user = $this->authenticateUser();
if (!$user)
{
$this->error_code = 1;
$this->error_message = 'login failed';
$this->forward('api', 'error');
}
// do some stuff
}
private function authenticateUser()
{
if (isset($_SERVER['PHP_AUTH_USER']))
{
if ($user =
UserPeer::getAuthenticatedUser($_SERVER['PHP_AUTH_USER'],
$_SERVER['PHP_AUTH_PW']))
{
$this->getContext()->getUser()->signIn($user);
return $user;
}
}
header('WWW-Authenticate: Basic realm="askeet API"');
header('HTTP/1.0 401 Unauthorized');
}
public function executeError()
{
}
}
?>
First of all, before executing any action of the API module (thus in the preExecute()
method), we turn off the web debug toolbar. The view of this action being XML, the insertion
of the toolbar code would produce a non-valid response.
The first thing that the index action will do is to check whether a login and a password are
provided, and if they match an existing askeet account. If that is not the case, the
authenticateUser() method sets the response HTTP header to ‘401’. It will cause an
----------------- Brought to you by](https://image.slidesharecdn.com/cfakepathaskeet-1-0-en-100531180741-phpapp02/75/C-fake-path-askeet-1-0-en-150-2048.jpg)
![Day 17: API 151
HTTP authentication window to pop-up in the user’s browser; the user will have to resubmit
the request with the login and password.
// first request to the API, without authentication Listing
17-5
GET /api/index HTTP/1.1
Host: mysite.example.com
User-Agent: Mozilla/5.0 (Windows; U; Windows NT 5.1; fr; rv:1.8) Gecko/
20051111 Firefox/1.5
Accept: text/xml,application/xml,application/xhtml+xml,text/
html;q=0.9,text/plain;q=0.8,image/png,*/*;q=0.5
...
// the API returns a 401 header with no content
HTTP/1.x 401 Authorization Required
Date: Thu, 15 Dec 2005 10:32:44 GMT
Server: Apache
WWW-Authenticate: Basic realm="Order Answers Feed"
Content-Length: 401
Keep-Alive: timeout=15, max=100
Connection: Keep-Alive
Content-Type: text/html; charset=iso-8859-1
// a login box will then appear on the user's window.
// Once the user enters his login/password, a new GET is sent to the server
GET /api/index HTTP/1.1
Host: mysite.example.com
User-Agent: Mozilla/5.0 (Windows; U; Windows NT 5.1; fr; rv:1.8) Gecko/
20051111 Firefox/1.5
Accept: text/xml,application/xml,application/xhtml+xml,text/
html;q=0.9,text/plain;q=0.8,image/png,*/*;q=0.5
...
Authorization: Basic ZmFicG90OnN5bWZvbnk=
An Authorization attribute is added to the HTTP request, which is sent again. It contains a
base 64179 encoded ‘login:password’ string. This is what the $_SERVER['PHP_AUTH_USER']
and $_SERVER['PHP_AUTH_PW'] look for in our authenticateUser() method.
Base64 does not output an encrypted version of its input. Decoding a base64-encoded
string is very easy180, and it reveals the password in clear. For instance, decoding the
string ZmFicG90OnN5bWZvbnk= gives fabpot:symfony. So you have to consider that the
password transits in clear in the Internet (as when entered in a web form) and can be
intercepted. HTTP authentication must be restricted to non-critical content and services for
this reason. Added protection could be gained by requiring the HTTPS protocol for API
calls as well.
If a login and password are provided and exist in the user database, then the index action
executes. Otherwise, it forwards to the error action (empty) and displays the
errorSuccess.php template:
<?php echo '<?' ?>xml version="1.0" encoding="utf-8" ?> Listing
17-6
<rsp stat="fail" version="1.0">
<err code="<?php echo $error_code ?>" msg="<?php echo $error_message ?>"
/>
</rsp>
179. http://en.wikipedia.org/wiki/Base64
180. http://makcoder.sourceforge.net/demo/base64.php
----------------- Brought to you by](https://image.slidesharecdn.com/cfakepathaskeet-1-0-en-100531180741-phpapp02/75/C-fake-path-askeet-1-0-en-151-2048.jpg)
![Day 17: API 154
words how to integrate the askeet API in a foreign website - whether built with symfony or
not.
PHP5 comes bundled with SimpleXML181, a very easy-to-use set of tools to interpret and loop
through an XML document. With SimpleXML, element names are automatically mapped to
properties on an object, and this happens recursively. Attributes are mapped to iterator
accesses.
To reconstitute the list of answers to a question provided by the API into a simple page, all it
takes is these few lines of PHP:
Listing <?php $xml = simplexml_load_file(dirname(__FILE__).'/question.xml') ?>
17-12
<h1><?php echo $xml->question->title ?></h1>
<p>Published on <?php echo $xml->question['time'] ?></p>
<h2>Tags</h2>
<ul>
<?php foreach ($xml->question->tags->tag as $tag): ?>
<li><?php echo $tag ?></li>
<?php endforeach ?>
</ul>
<h2>Answers to this question from askeet users</h2>
<ul>
<?php foreach ($xml->question->answers->answer as $answer): ?>
<li>
<?php echo $answer ?>
<br />
Relevancy: <?php echo $answer['relevancy'] ?>% - Pulished on <?php
echo $answer['time'] ?>
</li>
<?php endforeach ?>
</ul>
Paypal donation
While we talk about external APIs, some of them are very simple to integrate and can bring a
lot to your site. The Paypal182 donation API is a simple chunk of HTML code in which the
email of the accountant must be included.
Wouldn’t it be a good motivation for askeet users who generously answer questions to be able
to receive a small donation from all the happy users who found their answer useful? The
‘Donate’ button could appear on the user profile page, and link to his/her Paypal donation
page.
First, add a has_paypal column to the User table in the schema.xml:
Listing <column name="has_paypal" type="boolean" default="0" />
17-13
Rebuild the model, and add to the user/show template the following code:
Listing <?php if ($subscriber->getHasPaypal()): ?>
17-14
<p>If you appreciated this user's contributions, you can grant him a small
donation.</p>
181. http://www.zend.com/php5/articles/php5-simplexml.php
182. http://www.paypal.com
----------------- Brought to you by](https://image.slidesharecdn.com/cfakepathaskeet-1-0-en-100531180741-phpapp02/75/C-fake-path-askeet-1-0-en-154-2048.jpg)
![Day 18: Filters 160
For complex requests not using the Criteria object, we need to add the permanent tag as a
WHERE statement in the SQL code. Check how we did it for the
QuestionTagPeer::getPopularTags() and
187
QuestionTagPeer::getPopularTagsFor() methods in the askeet trac or in the SVN
repository188.
Lists of tags for a question or a user
All the questions of the ‘PHP’ universe are tagged with ‘php’. But if a user is browsing
questions in the ‘PHP’ universe, the ‘php’ tag must not be displayed in the list of tags since it
is implied. When outputting a list of tags for a question or a user in a universe, the permanent
tag must be omitted. This can be done easily by bypassing it in loops, as for instance in the
Question->getTags() method:
Listing public function getTags()
18-12
{
$c = new Criteria();
$c->add(QuestionTagPeer::QUESTION_ID, $this->getId());
$c->addGroupByColumn(QuestionTagPeer::NORMALIZED_TAG);
$c->setDistinct();
$c->addAscendingOrderByColumn(QuestionTagPeer::NORMALIZED_TAG);
$tags = array();
foreach (QuestionTagPeer::doSelect($c) as $tag)
{
if (sfConfig::get('app_permanent_tag') == $tag)
{
continue;
}
$tags[] = $tag->getNormalizedTag();
}
return $tags;
}
The same kind of technique is to be used in the following methods:
Listing Question->getTags()
18-13
Question->getPopularTags()
User->getTagsFor()
User->getPopularTags()
Append the permanent tag to new questions
When a question is created in an askeet universe, it must be tagged with the permanent tag
in addition to the tags entered by the user. As a reminder, in the question/add method, the
Question->addTagsForUser() method is called:
Listing $question->addTagsForUser($this->getRequestParameter('tag'),
18-14
$sf_user->getId());
187. http://trac.askeet.com/trac/browser/trunk/lib/model/
QuestionTagPeer.php?rev=40
188. http://svn.askeet.com/tags/release_day_18/
----------------- Brought to you by](https://image.slidesharecdn.com/cfakepathaskeet-1-0-en-100531180741-phpapp02/75/C-fake-path-askeet-1-0-en-160-2048.jpg)
![Day 19: Performance and cache 165
Apache’s ab
The second tool recommended by symfony is ApacheBench, or ab, another nice utility
brought to you by the Apache foundation. Its online manual200 is less detailed than JMeter’s,
but as ab is a command line tool, it is easier to use.
In Linux, it comes standard with the Apache package, so if you have an installed Apache
server, you should find it in /usr/local/apache/bin/ab. In Windows platforms, it is much
harder to find, so you’d better download it directly from symfony201.
The use of this benchmarking tool is very simple:
$ /usr/local/bin/apache2/bin/ab -c 1 -n 1 http://www.askeet.com/ Listing
19-1
This is ApacheBench, Version 2.0.41-dev <$Revision: 1.121.2.12 $>
apache-2.0
Copyright 1996 Adam Twiss, Zeus Technology Ltd, http://www.zeustech.net/
Copyright 1998-2002 The Apache Software Foundation,
http://www.apache.org/
Benchmarking www.askeet.com (be patient).....done
Server Software: Apache
Server Hostname: www.askeet.com
Server Port: 80
Document Path: /
Document Length: 15525 bytes
Concurrency Level: 1
Time taken for tests: 0.596104 seconds
Complete requests: 1
Failed requests: 0
Write errors: 0
Total transferred: 15874 bytes
HTML transferred: 15525 bytes
Requests per second: 1.68 [#/sec] (mean)
Time per request: 596.104 [ms] (mean)
Time per request: 596.104 [ms] (mean, across all concurrent requests)
Transfer rate: 25.16 [Kbytes/sec] received
Connection Times (ms)
min mean[+/-sd] median max
Connect: 61 61 0.0 61 61
Processing: 532 532 0.0 532 532
Waiting: 359 359 0.0 359 359
Total: 593 593 0.0 593 593
you need to provide a page name (at least / like in the above example) because targeting
only a host will give an incorrectly formatted URL error.
The -c and -n parameters define the number of simultaneous threads, and the total number
of requests to execute. The most interesting data in the result is the last line: the average
total connection time (second number from the left). In the example above, there is only one
200. http://httpd.apache.org/docs/2.2/programs/ab.html
201. http://www.symfony-project.com/downloads/ab.zip
----------------- Brought to you by](https://image.slidesharecdn.com/cfakepathaskeet-1-0-en-100531180741-phpapp02/75/C-fake-path-askeet-1-0-en-165-2048.jpg)
![Day 19: Performance and cache 166
connection, so the connection time is not very accurate. To have a better view of the actual
performance of a page, you need to average several requests and launch them in parallel:
Listing $ /usr/local/bin/apache2/bin/ab -c 10 -n 20 http://www.askeet.com/
19-2
...
Connection Times (ms)
min mean[+/-sd] median max
Connect: 59 88 19.9 89 130
Processing: 831 1431 510.9 1446 3030
Waiting: 632 1178 465.1 1212 2781
Total: 906 1519 508.4 1556 3089
Percentage of the requests served within a certain time (ms)
50% 1556
66% 1569
75% 1761
80% 1827
90% 2285
95% 3089
98% 3089
99% 3089
100% 3089 (longest request)
You should always start by a ab -c 1 -n 1 to have an idea of the time taken by the test
itself before executing it on a larger number of requests. Then, increase the number of total
requests (like ab -c 1 -n 30) until you have a reasonably low standard deviation. Only
then will you have a significant average connection time measure, and you will be ready for
the actual load test. Add threads little by little (and don’t forget to increase the total number
of requests accordingly, like ab -c 10 -n 300) and see the connection time increase as
your server load is being handled. When the average loading times pass beyond a few
seconds, it means that your server is outnumbered and can probably not support more
concurrent threads. You have determined the maximum charge of your service. This is called
a stress test.
Please be kind enough not to stress test any running website in the Internet but your own.
Doing stress test on a foreign site is considered as a denial-of-service attack202. The askeet
website203 is no different, so once again, please do not stress test it.
The load tests will provide you with two important pieces of information: the average loading
time of a specific page, and the maximum capacity of your server. The first one is very useful
to monitor performance improvements.
Improve performances with the cache
There are a lot of ways to increase the performance of a given page, including code profiling,
database request optimization, addition of indexes, creation of an alternative light web server
dedicated to the media of the website, etc. Existing techniques are either cross-language or
PHP-specific, and browsing the web or buying a good book about it will teach you how to
become a performance guru.
202. http://en.wikipedia.org/wiki/Denial-of-service_attack
203. http://www.askeet.com/
----------------- Brought to you by](https://image.slidesharecdn.com/cfakepathaskeet-1-0-en-100531180741-phpapp02/75/C-fake-path-askeet-1-0-en-166-2048.jpg)
![Day 19: Performance and cache 167
Symfony adds a certain overload to web requests, since the configuration and the framework
classes are loaded for each request, and because the MVC separation and the ORM
abstraction result in more code to execute. Although this overhead is relatively low (as
compared to other frameworks or languages), symfony also provides ways to balance the
response time with caching. The result of an action, or even a full page, can be written in a
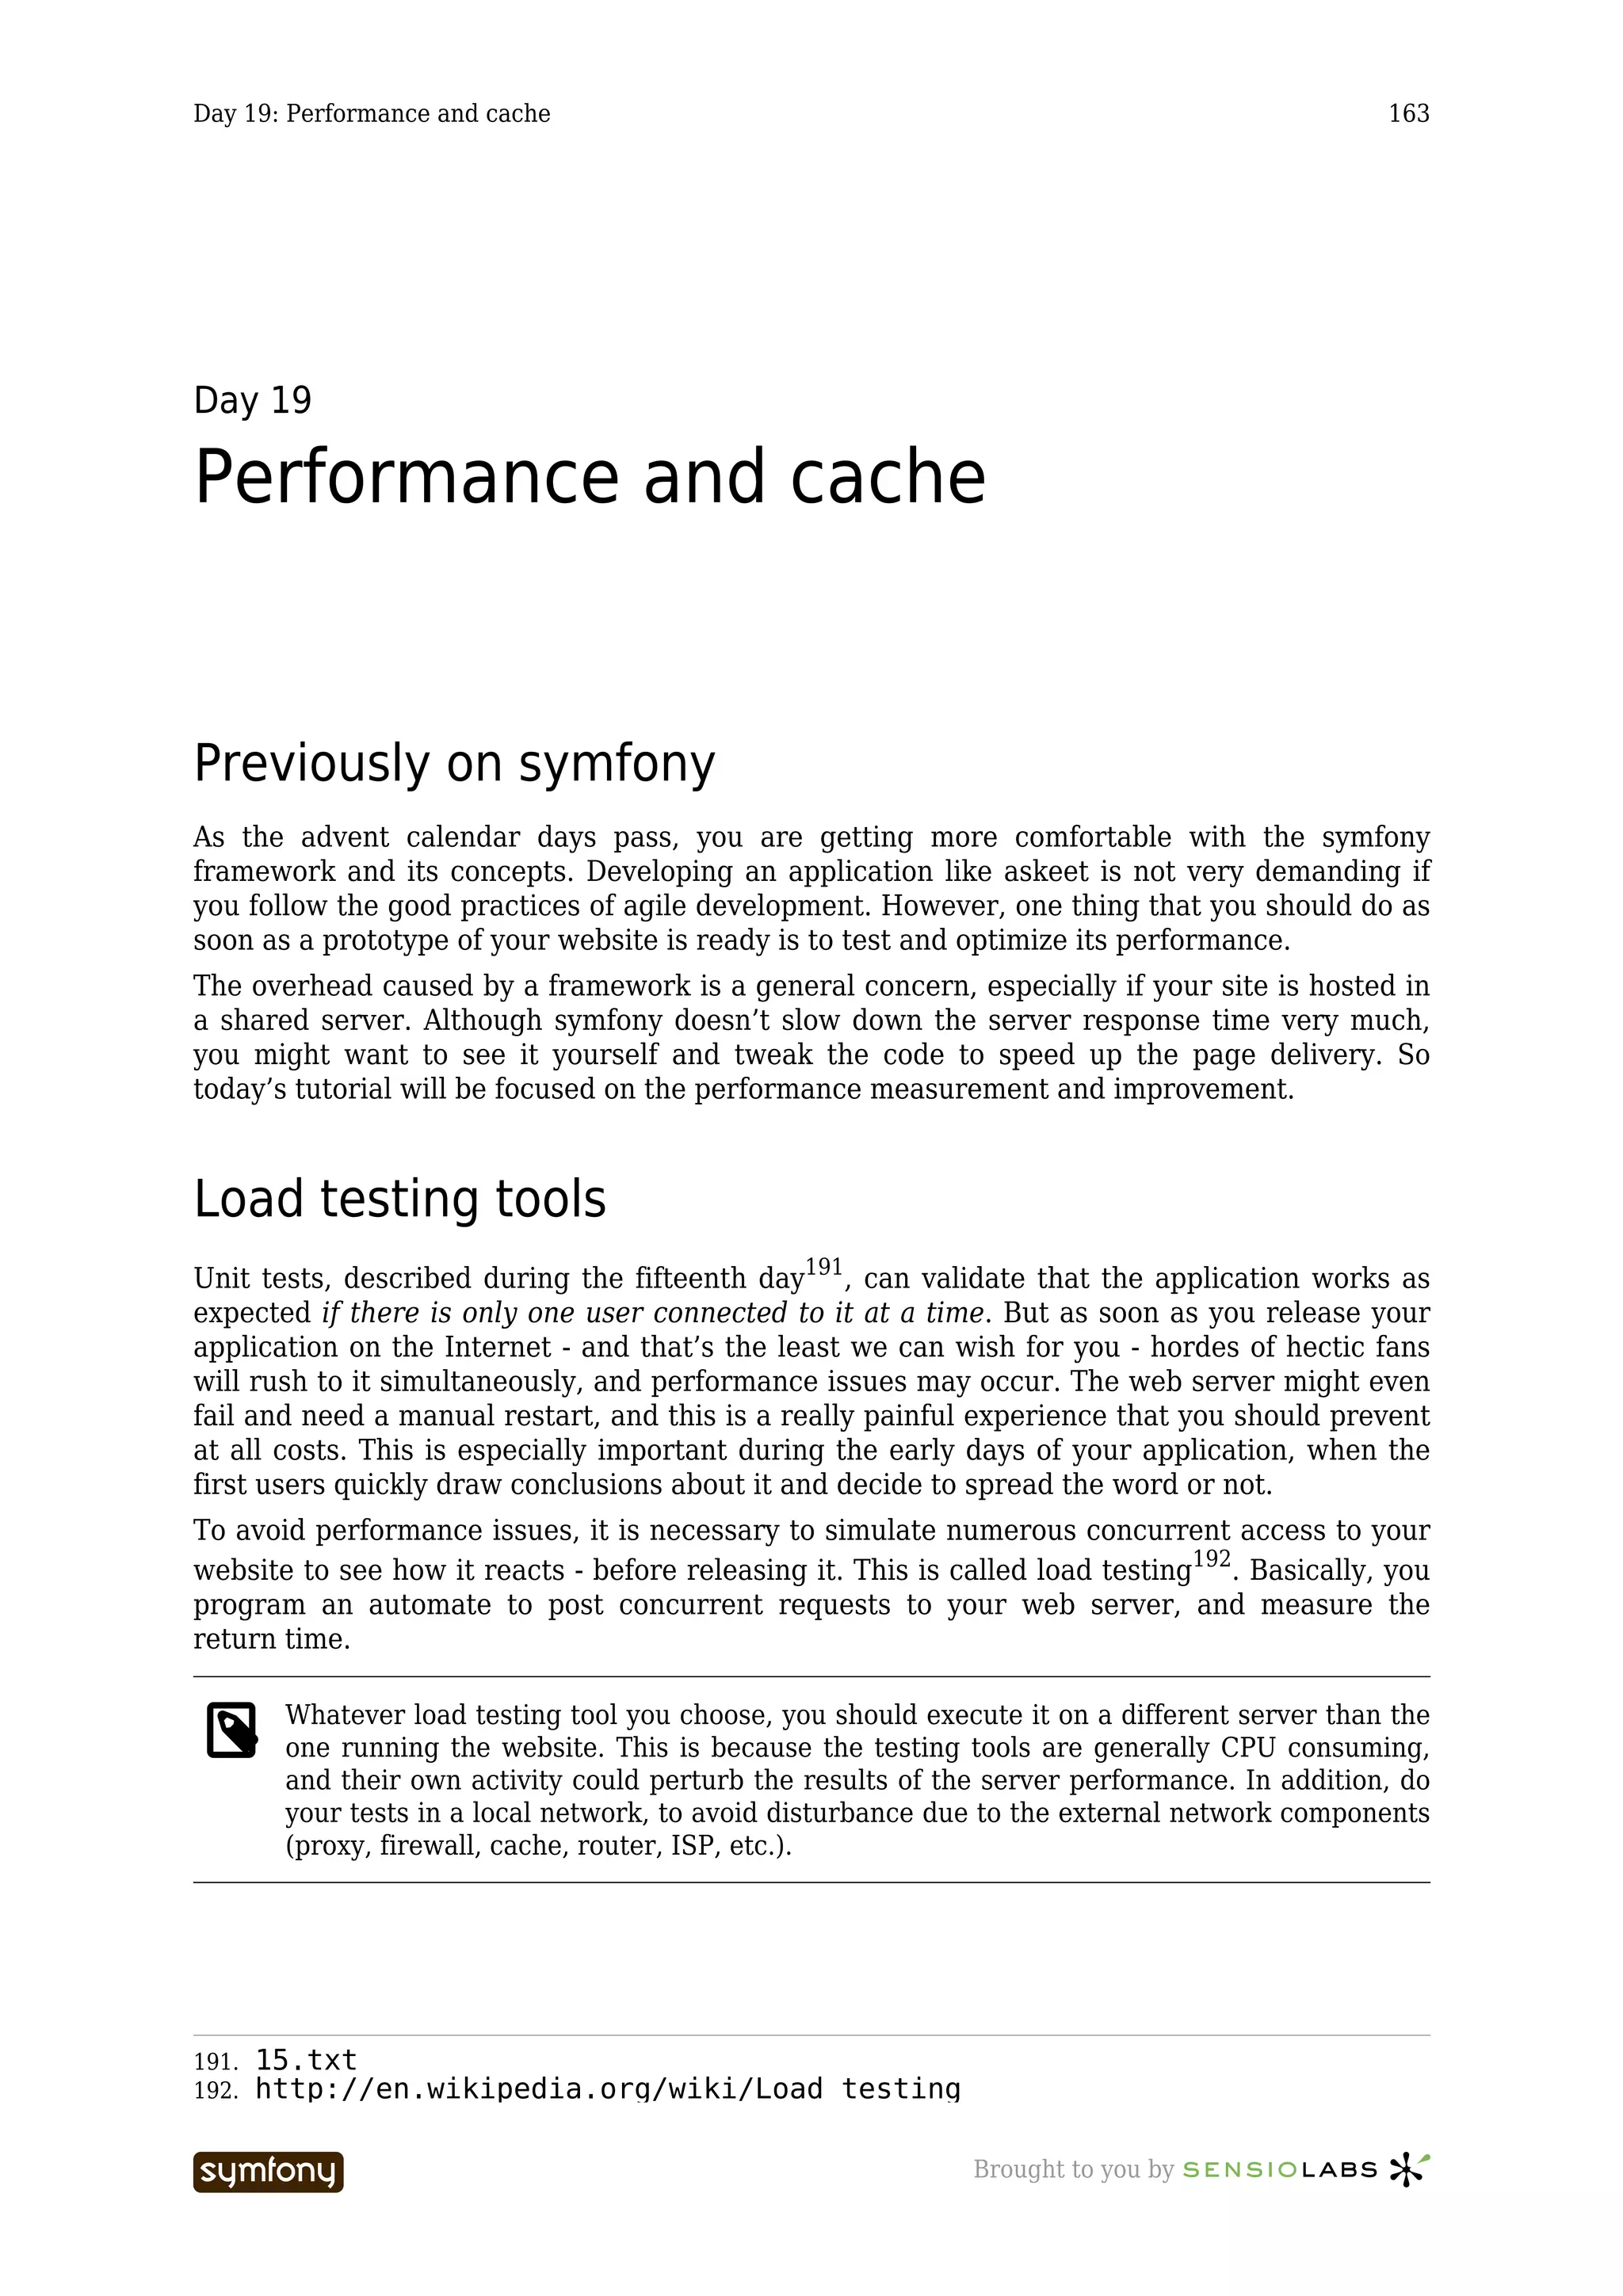
file on the hard disk of the web server, and this file is reused when a similar request is
requested again. This considerably boosts performance, since all the database accesses,
decoration, and action execution are bypassed completely. You will find more information
about caching in symfony in the cache chapter204 of the symfony book.
We will try to use HTML cache to speed up the delivery of the popular tags page. As it
includes a complex SQL query, it is a good candidate for caching. First, let’s see how long it
takes to load it with the current code:
$ ab -c 1 -n 30 http://askeet/popular_tags Listing
19-3
...
Connection Times (ms)
min mean[+/-sd] median max
Connect: 0 0 0.0 0 0
Processing: 147 148 2.4 148 154
Waiting: 138 139 2.3 139 145
Total: 147 148 2.4 148 154
...
Put the result of the action in the cache
The following will not work on symfony 0.6. Please jump to the next section until this tutorial is
updated.
The action executed to display the list of popular tags is tag/popular. To put the result of
this action in cache, all we have to do is to create a cache.yml file in the askeet/apps/
frontend/modules/tag/config/ directory with:
popular: Listing
19-4
activate: on
type: slot
all:
lifeTime: 600
This activates the slot type cache for this action. The result of the action (the view) will be
stored in a file in the cache/frontend/prod/template/askeet/popular_tags/
slot.cache file, and this file will be used instead of calling the action for the next 600
seconds (10 minutes) after it has been created. This means that the popular tags page will be
processed every ten minutes, and in between, the cache version will be used in place.
The caching is done at the first request, so you just need to browse to:
http://askeet/popular_tags Listing
19-5
…to create a cache version of the template. Now, all the calls to this page for the next 10
minutes should be faster, and we will check that immediately by running the Apache
benchmarking tool again:
204. http://www.symfony-project.com/book/1_0/12-Caching
----------------- Brought to you by](https://image.slidesharecdn.com/cfakepathaskeet-1-0-en-100531180741-phpapp02/75/C-fake-path-askeet-1-0-en-167-2048.jpg)
![Day 19: Performance and cache 168
Listing $ ab -c 1 -n 30 http://askeet/popular_tags
19-6
...
Connection Times (ms)
min mean[+/-sd] median max
Connect: 0 0 0.0 0 0
Processing: 137 138 2.0 138 144
Waiting: 128 129 2.0 129 135
Total: 137 138 2.0 138 144
...
We passed from an average of 148ms to 138ms, that’s a 7% increase in performance. The
cache system improves the performance in a significant way.
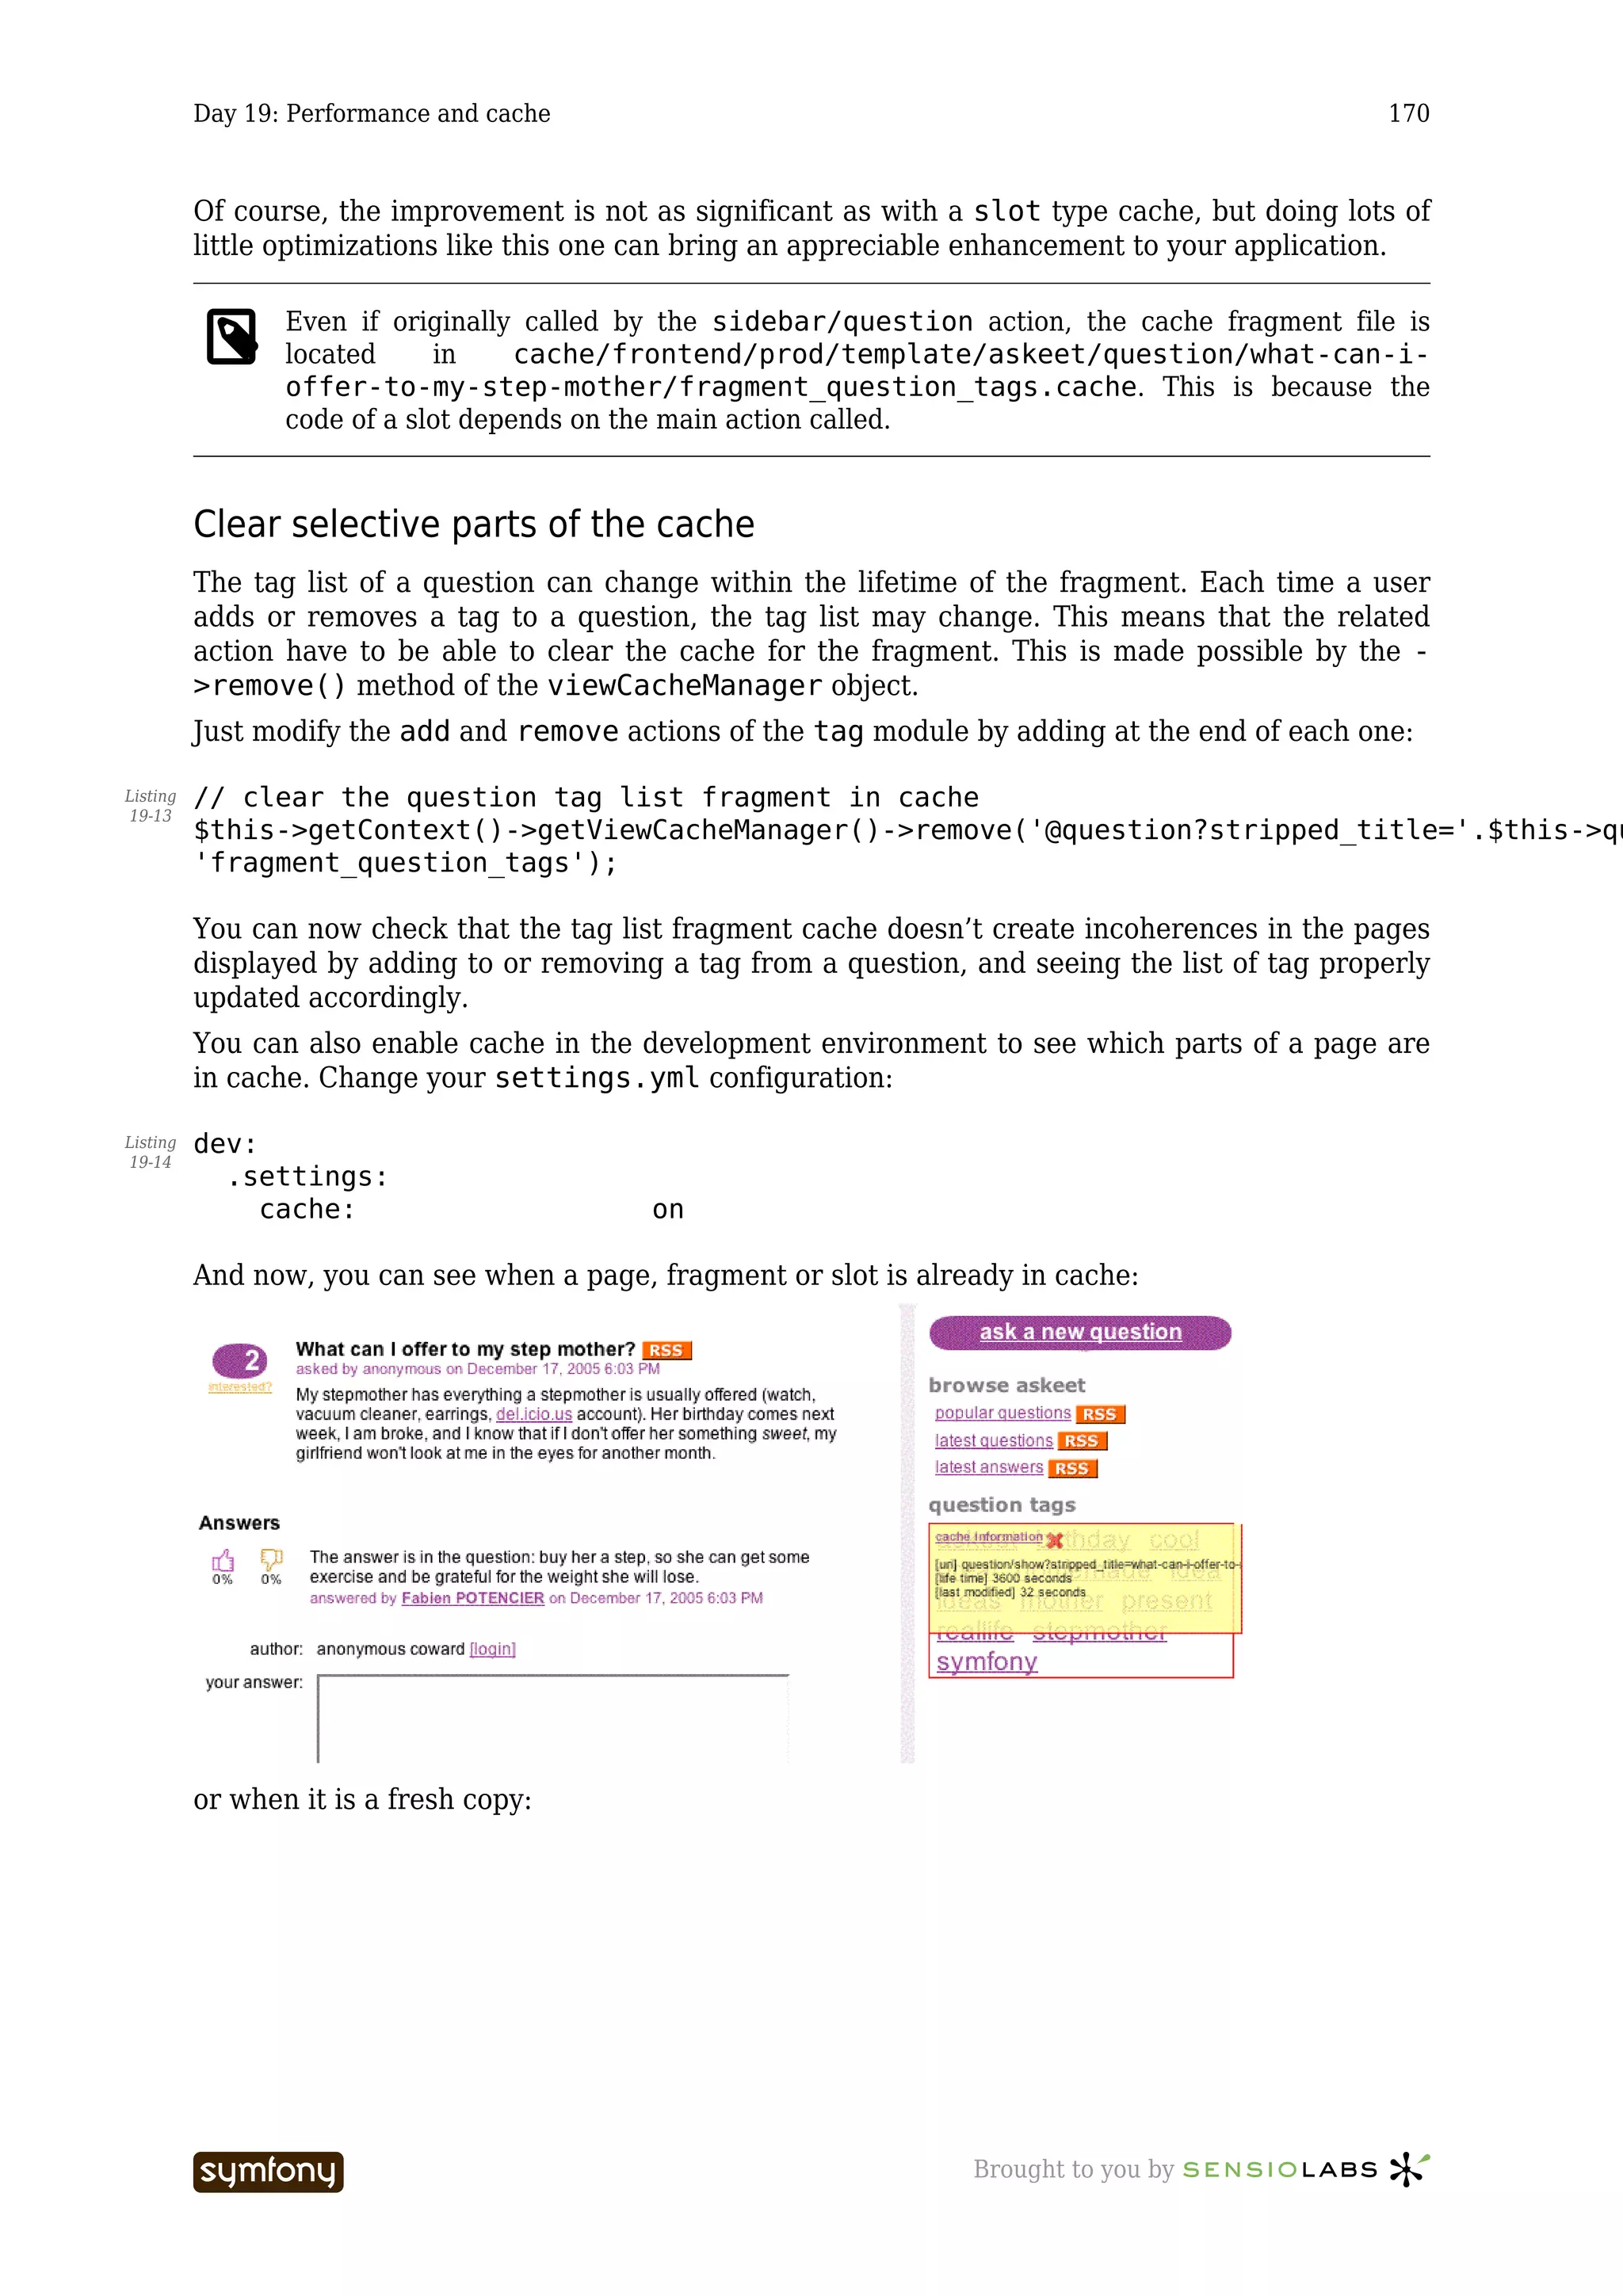
The slot type doesn’t bypass the decoration of the page (i.e. the insertion of the template
in the layout). We can not put the whole page in cache in this case because the layout
contains elements that depend on the context (the user name in the top bar for instance).
But for non-dynamic layouts, symfony also provides a page type which is even more
efficient.
Build a staging environment
By default, the cache system is deactivated in the development environment and activated in
the production environment. This is because cached pages, if not configured properly, can
create new errors. A good practice concerning the test of a web application including cached
page is to build a new test environment, similar to the production one, but with all the debug
and trace tools available in the development environment. We often call it the ‘staging’
environment. If an error occurs in the staging environment but not in the development
environment, then there are many chances that this error is caused by a problem with the
cache.
When you develop a functionality, make sure that it works properly in the development
environment first. Then, change the cache parameters of the related actions to improve
performance, and test it again in the staging environment to see if the caching system doesn’t
create functional perturbation. If everything works fine, you just need to execute load tests in
the production environment to measure the improvement. If the behaviour of the application
is different than in the development environment, you need to review the way you configured
the cache. Unit tests205 can be of great help to make this procedure systematic.
In order to create the staging environment, you need to add a new front controller and to
define the environment’s settings.
Copy the production front controller (askeet/web/index.php) into a askeet/web/
frontend_staging.php file, and change its definition to:
Listing <?php
19-7
define('SF_ROOT_DIR', realpath(dirname(__FILE__).'/..'));
define('SF_APP', 'frontend');
define('SF_ENVIRONMENT', 'staging');
define('SF_DEBUG', false);
require_once(SF_ROOT_DIR.DIRECTORY_SEPARATOR.'apps'.DIRECTORY_SEPARATOR.SF_APP.DIRECTORY
sfContext::getInstance()->getController()->dispatch();
?>
205. 15.txt
----------------- Brought to you by](https://image.slidesharecdn.com/cfakepathaskeet-1-0-en-100531180741-phpapp02/75/C-fake-path-askeet-1-0-en-168-2048.jpg)
![Day 20: Administration and moderation 180
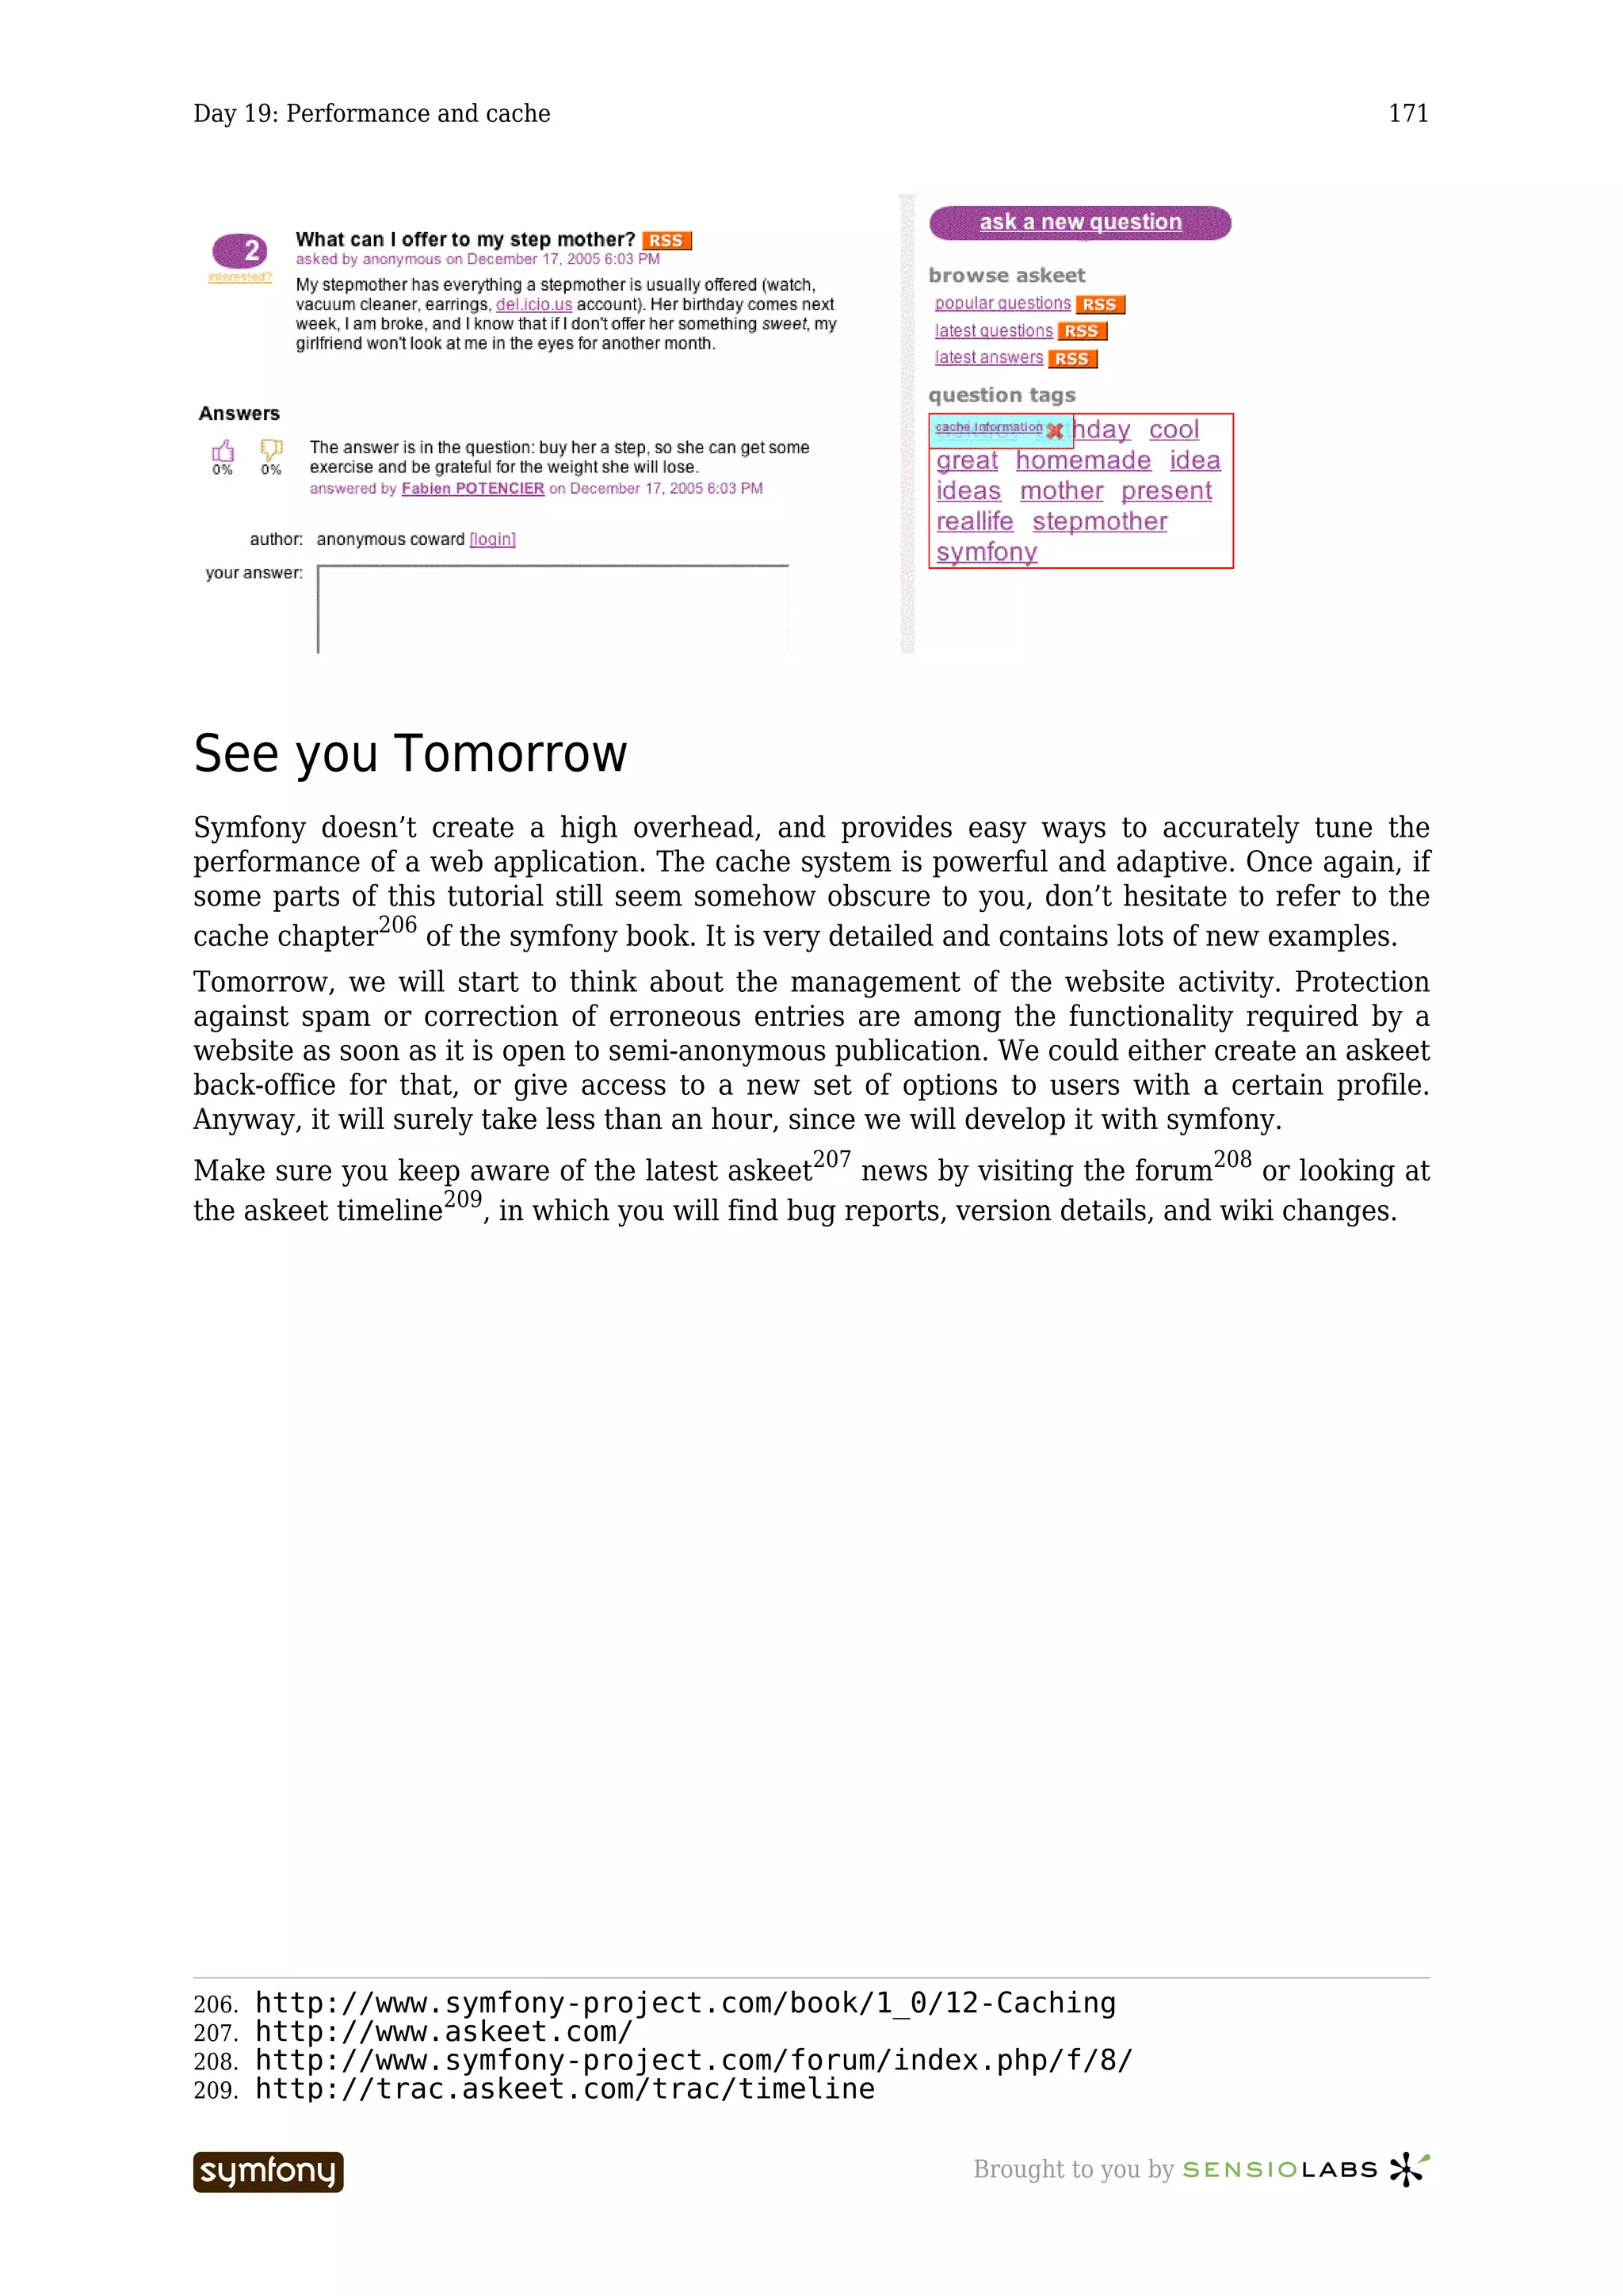
The class methods QuestionPeer::getReportCount(),
AnswerPeer::getReportCount(), UserPeer::getModeratorCandidatesCount() and
UserPeer::getProblematicUsersCount() are to be added to the model. They are all
based on the same principle:
Listing public static function getReportCount()
20-5
{
$c = new Criteria();
$c->add(self::REPORTS, 0, Criteria::GREATER_THAN);
$c = self::addPermanentTagToCriteria($c);
return self::doCount($c);
}
AJAX report
We will provide a ‘[report to moderator]’ link to report a question in all the places a question
is displayed (in the question lists, in a question detail page). It would be nice if this link was
an AJAX one, as in the day eight217 tutorial. So we add a new helper to the
QuestionHelper.php file in the askeet/apps/frontend/lib/helper/ directory:
Listing function link_to_report_question($question, $user)
20-6
{
217. 8.txt
----------------- Brought to you by](https://image.slidesharecdn.com/cfakepathaskeet-1-0-en-100531180741-phpapp02/75/C-fake-path-askeet-1-0-en-180-2048.jpg)
![Day 20: Administration and moderation 181
use_helper('Javascript');
$text = '[report to moderator]';
if ($user->isAuthenticated())
{
$has_already_reported_question =
ReportQuestionPeer::retrieveByPk($question->getId(),
$user->getSubscriberId());
if ($has_already_reported_question)
{
// already reported for this user
return '[reported]';
}
else
{
return link_to_remote($text, array(
'url' => '@user_report_question?id='.$question->getId(),
'update' => array('success' =>
'report_question_'.$question->getId()),
'loading' => "Element.show('indicator')",
'complete' =>
"Element.hide('indicator');".visual_effect('highlight',
'report_question_'.$question->getId()),
));
}
}
else
{
return link_to_login($text);
}
}
Now, the templates where the link has to appear (question/templates/
showSuccess.php, question/templates/_list.php) can use this helper:
<div class="options" id="report_question_<?php echo $question->getId() ?>"> Listing
20-7
<?php echo link_to_report_question($question, $sf_user) ?>
</div>
The @user_report_question rule has to be written in the routing.yml as leading to a
user/reportQuestion action:
public function executeReportQuestion() Listing
20-8
{
$this->question =
QuestionPeer::retrieveByPk($this->getRequestParameter('id'));
$this->forward404Unless($this->question);
$spam = new ReportQuestion();
$spam->setQuestionId($this->question->getId());
$spam->setUserId($this->getUser()->getSubscriberId());
$spam->save();
}
And the result of this action, the user/templates/reportQuestionSuccess.php
template, is simply:
----------------- Brought to you by](https://image.slidesharecdn.com/cfakepathaskeet-1-0-en-100531180741-phpapp02/75/C-fake-path-askeet-1-0-en-181-2048.jpg)
![Day 20: Administration and moderation 182
Listing <?php use_helper('Question') ?>
20-9
<?php echo link_to_report_question($question, $sf_user) ?>
The same goes for the reported answers.
New action links for users with credentials
In the question_body div tag of the askeet/apps/frontend/modules/question/
templates/showSuccess.php, we add the question management actions for moderators
only, so to be compatible with the AJAX report, we put them in a fragment:
Listing ...
20-10
<div class="options" id="report_question_<?php echo $question->getId() ?>">
<?php echo link_to_report_question($question, $sf_user) ?>
<?php include_partial('moderator/question_options', array('question' =>
$question)) ?>
</div>
The askeet/apps/frontend/modules/moderator/templates/
_question_options.php fragment contains:
Listing <?php if ($sf_user->hasCredential('moderator')): ?>
20-11
<?php if ($question->getReports()): ?>
[<strong><?php echo $question->getReports() ?></strong> reports]
<?php echo link_to('[reset reports]', 'moderator/
resetQuestionReports?stripped_title='.$question->getStrippedTitle()) ?>
<?php endif ?>
<?php echo link_to('[delete question]', 'moderator/
deleteQuestion?stripped_title='.$question->getStrippedTitle()) ?>
<?php endif ?>
...
The same options are added in the askeet/apps/frontend/modules/answer/
templates/_answer.php, with a link to a moderator/templates/
_answer_options.php fragment.
----------------- Brought to you by](https://image.slidesharecdn.com/cfakepathaskeet-1-0-en-100531180741-phpapp02/75/C-fake-path-askeet-1-0-en-182-2048.jpg)
![Day 20: Administration and moderation 183
The same kind of adaptation goes for the administrator action links in the user profile page.
One of the good practices about links to actions is to implement them as a normal link
(doing a ‘GET’ request) when the action doesn’t modify the model, and as a button (doing a
‘POST’) request when the action alters the data. This is to avoid that automatic web
crawlers, like search engine robots, click on a link that can modify the database. The AJAX
links being inmplemented in javascript, they can’y be clicked by robots. The ‘reset’ and
‘report’ links that we just added, however, could be clicked by a robot. Fortunately, they
are not displayed unless the user has moderator access, so there is no risk that they are
clicked unintentionnally.
We could add an extra protection on these links by declaring them as ‘POST’ links, as
described in the link chapter218 of the symfony book:
[php] Listing
20-12
<?php echo link_to('[delete answer]', 'moderator/
deleteAnswer?id='.$answer->getId(), 'post=true') ?>
Access restriction
When a user with specific rights logs in, his sfUser object must be given the appropriate
credential. This is done in the signIn method of the myUser class in askeet/apps/
frontend/lib/myUser.class.php, that we created during day six219:
public function signIn($user) Listing
20-13
{
$this->setAttribute('subscriber_id', $user->getId(), 'subscriber');
$this->setAuthenticated(true);
$this->addCredential('subscriber');
if ($user->getIsModerator())
{
$this->addCredential('moderator');
}
if ($user->getIsAdministrator())
{
$this->addCredential('administrator');
}
$this->setAttribute('nickname', $user->getNickname(), 'subscriber');
}
Of course, all the moderator actions have to be restricted to moderators with appropriate
settings in the askeet/apps/frontend/modules/moderator/config/security.yml:
all: Listing
20-14
is_secure: on
credentials: moderator
The same kind of restriction is to be applied for administrator actions.
218. http://www.symfony-project.com/book/1_0/09-Links-and-the-Routing-System
219. 6.txt
----------------- Brought to you by](https://image.slidesharecdn.com/cfakepathaskeet-1-0-en-100531180741-phpapp02/75/C-fake-path-askeet-1-0-en-183-2048.jpg)
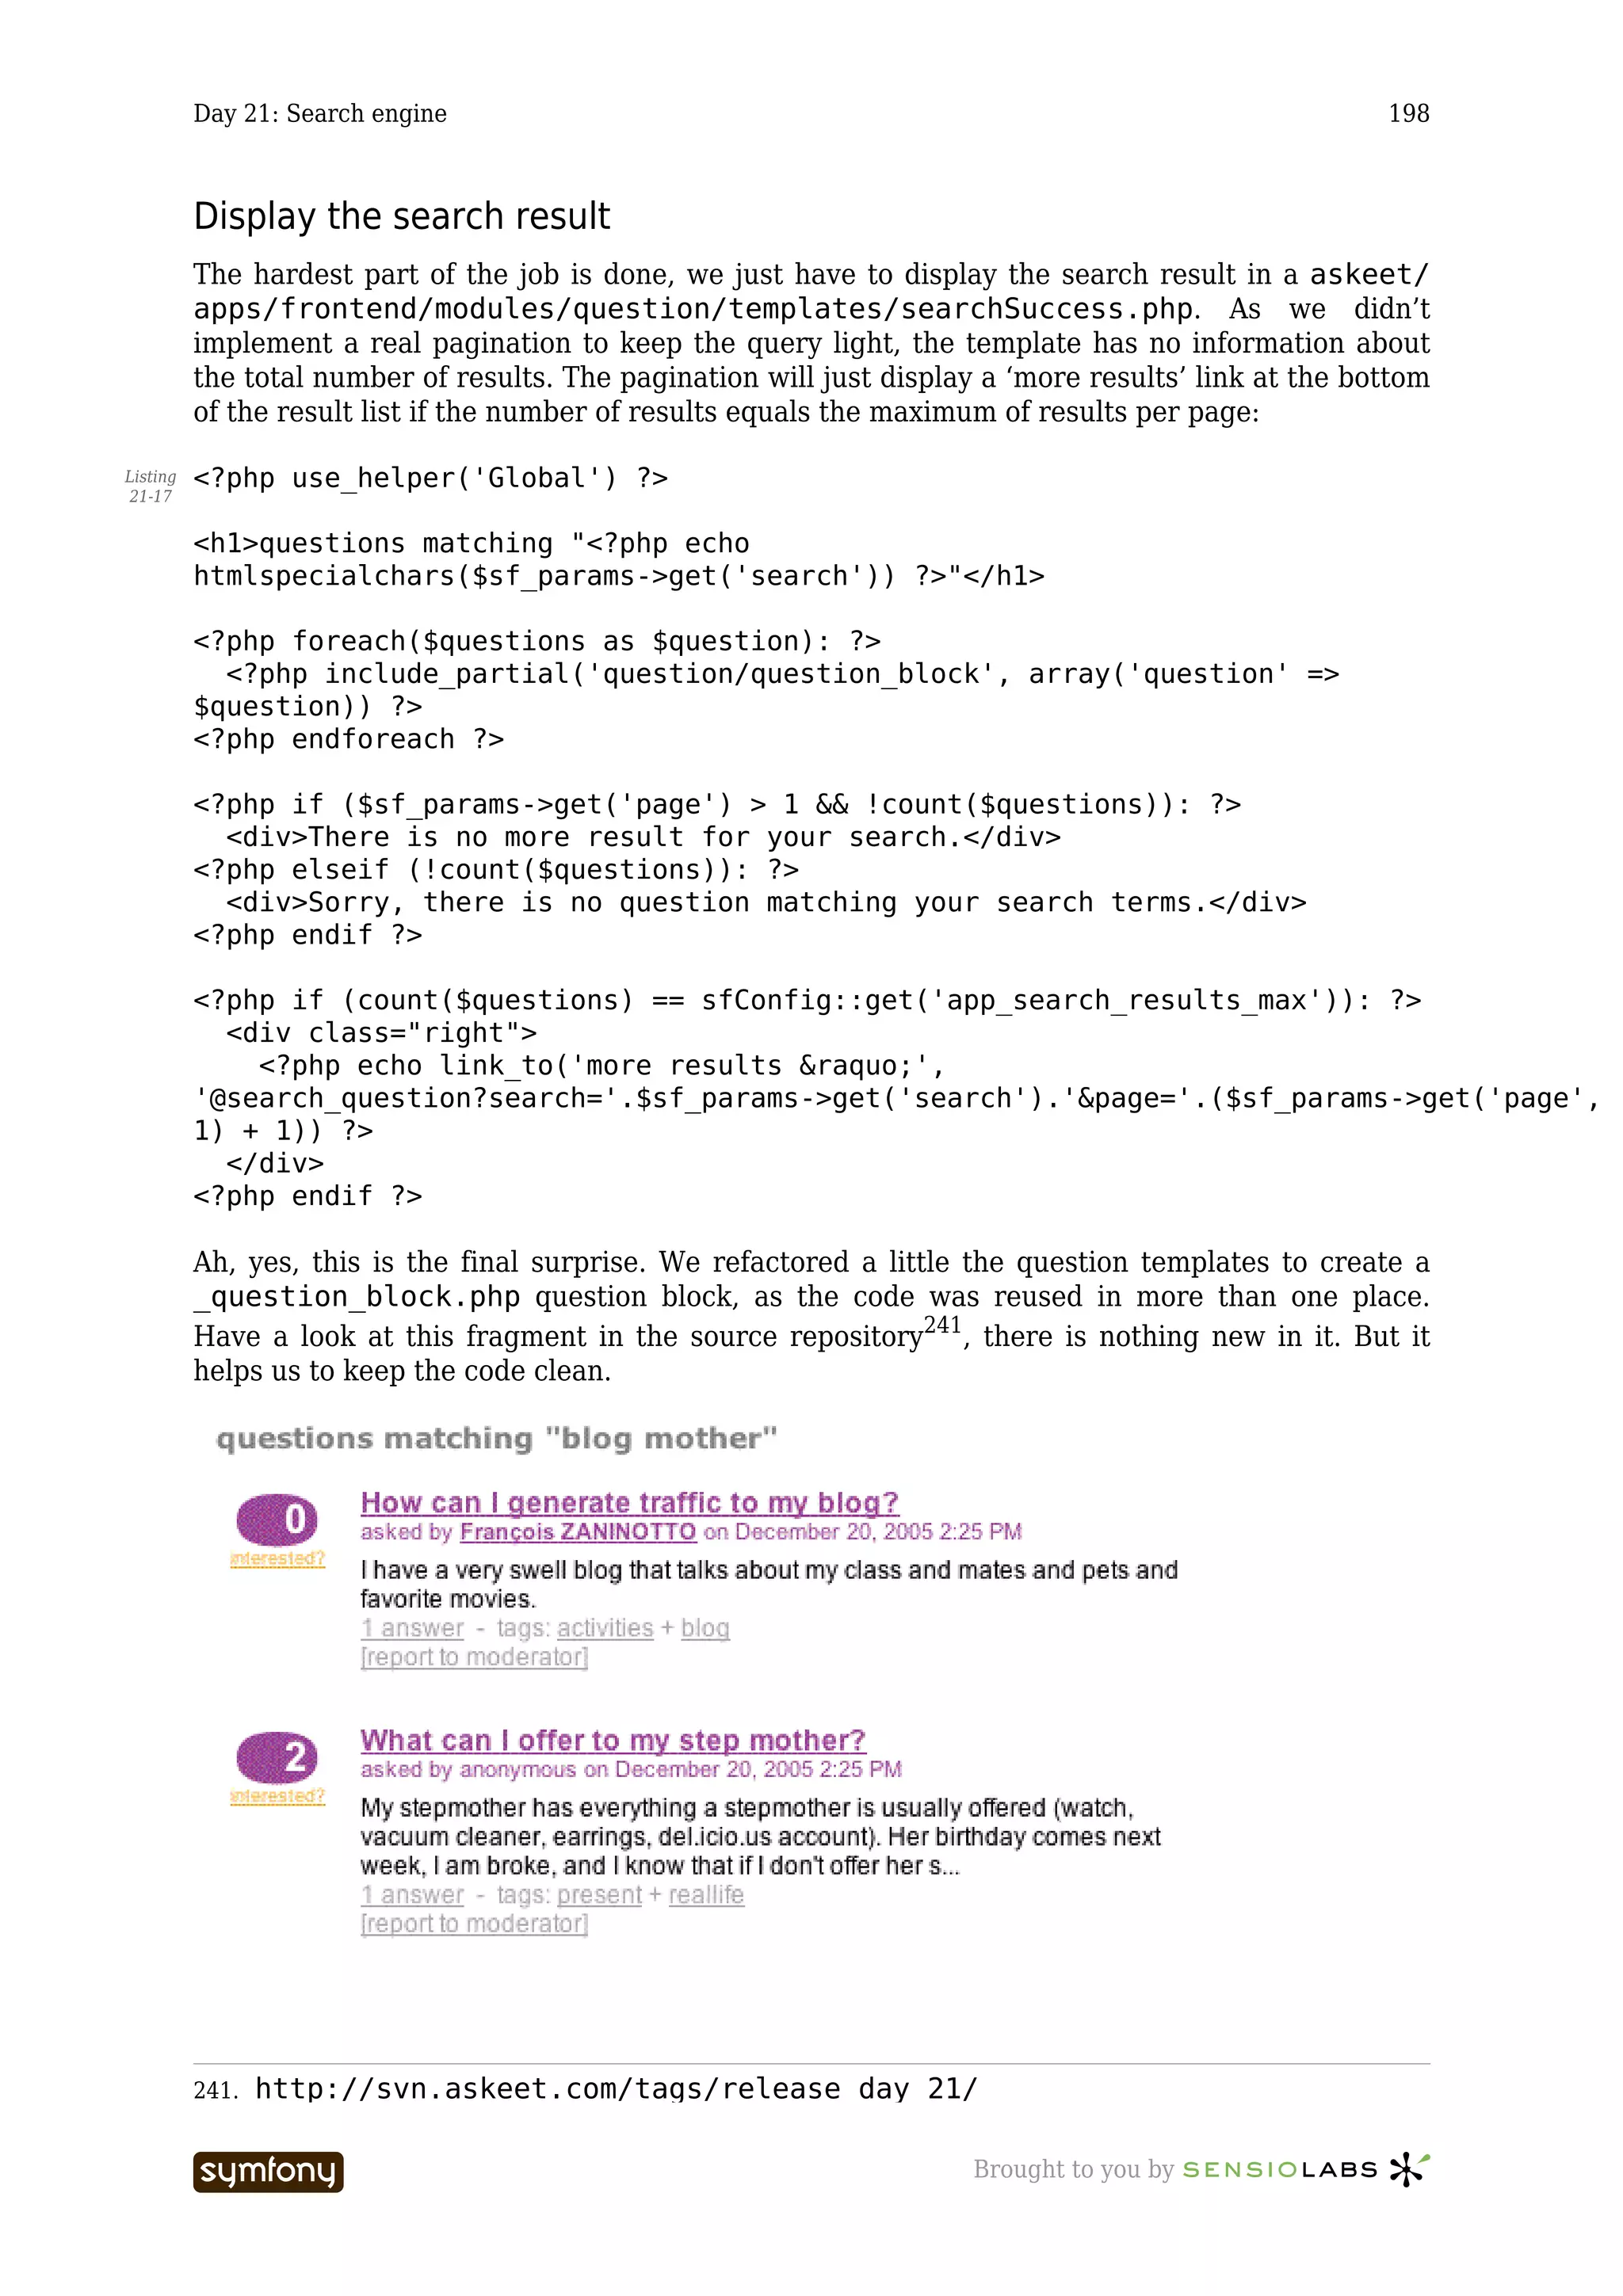
![Day 21: Search engine 190
Stemming
The first thing that you should notice in the example question given above is that words
having the same radical should be seen as a single one. ‘Children’ should increase the weight
of ‘child’, as should ‘sign’ do for ‘signs’. So before indexing words, they have to be reduced to
their greatest common divisor, and in linguistics vocabulary, this is called a stem235, or “the
base part of the word including derivational affixes but not inflectional morphemes, i. e. the
part of the word that remains unchanged through inflection”.
There are lots of rules to transform a word into its stem, and these rules are all language-
dependant. One of the best stemming techniques for the English language so far is called the
Porter Stemming Algorithm236 and, as we are very lucky, it has been ported to PHP5 in an
open-source script available from tartarus.org237.
The PorterStemmer class provides a ::stem($word) method that is perfect for our needs.
So we can write a method, still in myTools.class.php, that turns a phrase into an array of
stem words:
Listing [php]
21-4
public static function stemPhrase($phrase)
{
// split into words
$words = str_word_count(strtolower($phrase), 1);
// ignore stop words
$words = myTools::removeStopWordsFromArray($words);
// stem words
$stemmed_words = array();
foreach ($words as $word)
{
// ignore 1 and 2 letter words
if (strlen($word) <= 2)
{
continue;
}
$stemmed_words[] = PorterStemmer::stem($word, true);
}
return $stemmed_words;
}
Of course, you have to put the PorterStemmer.class.php in the same askeet/lib/
directory for this to work.
Giving weight to words
The search results have to appear in order of pertinence. The questions that are more tightly
related to the words entered by the user have to appear first. But how can we translate this
idea of pertinence into an algorithm? Let’s write a few basic principles:
• If a searched word appears in the title of a question, this question should appear
higher in a search result than another one where the word appears only in the body.
235. http://en.wikipedia.org/wiki/Stem_%28linguistics%29
236. http://www.tartarus.org/~martin/PorterStemmer/
237. http://www.tartarus.org/~martin/PorterStemmer/php.txt
----------------- Brought to you by](https://image.slidesharecdn.com/cfakepathaskeet-1-0-en-100531180741-phpapp02/75/C-fake-path-askeet-1-0-en-190-2048.jpg)
![Day 21: Search engine 193
if (!isset($words[$stemmed_tag]))
{
$words[$stemmed_tag] = 0;
}
$words[$stemmed_tag] += ceil(($count / $max) *
sfConfig::get('app_search_tag_weight'));
}
return $words;
}
We also have to update the question index each time a tag is added to it, so override the
save() method of the Tag model object as well:
public function save($con = null) Listing
21-9
{
$con = sfContext::getInstance()->getDatabaseConnection('propel');
try
{
$con->begin();
$ret = parent::save($con);
$this->getQuestion()->updateSearchIndex();
$con->commit();
return $ret;
}
catch (Exception $e)
{
$con->rollback();
throw $e;
}
}
Test the index builder
The index is ready to be built. Initialize it by populating the database again:
$ php batch/load_data.php Listing
21-10
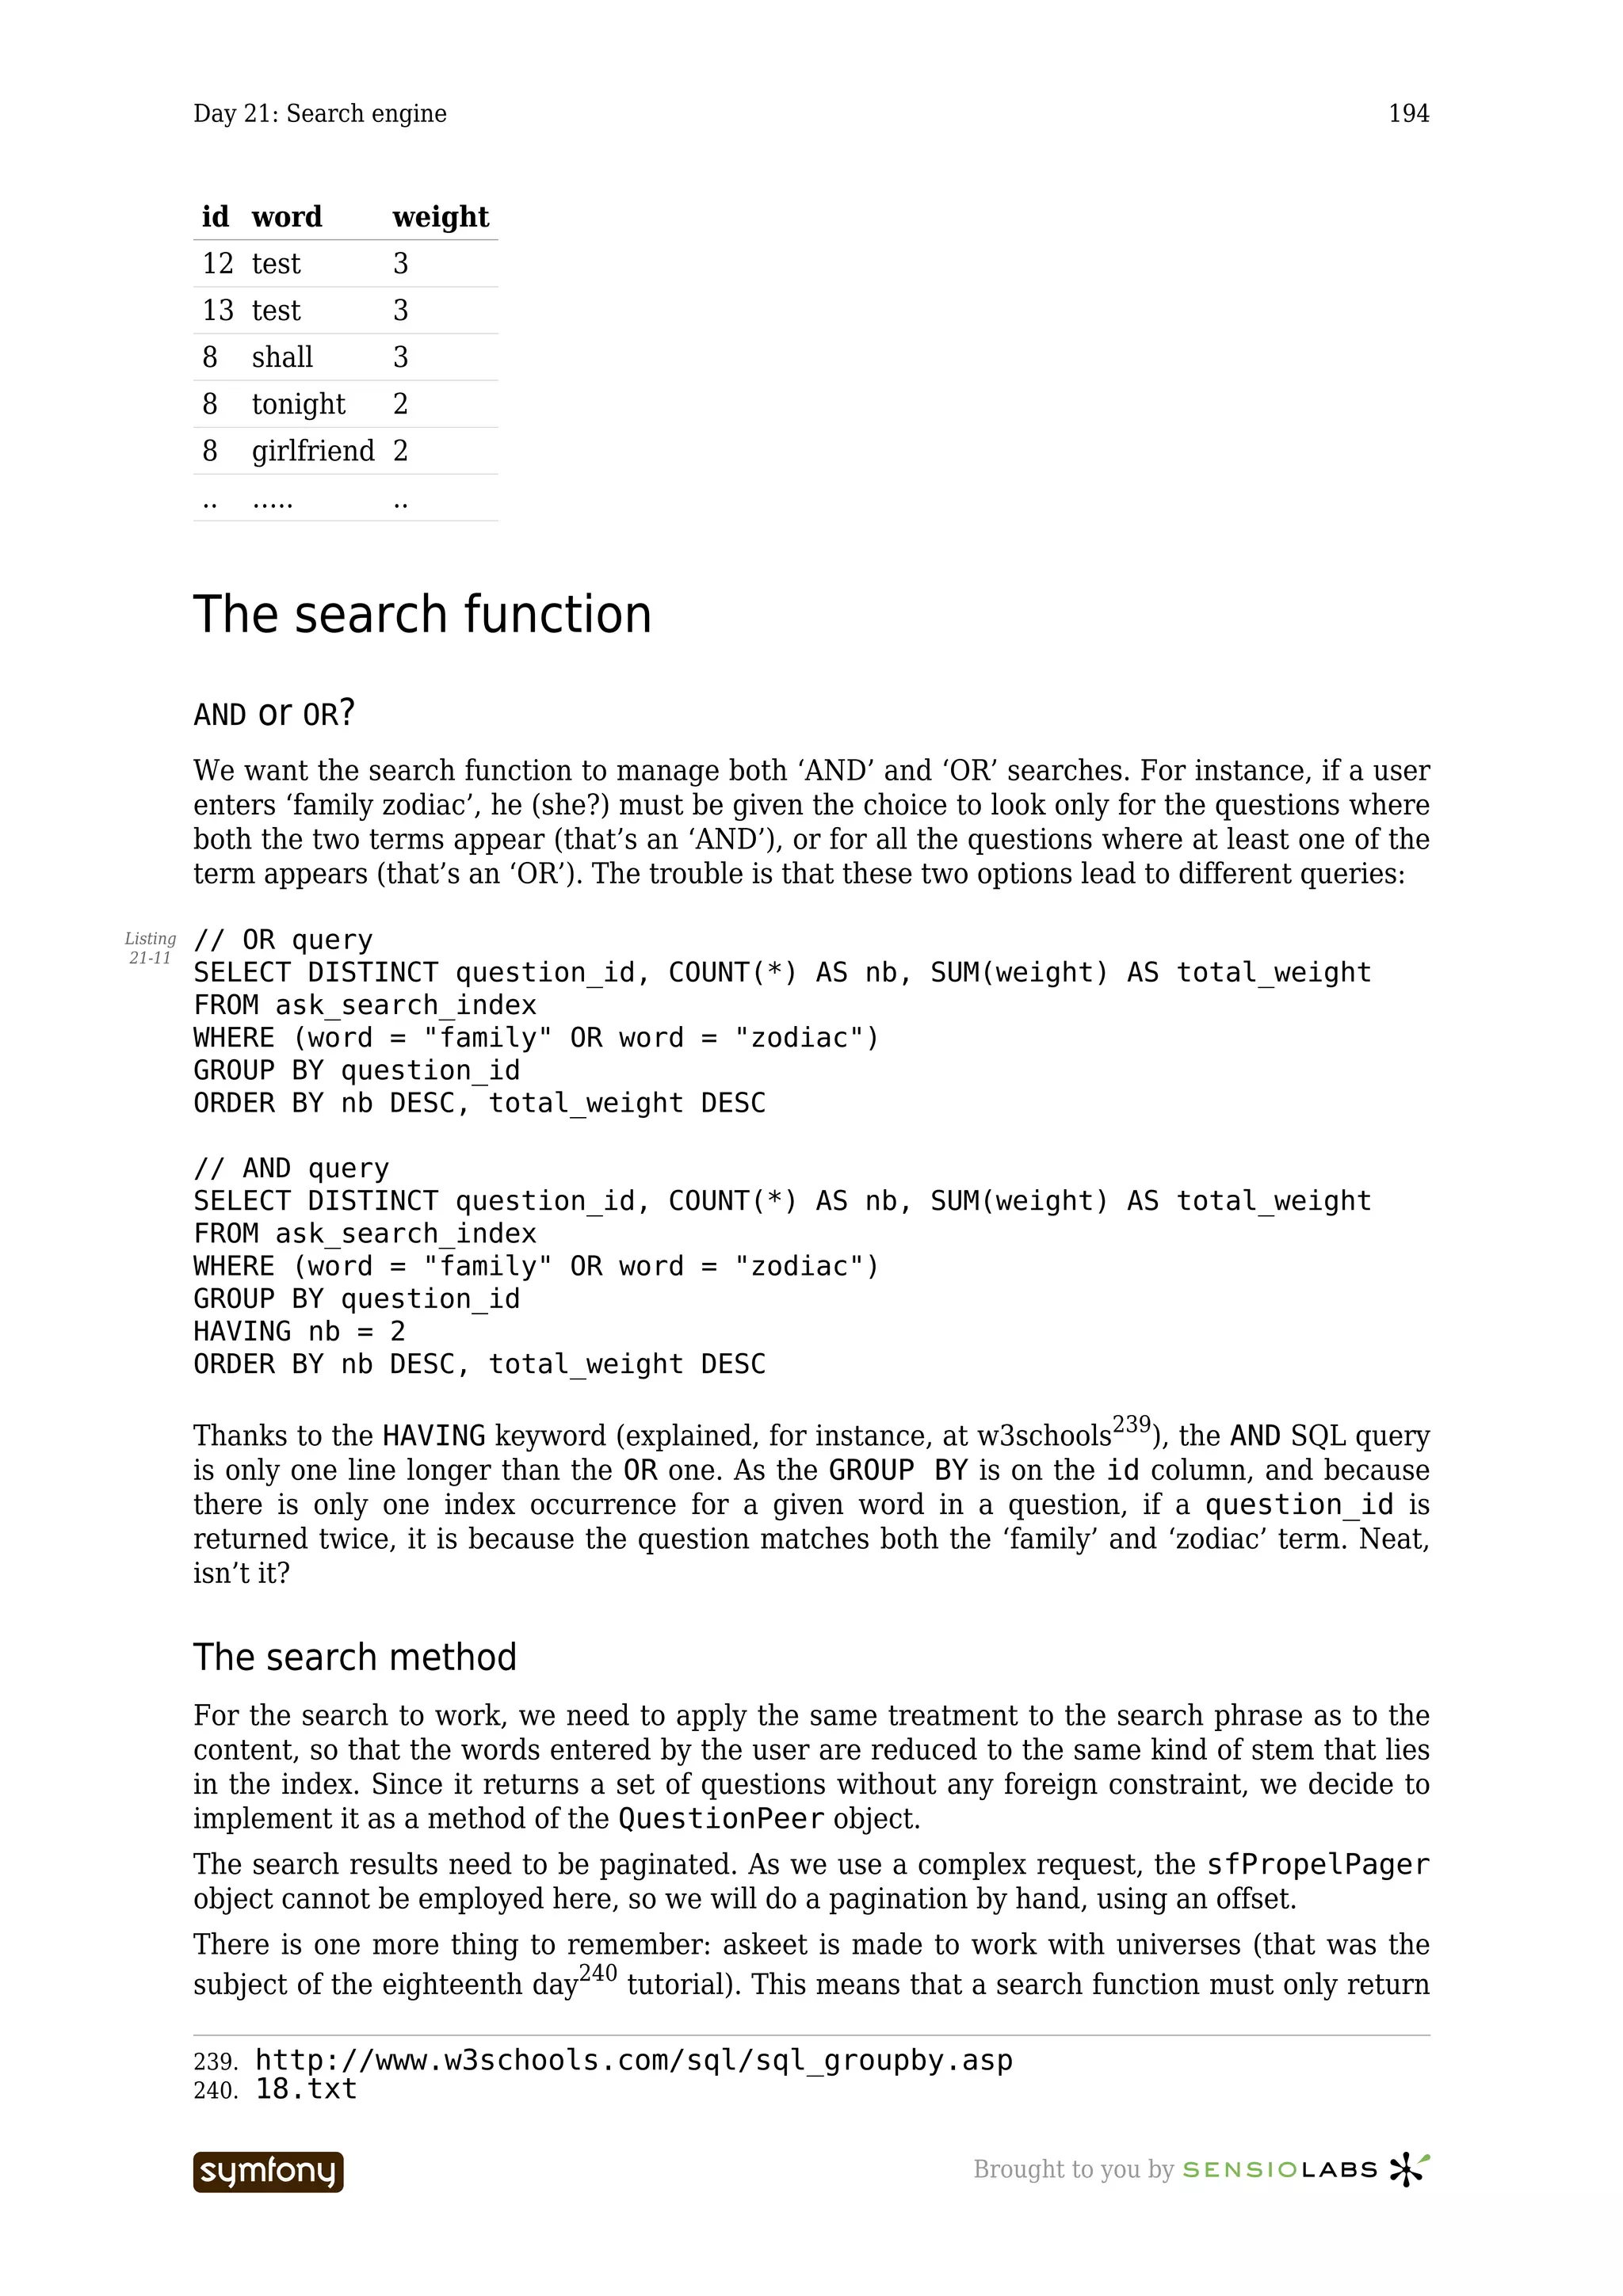
You can inspect the SearchIndex table to check if the indexing went all well:
id word weight
10 blog 6
9 offer 4
8 girl 3
8 rel 3
8 activ 3
10 activ 3
9 present 3
9 reallif 3
11 test 3
----------------- Brought to you by](https://image.slidesharecdn.com/cfakepathaskeet-1-0-en-100531180741-phpapp02/75/C-fake-path-askeet-1-0-en-193-2048.jpg)
![Day 21: Search engine 196
if (sfConfig::get('app_permanent_tag'))
{
$stmt->setString(1, sfConfig::get('app_permanent_tag'));
$placeholder_offset = 2;
}
for ($i = 0; $i < $nb_words; $i++)
{
$stmt->setString($i + $placeholder_offset, $words[$i]);
}
$rs = $stmt->executeQuery(ResultSet::FETCHMODE_NUM);
// Manage the results
$questions = array();
while ($rs->next())
{
$questions[] = self::retrieveByPK($rs->getInt(1));
}
return $questions;
}
The method returns a list of Question objects, ordered by pertinence.
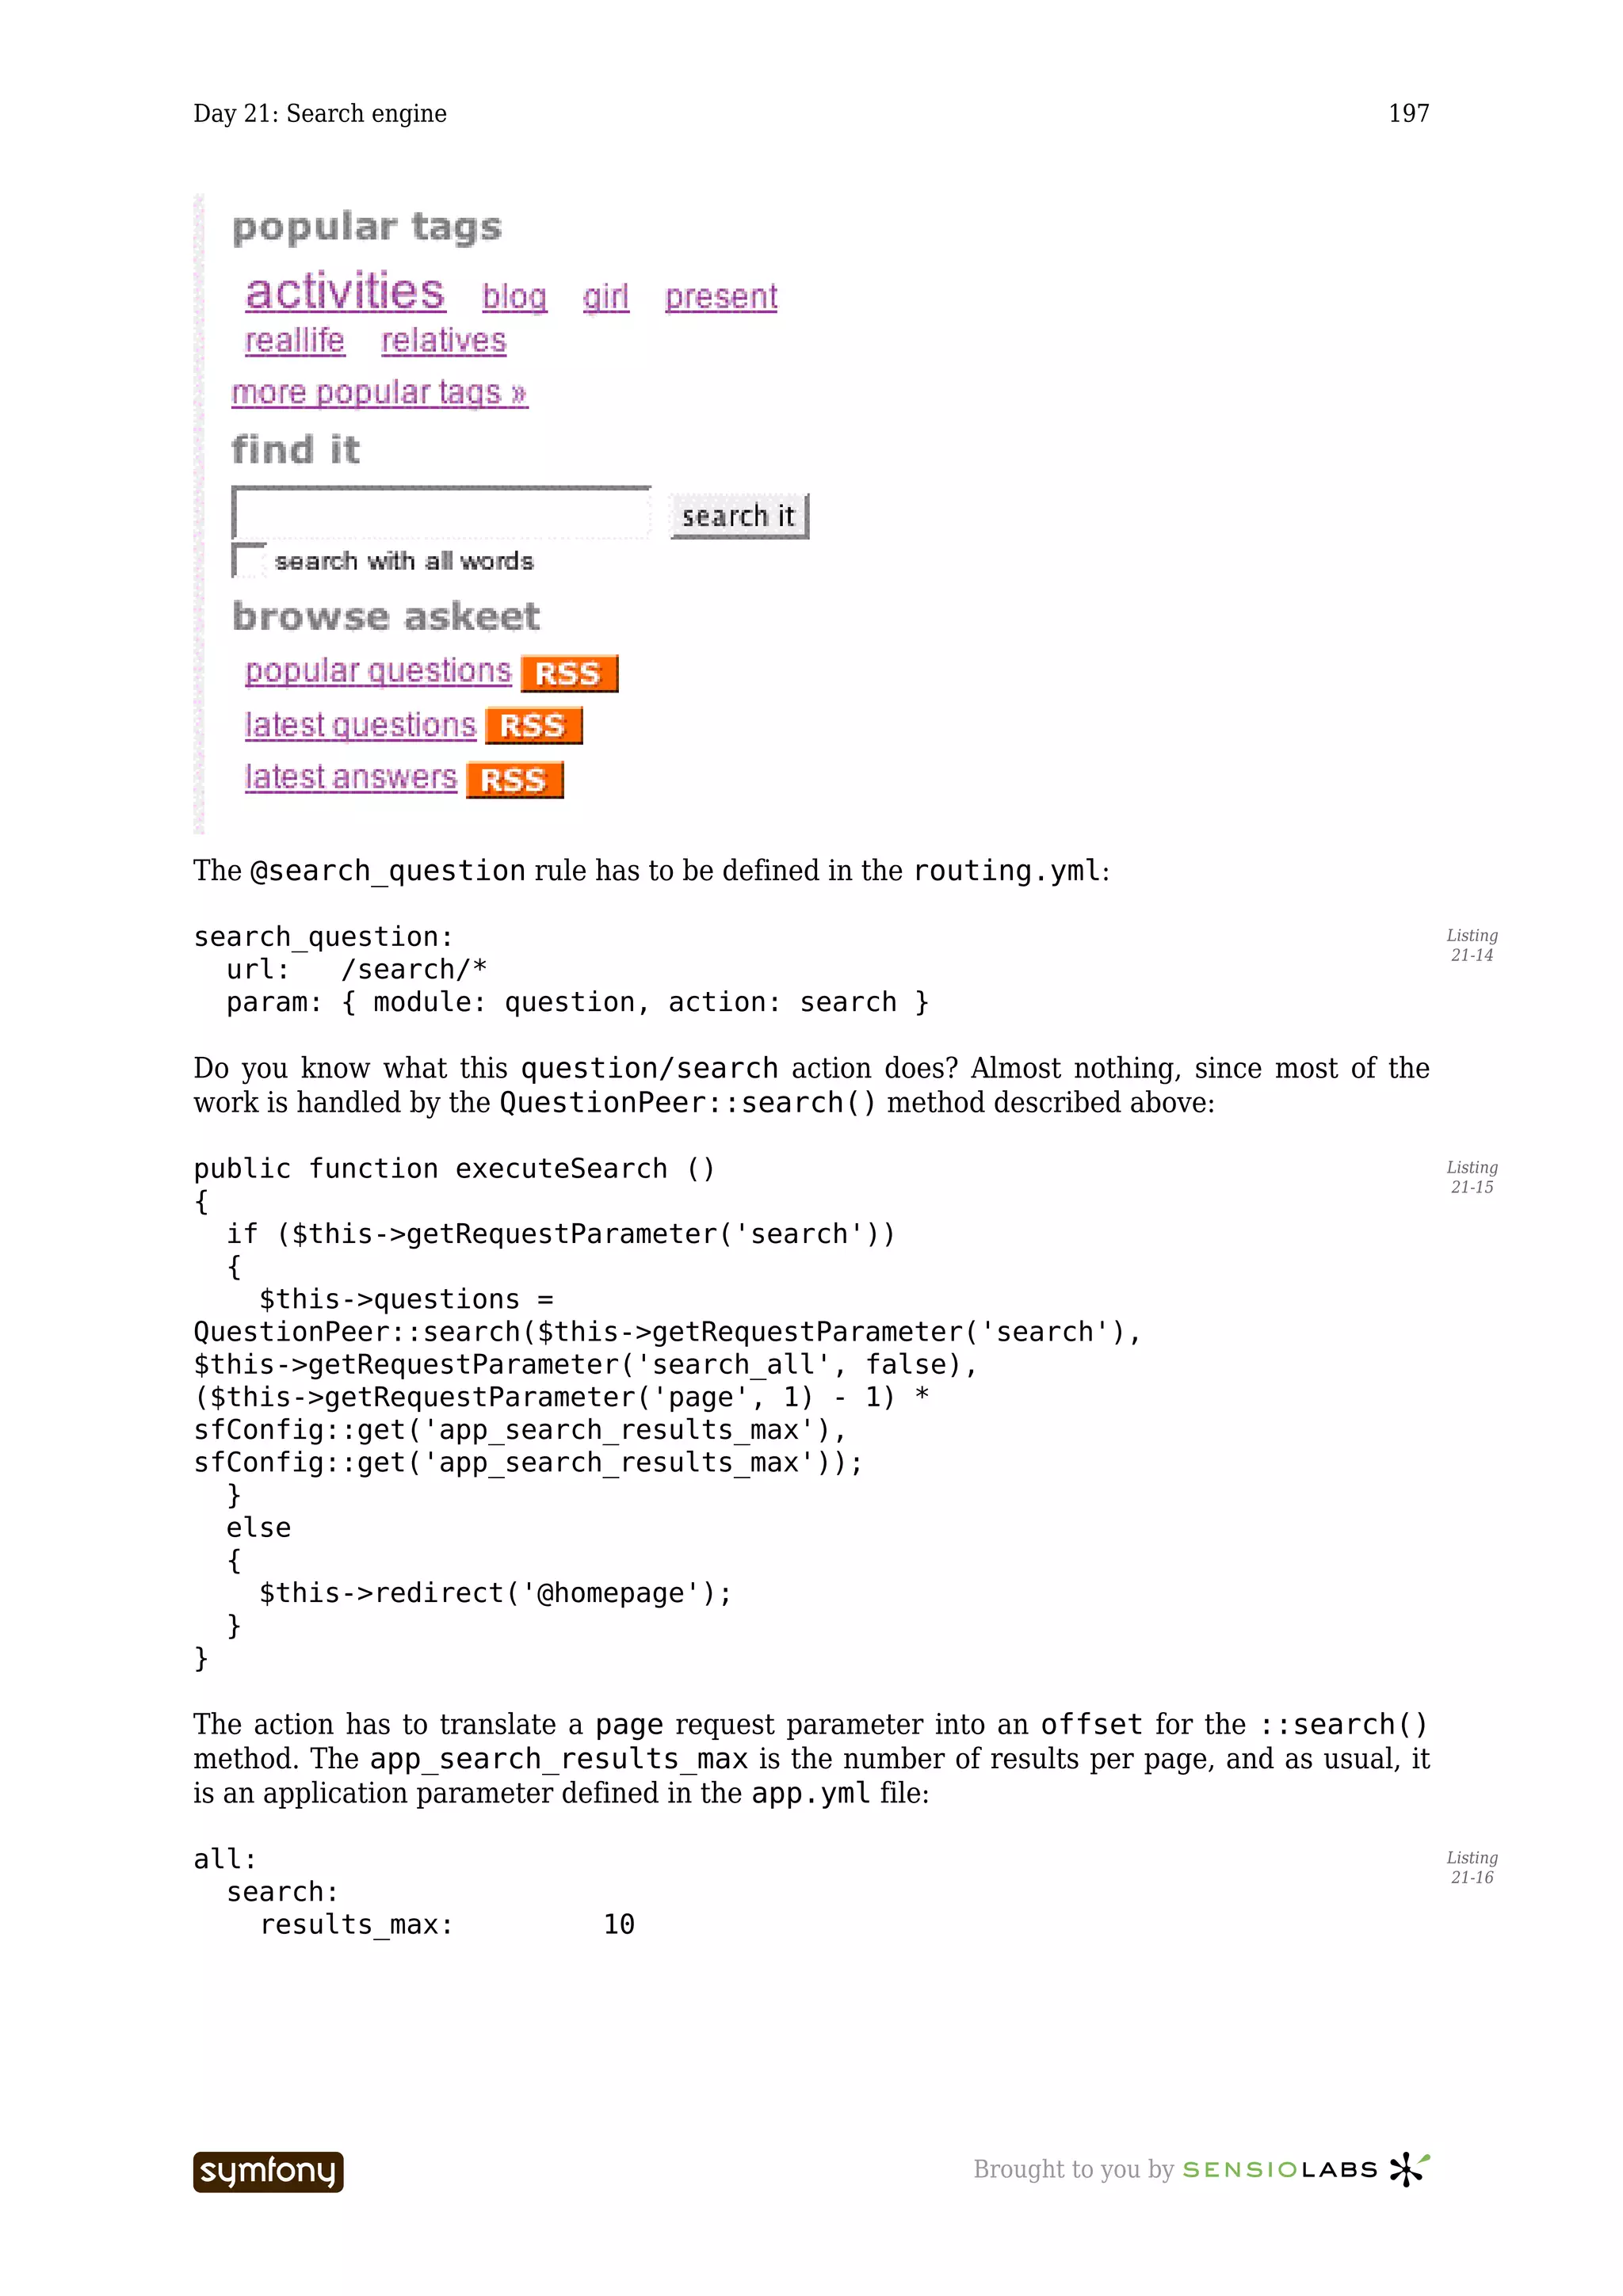
The search form
The search form has to be always available, so we choose to put it in the sidebar. As there are
two distinct sidebars, they should include the same partial:
Listing // add to defaultSuccess.php and questionSuccess.php in askeet/apps/
21-13
frontend/modules/sidebar/templates/
<h2>find it</h2>
<?php include_partial('question/search') ?>
// create the following askeet/apps/frontend/modules/question/templates/
_search.php fragment
<?php echo form_tag('@search_question') ?>
<?php echo input_tag('search',
htmlspecialchars($sf_params->get('search')), array('style' => 'width:
150px')) ?>
<?php echo submit_tag('search it', 'class=small') ?>
<?php echo checkbox_tag('search_all', 1, $sf_params->get('search_all'))
?> <label for="search_all" class="small">search with all words</label>
</form>
----------------- Brought to you by](https://image.slidesharecdn.com/cfakepathaskeet-1-0-en-100531180741-phpapp02/75/C-fake-path-askeet-1-0-en-196-2048.jpg)
![Day 22: Transfer to production 201
For notes on installing rsync and SSH on Linux, read the instructions in the related websites.
For Windows users, an open-source alternative called cwRsync248 exists, or you can try to
install the binaries by hand (instructions can be found here249). Of course, to be able to setup
an SSH tunnel between an integration server and a host server, the SSH service has to be
installed and running on both computers.
The symfony sync command
Doing a rsync over SSH requires several commands, and synchronization can occur a lot of
times in the life of an application. Fortunately, symfony automates this process with just one
command:
$ symfony sync production Listing
22-1
This command, called from the root directory of a symfony project, launches the
synchronization of the project code with the production hosted server. The connection
details of this server are to be written in the project properties.ini, found in askeet/
config/:
name=askeet Listing
22-2
[production]
host=myaskeetprodserver.com
port=22
user=myuser
dir=/home/myaccount/askeet/
The connection settings will be used by the SSH client call enclosed in the symfony sync
command line.
If you just call symfony sync like mentioned above, the rsync utility will run in dry mode by
default (--dry-run), i. e. it will show you which files have to be synchronized but without
actually synchronizing them. If you want the synchronization to be done, you have to mention
it explicitly:
$ symfony sync production go Listing
22-3
Ignoring irrelevant files
If you synchronize your symfony project with a production host, there are a few files and
directories that should not be transferred:
• All the .svn directories and their content: They contain source version control
information, only necessary for development and integration
• askeet/web/frontend_dev.php: The web front controller for the development
environment must not be available to the final users. The debugging and logging
tools available when using the application through this front controller slow down
the application, and give information about the core variables of your actions. It is
something to keep off of the host server.
• The cache/ and log/ directories of a project must not be erased in the host server
each time you do a synchronization. These directories must be ignored as well. If
you have a stats/ directory, it should probably be treated the same.
248. http://www.itefix.no/phpws/
index.php?module=pagemaster&PAGE_user_op=view_page&PAGE_id=6&MMN_position=23:23
249. http://optics.ph.unimelb.edu.au/help/rsync/rsync_pc1.html
----------------- Brought to you by](https://image.slidesharecdn.com/cfakepathaskeet-1-0-en-100531180741-phpapp02/75/C-fake-path-askeet-1-0-en-201-2048.jpg)
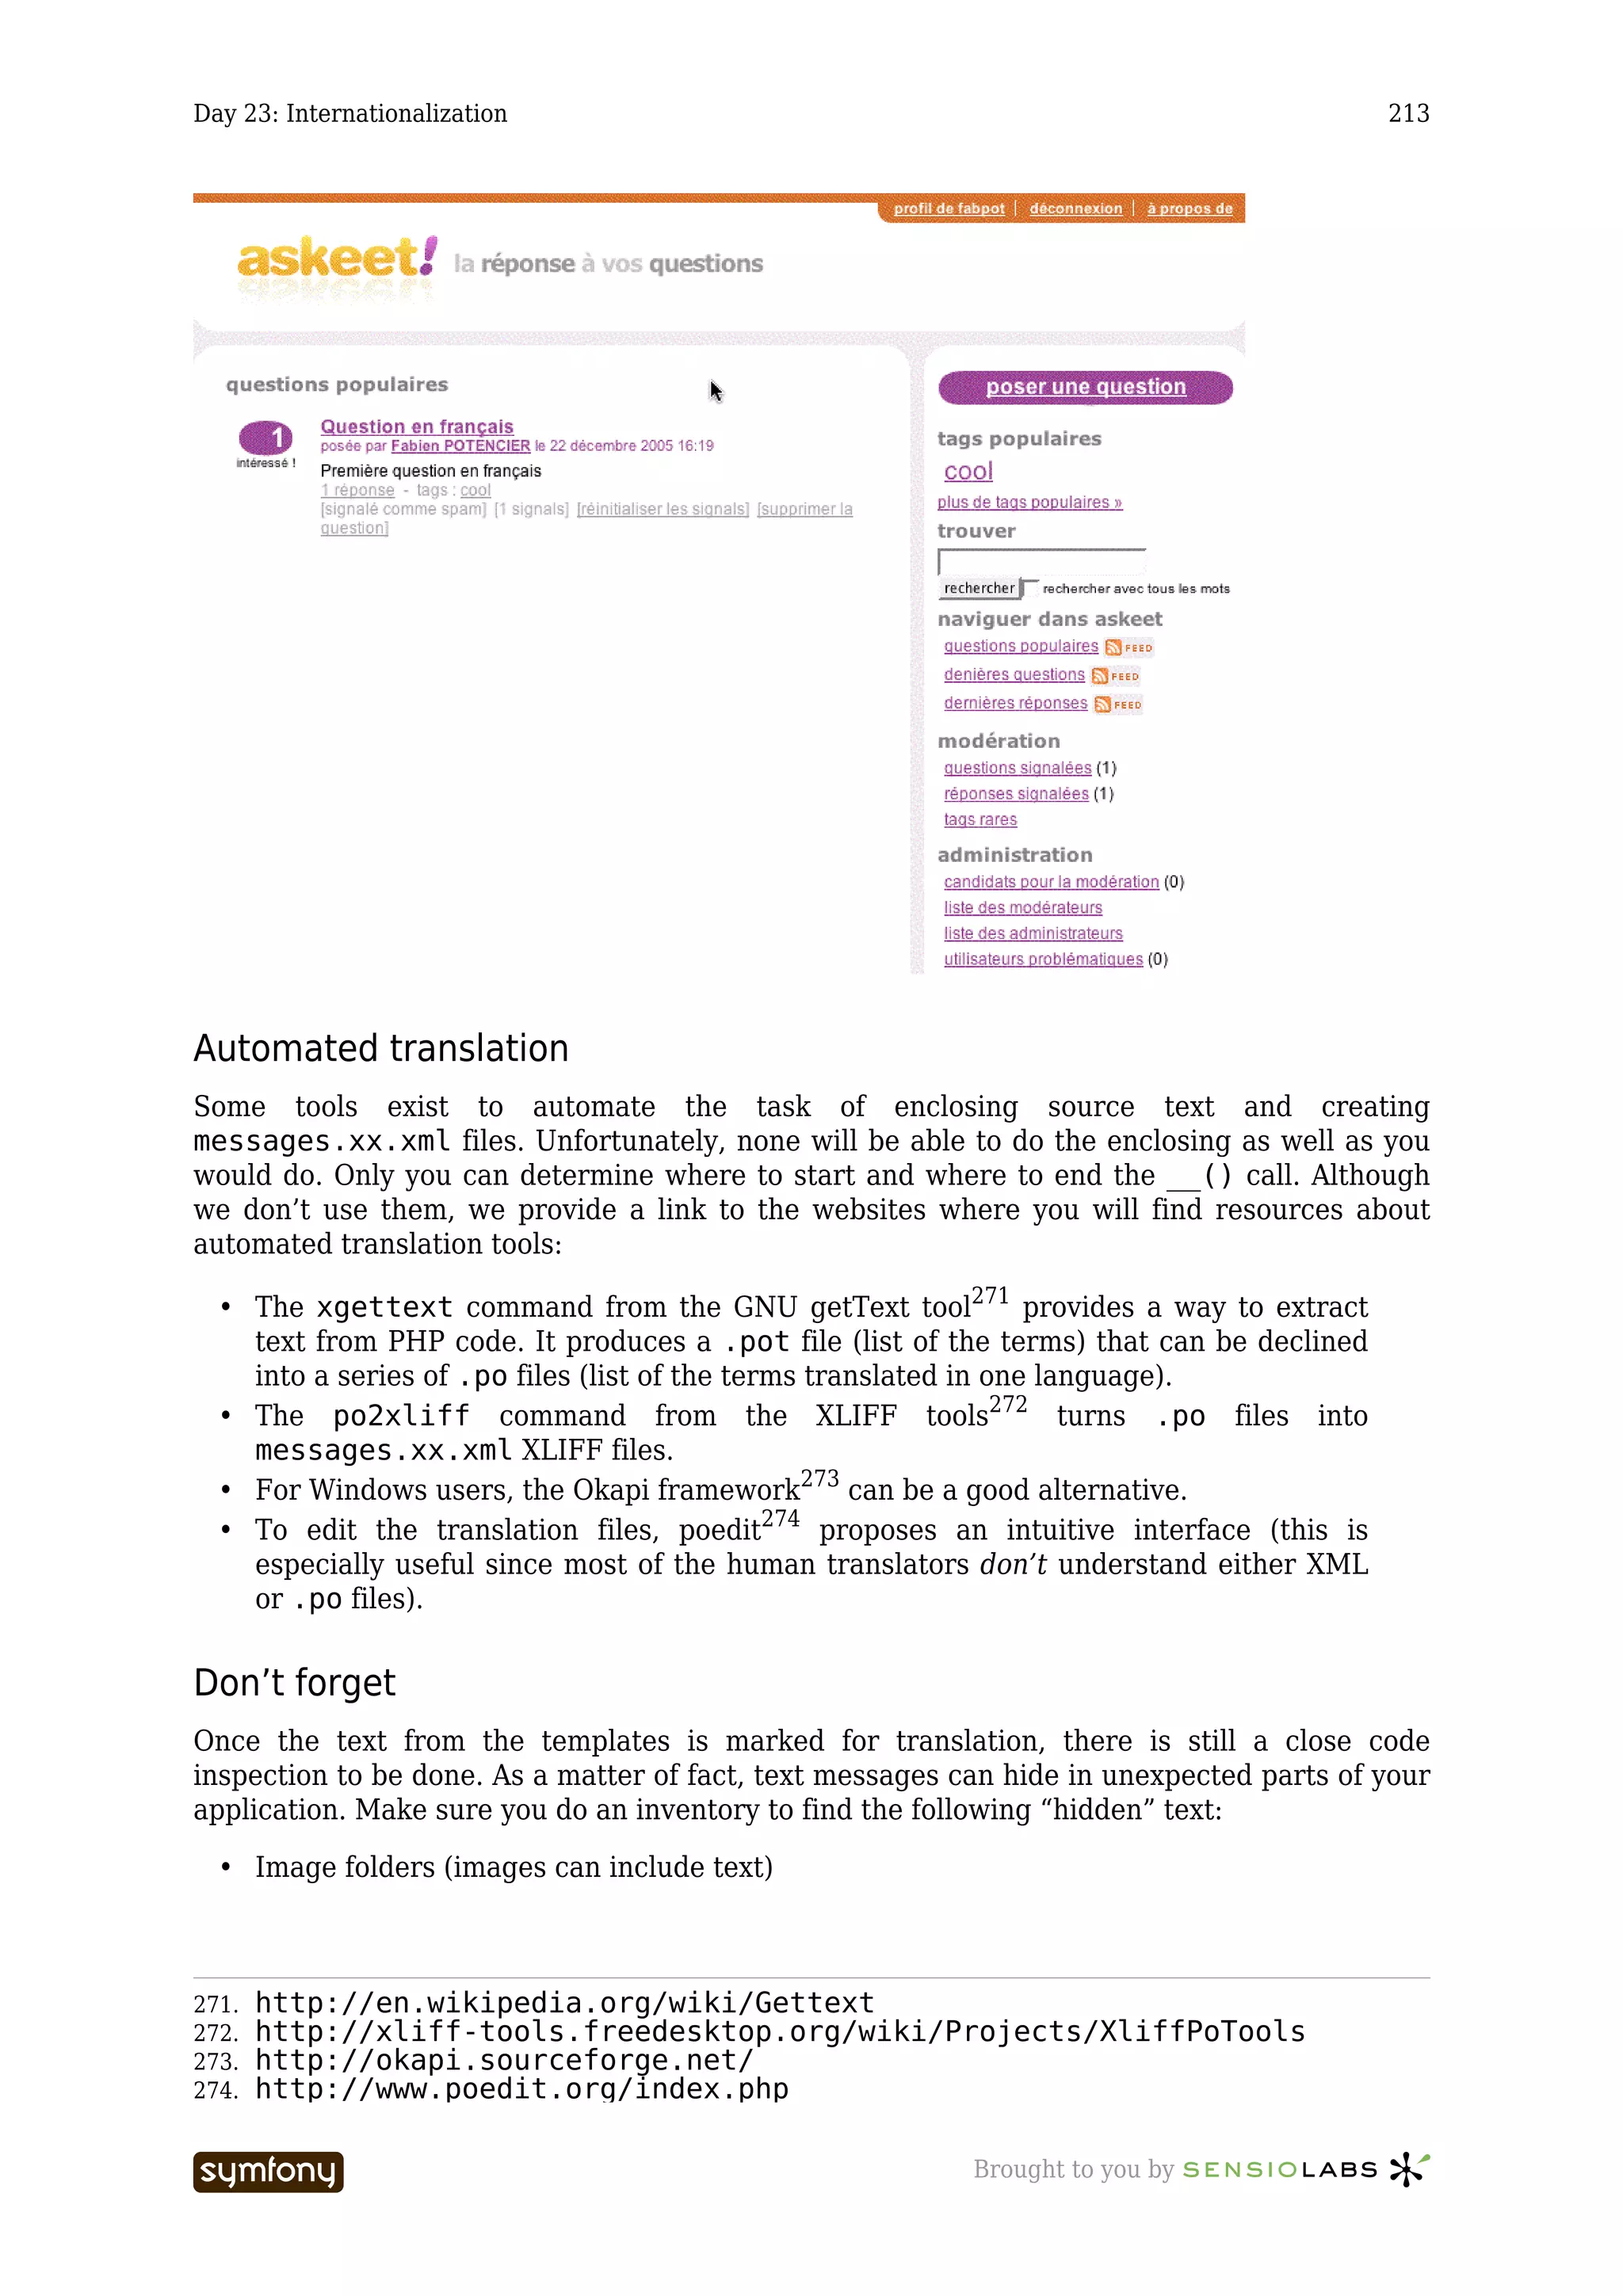
![Day 23: Internationalization 214
If you need to localize images, put them in a sub directory corresponding to their
culture, and add the culture to the image_tag() helper call:
Listing [php]
23-11
getCulture().'/myimage.png') ?>
• The alternative text for images, the button labels and all the text messages that are
parameters of <?php and ?> instructions.
• The JavaScript messages can be located in helpers (as in link_to('click',
'@rule', 'confirm=Are you sure?')), in JavaScript tags in your templates, or
in included .js files
All in all, if you don’t design an application with i18n in mind from the beginning, there is a
high risk that you will forget some untranslated text somewhere. Our best advice is to think
about i18n before starting to develop, and if you know that your application will probably be
translated, keep in mind to use __('') each time you write text that will be displayed to the
end user.
There are some hidden text messages in the validate/ directories of your modules, that
appear when a form is not properly validated. The cool thing is that you don’t have to do a
special treatment to these texts if they appear in the XLIFF translation. Symfony will
automatically find the translation in a <trans-unit> node, and use it instead of the
original text of the YAML files.
----------------- Brought to you by](https://image.slidesharecdn.com/cfakepathaskeet-1-0-en-100531180741-phpapp02/75/C-fake-path-askeet-1-0-en-214-2048.jpg)